I don’t know if eating meat gets any better than this, especially when that skin is crunch-ay! The best compliment (aka Yelp review) we often get about this dish is people telling us it tastes EXACTLY like we picked it up from an old-school Chinese BBQ spot. And that’s exactly what we’re going for: classic, crunchy, succulent . . . damn good. Thanks for that “tip” anonymous (1-star) reviewer(s)!
![]()
2–4 SERVINGS
1½ pounds skin-on pork belly*
½ teaspoon five-spice powder
1 teaspoon onion powder
1 teaspoon garlic powder
1 teaspoon light soy sauce
1 teaspoon plus ⅓ cup kosher salt
BALLS OUT
40–80 SERVINGS
![]()
10 pounds skin-on pork belly*
3⅓ teaspoons five-spice powder
6⅔ teaspoons onion powder
6⅔ teaspoons garlic powder
6⅔ teaspoons light soy sauce
6⅔ teaspoons plus 2¼ cup kosher salt
1. Wash pork belly under cool running water. Pat dry.
2. Combine five-spice, onion powder, and garlic powder in a small bowl; mix and use it all to dry rub only the entirety of the exposed meat (non-skin) sides. Next rub soy sauce on the exposed meat sides of the pork belly as well. (Do not take a shortcut and combine the soy sauce with the dry ingredients in this recipe, this was written like that intentionally . . . thank you!)
3. Set meat-side down over a baking sheet on a cooking rack. Next, rub 1 teaspoon salt onto skin side of the pork.
4. Refrigerate, uncovered, for 3 days (yup, 72 hours) to cure for the absolute best flavor.
5. When ready to cook: Remove pork from fridge and let it come to room temperature. Preheat oven to 350°F.
6. Set oven rack between the highest and middle rows. Line a roasting or baking pan with foil. Pat dry the skin-sides of the pork belly with a paper towel, then use the remaining salt to cover the skin completely with a thick layer. Lay pork on a wire rack on top of the foil. While the pork belly cooks, delicious pork drippings will drip onto the foil. Get ready!
7. Make sure the skin-side is level or it will not crackle as evenly later on (and you know you want it . . . at least I do). If it’s not level, use something oven-safe to prop it up to keep it completely level.
8. Bake for 50–55 minutes, or until internal temperature (of your pork belly) reaches 145°F at the center-most point and the salt forms a uniform crust across the skin.
9. Remove pork from oven, then increase temperature to 400°F.
10. Remove salt crust (which can sometimes be removed in one piece) and save for fried rice or other porkilicious creations. Scrape off excess salt and pat skin-side dry with a dry towel. Be sure not to dispose of the drippings.
11. Remove wire rack and keep foil in place and then wrap only the sides of pork and drippings in foil with skin-side exposed.
12. Once oven temperature reaches 400°F, place foil-wrapped pork belly back into oven. Bake for 20–25 minutes, or until bubbles start to visibly form on skin.
13. Remove from oven.
14. If the broiler is part of the main oven, relocate the oven rack to the middle shelf. Set broiler on low for 25–30 minutes, or until you get the desired crispy bubbling.
15. If the broiler is located underneath the oven, set the broiler rack to the lowest possible level, then broil on low. Turn off main oven (if it doesn’t turn off the broiler), then move baking sheet from oven to broiler. Broil pork for 5–10 minutes, or until you get the desired crispy bubbling.
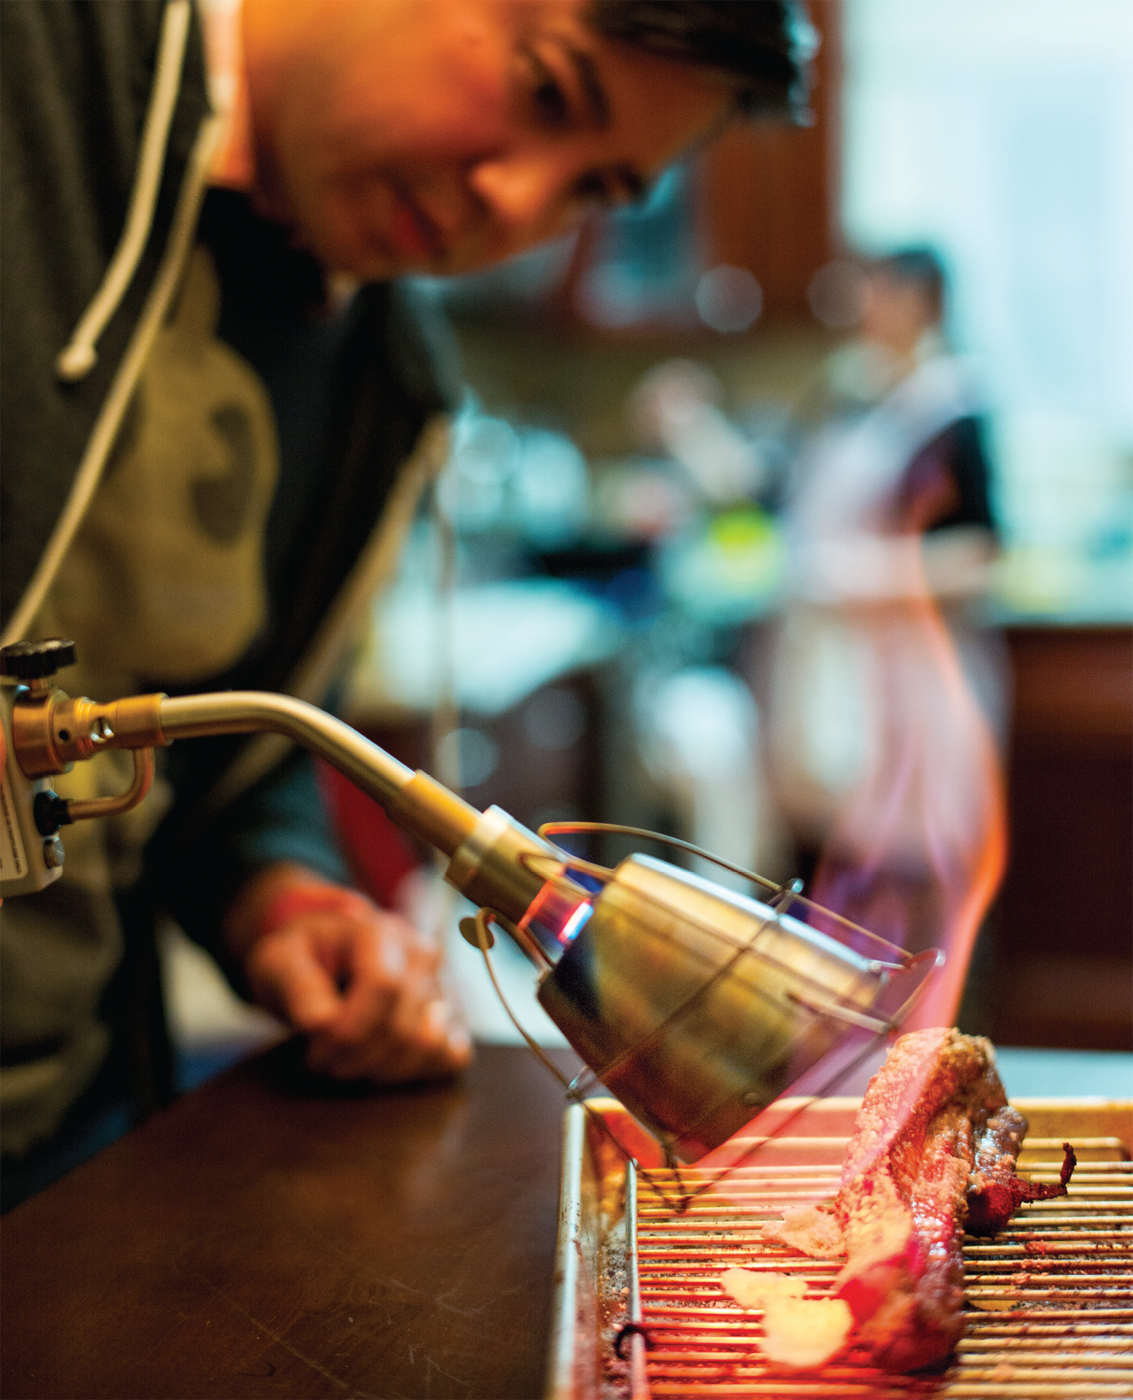
16. Watch pork closely to prevent burning or uneven bubbling—especially with broilers underneath the oven. If the pork is bubbling unevenly, shift the pork belly toward the point where the broiler flame seems to produce the most even bubbling. Don’t be afraid of the fire—get to know your oven! (If you have a fancy blowtorch-like Searzall [we’re guilty; we have one], you don’t need to do any of this and can use that to carefully bubble up the skin.)
17. Once the pork is bubbled evenly, remove from oven; let sit 10 minutes before serving. Save drippings from the foil for simple dipping, for a more complicated porky dip, or for fried rice.
When carving, cut skin-side down, and plate as an individual entree, over rice, in a banh mi, as a fun afternoon snack, or quite possibly make Roast Pork Belly XO Fried Rice!
![]()
For the most evenly crunchy pork belly skin possible, before curing, press the pork belly (skin-side down) uncovered for 1–2 days over a grated baking sheet with another weighted baking sheet, with at least 15 pounds on top to level out the slab. Place in refrigerator.
* Recipe adjustment advice: Your pork belly probably won’t weigh exactly 1½ pounds, which is cool. Divide the weight (in pounds) of your pork belly (let’s call that x) by 1½ pounds, the weight our recipe calls for, or “x ÷ 1.5,” to be exact. That generates your numeric ratio; then multiply that ratio individually with the rest of the ingredients to get the exact measurement adjustments you need. #mathRULES!