In the first part of the design process, we will look at how to reverse engineer the standard application in order to learn and reuse the knowledge in our own solution.
For the administration of our squash players, we use the data from the contact table. In the standard product, it is possible to create a customer or vendor with the contact data. We require the same functionality to create squash players so let's have a look at how this is done by Microsoft.
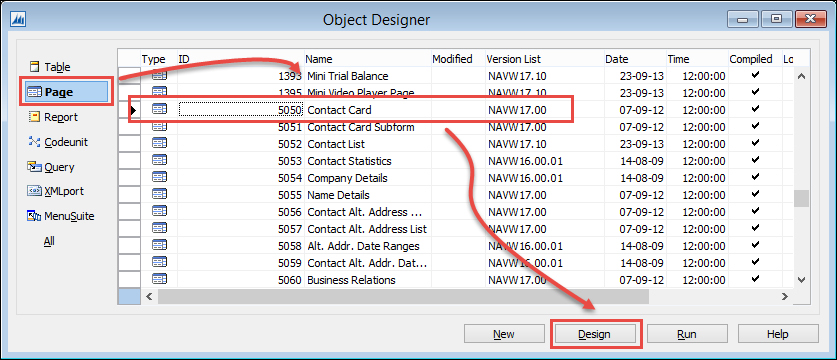
Open Contact Card and try to find this function, as shown in the following screenshot:
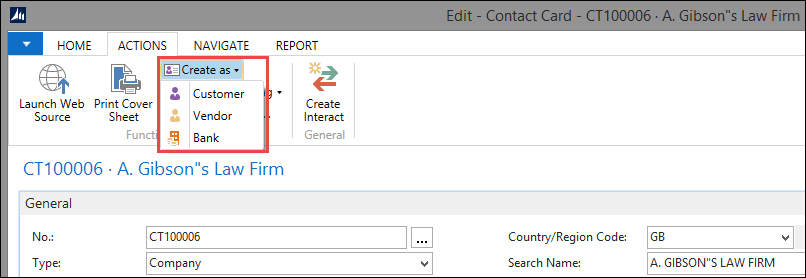
We want a function like this for our squash players. So let's get in and see what it does. For this, we need to design the page and look at the actions. The page number in this case is 5050, which we can find by clicking on About this Page in the top-right corner of the page, as shown in the following screenshot:
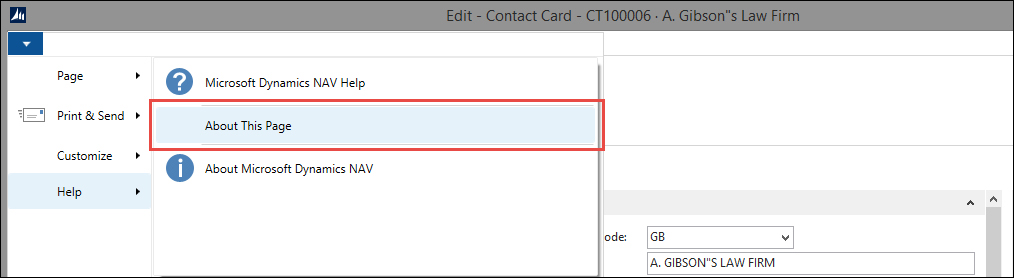
This option can be very useful to find information about the fields that are not on the page, the filters, or the source table.

To open the page, we need to open Object Designer in Development Environment (Shift + F12), as shown in the following screenshot:
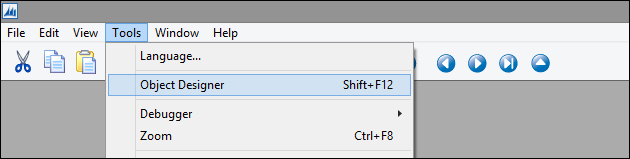
Here, we can find 5050 Contact Card in Page:
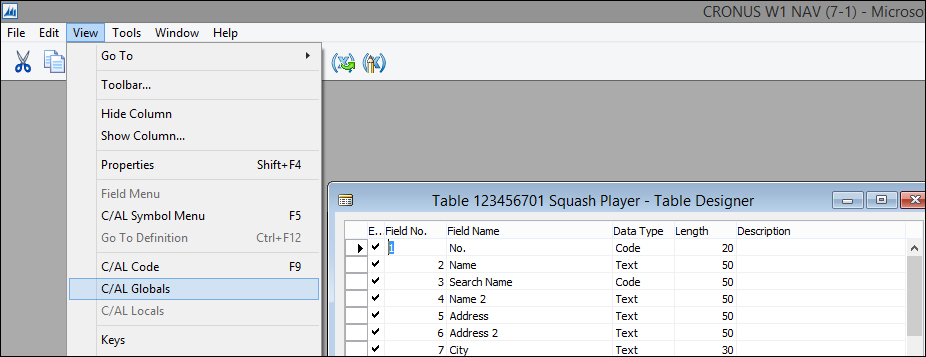
We are looking for Actions on this page. They are kind of difficult to find if you are unfamiliar with Page Designer. To open Actions, the cursor should be on the blank line below the last populated line. Then click on the right mouse button and Actions or select Actions from the View drop-down menu.
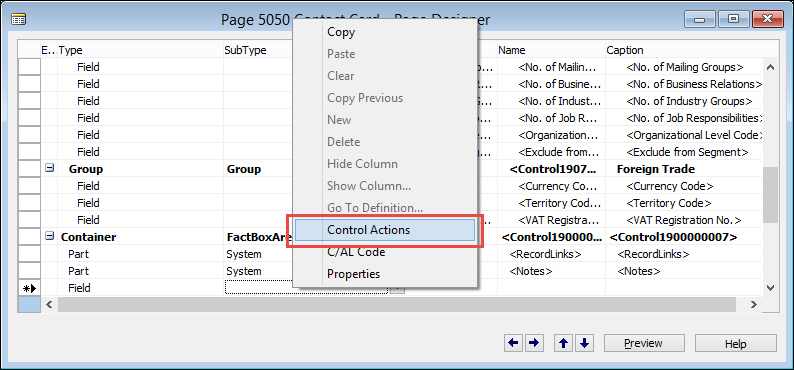
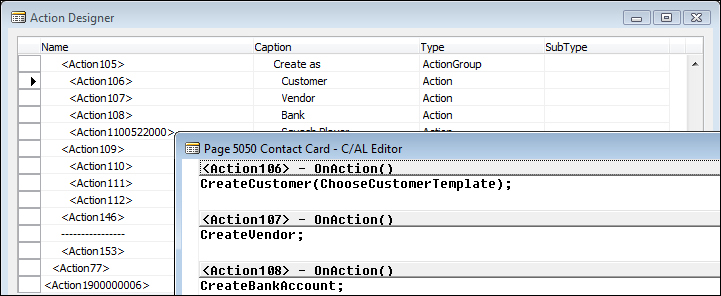
Now, we are in the Action Designer and we can search for the Create as option. To see what it does, we need to go into the C/AL code by pressing F9 or by selecting C/AL Code from the View drop-down menu:

In Microsoft Dynamics NAV, there is a small difference between creating a customer and a vendor from a contact. When creating a customer, the system will ask us to select a customer template. The Vendor option does not have that. To keep things simple, we will look at and learn from the Vendor function in this chapter.
The customer and vendor table are almost identical in structure and fields are numbered similarly in both tables. This is called transaction mirroring between sales and purchasing, which we will discuss further in Chapter 6, Trade. We will mirror our new table in a similar way to the other Microsoft Dynamics NAV tables.
The C/AL code in Action tells us that when clicking on the Menu option, the function CreateVendor in the contact table is started. To copy this feature, we need to create a new function, CreateSquashPlayer. Let's keep that in mind while we dive further in this code.
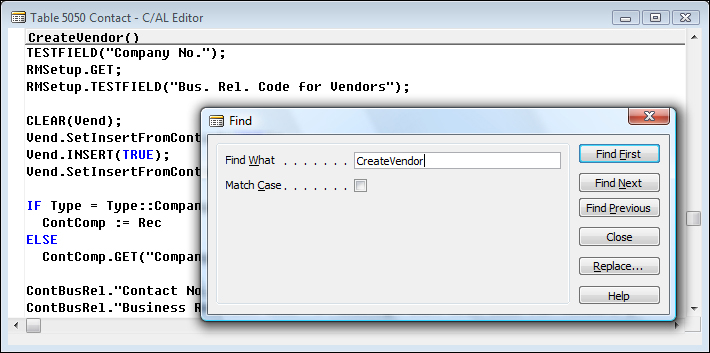
Open the contact table (5050) and search for the function CreateVendor. You can find functions in a table by going into the C/AL code (F9) from anywhere in the table designer, and by using the Find [Ctrl+F] function, as shown in the following screenshot:

We need to reverse engineer this code in order to see what we need to create for our CreateSquashPlayer function. We will look at each part of the C/AL code in order to decide whether we need it or not.
What does the following piece of code do?
TESTFIELD("Company No.");This tests the current record for a valid Company No. If this fails, we cannot continue and the end user gets a runtime error.
RMSetup.GET;
RMSetup.TESTFIELD("Bus. Rel. Code for Vendors");
This reads the Marketing Setup table from the system and tests whether the Bus. Rel. Code for Vendors is valid. We need a new code for squash players here, which will be added as a new field to the setup table:
CLEAR(Vend);
Vend.SetInsertFromContact(TRUE);
Vend.INSERT(TRUE);
Vend.SetInsertFromContact(FALSE);
Here, the Vendor table is cleared and a function is called within that table, then a new record is inserted in the database while activating the necessary business logic. Then the same function is called again with another parameter. Since the Vendor table is what we are copying, we will write down that we might need a similar function as SetInsertFromContact:
IF Type = Type::Company THEN
  ContComp := Rec
ELSE
  ContComp.GET("Company No.");
This code checks whether the current contact is a company. If so, it populates the ContComp variable with this record. If not, it populates ContComp with the company our current contact is related to:
ContBusRel."Contact No." := ContComp."No.";
ContBusRel."Business Relation Code" := RMSetup."Bus. Rel. Code for Vendors";
ContBusRel."Link to Table" := ContBusRel."Link to Table"::Vendor;
ContBusRel."No." := Vend."No.";
ContBusRel.INSERT(TRUE);
The ContBusRel function refers to the table Contact Business Relation (5054) and is a linking table in the Microsoft Dynamics NAV data model. Technically, a contact can be connected to multiple customers and vendors although this does not make sense. This table is populated here. Let's write down that we need to look into this table and see if it needs changes:
UpdateCustVendBank.UpdateVendor(ContComp,ContBusRel);
UpdateCustVendBank
is an external codeunit that is used with the function UpdateVendor. We might need a copy of this function for our Squash players.
MESSAGE(Text009,Vend.TABLECAPTION,Vend."No.");
The preceding code gives a message box for the end user that the record is created with the new number. Now, we have a number of things on our to-do list:
- Create a master data table that looks like the
Vendortable. - We need to copy the
CreateVendorfunction. - Look at the
Contact Business Relationtable and theCustVendBank-Update (5055)codeunit.
Let's look at the latter to learn something important before we start with the first:
UpdateVendor()
WITH Vend DO BEGIN
  GET(ContBusRel."No.");
  xRecRef.GETTABLE(Vend);
  NoSerie := "No. Series";
  PurchaserCode :=  Vend."Purchaser Code";
  TRANSFERFIELDS(Cont);
  "No." := ContBusRel."No.";
  "No. Series" := NoSerie;
  Vend."Purchaser Code" := PurchaserCode;
  MODIFY;
  RecRef.GETTABLE(Vend);
  ChangeLogMgt.LogModification(RecRef,xRecRef);
END;
This code synchronizes the contact table with the vendor table. It does that by using the TRANSFERFIELDS function. This function transfers all fields with the same number from one table to another. This means that we cannot be creative with our field numbering. For example, in the contact table, the Name field is number 2. If we were to use a different number for the Name field, TRANSFERFIELDS would not copy the information.
Using this information, our table should look like this:
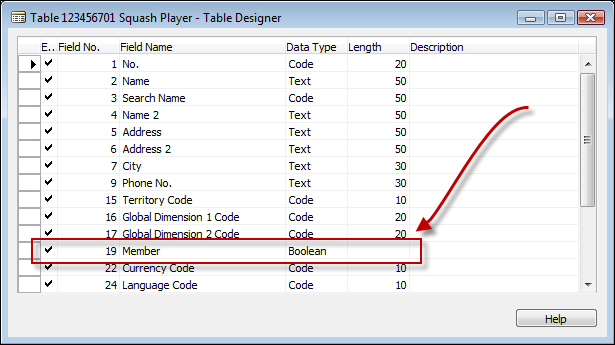
Notice that we use field 19 for our Squash Player specific field. This is because field 19 was used for Budgeted Amount in the vendor table. We can therefore safely assume that Microsoft will not use field 19 in the contact table in future.
An alternative approach for this if we wanted to be even safer is to add the fields that are specific to our solution as fields in our add-on number series. In our case, it would be 123.456.700.
The next step is to add some business logic to the table. We want this table to use number series functionality just like the vendor table. This requires some standard steps:
- First we create the setup table. A number series is defined in a setup table. As the Squash Court module will be quite sophisticated, we'll create our own.

Tip
On MSDN, you can watch a video about the singleton pattern at http://msdn.microsoft.com/en-us/dynamics/nav/dn722393.aspx.
A setup table always has a single Primary Key field, as shown in the preceding screenshot, and the necessary setup fields. This table is designed to only have one single record.
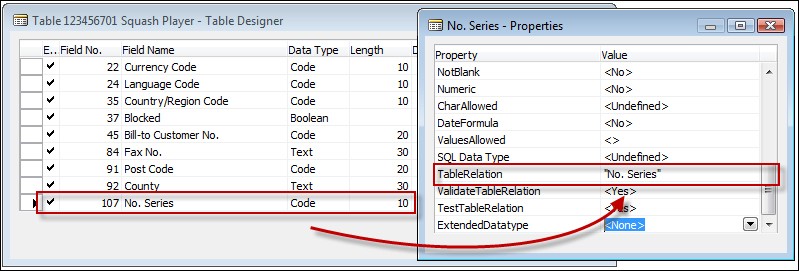
- Then, we create a link to the number series. Our Squash Player table is now required to have a link to the number series. We can copy this field from the vendor table and can make a table relation to the No. Series table, as shown in the following screenshot:
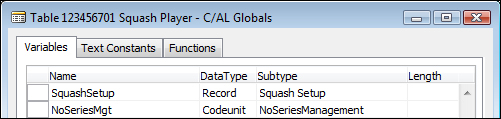
- Now, we add the C/AL business logic to our table, but first we need to define the variables that are required. These are our new Squash Setup table and the Number Series Management codeunits.
We can define the variables in the specially created C/AL Globals menu.
Number Series require three places of code. This code makes sure that the business logic of the Number Series functionality is always followed:
- The following code goes into the
OnInserttrigger. It populates theNo.field with the next value of the Number Series:OnInsert() IF "No." = '' THEN BEGIN SquashSetup.GET; SquashSetup.TESTFIELD("Squash Player Nos."); NoSeriesMgt.InitSeries(SquashSetup."Squash Player Nos.", xRec."No. Series",0D,"No.","No. Series"); END; - The
OnValidatetrigger of theNo.field tests when a user manually enters a value if that is allowed:No. - OnValidate() IF "No." <> xRec."No." THEN BEGIN SquashSetup.GET; NoSeriesMgt.TestManual(SquashSetup."Squash Player Nos."); "No. Series" := ''; END;
- Lastly, we create a new
AssistEditfunction. This function is for readability and others reading your code afterwards. The code is used in the page or form and allows users to switch between linked number series:AssistEdit() : Boolean SquashSetup.GET; SquashSetup.TESTFIELD("Squash Player Nos."); IF NoSeriesMgt.SelectSeries(SquashSetup."Squash Player Nos.", xRec."No. Series","No. Series") THEN BEGIN NoSeriesMgt.SetSeries("No."); EXIT(TRUE); END;
When the Number Series are in place, we can make the necessary change in the Contact Business Relation table.
In this table, we need to add the possibility to link squash players to contacts. This is done in the Properties window of Table Designer that can be accessed by pressing (Shift + F4) or by using the Properties option from the View drop-down menu, as shown in the following screenshot:

First, we add the Squash player option to the Link to Table field, as shown in the following screenshot:
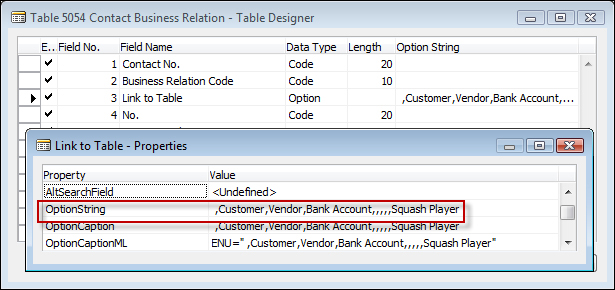
Then, we create a table relation with our new table, as shown in the following screenshot:

The next step is to expand the CustVendBank-Update codeunit with a new UpdateSquashPlayer function. This is a copy of the UpdateVendor function that we discussed before. We can add functions in the Globals menu.
There are two ways to copy a function. We can create a new function manually and copy the C/AL code and variables, or we can select a function from the list and use copy and paste and then rename the function.
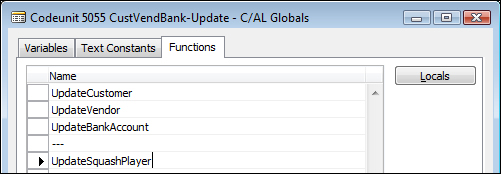
This code also requires a new global variable, SquashPlayer:
UpdateSquashPlayer()
WITH SquashPlayer DO BEGIN
GET(ContBusRel."No.");
xRecRef.GETTABLE(SquashPlayer);
NoSerie := "No. Series";
TRANSFERFIELDS(Cont);
"No." := ContBusRel."No.";
"No. Series" := NoSerie;
MODIFY;
RecRef.GETTABLE(SquashPlayer);
ChangeLogMgt.LogModification(RecRef,xRecRef);
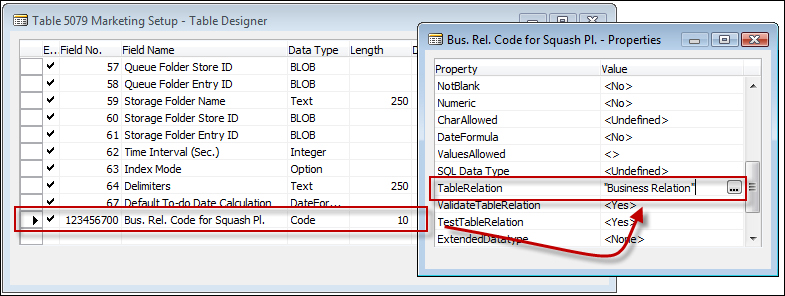
END;The final piece of preparation work is to add the Bus. Rel. Code for Squash Players field to the Marketing Setup table, as shown in the following screenshot:
With all this preparation work, we can now finally go ahead and make our function in the contact table (5050) that we can call from the user interface:
CreateSquashPlayer()
TESTFIELD(Type, Type::Person);
RMSetup.GET;
RMSetup.TESTFIELD("Bus. Rel. Code for Squash Pl.");
CLEAR(SquashPlayer);
SquashPlayer.INSERT(TRUE);
ContBusRel."Contact No." := Cont."No.";
ContBusRel."Business Relation Code" :=
RMSetup."Bus. Rel. Code for Squash Pl.";
ContBusRel."Link to Table" :=
ContBusRel."Link to Table"::"Squash Player";
ContBusRel."No." := SquashPlayer."No.";
ContBusRel.INSERT(TRUE);
UpdateCustVendBank.UpdateSquashPlayer(Cont,ContBusRel);
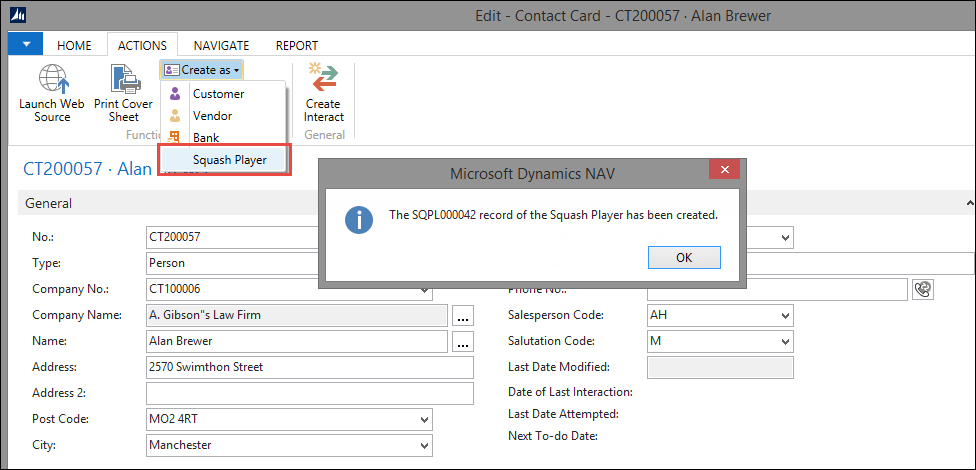
MESSAGE(Text009,SquashPlayer.TABLECAPTION,SquashPlayer."No.");Please note that we do not need the SetInsertFromContact function. This function enables users to create a new vendor first and create a contact using the vendor information. We do not want to support this method in our application.
Now, we can add the function to the page and test our functionality: