Let's walk through two scripts to generate a new item with a bill of materials: one for an assembling process and the other for manufacturing.
We will set up both, item costing and item tracking for these products.
In our company, we want to start producing office chairs. These chairs consist of five wheels, a pedestal, a seat, and two arm rests. We will create these four components as a new item and one new item for the end product.
All the items will have a different costing method to demonstrate the effect of cost changes. The end product will support serial number item tracking with a one year warranty period.
Before going into the application, we will have a look at how this process is solved in Microsoft Dynamics NAV. The following diagram illustrates the process:
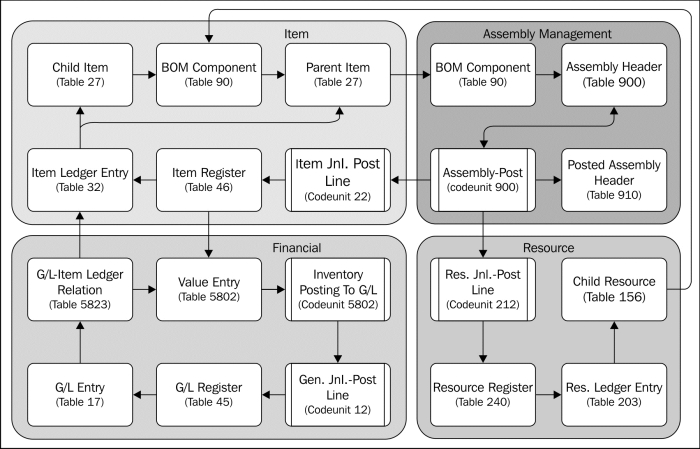
It starts with creating the components and end products as items in the database and connecting them using the BOM Component table. A BOM Component can also contain Resources.
If the components are in stock, we can use the assembly documents to create the products. When posting the assembly document, the components are consumed and the product is created. During this process, the system will create Resource Ledger Entries, Item Ledger Entries, and Value Entries.
The Value Entries can be posted in the general ledger using the Inventory Posting to G/L routine, either manual or in real time. This completes the process.
For this example, we will need to create five items, four components, and one end product. We will assign an estimated unit cost to the components and a unit price to the end product, as shown in the following table:
|
No. |
Description |
Base UOM |
Unit cost |
Unit price |
Costing |
|---|---|---|---|---|---|
|
CHAPTER5-C1 |
Chapter 5 | Wheel |
PCS |
5 |
FIFO | |
|
CHAPTER5-C2 |
Chapter 5 | Pedestal |
PCS |
60 |
LIFO | |
|
CHAPTER5-C3 |
Chapter 5 | Seat |
PCS |
120 |
Average | |
|
CHAPTER5-C4 |
Chapter 5 | Arm Rest |
PCS |
35 |
Standard | |
|
CHAPTER5-P1 |
Chapter 5 | Office Chair |
PCS |
500 |
Specific |
Item costing determines the calculation method of the item costs. We will assign a different costing method to each Item. Let's briefly discuss the available costing methods in Microsoft Dynamics NAV:
- FIFO: First in First out. The cost of the oldest item ledger entry is used.
- LIFO: Last in First out. The cost of the newest item ledger entry is used.
- Average: Each time we purchase items, the total costs are divided by the total quantity. The result is used as unit cost.
- Standard: The user will define the unit cost manually. All deviations in purchase pricing are posted as profit or loss when invoicing.
- Specific: This is always combined with item tracking and serial numbers. Each serial number uses its own unique unit cost.
All our chairs will get a serial number with a one year warranty period. This enables us to track all individual chairs when they come back to the factory with issues.

Item tracking in Microsoft Dynamics NAV can be done both on individual Serial numbers and Lot numbers for a group of items.
Serial Numbers and Lot Numbers are fields in the Item Ledger Entry table (32). The consequence of this will be that for each serial number or Lot number, an individual record will be created in the table. When using serial numbers, this can lead to a massive increase in the table size.
The Lot numbers and item numbers are saved in the Reservation Entry table (337) during the document entry process. A reservation entry can be assigned to any table in Microsoft Dynamics NAV, for example, sales lines, item journal lines, or production order.
When a document is posted and the item ledger entry is created, the reservation entry is removed and replaced by a tracking specification record that has the same value in the Entry No. field as the corresponding item ledger entry.
The process of item tracking in Microsoft Dynamics NAV works as drawn in the following schema:

Technically, item tracking in Microsoft Dynamics NAV is very complex and should only be changed by experienced developers after careful analysis.
We will discuss the reservation process in more detail in Chapter 6, Trade.
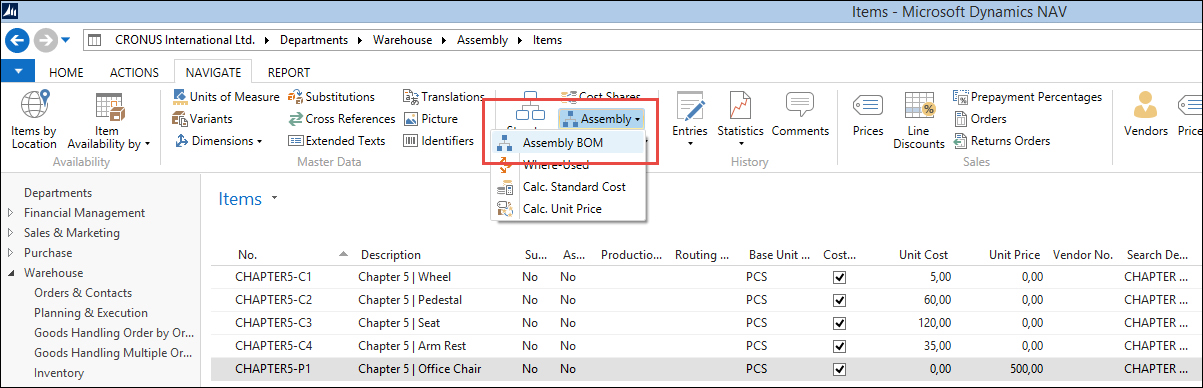
When the items are created, the costing method is defined and item tracking is set up. The next step is to create the bill of materials for the office chair. This can be done using the Bill of Materials option in the Assembly List in the Item List or Card page.
The bill of materials defines the component items and resources that will be used to create one new end product.
We set up the components as discussed earlier using five wheels, one pedestal, and seat and two arm rests.

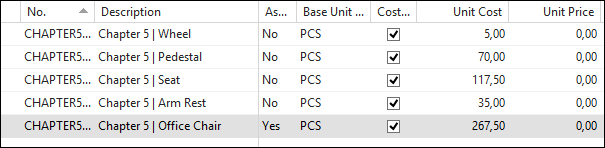
The components we selected for the bill of materials have a unit cost. Together these items can determine the unit cost of our end product.
We can calculate the standard cost of the office chair by selecting Calc. Standard Cost in the same Assembly menu we used for the bill of materials.

The standard cost is now calculated using the unit cost of the components and the overhead rate and indirect cost percent. We will not use the latter in our example.
((5*5) + (1*60) + (1*120) + (2*35)) = 275
Before we can assemble the chairs, we need to purchase the components. For this, we will create a purchase order with eight purchase lines. We will purchase the components for other prices than the unit cost in the system, allowing us to show what the impact of the costing methods is.

The purchase order we just created, received, and invoiced has a different unit cost compared to the unit cost we initially set up in our items.
Depending on the costing method of the items, this will have an impact on the unit cost. When we take a look at the new unit cost of the items we created, we can see that this was impacted by the purchase order. However, the values are not correct. The system only adopts the first change of unit cost.

To correct this, we need to run the Adjust Cost Item Entries (Report 795) batch. This will determine the new unit cost based on the costing method.

The unit cost for FIFO, LIFO, and average have been recalculated while the standard cost has not been impacted by the transactions.
Microsoft Dynamics NAV supports posting the inventory cost to the general ledger. This enables accountants to have a single point for data analysis rather than printing an inventory report and using the figures manually for reports to the management.
This can be done using the Post Inventory Cost to G/L function (report 1002), as shown in the following screenshot:

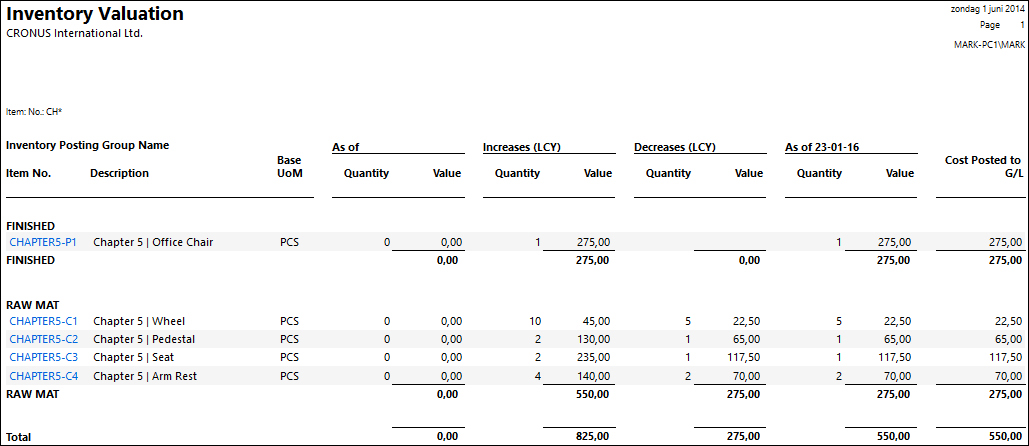
To check whether the value entries and the general ledger are synchronized, we can run Inventory Valuation (Report 1001). This will show us the inventory value versus the amount posted to the general ledger.

The standard unit cost we calculated for our office chair was 275. This was based on our assumption of purchase prices. Now that we have really purchased and received the components, we can calculate a new unit cost based on the real prices.
In this example, the price will still be 275 since the total price of all purchased items is 550. The inventory allows us to make two chairs with these materials:
(550 / 2) = 275
Now that we have the components in stock and the unit cost correct, we can create a chair. We will do this using an assembly order.
In the assembly order, we need to create one line for each item we want to assemble. The components are automatically used when posting the order. We will use the Purchasing Agent Role Center (9007) for this.

Assembly orders
After creating a document for the office chair, while trying to post the document, we will receive an error message because we first need to specify the serial numbers.

Specifying Serial Number
Serial numbers and Lot numbers can be set up using the Item Tracking Lines option. This opens the Item Tracking Line page (6510). This page is able to show both the reservation entries during the registration process as well as the tracking specification if the item ledger entry is already created.
We will manually create a new serial number. Microsoft Dynamics NAV also supports system generated serial numbers.

We can now post this assembly order and will have one office chair in stock with a serial number.
Creating the office chair changed the inventory of the component items and therefore might have affected the costing of our items. However, when we now check our items, the unit cost has not changed.

Even so, with the current inventory, the unit cost might be different. Remember we used 5 wheels using FIFO costing 4 and one seat using LIFO costing 70.
Let's run Adjust Cost Entries using the Posting to G/L option:
The unit cost has changed and now shows us that we have used the first five wheels using FIFO, leaving the other five wheels in the inventory for a value of 5. We used the last seat using LIFO, leaving the first seat in the inventory for a value of 70.
When we run the Inventory Valuation, we can see that producing the first chair actually costs 267,50 but we posted 275.
When we run Calculate Unit Cost for our office chair, we can see that the new cost will be 282,50.
(5*5) + (1*70) + (1* 117,50) + (2*35) = 282,50
Together with the first chair worth 267,50, we match our purchase invoice worth 550.
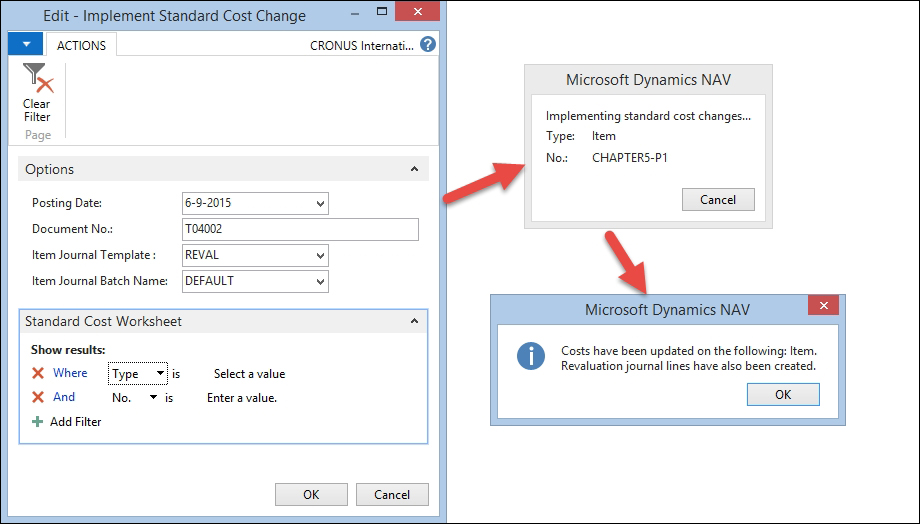
We need to correct the cost of the first chair, which is currently on inventory to have a correct inventory value. We can do this using the Standard Cost Worksheets, as shown in the following screenshot:
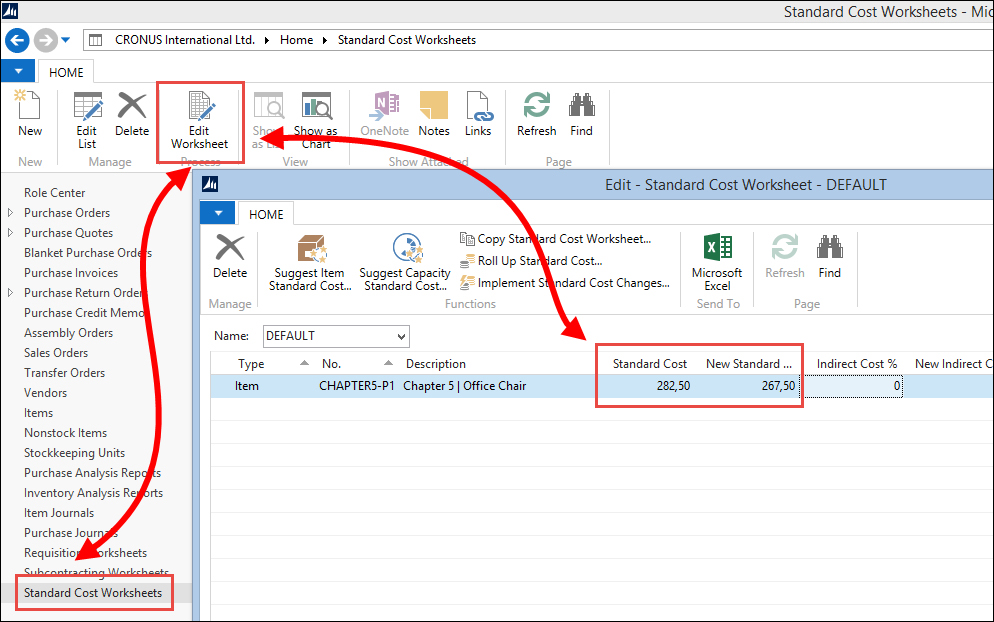
This worksheet allows us to correct old value entries by creating an entry in the Item Revaluation Journal when we select the Implement Standard Cost Change option. This will create a new value entry with the delta values to keep track of changes.


All the steps we performed in the example can be summarized in this 10 step process diagram:
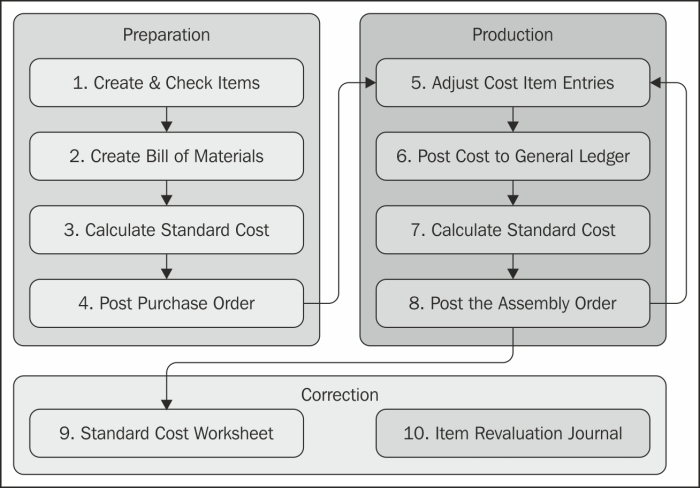
Let's have a look at the steps briefly:
- We start by creating new items and setting up the costing method.
- Then we create the bill of materials for the production item.
- Run the Calculate Standard Cost routine to get a unit cost for the production item.
- Purchase the necessary items for production.
- Run the Adjust Cost Item Entries routine.
- Synchronize the value entries with the G/L Entries using the Post Inventory Cost to G/L routine.
- Recalculate the standard cost if desired.
- Create an assembly order and post the document.
- Run Standard Cost Worksheet to change the standard cost.
- Run the Item Revaluation Journal to implement the standard cost for old value entries.
The assembly management module was added to the Microsoft Dynamics NAV product in Version 2013 and replaced the BOM Journal that existed since the introduction of the Windows version in 1995. Both enable us to create a new item out of other items.
In Version 2.01, Navision introduced the first version of Navision manufacturing. This was a separate product from Navision financials and only available for certified partners because of its complexity.
With Version 3.00, manufacturing became part of the standard Navision attain package and available for all partners. Manufacturing offers Microsoft Dynamics NAV users much more functionality than just creating an item from a bill of materials. Production orders can be scheduled using work centers, machine centers, tools, and a capacity calendar.
The items can be scheduled for production using either a Make-To-Stock or a Make-To-Order policy in a planning run.
The system calculates the required BOM components and can create purchase orders if the inventory is insufficient using a complex demand and supply process. If we put this into a design pattern, it looks like this:

The Production Order is the center of the process, which is created by items having a Production BOM that are either on sales order or low on inventory.
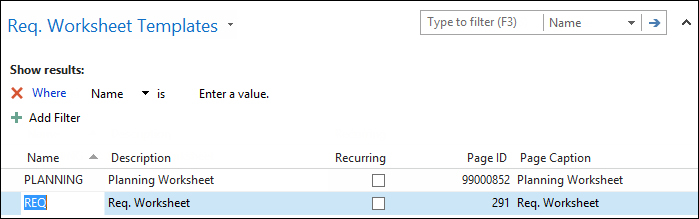
The Planning Run populates the Planning Worksheet, which is based on the Requisition Line table (246). The planning worksheet can be used to create the production orders and purchase orders.
During the production process, the Consumption Journal is used to record the use of the child items from Production BOM and the Output Journal creates the new item once it is finished. Alternatively, these steps can be combined in the Production Journal.
Let's demonstrate this with the next example using the Production Planner role center (9010).
We will create mahogany English desks using raw materials, machines, and resources.
For the desks, we need mahogany wood, green leather, glue, lacquer, and handles. To create one desk, the carpenter needs four days and one carpentry unit with tools. The painter needs one day to varnish the desk in the paint booth and the assembly department wraps up the components in boxes and needs four hours.
We need the following items for this example:
|
No. |
Description |
Base UOM |
Replenishment System |
Unit Cost |
Unit Price |
Manufacturing Policy |
|---|---|---|---|---|---|---|
|
CHAPTER5-P1 |
Mahogany English Desk |
PCS |
Prod. Order |
286,25 |
999 |
Make-to-Order |
|
CHAPTER5-C1 |
Mahogany Log |
PCS |
Purchase |
100 |
- | |
|
CHAPTER5-C2 |
Green Leather |
PCS |
Purchase |
60 |
- | |
|
CHAPTER5-C3 |
Glue |
CAN |
Purchase |
15 |
- | |
|
CHAPTER5-C4 |
Mahogany Lacquer |
CAN |
Purchase |
25 |
- | |
|
CHAPTER5-C5 |
English Desk Handles |
PCS |
Purchase |
10 |
- |
The following list is for machine centers:
|
No. |
Name |
Work Center No. |
Capacity |
Efficiency |
|---|---|---|---|---|
|
01-CARP |
Std. Carpentry Unit w. Tools |
400 |
1 |
100 |
|
02-PAINT |
Paint Booth |
300 |
1 |
100 |
|
03-PACK |
Packaging Department |
200 |
1 |
100 |
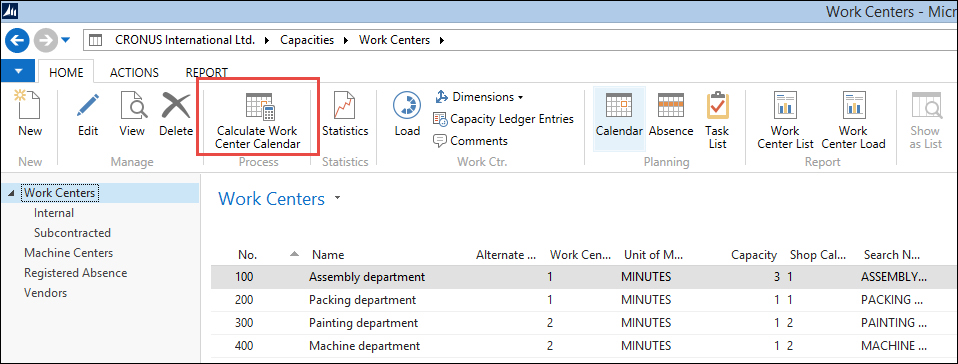
The planning run and the requisition worksheets will use capacity if it is defined. The capacity is defined for each Work Center and Machine Center.
The capacity is stored in the Calendar Entries, which are created using codeunit CalendarManagement (99000755) and reports Calculate Work Center Calendar (99001046) and Calc. Machine Center Calendar (99001045). Capacity is based on the concurrent capacity, from either the machine or work center, and the assigned shop calendar.
Just like the interaction log entries, the calendar entries are directly inserted instead of going through a journal first.
Calendar entries
When properly configured, the Planning Worksheet will calculate the starting and ending dates for the production order and each operation in order to meet the shipment date on the sales order line.
Setting up the Production bill of materials for manufacturing is not much different from the assembly functionality but it contains extra functionality.
The Production BOM uses its own header record with a number series, description, and search description. The Status field is used to determine whether the product is new, certified, under development, or closed. Together with the versioning, it enables us to maintain multiple BOMs during the product's life cycle.

The components of the bill of materials are saved as lines and support using scrap. The Scrap % is calculated when running the MRP and calculating the unit cost.
The Routing Setup determines how long it will take to produce one item and which work centers and machine centers are used in the process.

The Routing Setup gives you advanced features such as parallel and serial planning, and setup time. For our example, we will keep it simple and only use the Run Time.
We are now almost set to start testing our manufacturing item. We have set up the items and machine centers, calculated the calendar entries, and set up a routing.
The last step in the process is to calculate the low-level code. This field, which is stored both in the item and production BOM table, determines how low the item is in the BOM ranking. Low-level code zero means this is a parent item and one or higher is a child item or a child of a child item.
The low-level codes can be calculated automatically or manually. For automatic calculation, the Dynamic Low Level Code feature should be activated.
Due to NAV ability to create a production BOM before it is attached to an item, the dynamic low-level code is not always accurate. Prior to a planning run, it is good practice to run the Calculate Low Level Code (Codeunit 99000793).
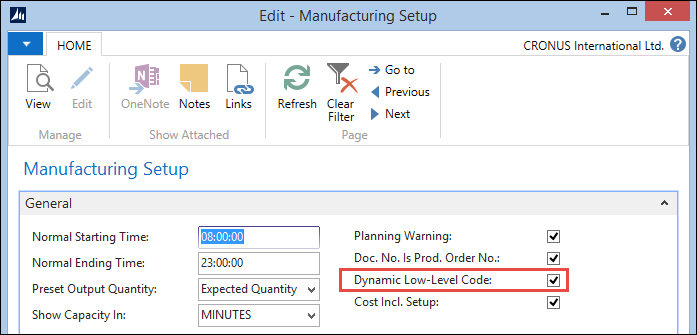
Activating Dynamic Low Level Code can however impact the performance of your system, so for most installations, it is preferable to periodically calculate this using Codeunit Calc. Low-level code (99000853).
There are three ways in Microsoft Dynamics NAV to create a production order. The easiest way is to manually enter them one by one. This can even be a simulation production order to test whether everything is set up as required.
Manual order entry is very time-consuming and is not often used by manufacturing companies. Most of them use MRP programs to plan the orders. When this is done using an external application, the interface will then create the production orders.
The MRP algorithm in Microsoft Dynamics NAV supports two policies, Make-To-Stock and Make-To-Order.
Make-To-Stock, also called Build-To-Stock is often used for high volume items, which are sold to trading companies. When this manufacturing policy is used, the reordering policy should be used. Reordering policies will be discussed in Chapter 6, Trade.
Make-To-Order is often used in demand-driven items such as automobiles. Keeping these items in the inventory is very expensive. The manufacturing process is started after the item is sold.
However, most companies that use Make-To-Order have reserved time slots where these items can be scheduled, so the production capacity is already reserved but the item is not yet determined.
When using Make-To-Order, the MRP run will create production orders for all sales orders. We will use this manufacturing policy in our example.

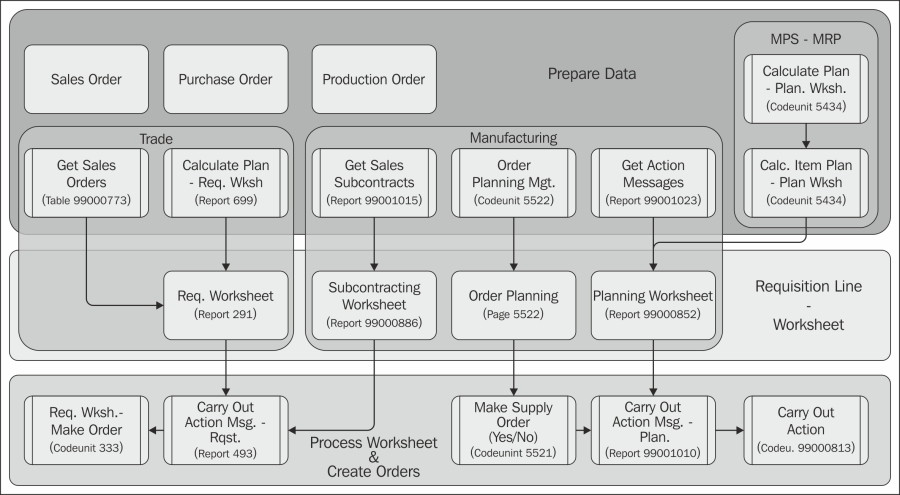
The planning run in Microsoft Dynamics NAV creates lines in the requisition or planning worksheets. This worksheet structure is very important in the sales/purchase/production process. This worksheet can create purchase orders and production orders for sales orders.
The Requisition Worksheet can show different user interfaces (pages) allowing users to do different tasks.
The Requisition Worksheet does not have a general post line routine like the other journals. Each worksheet type uses a different process. The following schema shows how the requisition process ties together:
The Trade section will be discussed in Chapter 6, Trade. In this chapter, we will focus on the planning (MPS and MRP) process and the manufacturing part.
The actual heart of the MRP calculation in Microsoft Dynamics NAV is codeunit Inventory Profile Offsetting (99000854), which is called from codeunit Calc. Item Plan - Plan Wksh. (5431) in our schema.
This codeunit is not easy to understand and should only be changed by specialized developers after careful analysis. The process uses the inventory profile buffer table during the calculation to build up information and starts with the function CalculatePlanFromWorksheet:
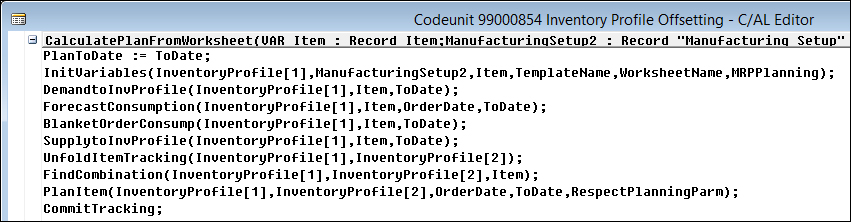
The code unit in this image in the standard Microsoft Dynamics NAV application is a perfect example of atomic coding, also known as workflow coding. With this style of programming, you break down the code into functions that have functional naming and leave out any programming while calling the functions one by one. This makes your code easier to read for others and cheaper to maintain.
Let's look at the functions in this code unit:
InitVariables: This function is used to clear and initialize variables used in this codeunit.DemandtoInvProfile: Here, the system creates records in the Inventory Profile table for Sales Orders, Service Orders, and Production Orders that may require items.ForecastConsumption: If Use Forecast on Locations is used in the manufacturing setup, additional demand lines are created in the inventory profile buffer based on the production forecast.BlanketOrderConsump: Additional demand is inserted for all blanket sales orders with a Shipment Date and Outstanding Qty. within the calculation period.SupplytoInvProfile: The current inventory, purchase orders, and production orders are added to the Inventory Profile as possible supply.UnfoldItemTracking: If the item uses Item Tracking, this function makes sure that Lot numbers and serial numbers match.Note
In this function, Microsoft developers use a trick that when a temporary table with more dimensions, the values in both tables are identical. This blog entry at https://markbrummel.wordpress.com/2014/06/01/tip-27-using-temp-tables-in-arrays/ explains how this works.
FindCombination: This function creates temporary Stock Keeping Unit records for each SKU that requires replenishment. If the item does not have any SKU, the system will create a temporary SKU record.PlanItem: This is where the actual requisition lines are created for the item, based on the information in the Inventory Profile table and the setup.CommitTracking: This function saves information stored in temporary record variables to actual data in the database for reservation entries and action messages.
Let's run the Planning Worksheet for our English desk and see what planning lines we get.
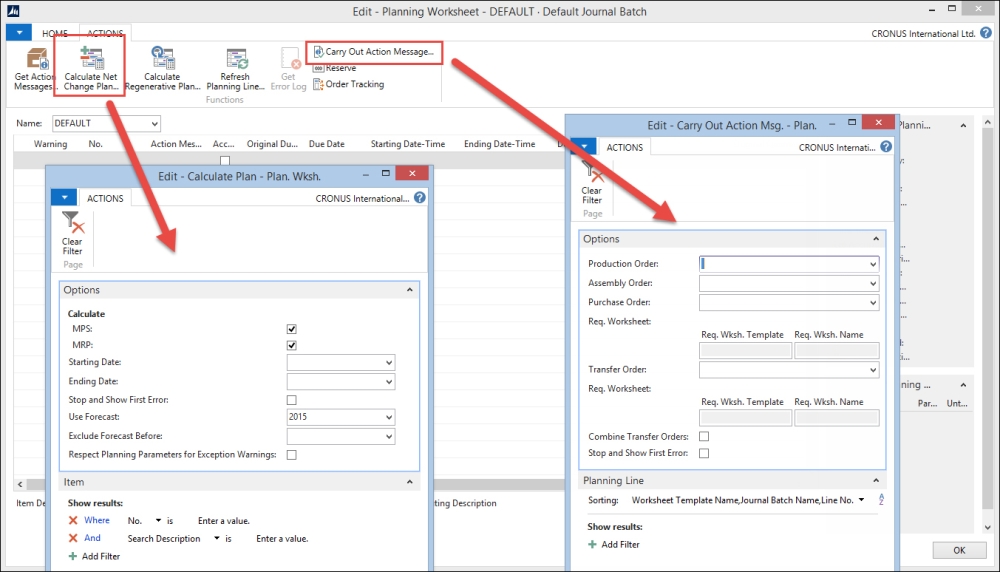
The MPS and MRP run is started from the Planning Worksheet. We need to enter a starting date and an ending date. In the CRONUS database using our example, we can use the current workdate.
When the MPS and MRP run is finished, we can start the process to Carry Out Action Message to create the Production Order.
The production order is now created and ready to be started. The first status is Planned or Firm Planned. During the planned status, Microsoft Dynamics NAV can automatically change the production order.
Once the production order is released, it can no longer be automatically changed.

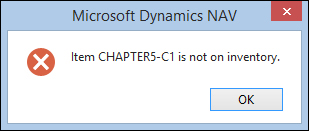
To release a production order, the components need to be available. In our test scenario, this is not yet true since we created new items, which have not been purchased.
Let's see how we can do this.
To create the purchase orders, we'll use the Order Planning worksheet to illustrate another method of planning. This will create requisition lines for the production order we just released.
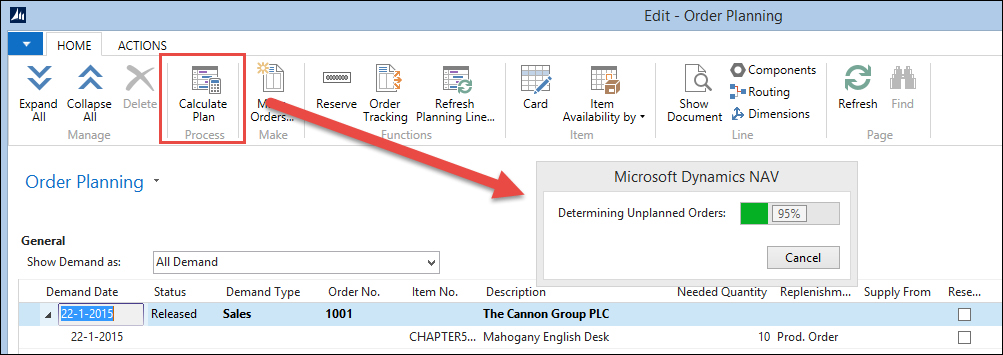
Once the requisition lines are created, we need to specify a vendor number in the Supply From field and then start the Make Orders process to generate the Purchase Orders.

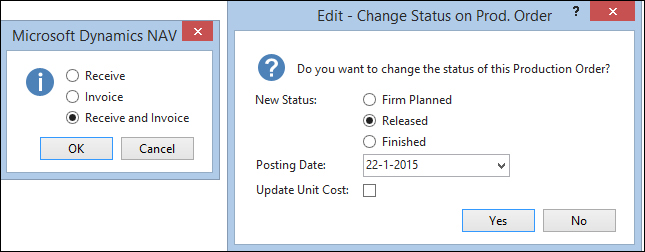
The Purchase Order can be received. This allows us to release the Production Order.
When the production order is finished, the end product should be in the inventory and the components should be consumed. This consumption process is called flushing.
This is done using the Consumption Journal and Output Journal and can be done automatically and manually.
The Consumption Journal is automatically posted when the flushing method in the item card is set to Forward, Backward or Pick + Forward, Pick + Backward.
When using Forward, the Consumption Journal is posted when the production order is released, Backward will post when the production order is set to finished. Pick + Forward and Pick + Backward can be used in combination with
Warehouse Management Locations.
The last production methodology we discussed at the beginning of the chapter is specialized production.
These are items produced in small numbers or items that have very different specifications each time they go into production. For these companies, creating a bill of materials each time an item changes is just too much work compared to the extra information they would get.
Still, these companies want to register their production orders and get a clear view of their inventory. Most companies doing this kind of production are using the jobs functionality of Microsoft Dynamics NAV.
We will discuss this in Chapter 8, Consulting, where we will assemble custom-made computer systems with different components as an example.