In a storage warehouse, products come and go all the time. A big difference between a storage company and a production plant is that the storage company does not care about what exact products they have; they care about the amount of space they require for storage. The business is selling storage handling, storage space, and transportation.
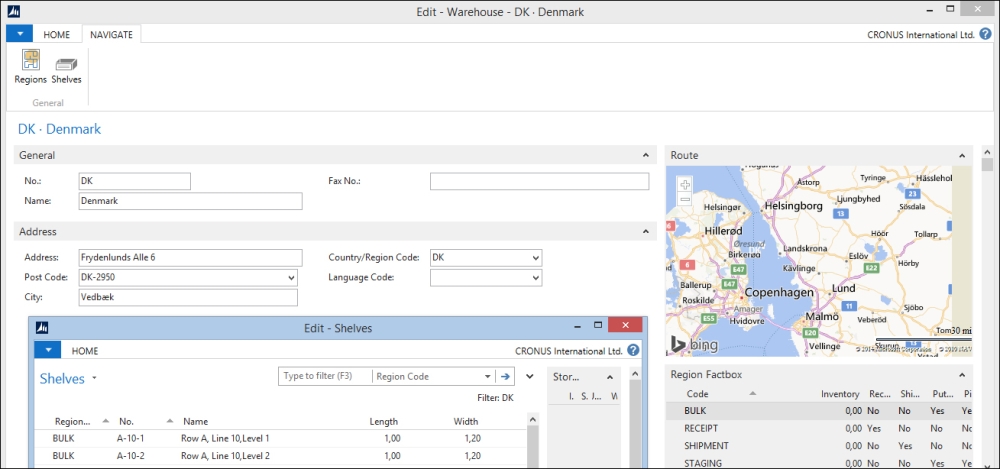
For our application, we'll assume that our warehouse has a receipt and a shipping region, an in-between staging region and a bulk storage region. If we simplify the warehouse, it might look like the following floor plan:
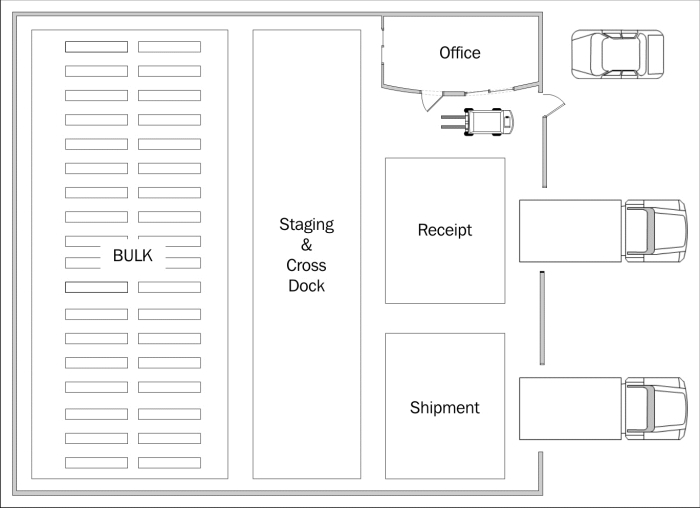
Let's look at the various sections in detail:
- Receipt: When products come in, they are first unloaded from the truck onto a receipt region. This is often located close to the unloading dock, so the truck can quickly move on to its next stop after the products are unloaded and the loading documents are checked. From the receiving location, the products should be stored away as quickly as possible since another truck might come and we need the space. The products can now go to either the staging region or the bulk region.
- Staging: The staging region is an in-between region where products can be stored but will leave the warehouse quickly when it is too busy to properly store in the bulk area and we need the space in the receipt region.
- Shipment: When products leave the warehouse, they will first be moved to the shipment region. This allows us to quickly load the trucks when they arrive and easily compare the loading documents with the real products.
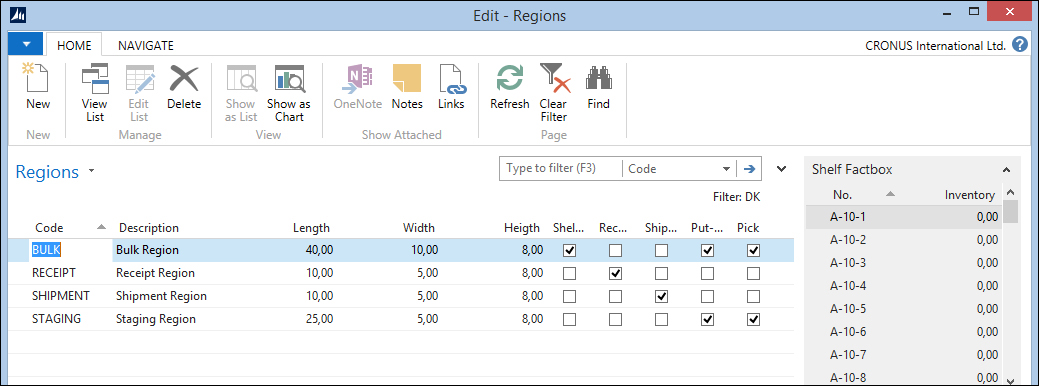
- Bulk: When we expect products to be in the warehouse for a longer period, they will be stored in the bulk area where we can define shelves. A shelf can have a capacity for one or more products depending on the setup in the system.
The first step is to have a registration of what will be coming to our warehouse by creating the receipt documents. In the old days, we would often receive this information by phone or fax, but today most companies use interfaces, such as EDI and web portals for this. This keeps us from making mistakes when typing the information in the system and allows us to automatically populate the receipt document.
The receipt documents will be combined into put-away documents that register the transfer from one region to the other. The software will also suggest a shelf to store the products.
When the products leave the warehouse, our customers will also register a shipment document. On their call, we will start the order picking process and combine the shipments. The pick documents will tell us on which shelf the products are stored.
Incidentally, it may also be necessary to move the products in the warehouse. This will be registered in internal movement documents.
The storage documents are connected to the logistics document structure, which we will see later in this chapter, while discussing logistics.
In Chapter 2, A Sample Application, we learned how to use a journal and entry design patterns to register usage. In this chapter, we will continue with this and add some document design pattern structures.
To design our application, we will look at how existing pieces of Microsoft Dynamics NAV are designed and reuse them.
Tip
On https://community.dynamics.com/nav/w/designpatterns/default.aspx, you'll find dozens of design patterns for Microsoft Dynamics NAV including many used in this chapter.
The core of our application is the Storage Journal, which is created from the same template as the Squash Journal earlier. The difference is that people in a warehouse use documents rather than journals.
We will support the five types of documents we discussed earlier, namely, Receipt, Shipment, Put-away, Pick, and Movement. The documents can be created manually by end users or created automatically. We will also provide an interface structure to allow customers to register receipts and shipments.
As all the documents have the same structure and mostly the same fields, they are in the same table to share business logic.
This is also done in the standard Microsoft Dynamics NAV application for sales and purchase documents as we discussed in Chapter 6, Trade.
To define what we are storing in the warehouse, we will use a new table called Product, which is similar to the Item table in the standard system. By creating a new table, we will improve upgradability of our solution, which will help us be more in control of our own application or in other words, less likely to be impacted by the changes Microsoft implements in the standard product.
If we combine this information into a table and transaction structure, it would look like the following diagram:
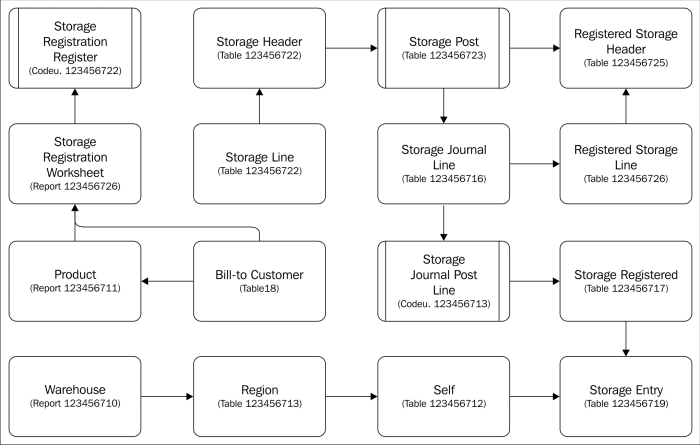
The actual inventory is kept in Storage Entries. By filtering on a warehouse code, region code, or shelf number, the inventory can be calculated.
The Storage & Logistics add-on application also has some shared tables. It does not make sense to have a product or warehouse table for each part of the add-on. We choose to also share the setup and the cue tables for the Role Center definition. The Storage & Logistics application has four Role Centers.
In our scenario, we'll ship and receive products for a company called CRONUS International Ltd. for whom we do shipping. We have warehouses in Austria, Belgium, Czech Republic, Denmark, Germany, Great Britain, Iceland, Netherlands, Norway, Sweden, Slovenia, Slovakia, and the USA.
Each warehouse has the same basic layout as explained earlier in this chapter. From the warehouse, we plan routes to transport the products to the consumer. After initializing the application and restarting the application, the Role Center should look like this:
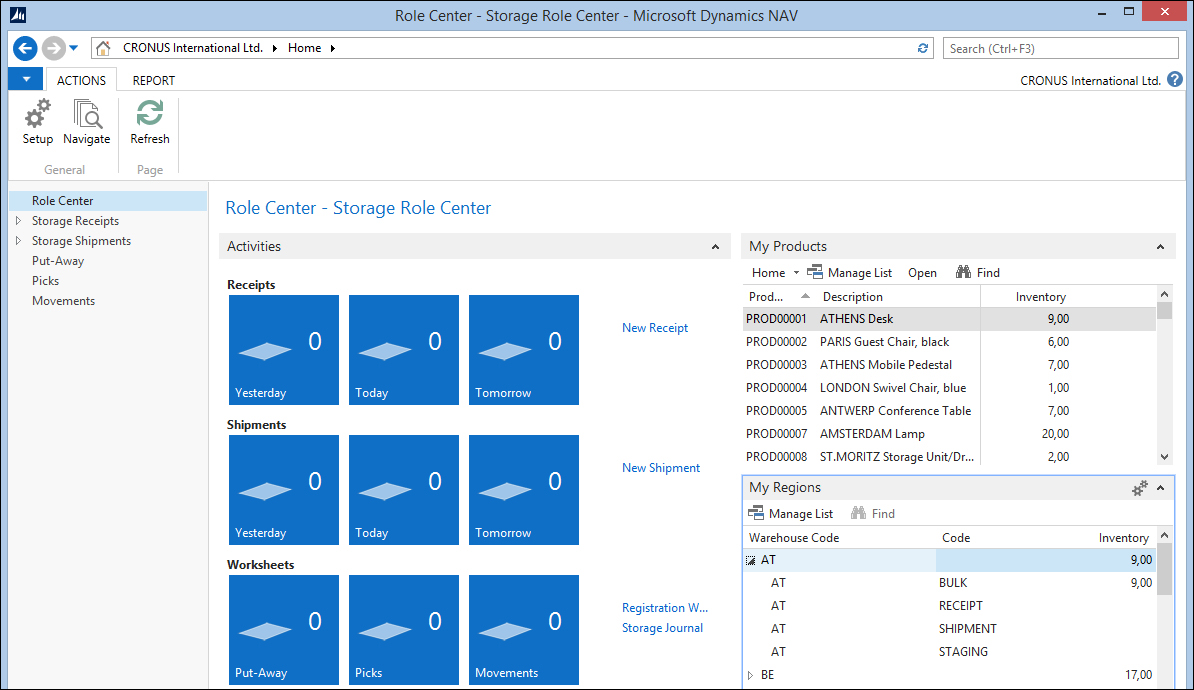
Let's look at the various sections in detail:
- Activities: This window shows the workflow for the warehouse floor
- My Products: This contains all customer products we have on inventory
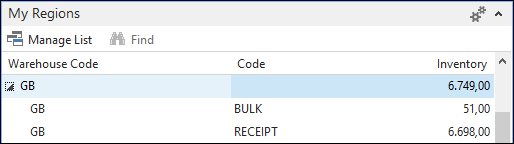
- My Regions: This allows us to see what inventory is where in our warehouses
The opening balance was created using the Storage Journal. By using the journal to create opening entries, we are sure that business rules are followed.
In our design, we have decided that end users are not allowed to directly register inventory on the bulk location. We start by receiving it, and then we create a put-away document to move it to the bulk location. We'll see how this is done later in this chapter when we discuss the storage documents.
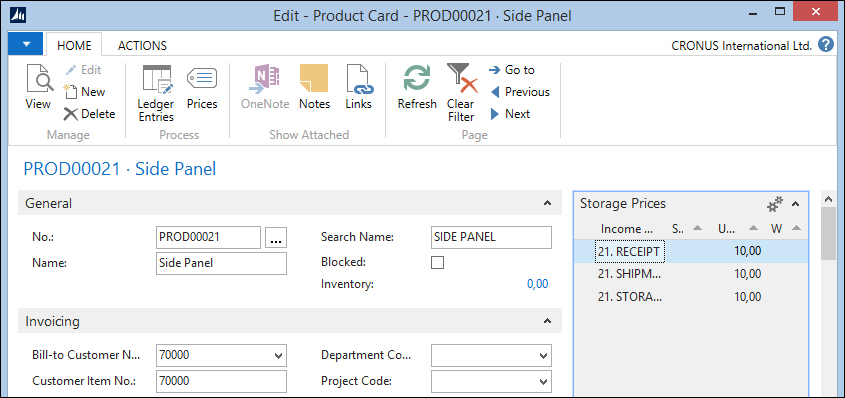
Products are references to the items of our customers that we keep in inventory. They contain a Bill-to Customer No. and a Customer Item No. This allows us, for example, to keep the item with number 70000 for two different customers.
We can also see and set up Storage Prices for this product, which we will later use for the invoicing.
A warehouse is a physical building with an address. To move products from one warehouse to another warehouse, we would need to ship them, create a route, and then physically receive them in the other building.
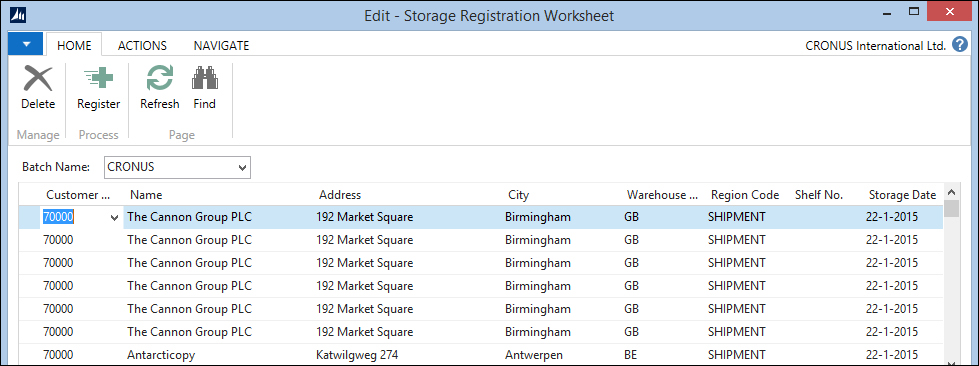
The warehouse process starts with receiving products. To save time when the products arrive on the dock, we ask our customers to register their products in advance. This is done in the storage registration worksheet.
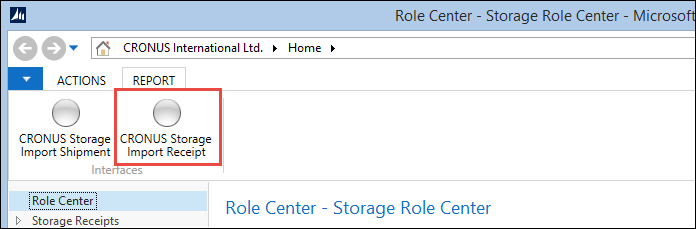
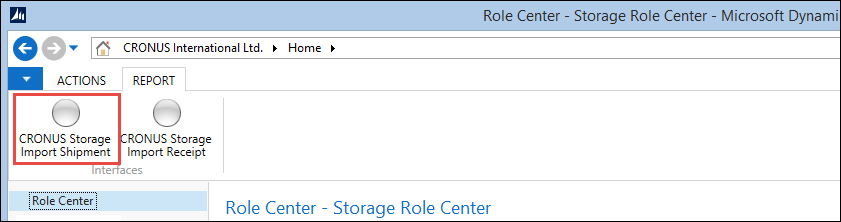
In our application, we have simulated an interface with our customer CRONUS International Ltd. We can start the interface from the Role Center directly.
- We start the CRONUS Storage Import Receipt report from the Role Center, as shown in the following screenshot:
- The system pops up and asks for a Storage Registration Code.
- We will choose CRONUS from the list and start the import process.
- After this, we open Registration Worksheets.
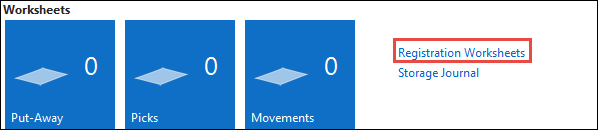
- When we now open the registration worksheet, we see what CRONUS will send us today. This allows us to prepare our business, maybe move around some products, and schedule resources.

- We can now register this worksheet, which will create the receipt documents for us.
We use documents to determine which product goes where. Creating those documents in the system manually requires a large amount of work, so in our application, this is done automatically.
By default, all products that are received are stored in the RECEIPT region. This region does not have shelves. If required, we can change the region code.
After we register the receipt document, we have inventory on the RECEIPT location:
Since this is a relatively small region, we need to move the products to the bulk location as quickly as possible. This is done using a put-away document.
A put-away document is used to move products from the receipt region into the bulk region. The storage entries tell us what is in the receipt region, so we copy that information into a new put-away document. These documents can be created manually, and based on the warehouse information on the document, we can pull the data into the document.
Another requirement is to have an automated process that creates put-away documents based on the entire content of the receipt region.
- To provide for this functionality, we have created the Receipts to Put-Away (123456715) report. This processing-only report reads the storage entries for the receipt region, and creates the put-away documents based on certain predefined rules.

- The report filters down the storage entries-based regions of type Receipt and with inventory.
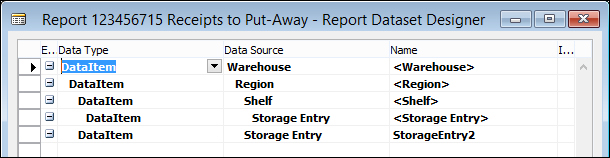
- It creates a put-away document for each warehouse suggesting the first put-away region in the warehouse. For each
StorageEntry, theCreateLinefunction is started. Let's have a look at the C/AL code for this:CreateLineCreateLine() FindOrCreateStorageHdr; Region2.SETRANGE("Warehouse Code"); Region2.SETRANGE("Put-Away", TRUE); Region2.FINDFIRST; WITH StorageEntry DO BEGIN NextLineNo := NextLineNo + 10000; StorageLn."Document Type" := StorageHdr."Document Type"; StorageLn."Document No." := StorageHdr."No."; StorageLn."Line No." := NextLineNo; StorageLn."No." := "Product No."; StorageLn."Warehouse Code" := "Warehouse Code"; StorageLn."Region Code" := Region2.Code; - The first step is to check whether it's necessary to create a new storage document. We create a new document for each
WarehouseandStorageDate. - Then, the system filters on the region table to find a put-away region. For each
StorageEntry, aStorageLineis created. - After running the report, our put-away document looks like this:
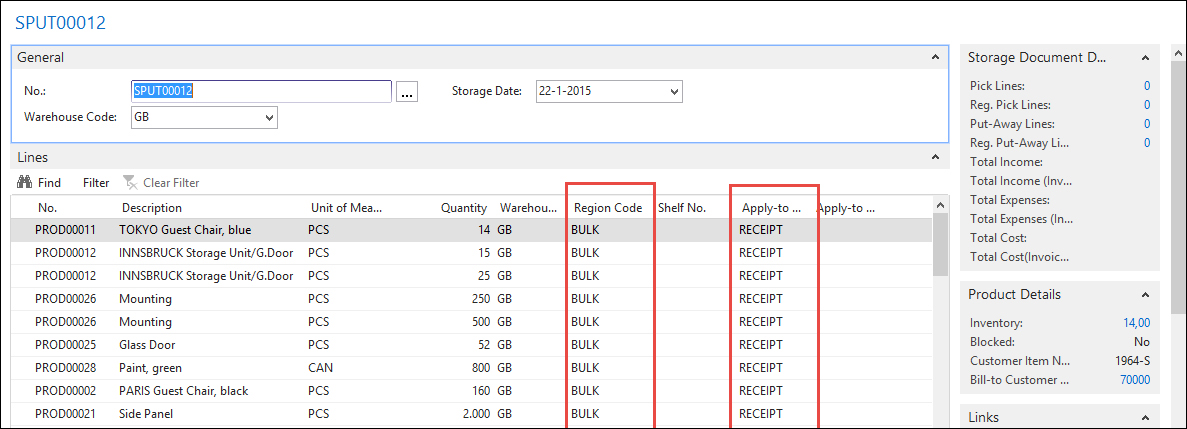
- The suggested Region Code is BULK and the Apply-to Region Code is RECEIPT.
- If we now try to register this document, we will receive an error since we did not enter any
Shelvesbecause this is mandatory on this region. - Since we rely on the system to keep track of our inventory, we can also have it suggest available shelves for us. This is also done using batch report 123456716 Generate Put-Away Shelves. Let's design the report and look at the C/AL code in
StorageLineDataItem:Storage Line - OnAfterGetRecord() Counter := Counter + 1; Window.UPDATE(1,"Document No."); Window.UPDATE(2,ROUND(Counter / CounterTotal * 10000,1)); Shelf.SETRANGE("Warehouse Code", "Storage Line"."Warehouse Code"); Shelf.SETRANGE("Region Code", "Region Code"); Shelf.SETRANGE(Inventory, 0); Shelf.SETRANGE("Blocked by Storage", FALSE); Shelf.FINDFIRST; "Shelf No." := Shelf."No."; MODIFY; - For each
StorageLinein the put-away document, it finds another shelf by filtering on availability based onInventoryandBlockedByStorage. - The
BlockedByStoragefield is a flow field that returns true if the shelf is used on a warehouse document preventing two forklift trucks from stopping at the same shelf. - When this report is executed, we can register this put-away document and we can see the Storage Entries that are generated from the Product Card using the Ledger Entries action:

Here, we can see that the put-away document has applied its entries to the receipt entries. Since we moved everything, the original entry is closed and the remaining quantity is set to zero.
This functionality is similar to what we created in Chapter 2, A Sample Application, when applying an invoice entry to a reservation.
After a while when the products are in inventory, the customer may send a request to ship them. The shipping documents are sent using the same interface as the receipt documents.
CRONUS Storage Import Shipment option
Running the CRONUS Storage Import Shipment report will create the Storage Registration Worksheet, which we can check and register to a shipment document, the same way as the receipt documents earlier.
The system creates a shipment document for each Ship-to Address.
We now have to start the process of moving the products from the storage region to the shipment region.
The products that will be shipped need to be picked from the bulk or staging region using a pick document. As with the put-away functionality, our application design provides an automated process that supports this process.
To create the document, we use batch Report 123456717 Shipments to Pick, as shown in the following screenshot:

This report can combine shipments into one or more pick documents:
Storage Line - OnAfterGetRecord()

Counter := Counter + 1;
Window.UPDATE(1,"Document No.");
Window.UPDATE(2,ROUND(Counter / CounterTotal * 10000,1));

Product.GET("No.");
Product.SETRANGE("Warehouse Filter Code", "Warehouse Code");
Product.CALCFIELDS(Inventory);
IF Quantity > Product.Inventory THEN
  ERROR(Text001, Quantity, Product.Inventory, "No.");

QtyToPick := Quantity;

StorageEntry.SETCURRENTKEY("Product No.");
StorageEntry.SETRANGE("Warehouse Code", "Storage Header"."Warehouse Code");
StorageEntry.SETRANGE("Product No.", "No.");
StorageEntry.SETRANGE(Open, TRUE);
IF StorageEntry.FINDSET(TRUE) THEN REPEAT
  StorageEntry.CALCFIELDS("Blocked by Storage");
  IF NOT StorageEntry."Blocked by Storage" THEN BEGIN
    IF QtyToPick >= StorageEntry.Quantity THEN
      QtyToPick := QtyToPick - StorageEntry.Quantity
    ELSE BEGIN
      StorageEntry.Quantity := QtyToPick;
      QtyToPick := 0;
    END;
    CreateLine(StorageEntry);
  END;
UNTIL (StorageEntry.NEXT = 0) OR (QtyToPick = 0);

IF QtyToPick > 0 THEN
  ERROR(Text002, "No.");
First, the system checks whether the products are in inventory in this warehouse. If they are here, it starts browsing through the storage entries to look for available shelves. Here, we also use the Blocked by Storage flow field to avoid two employees fighting over the same product.
One of the functional requirements in our application is to avoid having half a shipment to be picked and block the SHIPMENT region being incomplete. If there are not enough inventories available for the pick, the system will display an error.
After the pick is created, we update the Pick Status on the Shipment field. In the following screenshot, we can see that there are three Pick Lines attached to this shipment:
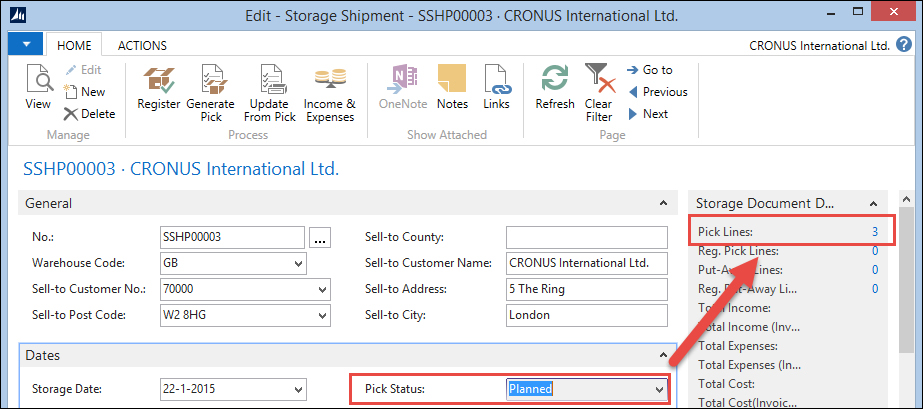
When we click on 3, the system opens the lines. Double-clicking on the lines will open the pick document.
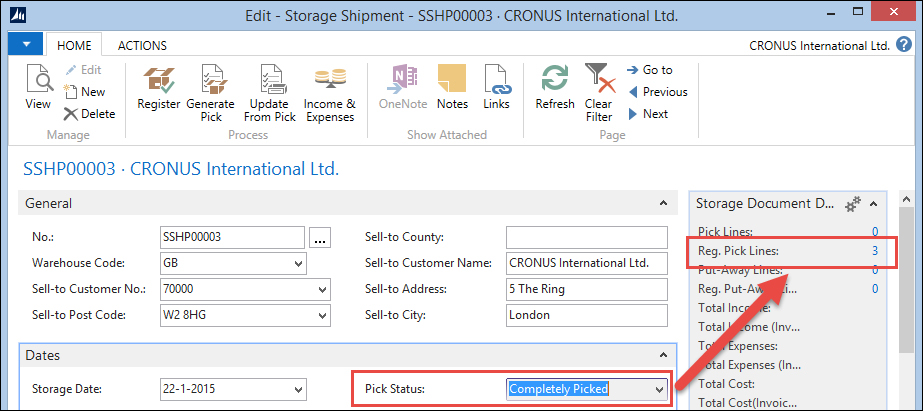
After registration of the pick document, the status of the shipment moves to Completely Picked. We can see that the Pick Lines are registered:
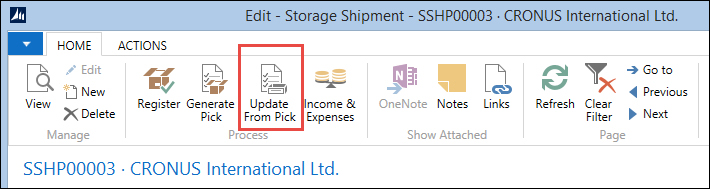
The last step before the shipment can be registered is updating the storage lines with the Apply-to Storage Entry No. from the pick document. For this step, we have designed a dedicated report Update Storage Shipment (123456718) that can be started from the Storage Shipment Document, as shown in the following screenshot:
After this, the shipment can be registered. The products have now left our warehouse and are on the road to the customer.