Chapter 3. What is a Node web application?
- Creating a new web application
- Building RESTful services
- Persisting data
- Working with templates
This chapter is all about Node web applications. After reading this chapter, you’ll understand what Node web applications look like and how to start building them. You’ll do everything a modern web developer does when building an application.
You’re going to build a web application called later that’s inspired by popular read-it-later websites such as Instapaper (www.instapaper.com) and Pocket (getpocket.com). This involves starting a new Node project, managing dependencies, creating a RESTful API, saving data to a database, and making an interface with templates. That might sound like a lot, but you’ll explore each of the ideas in this chapter again in subsequent chapters.
Figure 3.1 shows what the result should look like.
Figure 3.1. A read-it-later web application
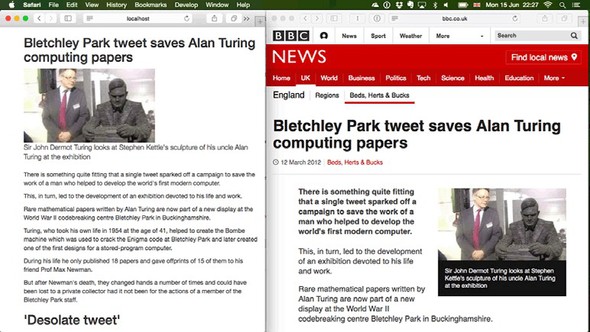
The read-it-later page on the left has stripped away all of the navigation from the target website, preserving the main content and title. More significantly, the article is permanently saved to a database, which means you can read it at a future date when the original article may no longer be retrievable.
Before building a web application, you should create a fresh project. The next section shows how to create Node projects from scratch.
3.1. Understanding a Node web application’s structure
A typical Node web application has the following components:
- package.json—A file that contains a list of dependencies, and the command that runs the application
- public/—A folder of static assets, such as CSS and client-side JavaScript
- node_modules/—The place where the project’s dependencies get installed
- One or more JavaScript files that contains your application code
The application code is often further subdivided as follows:
- app.js or index.js—The code that sets up the application
- models/—Database models
- views/—The templates that are used to render the pages in the application
- controllers/ or routes/—HTTP request handlers
- middleware/—Middleware components
There are no rules that dictate how your application should be structured: most web frameworks are flexible and require configuration. But this template is the general outline that you’ll find in most projects.
It’s much easier to learn how to do this if you practice, so let’s see how to create a skeleton web application the way a seasoned Node programmer would.
3.1.1. Starting a new web app
To create a new web app, you need to make a new Node project. Refer to chapter 2 if you want to refresh your memory, but to recap, you need to create a directory and run npm init with defaults:
mkdir later
cd later
npm init -fy
Now you have a fresh project; what’s next? Most people would add a module from npm that makes web development easier. Node has a built-in http module that has a server, but it’s easier to use something that reduces the boilerplate required for command web development tasks. Let’s see how to install Express.
Adding a dependency
To add a dependency to a project, use npm install. The following command installs Express:
npm install --save express
Now if you look at package.json, you should see that Express has been added. The following snippet shows the section in question:
"dependencies": {
  "express": "^4.14.0"
}
The Express module is in the project’s node_modules/ folder. If you wanted to uninstall Express from the project, you would run npm rm express --save. This removes it from node_modules/ and updates the package.json file.
A simple server
Express is focused on modeling your application in terms of HTTP requests and responses, and it’s built using Node’s built-in http module. To make a basic application, you need to make an application instance by using express(), add a route handler, and then bind the application to a TCP port. Here’s a full example:
const express = require('express');
const app = express();

const port = process.env.PORT || 3000;

app.get('/', (req, res) => {
  res.send('Hello World');
});

app.listen(port, () =>
  console.log(`Express web app available at localhost: ${port}`);
};
It’s not as complicated as it sounds! Save this code to a file called index.js, and run it by typing node index.js. Then visit http://localhost:3000 to view the result. To avoid having to remember exactly how to run each application, most people use npm scripts to simplify the process.
npm scripts
To save your server start command (node index.js) as an npm script, open package.json and add a new property under scripts called start:
"scripts": {
  "start": "node index.js",
  "test": "echo \"Error: no test specified\" && exit 1"
},
Now you can run your application by typing npm start. If you see an error because port 3000 is already being used on your machine, you can use a different port by running PORT=3001 npm start. People use npm scripts for all kinds of things: building client-side bundles, running tests, and generating documentation. You can put anything you like in there; it’s basically a mini-script invocation tool.
3.1.2. Comparing other platforms
For comparison, the equivalent PHP Hello World application is shown here:
<?php echo '<p>Hello World</p>'; ?>
It fits on one line and is easy to understand, so what benefits does the more complex Node example have? The difference is in terms of programming paradigm: with PHP, your application is a page; in Node, it’s a server. The Node example has complete control over the request and response, so you can do all kinds of things without configuring a server. If you want to use HTTP compression or URL redirection, you can implement these features as part of your application logic. You don’t need to separate HTTP and application logic; they become part of your application.
Instead of having a separate HTTP server configuration, you can keep it in the same place, and that means the same directory. This makes Node applications easy to deploy and manage.
Another feature that makes Node applications easy to deploy is npm. Because dependencies are installed per project, you don’t get clashes between projects on the same system.
3.1.3. What’s next?
Now that you have the hang of creating projects with npm init and installing dependencies with npm install --save, you can create new projects quickly. This is great, because it means you can try out ideas without messing up other projects. If there’s a hot new web framework you want to try, then create a new directory, run npm init, and install the module from npm.
With all of this in place, you’re ready to start writing code. At this stage, you can add JavaScript files to your project and load modules that you’ve installed with npm --save by using require. Let’s focus on what most web developers would do next: add some RESTful routes. This will help you define your application’s API and determine what database models are needed.
3.2. Building a RESTful web service
Your application will be a RESTful web service that allows articles to be created and saved in a similar way to Instapaper or Pocket. It’ll use a module that was inspired by the original Readability service (www.readability.com) to turn messy web pages into elegant articles that you can read later.
When designing a RESTful service, you need to think about which operations you need and map them to routes in Express. In this case, you need to be able to save articles, fetch them so they can be read, fetch a list of all of them, and delete articles you no longer want. That maps to these routes:
- POST /articles—Create a new article
- GET /articles/:id—Get a single article
- GET /articles—Get all articles
- DELETE /articles/:id—Delete an article
Before getting into issues such as databases and web interfaces, let’s focus on creating RESTful resources with Express. You can use cURL to make requests to a sample application to get the hang of it, and then move on to more complicated operations such as storing data to make it like a real web application.
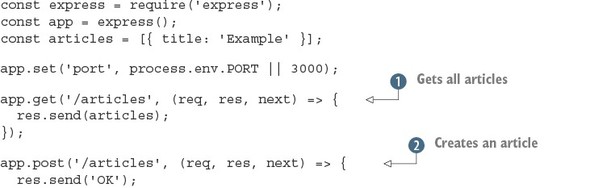
The following listing is a simple Express app that implements these routes by using a JavaScript array to store the articles.
Listing 3.1. RESTful routes example

Save this listing as index.js and you should be able to run it with node index.js. To use this example, follow these steps:
mkdir listing3_1
cd listing3_1
npm init -fy
run npm install --save express@4.12.4
Creating new Node projects is explored in more detail in chapter 2.
To run these examples, make sure you restart the server after editing the code each time. You can do this by pressing Ctrl-C to end the Node process and then type node index.js to start it again.
The examples are presented in snippets, so you should be able to combine them sequentially to produce a working app. If you can’t get it running, try downloading the book’s source code from https://github.com/alexyoung/nodejsinaction.
Listing 3.1 has a built-in array of sample data that’s used to respond with JSON for all articles ![]() by using the Express res.send method. Express will automatically convert the array to a valid JSON response, so it’s perfect for making quick REST APIs.
by using the Express res.send method. Express will automatically convert the array to a valid JSON response, so it’s perfect for making quick REST APIs.
This example can also respond with a single article by using the same principle ![]() . You can even delete an article
. You can even delete an article ![]() by using the standard JavaScript delete keyword and a numerical ID specified in the URL. You can get values from the URL by putting them in the route string (/articles/:id) and then getting the value with req.params.id.
by using the standard JavaScript delete keyword and a numerical ID specified in the URL. You can get values from the URL by putting them in the route string (/articles/:id) and then getting the value with req.params.id.
Listing 3.1 can’t create articles ![]() , because for that it needs a request body parser; you’ll look at this in the next section. First, let’s look at how you can
use this example with cURL (http://curl.haxx.se).
, because for that it needs a request body parser; you’ll look at this in the next section. First, let’s look at how you can
use this example with cURL (http://curl.haxx.se).
After the example is running with node index.js, you can make requests to it with a browser or cURL. To fetch one article, run the following snippet:
curl http://localhost:3000/articles/0
To fetch all articles, you need to make a request to /articles:
curl http://localhost:3000/articles
And you can even delete an article:
curl -X DELETE http://localhost:3000/articles/0
But why did we say you couldn’t create articles? The main reason is that implementing a POST request requires body parsing. Express used to come with a built-in body parser, but there are so many ways to implement it that the developers opted to make it a separate dependency.
A body parser knows how to accept MIME-encoded (Multipurpose Internet Mail Extensions) POST request bodies and turn them into data you can use in your code. Usually, you get JSON data that’s easy to work with. Whenever you’ve submitted a form on a website, a body parser has been involved somewhere in the server-side software.
To add the officially supported body parser, run the following npm command:
npm install --save body-parser
Now load the body parser in your application, near the top of the file, as shown in the following listing. If you’re following along, you can save this to the same folder as listing 3.1 (listing3_1), but we’ve also saved it in its own folder in the book’s source code (ch03-what-is-a-node-web-app/listing3_2).
Listing 3.2. Adding a body parser
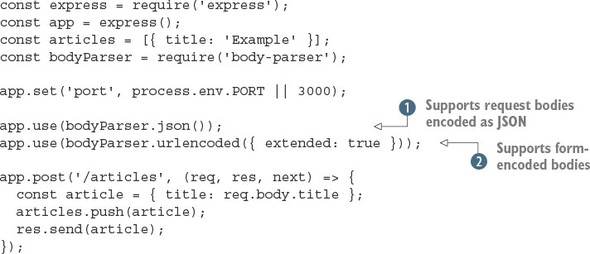
This adds two useful features: JSON body parsing ![]() and form-encoded bodies
and form-encoded bodies ![]() . It also adds a basic implementation for creating articles: if you make a POST request with a field called title, a new article will be added to the articles array! Here’s the cURL command:
. It also adds a basic implementation for creating articles: if you make a POST request with a field called title, a new article will be added to the articles array! Here’s the cURL command:
curl --data "title=Example 2" http://localhost:3000/articles
Now you’re not too far away from building a real web application. You need just two more things: a way to save data permanently in a database, and a way to generate the readable version of articles found on the web.
3.3. Adding a database
There’s no predefined way to add a database to a Node application, but the process usually involves the following steps:
- Decide on the database you want to use.
- Look at the popular modules on npm that implement a driver or object--relational mapping (ORM).
- Add the module to your project with npm -save.
- Create models that wrap database access with a JavaScript API.
- Add the models to your Express routes.
Before adding a database, let’s continue focusing on Express by designing the route-handling code from step 5. The HTTP route handlers in the Express part of the application will make simple calls to the database models. Here’s an example:
app.get('/articles', (req, res, err) => {
  Article.all(err, articles) => {
    if (err) return next(err);
    res.send(articles);
  });
});
Here the HTTP route is for getting all articles, so the model method could be something like Article.all. This will vary depending on your database API; typical examples are Article.find({}, cb),[1] and Article.fetchAll().then(cb).[2] Note that in these examples, cb is an abbreviation of callback.
Mongoose: http://mongoosejs.com
Bookshelf.js http://bookshelfjs.org
Given the amazing number of databases out there, how do you decide which one to use? Read on for the reasons that we’re going with SQLite for this example.
For our project, we’re going to use SQLite (www.sqlite.org), with the popular sqlite3 module (http://npmjs.com/package/sqlite3). SQLite is convenient because it’s an in-process database: you don’t need to install a server that runs in the background on your system. Any data that you add is written to a file that’s kept after your application is stopped and started again, so it’s a good way to get started with databases.
3.3.1. Making your own model API
Articles should be created, retrieved, and deleted. Therefore, you need the following methods for an Article model class:
- Article.all(cb)—Return all articles.
- Article.find(id, cb)—Given an ID, find the corresponding article.
- Article.create({ title, content }, cb)—Create an article with a title and content.
- Article.delete(id, cb)—Delete an article by ID.
You can implement all of this with the sqlite3 module. This module allows you to fetch multiple rows of results with db.all, and single rows with db.get. First you need a database connection.
The following listing shows how to do each of these things with SQLite in Node. This code should be saved as db.js in the same folder as the code from listing 3.1.
Listing 3.3. An Article model


In this example, an object is created called Article that can create, fetch, and delete data by using standard SQL and the sqlite3 module. First, a database file is opened by
using sqlite3.Database ![]() , and then an articles table is created
, and then an articles table is created ![]() . The IF NOT EXISTS SQL syntax is useful here because it means you can rerun the code without accidentally deleting and re-creating the articles
table.
. The IF NOT EXISTS SQL syntax is useful here because it means you can rerun the code without accidentally deleting and re-creating the articles
table.
When the database and tables are ready, the application is ready to make queries. To fetch all articles, you use the sqlite3
all method ![]() . To fetch a specific article, use the question mark query syntax with a value
. To fetch a specific article, use the question mark query syntax with a value ![]() ; the sqlite3 module will insert the ID into the query. Finally, you can insert and delete data by using the run method
; the sqlite3 module will insert the ID into the query. Finally, you can insert and delete data by using the run method ![]() .
.
For this example to work, you need to have installed the sqlite3 module with npm install --save sqlite3. It’s version 3.1.8 at the time of writing.
Now that the basic database functionality is ready, you need to add it to the HTTP routes from listing 3.2.
The next listing shows how to add each method except for POST. (You’ll deal with that separately, because it needs to use the readability module, which you haven’t yet set up.)
Listing 3.4. Adding the Article model to the HTTP routes
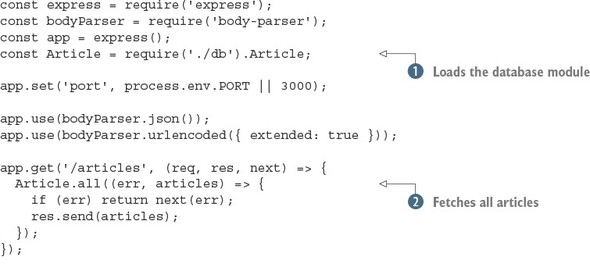
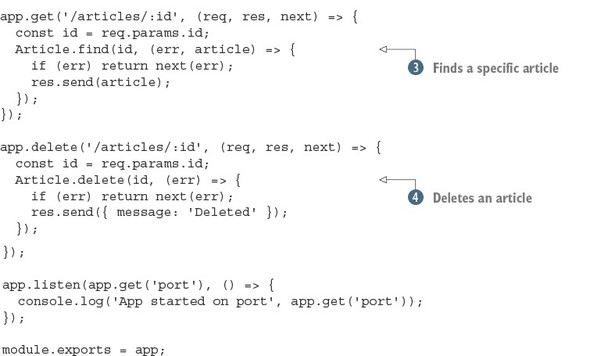
Listing 3.4 is written assuming that you’ve saved listing 3.3 as db.js in the same directory. Node will load that module ![]() and then use it to fetch each article
and then use it to fetch each article ![]() , find a specific article
, find a specific article ![]() , and delete an article
, and delete an article ![]() .
.
The final thing to do is add support for creating articles. To do this, you need to be able to download articles and process them with the magic readability algorithm. What you need is a module from npm.
3.3.2. Making articles readable and saving them for later
Now that you’ve built a RESTful API and data can be persisted to a database, you should add code that converts web pages into simplified “reader view” versions. You won’t implement this yourself; instead, you can use a module from npm.
If you search npm for readability, you’ll find quite a few modules. Let’s try using node-readability (which is at version 1.0.1 at the time of this writing). Install it with npm install node-readability --save. The module provides an asynchronous function that downloads a URL and turns the HTML into a simplified representation. The following snippet shows how node-readability is used; if you want to try it, add the snippet to index.js in addition to listing 3.5:
const read = require('node-readability');
const url = 'http://www.manning.com/cantelon2/';
read(url, (err, result)=>  {
  // result has .title and .content
});
The node-readability module can be used with your database class to save articles with the Article.create method:
read(url, (err, result) => {
  Article.create(
    { title: result.title, content: result.content },
    (err, article) => {
      // Article saved to the database
    }
  );
});
To use this in the application, open the index.js file and add a new app.post route handler that downloads and saves articles. Combining this with everything you learned about HTTP POST in Express and the body parser gives the example in the following listing.
Listing 3.5. Generating readable articles and saving them
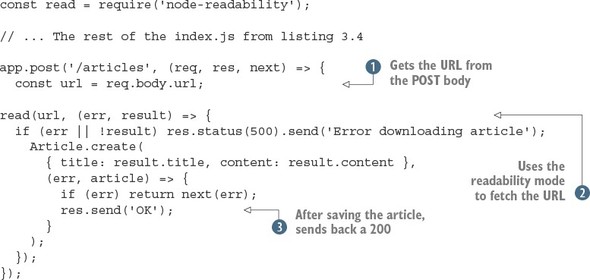
Here you first get the URL from the POST body ![]() and then use the node-readability module to get the URL
and then use the node-readability module to get the URL ![]() . You save the article by using your Article model class. If an error occurs, you pass handling along the Express middleware stack
. You save the article by using your Article model class. If an error occurs, you pass handling along the Express middleware stack ![]() ; otherwise, a JSON representation of the article is sent back to the client.
; otherwise, a JSON representation of the article is sent back to the client.
You can make a POST request that will work with this example by using the --data option:
curl --data "url=http://manning.com/cantelon2/" http://localhost:3000/articles
Over the course of the preceding section, you added a database module, created a JavaScript API that wraps around it, and tied it in to the RESTful HTTP API. That’s a lot of work, and it will form the bulk of your efforts as a server-side developer. You’ll learn more about databases later in this book as you look at MongoDB and Redis.
Now that you can save articles and programmatically fetch them, you’ll add a web interface so you can read articles as well.
3.4. Adding a user interface
Adding an interface to an Express project involves several things. The first is the use of a template engine; we’ll show you how to install one and render templates shortly. Your application should also serve static files, such as CSS. Before rendering templates and writing any CSS, you need to know how to make the router handlers from the previous examples respond with both JSON and HTML when necessary.
3.4.1. Supporting multiple formats
So far you’ve used res.send() to send JavaScript objects back to the client. You used cURL to make requests, and in this case JSON is convenient because it’s easy to read in the console. But to really use the application, it needs to support HTML as well. How can you support both?
The basic technique is to use the res.format method provided by Express. It allows your application to respond with the right format based on the request. To use it, provide a list of formats with functions that respond the desired way:
res.format({
  html: () => {
    res.render('articles.ejs', { articles: articles });
  },
  json: () => {
    res.send(articles);
  }
});
In this snippet, res.render will render the articles.ejs template in the views folder. But for this to work, you need to install a template engine and create some templates.
3.4.2. Rendering templates
Many template engines are available, and a simple one that’s easy to learn is EJS (Embedded JavaScript). Install the EJS module from npm (EJS is at version 2.3.1 at the time of writing):
npm install ejs --save
Now res.render can render HTML files formatted with EJS. If you replace res.send (articles) in the app.get('/articles') route handler from listing 3.4, visiting http://localhost:3000/articles in a browser should attempt to render articles.ejs.
Next you need to create the articles.ejs template in a views folder. The next listing shows a full template that you can use.
Listing 3.6. Article list template
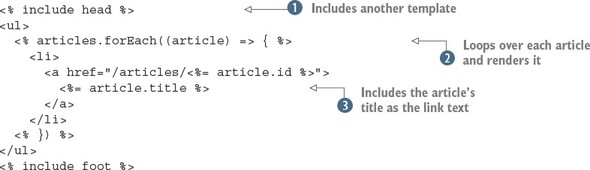
The article list template uses a header ![]() and footer template that are included as snippets in the following code examples. This is to avoid duplicating the header
and footer in every template. The article list is iterated over
and footer template that are included as snippets in the following code examples. This is to avoid duplicating the header
and footer in every template. The article list is iterated over ![]() by using a standard Java-Script forEach loop, and then the article IDs and titles are injected into the template by using the EJS <%= value %> syntax
by using a standard Java-Script forEach loop, and then the article IDs and titles are injected into the template by using the EJS <%= value %> syntax ![]() .
.
Here’s an example header template, saved as views/head.ejs:
<html>
  <head>
    <title>Later</title>
  </head>
  <body>
    <div class="container">
And this is a corresponding footer (saved as views/foot.ejs):
    </div>
  </body>
</html>
The res.format method can be used for displaying specific articles as well. This is where things start to get interesting, because for this application to make sense, articles should look clean and easy to read.
3.4.3. Using npm for client-side dependencies
With the templates in place, the next step is to add some style. Rather than creating a style sheet, it’s easier to reuse existing styles, and you can even do this with npm! The popular Bootstrap (http://getbootstrap.com/) client-side framework is available on npm (www.npmjs.com/package/bootstrap), so add it to this project:
npm install bootstrap --save
If you look at node_modules/bootstrap/, you’ll see the source for the Bootstrap project. Then, in the dist/css folder, you’ll find the CSS files that come with Bootstrap. To use this in your project, you need to be able to serve static files.
Serving static files
When you need to send client-side JavaScript, images, and CSS back to the browser, Express has some built-in middleware called express.static. To use it, you point it at a directory that contains static files, and those files will then be available to the browser.
Near the top of the main Express app file (index.js), there are some lines that load the middleware required by the project:
app.use(bodyParser.json());
app.use(bodyParser.urlencoded({ extended: true }));
To load Bootstrap’s CSS, use express.static to register the file at the right URL:
app.use(
  '/css/bootstrap.css',
  express.static('node_modules/bootstrap/dist/css/bootstrap.css')
);
Now you can add /css/bootstrap.css to your templates to get some cool Bootstrap styles. Here’s what views/head.ejs should look like:
<html>
  <head>
    <title>later;</title>
    <link rel="stylesheet" href="/css/bootstrap.css">
  </head>
  <body>
    <div class="container">
This is only Bootstrap’s CSS; Bootstrap also comes with other files, including icons, fonts, and jQuery plugins. You could add more of these files to your project, or use a tool to bundle them all up so loading them is easier.
Doing more with npm and client-side development
The previous example is a simple use of a library intended for browsers through npm. Web developers typically download Bootstrap’s files and then add them to their project manually, particularly web designers who work on simpler static sites.
But modern front-end developers use npm for both downloading libraries and loading them in client-side JavaScript. With tools such as Browserify (http://browserify.org/) and webpack (http://webpack.github.io/), you get all the power of npm installation and require for loading dependencies. Imagine being able to type const React = require('react') in not just Node code, but code for front-end development as well! This is beyond the scope of this chapter, but it gives you a hint of the power you can unlock by combining techniques from Node programming with front-end development.
3.5. Summary
- You can quickly build a Node web application from scratch with npm init and Express.
- The command to install a dependency is npm install.
- Express allows you to make web applications with RESTful APIs.
- Selecting the right database and database module requires some up-front investigation and depends on your requirements.
- SQLite is handy for small projects.
- EJS is an easy way to render templates in Express.
- Express supports lots of template engines, including Pug and Mustache.