Chapter 4. Front-end build systems
- Simplifying complex commands with npm scripts
- Using Gulp to manage repetitive tasks
- Bundling client-side web apps with webpack
In modern web development, Node is increasingly used to run tools and services depended on by front-end engineers. As a Node programmer, you may be responsible for setting up and maintaining these tools. As a full-stack developer, you’ll want to use these tools to create faster and more reliable web applications. In this chapter, you’ll learn how to use npm scripts, Gulp, and webpack to build maintainable projects.
The benefits of using front-end build systems can be huge. They can help you to write more readable and future-proof code. There’s no need to worry about ES2015 browser support when you can transpile it with Babel. Also, because you can generate source maps, browser-based debugging is still possible.
The next section provides a brief introduction to front-end development with Node. After that, you’ll see some examples of modern front-end technologies such as React that you can use with your own projects.
4.1. Understanding front-end development with Node
Recently, front-end and server-side developers have converged on using npm for distributing JavaScript. That means npm is used for front-end modules, such as React, and server-side code, such as Express. But some modules don’t neatly fall into either side: lodash is an example of a general-purpose library that can be used in Node and browsers. By packing lodash carefully, the same module can be consumed by Node and browsers, and the dependency within a project can be managed with npm.
You may have seen other module systems dedicated to client-side development, such as Bower (http://bower.io/). You can still use these tools, but as a Node developer, you should consider using npm.
Package distribution isn’t the only thing Node gets used for, however. Front-end developers are also increasingly dependent on tools for generating portable, backward-compatible JavaScript. Transpilers such as Babel (https://babeljs.io/) are used to convert modern ES2015 into more widely supported ES5 code. Other tools include minifiers (for example, UglifyJS; https://github.com/mishoo/UglifyJS) and linters (for example, ESLint, http://eslint.org/) for verifying the correctness of your code before shipping it.
Test runners are also often driven by Node. You can run the tests for UI code in a Node process, or use a Node script to drive tests that run in a browser.
It’s also typical to use these tools together. When you start juggling a transpiler, minifier, linter, and test runner, you’ll need a way to record how the build process works. Some projects use npm scripts; others use Gulp or webpack. You’ll look at all of these approaches in this chapter and see some related best practices.
4.2. Using npm to run scripts
Node comes with npm, and npm has built-in features for running scripts. Therefore, you can rely on your collaborators or users being able to invoke commands such as npm start and npm test. To add your own command for npm start, you add it to the scripts property of your project’s package.json file:
{
  ...
  "scripts": {
    "start": "node server.js"
  },
  ...
}
Even if you don’t define start, node server.js is the default, so technically you can leave this blank if that’s all you need—just remember to create a file called server.js. Defining the test property is useful because you can include your test framework as a dependency and run it by typing npm test. Let’s say you’re using Mocha (www.npmjs.com/package/mocha) for tests, and you’ve installed it with npm install --save-dev. To avoid having to install Mocha globally, you can add the following statement to your package.json file:
{
  ...
  "scripts": {
    "test": "./node_modules/.bin/mocha test/*.js"
  },
  ...
}
Notice that in the previous example, arguments were passed to Mocha. You can also pass arguments when running npm scripts by using two hyphens:
npm test -- test/*.js
Table 4.1 shows a breakdown of some of the available npm commands.
Table 4.1. npm commands
|
Command |
package.json property |
Example uses |
|---|---|---|
| start | scripts.start | Start a web application server or an Electron app. |
| stop | scripts.stop | Stop a web server. |
| restart | Run stop and then restart. | |
| install, postinstall | scripts.install, scripts.postinstall | Run native build commands after a package is installed. Note that postinstall can be run only with npm run postinstall. |
More commands are available, including some for cleaning up packages before publishing them, and pre/post version commands for migrating between package versions. But for most web development tasks, start and test are the commands you want.
Plenty of tasks that you may want to define won’t fit into the supported command names. For example, let’s say you’re working on a simple project that’s written in ES2015 but you want to transpile it to ES5. You can do this with npm run. In the next section, you’ll run through a tutorial that sets up a new project that can build ES2015 files.
4.2.1. Creating custom npm scripts
The npm run command, aliased from npm run-script, is used to define arbitrary scripts that are invoked with npm run script-name. Let’s see how to make one for building a client-side script with Babel.
Start by setting up a new project and installing the necessary dependencies:
mkdir es2015-example
cd es2015-example
npm init -y
npm install --save-dev babel-cli babel-preset-es2015
echo '{ "presets": ["es2015"] }' > .babelrc
Now you should have a new Node project with the basic Babel ES2015 tools and plugins. Next, open the package.json file and add a babel property under scripts. It should run the script that has been installed into the project’s node_modules/.bin folder:
"babel": "./node_modules/.bin/babel browser.js -d build/"
Here’s a sample file with ES2015 syntax that you can use; save it to browser.js:
class Example {
  render() {
    return '<h1>Example</h1>';
  }
}

const example = new Example();
console.log(example.render());
You’ll be able to test this by running npm run babel. If everything is configured correctly, you should now have a build folder with browser.js. Open browser.js to confirm that it’s indeed an ES5 file. It’s too long to print, so look for something like var_createClass near the top of the file.
If this is all your project ever does when it builds, you could name it build instead of babel in the package.json file. But you can go a little further by adding UglifyJS as well:
npm i --save-dev uglify-es
UglifyJS can be invoked by using node_modules/.bin/uglifyjs, so add it to the package.json under scripts with the name uglify:
./node_modules/.bin/uglifyjs build/browser.js -o build/browser.min.js
Now you should be able to invoke npm run uglify. You can tie all of this together by combining both of these scripts. Add another script property called build that invokes both tasks:
"build": "npm run babel && npm run uglify"
Both scripts are run by typing npm run build. People on your team can now combine multiple front-end packaging tools by invoking this simple command. The reason this works is that Babel and UglifyJS can be run as command-line scripts, and both accept command-line arguments, so it’s easy to add them as one-liners to a package.json file. In the case of Babel, you can manage complex behavior by defining a .babelrc file, which you did earlier in this chapter.
4.2.2. Configuring front-end build tools
In general, you can configure front-end build tools in three ways when used with npm scripts:
- Specifying command-line arguments. For example, ./node_modules/.bin/uglify --source-map.
- Creating a project-specific configuration file with options. This is often done for Babel and ESLint.
- Adding configuration options to package.json. Babel supports this as well.
What if your build requirements have more steps, and include things like copying, concatenating, or moving files? You could create a shell script and invoke it with an npm script, but it may help your JavaScript-savvy collaborators if you use Java-Script. Many build systems provide JavaScript APIs for automating builds. In the next section, you’ll learn all about one such solution: Gulp.
4.3. Providing automation with Gulp
Gulp (http://gulpjs.com/) is a build system based on streams. You can route streams together to create build processes that do more than just transpile or minify code. Imagine you have a project with an administration area that’s built with Angular, but you have a React-based public area; both subprojects share certain build requirements. With Gulp, you can reuse parts of the build process for each stage. Figure 4.1 shows an example of these two build processes that share functionality.
Figure 4.1. Two build processes that share functionality
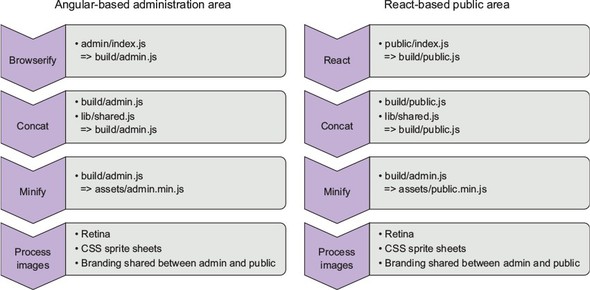
Gulp helps you achieve a high level of reuse through two techniques: using plugins and defining your own build tasks. As the figure suggests, the build process is a stream, so you can pipe tasks and plugins through each other. For example, you can handle the React part of the previous example with Gulp Babel (www.npmjs.com/package/gulp-babel/) and the built-in gulp.src file globbing method:
gulp.src('public/index.jsx')
  .pipe(babel({
    presets: ['es2015', 'react']
  }))
  .pipe(minify())
  .pipe(gulp.dest('build/public.js'));
You can even add the concat stage to this chain quite easily. Before looking more closely at this syntax, let’s see how to set up a small Gulp project.
4.3.1. Adding Gulp to a project
To add Gulp to a project, you need to install both the gulp-cli and gulp packages with npm. Most people install gulp-cli globally, so Gulp recipes can be run simply by typing gulp. Note that you should run npm rm --global gulp if you had previously installed the gulp package globally. In the next snippet, you install gulp-cli globally and create a new Node project that has a Gulp development dependency:
npm i --global gulp-cli
mkdir gulp-example
cd gulp-example
npm init -y
npm i –save-dev gulp
Next create a file called gulpfile.js:
touch gulpfile.js
Open the gulpfile. Now you’ll use Gulp to build a small React project. It’ll use gulp-babel (www.npmjs.com/package/gulp-babel), gulp-sourcemaps, and gulp-concat:
npm i --save-dev gulp-sourcemaps gulp-babel babel-preset-es2015
npm i --save-dev gulp-concat react react-dom babel-preset-react
Remember to use npm with --save-dev when you want to add Gulp plugins to a project. If you’re experimenting with new plugins and decide to remove them, you can use npm uninstall --save-dev to remove them from ./node_modules and update the project’s package.json file.
4.3.2. Creating and running Gulp tasks
Creating Gulp tasks involves writing Node code with Gulp’s API in a file called gulpfile.js. Gulp’s API has methods for things like finding files and piping them through plugins that transform them in some way.
To try this for yourself: Open gulpfile.js and set up a build task that uses gulp.src to find JSX files, Babel to process ES2015 and React, and then concat to join each file together, as shown in the following listing.
Listing 4.1. A gulpfile for ES2015 and React with Babel

Listing 4.1 uses several Gulp plugins to capture, process, and write files. First you find all of the input files by using file globbing, and then you use the gulp-sourcemaps plugin to collect source-map metrics for client-side debugging. Notice that source maps require two stages: one to state that you want to use source maps, and another to write the source-map files. Meanwhile, gulp-babel is configured to process files with ES2015 and React.
This Gulp task can be run by typing gulp in a terminal.
In this example, all of the files are transformed by using a single plugin. It just so happens that Babel is transpiling React JSX code and converting ES2015 to ES5. Once that’s done, the files are concatenated using the gulp-concat plugin. Now that all of the transpiling is done, it’s safe to write the source maps, and the final build can be placed in the dist folder.
You can try this gulpfile out by creating a JSX file named app/index.jsx. Here’s a simple JSX file that you can use to test Gulp:
import React from 'react';
import ReactDOM from 'react-dom';

ReactDOM.render(
  <h1>Hello, world!</h1>,
  document.getElementById('example')
);
Gulp makes it easy to express build stages in JavaScript, and by using gulp.task(), you can add your own tasks to this file. Tasks usually follow the same pattern:
- Source— Gather input files
- Transpile— Pipe them through a plugin that transforms them
- Concat— Pipe the files together to create a monolithic build
- Output— Set a file destination or move the output files
In the previous example, sourcemaps is a special case because it requires two pipes: one for configuration and a final one to output the files. That makes sense because source maps depend on mapping the original line numbers to the transpiled build’s line numbers.
4.3.3. Watching for changes
The last thing front-end developers want is a build/refresh cycle. The simplest way to streamline builds is to use a Gulp plugin to watch the filesystem for changes. But alternatives exist. Some libraries work well with hot reloading, and more-generic DOM and CSS-based projects can work well with the LiveReload (http://livereload.com/) project.
As an example, you can add gulp-watch (www.npmjs.com/package/gulp-watch) to the previous project in listing 4.1. Add the package to the project:
npm i --save-dev gulp-watch
Now remember to load the package in gulpfile.js:
const watch = require('gulp-watch');
And add a watch task that calls the default task from the previous example:
gulp.task('watch', () => {
  watch('app/**.jsx', () => gulp.start('default'));
});
This defines a task called watch, and then uses watch() to watch React JSX files for changes. Whenever a file changes, the default build task will run. With minor modifications, this recipe could be used to build Syntactically Awesome Style Sheets (SASS) files, optimize images, or pretty much anything else you might need for front-end projects.
4.3.4. Using separate files for larger projects
As projects grow, they tend to need more Gulp tasks. Eventually, you’ll end up with a long file that’s hard to understand. You can fix this, however: break up your code into separate modules.
As you’ve seen, Gulp uses Node’s module system for loading plugins. There’s no special plugin-loading system; it just uses standard modules. You can also use Node’s module system to split up long gulpfiles, to make your files more maintainable. To use separate files, you need to follow these steps:
- Create a folder called gulp, and a subfolder called tasks.
- Define your tasks by using the usual gulp.task() syntax in separate files. One file per task is a good rule of thumb.
- Create a file called gulp/index.js to require each Gulp task file.
- Require the gulp/index.js file in gulpfile.js.
The file tree should look like the following snippet:
gulpfile.js
gulp/
gulp/index.js
gulp/tasks/development-build.js
gulp/tasks/production-build.js
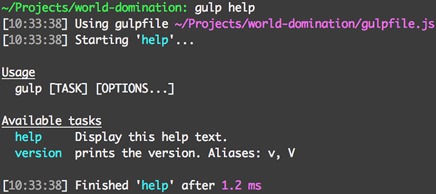
This technique can help you organize projects with complex build tasks, but it can also be paired with the gulp-help (www.npmjs.com/package/gulp-help) module. This module allows you to document Gulp tasks; running gulp help shows information about each task. This helps when you’re working in a team, or if you switch between lots of projects that use Gulp. Figure 4.2 shows what the output looks like.
Figure 4.2. Sample gulp-help output
Gulp is a general-purpose project-automation tool. It’s good when adding cross--platform housekeeping scripts to projects—for example, running complex client-side tests or bringing up fixtures for a database. Although it can be used for building client-side assets, there are also tools specifically designed to do that, which means they typically require less code and configuration than Gulp. One such tool is webpack, which focuses on bundling JavaScript and CSS modules. The next section demonstrates how to use webpack for a React project.
4.4. Building web apps with webpack
webpack is specifically designed to build web applications. Imagine that you’re working with a designer who has already created a static site for a single-page web app, and you want to adapt it to build more-efficient CSS and ES2015 JavaScript. With Gulp, you write JavaScript code to drive the build system, so this would involve writing a gulpfile and several build tasks. With webpack, you write a configuration file and then bring in new functionality by using plugins and loaders. In some cases, no extra configuration is required: you type webpack on the command-line with an argument for the source-file path, and it’ll build your project. Skip to section 4.4.4 to see what this looks like.
One of the advantages of webpack is that it’s easier to quickly set up a build system that supports incremental builds. If you set it up to automatically build when files change, it won’t need to rebuild the entire project when a single file changes. As a result, builds can be faster and easier to understand.
This section shows you how to use webpack for a small React project. First, let’s define the terminology webpack uses.
4.4.1. Using bundles and plugins
Before setting up a webpack project, some terminology should be clarified. webpack plugins are used to change the behavior of the build process. This can include things like automatically uploading assets to Amazon S3 (https://github.com/MikaAK/s3-plugin-webpack) or removing duplicated files from the output.
In contrast to plugins, loaders are transformations that are applied to resource files. If you need to convert SASS to CSS, or ES2015 to ES5, you need a loader. Loaders are functions that transform input source text into output. They can be asynchronous or synchronous. Plugins are instances of classes that can hook into webpack’s more low-level APIs.
If you need to convert React code, CoffeeScript, SASS, or any other transpiled languages, you’re looking for a loader. If you need to instrument your JavaScript, or manipulate sets of files in some way, you’ll need a plugin.
In the next section you’ll see how to use the Babel loader to convert a React ES2015 project to a browser-friendly bundle.
4.4.2. Configuring and running webpack
You’re going to re-create the React example from listing 4.1 by using webpack. To get started, install React in a new project:
mkdir webpack-example
npm init -y
npm install --save react react-dom
npm install --save-dev webpack babel-loader babel-core
npm install --save-dev babel-preset-es2015 babel-preset-react
The last line installs Babel’s ES2015 plugin and the React transformer for Babel. Now you need to make a file called webpack.config.js that instructs webpack on where to find the input file, where to write the output, and what loaders to use. You’re going to use babel-loader with some extra settings for React, as shown in the next listing.
Listing 4.2. A webpack.config.js file
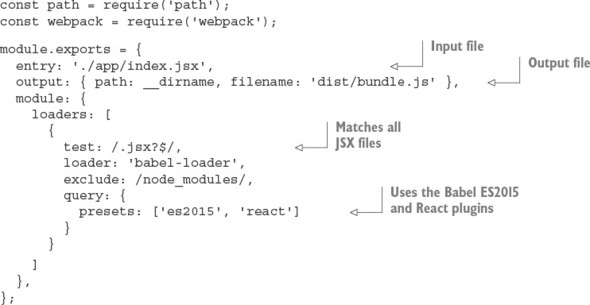
This configuration file encapsulates everything you need to successfully build a React app with ES2015. The settings are easy to follow: define an entry, which is the main file that loads the application. Then specify the directory where the output should be written; this directory will be created if it doesn’t yet exist. Next, define a loader and associate it with a file glob search by using the test property. Finally, make sure to set any options for the loader. In this example, these options load the ES2015 and React Babel plugins.
You need to include a sample React JSX file in app/index.jsx; use the snippet from section 4.3.2. Now running ./node_modules/.bin/webpack will compile an ES5 version of the file with the React dependencies.
4.4.3. Using webpack development server
If you want to avoid having to rebuild the project whenever a React file changes, you can use the webpack development server (http://webpack.github.io/docs/webpack-dev-server.html). In the book’s source code, this can be found under webpack--hotload-example (ch04-front-end/webpack-hotload-example). This small Express server will run webpack with your webpack configuration file when files change, and then serve the changed assets to the browser. You should run it on a different port to your main web server, and this means your script tags will have to include different URLs during development. The server builds assets and stores them in memory rather than in your webpack output folder. You can also use webpack-dev-server for hot module loading, in a similar way to LiveReload servers.
To add webpack-dev-server to a project, follow these steps:
- Install webpack-dev-server with npm i --save-dev webpack-dev-server@ 1.14.1.
- Add a publicPath option to the output property in webpack.config.js.
- Add an index.html file to your build directory to act as a harness to load your JavaScript and CSS bundles. Ensure that the port is the port specified in the next step.
- Run the server with the options you want. For example, webpack-dev-server --hot --inline --content-base dist/ --port 3001.
- Visit http://localhost:3001/ and load the app.
Open webpack.config.js from listing 4.2 and change the output property to include a publicPath:
output: {
  path: path.resolve(__dirname, 'dist'),
  filename: 'bundle.js',
  publicPath: '/assets/'
},
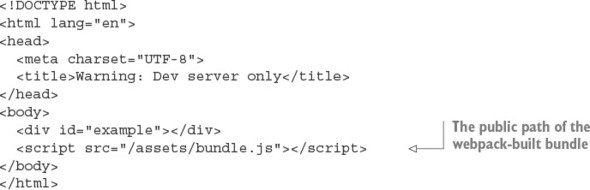
Create a new file called dist/index.html, as shown in the next listing.
Listing 4.3. An example HTML template for a React web app
Next open package.json and add the command that runs the webpack server under the scripts property:
"scripts": {
  "server:dev": "webpack-dev-server --hot –inline
     --content-base dist/ --port 3001"
 },
The --hot option makes the dev server use hot module reloading. If you edit the example React file in app/index.jsx, you should see the browser refresh. The refresh mechanism is specified with the --inline option. Inline refresh means the dev server will inject code to manage refreshing the bundle. There’s also an iframe version that wraps the entire page in an iframe.
Now run the dev server:
npm run server:dev
Running the webpack development server will trigger the build and start a server listening on port 3001. You can test everything by going to http://localhost:3001 in a browser.
Because of React and other frameworks including AngularJS, there are framework-specific hot module reloading projects. Some take into account data-flow frameworks such as Redux and Relay, which means code can be refreshed while the current state is maintained. This is the ideal way to perform code reloading, because you don’t have to keep running through steps to re-create the UI state that you’re working on.
The example we’ve given you here, however, is less React-specific and is a good way to get you started with webpack dev servers. Be sure to experiment to find the best option for your project.
4.4.4. Loading CommonJS modules and assets
We’ve been using React and Babel in this chapter, but if you’re using webpack with a more vanilla, CommonJS project, then webpack can provide everything you need without a CommonJS browser shim. It’s even capable of loading CSS files.
webpack and CommonJS
To use CommonJS module syntax with webpack, you don’t need to set anything up. Let’s say you have a file that uses require:
const hello = require('./hello');

hello();
And another that defines the hello function:
module.exports = function() {
  return 'hello';
};
Then you need only a small webpack config file to define the entry point (the first snippet), and the build destination path:
const path = require('path');
const webpack = require('webpack');

module.exports = {
  entry: './app/index.js',
  output: { path: __dirname, filename: 'dist/bundle.js' },
};
This example clarifies how different Gulp and webpack are. webpack is entirely focused on building bundles, and as part of that, is capable of generating bundles with CommonJS shims. If you open dist/bundle.js, you’ll see the webpackBootstrap shim at the top of the file, and then each file from the original source tree is wrapped in closures to simulate the module system. The following snippet is part of the bundle:
function(module, exports, __webpack_require__) {

  const hello = __webpack_require__(1);

  hello();


  /***/ },
  /* 1 */
  /***/ function(module, exports) {

  module.exports = function() {
    return 'hello';
  };
The code comments show where the modules are defined, and the files have access to module and exports objects as arguments to their closures to simulate the CommonJS module API.
Using npm packages with webpack
You can take this a step further by including modules downloaded from npm. Let’s say you want to use jQuery. Rather than making it a script tag on the page, you can install it with npm i --save-dev jquery, and then load it just like a Node module:
const jquery = require('jquery');
That means webpack gives you CommonJS modules and access to modules from npm out of the box without any additional configuration!
The webpack website has a list of loaders (https://webpack.github.io/docs/list-of-loaders.html) and plugins (https://webpack.github.io/docs/list-of-plugins.html). You can also find webpack tools on npm; the webpack keyword is a good place to start (www.npmjs.com/browse/keyword/webpack).
4.5. Summary
- If you need to automate simple tasks or invoke scripts, npm scripts are perfect.
- Gulp can be used to write more-complex tasks with JavaScript and is cross--platform.
- When gulpfiles get too long, you can divide the code into separate files.
- webpack can be used to generate client-side bundles.
- If you just need to build a client-side bundle, using webpack might be less work than setting up the equivalent script with Gulp.
- webpack supports hot module reloading, which means you’ll see code changes without refreshing your browser.