Chapter 10. Deploying Node applications and maintaining uptime
- Choosing where to host your Node application
- Deploying a typical application
- Maintaining uptime and maximizing performance
Developing a web application is one thing, but putting it into production is another. For every web technology, tips and tricks are available that can increase stability and maximize performance, and Node is no different. In this chapter, you’ll get an overview of how to choose the right deployment environment for your application, and you’ll also learn about how to maintain uptime.
The following section outlines the main types of environments you’ll deploy to. Then you’ll look at ways to maintain high uptimes.
10.1. Hosting Node applications
The web applications you’ve developed in this book use a Node-based HTTP server. A browser can talk to your application without a dedicated HTTP server such as Apache or Nginx. It’s possible to sit a server such as Nginx in front of your application, however, so Node can often be hosted anywhere you’ve previously been able to run a web server.
Cloud providers, including Heroku and Amazon, also support Node. As a result, you have three ways to run your application in a reliable and scalable way:
- Platform as a service— Run your application on Amazon, Azure, or Heroku
- Server or virtual machine— Run your application on a UNIX or Windows server in the cloud, a private hosting company, or internally at your place of business
- Container— Run your application and any other associated services by using a software container such as Docker
Choosing which of these three approaches to use can be difficult, particularly because trying them out first isn’t always easy. Note that each option isn’t tied to a particular vendor: Amazon and Azure are both capable of providing all of these deployment strategies, for example. To understand which option is right for you, this section explains their requirements as well as their advantages and disadvantages. Fortunately, every option has free or affordable options, so they should all be accessible to hobbyists and professionals alike.
10.1.1. Platform as a service
With platform as a service (PaaS), you typically prepare an application for deployment by signing up for the service, creating a new app, and then adding a Git remote to your project. Pushing to that remote deploys your application. By default, it’ll run on a single container—the exact definition of container varies among vendors—and the service will attempt to restart the application if it crashes. You’ll get limited access to logs, and web and command-line interfaces for managing your app. To scale, you’ll run more instances of your application, which carries an additional fee. Table 10.1 contains an overview of the features of a typical PaaS offering.
Table 10.1. PaaS features
| Ease of use | High |
| Features | Git push to deploy, simple horizontal scalability |
| Infrastructure | Abstracted/black box |
| Commercial suitability | Good: applications are typically network isolated |
| Pricing[1] | Low traffic: $$; Popular site: $$$$ |
| Vendors | Heroku, Azure, AWS Elastic Beanstalk |
$: Cheap, $$$$$: Expensive
PaaS providers support their own preferred database and third-party databases. For Heroku, this is PostgreSQL; and for Azure, it’s SQL Database. The database connection details will be in environment variables, so you can connect without adding database credentials to your project’s source code. PaaS is great for hobbyists, because it can be cheap or even sometimes free to run small projects with low traffic.
Some vendors are easier to use than others: Heroku is extremely easy for programmers familiar with Git, even with little or no sysadmin or DevOps knowledge. PaaS systems typically know how to run projects made with popular tools such as Node, Rails, and Django, so they’re almost plug-and-play.
Example: Node on Heroku in 10 minutes
In this section, you'll deploy an application to Heroku. Using Heroku’s default settings, you'll deploy the application to a single lightweight Linux container-, known as a dyno in Heroku’s terminology, to serve your application. To deploy a basic Node app to Heroku, you need the following prerequisites:
- An app to deploy
- An account with Heroku: https://signup.heroku.com/
- The Heroku CLI: https://devcenter.heroku.com/articles/heroku-cli
After you have these elements, sign in to Heroku on the command-line:
heroku login
Heroku then prompts you to enter your email address and Heroku password. Next, make a simple Express app:
mkdir heroku-example
npm i -g express-generator
express
npm i
You can run npm start and visit http://localhost:3000 to ensure that everything is running correctly. The next step is to make a Git repository and create a Heroku application:
git init
git add .
git commit –m 'Initial commit'
heroku create
git push heroku master
This displays a randomly generated URL for your application, and a Git remote. Whenever you want to deploy, commit your changes with Git and push to heroku master. You can change the URL and the name of the application with heroku rename.
Now visit the herokuapp.com URL from the previous step to see your basic Express app. To see the application logs, run heroku logs, and to get a shell in the application’s dyno, run heroku run bash.
Heroku is a quick and easy way to run a Node application. Notice that you don’t have to do any Node-specific tailoring—Heroku runs basic Node apps out of the box without extra configuration. Sometimes you need more control over the environment, however, so in the next section we introduce using servers for hosting Node apps.
10.1.2. Servers
Getting your own server has some advantages over PaaS. Instead of worrying about where to run the database, you can install PostgreSQL, MySQL, or even Redis on the same server if you want. You can install anything you like: custom logging software, HTTP servers, caching layers—it’s up to you. Table 10.2 summarizes the main characteristics of running your own servers.
Table 10.2. Server features
| Ease of use | Low |
| Features | Complete control over the whole stack, run your own database and caching layer |
| Infrastructure | Open to the developer (or sysadmin/DevOps) |
| Commercial suitability | Good if you have staff capable of maintaining the server |
| Pricing | Small VM: $; Large hosted server: $$$$$ |
| Vendors | Azure, Amazon, hosting companies |
You can obtain and maintain a server in various ways. You can get a cheap virtual machine from a company such as Linode or Digital Ocean; this will be a full server that you can configure however you like, but it’ll share resources with other virtual machines on the same hardware. You can also buy your own hardware or rent a server. Some hosting companies offer managed hosting, whereby they’ll help maintain the server’s operating system.
You have to decide which operating system you want to use. Debian has several flavors, and Node also works well in Windows and Solaris, so the choice is more difficult than it seems.
Another critical decision is how to expose your app to the world: traffic can be redirected from port 80 and 443 to your app, but you could also sit Nginx in front of it to proxy requests and potentially handle static files.
You have various ways to move your code from your repository to the server as well. You can manually copy files with scp, sftp, or rsync, or you can use Chef to control multiple servers and manage releases. Some people set up a Heroku-like Git hook that will automatically update the app on the server, based on pushes to a certain Git branch.
The important thing to realize is that managing your own server is difficult. Configuration takes a lot of work, and the server also has to be maintained with the latest OS bug fixes and security updates. If you’re a hobbyist, this may put you off—but you’ll learn a lot and may discover an interest in DevOps.
Running Node apps on a virtual machine or full server doesn’t require anything special. If you want to see some of the techniques used to run a Node app on a server and keep it running for long periods of time, skip forward to section 10.2, Understanding deployment basics. Otherwise, continue reading to learn about Node and Docker.
10.1.3. Containers
Using software containers is a kind of OS virtualization that automates the deployment of applications. The most well-known project is Docker, which is open source but also has commercial services that help you deploy production applications. Table 10.3 shows the main features of containers.
Table 10.3. Server features
| Ease of use | Medium |
| Features | Complete control over the whole stack, run your own database and caching layer, redeploy to various providers and local machines |
| Infrastructure | Open to the developer (or sysadmin/DevOps) |
| Commercial suitability | Great: deploy to a managed host, Docker host, or your own datacenter |
| Pricing | $$$ |
| Vendors | Azure, Amazon, Docker Cloud, Google Cloud Platform (with Kubernetes), hosting companies that allow you to run Docker containers |
Docker allows you to define your application in terms of images. If you’ve built a typical content management system that has a microservice for image processing, a main service for storing application data, and then a back-end database, you could deploy it with four separate Docker images:
- Image 1— Microservice for resizing images that are uploaded to the CMS
- Image 2— PostgreSQL
- Image 3— Your main CMS web application with the administration interface
- Image 4— The public front-end web application
Because Docker is open source, you’re not limited to a single vendor for deploying Dockerized applications. You can use Amazon’s Elastic Beanstalk to deploy your images, Docker Cloud, or even Microsoft’s Azure. Amazon also offers EC2 Container Service (ECS), and AWS CodeCommit for cloud Git repositories, which can be deployed to Elastic Beanstalk in a similar fashion to Heroku.
The amazing thing about using containers is that after you’ve containerized your app, you can bring up a fresh instance of it with a single command. If you get a new computer, you just need to check out your app’s repository, install Docker locally, and then run the script to start your app. Because your application has a well-defined recipe for deployment, it’s easier for you and your collaborators to understand how your application is supposed to run outside the local development environment.
Example: Running Node apps with Docker
Example: https://nodejs.org/en/docs/guides/nodejs-docker-webapp/
To run a Node app with Docker, you need to do a few things first:
- Install Docker: https://docs.docker.com/engine/installation/.
- Create a Node app. Refer to section 10.1.1, Platform as a service, for details on how to quickly make an example Express app.
- Add a new file to the project called Dockerfile.
The Dockerfile tells Docker how to build your application’s image, and how to install the app and run it. You’ll use the official Node Docker image (https://hub.docker.com/_/node/) by specifying FROM node:boron in the Dockerfile, and then run npm install and npm start with the RUN and CMD instructions. The following snippet is a full Dockerfile that works for simple Node apps:
FROM node:argon

RUN mkdir -p /usr/src/app
WORKDIR /usr/src/app

COPY package.json /usr/src/app/
RUN npm install

COPY . /usr/src/app

EXPOSE 3000
CMD ["npm", "start"]
After you’ve created the Dockerfile, run the docker build (https://docs.docker.com/engine/reference/commandline/build/) command in the terminal to create an application image. You need to specify only the directory to build, so if you’re in the example Express app, you should be able to type docker build . to build the image and send it to the Docker daemon.
Run docker images to see a list of images. Get the image ID, and then run docker run -p 8080:3000 -d <image ID> to run the app. We’ve bound the internal port (3000) to 8080 on localhost, so to access the app, we used http://localhost:8080 in a browser.
10.2. Understanding deployment basics
Suppose you’ve created a web application that you want to show off, or maybe you’ve created a commercial application and need to test it before putting it into full production. You’ll likely start with a simple deployment, and then do some work later to maximize uptime and performance. In this section, we walk you through a simple, temporary Git deployment, as well as details on how to keep the application up and running with Forever. Temporary deployments don’t persist beyond reboots, but they have the advantage of being quick to set up.
10.2.1. Deploying from a Git repository
Let’s quickly go through a basic deployment using a Git repository to give you a feel for the fundamental steps. Deployment is most commonly done by following these steps:
- Connect to a server by using SSH.
- Install Node and version-control tools (such as Git or Subversion) on the server if needed.
- Download application files, including Node scripts, images, and CSS style sheets, from a version-control repository to the server.
- Start the application.
Here’s an example of an application starting after downloading the application files using Git:
git clone https://github.com/Marak/hellonode.git
cd hellonode
node server.js
Like PHP, Node doesn’t run as a background task. Because of this, the basic deployment we've outlined requires keeping the SSH connection open. As soon as the SSH connection closes, the application will terminate. Luckily, it’s fairly easy to keep your application running by using a simple tool.
You can automate deployment of your Node application in various ways. One is to use a tool such as Fleet (https://github.com/substack/fleet), which allows you to deploy to one or more servers by using git push. A more traditional approach is to use Capistrano, as detailed in the “Deploying node.js applications with Capistrano” post on Evan Tahler’s Bricolage blog (https://blog.evantahler.com/deploying-node-js-applications-with-capistrano-af675cdaa7c6#.8r9v0kz3l).
10.2.2. Keeping Node running
Let’s say you’ve created a personal blog by using the Ghost blogging application (https://ghost.org/), and you want to deploy it, making sure that it stays running even if you disconnect from SSH.
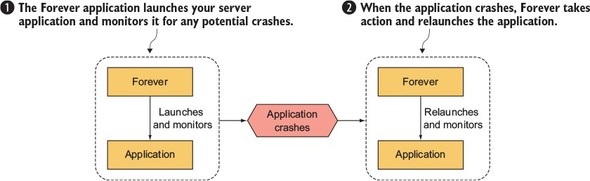
The most popular tool in the Node community for dealing with this is Nodejitsu’s Forever (https://github.com/foreverjs/forever). It keeps your application running after you disconnect from SSH and, additionally, restarts it if it crashes. Figure 10.1 shows, conceptually, how Forever works.
Figure 10.1. The Forever tool helps you keep your application running, even if it crashes.
You can install Forever globally by using the sudo command.
The sudo command
Sometimes when installing an npm module globally (with the -g flag), you need to prefix the npm command with the sudo command (www.sudo.ws) in order to run npm with superuser privileges. The first time you use the sudo command, you’ll be prompted to enter your password. Then the command specified after it will be run.
If you’re following along, install Forever now by using this command:
npm install -g forever
After you’ve installed Forever, you can use it to start your blog and keep it running with the following command:
forever start server.js
If you want to stop your blog for some reason, you can use Forever’s stop command:
forever stop server.js
When using Forever, you can get a list of applications that the tool is managing by using its list command:
forever list
Another useful capability of Forever is that it can optionally restart your application when any source files have changed. This frees you from having to manually restart each time you add a feature or fix a bug.
To start Forever in this mode, use the -w flag:
forever -w start server.js
Although Forever is an extremely useful tool for deploying applications, you may want to use something more full-featured for long-term deployments. In the next section, you’ll look at some industrial-strength monitoring solutions and see how to maximize application performance.
10.3. Maximizing uptime and performance
When a Node application is release-worthy, you’ll want to make sure it starts and stops when the server starts and stops, and that it automatically restarts when the server crashes. It’s easy to forget to stop an application before a reboot or to forget to restart an application afterward.
You’ll also want to make sure you’re taking steps to maximize performance. For example, it makes sense when you’re running your application on a server with a quad-core CPU to not use only a single core. If you’re using only a single core and your web application’s traffic increases significantly, a single core may not have the processing capability to handle the traffic, and your web application won’t be able to consistently respond.
In addition to using all CPU cores, you’ll want to avoid using Node to host static files for high-volume production sites. Node is geared toward interactive applications, such as web applications and TCP/IP protocols, and it can’t serve static files as efficiently as software optimized to do only that. For serving static files, you should use technologies such as Nginx (http://nginx.org/en/), which specializes in serving static files. Alternatively, you could upload all your static files to a content delivery network (CDN), such as Amazon S3 (http://aws.amazon.com/s3/), and reference those files in your application.
This section covers some server uptime and performance tips:
- Using Upstart to keep your application up and running through restarts and crashes
- Using Node’s cluster API for multicore processors
- Serving Node application static files using Nginx
Let’s start by looking at a powerful and easy-to-use tool for maintaining uptime: Upstart.
10.3.1. Maintaining uptime with Upstart
Let’s say you’re happy with an application and want to market it to the world. You want to make dead sure that if you restart a server, you don’t then forget to restart your application. You also want to make sure that if your application crashes, it’s not only automatically restarted, but the crash is logged and you’re notified, which allows you to diagnose any underlying issues.
Upstart (http://upstart.ubuntu.com) is a project that provides an elegant way to manage the starting and stopping of any Linux application, including Node applications. Modern versions of Ubuntu and CentOS support the use of Upstart. An alternative for macOS is to create launchd files (node-launchd on npm can do this), and the Windows equivalent is to use Windows Services, which is supported by the node-windows package on npm.
You can install Upstart on Ubuntu, if it’s not already installed, with this command:
sudo apt-get install upstart
You can install Upstart on CentOS, if it’s not already installed, with this command:
sudo yum install upstart
After you install Upstart, you need to add an Upstart configuration file for each of your applications. These files are created in the /etc/init directory and are named something like my_application_name.conf. The configuration files don't need to be marked as executable.
The following creates an empty Upstart configuration file for this chapter’s example application:
sudo touch /etc/init/hellonode.conf
Now add the contents of the following listing to your config file. This setup will run the application when the server starts and will stop the application upon shutdown. The exec section gets executed by Upstart.
Listing 10.1. A typical Upstart configuration file
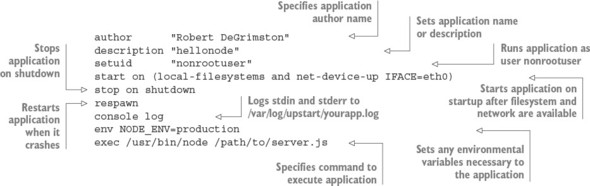
This configuration will keep your process up and running after the server restarts and even after it crashes unexpectedly. All the application-generated output will be sent to /var/log/upstart/hellonode.log, and Upstart will manage the log rotation for you.
Now that you’ve created an Upstart configuration file, you can start your application by using the following command:
sudo service hellonode
If your application was started successfully, you’ll see a line like this:
hellonode start/running, process 6770
Upstart is highly configurable. Check out the online cookbook (http://upstart.ubuntu.com/cookbook/) for all the available options.
Upstart and respawning
When the respawn option is used, Upstart will by default continually reload your application on crashes unless the application is restarted 10 times within 5 seconds. You can change this limit by using the respawn limit COUNT INTERVAL option, where COUNT is the number of times within the INTERVAL, which is specified in seconds. For example, you set a limit of 20 times in 5 seconds like this:
respawn
respawn limit 20 5
If your application is reloaded 10 times within 5 seconds (the default limit), typically there’s something wrong in the code or configuration, and it will never start successfully. Upstart won’t try to restart after reaching the limit, in order to save resources for other processes.
It’s a good idea to do health checks outside Upstart that provide alerts to the development team through email or some other means of quick communication. A health check, for a web application, can simply involve hitting the website and seeing whether you get a valid response. You could roll your own methods or use tools such as Monit (http://mmonit.com/monit/) or Zabbix (www.zabbix.com) for this.
Now that you know how to keep your application running regardless of crashes and server reboots, the next logical concern is performance. Node’s cluster API can help with this.
10.3.2. The cluster API: taking advantage of multiple cores
Most modern computer CPUs have multiple cores, but a Node process uses only one of them when running. If you're hosting a Node application on a server and want to maximize the server’s usage, you can manually start multiple instances of your application on different TCP/IP ports and use a load balancer to distribute web traffic to these instances, but that’s laborious to set up.
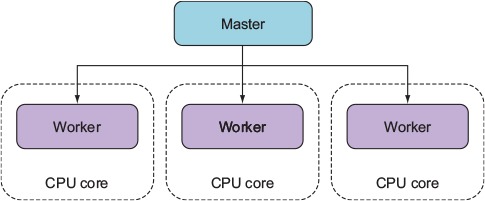
To make it easier to use multiple cores for a single application, the cluster API was added to Node. This API makes it easy for your application to simultaneously run multiple workers on different cores that each do the same thing and respond to the same TCP/IP port. Figure 10.2 shows how an application’s processing would be organized using the cluster API on a four-core processor.
Figure 10.2. A master spawning three workers on a four-core processor
The following listing automatically spawns a master process and a worker for each additional core.
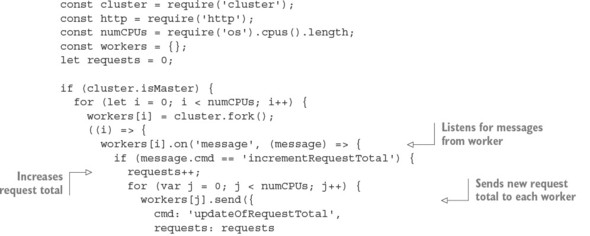
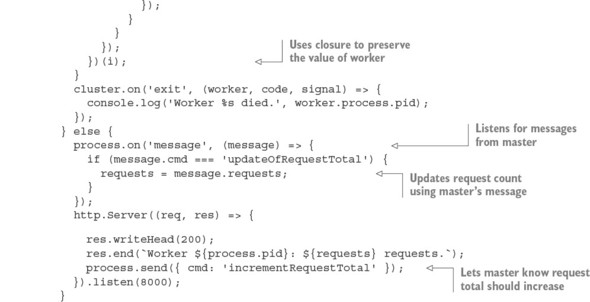
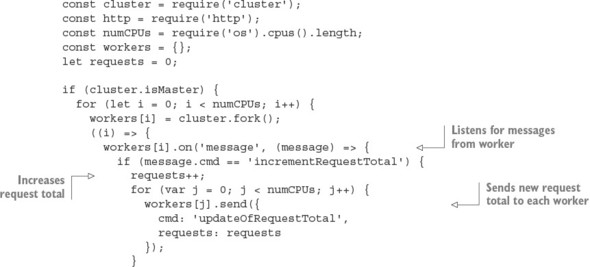
Listing 10.2. A demonstration of Node’s cluster API
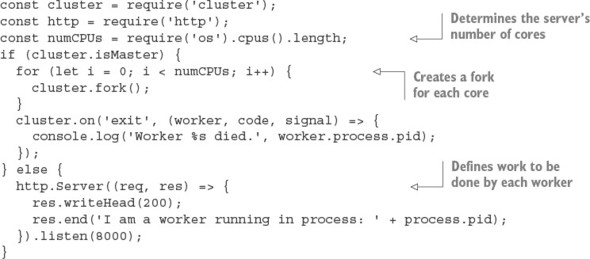
Because masters and workers run in separate operating system processes, which is necessary if they’re to run on separate cores, they can’t share state through global variables. But the cluster API does provide a means for the master and workers to communicate.
The following listing shows an example in which messages are passed between the master and the workers. A count of all requests is kept by the master, and whenever a worker reports handling a request, it’s relayed to each worker.
Listing 10.3. A demonstration of Node’s cluster API
Using Node’s cluster API is a simple way of creating applications that take advantage of modern hardware.
10.3.3. Hosting static files and proxying
Although Node is an effective solution for serving dynamic web content, it’s not the most efficient way to serve static files such as images, CSS style sheets, or client-side JavaScript. Serving static files over HTTP is a specific task for which specific software projects are optimized, because they’ve focused primarily on this task for many years.
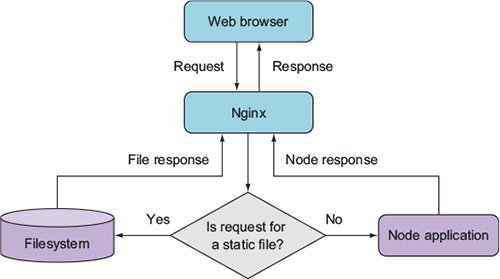
Fortunately, Nginx (http://nginx.org/en/), an open source web server optimized for serving static files, is easy to set up alongside Node to serve those files. In a typical Nginx/Node configuration, Nginx initially handles each web request, relaying requests that aren’t for static files back to Node. Figure 10.3 illustrates this configuration.
Figure 10.3. You can use Nginx as a proxy to relay static assets quickly back to web clients.
The configuration in the following listing, which would be put in the Nginx configuration file’s http section, implements this setup. The configuration file is conventionally stored in a Unix server’s /etc directory at /etc/nginx/nginx.conf.
Listing 10.4. A configuration file that uses Nginx to proxy Node.js and serve static files

By using Nginx to handle your static web assets, you ensure that Node is dedicated to doing what it does best.
10.4. Summary
- Node applications can be hosted by PaaS providers, dedicated services, virtual private servers, and cloud hosting.
- You can quickly deploy Node applications to Linux servers by using Forever and Upstart.
- To make your application perform better, Node’s cluster module lets you run multiple processes.