Chapter 11. Writing command-line applications
- Designing command-line applications by using common conventions
- Communicating with pipes
- Using exit codes
Node command-line utilities are used everywhere, from project automation tools, such as Gulp and Yeoman, to XML and JSON parsers. If you’ve ever wondered how to build command-line tools with Node, this chapter will show you everything you need to know to get started. You’ll learn how Node programs accept command-line arguments and how to handle I/O with pipes. We’ve also included shell tips that will help you use the command line more effectively.
Although writing command-line tools with Node isn’t hard, it’s important to follow community conventions. This chapter includes many of these conventions so you’ll be able to write tools that other people can use, without too much documentation.
11.1. Understanding conventions and philosophy
A big part of command-line development is understanding the conventions used by established programs. As a real-world example, take a look at Babel:
Usage: babel [options] <files ...>

Options:

  -h, --help                           output usage information
  -f, --filename [filename]            filename to use when reading from stdin
[ ... ]
  -q, --quiet                          Don't log anything
  -V, --version                        output the version number
Several points are worth noting here. The first is the use of both -h and --help for printing help: this is a flag that many programs use. The second flag is -f for filename—this is an easy mnemonic to learn. Lots of flags are based on mnemonics. Using -q for quiet output is also a popular convention, and so is -v for showing the program’s version. Your applications should include these flags.
This user interface isn’t merely a convention, however. The use of the hyphen and double hyphen (--) is recognized by the Open Group’s Utility Conventions.[1] This document even specifies how they should be used:
The Open Group Base Specifications Issue 7,” http://pubs.opengroup.org/onlinepubs/9699919799/basedefs/V1_chap11.html.
- Guideline 4— All options should be preceded by the - delimiter character.
- Guideline 10— The first -- argument that’s not an option-argument should be accepted as a delimiter indicating the end of options. Any following arguments should be treated as operands, even if they begin with the - character.
Another aspect of command-line application design is philosophy. This dates back to the creators of UNIX, who wanted to design “small, sharp tools” that could be used together with a simple, text-based interface.
This is the UNIX philosophy: Write programs that do one thing and do it well. Write programs to work together. Write programs to handle text streams, because that is a universal interface.
Doug McIlroy[2]
Basics of the Unix Philosophy”, www.catb.org/~esr/writings/taoup/html/ch01s06.html.
In this chapter, we provide a broad overview of shell techniques and UNIX conventions so you can design command-line tools that other people can use. We offer guidance for Windows-specific usage as well, but for the most part, your Node tools should be cross-platform by default.
If you get stuck when using the shell, try typing man <cmd>. This loads the manual page for the command.
If you can’t remember the command’s name, you can use apropos <cmd> to search the database of system commands.
11.2. Introducing parse-json
For JavaScript programmers, one of the simplest useful applications reads JSON and prints it if it’s valid. By following this chapter, you’ll re-create this tool.
Let’s start with what a command line for this application should look like. The following snippet shows how to invoke such a program:
node parse-json.js -f my.json
The first thing you need to do is figure out how to grab -f my.json from the command line; these are the program’s arguments. You also need to read input from stdin. Read on to learn how to do both of these things.
11.3. Using command-line arguments
Most—but not all—command-line programs accept arguments. Node has a built-in way to handle these arguments, but third-party modules on npm offer extra features. You need these features in order to implement some widely used conventions. Read on to learn more.
11.3.1. Parsing command-line arguments
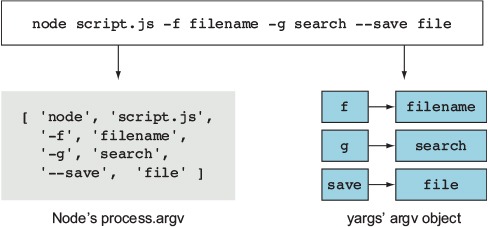
Command-line arguments can be accessed by using the process.argv array. The items in the array are the strings passed to the shell when running a command. So if you split up the command, you can figure out what each item in the array is. The item at process.argv[0] is node, the item at process.argv[1] is parse-json.js, [2] is -f, and so forth.
If you’ve ever used command-line applications before, you may have seen arguments with - or --. These prefixes are special conventions for passing options to applications: -- denotes a full string for an option name, and - denotes a single character for an option name. The npm command-line binary is a great example of this with -h and --help.
Other argument conventions are as follows:
- --version to print the version of your application
- -y or --yes to use default values for any missing options
Adding aliases for arguments, such as -h and –-help, makes parsing awkward after you add support for several options, but luckily there’s a module for parsing arguments called yargs. The following snippet shows how yargs works in the simplest case. All you need to do is require yargs, and then access the argv property to inspect the arguments that were passed to the script:
const argv = require('yargs').argv;
console.log({ f: argv.f });
Figure 11.1 shows how Node’s built-in version of the command-line arguments differs from the object generated by yargs.
Figure 11.1. Node’s argv compared to yargs
Although an options object is useful, it doesn’t provide much structure for validating arguments and generating usage text. The next section shows how to describe and validate arguments.
11.3.2. Validating arguments
The yargs module includes methods for validating the arguments. The following listing shows how to use yargs to parse the -f argument that your JSON parser will need, and it uses the describe and nargs methods to enforce the expected argument format.
Listing 11.1. Using yargs to parse command-line arguments
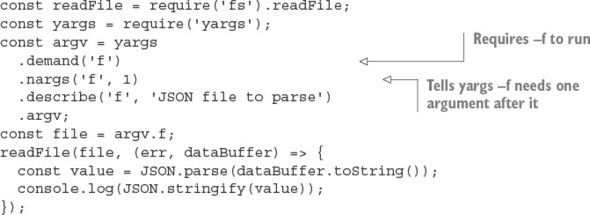
Using yargs is easier than manipulating the process.argv array, and it’s better because rules can be enforced. Listing 11.1 uses demand to force an argument, and then declares that it requires a single parameter, which will be the JSON file to parse. To make the program easier to use, you can provide usage text with yargs as well. The convention here is to print the usage text when -h or --help is passed. You can add these with the help of yargs, as shown in this snippet:
yargs
  // ...
  .usage('parse-json [options]')
  .help('h')
  .alias('h', 'help')
  // ...
Now your JSON parser can accept a file argument and process the file. File handling isn’t yet finished for this project, however, because it also needs to accept stdin. Read on to learn how to do that with a common UNIX convention.
Your shell stores a log of the commands you’ve typed previously. Type history to view the log; this is often aliased to h.
11.3.3. Passing stdin as a file
If a file parameter is given as a hyphen (-f -), it means grab the data from stdin. This is another common command-line convention. You can use the mississippi package to do this easily. You have to concatenate all the data piped to your application prior to calling JSON.parse, though, because it expects a full JSON string to parse. With the mississippi module, the example now looks like the following listing.
Listing 11.2. Reading a file from stdin
#!/usr/bin/env node
const concat = require('mississippi').concat;
const readFile = require('fs').readFile;
const yargs = require('yargs');
const argv = yargs
  .usage('parse-json [options]')
  .help('h')
  .alias('h', 'help')
  .demand('f') // require -f to run
  .nargs('f', 1) // tell yargs -f needs 1 argument after it
  .describe('f', 'JSON file to parse')
  .argv;
const file = argv.f;
function parse(str) {
  const value = JSON.parse(str);
  console.log(JSON.stringify(value));
}

if (file === '-') {
  process.stdin.pipe(concat(parse));
} else {
  readFile(file, (err, dataBuffer) => {
    if (err) {
      throw err;
    } else {
      parse(dataBuffer.toString());
    }
  });
}
This code loads mississippi and calls it concat. It then uses concat with the stdin stream. Because mississippi accepts a function that receives the final full set of data, the original parse function from listing 11.1 can still be used. This is done only when the filename is -.
11.4. Sharing command-line tools with npm
Any application that you want others to be able to use should be easily installed with npm. The simplest way to make npm see a command-line application is to use the bin field in package.json. This field makes npm install an executable available to any scripts in the current project. The bin field also tells npm to install the executable globally if you use npm install --global. This isn’t useful only for Node developers, but also for anyone else who might want to use your scripts.
This snippet and the #!/usr/bin/env node line in listing 11.2 are all you need for the JSON parser example in this chapter:
...
    "name": "parse-json",
    "bin": {
      "parse-json": "index.js"
    },
...
If you install this package with npm install –global, it will make the parse-json command available systemwide. To try it, open a terminal (or command prompt in Windows) and type parse-json. Note that this works even in Windows, because npm will automatically install a wrapper enabling it to work in Windows transparently.
11.5. Connecting scripts with pipes
The parse-json program is simple—it accepts text and validates it. What if you have other command-line tools that you want to use it with? Imagine you have a program that can add syntax highlighting to JSON files. It would be great if the JSON could be parsed first and then highlighted. In this section, you’ll learn about pipes, which can do all of this and more.
You’ll be using parse-json and other programs to perform fancy workflows with pipes. Windows and Unix shells differ, but the important bits are (luckily) the same in both shells. A few differences arise during debugging, but they shouldn’t affect you when you’re writing command-line applications.
11.5.1. Piping data into parse-json
The main way to connect command-line applications is called piping. Piping is taking an application’s stdout and attaching it to a different process’s stdin stream. It’s the central component of interprocess communication: enabling programs to talk to each other. You can access stdin in Node with process.stdin because it’s a readable stream. Look at the following code to parse JSON coming in from stdin:
echo "[1,2,3]" | parse-json -f –
Notice the | character. This tells the shell that echo '{}' should send its output to parse-json’s stdin.
Now that you’ve seen how pipes work, you can search the command history by combining history with grep:
history | grep node
An even better way to access previous commands is by using the up and down arrows on the keyboard. People do this all the time—but there’s an even better way! Type Ctrl-R to recursively search through the command history. This lets you fish out lengthy commands based on a partial text match.
Here are more shortcuts: Ctrl-S does a forward search, and Ctrl-G aborts the search. You can also edit text more efficiently with these shortcuts: Ctrl-W deletes words, ALT-F/B moves forward or backward one word, and Ctrl-A/E moves to the start or end of the line.
11.5.2. Working with errors and exit codes
Right now the program doesn’t output anything. But if you give it incorrect data, how do you know that it was able to complete successfully, even if you don’t know the expected output of an executable? The answer is the exit code. You can see the exit code of the last command you ran, but note that the echo and node commands are treated as a single command unit because of piping.
On Windows, you can inspect the exit code with the following:
echo %errorlevel%
On UNIX, you can see the exit code by using this command:
echo $?
If a command is successful, it has an exit code of 0 (zero). So if you feed incorrect JSON to the script, it should exit with a nonzero value:
parse-json -f invalid.json
If you run this, the application will exit with a nonzero status and print a message indicating the reason. This is because when an error is thrown but not caught, Node automatically exits and prints the error message.
error streams
Although printing your output to the console can be useful, saving it to a file to read is even better, because you can keep it for debugging purposes. Luckily, you can do this with the shell by redirecting the stdout stream:
echo 'you can overwrite files!' > out.log
echo 'you can even append to files!' >> out.log
When you try this with invalid JSON, it would make sense for parse-json to save the error message:
parse-json -f invalid.json >out.log
But doing this won’t log any errors. This is the expected behavior once you understand the difference between stderr and stdout:
- stdout is for other command-line applications to consume.
- stderr is for developers to consume.
Node logs to stderr when console.error is called or an error is thrown. This is different from echo, which logs to stdout, just like console.log. With that knowledge, you may want to redirect stderr to a file instead of to stdout. Luckily, that’s a simple change.
The stdin, stdout, and stderr streams all have associated numbers, from 0 to 2, respectively. stderr has a stream number of 2. You can redirect it by using 2> out.log, which tells the shell the stream number you want to redirect and the file in which to place the output:
parse-json -f invalid.json 2> out.log
Redirecting output is what piping does, but with processes instead of files. Take the following snippet:
node -e "console.log(null)" | parse-json
You’re logging null and piping it to parse-json. null won’t be logged to the console here because it’s being piped to only the next command. Say you do something similar, but use console.error:
node -e "console.error(null)" | parse-json
You’ll see an error because no text is being sent over to parse-json to consume. null was logged to stderr and will be printed to the console. The data should be piped to stdout and not stderr.
Figure 11.2 shows how pipes and numbered output streams can be used to connect programs and then route the output into separate files.
Figure 11.2. Combining pipes and output streams

Node also has an API for working with pipes. It’s based on Node streams, so you can use it with anything that implements Node’s stream classes. Read on to learn more about pipes in Node.
Some of these commands are pretty long; what do you do when you need to delete a long command and don’t want to run it? One useful shortcut is Ctrl-U, which deletes the current line. If you type Ctrl-Y, you’ll get the line back, so you can use these keyboard commands as you’d use copy and paste.
11.5.3. Using pipes in Node
You’re now going to learn how pipes work by using Node’s API. To do this, you’ll write a short script that displays how long it takes a program to run, without interrupting piping.
A program can monitor a pipe without interrupting it by waiting for stdin to close and then piping the results to stdout. Because Node programs end when there’s no more input to consume, you can print a message when the program is exiting. Here’s an example, which you can save as time.js to try it out:
process.stdin.pipe(process.stdout);
const start = Date.now();
process.on('exit', () => {
  const timeTaken = Date.now() - start;
  console.error(`Time (s): ${timeTaken / 1000}`);
});
By piping to stdout again, you can put time.js in the middle of commands you pipe together and still have them work! In fact, both parse-json and time.js can easily be used together with pipes. For example, this shows how long it takes to parse JSON and send the data:
parse-json -f test.json | node time.js
Now that you have a basic idea of what to output and how to get input from other applications, you can start making applications that are much more complex. But first, we should talk about timing while processes are piping to each other.
In addition to providing command history, most shells are capable of matching commands or files when the Tab key is pressed. Some even allow you to see the completions with Alt-?.
11.5.4. Pipes and command execution order
When you pipe commands, each command starts immediately. The commands don’t wait for each other in any way. This means piping data won’t wait for any command to exit, and you can consume only the data it gives you. Because the commands don’t wait, you can’t know how the previous command exited.
Imagine you want to log a message only when JSON is successfully parsed. To do this, you need new operators. The && and || operators act similarly in a shell to the way they do in JavaScript when used on numbers. Using && executes the next command if the previous exit code is zero, and || executes the next command if the exit code is a nonzero number.
Let’s see how to make a little script that logs a message when a process is exiting over stderr. It’s important to note that this is different from echo, because it’s printing to stderr—it’s meant for developers to use rather than other programs. All you need to do is listen for the process exit event, and then write the arguments to stderr:
process.stdin.pipe(process.stdout);
process.on('exit', () => {
  const args = process.argv.slice(2);
  console.error(args.join(' '));
});
Using &&, you can call exit-message.js if the JSON parsed successfully:
parse-json -f test.json && node exit-message.js "parsed JSON successfully"
But exit-message.js won’t get the output of parse-json. The && operator must wait for parse-json.js to finish, to see whether it should execute the next command. While using &&, there’s no automatic redirection as there is when piping.
Redirecting input
You’ve already seen how to redirect output, but you can also redirect input in a similar fashion. This is a rare need, but can be a valuable asset if an executable doesn’t accept a filename as an argument. If you want a command to read a file into stdin, use <filename to do so:
parse-json -f - <invalid.json
By combining both forms of redirection, you can use a temporary file to recover the output of parse-json:
parse-json -f test.json >tmp.out &&
  node exit-message.js "parsed JSON successfully" <tmp.out
Now that you’ve learned how to handle streams, exit codes, and command order, you should be able to write scripts with Node commands for your own packages. The next section demonstrates how to use Browserify and UglifyJS together using pipes.
You may sometimes cat binary data to the terminal and basically break it. Like a scene from The Matrix, garbled characters will appear everywhere. In cases like this, you can either press Ctrl-L to refresh the display or type reset to reset the terminal.
11.6. Interpreting real-world scripts
You’re ready to start writing your own scripts fields in package.json files. As an example, let’s look at how to combine the browserify and uglifyjs packages from npm. Browserify (http://browserify.org/) is an application that takes Node modules and bundles them up for use in the browser. UglifyJS (https://github.com/mishoo/UglifyJS2) is an application that minifies a JavaScript file so that it takes up less bandwidth and time to send to a browser. Your script will take a file called main.js (found in the book’s listings under ch11-command-line/snippets/uglify-example), concatenate it for use in a browser, and then minify the concatenated script:
{
  "devDependencies": {
    "browserify": "13.3.0",
    "uglify-js": "2.7.5"
  },
  "scripts": {
    "build": "browserify -e main.js > bundle.js && uglifyjs bundle.js > bundle.min.js"
  }
}
You can run the build script by typing npm run build. The build script in this example makes bundle.js. Then, if creating bundle.js is successful, the script creates bundle.min.js. By using the && operator, you can ensure that the second stage runs only if the first stage succeeds.
Using the techniques demonstrated in this chapter, you can create and use command-line applications. Remember, you can always use the command lines to combine scripts from other languages together—if you have a useful Python, Ruby, or Haskell command-line program, you can easily use it with your Node programs.
11.7. Summary
- Command-line arguments can be read from process.argv.
- Modules such as yargs make it easier to parse and validate arguments.
- A handy way to add scripts to your Node projects is by defining npm scripts in the package.json file.
- Data is read and written to command-line programs by using standard I/O pipes.
- Standard input, output, and errors can be redirected to different processes and files.
- Programs emit exit codes that are used to determine whether they ran successfully.
- Command-line programs adhere to established conventions that other users will expect.