Chapter 12. Conquering the desktop with Electron
- Building desktop apps with Electron
- Showing desktop menus
- Sending desktop notifications
- Creating cross-platform builds
In the preceding chapter, you learned about building command-line tools with Node. Node is starting to become prominent in another area, however: desktop software. Programmers are increasingly harnessing web technology to solve the problems of cross-platform development. In this chapter, you’ll learn how to make a desktop web application based on native desktop features, Node, and client-side web technology. You can develop and run this application in Linux, macOS, and Windows. You’ll also use Node modules in a model that isn’t too far removed from client-server web application development.
12.1. Introducing Electron
Electron, originally known as Atom Shell, enables you to build desktop applications with web technology. The application and user interface are left up to you to create with HTML, CSS, and JavaScript, but some of the “hard parts” of desktop software are provided for you. These include the following:
- Automatic updates
- Crash reporting
- Installers for Microsoft Windows
- Debugging
- Native menus and notifications
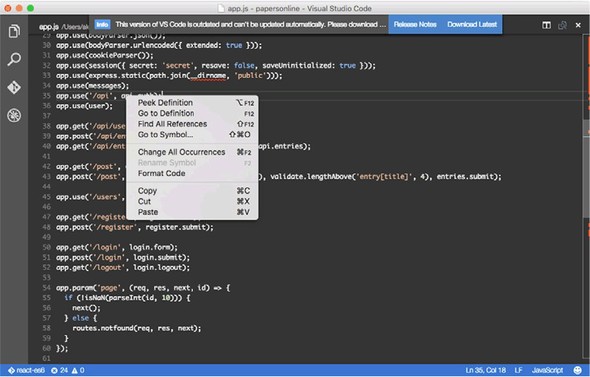
Some famous applications have been made with Electron. The first was Atom, GitHub’s text editor, but more recent applications include Slack, the popular chat service, and Visual Studio Code by Microsoft, shown in figure 12.1.
Figure 12.1. Visual Studio Code’s application window and a native context menu
You should try out some of these applications to see the kinds of things that are possible with Electron. It’s exciting to think that armed with Node and JavaScript skills, you can build compelling desktop software.
12.1.1. Electron’s stack
Before getting started with Electron, you should familiarize yourself with the way Electron fits in with Node, HTML, and CSS. An Electron app has the following components:
- The main process— A Node script that boots the application and provides access to native Node modules
- The render process— A web page managed by Chromium
A real application, however, has several other dependencies. The previous list can be fleshed out as follows:
- Includes the main process
- Connects to a native database (for example, SQLite)
- Communicates with web APIs
- Reads and writes any local files (for example, configuration files)
- Provides access to native features (for example, context menus)
- Includes the render process
- Shows a modern rich web application using your preferred client-side technology (for example, React or Angular)
- Triggers native features (for example, context menus and notifications)
- Provides build scripts
- Generates the front-end JavaScript by using your preferred build system (Grunt, Gulp, npm scripts)
- Prepares releases for distribution
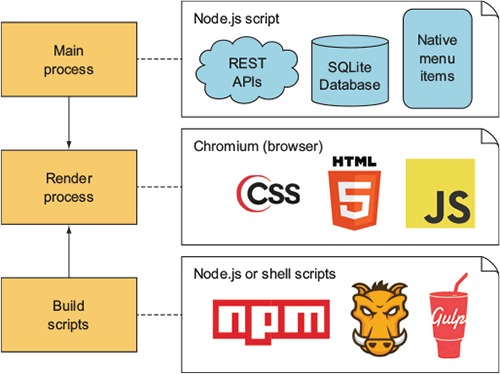
Figure 12.2 shows an overview of the three main parts of a typical Electron app. As you can see, Node is used to run the main process and to communicate with the operating system for services including opening files, reading and writing to a database, and communicating with web services. Although a large part of the focus is on the UI in the rendering process, Node is still used for a critical part of the application’s architecture.
Figure 12.2. The main parts of a typical Electron application
12.1.2. Interface design
Now that you’ve seen the main components of an Electron app, let’s look at how to design suitable interfaces. Electron applications are based on HTML, CSS, and Java-Script, so you can’t pull in native widgets. Imagine that you want to make a native Mac-style interface. You can fake the macOS toolbar by using CSS gradients. Using native fonts provided by macOS and Windows is possible through CSS, and you can even tweak the antialiasing to look like a native application. You can also remove text selection for certain UI components, and make the UI work with drag-and-drop. Currently, most Electron apps use CSS that uses the same colors, border styles, icons, and gradients as macOS and Windows.
Some applications go the extra mile in terms of duplicating the native experience; one example is the N1 email application (https://github.com/nylas/N1). Other applications, such as Slack (https://slack.com/), have their own unique branding and identity that’s clean enough to work well without too much modification on each platform.
When you build your own Electron apps, you’ll have to decide which approach is right for your project. If you want to make an app that looks like it uses native desktop widgets, you have to create styles that suit each platform. That requires more time designing each target UI. Your customers may prefer it, but it may also result in more overhead when deploying new features.
In the next section, you’ll use a skeleton Electron application to create a new one. This is the standard way to build new projects with Electron.
12.2. Creating an Electron app
The easiest way to get started with Electron is to use the electron-quick-start project, available on GitHub (https://github.com/atom/electron-quick-start). This small repository contains the dependencies necessary to run a basic Electron application.
To use it, check out the repository and install the dependencies with npm:
git clone https://github.com/atom/electron-quick-start
cd electron-quick-start
npm install
After everything has finished downloading, you can start the main process with npm start. It’s safe to use this project as the basis for the rest of your Electron application; you shouldn’t need to create your own project from scratch.
When the application starts, you should see a window with a web page and the Chromium Developer Tools. If you’re a web developer who uses Chrome, this might not seem that exciting: the app looks like a web page with no CSS rendering in Chrome. But a lot more is going on under the hood to make this work. Figure 12.3 shows what this looks like in macOS.
Figure 12.3. The electron-quick-start project running in macOS
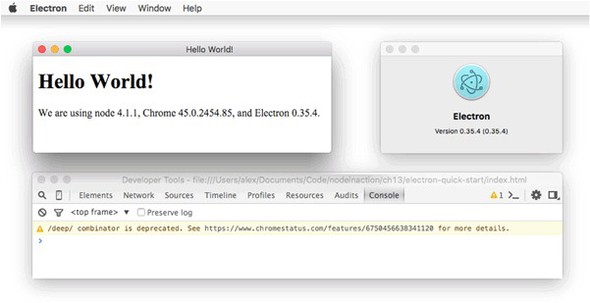
This is a self-contained macOS application bundle: it includes a version of Node that’s different from the one running on my system, and it has its own menu items and About window.
At this point, you can start to build your web application in index.html by using HTML, JavaScript, and CSS. But as a Node programmer, you’re probably eager to use Node for something, so let’s see how to do that first.
Electron comes with a module called remote that uses interprocess communication (IPC) between the rendering process and the main Node process. The remote module can even provide access to Node modules. To try it, add a file called readfile.js to your Electron project, and add the code in the following listing.
Listing 12.1. A simple Node module
const fs = require('fs');

module.exports = (cb) => {
  fs.readFile('./main.js', { encoding: 'utf8' }, cb);
};
Now open index.html and change it to add an element with an ID of source, and a script that loads readfile.js, as shown in the next listing.
Listing 12.2. Loading Node modules from the rendering process
<!DOCTYPE html>
<html>
  <head>
    <meta charset="UTF-8">
    <title>Hello World!</title>
  </head>
  <body>
    <h1>Hello World!</h1>
    <pre id="source"></pre>
    <script>
var readfile = require('remote').require('./readfile');
readfile(function(err, text) {
  console.log('readfile:', err, text);
  document.getElementById('source').innerHTML = text;

});
    </script>
  </body>
</html>
Listing 12.2 uses the remote module to load readfile.js and then run it on the main process. The interaction between the two processes is seamless, so it doesn’t seem that much different from using standard Node modules. The only real difference is the use of require('remote').require(file).
12.3. Building a full desktop application
Now that you’ve seen how to create a basic Electron app and how to use Node modules, let’s go a step further and see how to build a fully fledged desktop app with native features. The application you’ll create is intended to be a developer tool for making and viewing HTTP requests. Think of it as a GUI for the request module (www.npmjs.com/package/request).
Although you can build Electron apps with pure HTML, JavaScript, CSS, and Node, for this example you’ll use modern front-end development tools to make the app more maintainable and extensible. Here’s a list of what you’ll use:
- electron-quick-start as the basis for the project
- request module for making HTTP requests
- React for the user-interface code
- Babel for converting modern ES6 into browser-friendly ES5
- webpack for building the client-side app
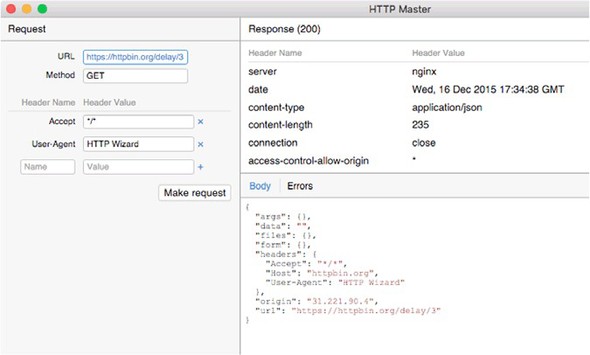
Figure 12.4 shows what the finished application should look like.
Figure 12.4. The HTTP Master Electron application
Next you’ll learn how to set up a React-based project with webpack and Babel.
12.3.1. Bootstrapping React and Babel
The biggest challenge in building a new app with a sophisticated front end is setting up libraries such as React and Babel with a maintainable build system. You have many choices, including Grunt, Gulp, and webpack. And what makes things even more difficult is that these libraries change over time, so books and tutorials quickly become out-of-date.
To mitigate the fast-paced world of front-end development, we specify the exact versions of each dependency, so you should be able to follow the tutorial and obtain similar results. If you get lost, you can use tools such as Yeoman (http://yeoman.io/) to generate a skeleton app. Then you can modify it to work like the app outlined in this chapter.
12.3.2. Installing the dependencies
Create a new electron-quick-start project. To recap, you must clone the project from GitHub:
git clone https://github.com/atom/electron-quick-start
cd electron-quick-start
npm install
Now install react, react-dom, and babel-core:
npm install --save-dev react@0.14.3 react-dom@0.14.3 babel-core@6.3.17
Next, you need to install Babel plugins. The main one is babel-preset-es2015, which may be overkill for a project limited to Chromium, but including it makes it easier for you to experiment with ES2015 features that Chromium doesn’t yet support. Use these commands for installation:
npm install --save-dev babel-preset-es2015@6.3.13
npm install --save-dev babel-plugin-transform-class-properties@6.3.13
This plugin adds JSX support to Babel:
npm install --save-dev babel-plugin-transform-react-jsx@6.3.13
Then install webpack:
npm install --save-dev webpack@1.12.9
You also need babel-loader for webpack to work with Babel:
npm install --save-dev babel-loader@6.2.0
Now that most of the dependencies are ready, add a .babelrc file to your project. It tells Babel to use the ES2015 and React plugins:
{
  "plugins": [
    "transform-react-jsx"
  ],
 "presets": ["es2015"]
}
Finally, open package.json and update the scripts property to include a webpack invocation:
"scripts": {
  "start": "electron main.js",
  "build": "node_modules/.bin/webpack --progress --colors"
},
This allows the application to be built with npm run build. Webpack plugins are available for React hot-loading, but we don’t cover that here. If you want to automatically build your client-side code when files change, you could use something like fswatch or nodemon.
12.3.3. Setting up webpack
To use webpack, you need a webpack.config.js file. Add it to the root of your project. The basic format is JavaScript, using a Node-style CommonJS module:
const webpack = require('webpack');
module.exports = {
  setting: 'value'
};
Our project requires settings for finding React files (.jsx), loading the entry point (/app/index.jsx), and then placing the output in a place where the Electron UI can find it (js/app.js). The React files also have to be processed with Babel. Putting those requirements together produces the file in the following listing.
Listing 12.3. webpack.config.js
const webpack = require('webpack');
module.exports = {
  module: {
    loaders: [
     { test: /\.jsx?$/, loaders: ['babel-loader'] }
    ]
  },
  entry: [
    './app/index.jsx'
  ],
  resolve: {
    extensions: ['', '.js', '.jsx']
  },
  output: {
    path: __dirname + '/js',
    filename: 'app.js'
  }
};
In this listing, webpack is told to transform .jsx (React) files with Babel through the module.loaders property. Babel has already been set up to handle React files with transform-react-jsx in .babelrc. Next, the entry property is used to define the main entry point for the React code. This works well because React components are based on HTML elements. Because HTML elements must have one parent node, a single entry point can encompass the entire application.
The resolve.extensions property tells webpack that .jsx files must be treated as modules. If you use a statement such as import {Class} from 'class', it’ll check class.js and class.jsx.
Finally, the output property tells webpack where to write the output file. Here I’ve used js/, but you could use any path that’s accessible to the Electron UI.
This is a good time to start fleshing out the React app. Let’s start by looking at the main entry point and how it’ll pull in the request and response UI elements.
12.4. The React app
In figure 12.4, you saw a preview of what this app should look like. It has two main groups of UI components that can be divided into seven items:
- Request
- URL: String
- Method: String
- Headers: Object of string pairs
- Response
- HTTP status code
- Headers: Object of string pairs
- Body: String
- Errors: String
But in React, you can’t render two things side by side: they need to be contained by a single parent. You need a top-level app object, which contains the UI elements for the request and response.
Given classes for Request and Response, which you’ll implement later, the App class itself should look like the following listing.
Listing 12.4. The App class
import React from 'react';
import ReactDOM from 'react-dom';
import Request from './request';
import Response from './response';

class App extends React.Component {
  render() {
    return (
      <div className="container">
        <Request />
        <Response />
      </div>
    );
  }
}
ReactDOM.render(<App />, document.getElementById('app'));
Save this file as app/index.jsx. It first loads the Request and Response classes, and then renders them in a div. The last line uses ReactDOM to render the DOM nodes for the App class. React allows you to refer to the App class with <App />.
To make this work, you also need to define the Request and Response components.
12.4.1. Defining the Request component
The Request class takes input for the URL and HTTP method, and then generates a request that’s posted with the Node request module. It renders the interface by using JSX, but unlike the previous example, it doesn’t render the element directly with ReactDOM; this happens when it’s included into the main app class in app/index.jsx.
The following listing (app/request.js) contains the code for the full class. We’ve removed the header-editing capability to reduce the length of the example; for an example with more features, including header editing, see our HTTP Wizard GitHub repository (https://github.com/alexyoung/http-wizard).
Listing 12.5. The Request class
import React from 'react';
import Events from './events';

const request = remote.require('request');

class Request extends React.Component {
  constructor(props) {
    super(props);
    this.state = { url: null, method: 'GET' };
  }

  handleChange = (e) => {
    const state = {};
    state[e.target.name] = e.target.value;
    this.setState(state);
  }

  makeRequest = () => {
    request(this.state, (err, res, body) => {
      const statusCode = res ? res.statusCode : 'No response';
      const result = {
        response: `(${statusCode})`,
        raw: body ? body : '',
        headers: res ? res.headers : [],
        error: err ? JSON.stringify(err, null, 2) : ''
      };

      Events.emit('result', result);
      new Notification(`HTTP response finished: ${statusCode}`)
    });
  }

  render() {
    return (
      <div className="request">
        <h1>Request</h1>
        <div className="request-options">
          <div className="form-row">
            <label>URL</label>
            <input
              name="url"
              type="url"
              value={this.state.url}
              onChange={this.handleChange} />
          </div>
          <div className="form-row">
            <label>Method</label>
            <input
              name="method"
              type="text"
              value={this.state.method}
              placeholder="GET, POST, PATCH, PUT, DELETE"
              onChange={this.handleChange} />
          </div>
          <div className="form-row">
            <a className="btn" onClick={this.makeRequest}>Make request</a>
          </div>
        </div>
      </div>
    );
  }
}

export default Request;
The bulk of the listing is taken up by the render method’s HTML. Let’s focus on the rest before going over how the UI is built up. First, we’ve used a descendent of Node’s EventEmitter in app/events.jsx to communicate between this component and the response component. The following snippet is app/events.jsx:
import { EventEmitter } from 'events';
const Events = new EventEmitter();
export default Events;
Notice that Request is a React.Component descendant class. It defines a constructor that sets up a default state: the state property is special in React and can be set this way only in a constructor. Elsewhere, you must use this.setState.
The handleChange method sets state based on the HTML element’s name attribute. To understand how this works, skip ahead to the URL <input> element in the render method:
<input
  name="url"
  type="url"
  value={this.state.url}
  onChange={this.handleChange} />
The name specified here is used to set the URL when it’s edited. Setting the state also causes render to run, and React will update the value attribute with the updated state. Let’s move on to look at how the request module is used by this class.
This class is client-side code that runs in a web view, so you need a way of accessing the request module to make HTTP requests. Electron provides a way of loading remote modules without any unnecessary boilerplate. Near the top of the class, you use the global remote object to require the Node request module:
const request = remote.require('request');
Then later in makeRequest, the HTTP request can be made with a simple call to request(). The arguments for the request have been set in the class’s state, so all you need to do is handle the callback that runs when the request is complete. Here that’s very little imperative code: the class’s state is set based on the outcome of the request, and then the result is emitted so the Response component can use it. A desktop notification is also displayed; if the request is slow, the user will be notified visually by using the operating system’s notification pop-up:
new Notification(`HTTP response finished: ${statusCode}`)
Figure 12.5 shows a typical notification.
Figure 12.5. A desktop notification

Now let’s look at how the Response component displays the HTTP response.
12.4.2. Defining the Response component
The Response component listens for result events and then sets its state to contain the results of the last request. It displays the results by using a table for headers, and divs for the request body and any errors.
The following listing has the whole Response component. This file is app/response.jsx.
Listing 12.6. The Response component
import React from 'react';
import Events from './events';
import Headers from './headers';

class Response extends React.Component {
  constructor(props) {
    super(props);
    this.state = { result: {}, tab: 'body' };
  }

  componentWillUnmount() {
    Events.removeListener('result', this.handleResult.bind(this));
  }

  componentDidMount() {
    Events.addListener('result', this.handleResult.bind(this));
  }

  handleResult(result) {
    this.setState({ result: result });
  }

  handleSelectTab = (e) => {
    const tab = e.target.dataset.tab;
    this.setState({ tab: tab });
  }

  render() {
    const result = this.state.result;
    const tabClasses = {
      body: this.state.tab === 'body' ? 'active' : null,
      errors: this.state.tab === 'errors' ? 'active' : null,
    };
    const rawStyle = this.state.tab === 'body'
      ? null
      : { display: 'none' }
    const errorsStyle = this.state.tab === 'errors'
      ? null
      : { display: 'none' };

    return (
      <div className="response">
        <h1>Response <span id="response">{result.response}</span></h1>
        <div className="content-container">
          <div className="content">
            <div id="headers">
              <table className="headers">
                <thead>
                  <tr>
                    <th className="name">Header Name</th>
                    <th className="value">Header Value</th>
                  </tr>
                </thead>
                <Headers headers={result.headers} />
              </table>
            </div>
            <div className="results">
              <ul className="nav">
                <li className={tabClasses.body}>
                  <a data-tab='body' onClick={this.handleSelectTab}>Body</a>
                </li>
                <li className={tabClasses.errors}>
                  <a data-tab='errors' href="#" onClick={this.handleSelectTab}>Errors</a>
                </li>
              </ul>
              <div
                className="raw"
                id="raw"
                style={rawStyle}>{result.raw}</div>
              <div
                className="raw"
                id="error"
                style={errorsStyle}>{result.error}</div>
            </div>
          </div>
        </div>
      </div>
    );
  }
}

export default Response;
The Response component doesn’t have any code specific to handling HTTP responses; it displays its state in various HTML elements. It’s able to switch tabs by binding an onclick event to the handleSelectTab method that switches between the body and errors by using an attribute (data-tab).
The Response component uses another component, Headers, to render the HTTP response headers. Breaking components into ever smaller components is standard practice in React. The values of each header are passed to the subcomponent by using an attribute; in React, these are known as props, or properties:
<Headers headers={result.headers} />
The following listing shows the Headers component. This is in the app/headers.jsx file.
Listing 12.7. The Headers component
import React from 'react';

class Headers extends React.Component {
  render() {
    const headers = this.props.headers || {};
    const headerRows = Object.keys(headers).map((key, i) => {
      return (
        <tr key={i}>
          <td className="name">{key}</td>
          <td className="value">{headers[key]}</td>
        </tr>
      );
    });

    return (
      <tbody className="header-body">
        {headerRows}
      </tbody>
    );
  }
}

export default Headers;
Notice how the props are accessed near the top of the render() method, at this.props.headers.
12.4.3. Communicating between React components
The Request and Response classes are fairly well isolated; they’re focused on solving their particular tasks without directly calling each other. React has other, more sophisticated state-management approaches, but they’re beyond the scope of this chapter. This example application doesn’t need a sophisticated communication mechanism, because it has only two main components, so instead it uses EventEmitter from Node to communicate.
To use EventEmitter this way, instantiate it inside its own file and then export the instance. This file is app/events.jsx in the example project for this chapter:
import { EventEmitter } from 'events';
const Events = new EventEmitter();
export default Events;
Now components can require events and either emit events or attach listeners to communicate. The Request component does this in the makeRequest method, with the result of the HTTP request:
Events.emit('result', result);
Then in the Response class, you can capture results by setting up a listener early in the component’s life cycle:
componentWillUnmount() {
  Events.removeListener('result', this.handleResult.bind(this));
}
As an application grows, this pattern becomes harder to maintain. One particular problem is tracking the names of events. Because they’re strings, it’s easy to forget them or write them incorrectly. An extension of this pattern is to use a list of constants for event names. If you extend this pattern again to split the responsibility of dispatching events and storing data, you end up with something similar to Facebook’s Redux state container (http://redux.js.org/), which is why many React programmers use it to design and build larger applications.
12.5. Builds and distribution
Now that you have a usable desktop application, you can bundle it for macOS, Linux, and Windows. App distribution with Electron has three stages:
- Rebrand the Electron app with your application’s name and icon
- Package your app into a file
- Create a binary for each platform
The electron-quick-start project is already almost suitable for distribution. You just need to copy your code into Electron’s Contents/Resources/app folder in macOS, or electron/resources/app in Windows and Linux.
But manually copying files isn’t the best way to build a redistributable binary. A more foolproof method is to use electron-packager (www.npmjs.com/package/electron-packager) by Max Ogden. This package provides a command-line tool for building executables for Windows, Linux, and macOS.
12.5.1. Building with Electron Packager
To install electron-packager, install it globally. This will allow you to build any project that you want to create platform-specific binaries for:
npm install electron-packager –g
After it’s installed, you can run it from your application’s directory. You must invoke it with the path to your application, the application name, platform, architecture (32- or 64-bit), and the Electron version:
electron-packager . HttpWizard --version=1.4.5
This downloads Electron version 1.4.5 and generates binaries for all supported platforms and architectures. This may take some time (Electron is about 40 MB), but when it’s done, you’ll have binaries that can be run on all major operating systems.
Before sharing builds, you should remove or change the line in main.js that opens the Chromium development tools:
mainWindow.webContents.openDevTools();
Alternatively, you could wrap this with a flag to hide it when working on the app:
if (process.env.NODE_ENV === 'debug') {
  mainWindow.webContents.openDevTools();
}
12.5.2. Packaging
To further improve your application’s performance, you can package the client-side and Node JavaScript file by using Atom Shell archives (https://github.com/atom/asar). These archives are known as asar files, and they work like the UNIX tar command. They hide your JavaScript but don’t obscure it enough to stop people from decoding the packages, so you can’t use it to truly obfuscate code. But they solve the issue of long filenames breaking in Windows, which you might run into if you have deeply nested dependencies.
In Electron, Chromium can read asar files as well as Node, so you don’t have to do anything special to support it. Also, electron-packager can create asar packages for you with the --asar command-line option.
Figure 12.6 shows what an application packaged without asar looks like.
Figure 12.6. A typical Electron application bundle’s contents
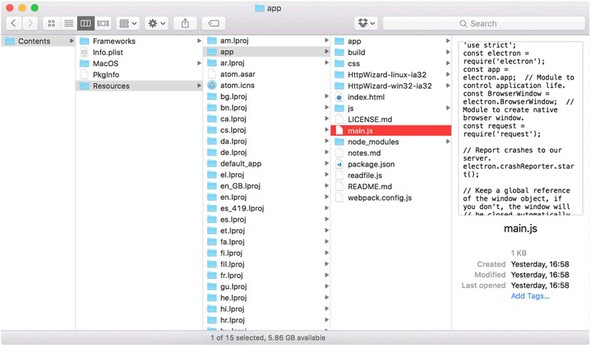
Notice that you can open the JavaScript files to view the source. The only binary files in an Electron application are resources such as images, or binary Node modules.
To generate a build with asar files, you can use electron-packager with the --asar flag:
electron-packager . HttpWizard --version=0.36.0 --asar=true
This is the easiest way to do it, because electron-packager runs all the necessary commands. To do it manually, you need to install asar, and then you need to invoke the command-line tool to create a package:
npm install -g asar
asar pack path-to-your-app/ app.asar
After you have the asar archive, download an Electron binary (https://github.com/atom/electron/releases) for the platform you want to support, and add the archive to the resources directory, as shown in figure 12.6. Running the application executable or bundle should cause your application to run.
Editing the vendor-supplied binaries is also how Electron applications are branded. You can change the application’s name and icons this way. If you run an Electron binary with no modifications, it provides a window that allows you to run Electron apps made with the electron-quick-start repository.
12.6. Summary
- Using Electron, you can make desktop applications with Node, JavaScript, HTML, and CSS.
- You can generate native menus and notifications without using C++, C#, or Objective-C.
- If you have useful Node modules, you can use them from the client-side Java-Script within the Electron application’s UI.
- Electron uses a fully fledged browser, so you can build UIs with the latest Java-Script technology, such as React or Angular.