Appendix B. Automating the web with scraping
- Creating structured data from web pages
- Performing basic web scraping with cheerio
- Handling dynamic content with jsdom
- Parsing and outputting structured data
In the preceding chapter, you learned some general Node programming techniques, but now we’re going to start focusing on web development. Scraping the web is an ideal way to do this, because it requires a combination of server and client-side programming skills. Scraping is all about using programming techniques to make sense of web pages and transform them into structured data. Imagine you’re tasked with creating a new version of a book publisher’s website that’s currently just a set of old-fashioned, static HTML pages. You want to download the pages and analyze them to extract the titles, descriptions, authors, and prices for all the books. You don’t want to do this by hand, so you write a Node program to do it. This is web scraping.
Node is great at scraping because it strikes a perfect balance between browser-based technology and the power of general-purpose scripting languages. In this chapter, you’ll learn how to use HTML parsing libraries to extract useful data based on CSS selectors, and even to run dynamic web pages in a Node process.
B.1. Understanding web scraping
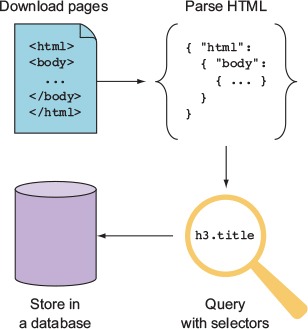
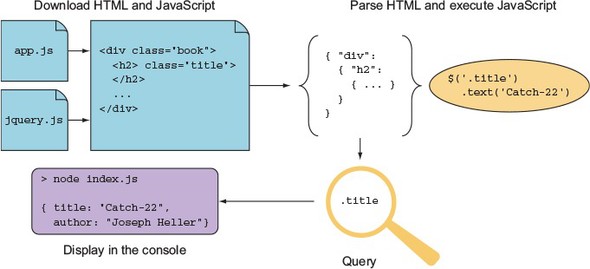
Web scraping is the process of extracting useful information from websites. This usually involves downloading the required pages, parsing them, and then querying the raw HTML by using CSS or XPath selectors. The results of the queries are then exported as CSV files or saved to a database. Figure B.1 shows how scraping works from start to finish.
Figure B.1. Steps for scraping and storing content
Web scraping may be against the terms of use of some websites, because of its cost or because of resource limitations. If thousands of scrapers hit a single site that runs on an old and slow server, the server could be knocked offline. Before you scrape any content, you should ensure that you have permission to access and duplicate the content. You can technically check the site’s robots.txt (www.robotstxt.org) file for this information, but you should contact the site’s owners first. In some cases, the site’s owners may have invited you to index its information—perhaps as part of a larger web development contract.
In this section, you’ll learn how people use scrapers for real sites, and then you’ll look at the required tools that allow Node to become a web-scraping powerhouse.
B.1.1. Uses of web scraping
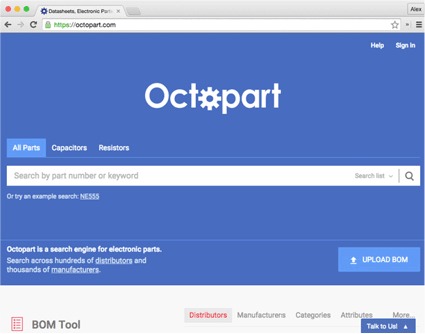
A great example of web scraping is the vertical search engine Octopart (https://octopart.com/). Octopart, shown in figure B.2, indexes electronics distributors and manufacturers to make it easier for people to find electronics. For example, you can search for resistors based on resistance, tolerance, power rating, and case type. A site like this uses web crawlers to download content, scrapers to make sense of the content and extract interesting values (for example, the tolerance of a resistor), and an internal database to store the processed information.
Figure B.2. Octopart allows users to search for electronic parts.
Web scraping isn’t used for only search engines, however. It’s also used in the growing fields of data science and data journalism. Data journalists use databases to produce stories, but because there’s so much data that isn’t stored in easily accessible formats, they may use tools such as web scraping to automate the collection and processing of data. This allows journalists to present information in new ways, through data--visualization techniques including infographics and interactive graphics.
B.1.2. Required tools
To get down to business, you need a couple of easily accessible tools: a web browser and Node. Browsers are one of the most useful scraping tools—if you can right-click and select Inspect Element, you’re already partway to making sense of websites and converting them into raw data. The next step is to parse the pages with Node. In this chapter, you’ll learn about two types of parser:
- Lightweight and forgiving: cheerio
- A web-standards-aware, Document Object Model (DOM) simulator: jsdom
Both of these libraries are installed with npm. You may need to parse loosely structured human-readable data formats such as dates as well. We’ll briefly look at Java-Script’s Date.parse and Moment.js.
The first example uses cheerio, which is a fast way to parse most static web pages.
B.2. Performing basic web scraping with cheerio
The cheerio library (www.npmjs.com/package/cheerio), by Felix Böhm, is perfect for scraping because it combines two key features: fast HTML parsing, and a jQuery-like API for querying and manipulating the HTML.
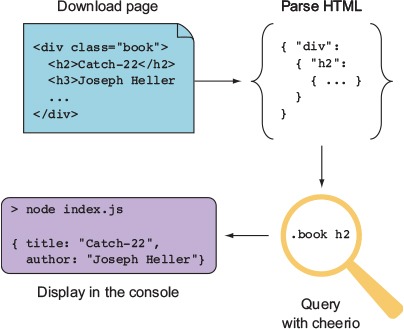
Imagine you need to extract information about books from a publisher’s website. The publisher doesn’t yet have an API that exposes book details, so you need to download pages from its website and turn them into usable JSON output that includes the author name and book title. Figure B.3 shows how scraping with cheerio works.
Figure B.3. Scraping with cheerio
The following listing contains a small scraper that uses cheerio. Sample HTML has been included, so you don’t need to worry about how to download the page itself yet.
Listing B.1. Extracting a book’s details

Listing B.1 uses cheerio to parse a hardcoded HTML document by using the cheerio.load() method and CSS selectors. In a simple example like this, the CSS selectors are simple and clear, but often real-world HTML is far messier. Unfortunately, poorly structured HTML is unavoidable, and your skill as a web scraper is defined by coming up with clever ways to pull out the values you need.
Making sense of bad HTML requires two steps. The first is to visualize the document, and the second is to define the selectors that target the elements you’re interested in. You use cheerio’s features to define the selector in just the right way.
Fortunately, modern browsers offer a point-and-click solution for finding selectors: if your browser has development tools, you can usually right-click and select Inspect Element. Not only will you see the underlying HTML, but the browser should also show a representation of the selector that targets the element.
Let’s say you’re trying to extract book information from a quirky site that uses tables without any handy CSS classes. The HTML might look like this:
<html>
  <body>
    <h1>Alex's Dated Book Website</h1>
    <table>
      <tr>
        <td><a href="/book1">Catch-22</a></td>
        <td>Joseph Heller</td>
      </tr>
    </table>
  </body>
</html>
If you open that in Chrome and right-click the title, you’ll see something like figure B.4.
Figure B.4. Viewing HTML in Chrome
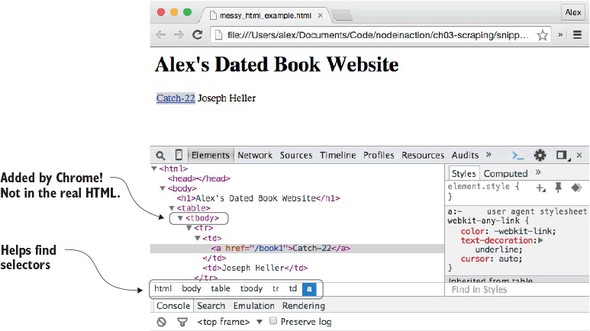
The white bar under the HTML shows “html body table tbody tr td a”—this is close to the selector that you need. But it’s not quite right, because the real HTML doesn’t have a tbody. Chrome has inserted this element. When you’re using browsers to visualize documents, you should be prepared to adjust what you discover based on the true underlying HTML. This example shows that you need to search for a link inside a table cell to get the title, and the next table cell is the corresponding author.
Assuming the preceding HTML is in a file called messy_html_example.html, the following listing will extract the title, link, and author.
Listing B.2. Dealing with messy HTML

You use the fs module to load the HTML; that’s so you don’t have to keep printing HTML in the example. In reality, your data source might be a live website, but the data could also be from a file or a database. After the document has been parsed, you use first() to get the first table cell with an anchor. To get the anchor’s URL, you use cheerio’s attr() method; it returns a specific attribute from an element, just like jQuery. The eq() method is also useful; in this listing, it’s used to skip the first td, because the second contains the author’s text.
Using a module such as cheerio is a quick and dirty way of interpreting web documents. But be careful of the type of content that you attempt to parse with it. It may throw an exception with binary data, for example, so using it in a web application could crash the Node process. This would be dangerous if your scraper is embedded in the same process that serves your web application.
It’s best to check the content type before passing it through a parser, and you may want to consider running your web scrapers in their own Node processes to reduce the impact of any serious crashes.
One of cheerio’s limitations is that it allows you to work only with a static version of a document; it’s used for working with pure HTML documents rather than dynamic pages that use client-side JavaScript. In the next section, you’ll learn how to use jsdom to create a browser-like environment in your Node applications, so client-side Java-Script will be executed.
B.3. Handling dynamic content with jsdom
jsdom is the web scraper’s dream tool: it downloads HTML, interprets it according to the DOM as found in a typical browser, and runs client-side JavaScript. You can specify the client-side JavaScript that you want to run, which typically means including jQuery. That means you can inject jQuery (or your own custom debugging scripts) into any pages. Figure B.5 shows how jsdom combines HTML and JavaScript to make otherwise unscrapeable content accessible.
Figure B.5. Scraping with jsdom
jsdom does have a downside. It’s not a perfect simulation of a browser, it’s slower than cheerio, and the HTML parser is strict, so it may fail for pages with poorly written markup. Some sites don’t make sense without client-side JavaScript support, however, so it’s an indispensible tool for some scraping tasks.
The basic usage of jsdom is through the jsdom.env method. The following listing shows how jsdom can be used to scrape a page by injecting jQuery and pulling out useful values.
Listing B.3. Scraping with jsdom
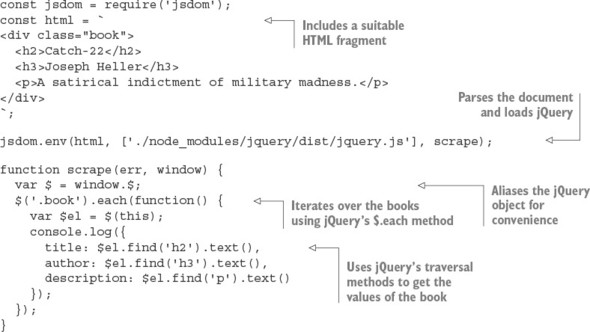
To run listing B.3, you need to save jQuery locally and install jsdom.[1] You can install both with npm. The modules are called jsdom (www.npmjs.com/package/jsdom) and jQuery (www.npmjs.com/package/jquery), respectively. After everything is set up, this code should print out the title, author, and description of the HTML fragment.
jsdom 6.3.0 is the current version at the time of writing.
The jsdom.env method is used to parse the document and inject jQuery. jQuery is injected by downloading it from npm, but you could supply the URL to jQuery on a content delivery network (CDN) or your filesystem; jsdom will know what to do. The jsdom.env method is asynchronous and requires a callback to work. The callback receives error and window objects; the window object is how you access the document. Here the window’s jQuery object has been aliased so it can be easily accessed with $.
A selector is used with jQuery’s .each method to iterate over each book. This example has only one book, but it demonstrates that jQuery’s traversal methods are indeed available. Each value from the book is accessed by using jQuery’s traversal methods as well.
Listing B.3 is similar to the earlier cheerio example in listing B.1, but the main difference is that jQuery has been parsed and run by Node, within the current process. Listing B.1 used cheerio to provide similar functionality, but cheerio provides its own jQuery-like layer. Here you’re running code intended for a browser as if it’s really running in a browser.
The jsdom.env method is useful only for working with static pages. To parse pages that use client-side JavaScript, you need to use jsdom.jsdom instead. This synchronous method returns a window object that you can manipulate with other jsdom utilities. The following listing uses jsdom to parse a document with a script tag, and jsdom.jQueryify to make scraping it easier.
Listing B.4. Parsing dynamic HTML with jsdom
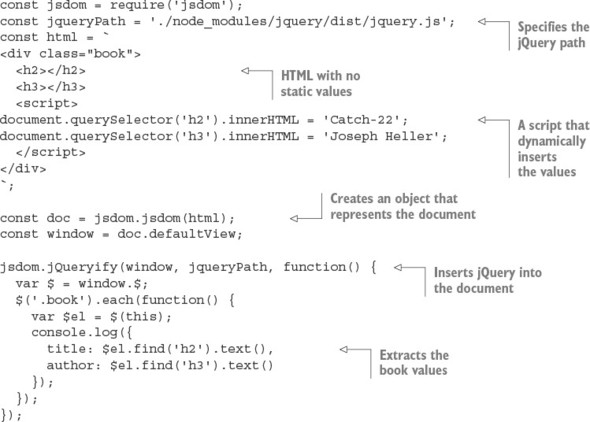
Listing B.4 requires jQuery to be installed, so if you’re creating this listing by hand, you need to set up a new project with npm init and npm install --save jquery jsdom. It uses a simple HTML document in which the useful values that you’re looking for are dynamically inserted. They’re inserted using client-side JavaScript found in a script tag.
This time, jsdom.jsdom is used instead of jsdom.env. It’s synchronous because the document object is created in memory, but won’t do much until you attempt to query or manipulate it. To do this, you use jsdom.jQueryify to insert your specific version of jQuery into the document. After jQuery has been loaded and run, the callback is run, which queries the document for the values you’re interested in and prints them to the console. The output is shown here:
{ title: 'Catch-22', author: 'Joseph Heller' }
This proves that jsdom has invoked the necessary client-side JavaScript. Now imagine this is a real web page and you’ll see why jsdom is so powerful: even websites made with very little static HTML and dynamic technologies such as Angular and React can be scraped.
B.4. Making sense of raw data
After you finally get useful data from a page, you need to process it so it’s suitable for saving to a database or for an export format such as CSV. Your scraped data will either be unstructured plain text or encoded using microformats.
Microformats are lightweight, markup-based data formats that are used for things like addresses, calendars and events, and tags or keywords. You can find established microformats at microformats.org. Here’s an example of a name represented as a microformat:
<a class="h-card" href="http://example.com">Joseph Heller</a>
Microformats are relatively easy to parse; with cheerio or jsdom, a simple expression such as $('.h-card').text() is sufficient to extract Joseph Heller. But plain text requires more work. In this section, you’ll see how to parse dates and then convert them into more database-friendly formats.
Most web pages don’t use microformats. One area where this is problematic but potentially manageable is date values. Dates can appear in many formats, but they’re usually consistent on a given website. After you’ve identified the format, you can parse and then format the date.
JavaScript has a built-in date parser: if you run new Date('2016 01 01'), an instance of Date will be returned that corresponds to the first of January, 2016. The supported input formats are determined by Date.parse, which is based on RFC 2822 (http://tools.ietf.org/html/rfc2822#page-14) or ISO 8601 (www.w3.org/TR/NOTE-datetime). Other formats may work and are often worth trying out with your source data to see what happens.
The other approach is to match values in the source data with a regular expression, and then use Date’s constructor to make new Date objects. The signature for the constructor is as follows:
new Date(year, month[,day[,hour[,minutes[,seconds[,millis]]]]]);
Date parsing in JavaScript is usually good enough to handle many cases, but it falls down in reformatting dates. A great solution to this is Moment.js (http://momentjs.com), a date-parsing, validation, and formatting library. It has a fluent API, so calls can be chained like this:
moment().format("MMM Do YY"); // Sep 7th 15
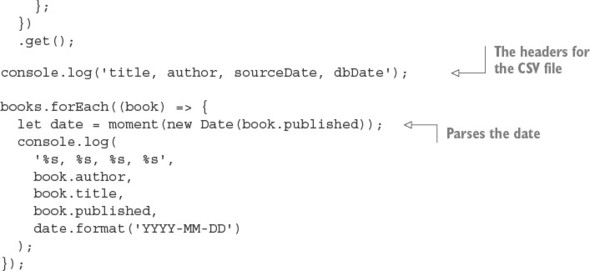
This is convenient for turning scraped data into CSV files that work well with programs such as Microsoft Excel. Imagine you have a web page with books that include title and published date. You want to save the values to a database, but your database requires dates to be formatted as YYYY-MM-DD. The following listing shows how to use Moment with cheerio to do this.
Listing B.5. Parsing dates and generating CSV
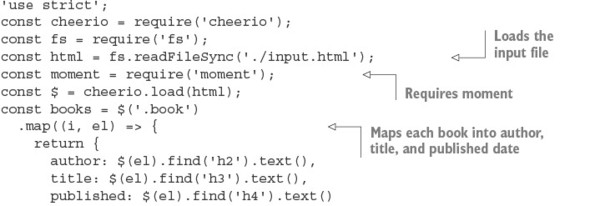
Listing B.5 requires that you install cheerio, Moment, and books. It takes as input HTML (from input.html) and then outputs CSV. The HTML should have dates in h4 elements, like this:
<div>
  <div class="book">
    <h2>Catch-22</h2>
    <h3>Joseph Heller</h3>
    <h4>11 November 1961</h4>
  </div>
  <div class="book">
    <h2>A Handful of Dust</h2>
    <h3>Evelyn Waugh</h3>
    <h4>1934</h4>
  </div>
</div>
After the scraper has loaded the input file, it loads up Moment, and then maps each book to a simple JavaScript object by using cheerio’s .map and .get methods. The .map method iterates over each book, and the callback extracts each element that you’re interested in by using the .find selector traversal method. To get the resulting text values as an array, .get is used.
Listing B.5 outputs CSV by using console.log. The header is printed, and then each row is logged in a loop that iterates over each book. The dates are converted to a format compatible with MySQL by using Moment; first the date is parsed using new Date, and then it’s formatted using Moment.
After you’ve become used to parsing and formatting dates, you can apply similar techniques to other data formats. For example, currency and distance measurements can be captured with regular expressions, and then formatted by using a more generic number-formatting library such as Numeral (www.npmjs.com/package/numeral).
B.5. Summary
- Web scraping is the automated transformation of sometimes badly structured web pages into computer-friendly formats such as CSV or databases.
- Web scraping is used for vertical search engines but also for data journalism.
- If you're going to scrape a site, you should get permission first. You can do this by checking the site’s robots.txt file and contacting the site’s owner.
- The main tools are static HTML parsers (cheerio) and parsers capable of running JavaScript (jsdom), but also browser developer tools for finding the right CSS selector for the elements you’re interested in.
- Sometimes the data itself is not well formatted, so you may need to parse things such as dates or currencies to make them work with databases.