GREAT DANE
The Great Dane is certainly “great” in size and in regal bearing. In the eighteenth century, French naturalist George-Louis Leclerc first saw the breed on a trip to Denmark and promptly dubbed it le Grand Danois, or “Great Dane.” The name has stuck ever since.
Although Dane-like dogs are prevalent in the art of ancient Egypt, Greece, and Rome, it is the Germans who are given credit for shaping the breed we are familiar with today. First bred to hunt wild boar, German breeders needed a dog that was tall and fast enough to bring down large prey. To achieve strength and stature, they crossed muscular English Mastiffs with long-legged Irish Wolfhounds. The Greyhound was then added to select for speed.
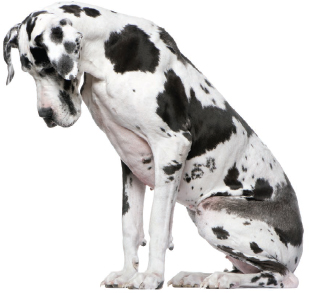
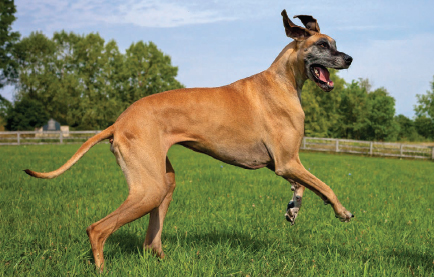
Great Danes are between 30–34 inches tall and weigh between 120–200 pounds. Though muscular, they still have a graceful bearing due to their long legs, large and noble head, and elegantly arched neck. Their short coats come in six colors: black, white, fawn, blue (really a shade of gray), harlequin (irregular black patches on white), and mantle (with a black blanket-like coat). When cropped, the ears stand high on the head. In their natural state, they fold over and lie close to the cheeks.
Though its stature might be intimidating, the Great Dane is one of the gentlest of dog breeds. Like the tiny Chihuahua, it seems to be oblivious to its size. In fact, these huge pups are known for their habit of draping themselves lovingly across an owner in a futile attempt to fit itself onto a friendly lap.
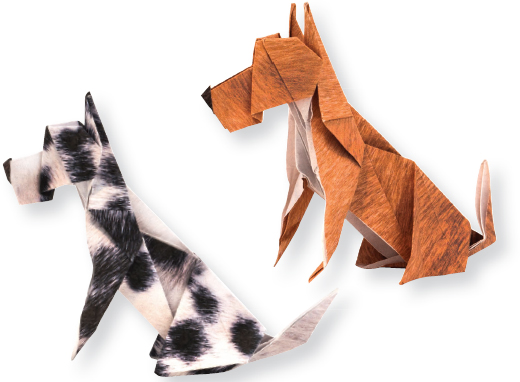
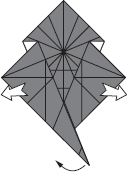
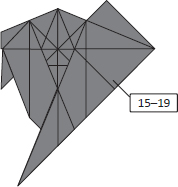
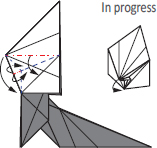
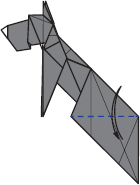
Both Great Danes follow the same set of instructions. To fold the second Great Dane, orient the paper as shown above, and proceed to step 1 on the following page.
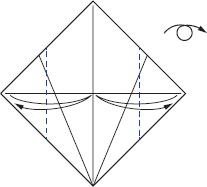
1.Orient the paper as shown. Turn over.
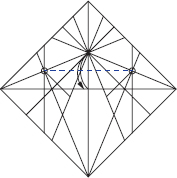
2.Valley fold in half in both directions, and unfold.
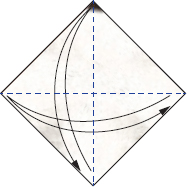
3.Valley fold, aligning edges to center, and unfold.
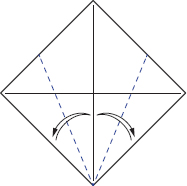
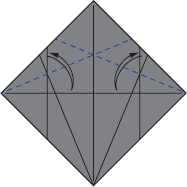
4.Valley fold, aligning tips to center, and unfold. Turn over.
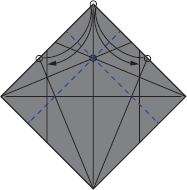
5.Valley fold, aligning upper edges to horizontal center crease, and unfold.
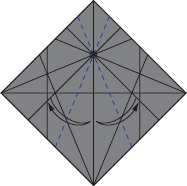
6.Valley fold through intersecting creases, parallel to outer edges, and unfold.
7.Valley fold, aligning creases from previous step to center crease, and unfold.
8.Fold, aligning lower edges to intersecting creases, creasing only as indicated, and unfold. Turn over.
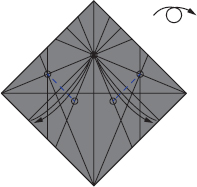
9.Valley fold between reference points, creasing only as indicated, and unfold.
10.Valley fold between sets of reference points, creasing only as indicated, and unfold. Turn over.
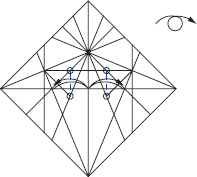
11.Valley fold, aligning end of crease from step 7 to intersecting creases on opposite side, and unfold.
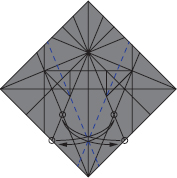
12.Pleat fold long creases, and flatten, treating the bottom section similar to a rabbit-ear fold.

13.Unfold everything.
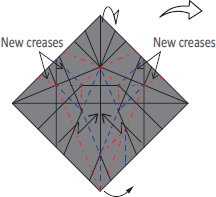
14.Prepare the collapse by reversing any necessary creases. Then, using previous pleat, as well as additional indicated creases, collapse the paper, establishing new creases to do so.
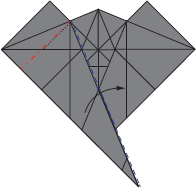
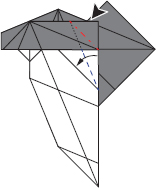
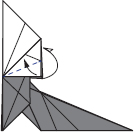
15.Swivel fold by valley folding along the long diagonal crease and squash folding the top section.
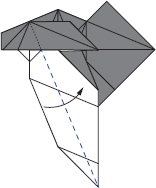
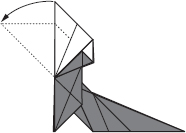
16.Valley fold, aligning edge to existing crease, and unfold.
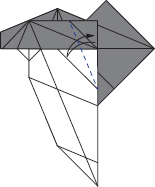
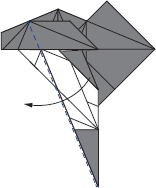
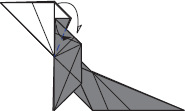
17.Reverse fold using creases from previous step.
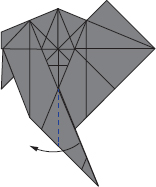
18.Valley fold, tucking the flap between layers.
19.Valley fold flap to the opposite side.
20.Valley fold flap to the opposite side.
21.Repeat steps 15–19 on opposite side.
22.Reverse fold both sides, folding the lifted flap downward.

23.Valley fold along existing creases, reverse folding near the top.

24.Valley fold along underside edge, creasing only as indicated, and unfold.
25.Carefully wrap the layer from behind.
26.Stand the top layer upright.
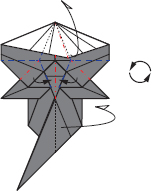
27.Mountain fold in half, incorporating the indicated creases. Rotate.
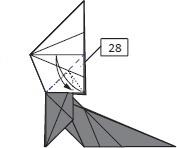
28.Valley fold, aligning edge to existing crease, and unfold. Repeat on opposite side.
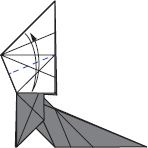
29.Valley fold, aligning edges, and unfold.
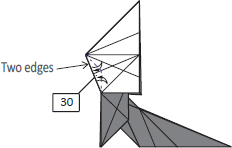
30.Establish set of valley folds, and unfold. Repeat on opposite side.
31.Lower the left corner, incorporating the established creases from previous step, and distribute the layers symmetrically to flatten.
32.Valley fold both sides, aligning edges.
33.Carefully pull the flap as far as the paper allows, establishing new creases to flatten.
34.Valley fold flaps on both sides.
35.Valley fold, aligning top edge to corner, and unfold.
36.Outside reverse fold using creases from previous step.
37.Valley fold flaps along hinges.
38.Valley fold on both sides, aligning edges.
39.Mountain fold flaps along existing creases on both sides.
40.Valley fold flaps along hinges.
41.Sink fold. Pre-crease as necessary.
42.Mountain fold corners inside the model on both sides.
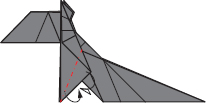
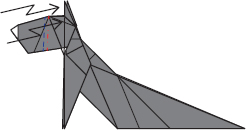
43.Open the head partially and valley fold, nearly aligning corners, wrapping paper onto itself.
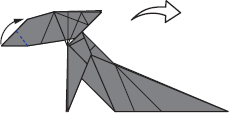
44.Mountain fold inside the model.
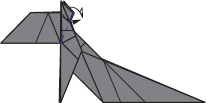
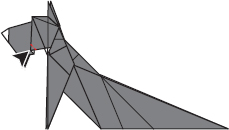
45.Reverse fold using existing creases, pushing where indicated.
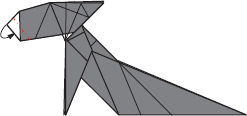
46.Reverse fold, further shaping the ears.
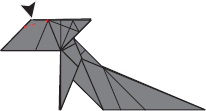
47.Crimp fold. Pre-crease as necessary.
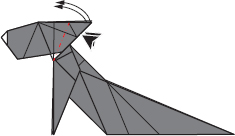
48.Reverse fold, shaping the mouth.
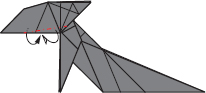
49.Reverse fold edges on both sides.
50.Valley fold flaps along hinges on both sides.
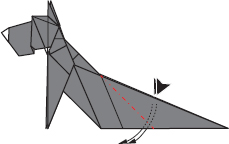
51.Valley fold, aligning corners, and unfold.
52.Valley fold perpendicular to lower edge, between reference points, and unfold.
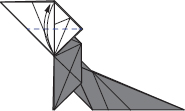
53.Sink fold the shaded area …
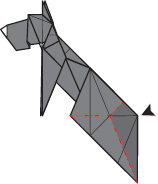
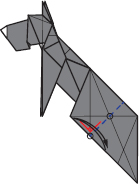
54.…and then crimp fold, incorporating indicated creases to flatten.

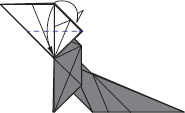
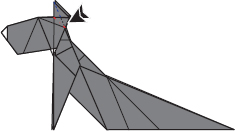
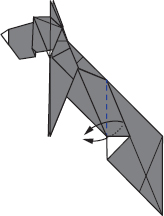
55.Valley fold the tail upward.
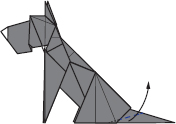
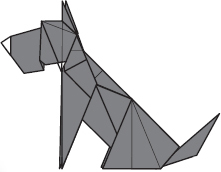
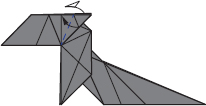
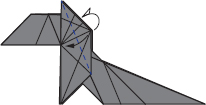
The completed Great Dane