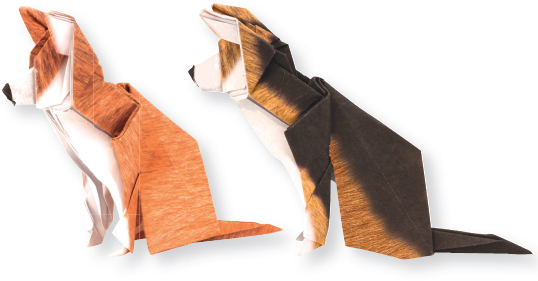
CHIHUAHUA
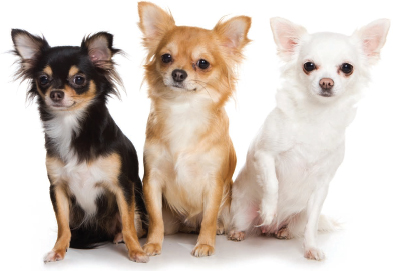
The Chihuahua just might possess one of the purest of all canine pedigrees. It is named for the Mexican state of Chihuahua, the area where the dog was thought to have originated. Until recently, conventional wisdom had it that the modern-day Chihuahua bore little resemblance to the one kept so long ago by the indigenous populations of the Americas. It was assumed that a Chihuahua’s DNA would have been radically transformed by crossing it with breeds brought to the region by European settlers. However, scientific research refutes these claims. Recent DNA studies have, in fact, proven that the modern-day Chihuahua has remained relatively unchanged, and can even trace its Mexican lineage back a thousand years, with roots that stretch even further back to Asia.
One thing few can dispute is how cute this playful pup can be. The quintessential lapdog, Chihuahuas enjoy being picked up and cuddled by their owners. Though Chihuahuas are affectionate and devoted to their owners, they are not recommended as pets for families with very young children who might injure them by mistake. The smallest breed in the world, it possesses the largest brain of any dog relative to its size. Once they reach maturity, a Chihuahua may resist any attempts to correct its behavior, so it’s best to start training them right away. Known for its outsized self-image, this high-spirited dog has been known to challenge dogs many times its size. They come in long- and short-hair varieties, in an endless array of colors and patterns.
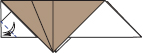
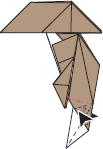
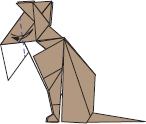
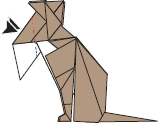
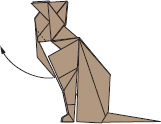
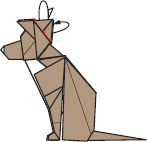
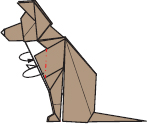
Both Chihuahuas follow the same set of instructions. To fold the second Chihuahua, orient the paper as shown on right, and proceed to step 1 on the following page.
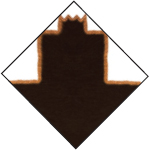
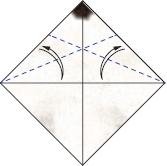
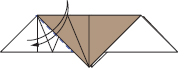
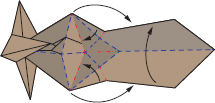
1.Orient the paper as shown. Valley fold in half in each direction, and unfold. Turn over.
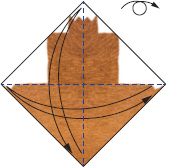
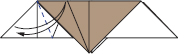
2.Valley fold, aligning edges to center, and unfold.
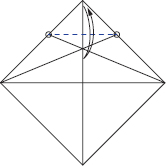
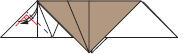
3.Valley fold between reference points, and unfold.
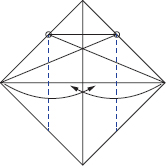
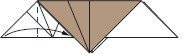
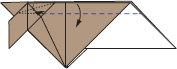
4.Valley fold vertically from where existing creases meet, starting with the right side.
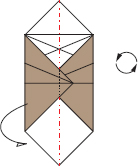
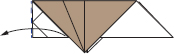
5.Mountain fold in half. Rotate counter-clockwise.
6.Valley fold along edge, and unfold.
7.Valley fold, reinforcing existing crease, and unfold.
8.Valley fold perpendicular to left edge, pivoting from where existing creases meet, and unfold.
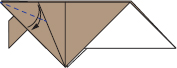
9.Valley fold along existing crease.
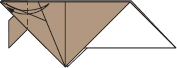
10.Valley fold along the crease on the back, and unfold.
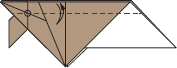
11.Unfold.
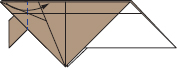
12.Reverse fold using existing creases.
13.Reverse fold using existing creases.
14.Reverse fold using existing creases, pivoting the left corner downward.

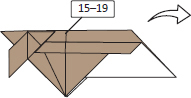
15.Valley fold, aligning edges, creasing firmly only as indicated, and unfold.
16.Valley fold triangular flap along its hinge, and unfold.
17.Valley fold parallel to top edge, aligning crease to point where existing creases intersect, and unfold. Be careful not to allow the paper to shift.
18.Valley fold the triangular flap.
19.Valley fold along existing crease, incorporating a reverse fold underneath the flap.
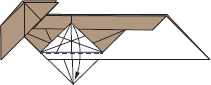
20.Repeat steps 15–19 on opposite side.
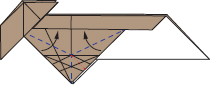
21.Valley fold, aligning edges, and unfold.
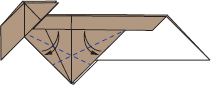
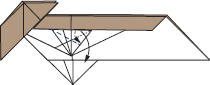
22.Valley fold horizontally, aligning crease through intersecting creases.

23.Valley fold, aligning edges, and unfold.
24.Unfold the triangular flap.
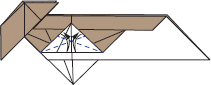
25.Rabbit-ear fold using existing creases.
26.Outside reverse fold using existing creases.
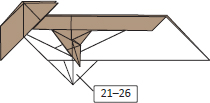
27.Repeat steps 21–26 on opposite side.
28.Valley fold along edge, creasing firmly, and unfold.
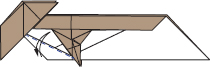
29.Sink fold using creases from previous step.
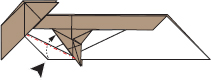
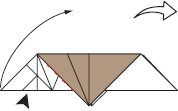
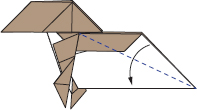
30.Valley fold, aligning top edge to both sides of the vertical crease, creasing firmly, and unfold.
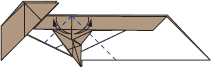
31.Open slightly and sink fold the interior layers using creases from the previous step in preparation for a collapse. View from above.
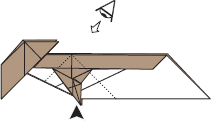
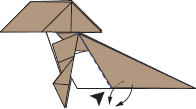
32.Collapse using indicated creases, pivoting the front legs downward in the process.
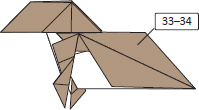
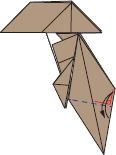
33.Valley fold, aligning edges.

34.Valley fold, aligning edges.
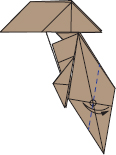
35.Repeat steps 33–34 on opposite side.
36.Valley fold along edge, and unfold.
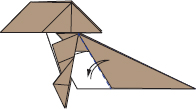
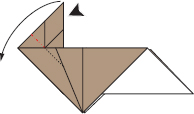
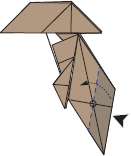
37.Open layers carefully, and reverse the sunken section.
38.Valley fold starting from the corner on the left side, establishing a perpendicular crease from the right edge, and unfold.
39.Valley fold where existing creases intersect, keeping the horizontal crease aligned, and unfold.
40.Sink fold using creases from previous step.
41.Swivel fold on both sides, aligning lower edges.
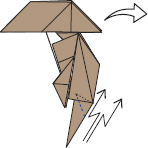
42.Crimp fold, redirecting the tail.
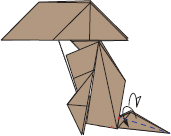
43.Valley fold the tail on both sides, incorporating a small squash fold near the rear legs. Then mountain fold, shaping the back.
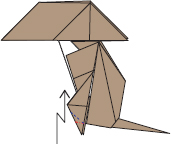
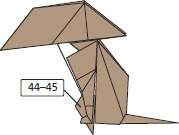
44.Pleat fold, redirecting the paw forward.
45.Mountain fold, narrowing the front leg and shaping the front paw.
46.Repeat steps 44–45 on opposite side.
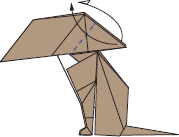
47.Valley fold on both sides, roughly parallel to existing crease, raising the ears.
48.Valley fold, aligning top edge with edge of raised flap from previous step, and unfold.
49.Open partially, and sink fold using creases from previous step.
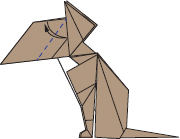
50.Reverse fold asymmetrically on both sides, redirecting the ears.
51.Valley fold, shifting flap as far as the paper allows, and unfold.
52.Reverse fold both edges using creases from previous step.
53.Pivot the middle flap upward, then valley fold, giving shape to the snout.
54.Open the head partially, and valley fold by wrapping paper onto itself.
55.Mountain fold both sides of the mouth inside the model.
56.Sink fold. Pre-crease as necessary.
57.Mountain fold the two corners inside the model.
58.Mountain fold both sides, rounding the shoulders.
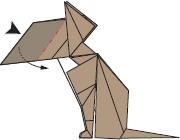
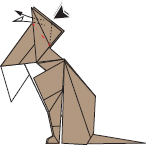
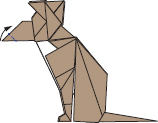
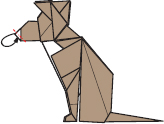
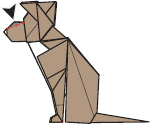
The completed Chihuahua