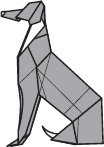
GREYHOUND
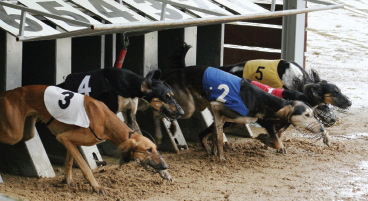
Bred to chase anything that moves quickly, Greyhounds were once prized for their ability to root out crop-destroying animals such as rabbits and squirrels. Uniquely equipped for the task, they have a 270-degree field of vision and can actually see behind their own heads. Though tall, these slender dogs weigh no more than 70 pounds. Their flexible spines allow for all four legs to leave the ground at once, enabling them to reach speeds of 45 mph in just 30 feet. Given a Greyhound’s reputation for speed, it is not surprising that the breed figures so prominently in the business of dog racing.
Greyhounds have been human companions for at least 4,000 years. They were so cherished in ancient Egypt that some royals even had them mummified and placed with them in their tombs. Centuries later in ancient Greece, Homer gave a Greyhound named Argus a starring role in his epic poem, Odyssey. In medieval England, it was once against the law for a commoner to own a Greyhound. In those days, killing one was a capital offense!
Today, Greyhounds that are not fast enough or that have lost their edge are regularly euthanized by those who race them for profit. To counteract this cruel practice, a large rescue community has sprung up to find homes for these dogs. Greyhounds make quiet, low-maintenance pets that rarely bark and require a minimum of exercise. Their short coats come in a variety of colors and require very little grooming. Best of all, these gentle, sweet-tempered dogs are wonderful with children.

Both Greyhounds follow the same set of instructions. To fold the second Greyhound, orient the paper as shown above, and proceed to step 1 on the following page.
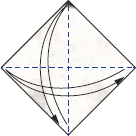
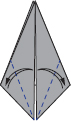
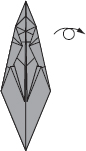
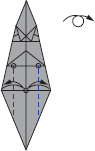
1.Orient the paper as shown. Turn over.
2.Valley fold in half in each direction, and unfold.
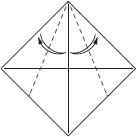
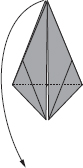
3.Valley fold, aligning upper edges to center, and unfold.
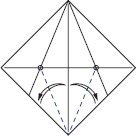
4.Valley fold, aligning lower edges to center, creasing only as indicated, and unfold.
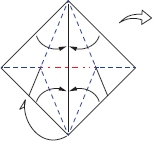
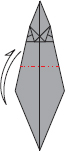
5.Reverse the crease in the center to a mountain fold, and then collapse along indicated creases, wrapping lower half to the back.
6.Valley fold, aligning edges to center, and unfold.
7.Lower the flap on the back.
8.Valley fold between ends of existing creases, creasing firmly, and unfold.
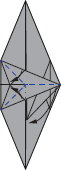
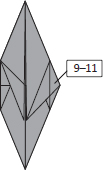
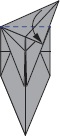
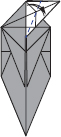
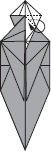
9.Lift the flap, push the corner where indicated, and reinforce mountain creases along the existing long diagonal creases.
Note: The model will not lie flat.
10.Step 9 in progress. Establish new creases by tucking excess paper between layers, and flatten when flap’s tip extends to opposite side.

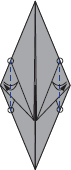
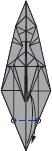
11.Rabbit-ear fold using existing creases.
12.Repeat steps 9–11 on opposite side.
13.Valley fold, aligning tips.
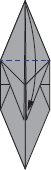
14.Valley fold perpendicular to flap’s right edge by first pivoting from upper-left corner.
15.Valley fold, aligning creases to edge underneath.
16.Unfold, reverting back to step 13.
17.Repeat steps 13–16 on opposite side.
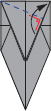
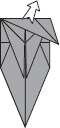
18.Valley fold the flap downward.
19.Rabbit-ear fold using existing creases.
20.Release trapped paper, lift excess paper, and flatten.
21.Valley fold flap to opposite side.
22.Release trapped paper, lift excess paper, and flatten.
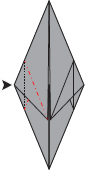
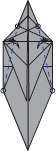
23.Valley fold, aligning edges, and unfold.
24.Reverse fold using creases from previous step.

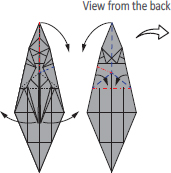
25.Reverse fold the top triangular flap using existing creases.
26.Shift the layer to the back, reversing creases to make the model symmetrical.
27.Reverse fold both sides using existing creases.
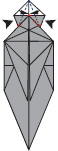
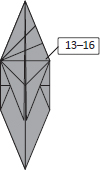
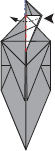
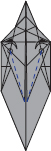
28.Valley fold between sets of reference points, and unfold.
29.Valley fold, aligning bottom tips to where creases intersect, creasing firmly, and unfold.
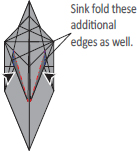
30.Sink fold using creases from previous step. Sink fold the indicated edges as well.
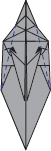
31.Valley fold along existing creases to flatten.
32.Shift the corners underneath above the top layer.

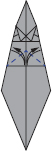
33.Turn over.
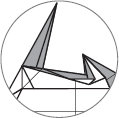
34.Mountain fold through all layers along existing crease, and unfold.
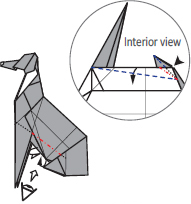
35.Valley fold, aligning edges to existing horizontal crease, creasing only as indicated, and unfold.
36.Valley fold between corners, and unfold.
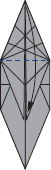
37.Valley fold, aligning corners to intersecting creases, creasing only as indicated, and unfold. Turn over.
38.Valley fold between reference points, and unfold.
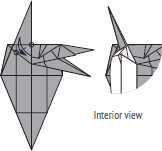
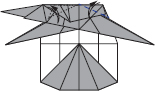
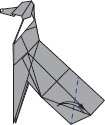
39.Rabbit-ear fold along existing creases, using both views of the model for reference, while redirecting the legs.
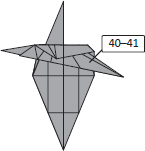
40.Valley fold flap upward, adjusting layers in the upper corner in order to keep the model flat.
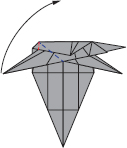
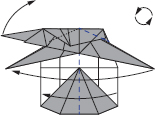
41.Establish valley fold on top layer and on part of the layer underneath it, using the interior view for reference.
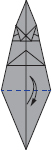
42.Valley fold flap to opposite side.
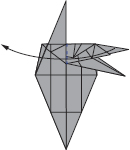
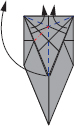
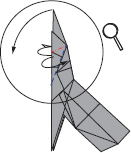
43.Repeat steps 40–41 on opposite side.
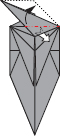
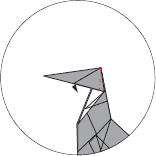
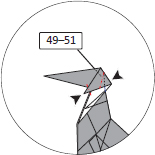
44.Open top layer on both sides along long vertical creases, then lift and align lower tip to center. Then use remaining existing creases to shift the two flaps down and outward.
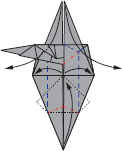
45.Mountain fold, aligning edges, to conceal the protruding edge entirely. Squash fold near the top to flatten.

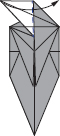
46.Valley fold, wrapping around edges, and unfold.
47.Valley fold model in half, incorporating creases from previous step, and draw the legs together. Rotate.
48.Crimp fold the neck while bringing the head downward.
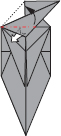
49.Separate the top layers on both sides so they can be moved independently.

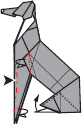
50.Swivel fold, shifting the edge, and tucking excess paper under the ear.
51.Reverse fold the tip of the ear. Reverse fold the back of the ear asymmetrically. Repeat steps 49–51 on opposite side.
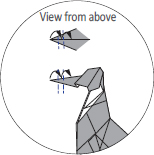
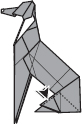
52.Valley fold twice, creasing firmly, and unfold. Creases should be parallel.
53.Crimp fold using creases from previous step.
54.Open the head partially, flatten the paper, and then valley fold by wrapping paper onto itself twice.
55.Valley fold, aligning lower edges, creasing firmly, and unfold.
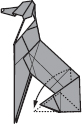
56.Crimp fold using creases from previous step, giving shape to the rear legs.
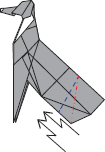
57.View from below. Mountain fold as far as the paper allows, incorporating a swivel fold near the rear leg.
Note: The model will not lie flat between steps 57–59.
58.Swivel fold once more, thinning the rear legs.

59.The completed swivel fold.
60.Release the triangular flap between layers.
61.Reverse fold both edges of the tail, changing the color of the paper.
62.Mountain fold both front paws, round the front legs, mountain fold both sides near the shoulders, and curl the tail.
The completed Greyhound