The shoulders are an often neglected part of the body. Most people only give them any thought when there’s an obvious problem, such as arthritis, bursitis, frozen shoulder or a rotator cuff injury. From a purely anatomical perspective, consider that they are connected to your neck and upper back. While many people complain of neck and upper back pain, few take into account that shoulder tension may be either a primary cause or a contributing factor.
On an energetic level, the shoulders directly connect all of the acupuncture Arm meridians—Lung, Heart, Pericardium, Large and Small Intestines, and Sanjiao/Triple Burner—as well as the Left, Right, and Central core channels used in qigong with the torso, where those pathways continue. They are the site of the Shoulder’s Nests, which directly affect the health of the heart and lungs as well as amplify qi flow through the Side Channels. While learning to mobilize the shoulder blades directly is most advantageous, having freely movable and functionally strong shoulders is a big step in that direction. The vertebrae between the shoulder blades influence the health of the heart and lungs both neurologically and energetically, and there are points along the inner borders of the shoulder blades that have similar influences.
The openness and free flow of qi through your shoulders and arms is a two-way street. Each must function equally well on all levels for either to function optimally. This should help you understand how the health of your shoulders and arms is crucial to your overall health. The exercises in this section will assist you to that end.
Purpose
Physical: Mobilizes the shoulder joint; engages and softens the muscles of the shoulder, upper back and lower neck; massages the thoracic and axillary lymph glands; gently prepares the shoulders for all the following exercises.
Energetic: Activates energetic structures deep within the shoulder girdle (the Shoulder’s Nest), which help maintain various energetic connections between the torso and arms; activates acupuncture meridian pathways, notably the Heart and Lung meridians, benefiting their functions. Activates the acupuncture points of the upper back that lie between the shoulder blades. These also primarily benefit the Heart and Lungs. Activates the acupuncture points between the front of the shoulders and the chest (the front of the Shoulder’s Nests), which primarily benefit the Lungs.
Technique Used
Active joint mobilization.
Method
Standing, or seated in an armless chair, let your arms hang at your sides. Keep them as relaxed as you can throughout this exercise (Fig 5.1A). Move your shoulders forward and slightly upward, compressing your chest a bit. Feel your shoulder blades spread away from your spine (Fig 5.1B). Then, in a rolling motion, move your shoulders upward toward your ears. In this position, they should be hunched up, but not too tight (Fig 5.1C). Continue to circle your shoulders rearward. In this position, feel your shoulder blades compressed toward your spine while the front of your chest opens (Fig 5.1D). Finally, continue to circle your shoulders downward until they return to their starting position (Fig 5.1A).

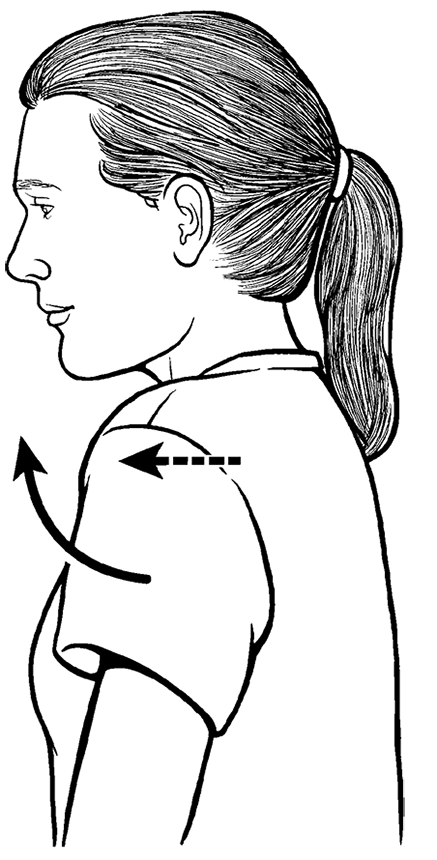
Figure 5.1A and 5.1B (Shoulder Rolls)
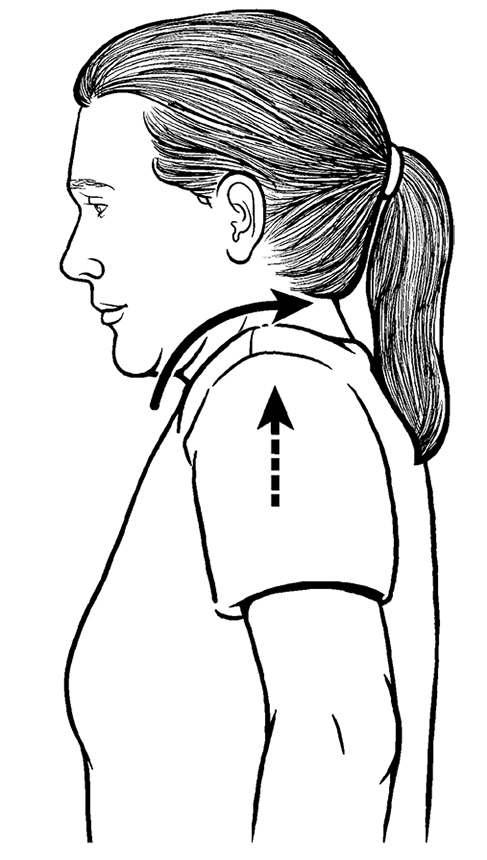
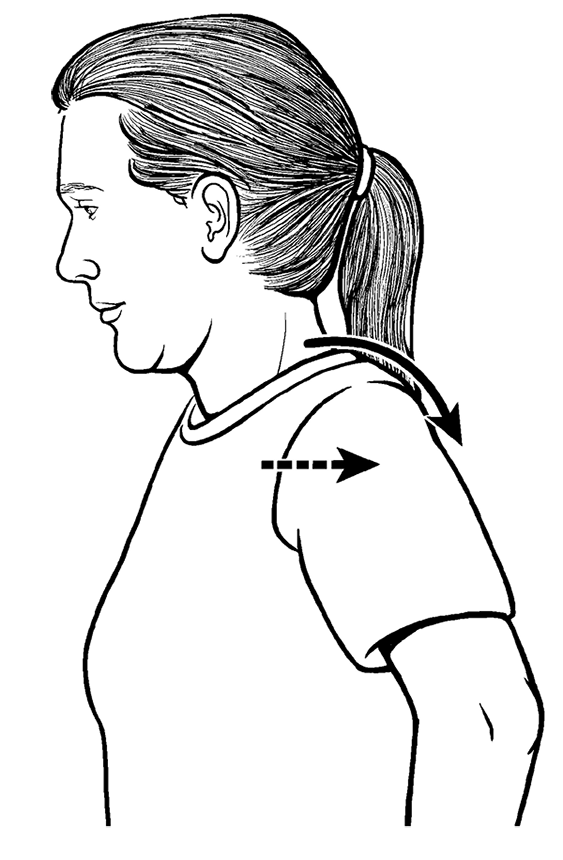
Figure 5.1C and 5.1D (Shoulder Rolls)
Throughout all those landmarks, keep your shoulder motion smooth and constant, making rearward circles at a moderate pace, one circle every two or three seconds. Do ten to fifteen circles, and then reverse direction for the same number of circles. If this is the only shoulder exercise you do on any given day, you can do up to fifty circles to really open the shoulders and related energetics.
The physical and energetic purposes are the same as in the Shoulder Rolls. This provides an additional physical benefit for the upper shoulder and lower neck muscles (mainly, the trapezius). Energetically, there is an additional benefit to the local Gall Bladder meridian acupuncture points. This more strongly releases shoulder tension and may help reduce headaches.
Techniques used
Joint mobilization, muscle tense/relax, guided breathing.
Method
Standing, or seated in an armless chair, let your arms hang at your sides. Keep them as relaxed as you can throughout this exercise. Begin as in the previous exercise. In a rolling motion, move your shoulders forward and then upward toward your ears. This time, shrug your shoulders tightly, and hold them tight for two to three slow, deep breaths (Fig 5.2A). Imagine they are being pulled up by strings. Then, on a quick exhalation, imagine the strings are suddenly cut, and drop your shoulders straight down (Fig 5.2B). This should feel like a release, and not like a push downward. Then reverse the direction of your shoulder shrug, moving your shoulders circularly rearward and then up. Hold the shrug tightly, breathe, and release as before. Do a minimum of five in each direction for a total of ten shrugs.
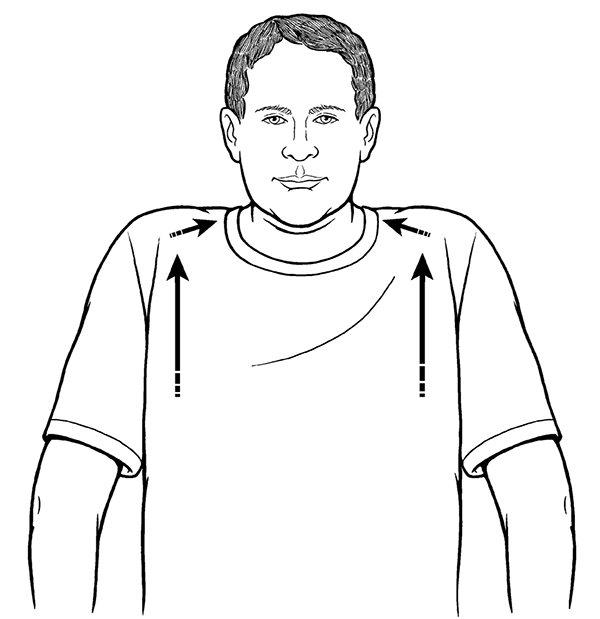 Figure 5.2A (Shoulder Shrug and Drop)
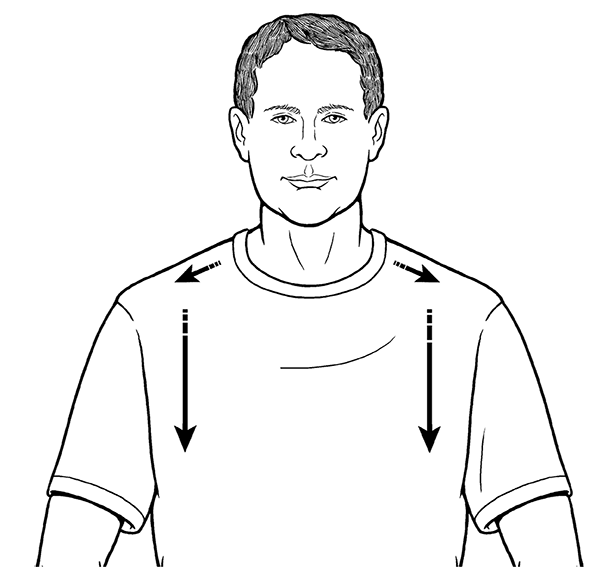 Figure 5.2B (Shoulder Shrug and Drop)
3. Shoulder Blade Protraction and Retraction with Arm Rotation
Purpose
Physical: Moves the shoulder blades toward and away from the spine to free any lingering tension between the shoulder blades. Opens the front of the chest. Pumps the inner (front) surface of the shoulder blades toward and away from the back of the ribcage. This massages the subscapularis muscles, often a hidden source of shoulder and upper back pain. The arm rotation begins to soften and release tension through the entire arm.
Energetic: Same as for the Shoulder Rolls. Additionally, there is a small energy center between the front of the shoulder blades and the back of the ribcage. The activation of that center further releases shoulder and upper back tension, and benefits the function of the Shoulder’s Nests. The rotational movement of the arms activates qi flow through the Arm meridians, primarily the Lungs, Heart, and Intestines, deepening the benefits begun in the previous shoulder exercises.
Techniques used
Joint mobilization, rotational stretch, guided breathing.
Method
Stand with your arms hanging relaxed at your sides. Breathe in, and on an exhalation, move your arms forward toward the center of the front of your body, keeping your fingers pointing to the ground, while rotating your arms so that the backs of your hands touch, or come as close to touching as you can get (Fig 5.3A). Your shoulders will hunch forward and slightly compress your chest. Feel your shoulder blades spread away from your spine, while they simultaneously move closer to the back of your ribcage. Feel the muscle of your arms twist inward, similar to wringing out a wet towel. Then, on an inhalation, move your arms toward the rear of your body, rotating your arms outward so that the palms of your hands face out to the sides, or slightly rearward if you can (Fig 5.3B). Feel your shoulder blades squeeze close to your spine, while they simultaneously move rearward away from the back of your ribcage. Feel the muscle of your arms twist outward. The front of your chest opens wide. Cycle forward and back ten to fifteen times, at a rate that is comfortable for your breath. Try to keep your breath smooth and continuous. Do not hold it at any time, neither at the end of the inhalation nor exhalation.
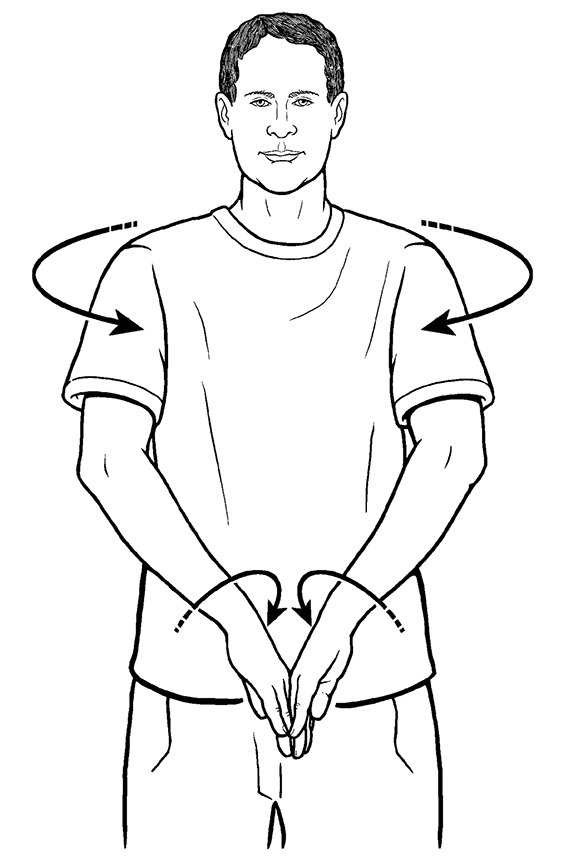 Figure 5.3A (Shoulder Blade Protraction
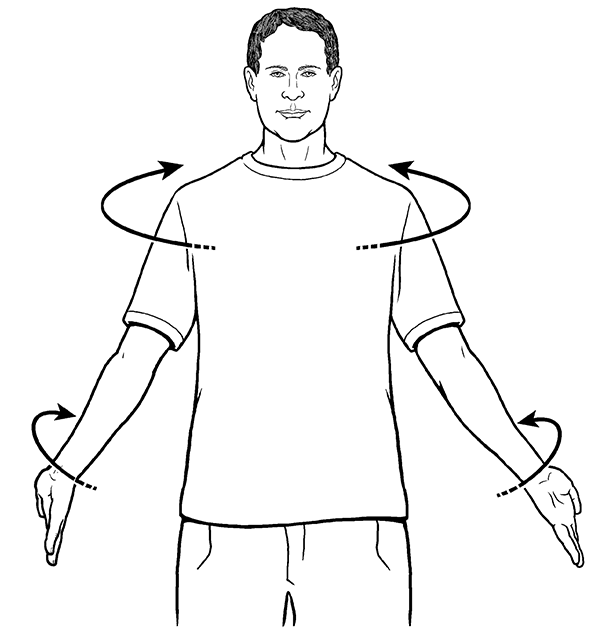 Figure 5.3B (Shoulder Blade Protraction
Purpose
Physical: Increases the stretch and opening of the back of the shoulders.
Energetic: The benefits are similar to those of the Shoulder Rolls. Although this exercise is very different, it addresses the same region of the body in a way that opens and stimulates the same points, in a slightly stronger way.
Techniques used
Passive stretch, guided breathing.
Method
Sitting or standing, place your left hand on your right shoulder, with your left elbow pointing straight in front of you. With your right hand, reach over your left arm and grasp it just above your left elbow. Turn your head to the left, as far as is comfortable, while you pull your left arm to the right (Fig 5.4 on next page). If your left shoulder is able to open and stretch, your left hand will slide behind your right shoulder, toward your right shoulder blade.
When you’ve reached the end of your stretch, hold it, and take a few slow, deep breaths. Breathe into your left shoulder, and on each exhalation, try to release more tension from that shoulder. Your stretch may increase. Hold this stretch for about thirty seconds to begin with. As you end the stretch, allow your head to face forward once more. Then repeat this stretch for your right shoulder. Gradually increase the length of the stretch to two minutes over the course of a few weeks or longer.
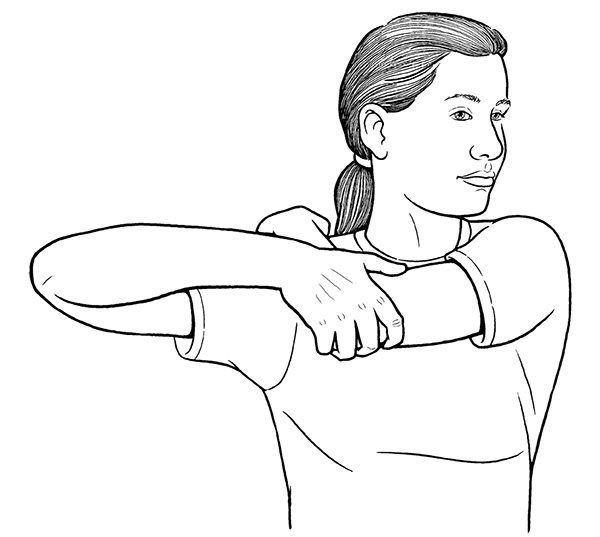 Figure 5.4 (Hand Over Shoulder Stretch)
Purpose
Physical: Softens and relaxes all the muscles in the arm; increases blood flow through the arm; prepares the arm for the following exercises.
Energetic: Strongly clears energetic blockages throughout the arm; stimulates qi flow through all the Arm meridians (Heart, Lungs, Pericardium, Small Intestine, Large Intestine, and Sanjiao).
Techniques Used
Paidagong: The gentle impact caused by tapping and patting induces a penetrating wave of energy through the body. When that wave encounters a pocket of stagnation, it can gradually break it up when applied over time, like a constant drip of water can wear down a boulder. Often it will happen more quickly than you might imagine. As that stagnation breaks apart, any associated health problem will resolve.
Method
Sitting or standing, hold your right arm loosely extended front of you. Curl the fingers of your left hand into a soft fist, not tightly clenched, with a little sense of space at the center of the palm. With any part of your fist that is easiest for you (back, sides, or front), tap and pat down your right arm, starting where your shoulder meets your neck, and slowly work your way down to your wrist. Tap and pat down and up your arm a number of times. Make sure to include the front, back, and sides of your arm equally. Vary the rate, rhythm, and force of the impacts, so that your body won’t be able to adapt to a repetitive pattern. While this is not crucial, it will enhance the benefit you get. Do not pat or tap strongly enough to hurt yourself. If you find any area of tenderness, you should stay on that area just a little longer than the others, since that indicates an area of stagnation that needs dispersing. Then repeat for your left arm.
6. “Breast Stroke” for the Shoulders
Purpose
Physical: Strongly stretches and opens all regions of the shoulder; stretches and benefits the front of the chest; massages and pumps the region between the shoulder blades; pumps the inner (front) surface of the shoulder blades toward and away from the back of the ribcage. This massages the subscapularis muscles, often a hidden source of shoulder and upper back pain; increases blood circulation in the arms, all the way to the fingertips; mobilizes and lubricates the joints (shoulder blades, shoulders, elbows, wrists, hands, and may include the upper thoracic vertebrae, between the shoulder blades). The more you can access the region between your shoulder blades, the more you will also neurologically benefit your heart and lungs. The spinal nerves that innervate those organs exit your spinal cord just below the fifth and third thoracic vertebrae respectively.
Energetic: Opens the shoulders energetically; activates the Shoulder’s Nests; pumps and so activates the energy center (gate) between the front of the shoulder blades and back of the ribcage; strongly stimulates qi flow through all the arm meridians. In addition to energetically freeing up the whole arm, shoulder girdle, and chest, the net result is a strong benefit for both the Heart and Lungs.
Techniques used
Conventional and rotational stretch, active joint mobilization.
Tip: For advanced practitioners already familiar with pulsing—a neigong practice, the teaching of which is outside of the scope of this book—include pulsing open whenever stretching is stated, pulsing closed on the bends. Other pulsing variations are possible in this exercise, so feel free to experiment and see what works best for you.
Caution: Unlike most other stretches in this book, there is a ballistic aspect to this stretch. That is, your arms move quickly to the end of their range of motion, and then there is a “bounce back” from that end point. Take care not to be too vigorous, especially if you have a current shoulder problem or if you easily dislocate your shoulder. Although injury is very unlikely in this exercise, it is possible.
Method
Stand and fully extend your arms in front of you at shoulder height, palms facing downward (Fig 5.5A). Pull your arms rearward, bending your elbows, retracting your shoulder blades toward your spine, and bending the palms of your hands a little so there is just a slight curve in your hands and fingers. To get your shoulder blades to fully retract, feel as though you are trying to touch your elbows together behind you (Fig 5.5B). (You won’t really be able to do this!) Although your shoulder blades are close together, see if you can simultaneously feel them move rearward, stretching very slightly away from your ribcage. Do your best to keep your forearms relatively parallel, and keep your palms facing toward the ground. (This is the first ballistic point, at which your arms rebound forward.)
Then extend your arms forward again, stretching to their starting position (Fig 5.5C). Feel the stretch extend all the way to your fingertips, but do not overstretch any part of your arm or hand, so nothing feels hyperextended or locked. Feel your shoulder blades spread away from your spine and simultaneously move closer to your ribcage.
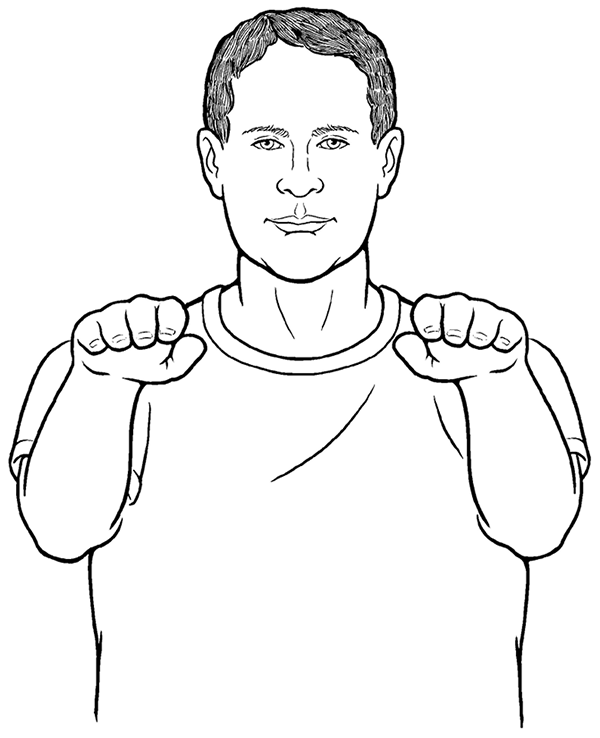
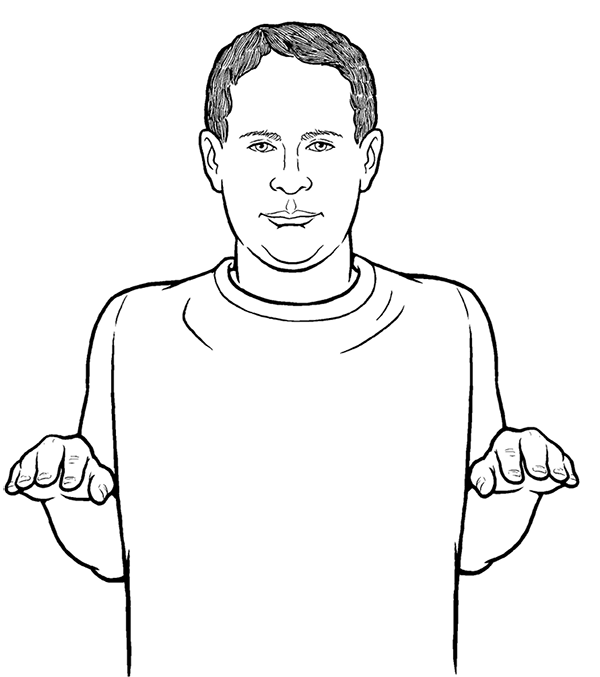
Figure 5.5A and 5.5B (“Breast Stroke” for the Shoulders)
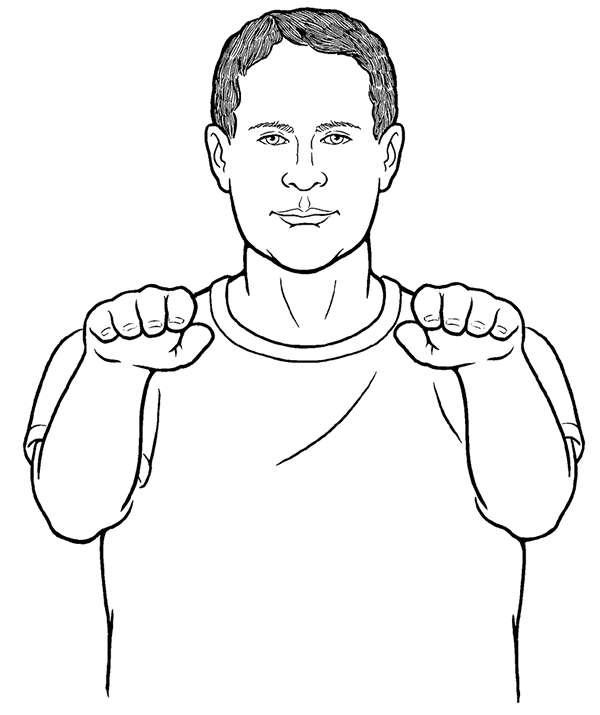 Figure 5.5C (“Breast Stroke” for the Shoulders)
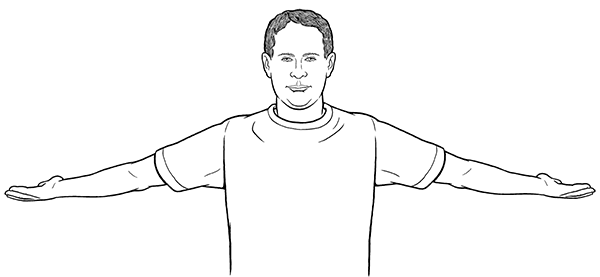 Figure 5.5D (“Breast Stroke” for the Shoulders)
Next, keeping your arms extended at the same height, move them out to your sides. While moving them to your sides, simultaneously rotate them, so that when your arms are fully out to your sides, your palms are facing upward, or possibly slightly to the rear of straight up (Fig 5.5D). This creates a rotational stretch through your entire arm, adding another vector through which qi can be stimulated, as well as providing the fullest wringing type of stretch for your muscles. Try to make sure you are getting that rotation to come all the way from your shoulders, and not just your wrists or elbows. In this position, your entire arm should feel its greatest stretch, all the way through to the tips of your fingers, more so than when they are extended straight in front of you. Your shoulder blades are once again fully retracted toward your spine, and are slightly stretched rearward away from your ribcage. (This is the second ballistic point, at which your arms rebound forward.)
Finally, keeping your arms extended at the same height, move them in front of you once more to your starting position (Fig 5.5A on previous page). While you move your arms, simultaneously rotate them so that your palms are facing down toward the ground when your arms are extended in front of you. Feel your shoulder blades spread away from your spine and forward toward your ribcage. This completes one repetition of the exercise.
Once the movement has been learned, this exercise should be performed at a fairly brisk pace, approximately one repetition per second. Again, use caution so you do not injure yourself. You can vary your arm height level some, between the top of your shoulder and a few inches below your armpit, so that you target different regions of your shoulder. For each repetition, keep your arm at the same height level. You can vary the heights from one repetition to the next if you’d like, though, or simply keep it at one height level throughout.
Purpose
Physical: Moves the shoulders through a different range of motion than the previous exercises. Increases blood flow within the shoulder and through the entire arm, and especially aids in getting blood into the hands through centrifugal (“to flee the center,” directing blood to move from the center to the periphery) force. Pumps the axillary lymph glands. Mobilizes and stretches most of the muscles in the shoulder girdle. When done vigorously, it is a very safe no-impact aerobic exercise.
Energetic: Opens the acupuncture points around the Shoulder’s Nests, stimulates qi flow through all the arm meridians, particularly the Heart and Lung meridians since they have points located within the Shoulder’s Nests (shoulder girdle), and the Pericardium. The natural direction of qi flow in those arm yin meridians is from torso to fingertips, which is best supported by this exercise. The Arm Yang meridians of the Large and Small Intestines and Sanjiao also have points within the shoulder girdle which are also opened and benefited, but their natural flow of qi is from fingertips to torso, so some of the benefit is less than in the yin meridians. This also pumps the Shoulder’s Nests and creates a more solid energetic connection between arms and torso.
Method
Stand with your feet parallel, slightly wider than shoulder width apart to provide a broader support base. Before you begin moving your arms, keep in mind that you want them as relaxed as possible. This means that while you will be using some arm strength to move your arms, you want to try to get most of the movement to come from a slight bounce in your legs. Use the force of that bounce to propel your arms. This is how your arms will move.
Raise both arms up in front of the centerline of your body, forearms crossing at or slightly above the wrists (Fig 5.6A). As you raise your arms above your head, allow them to part, and move them outward (Fig 5.5B). Then allow them to fall, still extended in a relaxed fashion at the sides of your body, and come together in front of your low belly, once again crossing at the wrists. In this part of the exercise, your left arm just completed one counterclockwise circle, while your right arm completed a clockwise circle. The only muscle strength used is on the raising portion of the arm movement; the descending portion is just a release and let go. As your arms move up, straighten your legs, being careful to not lock your knees. As your arms release downward, bend your legs just a bit, loading them for the next bounce up. After a couple of repetitions, the bounce alone should be strong enough to raise your arms. Repeat these circles, windmilling your arms twelve times in this direction. Then reverse direction, arms going down the centerline and up the sides, for another twelve times.
This should be a fairly brisk exercise; each circle should take no more than one second. Feel for the weight of your arms creating a traction at your shoulders through the full arc of the circle. The traction should have an elastic feel, with more of a stretch out at the bottom of the circle regardless of direction, with a slight elastic pull back near the top of each circle. This will create a pumping action within the shoulder joint and Shoulder’s Nest, very beneficial for the lymph glands in your armpits, providing lubrication for the shoulder joint, and a relaxing stretch for all the muscles of the shoulder girdle.
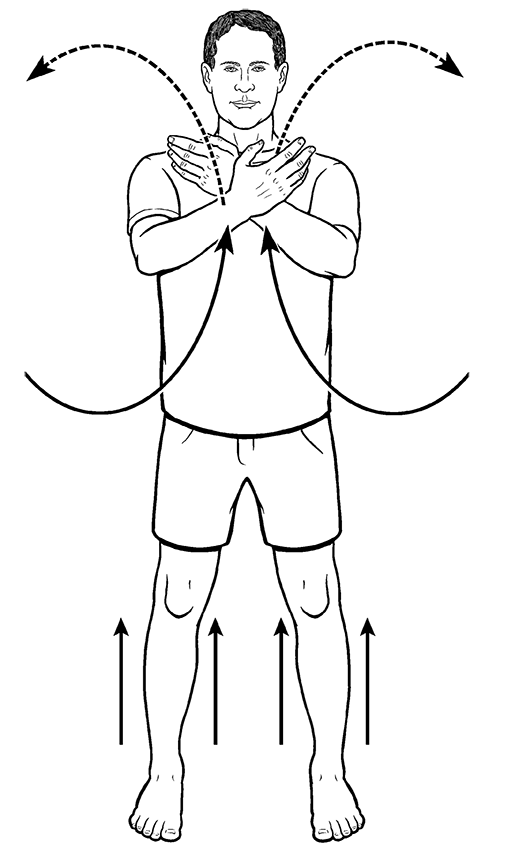 Figure 5.6A (Shoulder/Arm Windmills)
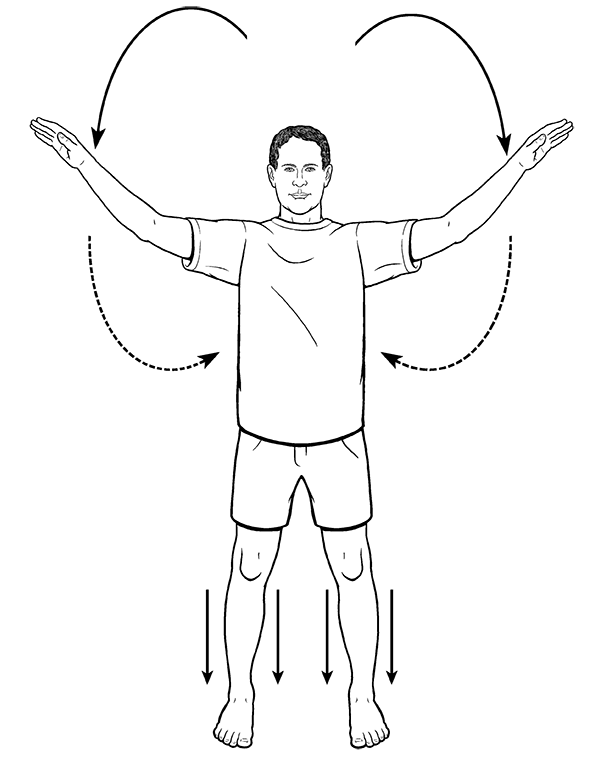 Figure 5.6B (Shoulder/Arm Windmills)
8. Full Arm Rotation for Elbow and Shoulderblades
Elbows can develop problems from overuse, injury, or aging, but they are more challenging to address in isolation. Except in direct self-massage, they are usually addressed as part of an exercise that includes other purposes. That is true of this exercise and the next, but together they are very useful in helping the elbows.
Purpose
Physical: Puts the elbow through its entire range of motion, including flexion (bending), extension (straightening), and rotation. Moves the shoulderblades through their range of motion, including protraction (away from the spine) and retraction (toward the spine), which produces a small rotary motion in the blades as well. As in the previous exercise, this pumps the shoulder blades forward, toward the rib cage, and rearward, away from the rib cage, massaging and stretching the subscapularis muscles, often a hidden source of shoulder and upper back pain. Creates a rotational stretch through all the arm muscles, releasing tension from the nerves and improving blood circulation.
Energetic: Stimulates qi flow through all the Arm meridians (Lung, Large Intestine, Heart, Small Intestine, Pericardium, and Sanjiao, benefiting all those organs) and the entire arm, with a special focus on the arm He Sea points, found around the elbow. While providing a calming effect on the mind, the Sea points mainly treat intestinal problems. The Yang Arm Sea points additionally treat problems associated with the shoulders, neck, and face.
Techniques used
Conventional and rotational stretch, active joint mobilization.
Method
Standing with feet approximately shoulders width apart, hold your arms straight in front of you, the inner edge of your hands touching with palms upward toward the sky, and elbows as close together as you can get them, preferably touching (Fig 5.7A on next page). In this position, your shoulder blades will be fully protracted away from your spine, and forward toward your ribcage. Bending your elbows while moving them apart and drawing your shoulder blades toward your spine, point your fingers toward the sky. While getting into this position, simultaneously rotate your arms, keeping the edge of your hands touching. The backs of your hands move closer together, at about a 45-degree angle at this point (Fig 5.7B). Spread your elbows their widest while continuing to rotate your arms so that the backs of your hands fully come together as your fingers point directly to the center of your chest (Fig 5.7C). Here, your shoulder blades are fully retracted toward your spine and rearward away from your ribcage.
Figures 5.7A and 5.7B (Full Arm Rotation for Elbow and Shoulderblades)
Continue to rotate your arms as you begin to both spread your shoulder blades and straighten your elbows. Your fingertips point toward the ground as the backs of your hands part to about 45 degrees, hands still touching along the index finger edge (Fig 5.7D). Finally, as you continue to rotate your arms, palms face the sky with the little finger edge of your hands touching. Simultaneously, fully straighten—but do not lock—your elbows, and bring them together as your arms fully extend, shoulder blades fully protracted and forward toward your ribcage, and you return to your starting position (Fig 5.7A). This completes one full repetition of the exercise.
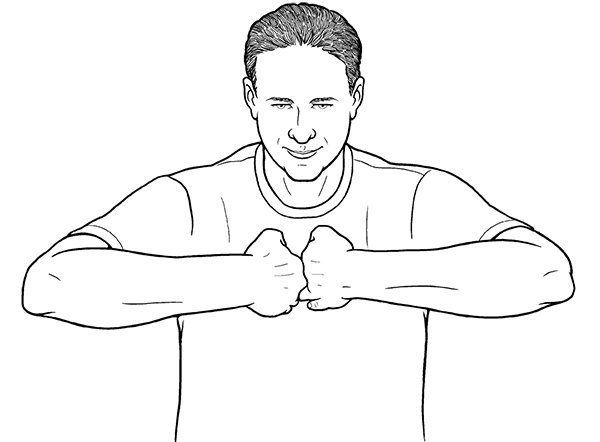 Figure 5.7C (Full Arm Rotation for Elbow and Shoulderblades)
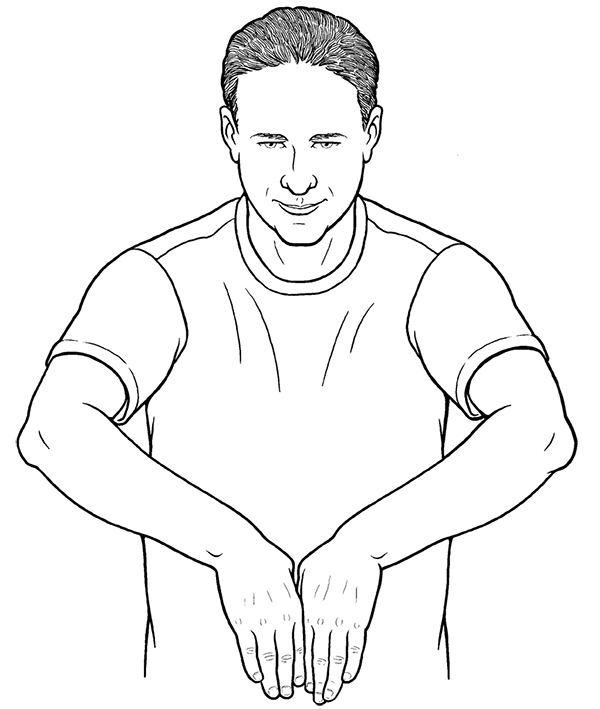 Figure 5.7D (Full Arm Rotation for Elbow and Shoulderblades)
Get the movement to flow smoothly. Your arms should always be rotating, your hands should always remain in contact, and your elbows should come into contact (or as close as possible) whenever you return to or pass through the starting position. Do your best to keep your shoulders from lifting toward your ears throughout. That keeps the focus of the shoulder movement within the shoulder blade region. There is no set number of repetitions for this exercise. Work on it until you get completely comfortable with it (may take a few weeks), and then do it as long as you like until your arms, shoulders, upper back, and neck feel more open and relaxed. As with all the exercises here, there should never be a sense of strain or overwork during or after the exercise.
Notice that in this variation, you’ve done 25 percent of your arm rotation during the first 180-degree arc, from where your hands are palm up in front of you through where the backs of your hands are together with fingertips pointing toward your chest. The remaining 75 percent of the arm rotation occurs during the second 180-degree arc as you return to starting position. While you have to rotate your arms faster during the second half, this is a slightly easier variation, better for someone who is unfamiliar with these types of body movements and therefore whose body is probably less open. With some practice, as you become more familiar and your body opens more fully, you can try a second variation. The only difference here is that the arm rotation fully matches the bending and stretching of the arms so that when your fingertips are pointed toward your chest, your palms again face fully upward. The difference is that when your arms are straight in front of you, the index finger sides of your hands are together, and when your fingertips are facing your chest, the little finger side of your hands are together.
Tip: Advanced practitioners familiar with neigong can add two more components for markedly increased benefit. A spinal C curve can be added to the arm movement, so that the spine is curved when arms are extended in front of you, and straightens as the fingertips point toward your chest. Add reverse breathing, inhaling as the spine curves, exhaling as it straightens. This markedly increases the gapping of the vertebrae, stretches the spinal cord to improve its elasticity and discharge nerve tension, strongly massages the internal organs, increases benefit to the Heart and Lungs, and increases qi and blood circulation through the arms, back, and spine. Caution: Do not attempt this variation unless you have neigong training specifically in the C curve and reverse breathing. They are not practices than can be safely and accurately learned from a book or video.
Purpose
Physical: This is one of the few stretches that targets the forearms, lengthening those muscles. Additionally, this opens the hands and fingers. Most of the hand and finger muscles attach somewhere in the forearm, so the stretches are mutually supportive. Almost all daily activities involve grasping or otherwise closing the hands, which over time can tighten and shorten the muscles of the hand and forearm. This stretch, opposite to the grasping and closing movements, reverses that tendency.
Energetic: Stimulates qi flow through the forearm portion of the arm meridians, primarily opening the Arm Yin meridians (Lung, Heart, Pericardium), while temporarily closing the Yang meridians (Large and Small Intestines, Sanjiao); opens and stimulates the Ying Spring, Shu Stream, and Jing River points located around the hands and wrists, and the He Sea points around the elbows; energetically benefits the whole body through the Daoist Five Element correspondences with each of the five fingers. See Finger and Hand Exercise 2: Backward Finger Extension and Stretch for more details. Opens the Laogong point at the center of the palms.
Techniques used
Extension and stretch, tissue lengthening, focused breathing.
Method
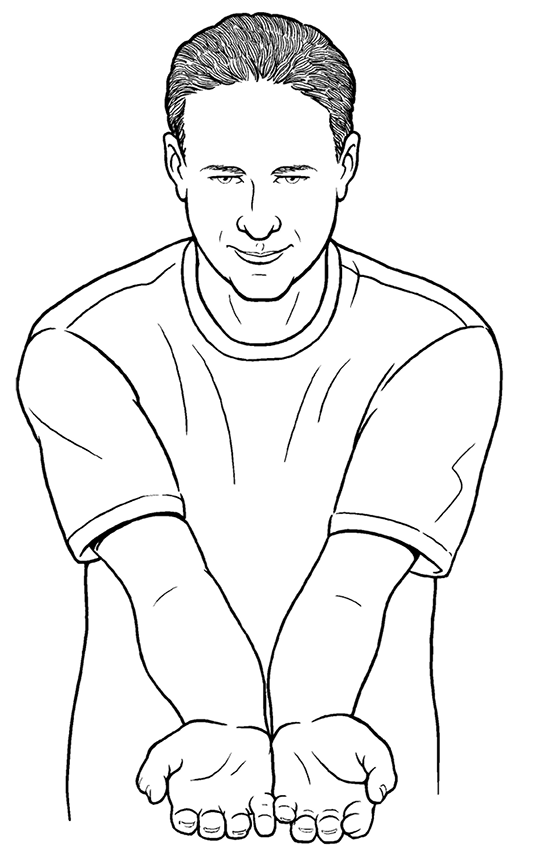
Kneeling with your knees close together, on a mat or other soft surface to protect your knees, place your hands palm down on the ground, fingers pointing toward you, with the little fingers of each hand touching (Fig 5.8 on next page). The closer you place your fingertips to your knees, the easier the stretch will be. The farther away, the greater the stretch and so the greater the difficulty. To begin, place your fingertips very close to your knees, even touching them if you want, with your body leaning forward so that your forearms are perpendicular to the ground. Gradually move your butt to your heels, increasing the stretch in your forearms and hands (Fig 5.9). If you can easily sit on your heels, lean forward to your starting position and move your hands farther from your knees. Again, gradually move your butt toward your heels, increasing the forearm stretch. When you reach the current limit of your stretch where it just begins to be uncomfortable, use guided breathing to relax in that posture, releasing the discomfort along with any tension on each exhale. You may find that you can slightly increase the stretch as you become more relaxed. You should not feel like the backs of your wrists are jammed tightly shut, like bone is pressing on bone. If that happens, lean your body forward just enough to open the backs of your wrists a bit while keeping the stretch in your forearms and hands.
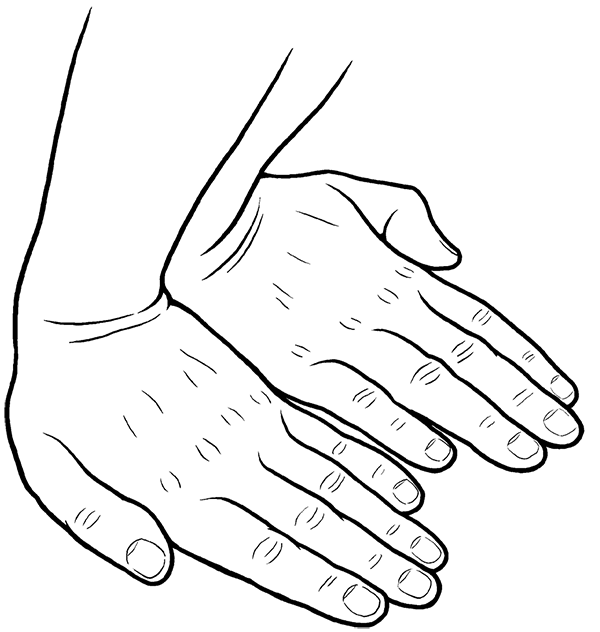 Figure 5.8 (Kneeling Forearm Stretch)
 Figure 5.9 (Kneeling Forearm Stretch)
Once you are able to do this stretch comfortably with your fingers a few inches in front of your knees, sitting all the way back on your heels, you can combine this with the seated toe stretches in the Seated Foot exercises section.
Purpose
Physical: This is a continuation of the previous exercise. Initially, you may not be able to do this one, but after practicing the Kneeling Forearm Stretch for some time, it will become easier. The next exercise, Interlocking Fingers behind Back, can also help you with this one, depending on where your particular restriction may be.
The previous exercise addresses the forearm and the entire front of the wrist. This one has a slightly greater focus on the little finger side of the wrist and forearm, in both the muscles and the joints. As such, it is more useful in addressing ulnar nerve problems. This also opens the front of the chest and stretches the front of the shoulders, benefiting the anterior deltoids (front shoulder muscles), the pectoral muscles (upper chest muscles), and the joint spaces where the front of the ribs attach to the sternum (breast bone).
Energetic: Same as for the Kneeling Forearm Stretch. Additionally, this has a stronger focus on the Heart and Small Intestine meridians, providing more of a benefit for those organs and energy systems. Opening the front of the chest in this way, the front of the Shoulder’s Nests are opened, and energetically benefits the Lungs. Opening the front of the chest further benefits the heart, and opens the acupuncture point called Tan Zhong, at the center of the chest. That too benefits the Lungs, and positively influences the qi of the entire body.
Techniques used
Extension and stretch, tissue lengthening, Daoist yoga, focused breathing.
 Figure 5.10 (Prayer Hands Behind Back)
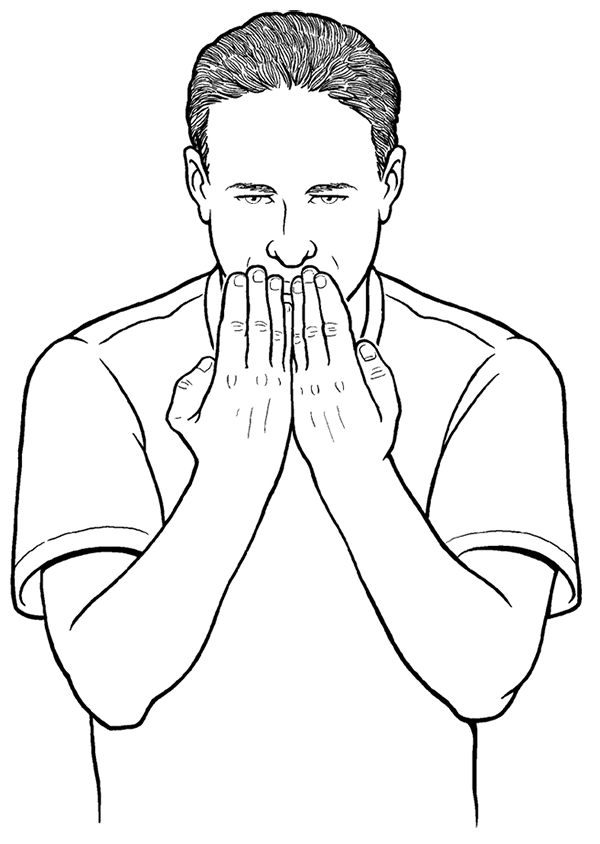
Method
Standing, or seated with no back obstructions, place the backs of your hands on your low back, fingertips touching. Keep your fingertips touching, and gradually move your hands up your back. You will naturally begin to point your fingers upward, and move your palms closer together. Your goal is to move your hands high enough up your back so that you can touch your palms together completely, in a prayer position, with the little finger edge of your hands staying in contact with your back (Fig 5.10). Once you attain that position, begin focused breathing, breathing into the stretch and releasing any tension you may feel with each exhalation. Gradually increase the stretch by moving your elbows rearward. That will further open the front of your chest and shoulders, and open the little finger edge of your wrists.
11. Interlocking Fingers behind Back—A Shoulder Stretch
Purpose
Physical: Opens the front of the shoulders, provides a rotational stretch to access muscles that are more difficult to stretch in other ways.
Energetic: Opens the Shoulder’s Nests, benefits the Lungs, releases local channel obstruction (shoulder pain from qi and blood stagnation). Opens the armpit (the bottom portion of the Shoulder’s Nests), benefits the Heart. The external portion of the Heart meridian enters the torso at the center of the armpit.
Techniques used
Standard stretch, rotational stretch, tissue lengthening, Daoist yoga, focused breathing.
Method
Standing, or seated with no back obstructions, place the back of your left hand on your low back, palm facing rearward. Keeping the back of your hand in contact with your back, move it upward as high as possible so that your fingertips point upward toward the sky, or as close as you can get to that. Hold your right arm straight up, by the right side of your head, fingers pointing to the sky. Then bend your right elbow so that your hand can reach behind your back, palm touching your back, with your right elbow now pointing upward. If the fingertips of each hand can touch, curl the fingers of each hand into hooks, so they interlock (Fig 5.11). This will pull your left arm higher up your back, increasing the stretch to the front of your left shoulder and the rotational stretch inside the shoulder joint. There will also be an increased stretch in your right armpit and along the right triceps.
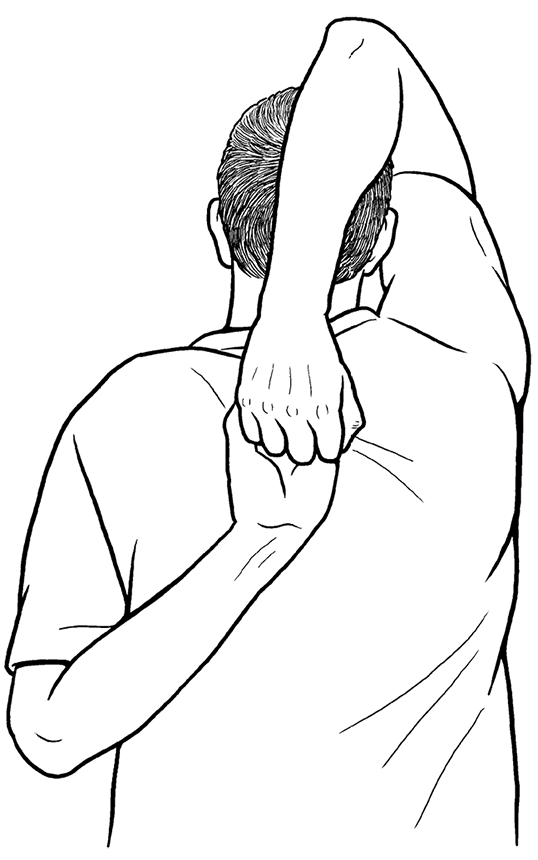
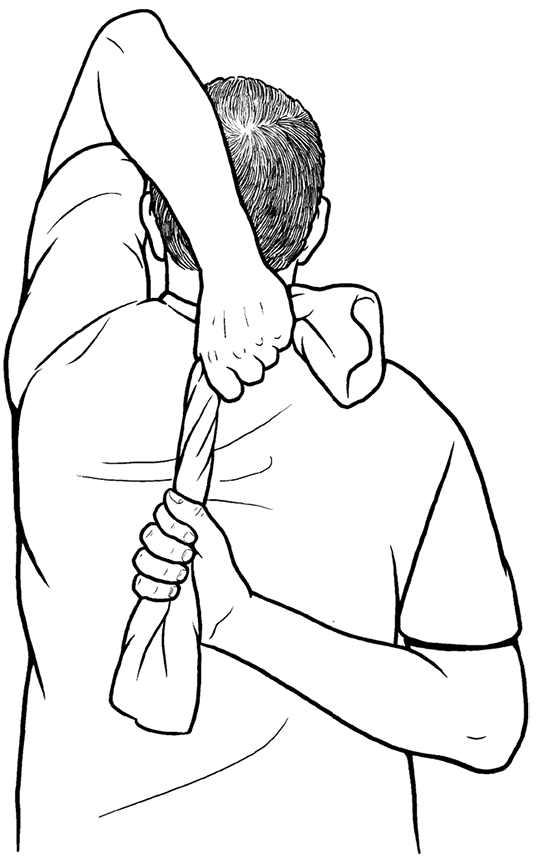
 Figure 5.13 (Nerve and Meridian Stretch/Release)