The next series of exercises focuses on the neck. The health of the neck is extremely important. Throughout the whole waking day, your neck supports the weight of your head and holds it upright. This is a little more challenging for people who sit at a desk for most of their work or school day, with their head inclined forward looking at a computer screen or doing paperwork, since the neck vertebrae are put out of optimal alignment and the neck muscles are forced to work harder for long parts of the day, every day.
The neck is the connecting pathway between your head and the rest of your body. This means it’s involved with the exchange of blood into and out of your head, including your brain, sense organs, and all your facial and scalp muscles. Any physical obstruction or restriction can reduce blood flow, impairing cognition, perception, and expression. Poor venous return, blood leaving the head to return to the heart, can increase the pressure inside the head and cause headaches, increase the concentration of metabolic and acquired waste products in the head, and set the stage for strokes. All the spinal nerves pass through the neck, from the brain to govern various functions of the body, and to the brain to relay information about the condition of the body and numerous environmental factors. Reduced nerve impulse transmission through the neck can impair the function of organs and muscles, and diminish sensory input so that various physical warning signs or dangers may go unnoticed. Virtually all acupuncture meridians pass through the neck, including seven of the Eight Extraordinary meridians and the core constitutional channels. While only the Yang, Du, and Ren meridians have external pathways through the neck and into the head, capable of being needled in acupuncture treatments, the Yin meridians have direct and indirect internal pathways there. The other neck and head Extraordinary meridians can only be needled through their associations with the regular meridians. As all of those meridians benefit from these exercises; the energetics are too extensive to list here individually.
Neck pain, which is almost always accompanied by upper back and shoulder pain, is epidemic in our culture, as are headaches. They may be the obvious result of traumatic injury, but otherwise physiologically, they may indicate muscle spasm, nerve impingement, or both, and cause or result from inflammation or other irritating factors, including mental and emotional stress. Arteries are muscular and are implicated in some types of headaches when they spasm within the head. Any type of spasm reduces blood flow, diminishing nourishment to the affected and surrounding muscles and allowing toxic waste to accumulate. This is one aspect of what the Chinese refer to as Blood Stagnation. In the absence of trauma, Blood Stagnation is usually a complication of prolonged Qi Stagnation, so attending to the associated energetics even before trouble is noticed is always a wise precaution. As with back pain, the narrowing of space between vertebrae and the degeneration of the vertebral bones may be involved. Most people naturally avoid anything that triggers pain, and often in the case of neck pain, especially chronic neck pain, that means reducing mobility. Reduced mobility eventually reduces functionality, which leads to further reduced mobility. So, while neck and shoulder pain may seem to mainly be common, troublesome nuisances, they are frequently the early stages of more serious complications if left untreated.
Most of these exercises utilize bending and stretching, flexion and extension, rotation, or combinations of those. Unless otherwise noted, they don’t involve held stretches, so focused breathing is optional. The main concern with breath throughout this series is that the breath should never be held. As a reminder, that’s true for all the exercises in this book. The entire series should not take much time, and ideally every exercise should be performed. The purpose of each is to maintain or improve the functionality of the neck and prevent or reduce pain, and to facilitate the transmission of nerve impulses and flows of blood and qi into and out of the head, for the reasons outlined above. It is common and normal to feel and hear popping and/or crunching sounds as you perform these exercises. The medical name for that is crepitus. Since you will not be actively trying to “crack” your neck in any of these exercises, the sounds you may hear are not at all damaging or dangerous, and in fact most often reduce over time with practice, indicating a healing response.
All of these exercises are best performed seated, either in a chair or on the ground, whichever is most comfortable. In terms of the seated posture, the most important thing is to keep your back straight. Slouching is counterproductive, since it creates a misalignment of the vertebrae of your back, which is the foundation upon which your neck rests. If you sit in a chair it should be firm, not plush, and you should sit on the forward half to the forward third of the seat. This will help keep your back straight. Do not lean on any seat back unless you have a serious back problem that requires that support. Place your hands on your knees, and let the weight of your arms comfortably pull your shoulders downward, helping to release any tension there. If you sit on the ground, either directly or on a cushion, make sure part of your focus is maintained on keeping your back straight. You may place your hands on your knees or keep them folded in your lap. Keeping your back straight also means that your shoulders and torso want to remain stationary, facing straight forward. In these exercises, we want to specifically target the neck, and for that to happen most effectively, only the neck should move.
Breathe comfortably, slowly, fully, and deeply, with no held breath at the end of either the inhale or exhale, and no place in between. From this starting posture, begin the neck exercises.
This simple exercise is always a good place to begin the neck exercises. It helps to loosen the neck vertebrae, soften the muscles, and increase regional blood flow, and prepares the neck for what comes later.
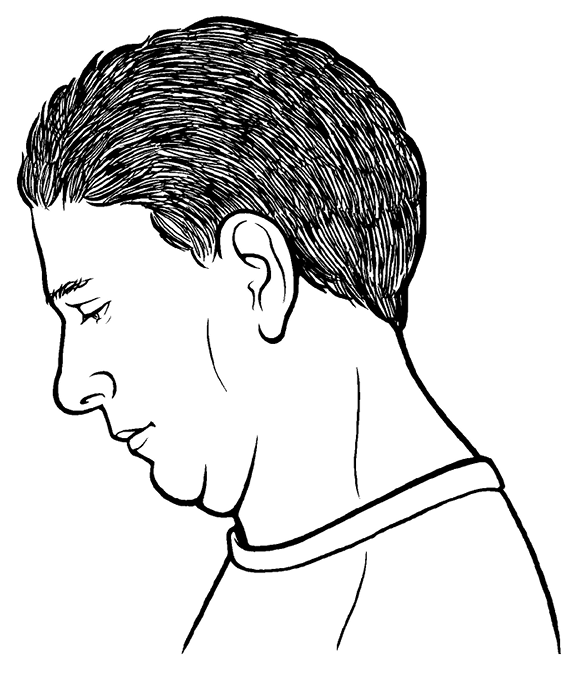
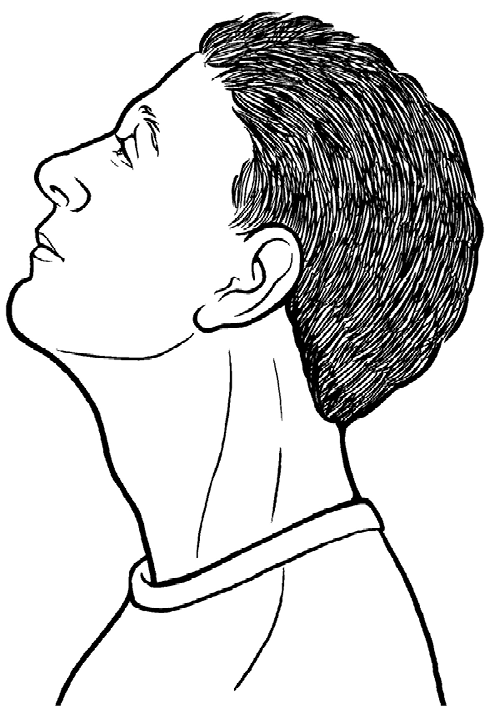
Figures 7.1A and 7.1B (Flex and Extend)
Keep your head facing straight forward, not turning to one side or the other, and carefully drop your chin toward your chest, as though you were nodding “yes.” Let the weight of your head stretch your neck forward as far as it will go, but do not force it farther forward than that (Fig 7.1A).As your neck opens over time, the natural final end point will be when your chin actually touches your chest. Then raise your head to its starting position, and slowly tilt it backward some to look toward the sky (Fig 7.1B).This backward extension should be limited, not as full as you might be able to move your neck. That’s because there are parts of the vertebrae—the spinous processes—that extend to the back of your neck, and they can get jammed together if you tilt your head back too forcefully or too far. In neigong practices, you may learn to increase the space between the vertebrae, which will safely allow a greater extension, but outside of that circumstance the neck is not structurally designed to extend far. A relatively slight extension is fine for this exercise.
Repeat this forward bend and backward extension ten to twelve times, slowly and purposefully, with no jarring at the ends of the bend in either direction. Breathe comfortably and naturally throughout. Return your head to its starting position and begin the next exercise.
2. Turtle
The Turtle naturally picks up where Flex and Extend ends. This exercise creates a glide, the motion of each vertebra sliding forward and back over its neighbors.
With your head fully upright and facing forward, stick your chin out as far as your neck allows, keeping your jaw as close to parallel to the ground as possible (Fig 7.2A).Feel the glide between the neck vertebrae, possibly extending into your upper back. This looks a bit like a turtle sticking its head out of its shell. Then, still facing forward and keeping your jaw parallel to the ground, withdraw your chin as far back as you can, tucking it in toward your neck (Fig 7.2B).You may feel or encourage a slight corresponding rise of the top of your head toward the sky. The chin tuck and rise of the head opens the back of the neck. Repeat this ten to twelve times, then return your head to its starting position and begin the next exercise.

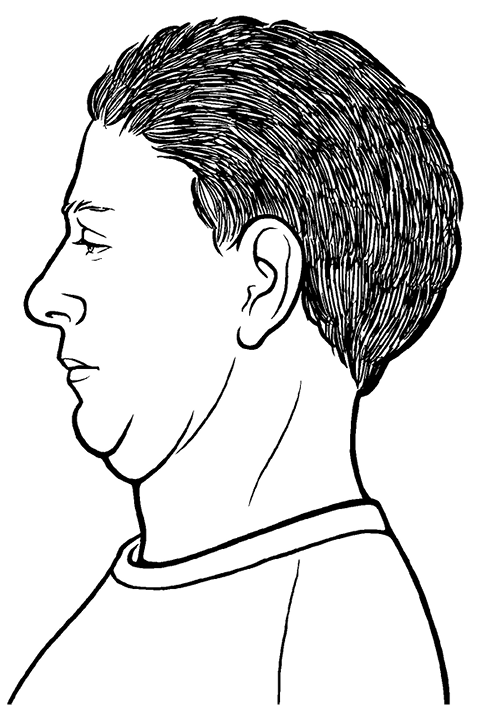
Figures 7.2A and 7.2B (Turtle)
The Crane completes the set of three forward neck bends. Ideally, you should practice all three whenever you do these neck exercises.
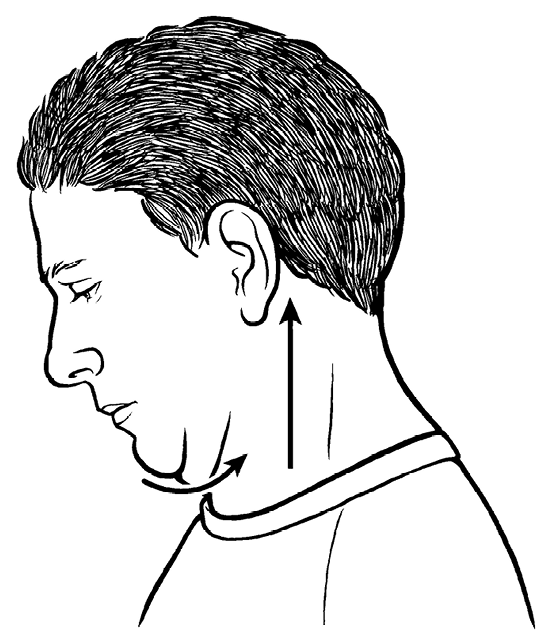
Begin as though you were doing the Turtle, sticking your chin out as far as your neck allows, keeping your jaw as close to parallel to the ground as possible (Fig 7.3A). Then, with your neck fully protracted (chin jutting forward), bend your neck forward as if you were wrapping the front of your neck around a ball under your chin (Fig 7.3B).Keep your chin as close to your body as you can, making sure you don’t drop the imaginary ball you are holding as you pull it up the front of your neck with your chin (Fig 7.3C).Feel the back of your neck extending and your whole neck unfurl as you gradually return your head to a fully upright position. At the end of the unfurl, give a little extra lift to your head, extending it straight up toward the sky. Repeat ten to twelve times.


This is the first neck exercise to include a side-to-side motion. If we liken the Flex and Extend exercise to nodding yes, this exercise is like shaking your head no.
Begin with your head fully upright and facing forward. Keep your jaw parallel to the ground, and turn your head slowly to the left, moving your chin toward your left shoulder. Keep your neck straight up, fully lengthened and perpendicular to the ground (Fig 7.4).At the end point of the turn, it’s common for people to want to tilt their head a little, moving it rearward to get a sense of an increased stretch. It’s also common to allow your left shoulder to move rearward, as that will allow you to turn farther and give you the illusion that you’re turning your neck more. You want to avoid both those possibilities, to do the stretch honestly and accurately, in order to get the best result from this exercise.
Then turn straight forward to your starting position, and continue the turn in the opposite direction, moving your chin toward your right shoulder this time. Repeat the left and right turn ten to twelve times.

In this second side-to-side neck exercise, your head stays facing straight forward throughout.
Begin with your head fully upright and facing forward. Tilt your head to the left so that your left ear moves toward your left shoulder (Fig 7.5).It’s common to turn your head to the left when doing this, so do your best to avoid that, keeping your head facing straight forward. A little trickier, try to lengthen your neck at the same time. To help with that, imagine that someone has their hand placed lightly at the top of your head, tracking your movement while you try to push the top of your head into their hand as you move your head to the left. In addition to stretching the right side of your neck better, opening the vertebrae at the right side of your neck, this neck lengthening also opens the left side of your neck some, keeping space there to minimize any excess compression or bone-on-bone contact on that side of your neck.
Then return your head to its starting position and repeat, tilting your head to the right so that your right ear moves toward your right shoulder this time. Do your best to keep your neck lengthened as you slowly move your head side to side ten to twelve times.
Once you sense your neck is lengthened, you can add a held stretch after the last sideways tilt in each direction. To do that, with your head tilted left, reach over the top of your head with your left hand, and place your palm on your head so that your left fingertips are close to your right ear. Let the weight of your left arm alone slightly increase the stretch, taking care not to actively pull your head to the left. Keep your neck lengthened so that the left sides of your cervical vertebrae do not grind on each other. In this held stretch, you can add focused breathing, inhaling into any tight or uncomfortable area, and releasing tension with each exhalation. Breathe five to ten times, then repeat the held stretch in the same way on the other side of your neck, head tilted to the right.
6. Chin to Chest Neck Rotation
This is a variation of the more well-known full neck rotation, one that provides as much benefit without the danger of grinding the bones of the cervical vertebrae.
Drop your chin to your chest, as in the beginning of the Flex and Extend exercise earlier (Fig 7.6A on next page).Keeping your chin as close to your body as possible, your neck fully flexed, imagine that you are drawing a line on your chest with the tip of your chin toward your left shoulder as your rotate your neck to the left. Your chin will rise as it approaches your shoulder. When turned as far to the left as your neck allows, look slightly downward over the back of your left shoulder if possible, to maximize the stretch (Fig 7.6B on next page). Then draw the imaginary line with the tip of your chin back to your starting position at the center of your chest, and continue turning your head to the right until you reach the end of your stretch and look slightly downward over the back of your right shoulder. Keep your movement smooth, slow, and deliberate. There is no particular breathing pattern used here, but remember to keep your breath smooth, full, and even, with no held breath at any point. Repeat this side-to-side rotation ten to twelve times.


Figures 7.6A and 7.6B (Chin to Chest Neck Rotation)
You may feel or hear crunching or popping noises, but that is normal, an indication of crepitus as described earlier, not bone grinding on bone.
7. Thumb Massage to Back of Neck
In this exercise, you will massage two or three parallel lines up the back of your neck. This self-massage is taken from Chinese Anmo and Tuina massage practices, which contain the physical therapy of standard massage and the energetic components of acupressure. Close to your spine, you will be accessing and benefiting the qi of the Urinary Bladder; slightly farther out, the Gall Bladder. The Sanjiao meridian intersects those diagonally. You may also access the qi of the small intestine, farther to the sides of your neck. That might be missed in this practice, but it is addressed in others in this section.
 Figure 7.7 (Thumb Massage to Back of Neck)
Interlock your fingers and place your hands at the back of your head, cradling the base of your skull. Point your thumbs downward toward the top of your shoulders (Fig 7.7 ). You may need to slide your hands a little lower, letting your thumbs touch your neck where it joins your back. Your interlocked fingers will allow you to use more force with your thumbs than you might otherwise be able. Using pressure comfortable to both your thumbs and neck, press into your neck with your thumb tips at the base of your neck. You may want to incline your head some to open the back of your neck for easier access. Make circling movements with your thumbs, massaging into your neck muscles. Start slightly wider on your neck, near the sides of your neck, and gradually move your circling thumbs upward in a relatively straight line until you reach the base of your skull. Then massage back down along the same line. Move your thumbs inward slightly, closer to your vertebrae, and repeat the circling massage up and down your neck. If there is room for you to move your thumbs closer still (without placing them directly on the center of the vertebrae), repeat the circling massage for a third and final time, up to the base of the skull and back down.
Wherever you may feel tension or tenderness, at any point on any of the three lines along the back of your neck, stay on those spots a bit longer. Massage long enough to feel some of the tension dissipate and the muscles soften. This may feel a little sore, but in a “good hurt” way. With practice over time that soreness will lessen and vanish.
All the previous neck exercises are loosening, opening, stretching, and mobilizing practices. These final exercises are not Chinese, to the best of my knowledge, but are isometric strengthening exercises for the neck. Muscle strengthening exercises are useful for the entire body, of course, but the neck is a special case in that it works nonstop throughout the day to hold up the weight of your head, and weak neck muscles are a contributing factor to many causes of neck pain. A strong neck is more stable (better able to hold the improvements from the previous exercises), less prone to injury, and will help to minimize or reverse degenerative changes.
1. Forward Resistance. With your head fully upright and facing forward, place the palm of your strongest hand on your forehead. Push your forehead into your hand as hard as you can without strain (Fig 7.8A).Feel the muscles at the front of your neck work as you use your hand to resist and hold it in place. Push for about ten seconds, and then relax. Repeat three times.
2. Rearward Resistance. Interlock your fingers and place your hands at the back of your head, palms cradling the lower part of your skull. Push the back of your skull into your hands as hard as you can without strain (Fig 7.8B).Feel the muscles at the back of your neck work as you use your hands to resist and hold it in place. Push for about ten seconds, and then relax. Repeat three times.
3. Lateral/Sideways Resistance. With your head fully upright and facing forward, place your right palm on the right side of your head near your temple. Push the side of your head into your hand as hard as you can without strain (Fig 7.8C). Feel the muscles at the right side of your neck work as you use your hand to resist and hold it in place. Push for about ten seconds, and then relax. Repeat three times. Then do the same exercise on your left side.
4. Rotational Resistance. With your head fully upright and facing forward, place your right palm on the right side of your face, with your upper palm near your cheekbone and your lower palm near your jaw. Turn your head into your hand as hard as you can without strain, as though you were trying to look at something at your right side (Fig 7.8D on next page ). Feel the muscles at the left side of your neck work as you use your hand to resist and hold it in place. This may seem counterintuitive, but the muscles on the left side of your neck are most responsible for it turning to the right. Turn for about ten seconds, and then relax. Repeat three times. Then do the same exercise on your left side.
When you are finished with these resistance exercises, you may want to do a few repetitions of the stretching exercises again to give your neck the sense of loose openness once more. If so, freely select whichever ones appeal to you.

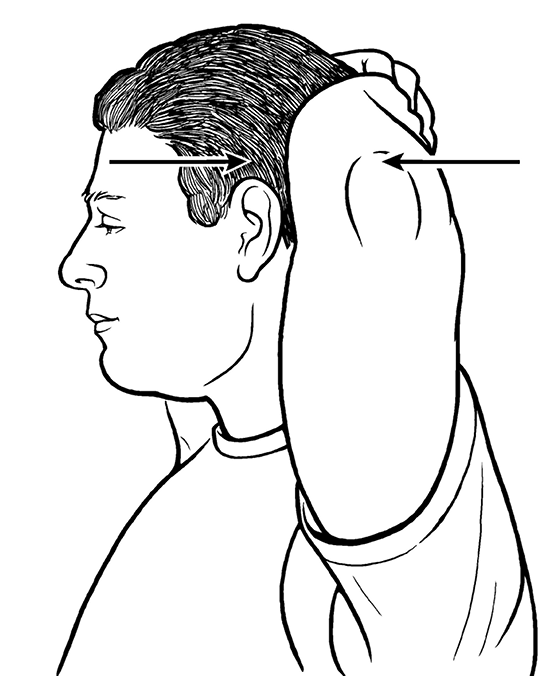
 Figure 7.8C (Resistance Exercises)
 Figure 7.8D (Resistance Exercises)