The exercises in this chapter focus on the sense organs. Many of these exercises come from what are called either the Seated Eight Brocades or the Seated Twelve Brocades, depending on how many “brocades” are taught in the traditional set. Numbers had a special significance to the ancient Chinese masters, and many contemporary practitioners still adhere to those principles. For our purposes, there’s no need to go into those philosophical distinctions except to point out that they exist, as you may encounter them if you explore these practices further along your path.
There is a well-known, very old yet still popular qigong set called the Eight Brocades, or the Eight Golden Brocades, Baduanjin. Some say that the Seated Brocades are derived from that primary set, but while they are sometimes taught together, they are in fact different if complementary practices. The Eight Brocades are a true qigong but the Seated Brocades, while having some direct effect on qi, are not complete qigongs. That doesn’t diminish their value in building health. It does makes them easier to learn, and more quickly provides the benefits for which they were designed. They have the additional virtue of being able to be practiced by people who are unable to stand due to injury, illness, or advanced age.
The more obvious benefits include better functioning of the sense organs involved—an improvement in vision, hearing, sense of smell, and taste. Along with those benefits, there can be a corresponding improvement in digestion and a decrease in acute or chronic nasal congestion, allowing for easier breathing, for example. The less obvious benefits are derived from the connection each sense organ has to a particular internal organ, through their Five Element correspondences, and from the acupuncture points and meridians that are stimulated. With those connections, and because the sense organs are organs of perception, these exercises can stimulate and improve mental functioning.
Here are the sense organs paired with their corresponding internal organs. The first organ given is the Yin organ, followed by that yin organ’s yang organ partner in parenthesis. In this case, the Yin organ is the one of primary influence, but the yang organ will also be involved. Note that this is a two-way street. That is, the functional condition of the internal organ can manifest in the sense organ, and the sense organ will also influence the health and functionality of the internal organ.
Eyes: Liver (Gall Bladder)
Ears: Kidneys (Urinary Bladder)
Nose: Lungs (Large Intestine)
Lips and Mouth: Spleen (Stomach)
Tongue: Heart (Small Intestine)
Some of these connections might not be readily apparent to someone not trained in Chinese medical concepts. The easiest might be the nose and lung connection, both because the physical, anatomical pathway is clear, and because a cold or flu can begin with nasal congestion and sneezing which if left untreated can progress to lung congestion and cough. As one more easily understood if less immediately obvious example, consider the connection between the liver and the eyes. Alcohol consumption is well known to be challenging to the liver, and when one drinks too much, two of the most common colloquial descriptions include “seeing double” or being “blind drunk.”
In almost all practices designed to influence qi, it’s most common to begin from the top of the body and work down when that is practical. Since that’s very easy to accommodate in these exercises, we’ll follow that principle here.
 Figure 8.1 (Scalp Rake)
This opens up the main Yang channels on the scalp and head, the Urinary Bladder, Gall Bladder, and Sanjiao (Triple Burner) meridians. All three communicate directly with the ears and eyes. While not directly stimulating the Du (Governing) meridian, which runs along the centerline of the head, it will receive some benefit from incidental stimulation, its proximity to the other meridians, and its connections to those meridians via small collateral vessels. This will activate the brain, enliven all the senses, and prepare you for all the exercises that follow in this section.
Curl the fingers of both hands as though you are making tiger’s claws (Fig 8.1). Keep your fingers firm and close together, and place the tips of them along the front of your hairline (or at the top of your forehead if you are balding). Your little fingers should be touching (Fig 8.2 on next page ). Keeping your little fingers in contact, rake over the top of your head to the base of the back of your skull. Use firm pressure, and make this movement brisk. Repeat two more times. Then spread your hands a bit so that your little fingers are about two inches apart, so that your lines of stimulation are farther apart, and repeat the raking movement again three times. Finally, move your hands farther apart again, so that your thumbs are in front of your ears. Rake back again three times, with your thumbs arcing just above your ears, and ending with your thumb tips coming to rest at the hollow near the outer edge of the back of your skull.
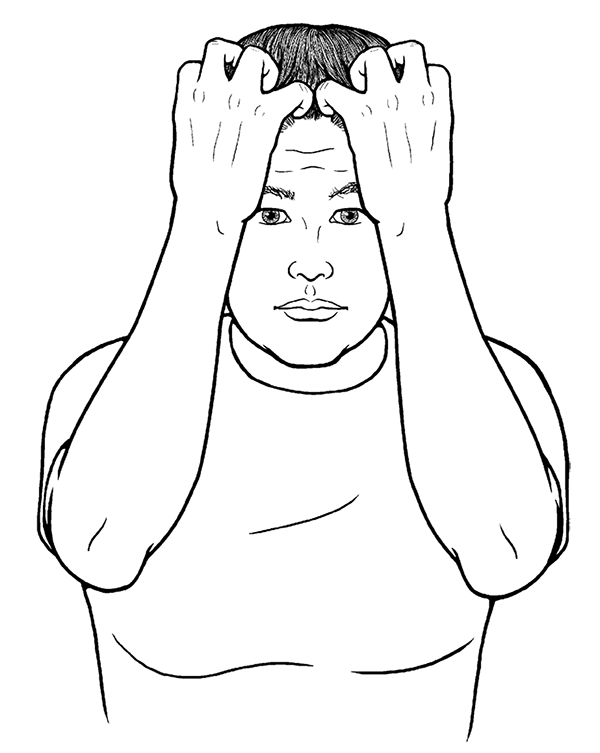 Figure 8.2 (Scalp Rake)
Massage can serve many purposes. This one addresses two common ones: relaxing tight or tense muscles and encouraging qi flow. Together, you can improve local blood circulation as a bonus. Many people don’t consider that the scalp is covered in muscle. The muscles at the temples are aptly named the temporalis muscles. The main acupuncture meridian at that location is the Gall Bladder meridian. In addition to the benefits common to all these exercises, this one is useful in relieving both tension and migraine headaches.
Place the tips of two or three fingers, whichever is most comfortable, at both temples, slightly above and in front of your ears. If you press directly toward your skull, you may feel indentations in the bones there. While those are the most advantageous spots for your fingertips, don’t worry if you can’t find them; anything in that area will be of benefit.
Start gently at first, but gradually apply more pressure as you make small circles with your fingertips. Use “attractive force”—that is, don’t let your fingers slide over the surface of your skin, but engage the muscles below. Circle your fingertips ten to twelve times forward, and then the same number of times backward. If you’re prone to headaches or stress, you may feel the muscles ache under the pressure. That’s not dangerous, and is in fact beneficial and necessary to relieve the tension there. Don’t use so much pressure that it actually hurts, though. That’s never a good idea. You can repeat the cycle of ten to twelve circles in each direction two or three times if you’d like.
3. Ten Point Eye Acupressure Massage
People tend to carry a lot of tension in their eyes, from overusing them in our visually oriented work and cultural environment, and possibly from viewing disturbing or overstimulating imagery either out in the world or generated internally. This can easily become generalized to create or increase stress in every aspect of one’s life, since the way you look at things, your perception and outlook on the world becomes quite literally viewed through the lens of that tension. All the eye exercises help to reduce eye tension, and when practiced over time, they will reduce your overall level of stress.
The Ten Point Eye Acupressure Massage most obviously benefits the eyes and can help improve all manner of vision problems. As the eyes are the sense organ associated with the Liver, it will also help improve aspects of Liver functions, notably in its emotional correspondences. People who work with their eyes a lot can be more prone to irritability and anger, as well as depression. Those emotions, especially when habitual and when inappropriate to immediate life circumstances, are generated by the Liver when it is not functioning optimally.
This exercise is also part of a regimen of facial rejuvenation, helping to diminish the fine lines and wrinkles that appear around the eyes with age, and reduce the dark circles and “bags” under the eyes that may result from a lack of adequate sleep, among other things. Liver blood, which is best replenished by regular sleep, nourishes the eyes. Eyes that are habitually tired or weak suffer from inadequate liver blood nourishment. Combine this with the other eye exercises in this section for better results, and for the best results, include any of the exercises for the Liver found elsewhere in this book.
To begin with, you must locate the four points around each of the eyes, and then one at the outer corner of the eyes. The four points are indentations found in the bone surrounding the eyes, so you’ll have to roll your fingers just inside the eye sockets to feel them. You may feel some tenderness or even slight pain when touching those points, another indicator that you’re on the right spot and that there’s qi stuck there. As previously noted, most Chinese exercises with an energetic component work from the top of the body first and then moves downward, so even within this individual exercise, we’ll start by locating the upper eye points.
 Figure 8.3A–8.3E (Ten Point Eye Acupressure Massage)
Place your thumbs at the inner corner of your eyes, touching the bridge of your nose, with thumb pads facing upward. Gently push up, feeling for the ridge of bone at the upper inner border of your eye socket. Move your thumbs slightly outward until you feel a clear indentation or depression in the bone. If you are looking in a mirror when you do this, you’ll see your thumbs have not yet reached the centerline of your eye above your pupils, they’re still closer to your nose. That’s the first point (Fig 8.3A). To find the second point, slide your thumbs toward the outer corner of your eye, thumb pads still pressing gently upward so you can clearly feel the ridge of your eye socket. As you approach the outer corner of your eyes, you’ll feel another indentation, perhaps a half inch before your reach the corner. That’s the second point (Fig 8.3B).
The third and fourth points are on the inner edge of the lower border of the eye socket, so now you’ll use either your index or middle finger to find them. Below your pupil, curl your fingertip just inside the eye socket. Toward your nose, you may feel a slight pointy bump of bone. Feeling outward from that bump, or just slightly outward from the center of your eye, you’ll find another indentation. This one may be smaller than some of the others, but still easy to find when you know where to look. That’s the third point (Fig 8.3C). Sliding your fingers outwards toward the outer corner of your eyes, you’ll find the final depression within the eye socket, a finger’s width or slightly less from the corner of your eyes (Fig 8.3D).
The fifth, final point is outside your eye socket, just beyond the outer corner of each eye. Place the tips of each index finger at the outer corner of your eyes, and slide them outwards toward the side of your head. Feel them pass over a small bony ridge, and then drop into a depression just beyond that ridge, and just very slightly higher than the corner of the eyes. That’s the fifth point (Fig 8.3E). This is an “extra” acupuncture point, not found on any of the regular or extraordinary meridians, called Taiyang. This is commonly needled to help both with headaches and with eye problems, especially those caused by Wind (the environmental factor associated with the Liver) and Heat. Internal Liver Wind and Liver Heat (Fire) are frequently generated by Liver pathologies, and often cause eye problems that are helped by treating Taiyang.
Now that you’ve found each point, you can treat them in this way. Follow the order given above, as that will direct any pathology outward, and create a slight lift to assist in cosmetic purposes at the same time. If you felt tenderness or pain with slight pressure while locating them, start with just direct pressure, enough to feel that tenderness. Hold it for about ten seconds, and then remove the pressure. This will help release any muscle tension held there and begin to disperse stagnant or stuck qi. Treat each point in this way. You can repeat this three times on each point. After a week or two, the tenderness should diminish. At that time, or if the points were not tender to begin with, apply some pressure to each point and make very small circles with your fingertips. The circling motion will disperse stagnant qi more effectively, and create more energetic motion so that more healthy qi will be drawn to those points as needed. This is useful and beneficial even if your eyes are completely healthy.
4. Four Directions Eye Exercise
This is an easy set to describe and to perform, and can be done anywhere and anytime. The four directions are:
1. Up and down.
2. Side to side.
3. Diagonally up in one direction to diagonally down in the other direction, both sides.
4. Circles, both clockwise and counterclockwise.
Here’s one convenient way to begin this practice. Sit in a chair, facing a wall or an object directly in front of your line of sight as you look straight forward. If you’re facing a wall, find a spot, place, or small picture directly in front of you. The object or spot will serve as a point of reference and help keep your eye motion as uniform as possible. Without moving your head, look upward as far as your eyes allow, and find something you can clearly focus on and spot each time you look up. Then look back at the spot directly in front of you. Then, again without moving your head, look downward as far as your eyes allow, and find something you can clearly focus on and spot each time you look down. Then look back at the spot directly in front of you. Tracing as straight a line as possible with your eyes, alternately look up and down, finding the spots you’ve picked out, including the one directly in front of you. Do this ten to twelve times, deliberately and at a moderate to slow pace.
Next, without moving your head, look to the left as far as your eyes allow, and find something you can clearly focus on and spot each time you look left. Then look back at the spot directly in front of you. Again without moving your head, look to the right as far as your eyes allow, and find something you can clearly focus on and spot each time you look right. Then look back at the spot directly in front of you. Tracing as straight a line as possible with your eyes, alternately look left and right, finding the spots you’ve picked out, including the one directly in front of you. Do this ten to twelve times, deliberately and at a moderate to slow pace.
Next, without moving your head, look diagonally up to the left as far as your eyes allow, and find something you can clearly focus on and spot each time you look left. Then look back at the spot directly in front of you. Then, again without moving your head, look diagonally down to the right as far as your eyes allow, and find something you can clearly focus on and spot each time you look right. Then look back at the spot directly in front of you. Tracing as straight a line as possible with your eyes, alternately look up to the left and down to the right, finding the spots you’ve picked out, including the one directly in front of you. Do this ten to twelve times, deliberately and at a moderate to slow pace. Then reverse the directions, looking up to the right and down to the left for the same number of times.
Finally, make circles with your eyes. You can start with either clockwise or counterclockwise circles. Here, you won’t be looking at the spot directly in front of you, but you can locate the other eight spots you selected in the previous exercises as you circle your eyes, again to ensure the most uniform eye movement possible. After circling your eyes ten to twelve times in one direction, reverse the direction of the circles for the same number of times.
This exercises the muscles that move your eyeballs. Those muscles attach all around the sides and rear of the eye, and allow for all the movements your eyes can make. The Chinese consider eyes that are capable of free, quick movement to be a sign of intelligence. As with any muscle, the ability to move freely and without pain requires the nourishment of blood and the qi and other nutrients it contains. Since the backs of the eyes connect almost directly with the brain, more blood drawn to that area benefits the brain as well. If you feel tenderness or discomfort as you move your eyes in any direction, it indicates that the muscles responsible for that movement are weak or tight, and they will get achy in the same way any other muscle will when weak or tight.
Place some attention on your breathing as you do these eye exercises. While you don’t have to breathe in any particular way, you may find that you hold your breath for some or all of these exercises. The Liver is responsible for the smooth flow of qi throughout the body. An unconsciously held breath indicates a disruption in qi flow, and smooth, deep breaths promote an unobstructed course. Do your best to keep your breathing even and regular throughout this exercise in particular.
This is not, to the best of my knowledge, specifically a Chinese exercise, but it is a type of continuation of the previous exercise. Our eyes focus because there are very tiny muscles that contract and relax to pull on the lenses within each eye. That pulling and relaxing makes the lens more convex or less convex, when viewed from the front, allowing for near and far focus. Now, the lens itself may harden some over time, becoming less flexible, but to whatever extent it remains supple, the strength of the muscles that shape the lens determines our clarity of focus. These days, most people spend too much time indoors, working with computers and other devices up close, so there’s less opportunity to exercise those small muscles beyond that narrow range. This focus exercise helps to remedy that, and may improve vision with practice over time.
Before sitting in a chair as above, place a magazine or newspaper, something with relatively large print of differing sizes, open to any page with such print propped upright at one end of the room. Place your chair at a distance where you can read the print when covering either eye. Hold a paperback book, a newspaper, magazine, matchbook cover, anything with small print, in your left hand, and sit in the chair. Cover your right eye with your right hand, and with your left eye, look at the printed page at the far end of the room. Clearly focus on the smallest size of print that you can read. Then lift your left hand to just below the height of your left eye, and hold the book or printed material as close to that eye as you can and still be able to clearly read print on that item. Shift your focus back and forth between the near and far print, making sure you can clearly read the letters you are looking at. Shift your focus back and forth ten to twelve times. Then place the book in your right hand, cover your left eye with your left hand, and repeat the exercise with your right eye. You may need to focus on larger print, or hold the book farther away, when using your other eye. That’s okay; just pick a the smallest print size you can read, and the closest distance you can focus on.
After a few weeks of daily practice, you may find you can read more clearly, possibly even not needing glasses to read things you would have in the past. All the other benefits of the previous exercise apply here on a finer, more subtle scale, as we are working with even smaller physiological structures.
This is another exercise that can be done anywhere and anytime, to soothe tired, overworked eyes. In the context of this set of eye exercises, doing it at the end of the practice will comfort eyes that have just been worked in some unfamiliar ways.
Sitting or standing, rub your hands together until they are comfortably warm. The friction from rubbing your hands together generates that warmth, which then dilates the blood vessels and brings more blood to your hands. Supportively, the increased blood in your hands makes them warmer still. People adept at the practice of qigong can make their hands warm just by using their mind to direct the qi there. In Chinese medicine, there is a saying: “The Qi is the commander of the Blood, but the Blood is the mother of the Qi.” This means that qi, energy, is required to move the blood wherever it goes in the body, and that wherever there is more blood, there can be more qi, since qi requires healthy blood as a medium from which to grow and flourish. Even if you can’t feel qi, more is present in your hands after rubbing them together to bring blood there. Now, place the palms of your hands over your eyes, and let the warmth penetrate your eyes. That warmth is an aspect of qi, so more qi will penetrate your eyes at the same time, helping them to become more comfortable and healthy.
If you have trouble understanding this from the standpoint of Chinese energetics, consider it from a basic scientific standpoint. If you were to observe your hands using night vision goggles, which detect infrared radiation, you would see that your hands appear brighter, as they are giving off more infrared radiation in the form of heat. All biological energy is qi, and the infrared radiation generated by your body is just one part of that biological energy, one part of your qi.
Moving down from the eyes, the next sense organs addressed are the ears. These exercises will help keep your ears healthy and your hearing strong well into old age. The ears are the sense organs associated with the Kidneys, so any problems you have with your ears may reflect a problem with Kidney function, any benefit to your ears will benefit your Kidneys, and exercises found elsewhere in this book that benefit your Kidneys will benefit your ears as well.
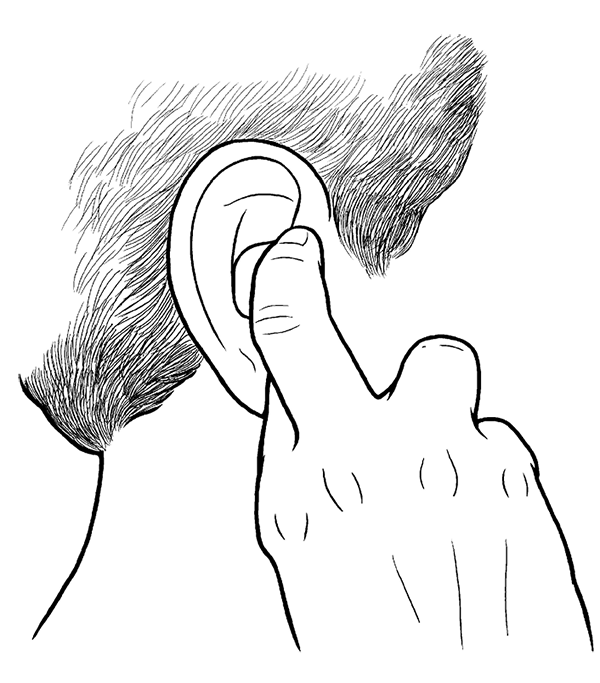
Beating the Heavenly Drum makes use of a gentle paidagong, a tapping and patting technique used in various exercises throughout this book that breaks up stagnant qi and stimulates local qi flow. It is commonly practiced in two different but related ways. The first way is the simplest, and getting the sense of the Heavenly Drum here will make it easier to get the Heavenly Drum in the second approach. Sitting comfortably, place the tips of your index fingers on the small triangular flap of cartilage and skin directly in front of your ear canal. Push that flap firmly so that it fully closes the opening to your ear, and hold it in place there (Fig 8.4A). Use your middle fingers to tap on the fingernail of your index fingers, so that you hear a drumlike beat within your ear (Fig 8.4B). Keep the beats as even as possible, and tap thirty-six times. (Fig 8.4C).
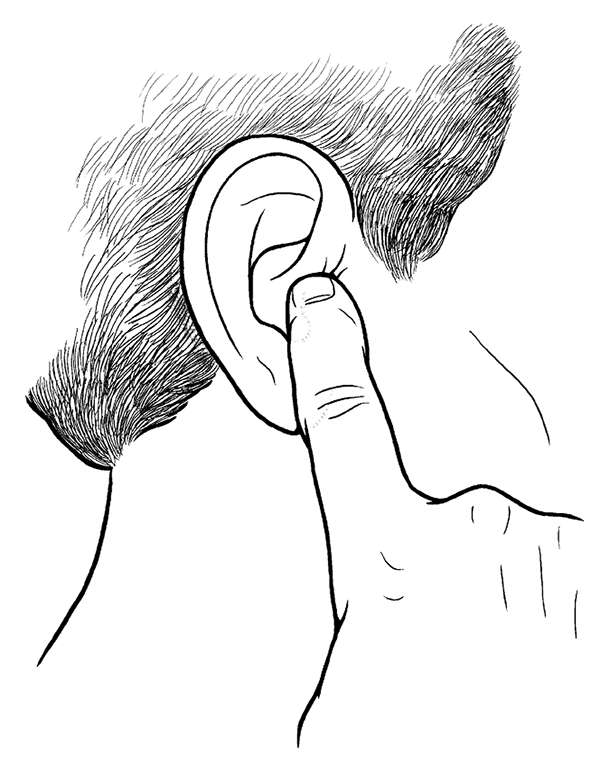
Figures 8.4A and 8.4B (Beating the Heavenly Drum)
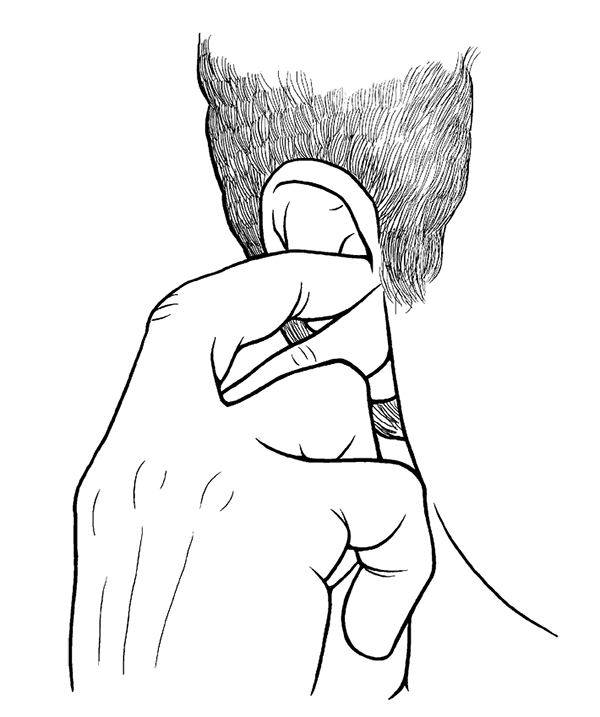 Figure 8.4C (Beating the Heavenly Drum)
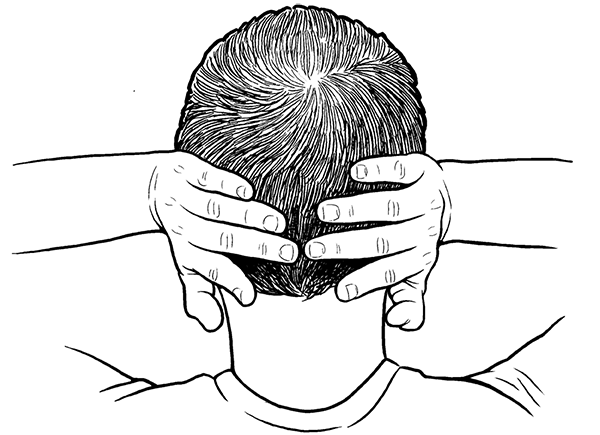 Figure 8.5A (Beating the Heavenly Drum)
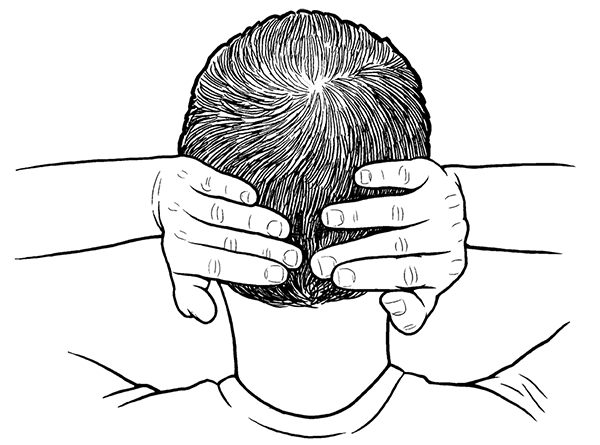 Figure 8.5B (Beating the Heavenly Drum)
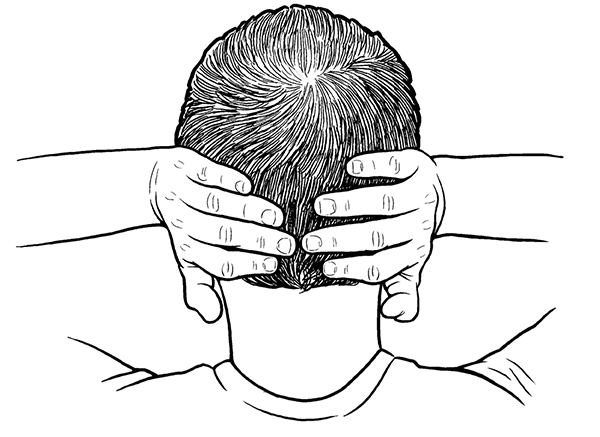 Figure 8.5C (Beating the Heavenly Drum)
In the second variation of the Heavenly Drum, getting that drum beat sound can be a little trickier, but once you have some experience with the first variation, you know what to look for. Here, place the palms of each hand over each ear, with your fingertips curling rearward to the back of your head. Your middle fingers should lie just at the lower ridge of your occiput, the base of your skull (Fig 8.5A), so that your index fingers will touch the skin and muscle just below, at the very top of your neck. Keeping your palms over your ears and your little, ring, and middle fingers firmly in contact with your skull (thumbs can touch your neck or hang down freely), place your index fingers directly on top of your middle fingers (Fig 8.5B), and then flick them with just a little force so that they tap your upper neck (Fig 8.5C). You should hear the same drum beat when doing this as you heard in the first variation, although possibly less sharp or at a slightly lower pitch. The Urinary Bladder (UB) meridian runs exactly under the spot the tips of your index finger will tap when doing this variation, so you will get an extra benefit from that. The UB is the Yang organ paired with the Yin Kidneys. The UB meridian runs down your back in parallel lines flanking your spine and directly overlays the Kidneys, so stimulating qi flow there helps release obstruction along your back, useful as an adjunct to reduce back pain, and offers more direct stimulation of the kidneys. As with the first variation, tap thirty-six times.
In addition to its Kidney correspondence, the ear has direct connections with three Yang meridians: the Small Intestine, the Gall Bladder, and the Sanjiao. This simple exercise stimulates those meridians (whose local points are used to treat various ear problems) while simultaneously freeing up the small physical structures just within and surrounding the ear. The slight vacuum this creates can also help dislodge waxy buildup within the ear. Even in the absence of any known hearing problems, those factors combine to sharpen the sense of hearing, and generally make your ears feel good.
Insert your little fingers into each ear, deeply enough so that your ears feel blocked and your hearing is reduced, but not so deep that you feel uncomfortable pressure on your eardrums. Then make circles with your little fingers, directing the force of the circles toward the wall of the ear canal and not toward your eardrums. You should feel the ear canal move. If there are any adhesions surrounding your ear canal, you may hear a slight crackling as they are freed. This should not cause any pain. Make twelve circles forward, and then twelve circles backward. Then curl your little fingers slightly, so they make ever more firm contact with the ear canals, and quickly pull them out of your ears, producing a soft popping sound. If you’ve dislodged any ear wax, the suction will help pull it from your ears.
8. Friction Massage to Sides of the Nose
The nose is the sense organ associated with the Lungs. This simple exercise helps with breathing problems, clears the sinuses, improves the sense of smell, and brings more qi and blood to the nose in preparation for the next exercise. Especially when combined with the next exercise, this also benefits the throat, which is the passageway between nose and lungs, and reduces the occurrence and severity of colds and flus.
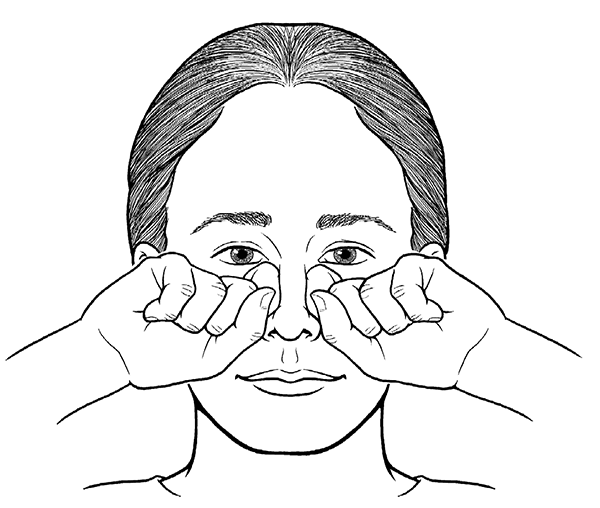 Figure 8.6 (Friction Massage to Sides of the Nose)
Step 1: Different Chinese teachers have slightly different preferred hand and finger positions for this. The results are very similar, but each position produces its own variation and places a slightly different emphasis on different parts of the nose, stimulating those areas to a greater or lesser degree. Experiment with both of these and see which you like best. Choose either one to start with, and feel free to alternate them at will.
Hand Position 1: For the first hand position, make a loose fist, and open your index finger just enough so that you can place the pad of your thumb on the fingernail of your index finger. Flanking your nose, place the backs of your index fingers on your cheeks, so that the knuckle of your index fingers are near or at the bridge of your nose, and the sides of your index fingers are touching the sides of your nose (Fig 8.6).
Hand Position 2: For the second hand position, keep your hands fully opened with your thumbs out at, or near, right angles to your hand. Placing your thumbs under your jaw, lay your index fingers at the sides of your nose so that the palm surface of the index fingers contact your nose, while the near sides of your index fingers, the side of the index fingers closest to your thumbs, touch your cheek at the sides of your nose (Fig 8.7). In this illustration, the middle, ring, and little fingers are folded to better show the index finger position.
Step 2: Using either hand position, rub your index fingers up and down briskly along the sides of your nose, for ten to thirty seconds. Hand position 1 will create a little more external friction and warmth on the surface of your skin, and naturally stimulate the points closer to the bridge of your nose. You can stimulate the points closer to the tip of your nose if you make sure to move your knuckles down that low. Hand position 2 doesn’t create much external friction, since your index fingers remain in firmer contact with your skin, with less sliding on the surface. This position will naturally free up the mucus membranes inside your nose a little better. Both bring qi and blood to your nose equally well, and both stimulate the points flanking your nose.
 Figure 8.7 (Friction Massage to Sides of the Nose)
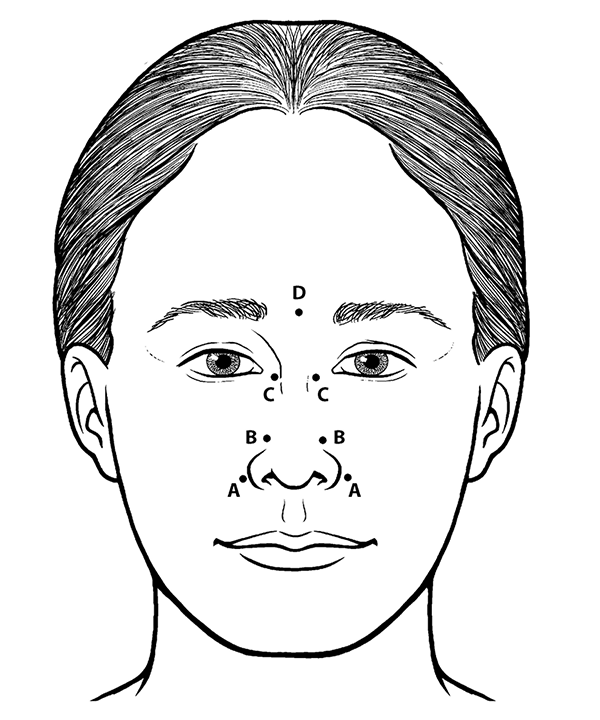 Figure 8.8A–8.8D (Seven Point Nasal Acupressure Massage)
9. Seven Point Nasal Acupressure Massage
This exercise picks up where the previous one left off. Now that you have more qi and blood at your nose, stimulating the local acupuncture points with direct finger pressure will have an even greater effect.
Locate the acupoints in this way. The first pair of points are just to the sides of your nostrils. If you place both index fingers at the very tip of your nose and slide them outwards along your nostrils until they reach where your nose joins your face (cheeks), your fingertips will come to rest on the first points (Fig 8.8A). If you press straight in, you’ll feel a slight depression in the bone there. Because your fingertips are much wider than an acupuncture needle, you’ll be covering two acupoints at the same time, Large Intestine 20 (the Chinese name translates as “Welcome Fragrance”) and just slightly below, Large Intestine 19. Both points are used traditionally to clear the lungs, decongest the nose, open the channel locally, and helps to dispel the invasion of pathogenic factors that can cause a cold—in this case, primarily Wind.
The second pair of points flank the nose slightly higher up, near where the cartilage ends and the nasal bone begins. Pressing toward the bones of your face (as opposed to toward your nose), you will feel another bony depression (Fig 8.8B on previous page). This corresponds to the extra acupoint called Bitong, sometimes referred to as Upper Large Intestine 20, and translates as “Penetrating the Nose” or “Nose Passage.” In addition to traditionally clearing heat and dispelling wind in order to treat nasal diseases and improve overall nose function, it also benefits the eyes and sharpens eyesight.
The third pair of points are located at the bridge of the nose, at the height of the inner corner of the eyes. Direct your finger pressure toward the bridge of your nose to feel the bony indentation there (Fig 8.8C on previous page). This is close to, but not exactly on, Urinary Bladder 1, another point used to clear heat and sharpen eyesight. Because your finger pressure is directed toward your nose, these points benefit nasal function as well.
The final location is a single point above the nose, between the eyebrows, on the centerline of the brow (Fig 8.8D on previous page). This point is commonly referred to as “the third eye,” and its Chinese name, Yintang, is translated as “Seal Hall” or “Hall of Impression.” Traditionally the point is used to clear wind and reduce pain, benefiting the eyes and nose. In spiritual traditions, it represents and enhances wisdom and enlightenment.
There are two basic approaches to stimulating these points. If you have nasal problems (congestion, a stuffy or runny nose, sneezing, etc.), here’s how to determine the approach that’s best for you. If you have chronic nasal problems, allergies, and/or you are typically tired or run-down, your nasal problems are most likely due to an underlying deficiency. In that case, treat the points starting at the tip of your nose and work up to Yintang. While the function of the individual points will still clear wind and heat as well as open your nasal passages, you’ll be directing healthy qi from the air inward, to build and strengthen your body at the same time. If your nose is congested due to an acute cold or flu, external pathogens are creating a temporary local excess, and in order to best clear that out, treat the points starting from Yintang and work toward the tip of your nose. If you are generally healthy and just want to address your nose and lungs as part of an overall health maintenance protocol, stimulating the points from the tip of your nose toward Yintang will be best for most
people, but feel free to experiment and see what feels best to you.
To stimulate the points, apply firm, steady pressure to each pair of points for about ten seconds, and then move to the next one in whichever direction you’ve selected. At Yintang, you can use a single index finger, or place the tip of one index finger over the other if you feel a need for stronger stimulation. Repeat this sequence three times. You can do this two, three, or even more times throughout the day. That’s a good idea if you are experiencing any sinus problems.
You may feel some initial discomfort when pressing on any or all of these points. That indicates there is local stagnation, of qi or blood. If you want to disperse that stagnation first, you can make small circling motions with your fingertips as you apply pressure. It may still take a number of days of regular treatment for the discomfort to completely disperse, so don’t be discouraged if it doesn’t stop right away.
10. Teeth Clicking and Tapping
This is the first of three exercises for the mouth. Because the teeth are considered to be extensions of bones and bones are the body tissue associated with the Kidneys, this practice will benefit the Kidneys as well as the teeth and gums. It’s a type of paidagong and as such will disperse qi stagnation locally while stimulating blood flow around the roots of the teeth. Because it’s practiced in a focused manner, it has the potential to strengthen and harden the teeth in the same way focused weight-bearing exercises can increase bone density in other parts of the body.
Simply click your teeth together, firmly enough to hear the tapping audibly. Unless you have some untreated tooth decay or infection, you should not feel any pain or discomfort from this. While I’ve never heard of anyone chipping a tooth from this practice, take care not to be so vigorous that you may cause that type of damage. Do your best to ensure that all your teeth tap together for at least part of the practice. If your teeth don’t align perfectly (few people’s do), you will need to emphasize different portions of your mouth at different times to affect all of your teeth. The traditional number of clicks is thirty-six, and it’s okay to do more if you’d like.
11. Tongue Circles the Teeth/Red Dragon Dances
The tongue is the organ most responsible for our sense of taste. Chinese medicine also recognizes its connection to the Heart, and the two organs are associated. This relationship may be most easily understood if we consider the use of the tongue in deep kissing, which stimulates heart-centered feelings of romantic love. The Chinese also believe the heart to be the seat of consciousness, so the tongue is used to express and communicate all manner of ideas and heartfelt emotions, aiding in creating a relational connection between all people.
In this first of two related exercises, sometimes called Red Dragon Dances (the tongue being likened to a red dragon; red is the color associated with the fire element, and so with the Heart), the tongue is exercised so more blood is drawn to it, which benefits the heart; saliva is generated, cleansing the tongue to improve the sense of taste, and is further used in the following exercise; and the mind is gently stimulated, refreshing thought and by extension the other senses.
Place your tongue anywhere on the outside surface of your teeth, between your teeth and lips. Circle your tongue clockwise or counterclockwise around the outer surface of all of your teeth, doing your best to make sure your tongue touches every tooth. Do this twelve times in one direction, and then reverse direction for another twelve times. This is usually enough to generate an ample amount of saliva. Hold this saliva in your mouth and do not swallow it. If there’s not much saliva, you can repeat this another twelve times in each direction. Now you’re ready to do the second exercise.
Saliva is an extremely useful fluid produced in the salivary glands around the mouth. It begins the process of digestion, both by providing a liquid medium in which to dissolve food substances, and because it contains the enzyme amylase, which breaks down starchy carbohydrates. It is mildly antibacterial, containing the enzyme lysozyme, which breaks down (lyses) many types of bacteria and other microbes. It is alkalizing, which also inhibits bacterial proliferation and neutralizes acidity, helping to reduce the formation of cavities in the teeth. Additionally, it is one type of Jing essence, a nutritional and qi-rich substance as understood by Chinese medicine. All in all, saliva is a wonderful body fluid, more remarkable than most people know.
Using the saliva you collected in Red Dragon Dances, swish that around your mouth like you might any mouthwash. It’s actually more healthy than any mouthwash you can buy. Doing this will clean your teeth, gums, and tongue. Swishing for the traditional number of thirty-six times, you will likely collect even more saliva than what you began with. Because of all its healthful properties, you don’t want to spit it out, but rather swallow it instead, allowing you to absorb those healthful benefits. You could swallow it all at once, and you’ll get all the physical benefits from doing that, but there’s another option if you want to aid your mind to tune in to the related energetics.
This is guidance I often give to my students in qigong and taiji classes, when they are learning to feel their Dantian, the main energy center having to do with all physical form and function. For many people, the Dantian can be difficult to feel in earlier stages of practice, but most find that this makes it much easier. Sit or stand still, quiet your mind, and mentally divide the saliva into approximate thirds. Swallow one third, and feel it travel down toward and then to your stomach. The physical saliva will stop there, of course, but because it is a Jing essence and contains qi, the energy continues down the centerline of your body all the way to the Dantian. You can feel a subtle yet distinct “thunk” as it reaches the Dantian, a couple of inches below your navel. Repeat this two more times, with the second and third thirds of your saliva. That reinforces your perception of your Dantian, making it easier to find the next time, eventually making it easy to feel using your mind alone at any time. This optional practice is only for people interested in working with their qi, and not necessary for the basic physical benefits to happen.
This is a necessary concluding step to be done after the preceding face, head, and sense organ exercises. The daily lives of most people bring excessive amounts of qi to the head, because of the overuse of the eyes in particular, reading, working at a computer, and watching television. Listening to music or lectures throughout the day, and being involved in any sort of mental work similarly brings a lot of qi to the head, and care must be taken to remove that qi, or it can, and often does, get stuck and create a variety of problems. Some of those problems may include headache, eye strain, diminished vision, ringing in the ears, cloudy thinking, memory problems, or any number of other sensory, emotional, or cognitive changes. Most of the exercises in this section are designed in part to disperse any such excess, but it’s not an absolute guarantee, especially in someone conditioned to bring qi upward out of daily habit, so this Wipe Down is an important final step.
Begin by rubbing your hands together as you did for the Eye Cupping exercise above, for the same reasons given there. Then rub your hands over your face as though you were washing it, using just enough pressure to move the muscles under your skin. This activates the qi and moves the blood, in no particular direction, just stirring and breaking up any pockets of stagnation that might be present. Do this for just a few minutes, being sure to wash over every area of your face, neck, and head. Then place your hands at the top of your head, keep them in physical contact with your body, and wipe down the front of your face, neck, chest, and belly, to just below your belly button. Bring them to the top of your head once more, and wipe down the sides of your head, over your ears, the sides of your neck, and then again down the front of your chest and belly, to just below your belly button. Bring your hands to the top of your head one last time, and wipe down the back of your head and neck, and then again down the front of your chest and belly, to just below your belly button. You can do this sequence one to three times, more or less to taste. On the last time, leave your hands just below your belly button for a minute or so, and allow your mind to gently focus and settle there. The wiping-down motion will bring the qi out of your head and into your body, which is the most important part of this ending practice. Even if you can’t sense qi at all, placing your hands just below your belly button and focusing your mind there will direct your qi to your Dantian. To whatever extent you may be able to store qi, even unconsciously, this will facilitate that process.