Chapter 6
Winding It Up with Wire Wrapping
In This Chapter
![]() Selecting the right wire
Selecting the right wire
![]() Understanding basic wire-wrapping techniques
Understanding basic wire-wrapping techniques
![]() Using wire wrapping in jewelry design
Using wire wrapping in jewelry design
![]() Creating clasps from wire
Creating clasps from wire
Working with wire provides endless design possibilities for jewelry making. By wrapping wire by itself, or intertwining it with beads, you can create beautiful wire-wrapped jewelry components. From simple memory wire designs to beaded rosary-style links used in necklaces; to free-form shapes used in pendants; to Victorian-inspired curved filigree used in clasps and earrings; to modern, eclectic twists used for everything from brooches to bracelets, you can never stop learning enough about this exciting jewelry-making technique. You can find entire books on the subject.
In this chapter, I introduce you to the basics of wire wrapping, including helping you choose the right wire and technique for your project. I provide some fun projects to get you started and hope to inspire you to develop your own ideas. And I show you how to create a custom clasp to finish off your original design.
Choosing the Right Wire for the Job
Wire is an excellent addition to any jewelry maker’s toolbox. Get started with memory wire to make a choker or bracelet in minutes, and then expand your supply closet to include bendable, wrappable wire in your creations.
Using memory wire
Memory wire is rigid, precoiled wire that holds its shape and strings very easily. Check out Chapter 2 for details on the sizes available. It’s a great way to get started working with beads and wire together in a design. Because memory wire is rigid and retains its shape even while you wear it, you don’t need to add a clasp.
 If you’re going to use memory wire very often, use memory wire shears instead of regular wire cutters. Cutting memory wire with regular cutters will damage them over time.
Project 6-1: Hematite Crystal Choker
With this design, you can create a stunning necklace in about 30 minutes. (I recommend that you let the glue cure overnight, though, before wearing it.) I use hematite (one of my very favorite semi-precious stones) because I love the shine, especially when paired with the crystals. Use this choker to dress up any casual outfit or compliment a trendy cocktail dress. Check out Figure 6-1 to take a look at the finished project.
Tools and Materials
11⁄4 coils necklace memory wire (standard size)
112 2×2mm hematite tubes
17 5mm clear crystal faceted rounds, AB finish
2 silver end caps
Super Glue or Hypo Cement
1. Put a small dab of glue on the silver end cap. Insert one end of the memory wire into the end cap. Allow glue to dry for 5 or 10 minutes.
2. String one crystal onto other end of the memory wire. Add 7 hematite beads. Add another crystal.
3. Repeat Step 2 until all the beads are used. Note: Your last bead should be a crystal. You should have about 1⁄8 inch of memory wire left. If you have more, trim away the excess. Repeat Step 1 with the last end cap.
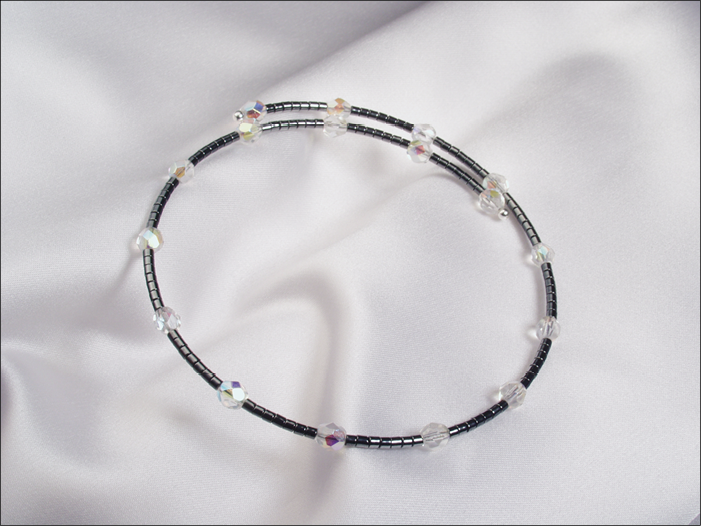
Photograph by Andy Dismore
Figure 6-1: Stunning Hematite Crystal Choker.
 If you prefer, you can skip the glue and end caps and, instead, just make a small loop at each end of the memory wire to keep the beads from falling off. Just make sure to use about 11⁄2 coils of memory wire (instead of the 11⁄4 listed in the directions) so you’ll have enough to loop. If you use this tip with other designs, put larger beads (at least 3mm) next to the loops.
Selecting wire for wrapping
I’ve seen just about every kind of wire used in jewelry making, including wire intended for industrial, commercial uses, like in your computer or in the electrical circuitry of your home. Anything that twists and holds the shape you give it can work for wire-wrapped jewelry. But in this chapter, I focus on the most commonly used wire for wire-wrapped jewelry. Check out Chapter 2 for details on how the wires differ.
Precious metal wire is used for wire wrapping, chain making, and other jewelry applications like creating findings. It’s available in several metals including platinum, gold-filled, silver-filled, and sterling silver; in three shapes (round, half-round, and square); and in three hardnesses (dead soft, half hard, and full hard). You can even buy it already twisted. Look for brass, copper, and niobium-based wire available in various colors and widths as well.
I discuss wire shapes and hardnesses later in this section. First up, I show you how to make a fairly simple and beautiful wire-wrapped pendant in Project 6-2.
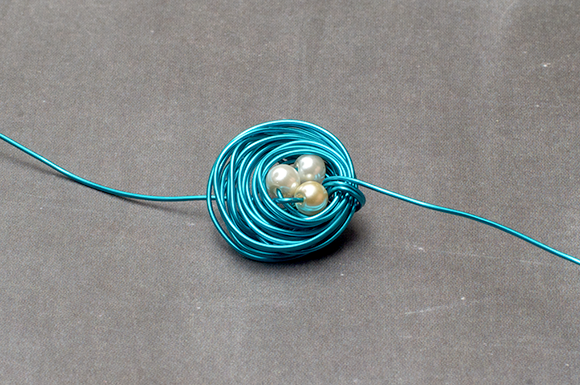
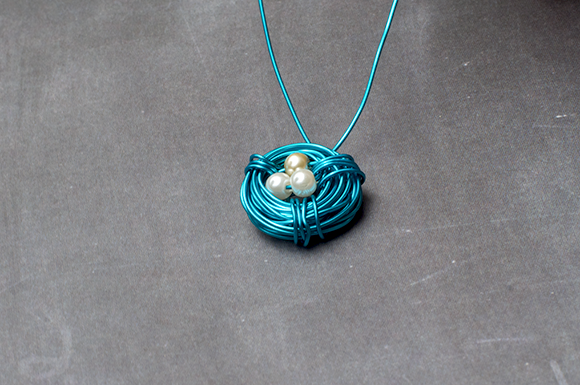
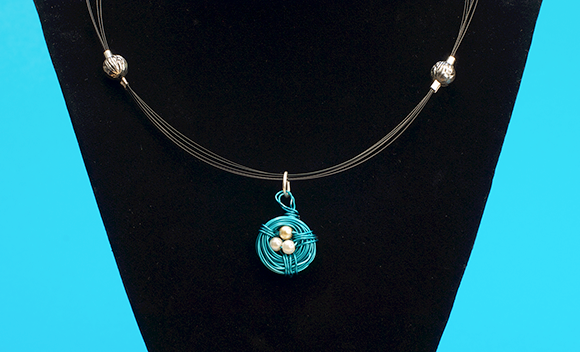
Project 6-2: Bird’s Nest Pendant
Colored wire is a fun choice to create this wire-wrapped pendant, which you can see in Figure 6-6. These pendants are hugely popular and much easier than you might expect. You need only basic tools to create your own right now. In this version, I use 24-gauge wire to create the pendant and the bail. For a heavy stone pendant, this wire might be a bit lightweight to be a bail, but it’s perfect for this delicate beauty. Plus, the freshwater pearls generally fit this gauge of wire pretty easily. You can create a forest of these little nests and string them on necklaces or add them to a charm bracelet. Or you can make two matching nests to create a set of earrings.
Tools and Materials
Round-nose pliers
Wire cutters
2 yards 24-gauge round wire, Pacific blue
3 6mm freshwater pearls, ivory
1. String the pearls on the wire. Gather the three pearls together to form a tight triangle. Twist the wire together, leaving a 3-inch tail on the short end of the wire, as shown in Figure 6-2. Put the tail to the back of the pendant.
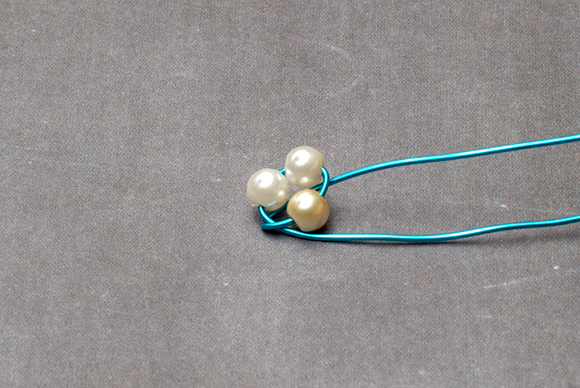
Photograph by Andy Dismore
Figure 6-2: Form a triangle of “eggs.”
2. Using the long tail of the wire, begin wrapping a tight circle around the eggs to form the nest. Continue wrapping until you have about 2 feet of wire remaining. Check out Figure 6-3 to see the project at this stage. Wrap the wire under the eggs as well as around the eggs. Wrap the circles fairly tight. They will naturally loosen at the next step, so form them tightly at this point.

Photograph by Andy Dismore
Figure 6-3: Wrap the wire around the eggs to form a nest.
3. Feed the long tail of wire down through the front of the pendant, between the pearls and the nest. Pull the wire taut, and then wrap it around the edge of the nest and feed it back down between the pearls and nest in roughly the same spot. Repeat this wrap three or four times to secure the edge of the nest. This motion reminds me of simple sewing. You use the wire to sew the bundle of wires into place like I did in Figure 6-4.
Photograph by Andy Dismore
Figure 6-4: Tighten the nest by securing it with wire.
4. Take your wire tail and feed it up through the nest roughly one-third of the way around the nest. Wrap the wire around the edge three or four times to secure. Repeat this step again. Check Figure 6-5 for placement. End with the wire on the backside of the project.
Photograph by Andy Dismore
Figure 6-5: Bend the wire to position the bail.
5. Trim the long tail to 3 inches to match the short tail. Twist the wires together several times. Hold both wires and flatten the wires against the back of the pendant with the tail pointing the direction you want to create your bail, like I did in Figure 6-5. Look at the front of the pendant, decide which end is up, and then flatten it into place.
6. Use your round-nose pliers to create a wrapped loop for the bail. Figure 6-14 later in this chapter shows you how to make a wrapped loop.
Photograph by Andy Dismore
Figure 6-6: Bird’s Nest Pendant.
 The more you bend wire, the more brittle it becomes, so be careful.
Deciphering wire sizes
Like cord, leather, and thread, wire comes in several weights and widths, called gauges. As a rule, the higher the gauge, the thinner and softer the wire. For example, 22-gauge is thicker than 26-gauge.
Start out with several gauges of copper or brass practice wire. It’s much less expensive than silver or gold wire, is available at most hardware stores for only a few dollars, and is a great way to help you learn wire work. Even now, I use it when I work on a new technique or design.
Selecting among three hardnesses
Here’s a quick rundown on the different precious metal wire hardnesses and what to use them for:
 Dead soft wire is extremely malleable, which means it can be bent easily into shapes. Because it’s so easily bent, it doesn’t hold its shape when pulled or tugged, so it’s not a good choice for making clasps, jump rings, or other findings. Use it for making decorative shapes in earrings and barrettes. Bend the wire easily with your hands, or use tools if you prefer.
Half hard wire is malleable and maintains its shape under some stress. Use it to create wire loops for rosary-style bead links or for earwires for lighter earrings. Choose this hardness for wrapping light beads or making scroll designs like in Project 6-3 later in this chapter. You can bend the lighter gauges easily with your hands, but you may need tools for the heavier gauges of half hard wire.
Full hard wire is the least malleable wire, and it holds its shape much better than the other hardnesses. Use it for wire wrapping, especially in situations when you need the wire to hold its shape (such as for a clasp). You may need pliers and/or a jig, a board with pegs to wrap wire around, to help you bend the wire into specific shapes. Check out the Gettin’ Jiggy with It: Wire Jig Projects section later in this chapter for details on working with a jig.
Studying wire shapes
To understand what the shape of a wire means, imagine that you cut the wire and look at the cut end head on. A wire can be round (the end looks like a full circle), square (the end looks like a square), or half-round (the end looks like a semicircle: round on one side, flat on the other).
Figuring out what works best
Take a look at Figure 6-7 for a list of some common shapes and gauges of wire. While the shape of wire you choose depends on your preference and specific design, I like to use the round mostly for making loops, earwires, and twists. Square and half-round wires are good for wrapping around cabochons or other flat-sided beads, depending on what you prefer. You can use 6.5mm wide heavier gauge flat or half-round wire for cuff bracelets (but you’ll need to file and sand the ends to smooth them down).
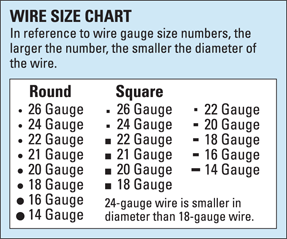
Illustration by Wiley, Composition Services Graphics
Figure 6-7: Various wire shapes and sizes.
Here’s a list of my recommendations for wire for different jewelry-making projects:
For making bead links, I recommend using 22- or 24-gauge wire.
For making medium weight drops or dangles, use 22-gauge wire.
For delicate beadwork, like winding beads around a barrette or hairpin, use 26-gauge.
For making clasps and earwires, I suggest using 21- or 22-gauge wire, round or twisted. If you use a higher gauge, the wearer will have trouble fitting it through her ear hole.
For very delicate designs with tiny beads, use super-fine 32-gauge wire.
For making loops and intricate molded designs, use 20- or 22-gauge wire.
When you’re using bead and wire together, consider the size of your bead hole when you’re choosing the gauge of the wire to use.
Because precious metal wire can tarnish over time, polish the wire and your finished jewelry creations gently with a polishing cloth. Look for these cloths at most jewelry-supply stores, online catalogs, or even at stores like Walmart or Target. Silver is a more active metal than gold, meaning it tends to tarnish faster, so silver designs need more polishing to keep them shiny and new. Of course, if you prefer an antique look, you can skip the polishing and keep the tarnish.
Identifying optional wire-wrapping tools
Nylon jaw pliers not only help protect wire from nicks and scratches, but they also help straighten out wire without denting it. (Check out Chapter 2 for a picture of these pliers.) In case you mess up a loop or something (which happens, even to me), simply use this handy tool to unbend the wire and straighten it by pressing it with the nose of the pliers. Straightening your wire this way saves you from wasting wire!
But don’t waste your time straightening your practice wire. If you mess up, simply throw it out and start over again. It’s cheap, which is why you practice with it.
If you need to wrap several wire pieces together, consider buying rubber-coated clamps or clips. Check out Figure 6-8 to see these. They’re like a pair of extra hands to hold your design together while you secure it with wire. Look for them at jewelry-supply stores or websites. Alternatively, you can use binder clips available at most office supply stores; just add a little bit of electrical tape to cushion the wire a bit and minimize scratching.
Bent-nose pliers are similar to long-nose pliers but with a slightly rounded or bent tip — great for making loops, reaching small places, and wrapping thin wire. You can get a close-up view of these pliers in Chapter 2.

Figure 6-8: Rubber-coated clamps hold wire-wrapping projects in place.
Jewelry files help file down the sharp edges left when you cut wire. Using a jewelry file helps prevent your wire creations from poking the wearer. Even though these tools look a bit like fingernail files, they definitely aren’t. So invest in a set (they cost around $10), and don’t experiment with your comparatively soft fingernail file.
Another option for smoothing sharp edges is a wire rounder (also called a cup burr). This tool is a small metal cup with tiny blades inside it. The cup is mounted on a wooden handle. You insert the end of your do-it-yourself earwire into the cup, and give it a twist to remove the sharp edges. A wire rounder costs around $10. If you're making earwires in bulk and not looking forward to overusing your wrist, you can buy a cup burr attachment to fit a dremel or drill and make quick work of these findings. I got mine for about $2 at Widget Supply (www.widgetsupply.com).
Getting Familiar with Wrapping Techniques
Before you create the next award-winning wire design that will have the crowds lining up at Tiffany’s, you first need to master a few basic techniques. Remember to play with your practice wire and get comfortable with the pliers. Don’t waste the expensive stuff at this point!
Creating “S” scrolls
Start with an “S” scroll:
1. Cut about 6 inches of 24-gauge practice wire.
2. Take your round-nose pliers in one hand and insert the tip of the wire into the jaws of the pliers with the other hand. Slowly begin to wrap the wire around the tip of the pliers, gradually expanding the wire. See Figure 6-9a (think expanding spirals or droplets of water).
3. Do the same thing at the other end of the wire, but go in the opposite direction, so you get a curly “S” shape. After you get the scrolls started, use your flat-nose pliers to keep the scrolls flat as you work them around.

Illustration by Wiley, Composition Services Graphics
Figure 6-9: Stages of the “S” scroll.
I like to work both ends toward the middle. That way, both ends are the same size. Check out Figure 6-9b. Figure 6-9c shows you the finished “S” scroll. Practice with several pieces, and don’t be worried about how silly the scrolls look at the beginning; you’ll get better.
After you’re comfortable with this technique, place beads on the wire before you coil the ends up. Check out Project 6-3 to see how to incorporate them into jewelry designs. You can make larger or smaller scrolls, depending on your preference and their role in your design.
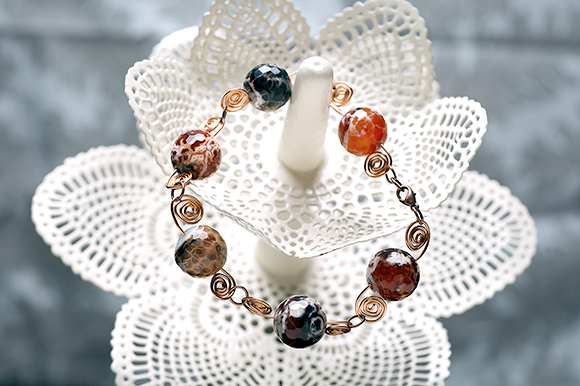
Project 6-3: Beaded “S” Scroll Bracelet
Customize the colors in this bracelet to make it your own. I used copper wire in my bracelet because I felt like it coordinated well with the color of the snake agate. I love the oranges and browns with the rustic copper. Check out Figure 6-11 for a look at the finished project.
Tools and Materials
Round-nose pliers
Chain-nose pliers
7 6-inch pieces of 20-gauge wire, half hard (copper)
7 16mm faceted snake agate beads
8 jump rings, copper
1 lobster claw clasp, copper
1. Place one bead on a piece of wire.
2. Twist the piece of wire into an “S” scroll as shown in Figure 6-9. Take a look at Figure 6-10a to see a finished scroll with a bead in the middle.

Illustration by Wiley, Composition Services Graphics
Figure 6-10: Steps to complete the Beaded “S” Scroll Bracelet.
3. Repeat Steps 1 and 2 with the remaining six wires.
4. Open one jump ring. Take a look at Figure 2-8 in Chapter 2 for help with jump rings. (Remember, never pull a jump ring open and distort the round shape. Just bend it sideways to open it.)
5. Connect two scrolls together by placing one end of a scroll in the jump ring. Place one end of a second scroll in the same jump ring. Gently squeeze the jump ring to return it to its original shape. See Figure 6-10b.
6. Repeat the Step 5 process until all the scrolls are connected in a single chain.
7. Use the lobster clasp to join each end of the chain to form the bracelet. Use jump rings to connect the clasp to the scrolls.
Photograph by Matt Bowen
Figure 6-11: Beaded “S” Scroll Bracelet.
Trying your hand at tight coils
Next, try your hand at tight coils, as shown in the following steps. You don’t need pliers to do this technique, but it’s good practice.
1. Cut about 6 inches of wire and insert the end into the jaws of flat-nose pliers, holding with one hand. With the other hand, hold a pencil or pen.
2. Holding the wire and pen together, wrap the wire around the pen with the other hand, creating a coil, as shown in Figure 6-12a. Keep working until you’ve made an even, tight coil, and then remove the pen. Voila! A cute little coil appears! Check out Figure 6-12b for the finished product.

Illustration by Wiley, Composition Services Graphics
Figure 6-12: Making tight coils.
You can find tools that can help you twist coils in no time. They can even help you make coils from your coils! Look for brand names like Twist ’n’ Curl or the Wire Worker coiling tool available at most crafts stores. You can use these coils as beads, especially if you make them from colored wire, by simply stringing them on stringing material.
Creating an eye loop
One of the most basic and often-used wire-working techniques is the eye loop. An eye loop basically adds a loop to a piece of wire to make it connectable. This technique is often used to connect beads together and to add dangles to earrings, bracelets, or necklaces.
The following steps show you how to use eye loops to make a dangle for an earring, a necklace, or a charm bracelet.
1. Take a 2-inch headpin and add a bead to it. In Figure 6-13, I used a heart-shaped bead, drilled from the top down.
2. Using your flat-nose pliers, bend the wire to create a 90-degree angle, like the one in Figure 6-13a.

Illustration by Wiley, Composition Services Graphics
Figures 6-13: Creating an eye loop.
3. Trim your headpin so that only 1⁄2 inch of wire remains.
4. Use your round-nose pliers to bend the end of the wire back to begin to create the eye, as in Figure 6-13b. Reposition your pliers if necessary to complete the loop. Check out Figure 6-13c for the finished eye.
Now add your dangles to a pair of earwires or hooks, and you’ve got an easy pair of earrings to keep for yourself or to give as a nice gift. When you’re feeling confident about your eye-making techniques, try using silver or gold headpins, and use semi-precious stones to match a special outfit.
 The DVD that comes with this book (or
 http://booksupport.wiley.com for you e-readers) includes a step-by-step video tutorial on making eye loops. Fire it up if you'd like to see this technique in action.
Wrapping loops
Creating wrapped loops is a slightly more advanced technique in wire wrapping but not tough to tackle. Basically, you’re creating an eye loop on the end of a head pin or piece of wire and wrapping the wire decoratively around itself to create a professional-looking component. It’s a terrific technique that you can quickly master and then build on to create interesting designs on bracelets, eyeglass chains, earrings, and more.
If you'd like to watch me do this technique, peruse the DVD that comes with this book (or http://booksupport.wiley.com if you're an e-reader). I include a step-by-step video tutorial on making wrapped loops. Master this technique now, young Padawan, because you will likely make many, many of these in your jewelry-making career.
Here are the steps for creating wrapped loops:
1. Cut an 8-inch piece of practice wire.
2. Using your round-nose pliers, create a loop in the middle of the wire and end up with a 90-degree angle about one-third of the way down the wire. Take a look at Figure 6-14a for reference.
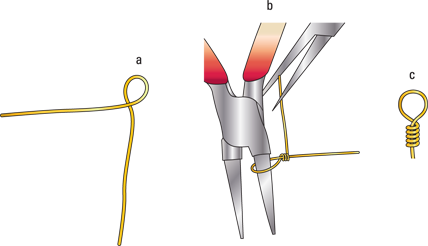
Illustration by Wiley, Composition Services Graphics
Figure 6-14: Creating wrapped loops.
3. Hold the loop with your round-nose pliers, and use your fingers to wrap the short end of the wire around the straight piece of wire that is directly under your loop. If the wire is hard, use your flat-nose pliers to hold the loose wire and wrap it around. Check out Figure 6-14b to see how it works.
4. Continue to wrap the wire as many times as you want and, if necessary, trim off excess wire. Use bent-nose pliers to press the wire-wrapped end flat to make sure it doesn’t stick out and scratch or poke the wearer of your jewelry. File the end of the wire if it’s sharp or pointed.
5. If necessary, use your round-nose pliers to reshape and straighten the loop. Take a look at Figure 6-14c for the finished wrapped loop.
If you’re adding a wrapped loop to both sides of a bead, don’t wrap too closely to the bead. Leave a little room when you’re first starting out or you could crack the bead.
Add a loop and single wrap to both sides of a bead, and then connect both ends to other components. It stretches out your bead budget while lengthening your chain.
Creating wrapped beads
When you want to experiment with beads and wire to create wrapped beads, follow these steps:
1. String a glass bead onto an 8-inch piece of wire.
2. Make an eye loop and wrap on one end of the wire like the one in Figure 6-14c.
3. On the opposite end of the wire, create an eye loop and start to wrap the excess around the wire between the eye and the bead, but don’t trim it this time. Check out Figure 6-15aa.
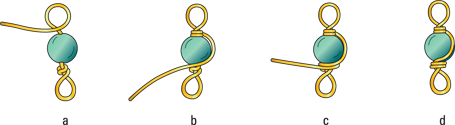
Illustration by Wiley, Composition Services Graphics
Figure 6-15: Wrapping beads.
4. Bring the excess down across the bead and wrap it around the opposite eye loop. Figures Figure 6-15b and Figure 6-15c show you how this works.
5. After you have an adequate wrap, trim the excess. File down any sharp edges. Figure 6-15d shows you the finished bead wrap.
This technique is great to create eyeglass cords, rosaries, or even necklaces. Mix wrapped beads with chain for a super fast, trendy design.
Incorporating Wire-wrapping Techniques in Jewelry Design
All the techniques in this chapter are basic, but when combined they help you create a wide range of complicated or simple and elegant jewelry. Try Project 6-4 to combine several techniques into a simple but beautiful design. Finish off a basic bead with a wrapping loop on each end, and then make more to create a chain.
Project 6-4: Wrapped Beaded Earrings
This project combines many of the skills we develop in this chapter, like making “S” scrolls, creating wrapping loops, and creating wrapped beads. I used semi-precious stones, poppy jasper and carnelian, but any round beads you have would work, especially when you’re practicing. Take a look at Figure 6-17 for the finished project.
Tools and Materials
Round-nose pliers
Wire cutters
Flat-nose pliers
Jewelry file
Approximately 16 inches of 22-gauge, half hard, round sterling wire
2 6mm round poppy jasper beads
2 8mm round carnelian beads
2 2-inch eye pins, sterling silver
2 lever-back earwires, sterling silver
1. Thread one poppy jasper bead onto an eye pin. Follow it with one earwire. Make a wrapped loop (refer to Figure 6-14c) on the open end of the pin. Make sure the loop of the earwire ends up inside the new wrapped loop before you close it up. Set this aside.
2. Use your wire cutters to cut the 22-gauge wire into two equal parts (each approximately 8 inches in length). Using approximately 3 inches of one piece of wire, create half of an “S” scroll on one end the wire.
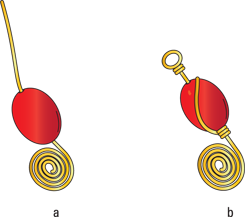
Illustration by Wiley, Composition Services Graphics
Figure 6-16: Steps for creating Wrapped Beaded Earrings.
3. Thread one carnelian bead onto the straight end of the wire as shown in Figure 6-16a. Use the wrapped bead technique to make one loop. Finish the wrap between the scroll and the bead. Take a look at Figure 6-16b.
4. Connect the two components by opening the eye on the jasper component and sliding on the eye loop of the carnelian wrap. Gently close and reshape the eye of the eyepin.
5. Repeat Steps 1 through 4 to create a matching earring.
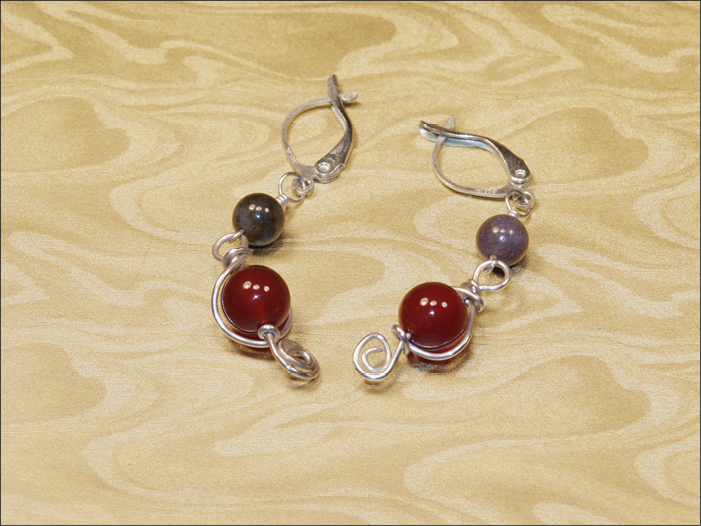
Photograph by Andy Dismore
Figure 6-17: Wrapped Beaded Earrings.
If your bead budget doesn’t allow you to buy semi-precious stones, substitute similarly colored glass beads.
Gettin’ Jiggy with It: Wire Jig Projects
A jig is short for a “thing-a-ma-jig,” which is a board (made from wood, metal, or plastic) with holes and pegs that fit into those holes. You simply move the pegs to match the pattern you’re creating and then wrap your wire around the pegs. You can create an infinite number of patterns, from simple to very elaborate. Check out Figure 6-18 for a few simple jig patterns.
Jigs are a great way to make lots of wire designs and ensure that they are all uniform in shape and size. The small jigs cost about $10, and the larger, intricate ones can be up to $50. If you’re handy, you can even make your own jig by nailing some thick nails and screws in an even pattern into a piece of wood.

Illustration by Wiley, Composition Services Graphics
Figure 6-18: Simple jig patterns.
If you have a local bead store, you may find some jigs there. Most crafts stores like Michaels, Hobby Lobby, and Jo-Ann Fabric and Craft sell jigs as well. WigJig is a big name maker of jigs, which are sold through stores or companies like Rio Grande and Fire Mountain Gems and Beads. Or check out WigJig's website at www.wigjig.com to buy a jig or other wire-working tools. They also have a great selection of patterns and wire jewelry projects.
Many jigs come with a booklet of patterns you can follow to make your own custom charms and jewelry components. Choose a transparent plastic jig that lets you place patterns under your jig to make arranging your pegs much easier.
Project 6-5: Celtic Earrings
Celtic designs often employ twists and knots, perfect elements for wire-wrapped jewelry. Use the simple jig pattern in Figure 6-19a to wrap your way to these beautiful earrings. See the completed piece in Figure 6-21.
Tools and Materials
Wire cutter
Wire jig
Jewelry file
Flat- or bent-nose pliers
Round-nose pliers
2 pieces 20-gauge, half hard wire, approximately 10 inches each
2 6mm round beads
2 head pins, 2 inches long
2 earwires
1. Start by arranging eight pegs into the shape of a large diamond on your jig. Check out Figure 6-19a to see what it should look like.
2. Start with one piece of wire. Insert a small amount of wire into a hole near peg 1. Doing so helps keep the wire tight as you wrap. Wrap the wire around peg 1 in a clockwise direction. Figure 6-19b shows you how.
3. Continue by wrapping the wire around the three sets of middle pegs so you create three figure-eights. For the top pegs, work clockwise. For the bottom pegs, work counterclockwise. Figures Figure 6-19c and Figure 6-19d mark your progress.

Illustration by Wiley, Composition Services Graphics
Figure 6-19: Creating the wire components.
4. Finish the wire component by wrapping the wire around peg number 8 in a clockwise direction.
5. Remove the wire component from your jig, and trim off the excess wire at either the beginning or the end of the component if necessary. Use a jewelry file to smooth the rough ends of the piece.
6. Repeat Steps 2 through 5 with the second wire. Set both wire components aside. They should resemble Figure 6-20a.

Illustration by Wiley, Composition Services Graphics
Figure 6-20: Adding a bead dangle to the wire components.
7. Place a bead on a head pin. Create a wrapped loop (refer to Figure 6-14 for complete instructions). Your finished bead dangle should look something like Figure 6-20b.
8. Hang the bead dangle from the end of one of the wire components. Use round-nose pliers to close the loop of the wire component around so the dangle is secure. Take a look at Figure 6-20c and Figure 6-21 if you need help.
9. Add an ear hook to the top of the component (opposite the bead dangle) to finish off the project.
10. Repeat Steps 7 through 9 to make a matching earring.
Photograph by Andy Dismore
Figure 6-21: Celtic Earrings.
Making Your Own Clasps
Jewelry stores, catalogs, and websites are full of clasps and other findings in every finish and style imaginable. But often, I create a simple clasp myself, especially to add to wire-wrapped designs. In this section, I show you how to make two of the most basic clasps.
Hook and eye clasp
The hook and eye clasp is about as basic as they come. It’s a figure-eight that connects to a simple but elegant hook. Look at Figure 6-22d to see the finished clasp. This clasp is particularly good for necklaces because the weight of the necklace usually keeps the necklace flat to the skin. If the clasp doesn’t stay flat, as in a bracelet, it can come unhooked and you could lose your piece.
Tools and Materials
Wire cutters
Jewelry file or wire rounder
Ruler
Round-nose pliers
Flat-nose pliers
31⁄2 inches of 18-gauge round wire, full hard
1. Cut a 2-inch piece of wire. File both ends smooth.
2. Using your round-nose pliers, make the smallest possible curl on one end of the wire (refer to Figure 6-9a).
3. Use your round-nose pliers and make a larger loop on the opposite end of the wire, curling toward the little loop. Check out Figure 6-22a to see how it looks. Your large loop will connect to your jewelry, while the little loop will be the decorative end of the hook.

Illustration by Wiley, Composition Services Graphics
Figure 6-22: Creating a hook and eye clasp.
4. Use your round-nose pliers to create the hook. Hold your wire perpendicular to your work surface with the large loop at the bottom and the small loop at the top, with the loops facing away from you. Position your pliers just under the small loop. Bend the wire toward you so that it forms a hook, like the one in Figure 6-22b. Set your hook aside.
5. File the ends of the remaining 11⁄2 inches of wire.
6. Use your round-nose pliers to make a loop like the one in Step 3. Repeat it on the other end, in the opposite direction. Create a figure-eight like the one in Figure 6-22c. Figure 6-22d shows you the finished clasp.
“S” hook clasp
The “S” hook is a simple and elegant way to finish a bracelet or necklace. Check out Figure 6-23c for the finished clasp. Use a heavy gauge wire because each time you open and close this clasp, you actually bend the clasp. If you’re using gold, use 10kt or 14kt because anything higher will be too soft and will create a weak clasp.
Tools and Materials
Wire cutters
Jewelry file or wire rounder
Round-nose pliers
3 inches of 18-gauge wire, sterling silver
1. File the ends of your wire pieces smooth.
2. Make a small loop at each end of the wire with the tip of your round-nose pliers. One loop should face up and the other down. Check out Figure 6-23a.

Illustration by Wiley, Composition Services Graphics
Figure 6-23: Creating an “S” clasp.
3. Use the wider part of round-nose pliers to create the larger curves in the “S” clasp. Hold the wire with a loop facing away from you. Position your pliers about 3⁄4 inch from the loop. Gently, bend the wire toward you to create a large loop. Yours should look like Figure 6-23b.
4. Repeat Step 3 with the other end of the wire to create an “S” like the one in Figure 6-23c.
5. Connect this clasp to your piece with jump rings, or create an eye clasp using the instructions in the Hook and eye clasp section. Then gently bend one side of the “S” clasp and insert it through the eye for your finished clasp.
For an added touch of elegance, add a delicate dangle to the tiny loop of the “S.”
Project 6-6: “S” Wire Earrings
To get a little extra practice creating “S” hooks, try these easy, fun earrings. Add beads before you bend them to dress them up a bit. Join several together to add glamour. Check out Figure 6-24 for the finished project.
Tools and Materials
Round-nose pliers
Wire cutters
Jewelry file
2 pieces, 3 inches each 18-gauge wire, sterling silver
2 earwires, sterling silver
1. Create an “S” clasp like the one in Figure 6-23c, but before bending the last loop, slide an earwire onto the straight end. Complete the “S.”
2. Repeat Step 1 with the second piece of wire.
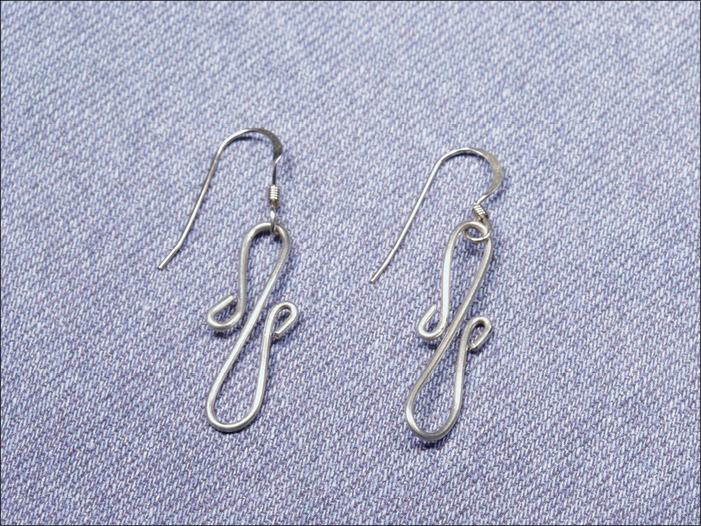
Photograph by Andy Dismore
Figure 6-24: “S” Wire Earrings.