Chapter 7
Stamping Custom Metal Jewelry
In This Chapter
![]() Adding a few specialty tools to your jewelbox
Adding a few specialty tools to your jewelbox
![]() Crafting custom components
Crafting custom components
![]() Finding the right finish
Finding the right finish
Stamped metal jewelry has made a comeback in recent years. You can’t go to a crafts fair without seeing someone making these simple but beautiful pieces. Necklace pendants, keychains, and golf markers for both men and women are hot. This technique is one of the easiest ways to create a truly personalized jewelry design. And it’s a great way to get started with metalsmithing without a huge investment of time or money.
In this chapter, I get you started with the basics of metal stamping and show you what you need to make a few simple projects. When you have the basic tools in hand, you need to practice. Practice takes your stamped jewelry from okay to wow fairly quickly. I also give you tips on finishing your pieces to create an aged look or a bright shiny finish, depending on the look you’re going for. And most importantly, I show you how to avoid a few common mistakes so that you can make the most of your practice and move from novice to professional in no time.
 You can find complete books on metal stamping. If you’re interested in learning more after trying these projects, look for them at your local library or favorite book retailer.
Identifying Special Equipment
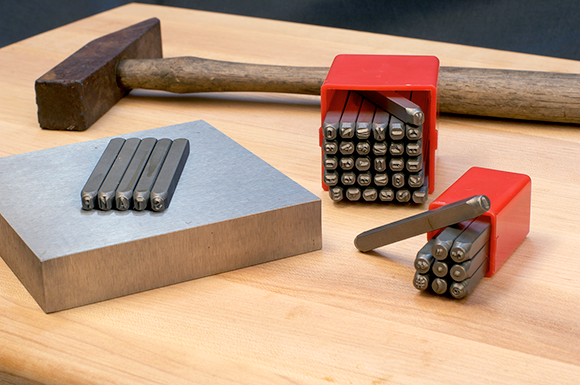
In addition to basic jewelry-making tools (pliers, for example) and findings (such as jump rings and clasps), you need a few additional tools to create beautiful metal-stamped jewelry. At a minimum, you need a bench block, metal stamps, and a hammer, like the ones in Figure 7-1.
In this section, I describe these tools and a few more that are helpful but not required. Depending on how you want to use the components you stamp, a metal hole punch and polishing cloths can come in handy. I include specific information about these tools under the corresponding headings.
Photograph by Andy Dismore
Figure 7-1: A bench block, alphabet and punctuation stamps, and a hammer.
 Stamping works best when you work on a solid table or work surface. Card tables aren’t ideal because they allow for too much bounce when you strike with the hammer. You want to deliver dead blows, or blows that don’t bounce, when you strike the stamp with a hammer. Choose a sturdy wooden table for best results.
Bench block
A bench block (available at crafts stores or online) is a heavy chunk of steel used to provide a solid foundation for stamping on metal. Using a hard surface like a bench block allows you to create a crisp impression on the metal. I use the 4×4×1-inch steel bench block pictured in Figure 7-1. Expect to pay around $20 to $30 for one. (If you have a 40-percent-off coupon to your favorite chain crafts store, use it to buy a bench block at a better price.)
Metal stamps
For the projects in this book, I exclusively use alphabet stamps. They tend to be easy to use, especially for beginners, because they are made up of just a few lines. The force from the blow of the hammer spreads over only a small area so it makes a clear impression. You can find metal stamps at chain crafts stores or online retailers. I’ve kept this chapter simple and use a 1⁄8-inch alphabet stamp set for these projects. This way you can get started with metal stamping affordably. A basic set of alphabet stamps costs about $30. If you want a more ornate font, a set will cost you closer to $60.
When you've practiced with alphabet stamps and are ready for a new challenge, you can move on to design stamps. These are typically more detailed than simple letter stamps and take a more forceful hammer blow. You can deliver that blow with a heavier hammer, multiple strikes, or an advanced technique where you tilt the stamp and rotate it, all while tapping it with a hammer to get a full impression over all the detail of the larger stamp. When you're ready, you can find more information on this technique at a website that offers online stamping classes such as Beaducation (www.beaducation.com).
New stamps are coming on the market constantly. Look for activity-related stamps (like soccer balls or cheerleading megaphones), motif stamps (birds, leaves, spirals, dragonflies, or hearts), and decorative stamps (frames and borders) to make your design more detailed and unique.
Hammers
For the projects in the book and on the DVD (or at http://booksupport.wiley.com if you're reading an electronic publication), you can use a regular hardware-grade hammer. Make sure it weighs at least 16 ounces to deliver a strong enough blow to make a clear impression. If you want to buy a hammer specifically made for stamping, choose a 1-pound brass-head hammer and expect to pay $25 to $30. If you move on to design stamps, a 2-pound brass-head hammer, for about $35, is your best bet.
Other metalworking hammers can add variety to your work. Here’s a quick list of some additions you can try:
 A chasing hammer is also called a ball-peen hammer. One side is flat and very subtlety convex, and the other side is a round ball. The flat side flattens curved metal, and the round end delivers the familiar hammered texture.
A texture hammer is one with a design impressed on its face. The design varies: Some have a single small spike, while others sport rows of squiggly lines. Use them to transfer a texture on metal.
A rubber mallet is used to harden metal without nicking it, marking the metal, or changing its shape.
Metal hole punches
Most people use one of two tools to punch holes in metal: a pair of metal hole punch pliers or a screw-down hole punch. The pliers work like the familiar paper hole punch, with a single squeeze. The screw-down model punches a hole as a user turns, or screws, the handle. These tools help put a finishing touch on your stamped items; however, you can also purchase stamping blanks that already have a hole. These tools are nice to have but not absolutely required because you can purchase stamping blanks with holes.
If you do choose to purchase a hole punch, make sure you get one that works on metal. Punches that are designed for paper or leather may not work.
Metal files
Metal files are helpful for removing burrs and sharp edges left in metal after cutting it. If you punch holes in your pieces, be sure to file the hole to remove any sharp bits. Even if you use precut blanks, files are handy to finish the edges nicely.
Polishing tools
Generations of jewelry metal workers have used fine grade (0000) steel wool to remove oxidation and light scratches from metals. They follow the steel wool with a firm rubbing from a polishing cloth to make metal shine.
If you’d like a more convenient way, choose a product that combines abrasives and polishing agents in a single step. Look for brand names like Pro Polish Pads, Shine Rite Polishing Pads, or Sunshine Cloths. The pads are disposable but extremely effective; the cloths last longer but don’t give the same instant gratification.
If you’re looking for a less hands-on approach, you might choose to tumble the stamped pieces in a rotary tumbler. Purchase a rock and jewelry tumbler for around $80 to $100 and jewelry-grade stainless steel shots (small metal pieces of various shapes and sizes) for about $30 to $40 per pound. Place your pieces, the shot, some water, and a polishing or burnishing compound (an agent designed to aid in polishing) in the tumbler, and turn on the machine. After several hours, your pieces will gleam. Many metal stampers prefer to use liquid dish detergent instead of a product designed for the job. Give it a shot to see if it works for you. If you like the results, you could save some cash and skip the polishing compounds.
 Don’t polish jewelry with stones or pearls in a rotary tumbler. The shot can damage the stones. You can also polish chain jewelry in the tumbler, but do so one chain at a time or you will have quite a tangle on your hands.
Creating Stamped Components
Creating stamped metal jewelry components is a simple process, but it does take some practice. In the beginning, I’m sure I spent more time preparing to stamp than I did actually stamping pieces. Each time you practice you will get better, so take your time and don’t rush it.
Each time I sit down to make a component, I practice. I work on paper, and then I work on inexpensive metal before I move on to stamping blanks: blank pieces of metal cut into shapes used as charms and pendants.
Practicing on paper
When I’m working on a new design, I often start on paper, especially if I’m not sure if the message or phrase I want to stamp will fit on the stamping blank. I trace the shape of the blank on scrap paper. Next I write out possible phrases on the paper. Finally, when I’ve chosen the words, I press stamps into the paper “blank” to test out the design. Take a look at a sample of my scrap paper version in Figure 7-7 later in this chapter. When I’m satisfied the design is a good one, I move on to practicing on copper sheet metal.
Using copper sheets
Copper is my go-to practice metal for three reasons:
Copper sheet metal is relatively cheap. A 3×3-inch square of 22-gauge copper is about $2, compared to the same size sterling silver at $70 or more.
Copper is softer than the other inexpensive alternatives (brass or nickel), so it’s easier to stamp.
Copper is more similar to the precious metals (sterling silver or silver-filled sheets) that I often use in finished pieces. Therefore, practicing with copper sheets is the closest approximation to making the real product.
I recommend using sheet metal to practice on because it’s cheaper than pre-cut blanks. When you buy blanks you’re paying for the metal and for someone to cut them for you. If you’re not going to wear the practice pieces, why pay for the additional expense?
Moving up to metal blanks
After you’ve done your homework, it’s time to get down to the real business of stamping stuff. And by stuff I mean beautiful jewelry pieces. When you’re starting out, I recommend purchasing stamping blanks rather than purchasing sheet metal and cutting your own. That way, you avoid buying metal shears and heavy duty gloves required to keep your hands safe when working with sharp, freshly cut edges.
Following are three terrific and not-too-tough projects to get you started with stamping. If you want to make a simple but inspiring gift for a special mom in your life, start with Project 7-1. You can try out the same techniques by making the earrings in Project 7-2. Or you can go for something less traditional and more whimsical by crafting the guitar pick–shaped keychain in Project 7-3.
 The DVD that comes with this book (or
 http://booksupport.wiley.com for you e-readers) includes video tutorials for two more metal stamping projects: a Pet ID Tag, and Monogram Tags that include a single large stamped initial. Check out these videos if you want to see a step-by-step tutorial before moving on to a metal blank project.
Project 7-1: Mom’s Pendant Necklace
If you’re a parent, imagine getting a personalized piece of jewelry with the names of your children stamped on it. Even if you’re not a parent, you can probably imagine how much your own mother, grandma, sister, aunt, or friend with children would love such an item. You can add the kids’ birthstone dangles to make it extra special. Check out the finished project in Figure 7-4. Note that my necklace sports three charms to reflect three kids’ names, so that’s what my Tools and Materials list below reflects. If you need fewer or more charms, purchase whatever number of stamping blanks you need.
I recommend using altered stamping blanks for this project. This simply means that a lot of the extra work, such as punching a hole and applying a finish, has been done for you. Buying an altered blank saves you steps in this first project. Look for brand names like Vintaj and Industrial Chic at crafts stores to find these altered blanks.
Tools and Materials
1⁄8-inch metal alphabet stamp set
Steel bench block
Hammer
Black permanent marker
Masking tape
1 round 33.5mm altered stamping blank, antique copper
1 round 22.5mm altered stamping blank, rustic brass
1 round 12mm altered stamping blank, natural brass
1 8mm jump ring, antique bronze
1 rigid choker, antique bronze
Polishing cloth
1. Trace each blank onto scrap paper. Play around with the placement of names on the blanks. Keep in mind that when you layer these graduated charms together, you want to see all the names at the same time. As you may suspect, layout varies with the length of the names you’re using. I used “AVA” (3 letters), “COLLIN” (6 letters), and “RACHEL” (6 letters). I decided to match the graduated sizes of blanks to correspond to the ages of the kids in this family. Rachel is the oldest, Collin is the middle child, and Ava is the brand-new baby.
2. Start by stamping the smallest blank. Tape the tag blank to the bench block. Place the tape directly above where you want the top of the stamps. Write the name (in my case “AVA”) on the tape directly above the spot where you want to stamp the letters. Slide the stamp into place, using the tape at the top as a guide. Hold the stamp firmly at a 90-degree angle. Strike the stamp with the hammer using a single solid blow. Continue stamping until you’ve spelled out the first name.
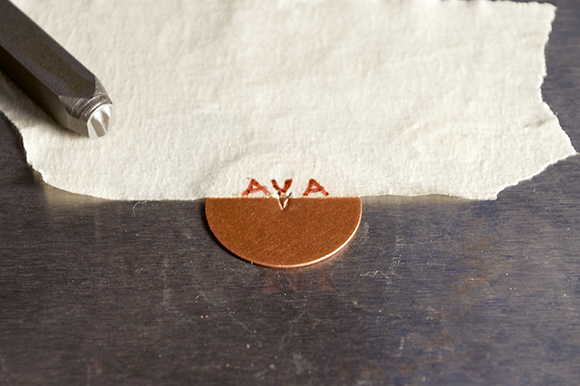
To center a design, begin stamping with the middle letter, then work your way out. See how this looks in Figure 7-2.
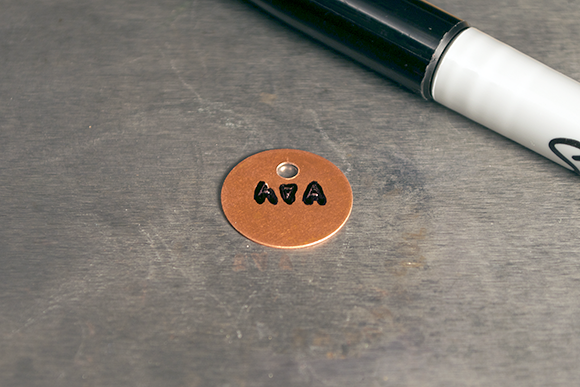
3. Fill in the stamped letters with black permanent marker as shown in Figure 7-3. This step isn’t required, but it makes your letters really stand out so they’re much easier to read. Over time, you may have to do this step again because the marker ink wears off. For more permanent results, you can use harsher products like Silver Black or liver of sulphur (products I describe in the upcoming section Oxidizing). But using a black permanent marker is a quick and simple way to get started without investing more money in the process.
Photograph by Andy Dismore
Figure 7-2: To center a word, stamp from the middle and work your way out.
Photograph by Andy Dismore
Figure 7-3: Color in the stamped letters with black marker.
4. Using a polishing cloth, vigorously rub off the excess ink, revealing the inked impressions. When using altered blanks, I don’t recommend using polishing pads. I think they take off too much of the finish. Choose a cloth instead for a more subtle finish.
Because these charms are already distressed, rubbing off the excess ink also removes a bit of the surface finish. I like this distressed look as shown in Figure 7-4. If you’d rather preserve the finish completely, highlight the impressions with black paint in Step 3, and immediately remove the excess with a paper towel. Set the painted pieces aside to dry for an hour or so before completing the pendant.
5. Repeat Steps 2-4 with the next two blanks. Because you’re layering these charms, make sure you stamp the names in a place where you can see them when the blanks are stacked together. See Figure 7-4 for help with placement.
6. Use pliers to open the jump ring. Slide on the stamped pieces to make the pendant. Close the jump ring. Slide the pendant onto the rigid choker to complete the necklace.

Photograph by Andy Dismore
Figure 7-4: Mom’s Pendant Necklace.
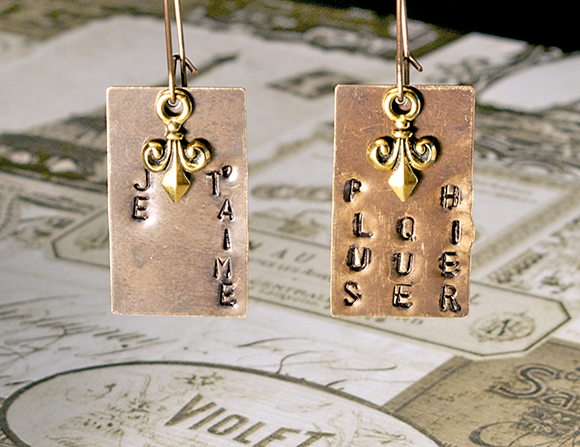
Project 7-2: Layered Earrings
This project combines stamping metal tags and using pre-made charms to create a wearable collage. I decided to use the French phrase “Je t’aime plus que hier” which means “I love you more than yesterday.” I added tiny fleur-de-lis charms to complete the French-inspired theme.
Tools and Materials
1⁄8-inch metal alphabet stamp set
Steel bench block
Hammer
Black permanent marker
Masking tape
2 30×22mm altered stamping blanks, rustic bronze
2 20mm fleur-de-lis charms, gold tone
2 kidney-shaped earwires, antique bronze
Polishing cloth
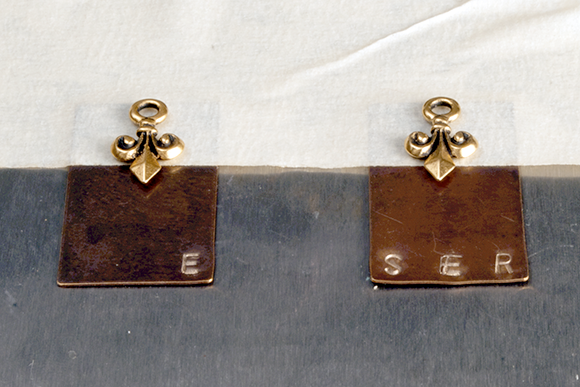
1. Trace the rectangle blanks onto scrap paper. Lay the charms on top of the templates and decide where to place your words. I split my phrase over both earrings. I also decided to line up the words vertically. Take a look at the finished piece in Figure 7-6.
2. Tape the blanks to the bench block. Place the tape directly above where you want the top of the phrase. Lay the charms on the blanks for placement. Begin stamping the words from the bottom up, as shown in Figure 7-5. Hold the stamp firmly at a 90-degree angle. Strike the stamp with the hammer using a single solid blow. Continue stamping words, working from the bottom up.
Photograph by Andy Dismore
Figure 7-5: Stamp from the bottom up.
Photograph by Andy Dismore
Figure 7-6: Layered Earrings.
3. Highlight the stamped impressions with permanent marker. Use a polishing cloth to remove the excess ink.
4. Slide the stamped tags and charms onto earwires to finish the earrings.
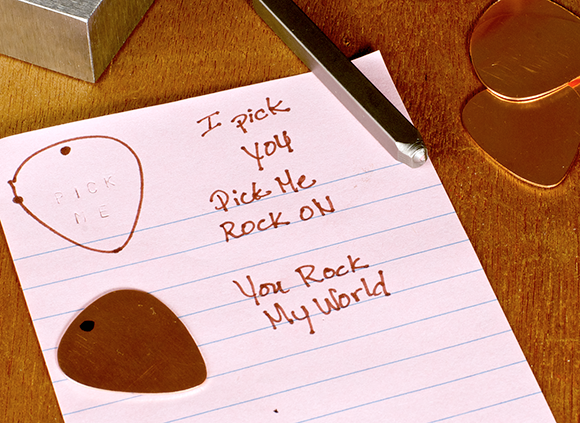
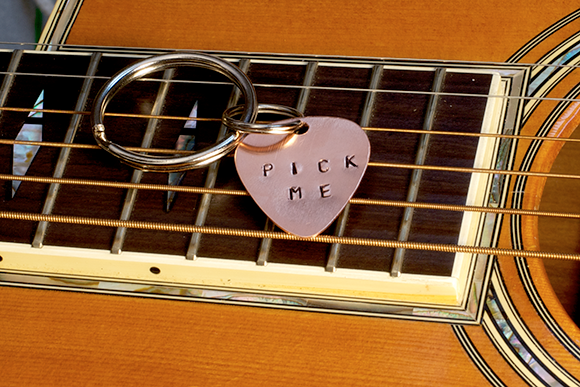
Project 7-3: Guitar Pick Keychain
This simple project is a favorite of many first-time stampers. It can add a whimsical vibe to a friend’s everyday accessory, the lowly keychain.
If a guitar pick isn’t your idea of fun, feel free to substitute a simple round or rectangle blank and follow the project steps.
Tools and Materials
1⁄8-inch metal alphabet stamp set
Steel bench block
Hammer
Black permanent marker
Masking tape
1 30×25mm 18-gauge guitar pick stamping blank, copper
15mm split ring
30mm split ring
Metal hole punch
Polishing pad
File
1. Trace the guitar pick onto scrap paper. Choose a phrase to stamp, and press the stamped phrase into the traced stamp template to see how it will look. Don’t forget to add a spot for the hole. I went with the phrase “PICK ME.” See how this practice step looks in Figure 7-7.
Photograph by Andy Dismore
Figure 7-7: Using paper for practice.
2. Tape the blank to the bench block. Place the tape directly above where you want the top of the phrase to appear. Mark the center point. Start with the center of the first word (in my case, either the “I” or the “C”). Slide the stamp into place, feeling for the tape as a guide. Hold the stamp firmly at a 90-degree angle. Strike the stamp with the hammer using a single solid blow. Continue stamping from the center out until you’ve spelled out the first word.
3. Add another piece of tape to mark the top of the second word. In my case, I slide the “M” stamp into place to the left of the center mark and against the tape. Strike the stamp. I repeat for the “E,” this time to the right of the center mark.
4. Remove the tape. Punch a hanging hole in the pick with the metal hole punch. Use a file to soften any rough edges.
5. Fill in the stamped letters with black permanent marker. Use a polishing pad to remove the excess marker and polish the pick.
6. Slip the smaller split onto the pick. Slide the smaller split ring onto the larger one to complete the keychain.
I opted to attach the keychain to the larger split ring with a small split ring rather than a jump ring. I think the split ring is much more durable than a jump ring, and because keychains need to withstand a lot of rough treatment in pockets, purses, and backpacks, I think it’s the best option.
Photograph by Andy Dismore
Figure 7-8: Guitar Pick Keychain.
Exploring Finishes
As a metal stamper, you have several options for finishing your pieces. Oxidizing metals turns them dark gray. Highlighting stamped impressions with markers or paint creates temporary color in the impressions. You can then polish the finished pieces to reveal the contrast. In this section, I walk you through these three finishing options.
Oxidizing
You can oxidize metal, or turn metal dark gray, using these products:
Liver of sulfur: This combination of potassium sulfides mixes with water to create an oxidizing bath for metal. Hot metal soaks in the bath for a period of time (several seconds to a minute or so) to develop the oxidation and is then removed and polished. Liver of sulfur works well with any metal.
Hydrochloric acid: Silver Black and Black Max are commercially available oxidizing products using hydrochloric acid. Typically, the product is dabbed directly onto stamped impressions, rinsed, and then polished. Hydrochloric acid works well with silver blanks (including fine silver, sterling silver, silver filled, and nickel), but it’s not recommend for brass, copper, or gold.
Each of these processes uses strong chemicals, so if you go this route, read the instructions that come with the products very carefully. Always use them in a well-ventilated area, with safety glasses and appropriate gloves. They can burn you quickly and damage your tools, supplies, and work space. Proceed with caution.
 You may hear the word patina in discussions of metal finishes. The term patina is traditionally used to describe oxidation that accumulates on copper, brass, and stone. Often the patina occurs over time, as the material is exposed to the elements. But you can find chemical solutions that speed up the process and add this oxidation to metal jewelry or other crafts projects. Look for products wherever metal-working tools and supplies are sold.
Highlighting
Highlighting metal is sort of a faux oxidizing. Highlighting impressions with a black marker is extremely common to create an oxidized look to stamped metal pieces. It’s also the least expensive method because it requires no special equipment. I’ve chosen to use this method for the projects in this book to keep your first few projects simple.
Create a similar effect by dabbing paint into the impressions and removing the excess. Choose any color for a variety of effects.
These highlighting processes don’t create a permanent coloring. You can extend the life of the color by applying a thin wax coating using a product such as Renaissance Wax.
Polishing
Polishing is the simplest finish for stamped pieces. It’s typically performed after oxidizing to remove the excess oxidation, leaving a polished finish to contrast with the oxidized impressions.
You can polish pieces with a variety of polishing tools, such as polishing pads and cloths or a jewelry tumbler. Check out the Polishing tools section earlier in this chapter for details.
Using a rotary tumbler can also save you some filing time. Toss pieces into the tumbler to create a mirror finish and knock off any sharp edges.
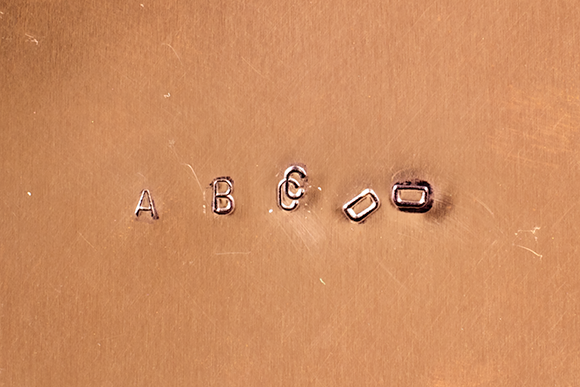
Avoiding Common Problems
As with any jewelry-making technique, the more you stamp jewelry, the better you get. By better I mean you’ll be stamping straighter, with more evenly spaced letters. But honestly, one of the things I love about this technique is the roughness of it. I prefer the handmade, rustic feel of these pieces rather than something that looks so perfect it seems like a machine cranked it out.
Having said that, you should work to avoid a few problems (as illustrated in Figure 7-9):
Too light an impression: Check out Figure 7-9, letter A. The impression is so light that it barely takes the highlight. To keep this problem from showing up in your finished pieces, practice on the same metal you’ll use for your finished piece. Make sure you know how hard you need to strike the stamp to deliver a quality impression before you create your piece.
Too heavy an impression: Figure 7-9, letter B shows a heavy impression. Not only is the metal overly distorted, but also you can see a bit of the square of the shank of the stamp on the left. Avoid this situation by using the right weight hammer. Precious metals like gold and silver and a soft metal like copper need only a 1-pound hammer. Base metals and alloys like nickel silver and brass may require a 2-pound hammer.
Shadow stamps. Figure 7-9, letter C shows what happens when a stamp is struck two times. This problem can happen when you deliberately strike the stamp twice without lining it up properly. Or it can occur when the stamping surface is unsteady, causing the hammer to bounce back inadvertently. The best way to avoid this second issue is to choose a sturdy work surface. You can add a leather sandbag (about $20) under your bench block to help deaden the blow of the hammer and minimize bounce back.
Crooked letters. Figure 7-9, letter D is an example of a crooked stamp. Most stamps have square shafts but aren’t marked with an obvious “this end up” sort of distinction. You can add your own with a permanent marker. A simple dot can help you position a stamp in the right orientation every time.
Photograph by Andy Dismore
Figure 7-9: Practice to avoid these common stamping mistakes.