
PROPAGATION IS AS OLD as the world, and in the garden its ancient ways are still at work with only minor variations. It is the magic of the garden that earth and sun meet to create new plants from parts of old ones. At its most basic, the plants take care of reproducing and creating new varieties themselves by casting pollen and seeds to the wind, insects, birds, or bats or by sending creeping stems across the soil to root. Playful Homo sapiens developed methods to, if not improve, at least to complicate the original simplicity.
Scientists refer to seed propagation as sexual reproduction and to methods that use roots, stems, or other plant parts as asexual reproduction. Both procedures require the propagator’s knowledge of special techniques, some easily acquired skills, and a certain amount of special equipment to make the job easier and the outcome reliable.
Seeds often appear to be dried husks, but they are actually tiny embryos, the offspring of sexual unions that take place in a plant’s flower where sperm in the stamen’s pollen fertilizes an egg in the ovule found in the ovary. The ovule matures to form the seed, while the ovary matures to form the fruit. Some seed coats are closely attached to the fruit wall, making seed and fruit essentially synonymous for the home gardener; examples include cumin, dill, coriander, and other members of the carrot family.
Most herb species pollinate themselves with the help of wind currents and insects to reproduce plants of similar size and aroma, but sometimes species within a genus, or cultivated varieties of a species, cross-pollinate to create a hybrid. This may happen as an accident of nature or through the intentional intervention of a plant breeder. These hybrids are often genetically unstable or sterile and cannot reproduce sexually. In rare cases, herbs such as English thyme have only one sex and cannot reproduce from seed.
Because seed is produced through a sexual process, care must be taken to prevent unwanted cross-pollination that will create plants that vary from the parent. This means that space—sometimes as much as a mile or more—must be maintained to isolate species or cultivated varieties and prevent cross-pollination. Alternatively, cages can keep pollinators from reaching the plants or trap pollinators, such as bees, inside the cages to perform their pollination chores. Pollination can also be performed by hand, using soft brushes.
The knowledge needed to propagate herbs successfully includes knowing which herb varieties do not produce viable seed or vary widely when grown from seed. Seed to be avoided includes that of herbs such as French tarragon, English and several other thyme varieties, all named lavenders, rosemary, mints, and many oregano cultivars (see individual listings for varietal characteristics). Of course, a certification that plants are grown from vegetative cuttings is no guarantee of varietal purity, but a plant in hand provides the gardener or the farmer a way of assessing the plant’s quality and pedigree—foliage to sniff and flowers to see, at the very least.
Whether you have a small backyard plot or several acres, the seed quality is important. As a living embryo, the seed needs special care to maintain viability while awaiting the proper conditions for growth. Viability is partly genetic, but proper temperature and humidity control help to maintain the natural vigor of most seeds. Packets of seeds enclosed in a sealed container and put in a refrigerator provide the home gardener with the best chance of maintaining seed viability. However, many seeds—parsley, chives, and coriander to name only a few—have a naturally short lifespan of about one year.
Your seed merchant’s reputation and the germination rate of the seed you choose indicate its quality. Although government regulations require germination tests on large seed lots, small packets are not required to show test results. Most American seed firms do not routinely offer germination data on the herb seed intended for home gardeners. This policy of nondisclosure has been criticized by experts in the field. “Stricter quality control on seed purity and trueness to type as well as seed vigor for basil varieties and other culinary herbs is needed,” according to leading U.S. herb researcher James E. Simon. “Basic information such as germination percentage should be included on every herb seed packet, as this alone would aid in ensuring minimum seed viability and improve the performance that commercial growers and home gardeners expect.”
Simon did not reach this conclusion from his ivory tower; he found out the hard way through experience. He is known for his extensive studies of basil and parsley, but he has also studied many other annual and perennial herbs grown from seed. His disquieting conclusion on herb seed quality: “We . . . found that many seeds were of poor quality: low viability and vigor; others were composed of many seed types and were not uniform in growth and visual appearance. Several herbs were incorrectly labeled in commercial seed catalogs.”
Basil-seed germination was so variable from the different firms supplying the seed that in the first year of Simon’s trials it was almost too difficult to make research comparisons. Future studies used transplants instead of direct seeding in order to make comparisons less complex. Simon found the names on the basil-seed packets were often incorrect and recommended efforts to correct the misidentification of cultivated basil varieties.
Other researchers have expressed concerns about seed viability. Robin Cowen, Charles Voigt, and Joe Vandemark looked at germination rates of thyme, oregano, and marjoram and agreed with Simon that “the source of seed is important in percentage germination,” but they noted that the growing media used to germinate seeds is another factor that is often overlooked. In their study, University of Illinois researchers discovered that oregano seed from the same supplier varied from 60 to 100 percent germination, depending on the germination medium used; marjoram and thyme showed similar reactions. Nine major brands of soilless and other growing media were tested. “Overall” the researchers concluded, “Fafard no. 2 and Metro mix had the highest percent germination for all seed sources. Both seed source and media are important in obtaining high germination percentages. If the lowest percent germination sources were dropped out, any of the soilless mixes except Grendell [Farms Growing Mix] would give quality results. All seedlings in the other soilless mixes grew on very well.”
If germination rate is one standard of seed quality, government regulation of these standards has been minimal under the U.S. Federal Seed Act. The law establishes minimum germination for only three herbs: chives (50 percent), parsley (60 percent), and sorrel (65 percent). In Europe, more herb seed is regulated and minimum germination standards are more stringent. Under Common Market regulations, at least 75 percent of chive seed must germinate. Minimum germination is regulated as well: dill (75 percent), chervil (80 percent), sorrel (75 percent), summer savory (75 percent), thyme (70 percent), fennel (75 percent), basil (70 percent), marjoram (70 percent) and parsley (75 percent). These higher standards may spring from a more intense European interest in herbs and in gardening, as demonstrated by French national newspapers that publish independent germination tests comparing vegetable and herb seeds from different firms to help seed buyers determine quality.
While the majority of vegetable seeds are directly sown in the garden or field, only a few herbs are usually handled this way. The minute seed size of many herbs and their slow germination and growth often necessitate growing them to transplanting size in pots. Slow-growing herbs with tiny seeds are best started indoors so that established plants can be set out to receive extra garden time to provide a shorter interval to the first harvest. Perennials with large seeds and rapid germination, such as sorrel (about 34,000 seeds per ounce), sage (3,400) and chives (26,000), may be sown directly in the garden, but harvests may be delayed more than a year while the plants mature to cutting size. But small-seeded perennials such as thyme (about 100,000 seeds per ounce), sweet marjoram (120,000 seeds per ounce), oregano (300,000 seeds per ounce), catnip (48,000 seeds per ounce), and lemon balm (56,000 seeds per ounce) benefit from a controlled indoor environment. Large-seeded annual herbs like basil (18,000 per ounce), dill (21,800 seeds per ounce), borage (1,600 seeds per ounce), coriander (2,000 seeds per ounce), chervil (12,000 seeds per ounce), and parsley (18,000 seeds per ounce) can be direct seeded.
Earlier yields from these seed-grown plants may be obtained with transplants where cost is not a consideration. Parsley transplants, for instance, can be ready for the garden and near harvestable size in the time it takes for the seed to germinate outdoors.
Most annual herb seeds are direct-sown outdoors like vegetable seeds: Once the soil warms in spring, seed is covered in rows to a depth twice its thickness and kept moist until germination. After germination, the seedlings are thinned to prevent overcrowding.
Not all seed lends itself to direct-sowing, however. Parsley seed can be troublesome because, like many of its umbelliferous relatives, parsley seeds ripen unevenly, resulting in low germination rates; even viable parsley seeds germinate slowly and unevenly in cold, wet ground. The cause of this poor germination is the presence in the seed of a germination inhibitor, a water-soluble chemical called heraclenol, a furanocoumarin. The common advice to soak parsley seed is on target, but it takes more than a quick soak to get rid of heraclenol—several days is required, according to researchers. Simon recommends the use of aerated water, such as might be found in an aquarium. The seed is soaked in the bubbling water in a mesh bag or panty hose for several days and then dried before planting. Jack Rabin, a researcher with Rutgers Cooperative Extension in New Jersey, recommends a similar method but allows water to run through the mesh bag to carry the germination inhibitor away to prevent any from remaining on the seed coat. Such a procedure improved germination of seed sown in late February and early March in New Jersey by 78 percent, according to Rabin. As ground warms, however, there is almost no difference in germination, according to Rabin. Parsley sown indoors under optimum conditions takes about eight days to germinate; outdoors, it can take four times as long.
Parsley is not the only herb whose seeds need special treatment to germinate; some, like sweet cicely (Myrrhis odorata), for instance, won’t sprout at all without special treatment. Sweet cicely’s splinter-like seeds should be harvested as soon as they are dark and ripe, then placed in a plastic bag and mixed with damp sphagnum peat moss. The bag is sealed and placed in a refrigerator where the seeds will begin to germinate in five months; then they can be planted and grown as other seedlings described below. Seed of sweet bay (Laurus nobilis) needs a similar hot/cold treatment to help it break dormancy.
Starting herb seedlings indoors takes little special equipment other than fluorescent lights. This supplemental light is necessary because the days of late winter and early spring are not long enough or intense enough to promote sufficient growth. A shop light with two 4-foot (1.2 m) long fluorescent tubes produces enough light for sixty-four plants in 2.5-inch (6.4 cm) pots. Special plant lights aren’t necessary; instead, install one warm-white tube and one cool-white tube in the fixture. Keep the light no more than 6 to 8 inches (15.2 to 20.3 cm) from the tops of the seedlings. The lights should illuminate the seedlings for sixteen hours per day.
A growing medium made of equal parts of sphagnum peat moss and perlite along with some lime works well to grow seeds from germination to transplant size because it is sterile, holds moisture, and drains well. Such soilless mixes are available from a number of companies. Dampen such growing medium with warm water prior to filling flats or pots. Seeding mix should not be so wet that you can squeeze water from it.
New, sterile plastic pots should do fine for a few seedlings, but don’t use any much deeper than 2 inches, or the volume of growing medium will not dry quickly and may lead to disease problems. In a plastic nursery tray, or flat, measuring 10 inches wide by 20 inches (25.4 × 50.8 cm) long and filled with soilless medium, sow seed in twelve 10-inch (25.4 cm) rows to produce 200 to 500 finished plants. Two of these germination trays can be accommodated under one 4-foot fluorescent fixture.
Seeds of chive and similar herbs without traditional stems can be successfully sown directly in a pot, but herbs with stems or those that grow from a rosette are better transplanted from the pot or flat into individual pots, in which they will grow to transplant size. This additional transplanting helps prevent new seedlings from falling over because their young stems are rather soft.
Because some seed requires light to germinate, it should be left uncovered when sown outdoors; other types of seed germinate best when covered with soil. When grown indoors, the high humidity of the germination chamber minimizes such seed differences. Two methods of seed sowing are generally used: broadcasting the seeds on the surface of the growing medium, and sowing seeds in evenly spaced rows. If you choose to use small pots, the broadcasting method is best; for more seedlings, flats are better. If different seed varieties must be sown in the same flat or pot, choose varieties that germinate within a day or two of each other and grow at the same rate; this allows simultaneous transplanting of the varieties and little risk of one or two varieties becoming too large and shading smaller seedlings near them. Air circulation is improved for seedlings grown in rows, an important factor to eliminate potential disease problems. A small piece of metal that is shaped like a V is handy to press rows into the dampened growing medium. Seeds are sown into these depressions, and some care should be taken to space the seed correctly. Seed-germination rates enter into spacing decisions; for instance, if the rate is 50 percent, you’ll know that only half the seed sown will germinate. Seed sown too thickly will lessen air circulation among the seedlings and encourage diseases.
After the seed is sown, water it with a gentle spray and immediately wrap the top of the flat with plastic wrap or place it in a clear plastic bag to prevent the growing medium from drying before the seeds germinate. Garden centers often sell special seed-starting kits that contain a flat equipped with a plastic dome. Place the covered germination containers in a bright, warm room with temperatures ranging between 70 and 80°F (21 to 26.8°C) but away from direct sunlight.
Once the seed germinates, remove the plastic covering and place the pot or tray under the fluorescent lights, maintaining similar temperatures. Temperature when the lights are off may drop to the 60 to 65°F (15.6 to 18.2°C) range; however, plant researchers have discovered that nighttime temperatures that are 5 to 10 degrees Fahrenheit (2.7 to 5.7 degrees Celsius) warmer make seedlings and plants stockier.
Depending on the temperature under the lights and the moisture level in the seedling flat, it is usually not necessary to water the seedlings until the second or third day under the lights. When it becomes necessary to water, the peat moss will lighten in color. A gentle flow of water that does not knock the seedlings down is best to moisten the growing medium; this can be achieved by watering between the rows or watering from the bottom if the pots sit in a saucer.
Fertilization of seedling herbs is an important but often overlooked aspect of growing healthy, vigorous plants. Israeli scientist Eli Putievsky performed experiments on seed-grown marjoram, lemon balm, and thyme that dramatically illustrated the importance of fertilizer application even at the earliest stages of growth. He began fertilizing seedlings after germination with one gram of 7-3-7 (N-P-K) in a liter of water (a 20-20-20 water-soluble fertilizer at 1/20 ounces per gallon would be the closest commercial American equivalent) every two days. Within thirty days, the marjoram was 1,033 percent larger than unfertilized seedlings. Lemon balm and thyme seedlings did not show such dramatic increases but were 600 percent or more larger than their unfertilized counterparts. After sixty days, or at transplant size, all fertilized seedlings were at least 100 percent larger (marjoram, 138 percent; lemon balm, 103 percent; and thyme, 176 percent) than their unfertilized counterparts.
Transplanting to pots can occur when the plants’ first true leaves are well developed and the second begins to emerge. If left in their first homes, the crowded seedlings will become stringy, and disease may become established.
Two to 2.5-inch plastic pots with the same sterile growing medium used to start the seedlings are ideal for transplants. If you must reuse pots, plastic pots are easy to sterilize in a mixture of bleach, soap, and water.
Traditionally, each pot receives a single transplant, but healthier, fuller transplants develop quicker with clump transplanting, a method that groups three to six seedlings into a single pot. This method decreases the seedlings’ stress because removing a small clump of seedlings reduces root damage, and the greater number of roots in the pot use water and nutrients that might otherwise build up to create disease problems.
To use the clump method, gently remove a small clump of up to five seedlings from the flat or germination pot. It’s not necessary to count the seedlings in the clump; instead take what comes apart easily with the least root damage. The clump size also depends on the physical stature of the seedlings: the larger the leaves on the seedling, the fewer seedlings go in the clump.
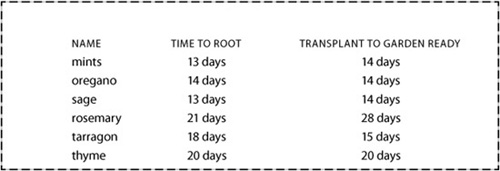
TABLE 9.
Sow-to-plant data for seventeen culinary herbs grown from seed.
Hold this clump by the leaves to avoid damage to the soft stems, and shove the index finger of your free hand into the center of the transplant pot. Then gently settle the clump into its new home, planting it deeper than it was growing in the seedling flat. Set the clump upright so the seedlings’ true leaves lie on or close to the surface of the growing medium. This method often buries the plants’ cotyledons, often called first leaves or nurse leaves, which look different from the plants’ true leaves. This deep transplanting of the seedlings helps them stand up much better after watering and develop stockier stems. Indoors, the transplants are grown under lights just as the seedlings were and with similar fertilization.
When home gardeners need only a few perennial herb plants to give to a friend or to enlarge their own herb patch, their own gardens may be able to produce the additional plants. Two no-hassle methods of ancient vintage are up to the task of propagation.
One method called layering takes advantage of woody herbs’ low growing branches. In a technique copied from nature, the gardener selects pliable branches near the ground and, without breaking them, strips them of leaves except for about 2 to 3 inches at the tip. Next, a narrow strip of bark is scraped from the outer layer of the branch with a sharp knife to enhance rooting. The branch, still connected to the plant, is then covered with soil except for the leafy tip. A stone or a brick will be necessary to hold the stem in place. This is not a method to use when quick results are required, and it may take six or more months for the roots to grow substantially. After the roots form, the stems are cut from the plant, and the rooted cutting is potted and grown to transplanting size.
A second technique, division, involves dividing clump-forming herbaceous species as spring growth commences. The plants to be divided are carefully dug from the ground where the gardener can look at the root structure to determine where the most advantageous areas to cut occur. For some plants, the previous year’s growth was abundant, and there are many areas where many roots will remain after several divisions are taken; in other, slower growing species, growth is slower and fewer divisions can be cut. After the divisions are made, the plants may be planted in the garden immediately, or, alternatively, the divisions may be potted and kept in the shaded garden for several weeks to recover from the trauma of surgery before they are placed in a sunny spot. After growth is observed, the divisions may be planted in the garden.
Both propagation methods are easy, but they have limited usefulness because only small numbers of plants can be reproduced and the gardener must already possess the plants to be multiplied. The traditional way perennial herbs are reproduced is by stem cuttings. Two types of cuttings are used. Softwood cuttings originate in green, immature growth; hardwood cuttings are taken from mature growth that is wounded by scraping away the bark to expose its cambium layer.
The typical tip cutting is 3 to 4 inches long and is removed from the growing end of the stem with a sharp knife or scissors. The cutting instrument should be disinfected frequently in bleach or other sterilizing solution to decrease the chance of transmitting disease. One-third to one-half of the lower portion of the cutting is stripped of leaves before it is stuck in the rooting medium. The traditional rooting medium of sterile sand has been largely replaced by the use of soilless growing media, often amended with an equal volume of perlite or calcined clay (sterilized, pelleted clay also known as cat litter).
Rooting cuttings relies on many plants’ almost magical ability to reproduce by thrusting life-sustaining roots out through their stem walls. Scientists reduce this magic to a single word, mitosis, which describes a plant’s ability to duplicate cells with chromosomes that are identical to its parent. H. T. Hartmann and D. E. Kester, in their book Plant Propagation, describe mitosis as “the basic process of normal vegetative growth, regeneration, and wound healing.” This is the process with which gardeners are so familiar: the elongation of stems and the production of new leaves, the growth of large root systems, and the ability of plants to heal wounds with new growth. Under the proper conditions, stems form a swollen cluster of new cells called a callus, from which roots will spring.
Most named varieties of perennial herbs are reproduced with this method, assuring that the plant’s offspring retain the parent’s characteristics. Because it is necessary to have plants, or access to them, before this type of propagation can occur, commercial growers and advanced experienced gardeners most typically root cuttings to increase their plant stock. But this should not dissuade even the beginning home gardener from trying the process when given the opportunity.
Stem-tip cuttings 3 to 4 inches long from many herbs can be rooted in a glass of water on a windowsill, but two things should be remembered: change the water daily to prevent disease, and give the stems about twice as long to root as needed for other methods.
The key to successfully rooting large numbers of stem-tip cuttings is an environment that encourages roots to form quickly: high humidity, strong to moderate sunlight, a day length of at least ten hours, and temperatures at the root zone of 10 to 15 degrees Fahrenheit (5.7 to 8.3 degrees Celsius) above a cool-to-moderately warm ambient air. This environment keeps the cuttings from wilting and dying and allows root formation.
Over the years, plant propagators have developed several methods of achieving conditions needed to root cuttings. The simplest method requires a large, sterilized plastic pot, sometimes cut in half to shorten it and reduce the amount of rooting medium, and covered with a clear polyethlene bag to provide a humid atmosphere. Usually some type of support, such as a clean, stainless steel fork, keeps the bag from touching the cuttings. The bag-covered pot is placed in bright but indirect sunlight; direct sun creates lethal temperatures inside the plastic bag. An alternative is a 10-inch by 20-inch (2.5 by 50.8 cm) flat with a humidity dome similar to that used for starting seeds.
The bag or humidity dome should be removed several times a day to allow fresh air to circulate through the cuttings. If the cuttings appear to wilt, they may be misted with fresh water from a hand-held pump sprayer.
As the gardener becomes more ambitious, a larger rooting area may become necessary, but always humidity is required to maintain cutting turgidity. Cold frames and hot beds are low structures with sides made of treated wood, have glass-sash tops, and are traditional garden accoutrements that are used for both seed-starting and rooting cuttings in both spring and fall. Today’s commercial cold-frame kits are lighter and more portable than traditional ones. Hot beds differ from cold frames only in that they have packed, fresh manure or heating cables buried under them to provide heat; keeping such structures from overheating and cooking the plants takes skill and constant attention.
In the early stages of rooting cuttings, the sashes of the cold frame are often left closed to hold humidity when temperature permits. During warm periods, automatic mist systems or hand watering with a hose and fine-spray water breaker can maintain humidity until roots form. Lathhouses are structures usually made of narrow pieces of wood nailed to a frame to limit the amount of sun; the shade they create cools summer temperatures around cuttings. Because these structures are so open to air currents, hand watering or automatic misting is often necessary to maintain humidity.
Inside a greenhouse, benches or ground areas are sometimes set aside to root cuttings and sometimes have overhead frames covered with clear poly and 50-percent shade cloth to retain humidity and protect tender cuttings. These poly tents may cause trouble, and frequent hand misting may be necessary until roots form. The most common method of propagating cuttings in greenhouses uses a bench—or an entire greenhouse—equipped with an overhead, automatic mist system that emits regular bursts of fine spray to maintain leaf moisture. Fog systems produce very fine spray particles that cool the greenhouse by raising humidity. The most effective system for rooting cuttings automates as much of the process as possible so that constant manual adjustments are unnecessary.
In a small greenhouse, a typical propagation area consists of a bench with heating mats that are thermostatically controlled to maintain a preset root-zone temperature. Over the bench hangs a mist line, a long water pipe with numerous mist nozzles. Water to the mist line is controlled by a computer or other device that turns the water line on as moisture evaporates from the cuttings. Although some greenhouses have special beds of sand for the cuttings, most commercial growers now use flats or small containers filled with soilless growing media into which the cuttings are inserted.
Whether you plan to grow just a few cuttings or thousands, begin with strong, healthy cuttings taken from plants that are in vigorous growth. Stems from such plants are thicker than those suffering from lack of sun or nutrients. Tip cuttings should be free of diseases and insects; this is especially important because cuttings are placed close together—often the leaves barely touch each other—and their rooting environment is ideal for the spread of disease.
Because the interaction of the cutting with the environment is important, the condition of the cutting is also a crucial factor. The age of the wood that makes up the cutting definitely affects its ability to root. Despite the oft-repeated advice to take a bit of old wood with lavender and lavandin (Lavandula angustifolia, L. ×intermedia) cuttings and to take them in the fall, our research shows that at this age lavender stems root slowly and unreliably. The best lavender cuttings for rooting are taken from the tips of stems in the active growth that typically coincides with the onset of flower-bud formation. Nearly 100 percent of cuttings taken at this time will strike roots in twenty-one days under intermittent mist, if the weather is not extremely hot. Most Lavandula angustifolia and L. ×intermedia varieties in outdoor environments are not in full growth in fall, but cuttings may be obtained from four- or five-month-old potted plants.
Rooting aids in the form of liquids or powders are often used on the bare stems, and some horticulturists consider these products essential to producing roots. These rooting aids, called rooting hormones, usually contain varying concentrations of indole-3-butyric acid (IBA) and naphthaleneacetic acid (NAA). There is some controversy over whether these rooting compounds actually induce rooting, but there is evidence that they improve the number and vigor of roots on some herbs.
Tests we made on rosemary and bay cuttings illustrate the old grower’s axiom that rooting compounds are sometimes a more effective psychological aid to the uncertain propagator than they are to the initiation of roots on cuttings. We took a group of cuttings from Rosmarinus officinalis ‘Mrs. Reed’s Dark Blue’ and treated half with a rooting powder containing 0.8 percent indole-3-butyric acid, one of the strongest formulas available. Both sets of cuttings were grown side by side on a heat mat under intermittent mist. The results showed no difference in the time it took to root the cuttings, but the treated cuttings had larger, more vigorous root clusters.
A second test using the same rooting aid on cuttings of Laurus nobilis produced results that conflicted with the rosemary. Bay is one of the toughest herbs to root; the condition of the cutting and even the timing of the cutting are critical to achieve fast, reliable rooting. While fresh new growth of most herbs roots well, it fails with bay and rots instead of rooting. Over the years, we have discovered that first-year growth of bay stems that are half-ripe root best. A half-ripe cutting is somewhat stiff but still green; soft bay cuttings that bend without much resistance usually rot before they root. Because bay grows in spurts several times a year, it is best to take tip cuttings 4 or 5 inches long from stems that have ceased active growth for several weeks.
Bay’s sensitivity to the rooting environment hints of important factors in the propagation environment. Our experience has shown that wounding bay cuttings by scraping the butt half of the stem produces better roots quicker. To judge the effect of wounding, rooting aids, and root-zone heat on these hard-to-root bay cuttings, we set up a test that compared cuttings treated in different ways. Cuttings were stuck in 3-inch-deep tapered pots filled with a soilless growing medium enhanced by an equal amount of perlite.
All the cuttings were grown under intermittent mist but divided into two broad groups: One had root-zone heating that was 15 to 20 degrees Fahrenheit (8.3 to 11.1 degrees Celsius) above ambient air temperatures; the other had no heat. Within the two large groups were subgroups of cuttings that were wounded and unwounded, and treated with a rooting aid and untreated. Cuttings were prepared and stuck 1 December; nine weeks later they were checked. Here are the results:
• Without root-zone heat, there were no rooted cuttings; 42 percent of the heated cuttings had produced roots.
• Of the heated cuttings, twice as many of those that were wounded and had no rooting powder were as well rooted as were those that received the rooting aid.
• It took another four weeks for the unheated cuttings to send out any roots, and again the wounded cuttings without rooting powder were the best rooted, double in number of those that received no rooting aid.
• However, the cuttings that were not wounded and received rooting powder produced 36 percent more rooted cuttings than the unaided and unwounded counterparts.
The results show the importance of root-zone heating to speed the rooting process under intermittent mist and indicate that the treatment of the cutting plays an important part in how it roots and the effectiveness of rooting aids.
Fortunately, not all herbs are as temperamental as bay, but our comparison of different methods may provide some clues to the most important factors that apply to rooting any cutting. Little information from the scientific literature about herbs is available on this subject, but some observations from experience and our comparison tests are worth considering. Extreme heat, especially accompanied by hot sun, as sometimes occurs in late spring or during summer, can make rooting cuttings difficult, no matter what method is used. When temperatures exceed 85° or 90°F, it is difficult to keep cuttings from wilting or becoming stressed to the point that it is difficult to achieve quick rooting. The longer it takes a cutting to root, the lower the success rate is likely to be.
Our experience in the laboratory and in the greenhouse has also shown that providing high humidity, especially with intermittent mist or fog, is probably the most important environmental factor when it comes to rooting cuttings. The second factor is probably root-zone heating accomplished with heat mats embedded with electric cables.
Another important factor in producing heavily rooted cuttings was discovered by Israeli researchers. They found that fertilizer, an often-overlooked aspect of the rooting process, may also play a key role in root formation. Eli Putievsky of the Israeli Agricultural Research Organization reported increased rooting and root development of sage cuttings with the addition of 1 gram of 7-3-7 fertilizer in 1 liter of water (a 20-20-20 water-soluble fertilizer at 1/20 ounce per gallon would be the closest commercial American equivalent) applied every two days. With fertilization, 90 percent of the sage cuttings rooted, while only 79 percent of the unfertilized cuttings did so, and the fertilized cuttings had a 128 percent increase in the number of roots.
After cuttings have rooted, they are removed from the propagating environment and introduced to bright sunlight for a few days before being transplanted. Each rooted cutting is placed in a 2- to 3-inch pot filled with soilless growing media. The tip is pinched out of the cutting when it is transplanted so that the stem will begin to branch as the roots begin to grow in the pot. If the weather is warm, the potted cutting can be grown in a cold frame; when the weather is inhospitable, an indoor garden with fluorescent lights, a sunny window, or a greenhouse are suitable sites for growing the cutting. When the roots begin to reach the sides of the pots, it is time to transplant the herbs to the garden.
TABLE 10.
Cutting to plant for selected perennial herbs.
To be successful at propagation, rigorous control must be exercised over the environment to prevent the invasion of diseases at a time of a plant’s greatest vulnerability. Where seeds or cuttings are to be started in a controlled indoor environment, the use of new or sterilized pots and trays is important from the start. Plastic containers are a good choice because they are sterile when new and if reused they can be sterilized easily with chlorine bleach, hot water, and soap.
The medium used for seeding and rooting cuttings may vary slightly, but it should consist of material that has not been contaminated with disease by standing in water or sitting in an open bag where diseases could infect it. It is a smart precaution to use a newly opened bag of material wetted especially for the day of use. If you feel unsure about the seed starting material, it can be sterilized with heat: a temperature of 180°F (83°C) for 30 minutes will kill nematodes and other soil insects, damping-off organisms, bacteria and fungi, and most viruses. The tools used to take stem tip cuttings should be cleaned and disinfested frequently so that they do not spread viruses and diseases; cuttings should not be taken from plants on which disease or insects are visible. The area in and around which the rooting or seedling growth is to take place should be scrubbed with a solution of hot water, detergent, and bleach (one cup of bleach per gallon of hot water) to kill any diseases that might be present; be sure to wear rubber gloves and other protective clothing.
Water, the essential ingredient for seed germination and for rooting cuttings, is also one of the most important factors in the transmission and spread of diseases. The management of moisture, along with sanitation, is the key to seedling and cutting root growth, as well as the control of the typical root rot and damping-off diseases that may romp through the propagation area. Pythium, Rhizoctonia, Phytophthora, and Botrytis are fancy names for organisms that are commonly called water molds and root rots and may attack seedlings or cuttings. Water molds like Pythium and Phytophthora go through a spore stage that swims in water; the disease can be splashed easily from one container to another. These fungi are unlikely to live in a well-drained growing or seeding medium.
Pythium can cause trouble to a seed before it emerges by preventing germination; avoid overwetting of the growing medium when sowing seeds to help control this problem. Rhizoctonia, Pythium, and Phytophthora may all be responsible for post-emergent damping-off, a condition in which disease organisms attack the stem at the soil and cause it to collapse. In addition Pythium and Phytophthora may attack seedling and cutting roots causing poor growth and leaf-yellowing. Overwatering encourages these organisms and their spread, but excessive dryness can also weaken young plants and damage them so that when water is applied the diseases they cause have an easy time of destroying the crop. “Frequent light waterings keep the upper part of the medium moist, which promotes the growth of disease organisms,” according to researcher Charles C. Powell of Ohio State University. “When the medium is irrigated thoroughly and less often, leaving the area at or near the surface slightly drier, it is less likely to see the growth of damping-off pathogens.” In our experience, the ideal combination of good drainage, light, and temperature should allow the seeding medium to dry each day to permit daily irrigation at the beginning of the lights-on cycle.
Foliar diseases can also present obstacles to propagation success. Mildews, rusts, botrytis, and fungal blights caused by Septoria and Alternaria may be encountered in the propagation area, especially in the humid atmosphere where cuttings are rooted. The use of disease-free cuttings, environmental sanitation, and moisture management lessen chances that these organisms will attack seedlings and cuttings. Air circulation through the rooting or seedling area aids in the drying of the medium and helps to dry vegetation; this will also lessen the spread of water-borne diseases. When seedlings or cuttings are too close together they cut down on this beneficial air circulation and hold water on their foliage longer, which aids the spread of disease organisms. Chapter 8 contains detailed descriptions of all these diseases and a further discussion. Whether with seeds or rooted cuttings, starting herbs from scratch provides the gardener with a sense of self-reliance and participation in the magic of the birth of nature. It is something that can be looked back upon later in the gardening process with pride and a sense of personal accomplishment.
Spring is the best time to transplant herbs. It’s the season of new growth with a ready availability of plants from specialists and garden centers. It also reveals the need to replace plants killed by winter, as well as the necessity of rejuvenating older plants by dividing thick clumps of roots. Most of these tasks can also be tackled in fall, but the wise gardener gets started early to allow 45 to 60 days before the first frost hits new transplants.
More than physical labor is needed to transplant herbs. Timing is often critical, as with so much else in the garden. The ideal air and soil temperatures to transplant encourages steady plant growth; these are not the same for all herbs. Some herbs—chervil, coriander, dill, sorrel, tarragon, and parsley—respond to cool weather to produce their best foliage growth. Herbs such as basil don’t take off until the nights get hot. Sage, mint, thyme, rosemary, winter savory, oregano, and a host of others put forth steady growth over a longer period of the year and are usually transplanted between the cool-weather-lovers and basil.
When the job at hand requires moving a plant from its current site in the ground, air temperature, maturity, and the condition of the plant are first considerations. They are important to minimize water loss by the plant, often manifested by wilted foliage after transplanting. The best time to move established plants is when they are still dormant—usually late winter or early spring. This is true for woody-stemmed perennials such as rosemary, hyssop, lavender, sage, and thyme, as well as herbaceous ones that die to their roots each year. Woody plants show their eagerness to grow with small, swollen, green growth nodes along their stems.
Soil prepared before transplanting speeds the process and makes it easier to prevent root exposure to drying air. When digging the plant, as many roots should be held in the ball of soil as possible. Stress that hinders growth or may be fatal is lessened by disturbing the roots as little as possible.
A second reason for transplanting established herbs is to divide herbaceous roots to increase their numbers in the garden or to thin out plants whose roots have become crowded and need thinning. When the tiny, green-capped nodes of French tarragon push their heads through the soil, dormancy is broken and the plant will begin vigorous growth soon. French sorrel also begins to grow at this time by pushing thin spears from its crown. At this stage of spring development, it is easiest to make divisions. Weather can be changeable and observation is the best guide to determine when the time is right, but both tarragon and sorrel begin observable growth when temperatures start to top 40°F (4.4°C) regularly and produce foliage rapidly until night temperatures push 65 to 70°F (18.2 to 21°C). As these two plants begin growth, divisions may be made from other herbaceous herbs.
Finding the roots of herbaceous herbs is simplified when the gardener is a bit lazy and hasn’t cut away all the dead plant tops. Pushing a shovel through the crown of a large plant is the easiest approach to root division; digging the whole clump and using a knife to cut new plants is a more exact method. Use the new buds showing on the roots to guide your work and choose new crowns with several growth buds for each new plant.
New plants that have come from a windowsill or a greenhouse need different treatment because they are not accustomed to the fractious atmosphere outside. Because vegetable transplanting schedules are readily available for every area of the United States through local agricultural extension offices and are well known to experienced gardeners, herb transplanting dates are easily related to them. The earliest date for transplanting cool-weather annual herbs and many perennials parallels the time recommended to transplant lettuce and broccoli. Most other potted herbs go in about the same time as tomato plants or around the time minimum night temperatures hover around 50°F (9.9°C). Basil should wait until the ground is warm and nights are above 55°F (12.6°C) and daytime highs reach the upper 70s, about the time eggplants and watermelons are planted.
Before transplanting potted herbs, their tender foliage and soft stems need to be protected from sudden temperature swings, extreme cold and hot sun. A cold frame or a protected place next to a building will help moderate air currents and shelter the potted plants from blistering sun. (Although the air is rarely as hot in April as it is in August, the sun can be as scalding.) If the plants are not protected from temperatures below 40°F (4.4°C) in a cold frame, they should be brought inside for a few nights until their leaf and stem tissues stiffen or, as gardeners say, harden off. The process takes four to five days. Once the plants are acclimated, knock them gently from their pots—pulling them out by grabbing them by their tops may rip roots from the stem and kill them. Hold the rootball in one hand and gently spread the roots with your other hand, if necessary, before placing the plant in the hole.
Before soft soil is pushed around the roots, puddle the roots in the hole with a solution of liquid fertilizer. After the hole is filled, leave a slight dimple in the soil around the stem so that water will run toward the roots. A second drench with liquid fertilizer finishes the transplanting.
Getting your herb plants off to a good start in their new home is one of the most important things you can do to create a successful garden. Timing is important, but it’s a lot more flexible than serving a tennis ball or casting a fly rod. The plant will present signals when the time is right, but it’s a good idea to be aware of local weather patterns and seasonal changes as they also govern what you do and when.
The distance between an herb plant and its nearest neighbor—be it another plant or an object like a fence or a wall—can be crucial to its survival. It’s also an important consideration for those who husband large acreages and expect top yields.
Proper spacing can boost yields and help to control pests and diseases. Foliage production of dill in commercial fields can increase spectacularly when proper spacing is used, Nancy Garrabrants and Lyle Craker discovered in research conducted at the University of Massachusetts. When spacing went from 1 plant per square foot (10/square m) to 6 plants per square foot (68/square m), yields soared from 8 tons per acre to 27 tons per acre (9.9 t/ha). This high yield was achieved with plants 4 inches (10.2 cm) apart in rows 10 inches (25.4 cm) from each other, a spacing that would be inadvisable with many herbs that require more time to develop, or have a longer growing season.
In commercial fields where several acres of dill might be grown, spacing is easier than it is in a home garden where many different herbs share a small common area. At home, yields are important but they are not the governing principle—separation is important for visual effect and to foster air circulation, availability to sunlight, and access to the plants for harvest. An herb’s growth rate and ultimate height and width are important pieces of the spacing puzzle in the home garden. Tall plants improperly sited can cut off essential sunlight to shorter plants. Likewise faster growing plants can crowd slower ones and smother them. The intended effect of the planting should be considered, also. Obviously, if a hedge or a groundcover is desired, spacing will be closer.
There are some general rules to aid gardeners through the spacing maze. Rapid-maturing annuals produced for their foliage can be planted close together because they are harvested often, while those annuals grown for their seeds should be separated a bit more. This is one reason annuals and perennials are often relegated to their own portions of a garden.
Non-invasive perennials should be spaced according to their mature height and width. Taller herbs are placed where they will not shade the shorties. The important number to know to separate plants from each other, or from stationary objects, is one and one-quarter the plant’s expected diameter. This is known as the spacing factor. A perennial that will mature at 12 inches (30.5 cm) wide, for instance, has a spacing factor of 15 inches (38.1 cm).
A good rule of thumb is to separate plants of the same species a distance equal to the spacing factor, or one and a quarter times their mature width. If you had two upright thyme plants that would be expected to become 18 inches in diameter, space them about 22.5 inches (57.2 cm) apart (18 + 4.5= 22.5) on centers. Herbs of different species use a different equation. To arrive at the distance between them, take the spacing factor of each, add them together and divide by two. The result is the distance to separate them. If you have a plant that will become 12 inches (30.5 cm) wide at maturity and one that will become 6 inches (15.2 cm) wide at maturity to be sited next to each other, add one-quarter the expected diameter of each, add the results together, and divide by two to achieve the spacing (15 + 7.5 = 22.5 ÷ 2 = 11.25).
Even the best gardeners’ efforts to correctly space herbs sometimes fall short because a number of factors influence growth. If plants become too close, they can be pruned to improve air circulation, or moved. Where a species may take a number of years to achieve its mature width, annuals or short-lived perennials are sometimes planted around it to achieve a more pleasing balance in the garden and make use of the empty space.