Chapter 3: Finding Your Way around the PowerPoint Screen
In This Chapter
 Looking at the different parts of the screen
Understanding the new PowerPoint interface
Zooming in and out on slides
Changing your view to get a better look at your work
Removing and resuscitating parts of the screen
Seeing and hiding the rulers
Finding your way around a new computer program is like the first day of junior high school — it’s intimidating. Your palms sweat. You feel agitated. To keep you from being intimidated, these pages give you the lay of the land. They explain what the different parts of the screen are and how to find your way around the new PowerPoint interface. You also discover how to zoom in and out and get a better view of your work by choosing one of the View options. Finally, this chapter shows how to hide different parts of the screen to get more room to work in.
A Brief Geography Lesson
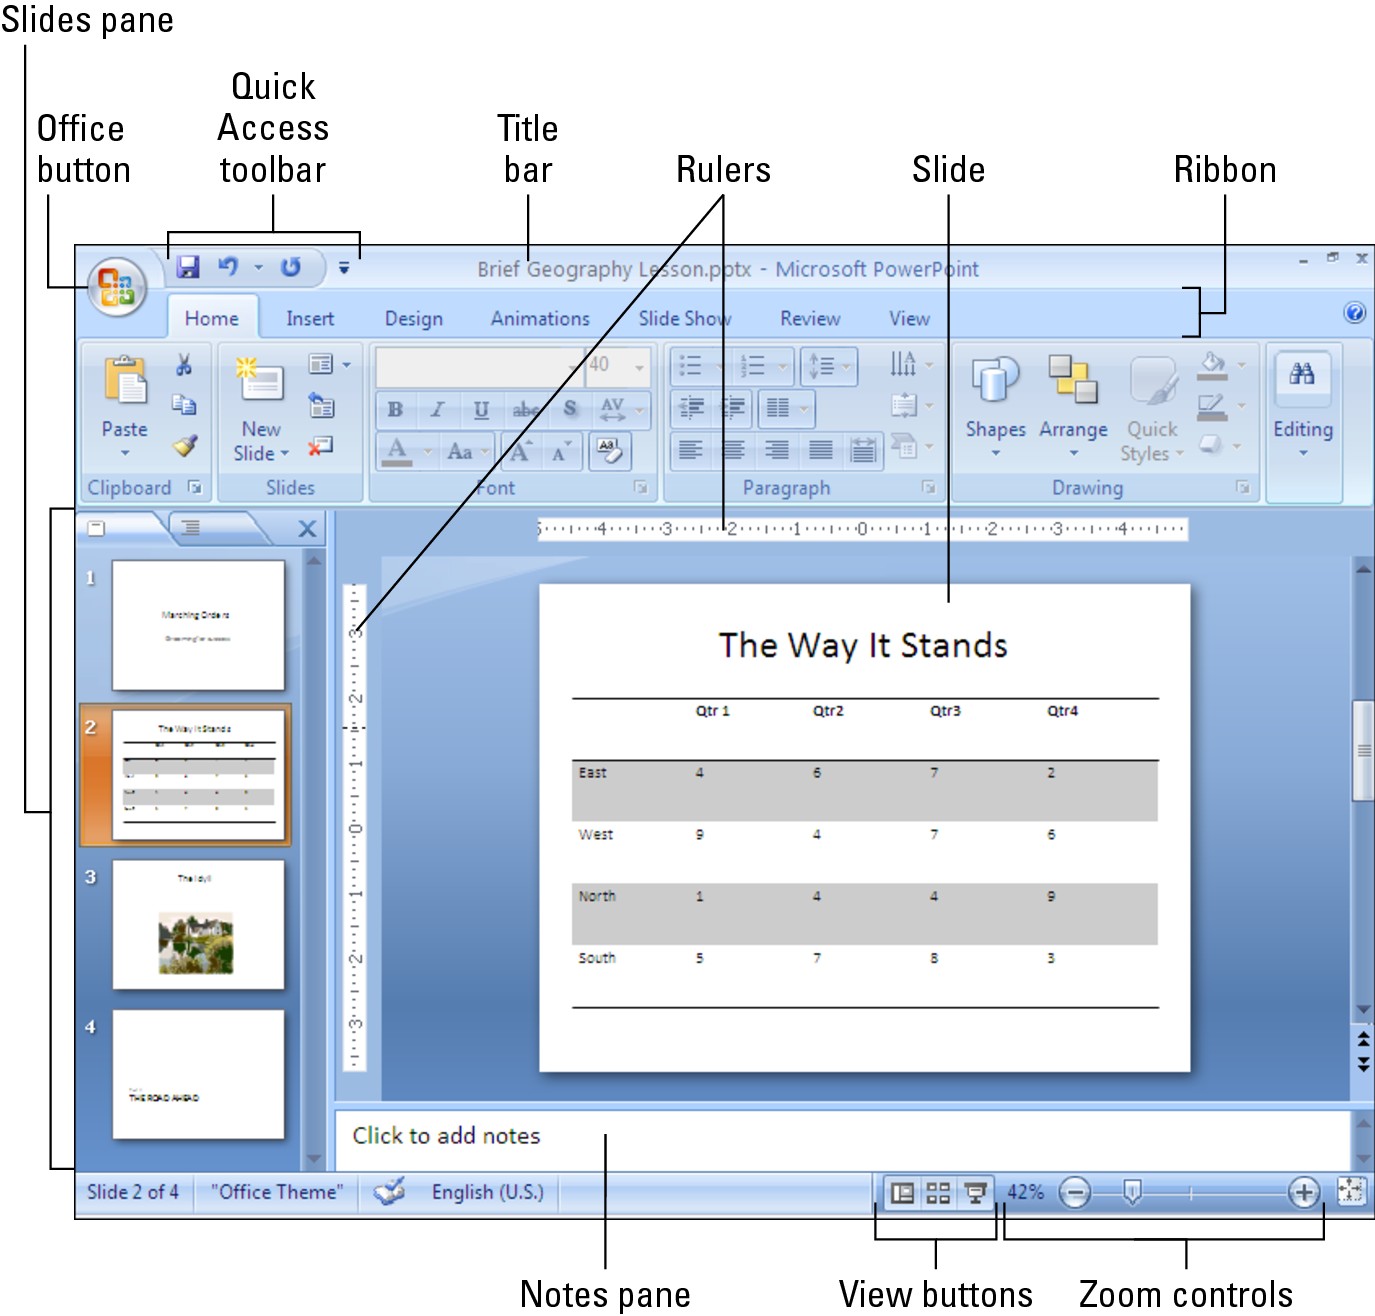
Here is a brief geography lesson about the different parts of the PowerPoint screen. I’d hate for you to get lost in PowerPoint Land. Figure 3-1 shows the different parts of the screen. Fold down the corner of this page so that you can return here if screen terminology confuses you:
|
Figure 3-1: The different parts of the PowerPoint screen. |
|
 Title bar: The stripe along the top of the screen. It lists your presentation’s name.
Window buttons: These buttons are for shrinking, enlarging, and closing the PowerPoint window.

Office button: The round button you can click to open a menu with commands for creating, opening and saving PowerPoint presentations, as well as doing other file-management tasks.
Quick Access toolbar: A toolbar with three buttons — Save, Undo, and Repeat. You see this toolbar wherever you go in PowerPoint. See “The Quick Access toolbar” later in this chapter for details.
Ribbon: The place where the tabs are located. Click a tab — Home, Insert, Design, Animations, Slide Show, Review, or View — to start a task. See “The Ribbon and its tabs,” later in this chapter, for details.
Slides pane: In Normal view, the place on the left side of the screen where you can see the slides or the text on the slides in your presentation. Scroll in the Slides pane to move backward and forward in a presentation.
Slide window: Where a slide (in Normal view) or slides (in Slide Sorter view) are displayed. Scroll to move backward or forward in your presentation.
Notes pane: Where you type notes (in Normal view) that you can refer to when giving your presentation. The audience can’t see these notes — they are for you and you alone. See Book VI, Chapter 2 for details.
Status bar: Tells you information about your presentation. Book VII, Chapter 1 explains how to customize the Status bar.
View buttons: Buttons you can click to switch to (from left to right) Normal, Slide Sorter, and Slide Show view. See “Getting a Better View of Your Work,” later in this chapter.
Zoom controls: Enlarge or shrink the slide (in Normal view) or slides (in Slide Sorter view). See “Zooming In, Zooming Out” later in this chapter.

Knowing Your Way around the New PowerPoint Interface
If you’re friendly with previous editions of PowerPoint and the other Office programs, you probably got a shock when you opened this new edition of PowerPoint for the first time. The new PowerPoint looks different. Gone are the main menu across the top of the screen and the many toolbars. The entire program has been given a facelift.
Why the change? The mighty muck-a-mucks of Microsoft decided that the number of features in PowerPoint had outgrown the old menu-and-toolbar structure. Users of PowerPoint had to take too many steps — they had to open too many menus and fiddle with too many toolbars — to find features and commands. Microsoft thought that features and commands were going unused because they were buried too deeply in the menu-and-toolbar structure.
To bring all the features and commands into the open, Microsoft designed a new interface for PowerPoint. Interface, also called the user interface, is a computer term that describes how a software program presents itself to the people who use it (and you probably thought “interface” meant two people kissing). PowerPoint’s new interface is daunting at first, because it’s hard to tell where to find commands. It’s hard to know where to begin. However, I’m happy to report, having spent a lot of time with PowerPoint in the course of writing this book, that I like the new interface. I like it very much. Maybe I’m suffering from Stockholm Syndrome, a condition that makes kidnap victims fall in love with their kidnappers, but I like this new interface.
These pages give you a quick tour of the new PowerPoint interface and explain what the various parts of the interface are. Click along with me as I describe the interface, and you’ll know what’s what by the time you finish reading these pages.
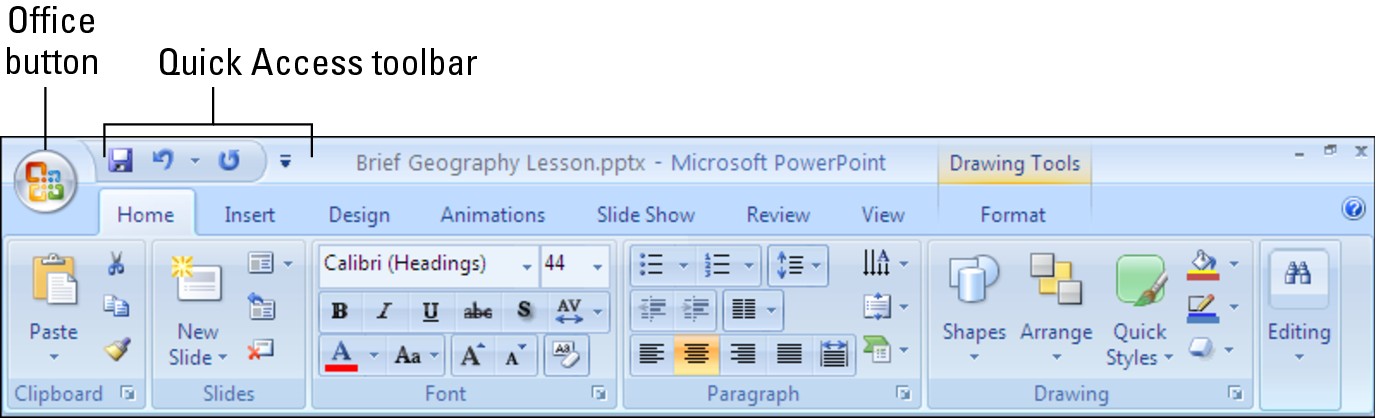
The Office button
|
Figure 3-2: The Office button and Quick Access toolbar are always available. |
|
The Quick Access toolbar
No matter where you travel in PowerPoint, you see the Quick Access toolbar in the upper-left corner of the screen next to the Office button (refer to Figure 3-2). This toolbar offers three necessary buttons: the all-important Save button, the trusty Undo button, and the convenient Repeat button. You can place more buttons on the Quick Access toolbar as well as move the toolbar lower in the window. I explain how to change around the Quick Access toolbar in Book VII, Chapter 1, the chapter about customizing PowerPoint.
By the way, Microsoft says you can call the Quick Access toolbar the QAT, or “kwat,” but I don’t think you should do that. Others will think you have indigestion.
The Ribbon and its tabs
Across the top of the screen is the Ribbon, an assortment of different tabs; click a tab to undertake a task. For example, click the Home tab to add a slide to a presentation and format the text on slides; click the Insert tab to insert a table or picture, among other things, on a slide. Figure 3-3 shows what you see when you click the Home, Insert, and Design tab on the Ribbon. Each tab offers a different set of buttons and galleries.
|
Figure 3-3: The commands are different on each tab on the Ribbon. |

|
Practically speaking, your first step when you start a new task is to click a tab on the Ribbon. Knowing which tab to click takes a while, but the names of tabs — Home, Insert, Design, Animations, Slide Show, Review, and View — hint as to which commands you’ll find when you visit a tab.

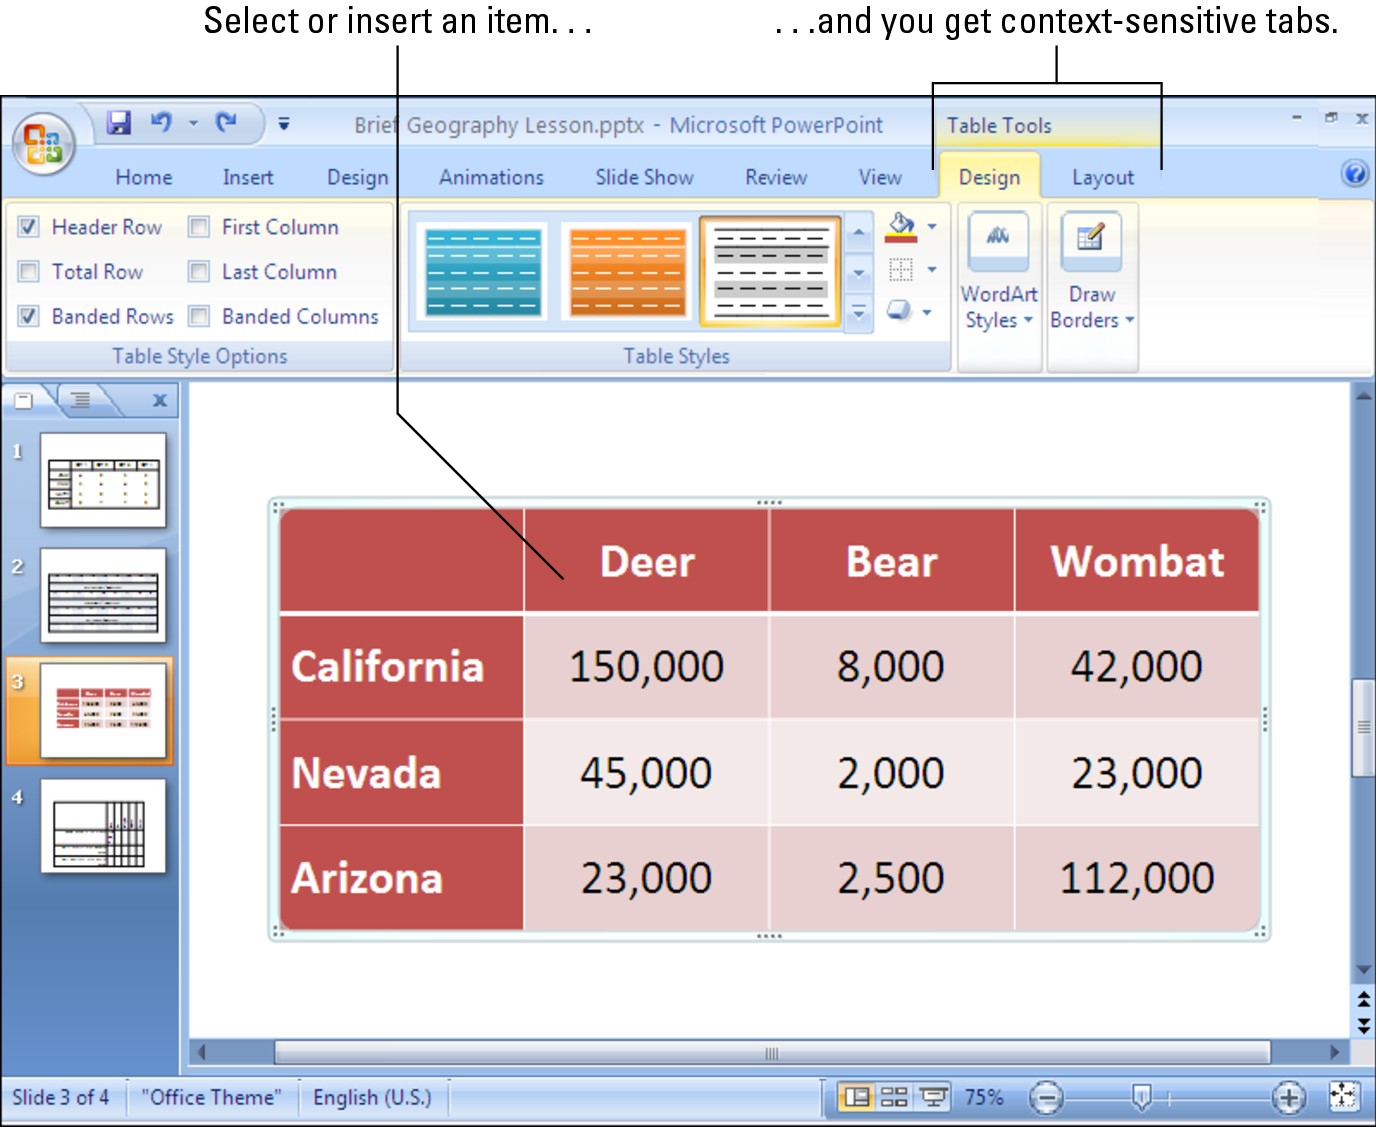
Context-sensitive tabs
Sorry for dropping the word context-sensitive on you. I usually steer clear of these horrid computer terms, but I can’t help it this time because Microsoft calls some tabs “context-sensitive,” and by golly, I have to call them that, too.
To keep the Ribbon from getting too crowded with tabs, some tabs appear only in context — they appear on the Ribbon after you insert or click something on a PowerPoint slide. In Figure 3-4, for example, I inserted a table, and two additional tabs, the Design and Layout tab, appear on the Ribbon under the heading “Table Tools.” These context-sensitive tabs offer commands for designing and laying out tables. When I click the (Table Tools) Design tab, as Figure 3-4 shows, I see commands for putting colors and borders on tables. The idea behind context-sensitive tabs is to direct you to the commands you need and exclude all other commands.
.jpg)
|
Figure 3-4: After you insert or select an item, context-sensitive tabs appear on the Ribbon. |
|
The anatomy of a tab
All tabs are different in terms of the commands they offer, but all are the same insofar as how they present commands. On every tab, you will find groups and buttons. Some tabs also offer galleries. Groups, buttons, galleries — what’s up with that?
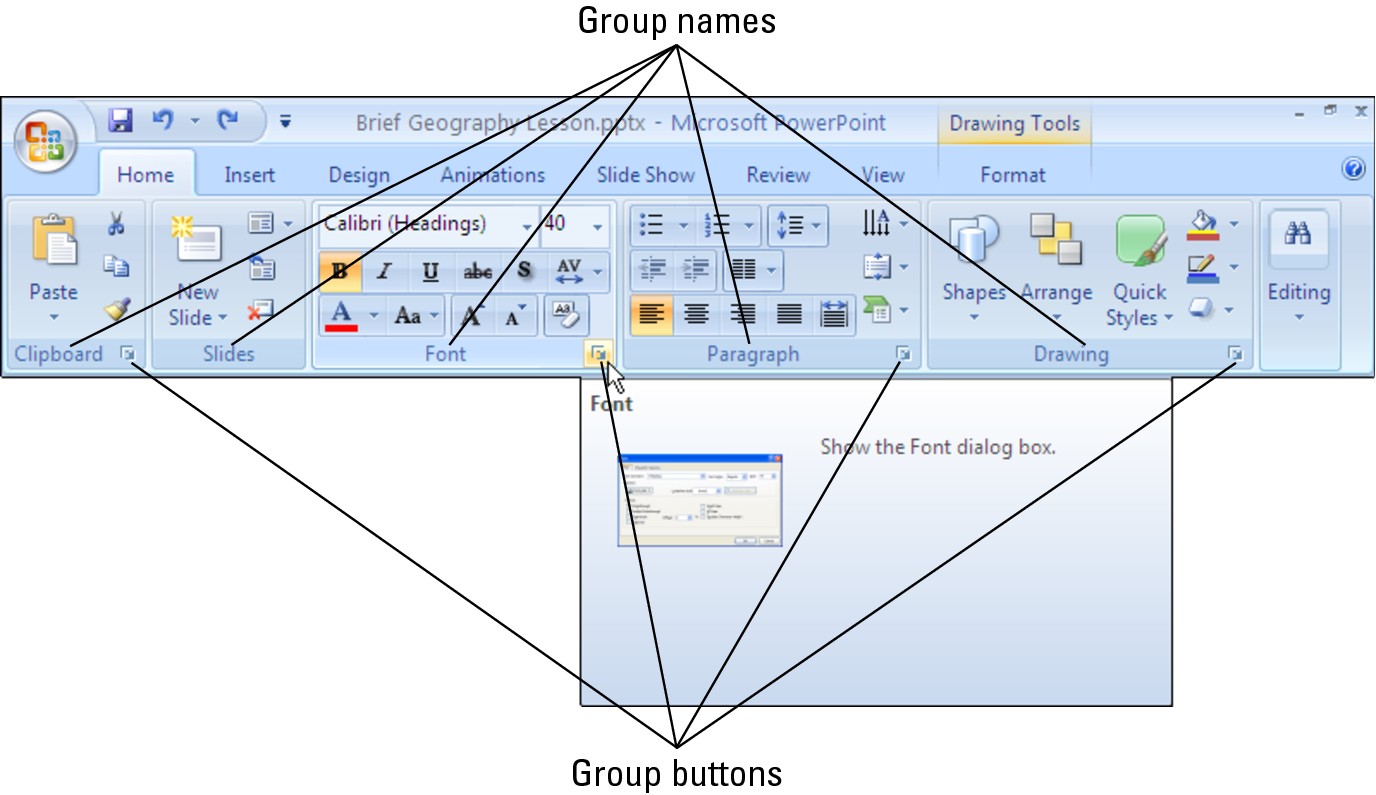
Groups
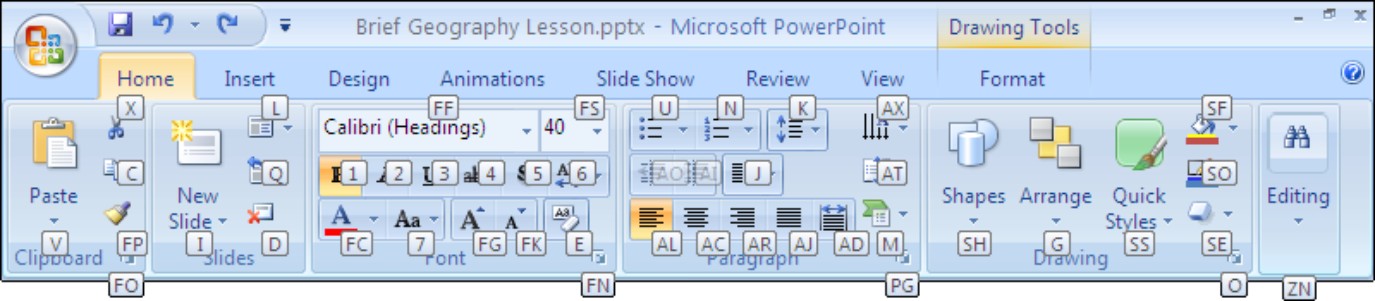
Commands on each tab are organized into groups. For example, the Home tab is organized into five groups: Clipboard, Slides, Font, Paragraph, and Drawing, as shown in Figure 3-5. Group names appear below the buttons and galleries on tabs.
Groups serve two purposes:
Groups tell you what the buttons and galleries above their names are for. On the Home tab, for example, the buttons on the Font group are for formatting text. Read group names to help find the command you need.

Most groups have group buttons that you can click to open a dialog box or task pane (officially, Microsoft calls these little buttons dialog box launchers, but let’s act like grownups, shall we?). Group buttons are found to the right of group names. As Figure 3-5 shows, moving the pointer over a group button opens a pop-up help box with a description and picture of the dialog box or task pane that appears when the button is clicked.
|
Figure 3-5: Each tab is organized into groups; some groups offer group buttons. |
|
Buttons
Go to any tab and you will find buttons of all shapes and sizes. Square buttons and rectangular buttons. Big and small buttons. Buttons with labels and buttons without labels. Is there any rhyme or reason to these button shapes and sizes? No, there isn’t.
What matters is not a button’s shape or size, but whether a downward-pointing arrow appears on its face:

A button with an arrow: Click a button with an arrow and you get a drop-down list. Sometimes the drop-down list presents still more buttons. Yet again, on these drop-down lists, clicking a button with an arrow gets you another drop-down list, but clicking a button without an arrow opens a dialog box or task pane.

A button without an arrow: Click a button without an arrow and you complete an action or open a dialog box or task pane.

A hybrid button with an arrow: Some buttons serve a dual purpose as a button and drop-down list. By clicking the symbol on the top half of the button, you complete an action; by clicking the arrow on the bottom half of the button, you open a drop-down list. On the Home tab, for example, clicking the top half of the New Slide button inserts another slide right away, but clicking the bottom half of the New Slide button opens a drop-down list.
Galleries
Built into some tabs are galleries like the one shown in Figure 3-6. The gallery in the figure pertains to charts: the Chart Styles gallery is for formatting charts. A gallery presents you with visual options for changing an item on a slide. Rather than visit numerous dialog boxes and task panes, you can select a gallery choice and give many commands at one time. The item on your slide — the table, chart, or diagram, for example — changes appearance as you move the pointer over different gallery choices.
To view and make choices on a gallery:

Click a Scroll button to see more gallery choices at a time on the tab.

Click the More button (refer to Figure 3-6) to open the gallery choices in a drop-down list and see many choices at one time.
Galleries are unique because they present, in the form of visual choices, the results of commands, not command names. All you have to do is glance at a gallery option to see what selecting the option will do to your chart, table, shape, or whatever. By selecting gallery options, you can get very sophisticated layouts and formats without having to be an expert in PowerPoint or know your way to all the layout and formatting commands. You can experiment with formats and layouts in a matter of seconds merely by hovering the pointer over gallery choices (see “Live previewing,” the next section in this chapter).
|
Figure 3-6: Galleries present you with visual choices. |

|
Live previewing
This new edition of PowerPoint comes with live previewing, a welcome and inspired innovation. Thanks to live previewing, you can see the results of a menu or gallery choice before actually making the choice.
Here’s how live previewing works: Move the pointer over an option in a gallery or drop-down list and glance at the screen. You can see the results of selecting the option. For example, you see a different font or shape color. You can judge whether choosing the option is worthwhile without choosing the option first. Live previewing liberates you from repeatedly choosing commands, backtracking, and trying again until you get it right.
Follow these steps to experiment with live previewing:
1. Enter some text on a PowerPoint slide.
2. Drag over the text to select it.
“Drag” means to hold down the mouse button as you slide the pointer over the text.
3. Click the Home tab.
4. Open the Font drop-down list.
5. Slowly move your pointer over the options on the Font drop-down list.
As the pointer comes to different font names, the text on your slide changes fonts.
If live previewing is turned off and you want to turn it on, click the Office button and choose PowerPoint Options. In the Popular category of the PowerPoint Options dialog box, click the Enable Live Preview check box and click OK.
Mini toolbars
A Mini toolbar is a ghost-like menu that appears on-screen to help you do a task, as shown in Figure 3-7. Move the pointer onto a Mini toolbar, and it ceases being ghost-like, as Figure 3-7 demonstrates. Now you can choose an option from a drop-down list or click a button on the Mini toolbar to complete a task.
|
Figure 3-7: Move the pointer over a Mini toolbar to make it come alive. |

|
PowerPoint 2007 for keyboard lovers
People who like to give commands by pressing keyboard shortcuts may well ask, “Where are the keyboard shortcuts in the new edition of PowerPoint?” The answer is: They’re still there. All keyboard shortcuts — press Ctrl+B for boldface text and Ctrl+ U for underline text, for example — work the same way as they did in earlier editions of PowerPoint.
To find out the Alt+key shortcuts for opening and choosing menu commands, press the Alt key. Letters appear on tab names. Microsoft calls these letters KeyTips. After you press the Alt key, follow these instructions to make use of KeyTips:
Go to a tab: Press a KeyTip on a tab to visit a tab. As shown in Figure 3-8, letters, numbers, and combinations of letters and numbers appear on the commands.
Make KeyTips appear on menu items: Press a KeyTip on a button or gallery to make KeyTips appear on menu items.
|
Figure 3-8: Press the Alt key to see KeyTips. |
|
Right-clicking to open a shortcut menu
Similar to Mini toolbars are the shortcut menus you get when you right-click. Right-click means to click the right, not the left, mouse button. Right-click anywhere in PowerPoint and you get a shortcut menu of some kind. The shortcut menus differ, depending on what you right-click.
Right-clicking sometimes gets you to the command you need without having to select a different tab. I know I’ve been right-clicking more than usual in this new edition of PowerPoint to keep from having to switch from tab to tab on the Ribbon.
When you right-click text, the Mini toolbar appears at the top of the shortcut menu. To see what I mean, compare this illustration to Figure 3-7.

Zooming In, Zooming Out
Eyes weren’t meant to stare at computer screens all day, which makes the Zoom controls all the more valuable. Use the Zoom controls freely and often to enlarge or shrink slides and preserve your eyes for important things, such as gazing at the horizon for protein-rich prey. As shown in Figure 3-9, the Zoom controls are located in the lower-right corner of the screen and on the View tab. The Zoom box tells you at what percentage you’re currently viewing slides.
|
Figure 3-9: The Zoom controls. |

|
Meet the Zoom controls:

Zoom dialog box: Click the Zoom box (the % listing) to display the Zoom dialog box, and then select an option button or enter a Percent measurement (refer to Figure 3-9). You can also open the Zoom dialog box by starting on the View tab and clicking the Zoom button.

Zoom slider: Drag the Zoom slider left to shrink or right to enlarge slides. Click the Zoom In or Zoom Out button to zoom in or out by 10-percent increments.

Fit Slide to Current Window button: Click this button (in Normal view) to make the slide just large enough to fit in the window. You can also find the Fit to Window button on the View tab.
If your mouse has a wheel, you can hold down the Ctrl key and spin the wheel to quickly zoom in or out.
Getting a Better View of Your Work
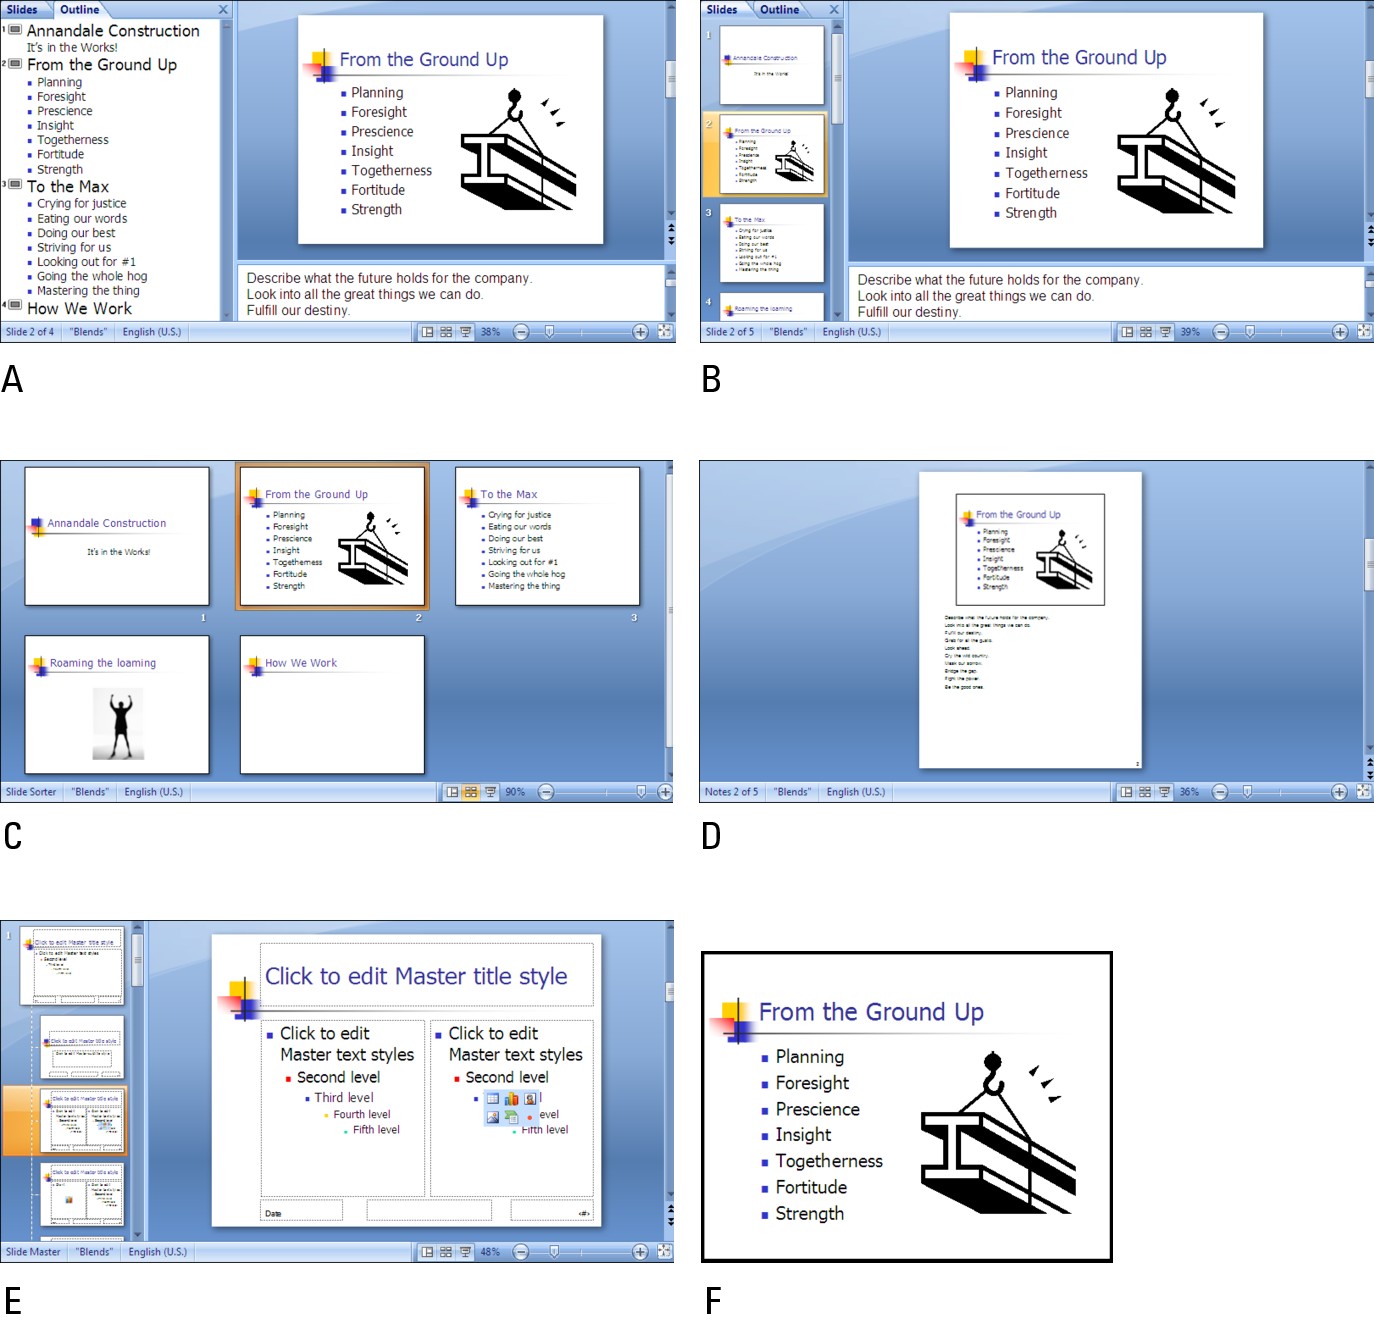
Depending on the task at hand, some views are better than others. Figure 3-10 demonstrates different ways of viewing a presentation. These pages explain how to change views and when to choose one view over another. You discover Normal, Slide Sorter, Slide Show, Slide Master, Notes Page, Handout Master, Notes Masters, and the Color/Grayscale views.
|
Figure 3-10: The different views: Normal/ Outline (A); Normal/ Slides (B); Slide Sorter (C); Notes Page (D); Slide Master (E); and Slide Show (F). |
|
Changing views
PowerPoint offers two places to change the view:
View buttons on the Status bar: Click a View button — Normal, Slide Sorter, or Slide Show — on the Status bar to change views, as shown in Figure 3-11.
View tab: Click the View tab and then click a button on the Presentation Views group to change views, as shown in Figure 3-11.
|
Figure 3-11: Techniques for changing views. |
|
Normal/Outline view: Fiddling with the text

Normal/Slides view: Moving from slide to slide

Slide Sorter view: Moving and deleting slides

Slide Show view: Giving a presentation

Notes Page view: Reading your speaker notes
In Notes Page view (refer to Figure 3-10), you see notes you have written to aid in your presentation, if you’ve written any. You can write notes in this view as well as on the Notes pane in the Normal view. PowerPoint gives you one page per slide (although you can change that). To get from page to page, drag the scrollbar. Notes Page view is available by going to the View tab and clicking the Notes Page button.
Pure Black and White and Grayscale views
Sometimes color on slides, not to mention animations and graphics, is a distraction. To strip down slides to their bare essence, change to Grayscale or Pure Black and White view. These views don’t actually change the color on slides — they change the slides’ appearance only on your computer monitor. Pure Black and White is especially useful for focusing on text.

The Master views
Also on the View tab are the Master views — Slide Master, Handout Master, and Notes Master. To switch to these views, visit the View tab and click the appropriate button.
These sophisticated views are for handling master styles, the formatting commands that pertain to all the slides in a presentation (Slide Master view), the printed handouts you can give to audience members (Handout Master view), and the notes you write to yourself about giving a presentation (Notes Master view). Slide Master view is the subject of Book II, Chapter 2. You can read about Handout Master view and Notes Master view in Book VI, Chapter 2.
Hiding and Displaying the Slides Pane and Notes Pane
In Normal view, the Slides pane with its slide thumbnails appears on the left side of the screen, and the Notes pane appears on the bottom of the screen so that you can scribble notes about slides. Sometimes these panes just take up space. They clutter the screen and occupy real estate that could be better used for formatting slides.
As shown in Figure 3-12, you can temporarily remove the Slides pane and Notes pane by following these instructions:
Removing the Notes pane: Move the pointer over the border between the Notes pane and the rest of the screen, and when the pointer changes to a two-headed arrow, drag the border to the bottom of the screen.

Removing the Slides pane (and the Notes pane): Click the Close button on the Slides pane. This button is located to the right of the Outline tab. Clicking it removes the Notes pane as well as the Slides pane.

Restoring the Slides and Notes pane: On the View tab, click the Normal button. You can also move the pointer to the left side or bottom of the screen, and when you see the double-headed arrow, click and start dragging.
|
Figure 3-12: Hey! Where’re the Slides pane and Notes pane? |
|
Viewing a presentation through more than one window
You can be two places simultaneously, at least where PowerPoint is concerned. You can open a slide in one window and open a second slide in another, which saves you the trouble of finding the second slide when you need it. To open a second (or third of fourth) window on a PowerPoint presentation, go to the View tab and click the New Window button. An extra button appears on the Windows taskbar with your presentation’s name on it.
To go back and forth between open windows:
On the Windows taskbar: Click a PowerPoint button on the taskbar.
On the View tab: Click the Switch Windows button and select a window on the drop-down list.
To view open windows at the same time, go to the View tab and click one of these buttons:
Arrange All: Arranges the windows side-by-side on-screen.
Cascade: Arranges the windows fanlike on the screen.
To work with PowerPoint windows after you’ve opened more than one, look to the windows’ Minimize, Maximize, and Close buttons. You can find these buttons in the upper-right corner of the windows.
Enlarging a window you “arranged” or “cascaded”: Click the window’s Maximize button.
Closing an open PowerPoint window: Click the Close button. Clicking the Close button this way doesn’t close PowerPoint.
Changes you make in either window also appear in the other window. The important thing to remember here is that you’re working on a single presentation, not two presentations.
Displaying, Hiding, and Reading the Ruler
PowerPoint offers a vertical and horizontal ruler to help you align text boxes, clip art, and all and sundry on slides, as shown in Figure 3-13. Follow either of these instructions to display or hide the ruler:
Right-click a slide (but not an object or placeholder frame) and choose Ruler on the shortcut menu.
Go to the View tab and click the Ruler check box.
|
Figure 3-13: PowerPoint offers a vertical and horizontal ruler. |
|
Notice that 0 is the measurement at the center of both rulers and that these rulers contain negative and positive measurements. As you’ll discover later, this measurement system is useful for positioning items on slides.
Book IV, Chapter 2 explains two other valuable tools for aligning items on slides, the grid and the drawing guides. Book IV, Chapter 2 also explains how you can display centimeters on the ruler instead of inches.