Chapter 1: Drawing Shapes, Lines, and Other Objects
In This Chapter
 Drawing lines and arrows on slides
Placing connectors between shapes
Creating and modifying shapes
Exchanging one shape for another
Using shapes as text boxes
Creating WordArt images
Whether you know it or not, PowerPoint comes with drawing commands for drawing lines, arrows, shapes, block arrows, stars, banners, and callout shapes. The drawing commands are meant to bring out the artist in you. Use them to decorate your slides, fashion your own charts, mark your slides with stars or thunderbolts, or illustrate difficult concepts and ideas. A picture is worth a thousand words, so they say, and the drawing commands give you a chance to say it without having to write a thousand words.
Not everyone takes advantage of the drawing commands, yet they are fairly easy to use, and you can make your slide presentation stand out in a crowd by carefully sprinkling a few lines and shapes on your slides. Lines and shapes give you a wonderful opportunity to exercise your creativity. They give you the chance to make your presentations different from everybody else’s.
These pages explain how to draw lines and arrows, draw connections between shapes, and draw ovals, squares, and other shapes, as well as WordArt images. You also find out how to exchange one shape for another and use a shape like a text box. (The next chapter explains how to manipulate shapes after you draw them.)
The Basics: Drawing Lines and Shapes
To create a line, arrow, triangle, lightning bolt, flowchart box, or callout, you start from the same place. Follow these basic directions to draw a line or shape:
1. Click the Insert or Home tab.
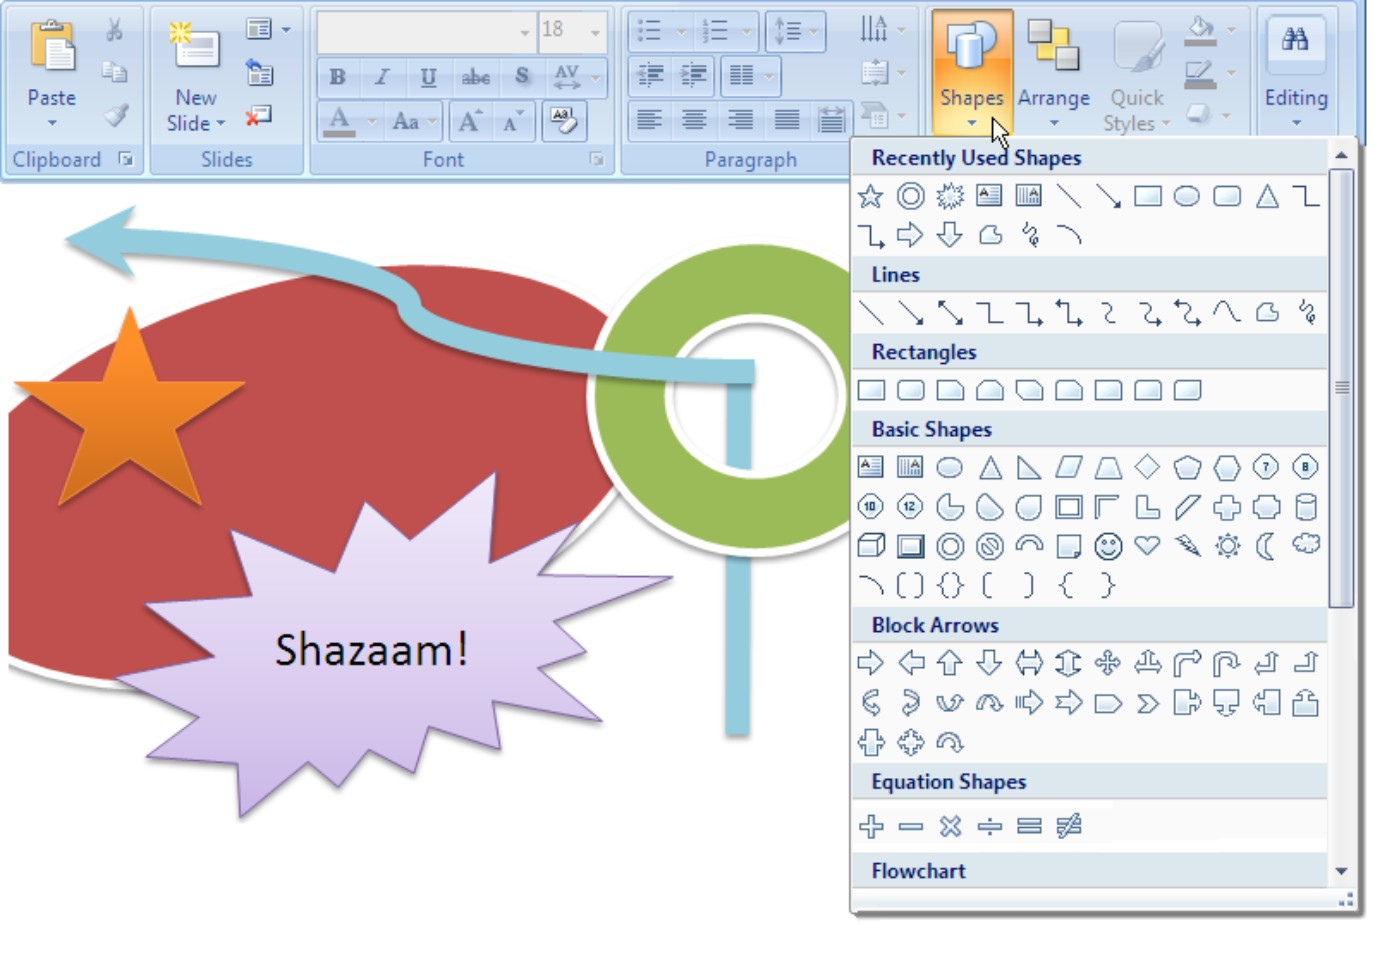
2. Open the Shapes gallery (depending on the size of your screen, you may have to click the Shapes button before you see the Shapes gallery).
As shown in Figure 1-1, the Shapes gallery appears. The shapes are divided into nine categories: Lines, Rectangles, Basic Shapes, Block Arrows, Equation Shapes, Flowchart, Stars and Banners, Callouts, and Action Buttons, as well as a category at the top of the gallery where shapes you chose recently are shown.
|
Figure 1-1: To draw a line or shape, choose a line or shape from the Shapes gallery on the Insert tab. |
|
3. Select a line or shape in the Shapes gallery.
4. Drag on your slide to create the line or shape.
5. To alter your shape — to change its size, color, or border — select the (Drawing Tools) Format tab.
This tab offers many commands for manipulating lines and shapes. You must select a line or shape to make the (Drawing Tools) Format tab appear. Click a line or shape to select it.

The left side of the (Drawing Tools) Format tab offers another Shapes gallery for creating new shapes to go along with the one you created. You can click the Edit Shape button on the Format tab to exchange one shape for another.
Drawing Lines and Arrows
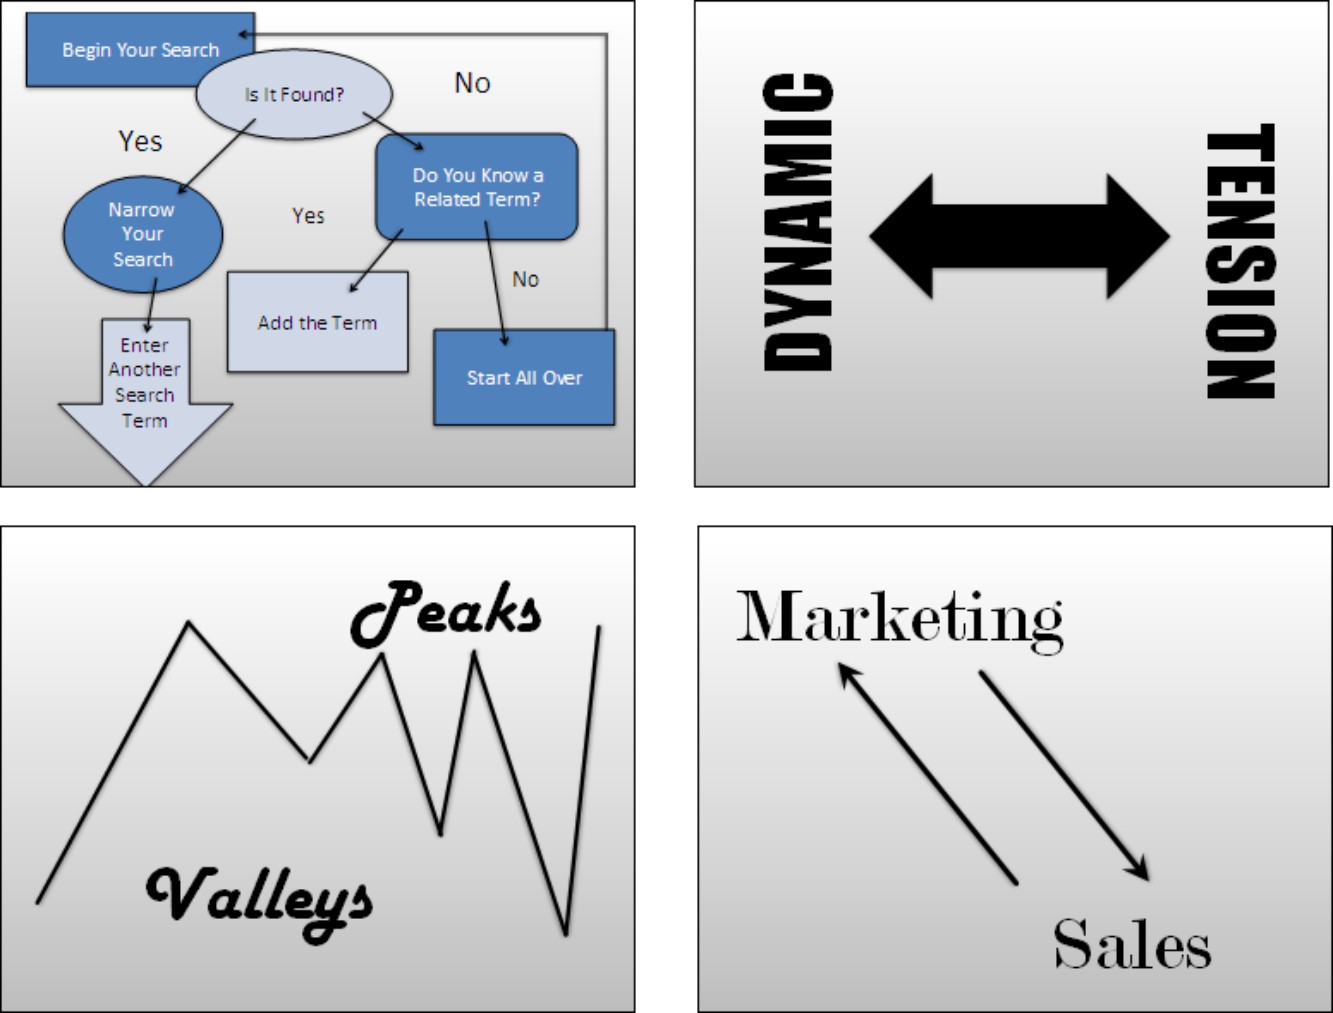
Figure 1-2 shows examples of how you can use lines and arrows on slides. In the figure, the lines and arrows illustrate different concepts and ideas. Use lines and arrows in presentations to outline what you want to say such that your audience can understand you better.
|
Figure 1-2: Exercise your creativity by including lines and arrows on your slides. |
|
Drawing a line can be as easy or as difficult as you want it to be. To draw a straight line, all you have to do is select the Line shape and start dragging. But you can also draw arrows, curves, freeform lines, and scribbles. And you can choose a thickness for your line or a dashed or dotted line as well. Better read on.
Drawing a straight line (or arrow)
Use one of these techniques to draw a straight line:
 Insert tab: On the Insert tab, open the Shapes gallery, and under “Lines,” select Line, Arrow, or Double Arrow. Then drag the pointer on your slide to draw the line (or arrow).
Format tab: Click a line or object you already created to select it, and click the (Drawing Tools) Format tab. Then select Line, Arrow, or Double Arrow in the Shapes gallery and start dragging.
Changing a line’s length and position
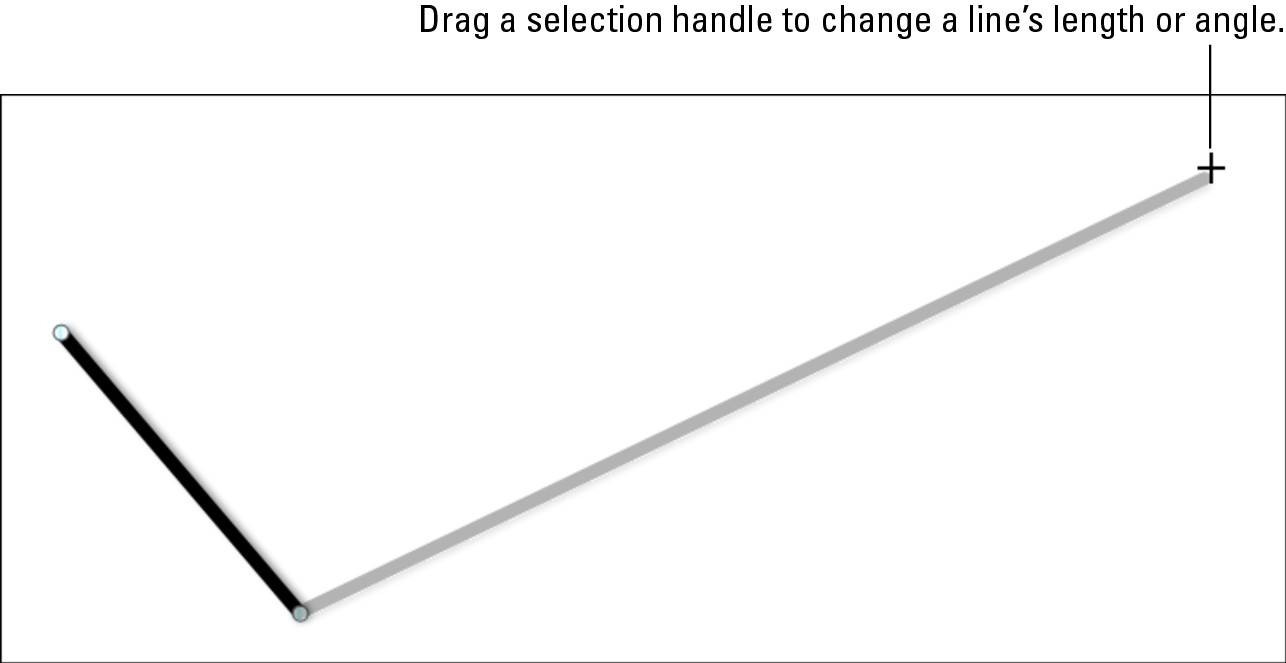
To change the length or angle of a line or arrow, start by clicking to select it. You can tell when a line has been selected because round selection handles appear at either end, as shown in Figure 1-3. Follow these instructions to move a line or adjust its length or angle:
Changing the angle of a line: Drag a selection handle up, down, or sideways. A faint line shows where the line will be when you release the mouse button.
|
Figure 1-3: Edit a line by dragging a selection handle or the line itself. |
|
Changing the length: Drag a selection handle away or toward the opposite selection handle.

Changing the position: Move the pointer over the line itself and click when you see the four-headed arrow. Then drag the line to a new location.
You can also establish the angle, length, and position of a straight line or arrow in the Size and Position dialog box. To open this dialog box, go to the (Drawing Tools) Format tab, and click the Size group button (click the Size button first if you don’t see the Size group button on your screen). The Size and Position dialog box is of use if you are working with several lines and you want to place them precisely or make them exactly the same length. In other words, use this dialog box if you are adverse to “eyeballing it.” The Rotation text box on the Size tab is also useful for rotating a line or arrow on its axis.
The next chapter explains what to do when lines and objects overlap and you want to place one line or object in front of or behind another.
Changing a line’s appearance
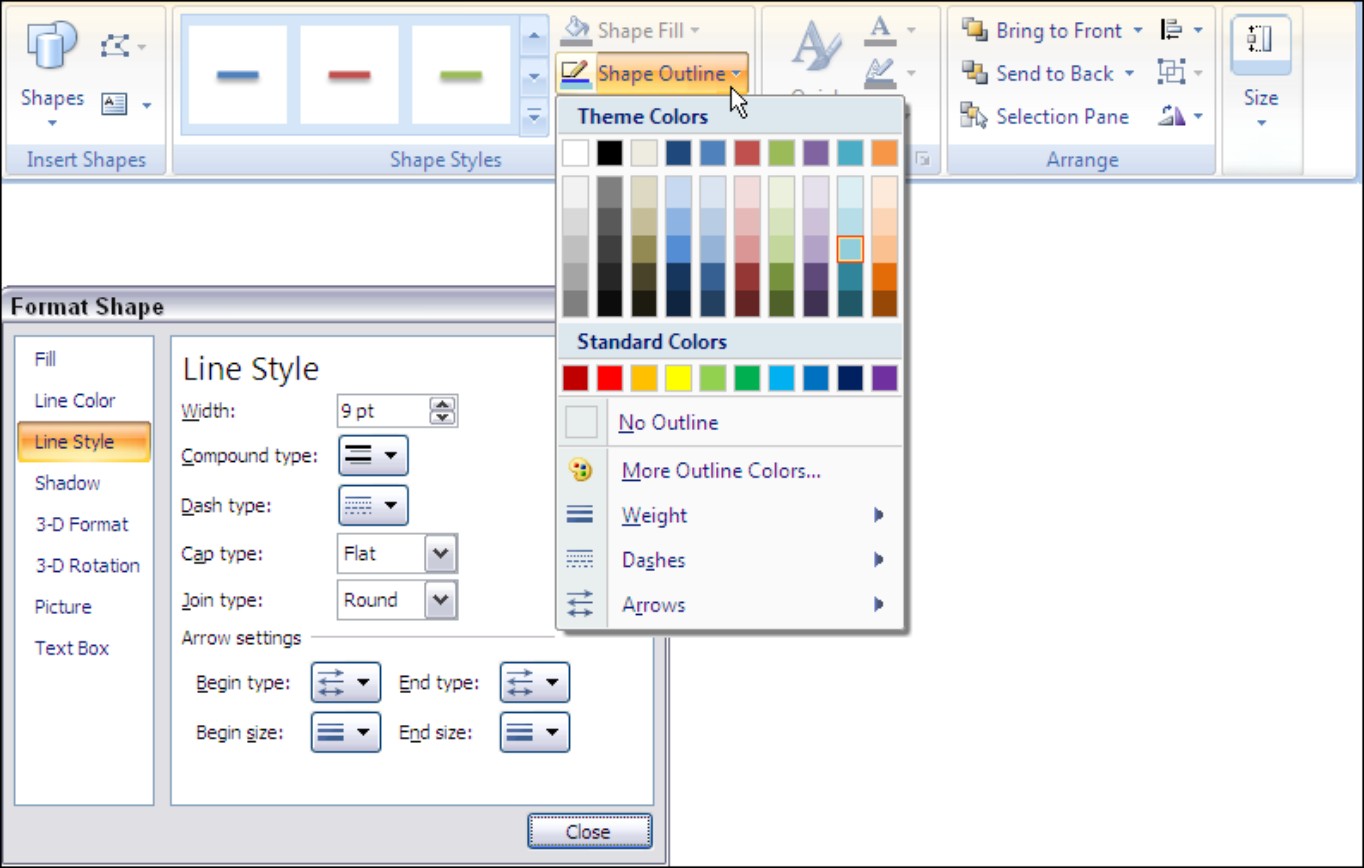
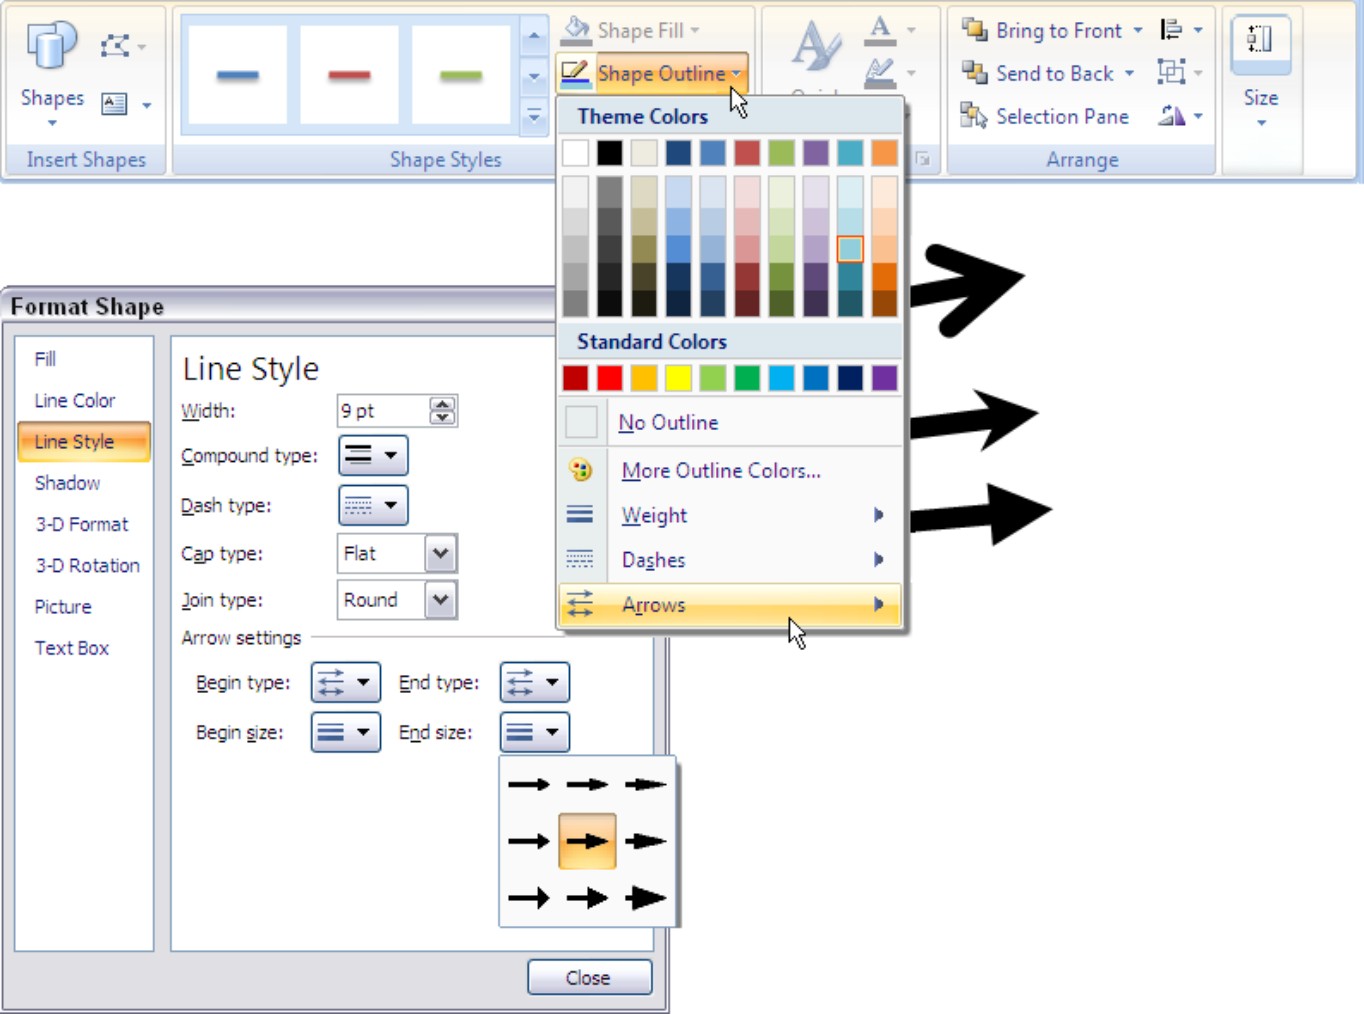
What a line looks like is a matter of its color, its weight (how thick it is), its dash status (it can be filled out or dashed), its cap (its ends can be rounded, square, or flat), whether it casts a shadow, and whether it is three-dimensional. As shown in Figure 1-4, PowerPoint offers three places for changing a line’s appearance: the Shape Styles gallery and Shape Outline button on the (Drawing Tools) Format tab, and the Format Shape dialog box.
|
Figure 1-4: Start on the Format tab to change a line’s appearance. |
|
To open the Format Shape dialog box, select your line and use one of these techniques:
Right-click your line and choose Format Shape.
Click the Shape Styles group button.

Click the Shape Outline button (refer to Figure 1-4), select Weight, Dashes, or Arrows, and then select More on the submenu.

The basics of changing lines
Of course, the fastest way to change a line’s appearance is to choose a line in the Shape Styles gallery. But if you want to fashion a line of your own, o to the (Drawing Tools) Format tab and follow these instructions to change basic appearances:
Color: Click the Shape Outline button and select a color on the drop-down list (refer to Figure 1-4). In the Line category of the Format Shape dialog box, select a color on the Color drop-down list.
Width: Click the Shape Outline button, select Weight on the drop-down list (refer to Figure 1-4), and choose a line width on the submenu. In the Line Style category of the Format Shape dialog box (refer to Figure 1-4), enter a setting in the Width box.
Dotted or dashed lines: Click the Shape Outline button, select Dashes on the drop-down list (refer to Figure 1-4), and choose an option on the submenu. In the Line Style category of the Format Shape dialog box (refer to Figure 1-4), click the Dash Type button and choose an option on the drop-down list.
Compound lines: In the Line Style category of the Format Shape dialog box (refer to Figure 1-4), click the Compound Type button and choose an option on the drop-down list.
Line caps (endings): In the Line Style category of the Format Shape dialog box (refer to Figure 1-4), open the Cap Type drop-down list and select Square, Round, or Flat. The Square and Flat options are very much alike, except flat corners aren’t as pronounced.
If you’re interested in attaching shadows or a third dimension to a line, open the Format Shape dialog box and visit the Shadow, 3-D Format, and 3-D Rotation categories. Shadows and third dimensions are a subject of the next chapter in this book.
Choosing a default line style for consistency’s sake
One of the secrets to making an attractive drawing is to make the lines consistent with one another. Lines should be the same width and color. They should be the same style. Unless you observe this rule, your slides will be infested with lines of varying width and different colors. Your slides will look like a confetti parade in a windstorm.
You can get around the problem of making lines consistent with one another by creating a model line and making it the default line style. After you declare a default style, all new lines you create are assigned the style. You don’t have to spend as much time making the lines look alike.
Give a line the style, weight, and color that you want for all lines in your presentation, and follow these steps to make that line the default style:
1. Select and right-click the line.
2. Choose Set As Default Line on the shortcut menu.
Attaching and handling arrowheads
Arrows, of course, have arrowheads, and arrowheads can go on either side or both sides of a line. What’s more, arrowheads come in different sizes and shapes, as shown in Figure 1-5.
To change the style of an arrowhead, attach an arrowhead to both or either side of a line, or change the size of an arrowhead, start by selecting your arrow or line and going to the (Drawing Tools) Format tab. Then use one of these techniques to handle the arrowheads:
Click the Shape Outline button, choose Arrows on the drop-down list, and select an arrow on the submenu.
Click the Shape Styles group button to open the Format Shape dialog box. In the Line Style category, click the Begin Type or End Type button and choose which arrowhead you want (or choose No Arrow) on the drop-down list. Then, to choose a size for your arrowhead, click the Begin Size or End Size button and choose an option on the drop-down list. (Refer to Figure 1-5.)
|
Figure 1-5: Select an arrowhead on the Arrows submenu or the Format Shape dialog box. |
|
Drawing and editing arcs and curved lines
Before you attempt to draw curved lines or arcs, you should know that drawing curved lines may well fall in the “more trouble than it’s worth” category. It can be done, but not very elegantly. You can spare yourself a bit of trouble by choosing a shape and manipulating it instead of drawing curves and arcs on your own.
Creating a curved line
Open the Shapes gallery and choose Curve to draw a curved line or arc (you can find Curve under “Lines” on the menu). Drag on-screen to draw the curved line. As you do so, take note of these important facts:
Drawing curves in a line: As you draw, click lightly where you want to draw a bend in the curve. PowerPoint enters an edit
point at each bend, as shown in Figure 1-6 (bottom). Very shortly, you will discover how to view the points on a line and edit a line by dragging or removing an edit point.
|
Figure 1-6: A curved line selected (top); the same curved line with the edit points displayed (bottom). |

|
Ending a curved line: Double-click when you want to stop drawing.
Selecting a curved line: Move the pointer over a curved line and click when you see the four-headed arrow. Selection handles appear around the extremities of the line you drew, as shown in Figure 1-6 (top). You see eight selection handles, not the two you get when you draw a straight line.
As far as PowerPoint is concerned, a curved line or arc is treated like a shape. Techniques for moving shapes, changing their size, and making them appear above or below other objects are explained in the next chapter.
Displaying the edit points on a curved line
In order to alter a curved line, you must display its edit points (refer to Figure 1-6). Follow these steps to display the edit points on a curved line:
1. Select the curved line.
2. Click the (Drawing Tools) Format tab.

3. Open the drop-down list on the Edit Shape button and choose Edit Points.
Figure 1-6 (bottom) shows what a curved line looks like with its edit points displayed. You can also display the edit points by right-clicking the curved line and choosing Edit Points on the shortcut menu.
Closing a curved drawing
Follow these steps to close a curved drawing so that it has no beginning or end:
1. Select the drawing.
2. On the (Drawing Tools) Format tab, click the Edit Shape button and choose Edit Points on the drop-down list.
3. Right-click any edit point.
You see a shortcut menu with commands for handling curved lines (refer to Figure 1-6).
4. Choose Close Path on the shortcut menu.
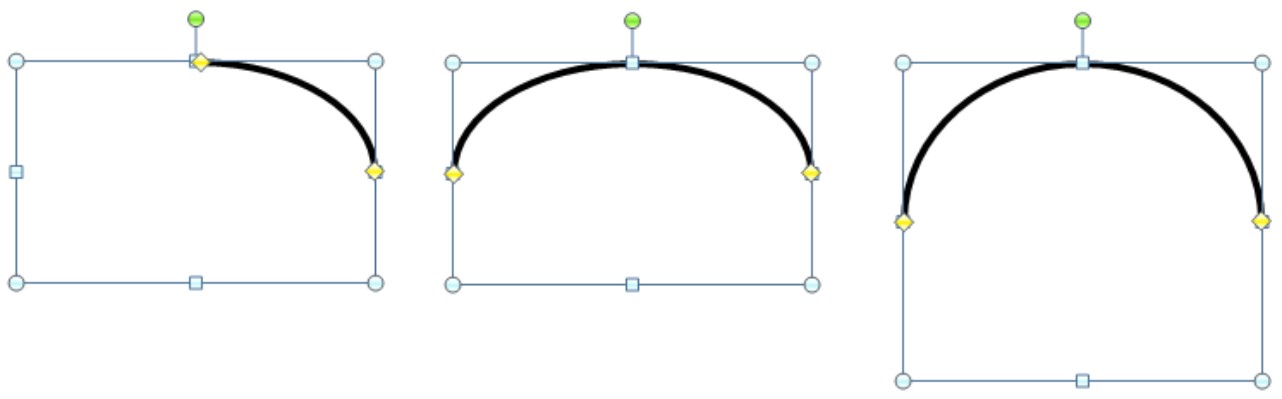
Drawing an arc
To draw an arc, start by selecting Arc in the Shape gallery (you’ll find it under “Basic Shapes”) and then draw the initial part of the arc, as shown in Figure 1-7. Notice the yellow diamonds on the arc. By dragging one of the diamonds, you can shape the arc. Use these techniques to fashion your arc:
Drawing the curve of the arc: Drag one of the diamonds to make the arc curve.
Changing the arc’s size: Drag a selection handle on the arc.
|
Figure 1-7: Drawing an arc. |
|
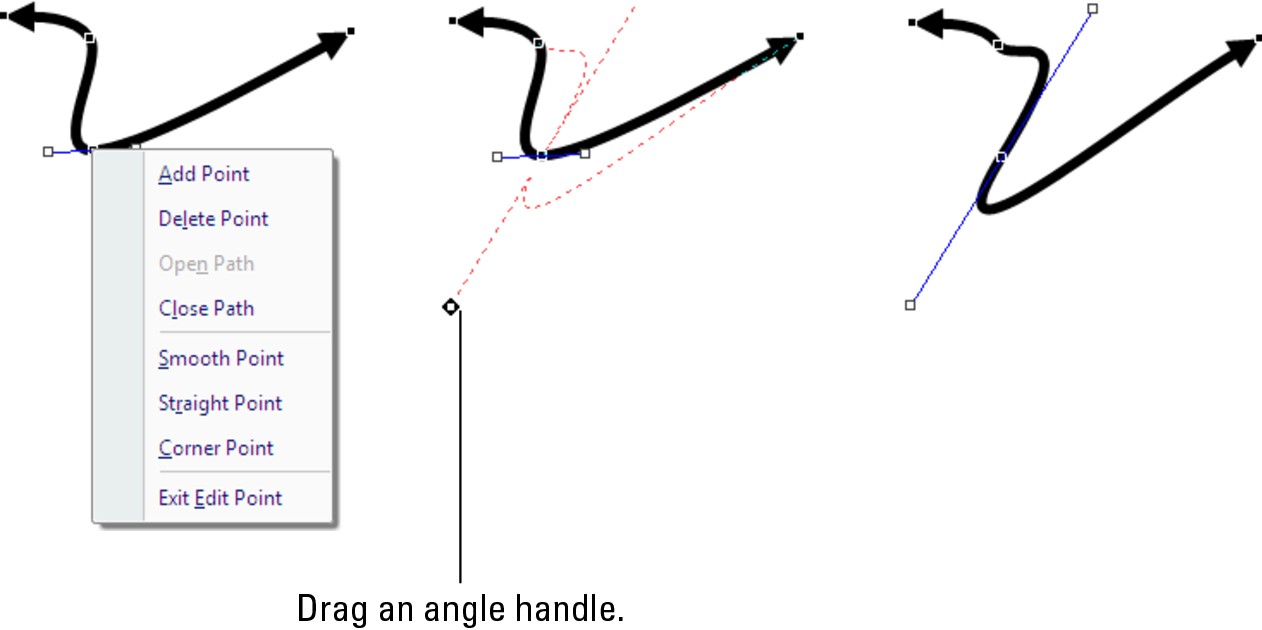
Changing around a curved line
To change the shape of a curved line, click to select it, and then display the curve’s edit points (see “Displaying the edit points on a curved line,” earlier in this chapter). Edit points appear on the line and show where each curve in the line is located (refer to Figure 1-6).
With the edit points showing, you can change around a curved line or arc:
Making a curve sharper or smoother: Drag the curve’s edit point.
Changing a line’s direction: Drag an edit point. You can also right-click the path and choose Add Point to add a point, and then drag the new point.
Removing a bend or crimp from a line: Right-click an edit point and choose Delete Point.
Putting another curve in the line: Right-click where you want the curve to go, choose Add Point from the menu, and drag the new point.
Straightening out a curve: Right-click a curve in the path and choose Straight Segment.
Turning a straight line into a curvy line: Right-click the line and chose Curved Segment. Then drag the line where you want the curve to be.
Closing a line: To make a line come all the way around to the place it started from, right-click the line and choose Close Path.
Opening up a closed drawing: Right-click the segment of the closed drawing where you want an opening to appear and choose Delete Segment.
Changing the angle of a curve: Right-click an edit point and choose Smooth Point, Straight Point, or Corner Point. Then, to make the curve steeper or smoother, drag one of the square angle handles, as shown in Figure 1-8.
Freeform and scribble drawing
So you want to play Etch-A-Sketch on your new pal PowerPoint? Bully for you. You can do it with the Freeform or the Scribble tool. With both these tools, you can draw directly onto a slide by following these steps:
1. Open the Shapes gallery and click the Freeform or Scribble button.
The Freeform tool draws smoother lines than the Scribble tool.
|
Figure 1-8: Changing the angle of a curve. |
|
2. Start drawing.
3. Double-click when you have finished drawing your line.
Edit a freeform or scribble line using the same techniques you use to edit a curved line (see “Changing around a curved line,” earlier in this chapter). However, you have to wrestle with many edit points to change around a freeform or scribble line.
Connecting Shapes with Connectors
Under “Lines,” the Shape gallery offers six different connectors. Use connectors to link different shapes and text boxes in a diagram. In other words, use connectors to describe the relationships between the people or things in your diagram. Connectors differ from conventional lines in an important way: After you attach one to a shape, it stays with the shape when you move the shape. You don’t have to worry about remaking all the connections after you move a shape. You can move shapes at will and let the connectors between shapes take care of themselves.
These pages explain how to draw a connector, move a connector, and adjust its shape and appearance. If you came here to explore how to make a diagram, be sure to check out Book III, Chapter 3 as well. It explains PowerPoint’s SmartArt diagramming gizmos.
Making a connection
Before you draw the connections, draw the shapes and arrange them on the slide where you want them to be in your diagram. Then follow these steps to connect two shapes with a connector:
1. Select the two shapes that you want to connect.
To select the shapes, hold down the Ctrl key and click each one.
2. On the (Drawing Tools) Format tab, open the Shapes gallery.
3. Select the connector that will best fit between the two shapes you want to link together.
For now, don’t worry about selecting the right kind of connector — Elbow, Elbow Arrow, Elbow Double-Arrow, Curved, Curved Arrow, or Curved Double-Arrow — because you can change your mind later as well as get a straight-line connector, as “Adjusting a connector” explains later in this chapter.
4. Move the pointer over a selection handle on one of the shapes you want to connect.
The selection hand turns red.
5. Click and drag the pointer over a selection handle on the other shape, and when that selection handle turns red, release the mouse button.
As shown in Figure 1-9, notice the red, round selection handles on the shapes where they are connected, and the diamond on the connector (select the connector if you don’t see the red selection handles or diamond). Those red handles tell that the two shapes are connected and will remain connected when you move them on a slide.
|
Figure 1-9: The three types of con- nectors — (from top to bottom) elbow, straight, and curved. |

|
Attaching a connector to a different shape
If your connector is attached to the wrong shape, don’t despair. Follow these steps to disconnect it from one shape and connect it to another:
1. Select the connector.
2. On the (Drawing Tools) Format tab, click the Edit Shape button and choose Reroute Connectors.
You can also right-click the connector and choose Reroute Connectors.
3. Move the pointer over the red handle on the side of the connector that needs to be attached elsewhere, click, drag the connector onto the other shape, and release the mouse button when you see the red dot on the other shape.
.jpg)
Don’t release the mouse button until you see red. Unless you see a red dot, PowerPoint doesn’t make the connection with the new shape.
Adjusting a connector
Chances are your connector needs adjusting to make it fit correctly between the two shapes. Click to select your connector and follow these techniques for adjusting it:
Changing the shape of a connector: Drag the yellow diamond on the connector. As you drag, the connector assumes different shapes.
Changing the connector type: Right-click the connector, choose Connector Types, and choose Straight Connector, Elbow Connector, or Curved Connector on the submenu. Figure 1-9 shows the three types of connectors.
Handling arrows on connectors: If the arrows on the connector aren’t there, are pointing in the wrong direction, or shouldn’t be there, change around the arrowheads using the same techniques you use with standard arrows. See “Attaching and handling arrowheads,” earlier in this chapter for details.
Changing the color, style, and line width of a connector: See “Changing a line’s appearance,” earlier in this chapter.
Drawing Rectangles, Ovals, Stars, and Other Shapes
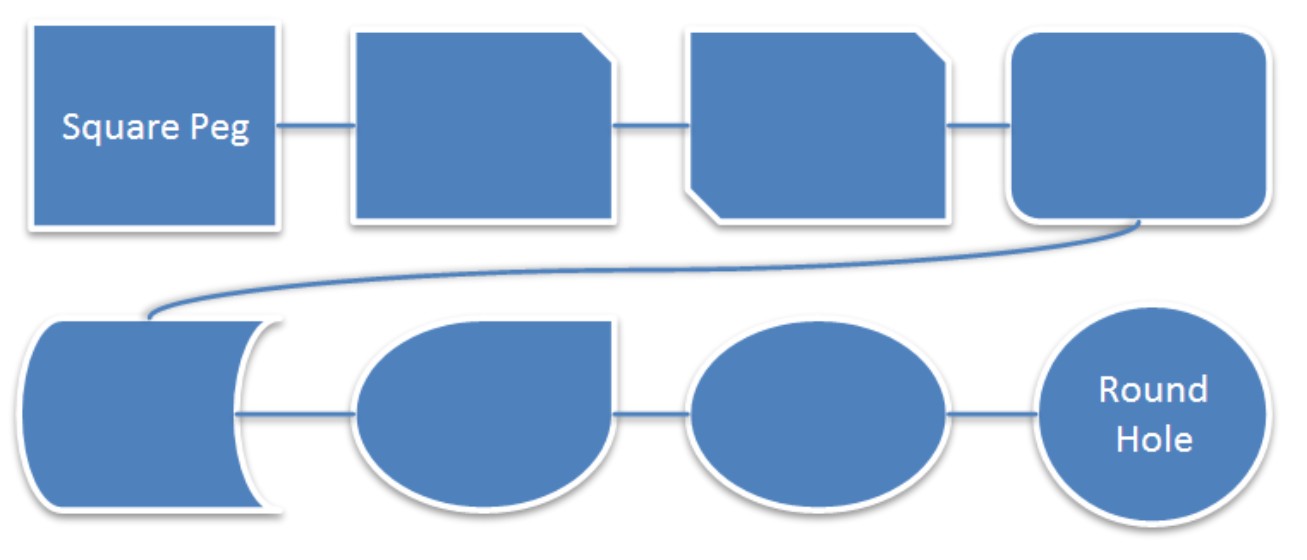
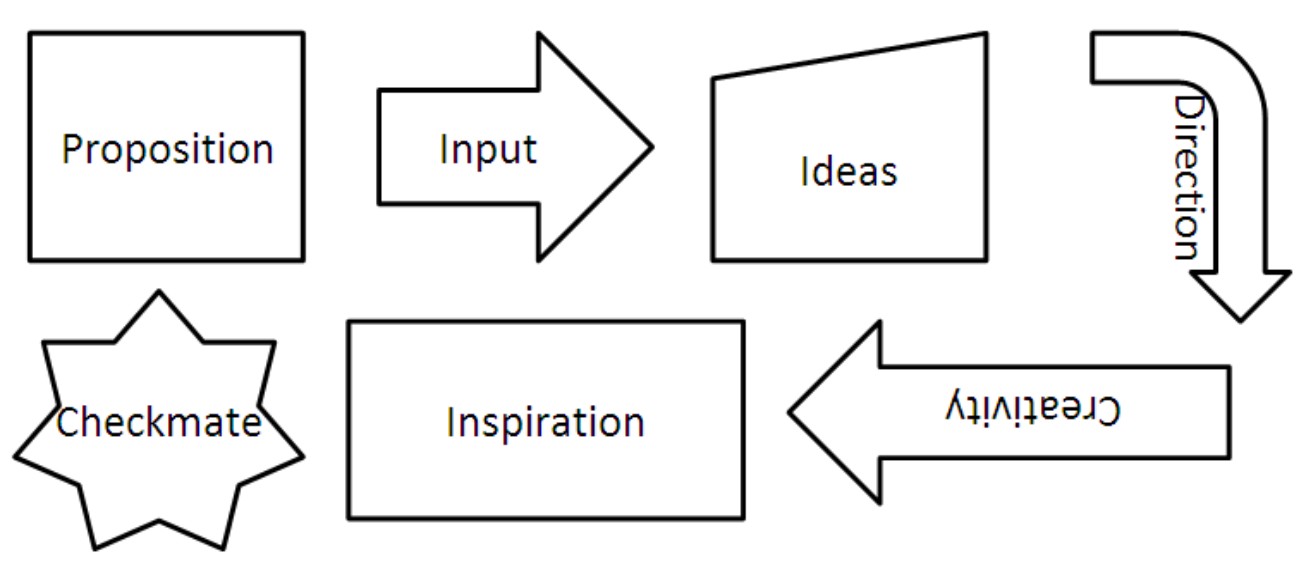
Besides drawing lines and arrows, you can draw shapes on slides. As I mentioned earlier, shapes can come in very handy for illustrating concepts and ideas, as shown in Figure 1-10. And you can combine shapes to make your own illustrations. PowerPoint offers about 140 different shapes. Apart from the standard rectangle and oval, you can draw octagons and various other “-agons,” arrows, stars, and banners. You are hereby encouraged to make shapes a part of your presentations, and you’ll be glad to know that drawing shapes is not difficult. These pages explain how to draw a shape and change its symmetry.
|
Figure 1-10: An example of using shapes (and connectors) to convey an idea. |
|
Drawing a shape
Follow these steps to draw a shape:
1. Open the Shapes gallery.
You can find the Shapes gallery in a couple of different places:
• Insert or Home tab: Click the Insert or Home tab (depending on the size of your screen, you may have to click the Shapes button before you see the Shapes gallery).
• Format tab: Select a shape you already created and then select the (Drawing Tools) Format tab. You can find the Shapes gallery in the upper-left corner of the tab.
2. Select a shape in the gallery.
If you’ve drawn the shape recently, you may be able to find it at the top of the gallery under “Recently Used Shapes.”
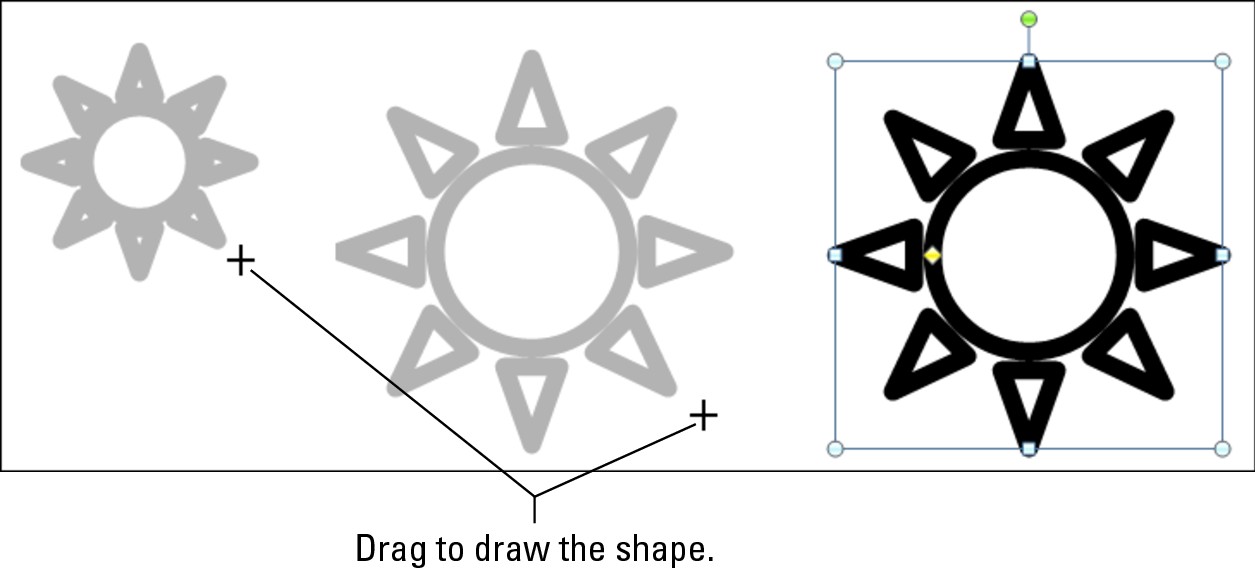
3. Click on-screen and drag slantwise to draw the shape, as shown in Figure 1-11.
|
Figure 1-11: Drag on your slide to create a shape. |
|
Hold down the Shift key as you drag if you want the shape to retain its symmetry. For example, to draw a circle, select the Oval shape and hold down the Shift key as you draw on your slide.
4. Release the mouse button.
Round selection handles appear on the corners of the shape, and square handles appear on the sides. Drag a round handle to change the shape’s size and retain its symmetry; drag a square handle to stretch or scrunch the shape. Depending on which shape you drew, you may also see a yellow diamond or two. Drag a yellow diamond to change the shape’s symmetry.
The next chapter explains in detail how to change an object’s size and proportions.
Changing a shape’s symmetry
A yellow diamond — sometimes two or three — appear on some shapes. By dragging a diamond, you can change the symmetry of the shape. Figure 1-12, for example, shows the same shape — the Left-Right Arrow — twisted into four different shapes. Notice where the diamonds are. By dragging a diamond even a very short distance, you can do a lot to change the symmetry of a shape.
|
Figure 1-12: By dragging the diamonds on a shape, you can change its appearance slightly or not so slightly. |

|
Exchanging One Shape for Another
It sometimes happens that the shape you chose isn’t the one you really wanted. You wanted a different one. You asked the waitress for the lemon cake, but when it arrived, you realized that lemon wasn’t your first choice. Your first choice was banana cream. Is it too late to send the lemon cake back to the kitchen and exchange it for a slice of banana cream cake? No, it’s not too late.
To exchange one shape for another, follow these steps:
1. Select the shape.
2. Click the (Drawing Tools) Format tab.
3. Click the Edit Shape button and choose Change Shape on the drop-down list.
The Shape gallery opens.
4. Select a new shape in the Shape gallery.
The replacement shape retains the color, border, and other decorations that you put on the original shape.
Using a Shape as a Text Box
Here’s a neat trick: Rather than use the conventional rectangle as a text box, you can use a shape. Figure 1-13 shows examples of shapes being used as text boxes. By placing words on shapes, you can make the shapes serve to illustrate ideas and concepts.
|
Figure 1-13: Shapes can do double duty as text boxes. |
|
Follow these steps to turn a shape into a text box:
1. Create the shape.
Earlier in this chapter, “Drawing a shape” explains how.
2. Click in the shape and start typing.
Book II, Chapter 5 explains everything there is to know about text boxes. Here is everything you need to know about a shape you’ve converted into a text box:
Editing the text: Click in the text and start editing. That’s all there is to it. If you have trouble getting PowerPoint to understand that you want to edit text, select the shape, right-click it, and choose Edit Text on the shortcut menu.
Changing the font, color, and size of text: Right-click in the text and choose Font. Then, in the Font dialog box, choose a font, font color, and font size for the text.
Allowing the shape to enlarge for text: To allow the shape to enlarge and receive more text, right-click it and choose Format Shape. Then, in the Text Box category of the Format Shape dialog box, select the Resize Shape to Fit Text option button.
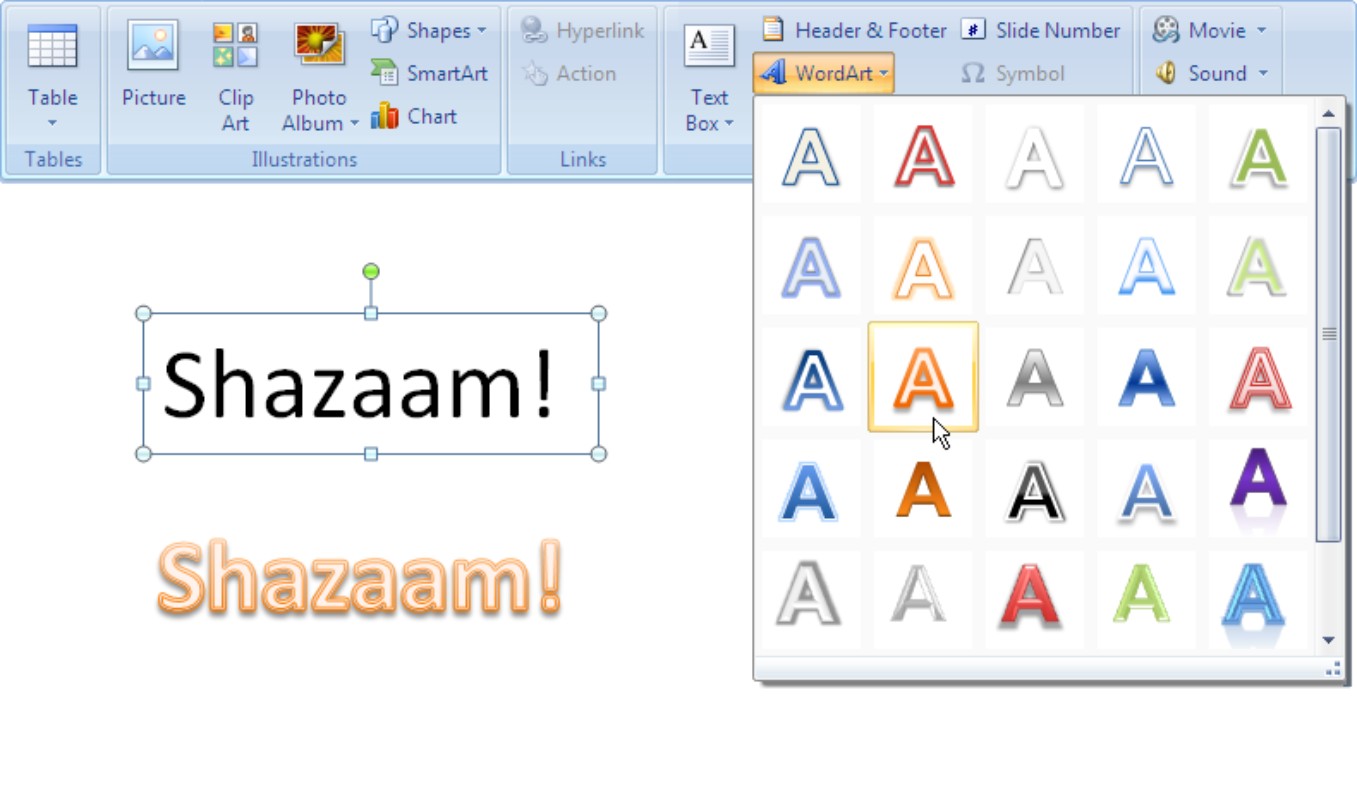
WordArt for Bending, Spindling, and Mutilating Text
A WordArt image consists of a word that has been stretched, crumpled, or squeezed into an odd shape. Actually, a WordArt image can include more than one word. Figure 1-14 shows the WordArt Gallery, where WordArt images are made, and an example of a WordArt image. After you insert a WordArt image, you can fool with the buttons on the WordArt toolbar and torture the word or phrase even further. Read on.
|
Figure 1-14: Creating a WordArt image. |
|
Creating a WordArt image
You can get a head start in writing the words for your WordArt image by entering the words in a text box and selecting it before you create the image. Anyhow, follow these steps to create a WordArt image:
1. Click the Insert tab.
If you intend to turn a text box into a WordArt image, select the text box.

2. Click the WordArt button.
A drop-down list with WordArt styles appears (refer to Figure 1-14).
3. Select a WordArt style.
Don’t worry about selecting the right style — you can choose a different one later on. If you entered the text first, you can move the pointer over different WordArt styles on the drop-down list and “live-preview” them.
4. Enter the text for the image (if you didn’t select text to begin with).
WordArt images are objects. Therefore, you use the same techniques to enlarge or shrink them as you do standard objects. The next chapter explains how to change the size of and manipulate WordArt images and other objects.
Editing a WordArt image
Usually, you have to wrestle with a WordArt image before it comes out right. Here are some pointers to help you win the wrestling match:
Choosing a new WordArt style: You don’t like the WordArt style you chose when you created the image? To choose a different style, select the image, click the (Drawing Tools) Format tab, click the Quick Styles button to open the WordArt Quick Styles gallery, and choose a new style on the drop-down list.

Changing the letters’ color: On the (Drawing Tools) Format tab, open the drop-down list on the Text Fill button and select a new color to change the letters’ color.

Changing the letter’s outline: On the (Drawing Tools) Format tab, open the drop-down list on the Text Outline button and make a choice.
You can also alter the letters in a WordArt image by boldfacing or italicizing it. All text effects you can apply to normal text can also be applied to a WordArt image.