Chapter 1: Taking Advantage of Transitions and Animations
In This Chapter
 Contrasting transitions and animations
Applying transitions to slides
Understanding how animations work
Taking advantage of the prebuilt animations
Using advanced animation techniques
Making sound a part of an animation
This chapter describes how to put a little pizzazz in your presentations with transitions and animations. In a normal, humdrum presentation, slides simply arrive on-screen one after the next, but with transitions, slides arrive on-screen with a flourish. With animations, slide elements such as text frames and graphics can dance around on slides — they can fade in, fly out, spin, change shape, move from place to place, and do any number of things.
Transitions are easy. All you have to do is tell PowerPoint which kind you want and be done with it. Animations can be as simple or complex as you want them to be. You can opt for PowerPoint’s canned animations or create animations from scratch on your own. If you’re running a self-propelled, kiosk-style presentation, transitions and animations may be exactly what you need to attract passersby to your slide show. This chapter explains how to fiddle with transitions and animations. It looks into the numerous ways you can animate parts of a PowerPoint slide.
Comparing Transitions and Animations
A transition occurs as a slide arrives on-screen; animations occur while a slide is still on the screen. You can apply only one transition per slide, but a slide can have as many animations as your skill at making animations permits. Slide animations can occur simultaneously or one after the other. Using animations, you can treat the different parts of a slide like a dance troupe and choreograph the graphics, text boxes, charts, and tables to make a lively presentation.
If your goal is to impress your friends and enemies without having to put out very much effort, apply transitions to slides. Transitions require hardly any effort and can be quite sophisticated. Animations, however, can be a tangle of thorns. You really have to know what you’re doing to animate different parts of a slide.
Showing Transitions between Slides
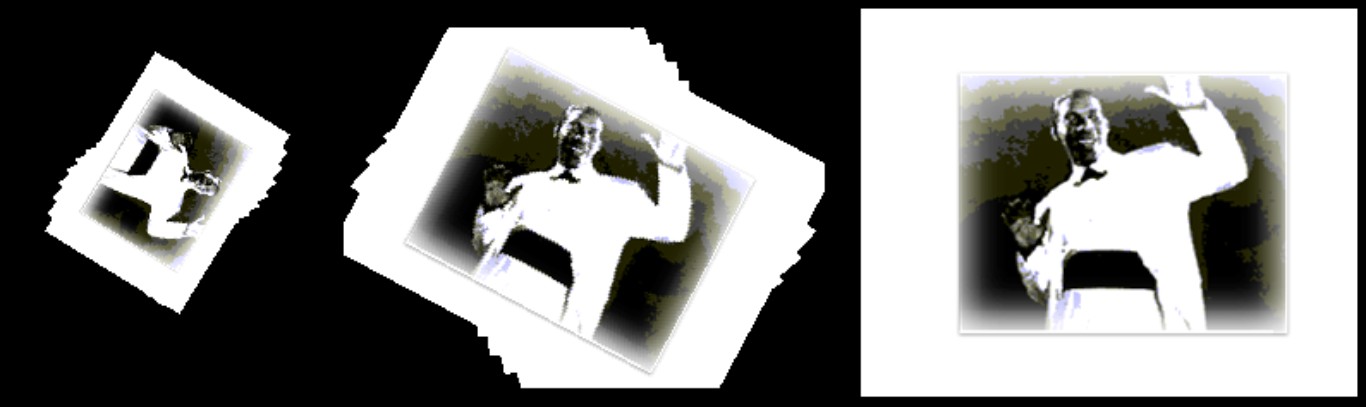
Figure 1-1 shows how a transition works. For the figure, I chose the Newsflash transition. This slide doesn’t so much arrive on-screen as it does spin onto the screen. Transitions are great for getting viewers’ attention, especially in a self-running, kiosk-style presentation. Viewers see the transition, and they are naturally inclined to turn their attention to the changing screen. You can make sound a part of slide transitions. For example, applause, a drum roll, or an explosion can accompany the arrival of a slide on-screen. Sounds make transitions even more attention getting.
To use transitions, you start by selecting the slides that require a transition. Then, on the Animations tab, you choose a transition from the 65 that PowerPoint offers. While you’re at it, you can tell PowerPoint to make a sound a part of the transition and declare how fast or slow you want the transition to occur. The only hard part about transitions is choosing one — there are so many to choose from.
.jpg)

|
Figure 1-1: The Newsflash transition in action. |
|
Assigning transitions to slides
The only tricky part about assigning transitions to slides is finding the right transition. You have to experiment a little. Follow these steps to assign transitions to slides:
1. Click the Animations tab.
Notice the transition commands on the Transition To This Slide group — the Transition Scheme gallery, Transition Sound, Transition Speed, and Apply to All.
2. Select the slides that need a transition.
If you need to select more than one slide or you don’t want to assign the same transition to all your slides, switch to Slide Sorter view to make selecting slides easier. Book II, Chapter 1 explains how to select slides. You can Ctrl+click or Shift+click them.

To apply the same transition to all the slides in the presentation, skip this step and click the Apply To All button after you select a transition.
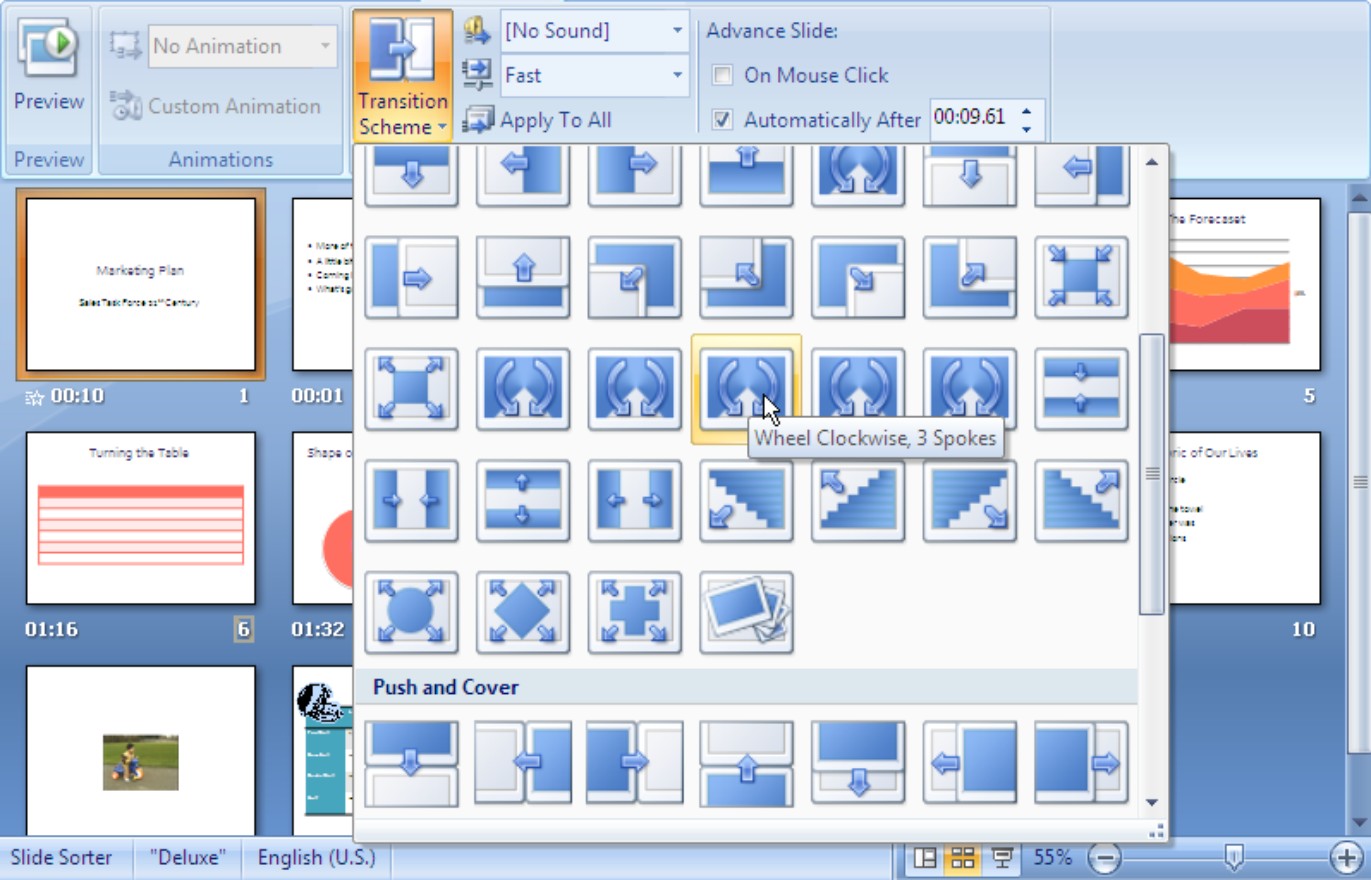
3. In the Transition Scheme gallery, select a transition, as shown in Figure 1-2 (depending on the size of your screen, you may have to click the Transition Scheme button to open this gallery).
The names and images on the drop-down list give an idea of what the transitions are, and you can point to transitions to “live-preview” them.
|
Figure 1-2: Selecting a transition for a slide in the Transition Scheme gallery. |
|

4. Optionally, open the Transition Sound drop-down list and choose a sound to accompany the transition.
Hold the pointer over sound names to hear the different sounds. (Book V, Chapter 3 explains sounds in detail.)
If none of the sounds excite your ears, choose Other Sound at the bottom of the list. In the Add Sound dialog box, locate and select a .WAV (wave) file on your computer or computer network and click OK.
The Loop Until Next Sound option at the bottom of the drop-down list plays the sound continuously until the next slide in the presentation appears.

5. On the Transition Speed drop-down list, choose Slow, Medium, or Fast to declare how quickly or slowly you want the transition to occur.
As I mentioned earlier, you can click the Apply To All button to assign the same transition to all the slides in your presentation.

Troubleshooting transitions
Sometimes a transition doesn’t come out right and you have to alter it or remove it altogether. Go to the Animations tab, select the slide or slides that need work, and follow these instructions to troubleshoot transitions:
 Choosing a different transition: Open the Transition Scheme gallery (see Figure 1-2) and choose a different transition.
Removing a transition: Open the Transition Scheme gallery (see Figure 1-2) and choose No Transition, the first option in the gallery.
Removing all transitions from slides: Select a slide that hasn’t been assigned a transition and then click the Apply to All button. If all the slides in your presentation have been assigned transitions, select them, open the Transition Scheme gallery (see Figure 1-2), and choose No Transition.
Changing or stopping a sound: Open the Transition Sound drop-down list and choose a different sound or [No Sound].
Preventing a continuous sound from playing: Sounds play continuously after a transition occurs if you chose the Loop Until Next Sound option on the Transition Sound drop-down list. Open this list and unselect Loop Until Next Sound to prevent continuous sounds from playing.
A Short but Sweet Animation Primer
Normally, a slide arrives on-screen all at one time and sits there like a bump on a log, but an “animated” slide can do much more than that. For example, an animated slide can arrive in parts. First you see the heading, and then you see the first, second, and third line in a bulleted list. A part of an animated slide can also do things on-screen. For example, a graphic can spin around, fade in, or fade out. Text can grow to a larger font size or change fonts. Items can arrive from different directions on a slide. Slide elements can move across a slide from place to place.
To animate part of a slide, you select it and then give an animation command. If you want to animate several parts of a slide, you tell PowerPoint the order in which to animate the different parts. For example, you can start with the heading, proceed to a graphic, and then animate a bulleted list. Items can start animating when you click the mouse, or start automatically as time elapses. For example, you can click the mouse once and then twice to make the first and second lines in a bulleted list appear on-screen, or you can make these items appear automatically 10 seconds after one another.
To make good use of animation, and to make animations of your own, you need a little background understanding, and to that end I hereby present to you a short but sweet animation primer. Later in this chapter (see “Advanced Techniques for Animating Slides”), I describe animation techniques in excruciating detail. For now, read the following pages to get the lay of the land and understand what animation entails.
Uses for animations
Animations are useful for getting the audience to focus its attention on information you present on one part of a slide. Rather than have a bulleted list appear all at one time, you can display the bulleted items one at a time as you discuss each item. Animations keep the audience guessing. You can arrange for a chart to appear on a slide at the moment you begin talking about the information presented on the chart. You can make a graphic, a company logo, or a lightning bolt fly across the screen. You can even play sounds as items appear on-screen, and make items arrive from different directions. You can “animate” an item in a number of different ways — by dimming, fading, or flashing, for example. Animations lend a little drama to a PowerPoint presentation. They keep the audience on its toes. They can be entertaining.
Figure 1-3 (top) shows a classic use for animation — in a bulleted list. Instead of the list’s appearing all at one time, bulleted items appear one at a time so that the audience can direct its attention to each item. Figure 1-3 (middle) shows another example of an animated bulleted list. As one item in the list appears, the others are dimmed so that the presenter and audience can focus on a single item without being distracted by the other items. Figure 1-3 (bottom) shows a question-and-answer list, with the answers appearing one at a time as each question on the list is answered.
Figure 1-4 (top) demonstrates how sophisticated an animated slide can be. In the slide shown on top, category bars in a bar chart arrive on-screen one at a time. As each bar arrives, it becomes the subject of discussion. Figure 1-4 (middle), a title slide, shows a company logo getting larger. This is a great way to start a presentation. The idea is to make the audience take note of the logo and remember the name of the company that the presenter works for. Figure 1-4 (bottom) shows text spinning to get attention from the audience.
|
Figure 1-3: Examples of “animated” lists. |

|
|
Figure 1-4: An example of an “animated” chart (top), a graphic changing size (middle), and animated text (bottom). |

|
Later in this chapter, “Suggestions for Animating Slides” suggests still more ways to use animations in slides.
Choosing which slide elements to animate
Before you know anything about animations, you need to know that slides are composed of different elements — text boxes, graphics, drawn objects, and others. Your first task in animating a slide is to take stock of how many elements are in the slide and decide which elements to animate.
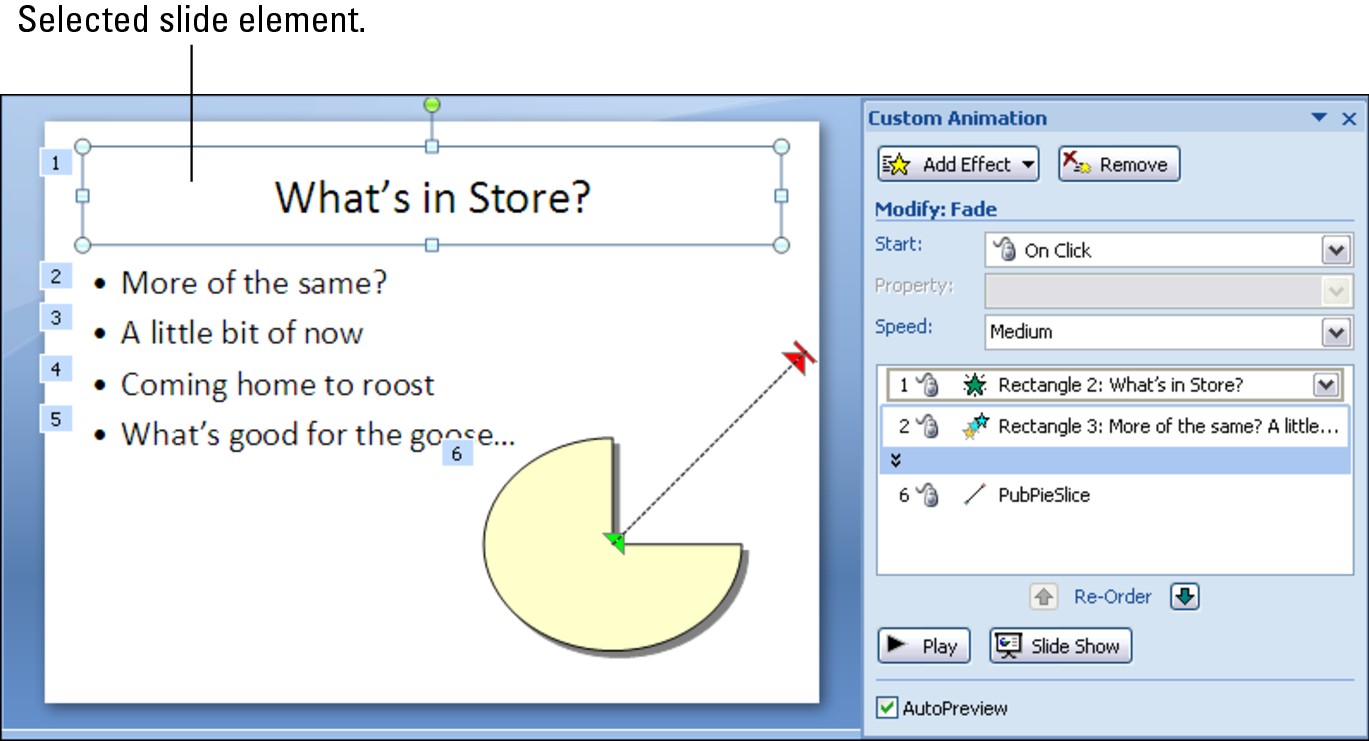
You can tell where elements are by clicking different parts of a slide. As shown in Figure 1-5, a selection box appears around an element when you click to select it. To animate part of a slide, you select the element that you want to animate and then give animation commands — they’re called effects — to tell PowerPoint how to animate the element. In the slide in Figure 1-5, six elements are animated. PowerPoint numbers all animated elements on a slide.
|
Figure 1-5: Select a slide element in order to animate it. |
|
Effects for defining an animation
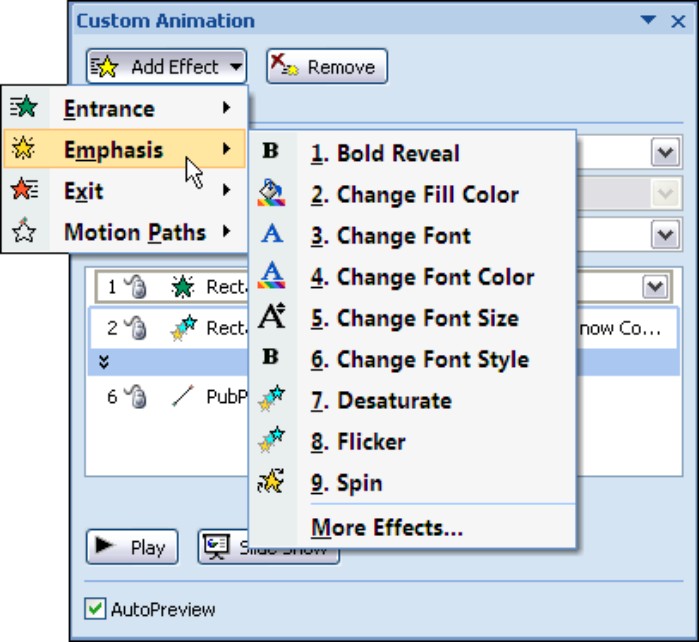
The next step after choosing an element on your slide is to go into the Animations tab and tell PowerPoint how to animate it. You do that by selecting what PowerPoint calls effects. An effect is a description of how you want the element to behave — in other words, what you want elements to do on-screen. You can choose more than one effect for a single element.

Entrance effect: Determines how the element arrives on-screen. You can make it fly in from the side or fade in, for example. Choose an entrance effect if you want an element to appear on-screen after the slide appears.
Emphasis effect: Determines how the element calls attention to itself while it is on-screen. For example, you can change its font size, make it spin, or make it flicker.
|
Figure 1-6: Choosing an animation effect. |
|
Exit effect: Determines how the element leaves the slide. For example, the element can fade out or fly off-screen before the slide itself disappears.
Motion path: Determines how the element moves across or around on the slide. For example, you can move the element up, down, right, or left. You can also choose from and draw complex motion paths.
When you choose an effect, you can also fine-tune it. For example, you can choose its speed, size, and direction. Which options you get for fine-tuning depends on the effect you’re working with.
Defining the order of animations
As you animate different elements on a slide, PowerPoint places the names of elements in the Custom Animation task pane (refer to Figure 1-5). The program also displays numbers on the slide to show you the order in which animations occur (refer to Figure 1-5). Animations with the same number are chained together. These animations either occur at the same time or right after one another (the next section in this chapter explains how this process works).
To change the order of animations in the Custom Animation task pane, select an animation and then click a Re-Order button.
Deciding when elements are animated
After you’ve chosen effects for elements, the next step is to decide when to animate them on your slide. As I explained earlier, numbers on the slide and in the Custom Animation task pane tell the order in which animations occur. Animations with the same number either occur at the same time or are choreographed such that one animation occurs after another with the same number.
As shown in Figure 1-7, PowerPoint offers four ways to begin animating a slide element during the presentation of a slide:
On Click: When you click your mouse anywhere on the screen. You can arrange, for example, to bring up each item in a bulleted list by clicking the mouse. As you discuss each bulleted point with your audience, you click the mouse to bring each bullet onto the slide.
|
Figure 1-7: You can start animating an effect with a Start command (left) or a trigger (right). |

|
With Previous: Automatically at the same time as another animation. Making two, three, or more elements animate on a slide simultaneously can truly be called “animation.”
After Previous: Automatically a certain amount of time after another animation begins. With this option, you can play choreographer and arrange for different elements to dance on-screen in cahoots with one another.
Trigger: When you click a particular part of the screen. You can arrange, for example, for a chart to appear on-screen that illustrates a point you’re trying to make. Triggered animations give you the ability to bring elements on-screen as you need them. If an audience member asks for more information about a topic, you can trigger an element on-screen to provide information in the form of a chart, list, or graphic.
The Quick Way to Animate a Slide
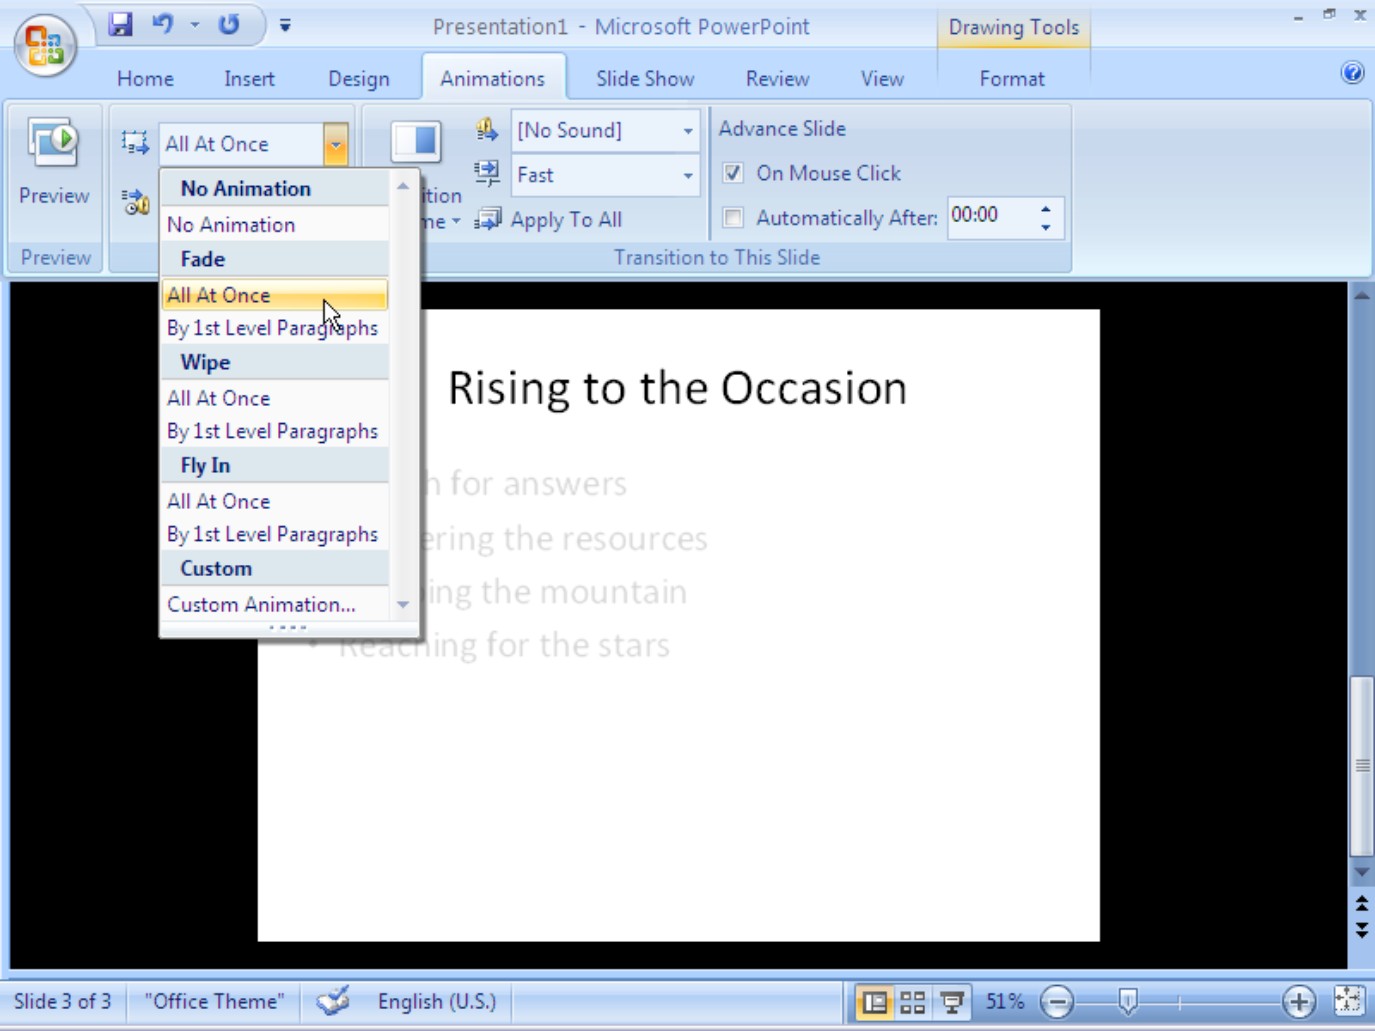
The good news as far as animation is concerned is that you can take advantage of prebuilt animations made by the elves of the Microsoft Corporation. These prebuilt animations are not especially sophisticated, but they’re easy to set up, and it’s easy to animate all the slides in the presentation simultaneously. With prebuilt animations, the animations occur when you click the screen, and you can choose from three entrance effects: Fade, Wipe, and Fly In.
Starting on the Animations tab, follow these steps to animate one element on a slide the easy way:
1. Click to select the element on the slide that you want to animate.
You can tell when you’ve selected an element because a selection box appears around it.
2. Open the Animate drop-down list and choose an animation effect, as shown in Figure 1-8.
Your choices are Fade, Wipe, and Fly In.
If you chose a text-box or text frame element with more than one paragraph in Step 1, tell PowerPoint whether to animate all the text or each paragraph at a time (later in this chapter, “Animating text frames and text boxes” describes animating paragraphs in detail):
• All at Once: All the text is animated at the same time.
• By 1st Level Paragraphs: Each paragraph is treated separately and animated on its own. For example, each item in a bulleted list is treated as a separate element — each item fades, wipes, or is flown in after the one before it, not at the same time as the one before it.
Very briefly, you see a preview of the animation choice you made.
|
Figure 1-8: Apply effects from the Animate drop-down list. |
|
To get a good look at the animation you just chose for your slide, click the Preview button on the Animations tab.
To remove an animation, open the Animate drop-down list and choose No Animation.
Advanced Techniques for Animating Slides
Animations can make a PowerPoint presentation stand apart, but mastering animations isn’t easy. You have to know not only how animations work but also how to use animations in concert. With the goal of helping you master animations, these pages explain how to use and read the Custom Animation task pane, apply and modify an animation effect, animate text frames and text boxes, and hide elements when they are finished animating. You also discover how to make elements move across slides and play choreographer by running several different animations simultaneously or in sequence.
Planning ahead
You can save much time by planning ahead when you animate a slide. The Custom Animation task pane offers about a hundred ways to revise an animation, but you spare yourself from revising if you get it right from the start. Most important is getting the animations in the right order and considering how much time will elapse when your slide is on-screen.
Here are some things to think about as you plan how to animate a slide:
Time: How much time do you want the slide to remain on-screen? If the slide is on-screen a short time, you don’t have time for many animations. Say that you want to animate six elements and the slide is to remain on-screen for two minutes, the duration (the speed) of each animation would be roughly 20 seconds.
Start method: Elements can appear when you click on-screen, at the same time as other elements, or a certain period of time after other elements.
Sequence: If you intend to animate more than one element on your slide, make like a choreographer and think about the order in which the elements will animate.
See “Uses for animations,” earlier in this chapter, for some ideas about how to animate slides.
Using and reading the Custom Animation task pane
After you click the Custom Animation button on the Animations tab, you see the Custom Animation task pane. This little corner of PowerPoint offers about a hundred different ways to fiddle with animations. You can choose and remove effects, customize effects, and change the order of animations, among other tasks. Because getting lost in the Custom Animation task pane is so easy, the next few pages explain in general terms how to use it, read it, and select animations inside it.
The Basics: Using the Custom Animation task pane
To apply an animation effect, select an element on-screen, click the Add Effect button in the Custom Animation task pane, and choose an effect or motion path from one of the drop-down lists. Applying an effect seems easy enough, but you can’t really tell what an effect is until you’ve chosen it. Diamond, Checkerboard, Peek Out, Bars — you can’t tell what these are by reading their names. Usually, you have to test-drive a few effects before you find the right one. And it’s usually necessary to customize effects to make them just-so.
As shown in Figure 1-9, here are basic instructions for using the Custom Animation task pane to handle animations:
Selecting an effect: Click the Add Effect button and choose an option on the Entrance, Emphasis, Exit, or Motion Paths submenu. You can select More Effects on one of the submenus to open the Effect Options dialog box and choose from many more effects, as shown on the right side of Figure 1-9.
Changing an effect: Select an animation on the list, click the Change button (you’ll find it where the Add Effect button used to be), and choose a different effect from a drop-down list.
|
Figure 1-9: Handling animations in the Custom Animations task pane. |

|
Choosing how to start the effect: From the Start drop-down list, choose On Click, With Previous, or After Previous (see “Playing choreographer with animations,” later in this chapter).
Modifying an effect: Depending on the animation you chose, you may be able to change its direction or speed by way of the Direction and Speed drop-down lists (see “Modifying an animation” later in this chapter).
Choosing effect, timing, and text-animation modifications: To really dig in and make major modifications, open an animation’s drop-down list and choose Effect Options or Timing. Doing so opens a dialog box with many modification options (see “Modifying an animation” later in this chapter for details). You’ll find options for changing the direction, speed, timing, and other aspects of an animation effect.
Changing the order of animations: Select an animation in the task pane list and either drag it up or down or click a Re-Order button (see “Playing choreographer with animations,” later in this chapter).
Previewing a slide: Click the Play button to see a preview animation in Normal view; click the Slide Show button to see a full-screen preview of your slide. Only by clicking the Slide Show button can you see how clicking on-screen makes animations work in your slide. When you click the Play button, the animations appear one after the other without your having to click, which makes it hard to see how clicking on-screen works.
Reading the Custom Animation task pane
PowerPoint lists the animations on your slide in the Custom Animation task pane, as shown in Figure 1-10. The task pane lists, in order, every animation on the slide. An element that is animated more than once — because, for example, it is animated when the slide appears and later, right before the slide leaves the screen — is listed on the task pane more than once. The task pane lists the order in which animations unfold while the slide is being presented.
|
Figure 1-10: Deciphering an animation. |

|
Knowing which animation you’re dealing with on the Custom Animation task pane can be a trial unless you know how to read the task pane. As shown in Figure 1-10, you can tell a little about an animation by studying its listing. From left to right, here is how to read an animation in the task pane:
Animation order number: The order in which the animation occurs. An animation that starts when you click the screen (On Click) gets its own number, but an animation that is chained to another animation (With Previous or After Previous) shares a number with other animations because it doesn’t begin until a previous animation plays. (See “Playing choreographer with animations,” later in this chapter, for more details.)
Mouse icon, no icon, or Clock icon: These icons (or absence of an icon) tell you whether the animation begins when you click the screen (Mouse icon), after another animation begins (Clock icon), or at the same time as the animation before it in the list (no icon).
Animation icon: This icon gives you a little picture of the animation you chose. The picture gives you an idea of what the animation does. You can also look right below the Add Effect (or Change) button to read the name of the animation effect you chose.
Element: The type of element. If you’re dealing with a text box, for example, the task pane says “rectangle.”
Text on element: If the element is a text box or text frame, the task pane lists the words (or some of the words) in the text box or frame.
You can move the mouse pointer over a listing in the Custom Animation task pane and see a pop-up box with information about the animation, including its animation name (see Figure 1-10).
Selecting an animation to work with
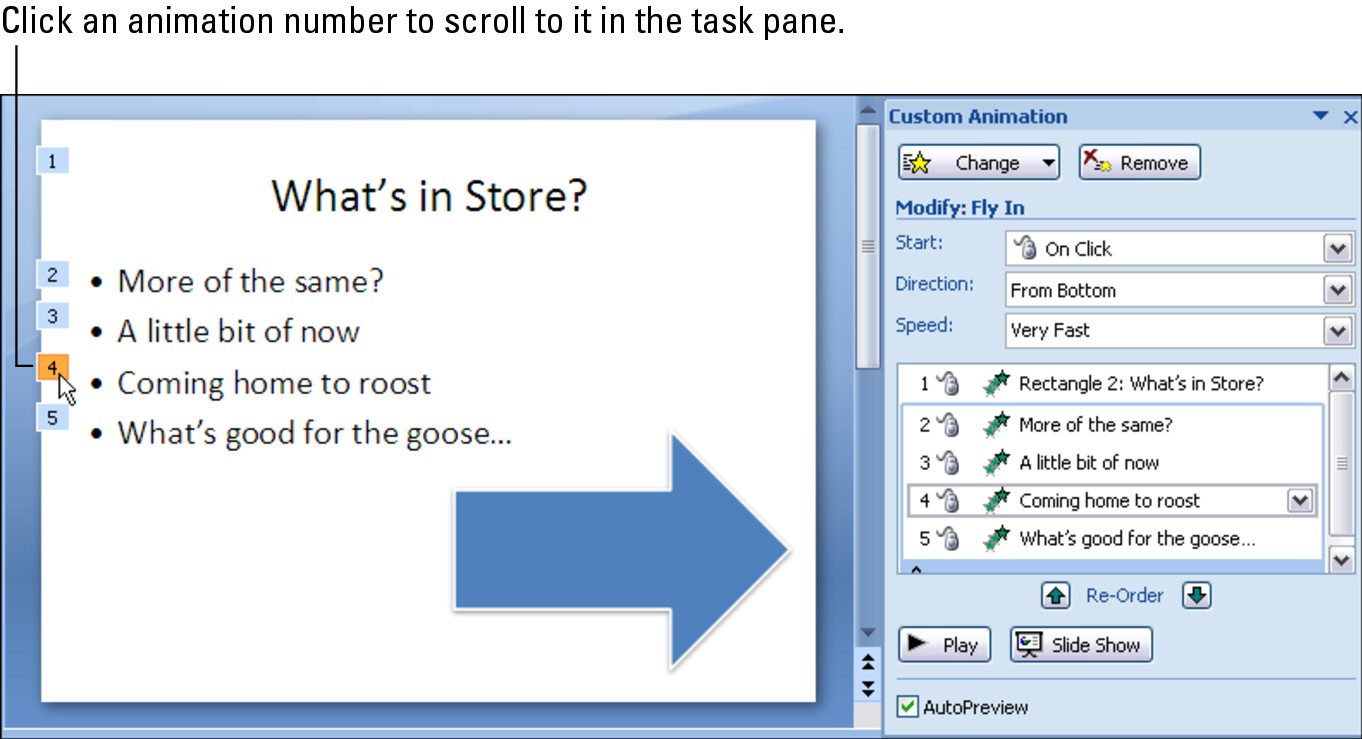
Click the animation number on the slide next to an element you want to work with. As shown in Figure 1-11, the Custom Animation list scrolls to the animation whose number you clicked.
Click the element with the animation you want to work with. The Custom Animation list scrolls to the element.
|
Figure 1-11: Locating an animation on the Custom Animation task pane. |
|
Applying an animation effect
|
Figure 1-12: Start from the Add dialog box so that you can preview before choosing an effect. |

|
Starting on the Animations tab, select an element, open the Custom Animation task pane, and follow these steps to choose — and preview — an animation effect:
1. Click the Add Effect button.
2. Select Entrance, Emphasis, Exit, or Motion Paths on the drop-down list.
Entrance effects handle how elements arrive on-screen; emphasis effects make elements dance on-screen; exit effects make elements depart the screen; and motion paths move the element on the slide.
3. Choose More Effects (or More Motion Paths) on the submenu you chose in Step 2.
You see an Add dialog box like the ones in Figure 1-12. Notice that the effects fall into the Basic, Subtle, Moderate, and Exciting categories.
4. Scroll (if necessary) to an element and click its name.
Did you see that? The effect you chose animated part of your slide.
5. Experiment with effects until you find one that floats your boat (so to speak), select it, and click the OK button.
As soon as you make your choice, you see an “autopreview” of the animation — a dry run on the slide. (If for some unfathomable reason you prefer not to see these “autopreviews,” deselect the AutoPreview check box in the Custom Animation task pane.)
Click the Slide Show button in the Custom Animation task pane to see the animation you chose on the big screen.
Be sure to read “Modifying an animation,” later in this chapter. PowerPoint gives you a hundred different ways to alter an animation after you select it.
Changing and scrapping animation effects
If you regret choosing an animation effect, all is not lost. You can choose a different effect or remove it altogether. Select the animation in the list that needs attention and follow these instructions:
Changing to a different effect: Click the Change button (you’ll find it where the Add Effect button used to be) and choose a different effect from one of the drop-down lists.
Removing an effect: Click the Remove button to remove the animation from an element. If more than one effect is assigned to the element, you can make sure that you remove the right one by finding the animation you want to remove in the animation list, opening the animation’s drop-down list, and choosing Remove.
You can remove an effect right after you’ve chosen it by clicking the Undo button on the Quick Access Toolbar.
Modifying an animation
PowerPoint wants you to be the master of your slide-show kingdom, and to that end, the program permits you to modify an animation in any number of ways. Which modifications you can make depends on the type of effect you’re working with and whether you’re dealing with an entrance or exit effect, an emphasis effect, or a motion path:
Entrance and exit effects: Entrance and exit effects govern how an element arrives on or leaves the screen. You can modify entrance and exit effects by changing the direction and speed by which elements arrive or leave.
Emphasis effects: You can modify emphasis effects in any number of ways, depending on the type of effect. For example, you can enlarge an element by a certain percentage, or spin it clockwise or counterclockwise. The only way to find out how you can modify an emphasis effect is to experiment and see what PowerPoint has to offer.
Text effects: Effects that apply to text are a category of their own. You can change fonts, animate words all at one time or one word at a time, boldface and italicize text, and treat bulleted lists in different ways (see “Animating text frames and text boxes,” later in this chapter).
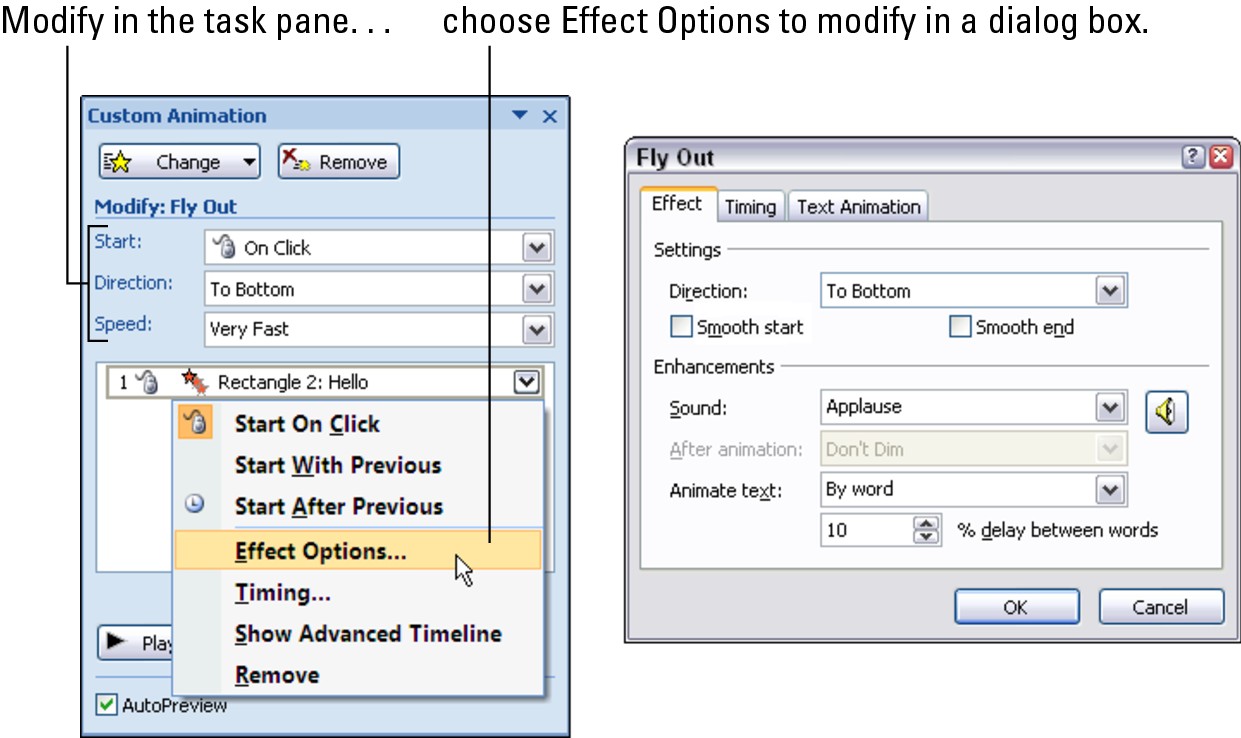
Play around with the modification options until your animation behaves the way you want it to behave. The following pages look at changing entrance and exit directions, changing the speed and duration of an animation, changing an element’s size, and handling smooth starts and endings. Meanwhile, to modify an animation, select it in the Custom Animation task pane, as shown in Figure 1-13, and use one of these techniques to start modifying:
Choose options in the Modify section of the task pane.
Open the animation’s drop-down list and choose Effect Options. You see a dialog box for modifying the animation that is similar to the one shown in Figure 1-13. (The name of the dialog box that comes up changes depending on the effect you’re working with.)
|
Figure 1-13: The two ways to modify an animation effect. |
|
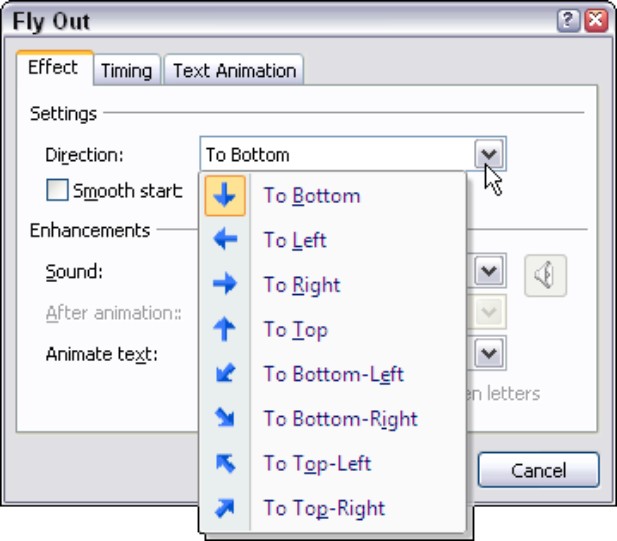
Choosing the entrance or exit direction
Some entrance and exit effects make elements arrive or depart from the slide. By default, elements come from the bottom of the slide and leave from the bottom as well. That is, they rise from the bottom when they arrive on-screen and drop to the bottom when they depart.
Follow these steps to change the direction by which an animated element arrives or departs:
1. Select the animation in the Custom Animation task pane.
To open this task pane, click the Animations tab and then click the Custom Animation button.
2. Open the animation’s drop-down list and choose Effect Options (refer to Figure 1-13).
The Effect Options dialog box appears. You can also open this dialog box by double-clicking the animation’s name on the task pane.
3. On the Effect tab, open the Direction drop-down list and select a direction, as shown in Figure 1-14.
4. Click OK.
|
Figure 1-14: Changing an effect’s exit or entrance direction. |
|
You can make elements move on a slide without exiting. The elements move from point to point, hovering like alien spacecraft. See “Motion paths for moving elements across a slide,” later in this chapter.
Changing an element’s speed (its duration)
For every animation, you can find a Speed option in the Custom Animation task pane (refer to Figure 1-13). These options describe how long the animation lasts from start to finish — in other words, they describe its duration. The options are Very Fast (.5 seconds), Fast (1 second), Medium (2 seconds), Slow (3 seconds), and Very Slow (5 seconds). Besides the task pane, you can also find these Speed options on the Timing tab of the Effect Options dialog box, as shown in Figure 1-15.
|
Figure 1-15: Speed options (left) and Repeat options (right) on the Timing tab. |

|
If five seconds isn’t long enough for you, you can always repeat the animation — up to ten times, until you click the mouse, or until you move on to the next slide. Options for repeating an animation are found on the Timing tab of the Effect Options dialog box (refer to Figure 1-15).
Later in this chapter, “Handling animations with the Advanced Timeline” (look under “Playing choreographer with animations”) explains the easiest way to change an animation’s duration — by dragging on the Advanced Timeline.
Changing an element’s size
Animation effects that fall in the “Grow/Shrink” category change an element’s size on-screen. Changing an element’s size is a great way to call attention to part of a slide. By default, elements change in size horizontally and vertically by 150 percent, but you can shrink them to 25 percent or enlarge them to 400 percent, and you can change their horizontal and vertical sizes as well. Figure 1-16 shows an example of an element — in this case a star — changing sizes.
|
Figure 1-16: Changing an element’s size on-screen. |

|
Follow these steps to change an element’s size by way of an animation:
1. Select the animation in the Custom Animation task pane.
2. Open the animation’s drop-down list and choose Effect Options.
You see the Effect Options dialog box. You can also double-click an animation in the task pane to open this dialog box.
3. On the Effect tab, choose a size option — Tiny, Smaller, Larger, or Huge — on the Size drop-down list.
Here are the percentages by which the elements change size: Tiny (25%); Smaller (50%); Larger (150%); and Huge (400%). You can also select Custom and enter a percentage amount of your own in the text box.
4. Also on the Size drop-down list, choose Horizontal, Vertical, or Both to tell PowerPoint in which direction to enlarge the element.
Choose Horizontal to make it wider, Vertical to make it taller, or Both to enlarge it in both directions.
5. Click OK.
Getting a smooth start and a smooth ending
Any animation that causes an element to move on-screen can have what PowerPoint calls a “smooth start” and a “smooth end.” Smooth starts and endings make animations a little less jerky. Instead of abrupt starts and endings, animations begin and end slowly. If smooth takeoffs and landings appeal to you, select the Smooth Start and Smooth End check boxes in the Effect Options dialog box. You’ll find these options on the Effect tab.
Animating text frames and text boxes
Because you’re dealing with letters and words instead of more concrete elements, text frames and text boxes are in a league of their own where animating is concerned. You can choose emphasis effects that change fonts and font sizes in the text. You can animate text by boldfacing, italicizing, or underlining text. You can make letters and words arrive or depart the screen one at a time. You can also treat paragraphs in a text box or frame independently of one another. Better read on.
Dealing with paragraphs in text boxes
A text box holding more than one paragraph is a special kind of element because you can “animate” one paragraph at a time. For example, in a text box with a bulleted or numbered list, you can make each line of text — each paragraph — enter the slide separately when you click your mouse. This way, you can describe each bulleted or numbered item to your audience as it comes on-screen.
As shown in Figure 1-17, PowerPoint offers these options for declaring how you want to animate paragraphs in a text box:
|
Figure 1-17: Animating paragraphs in a text box. |
|
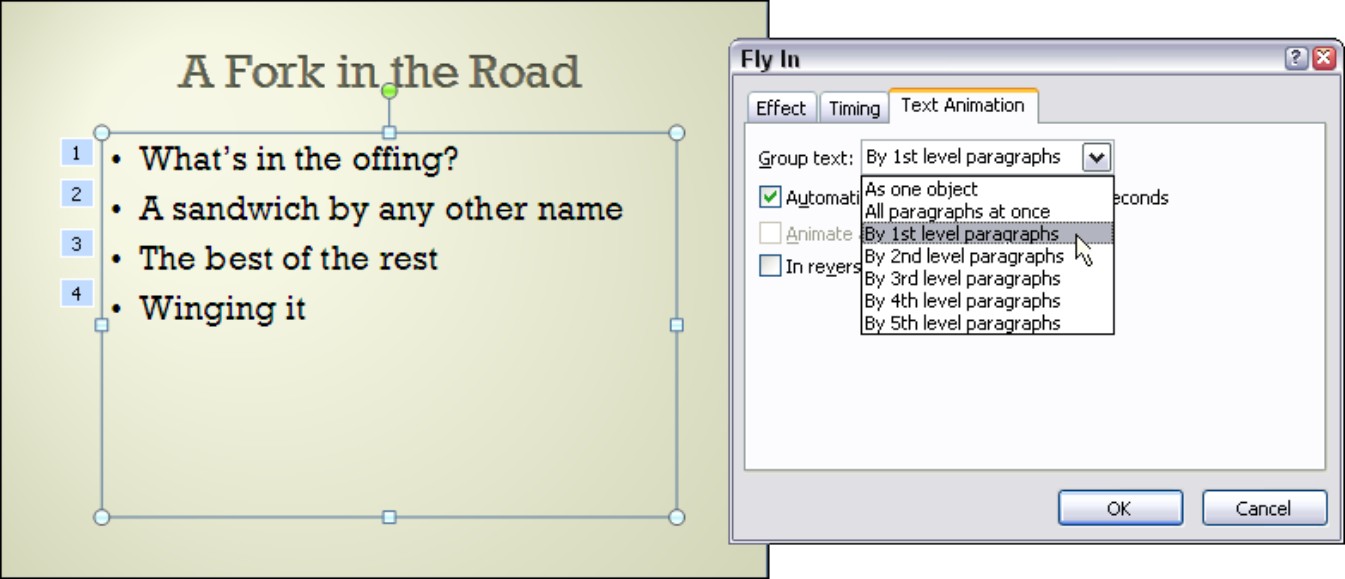
As One Object: All paragraphs are animated the same way at the same time. For example, if you chose the Fly In effect for the text box, all bulleted paragraphs “fly in” at the same time.
All Paragraphs at Once: All paragraphs are animated the same way at the same time, but each paragraph’s name is listed separately in the Custom Animation list in case you want to apply a second or different animation to one of the paragraphs (if you don’t see a paragraph name, click the Expand button in the animation list).
By 1st Level Paragraphs: One at a time, not all at one time, each first-level paragraph is animated. If subordinate second-level paragraphs are located under first-level paragraphs, the second-levels tag along with the first-levels during the animation. In other words, each second-level paragraph is animated right along with its first-level master. Choose this option to animate each item in a bulleted or numbered list.
By 2nd (3rd, 4th, 5th) Level Paragraphs: One at a time, first- and second-level (and third-, fourth-, and fifth-level) paragraphs are animated. The further you go down this list, the more animations you get, as PowerPoint animates paragraphs deeper in the hierarchy. For example, if your paragraphs go as deep as five levels and you choose By 5th Level Paragraphs, all paragraphs in the text box are animated one at a time.
Follow these steps to open the Effect Options dialog box (refer to Figure 1-17) and declare how you want to animate paragraphs in a text frame or box:
1. Select the text frame or box on your slide.
2. On the Custom Animation list, open the drop-down list of the text-box or text-frame animation.
If the list shows several paragraphs, select any paragraph.
3. Choose Effect Options.
The Effect Options dialog box opens.
4. Click the Text Animation tab.
5. Open the Group Text drop-down list and choose an option (refer to Figure 1-17).
The options on this menu are explained earlier.
6. Optionally, if you chose a “By Paragraphs” option, you can select the Automatically After check box and enter a Seconds number to animate paragraphs not right after one another, but a couple seconds after one another.
For example, if you enter 2 seconds and you’re animating a bulleted list, eachitem will appear two seconds after the one before it. Beware, however, that choosing this option is equivalent to going to the Timing tab in the Effect Options dialog box and entering seconds in Delay text box (see “Playing choreographer with animations,” later in this chapter). Instead of clicking to animate a paragraph, the paragraph is animated automatically a couple seconds after the previous paragraph.
7. Click OK.
To choose a different Group Text option for paragraphs in a text box, go into the Custom Animation list, select any paragraph in the text box in the list, and make the change. You don’t have to choose the first paragraph in the list.
Select the In Reverse Order check box on the Text Animation tab (refer to Figure 1-17) to animate paragraphs in your text box or frame starting with the last, not the first.
Animating text all at one time, by word, or by letter
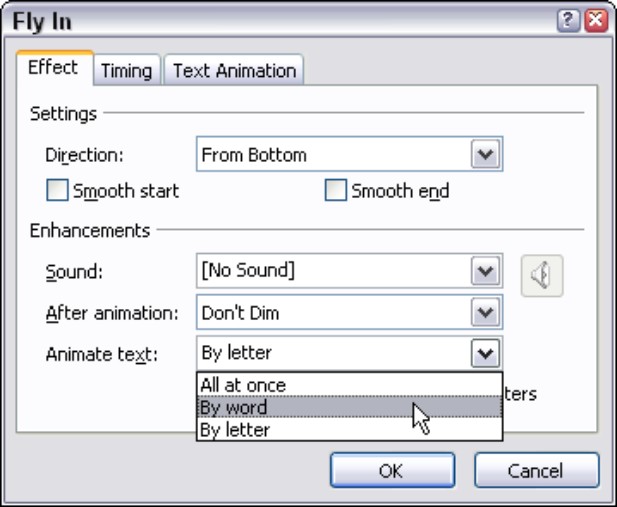
Instead of animating text all at one time, you can animate it one word or one letter at a time. In an entrance effect, for example, the text arrives on-screen word by word or letter by letter instead of in a bunch. Follow these steps to animate text by word or by letter:
1. Select the animation in the Custom Animation task pane.
2. Double-click the animation.
You see the Effect Options dialog box.
3. On the Effect tab, open the Animate Text drop-down list, as shown in Figure 1-18.
|
Figure 1-18: Options for animating words and letters. |
|
4. Choose All at Once to treat the text as one, By Word to animate text a word at a time, or By Letter to animate text a letter at a time.
5. Optionally, if you chose By Word or By Letter, tell PowerPoint how much delay time to put between words and letters in the % Delay Between Words (or Letters) text box.
Delay time is measured by percentage. The higher the percentage, the slower the words or letters arrive or leave the screen.
6. Click OK.
Choosing animation fonts and font sizes, styles, and colors
As Book II, Chapter 4 explains, a font is typeface; font size measures how large letters are; and font styles such as bold, italic, and underline call attention to text. If you chose the Change Font, Change Font Size, or Change Font Style effect (these options are on the Emphasis submenu), you will find a Font, Font Size, or Font Style drop-down list in the Custom Animation task pane. Use the drop-down list to change fonts, font sizes, or font styles.
To change the color of a font in an animation, choose the Change Font Color effect (click the Add Effect button, choose Emphasis⇒More Effects, and select Change Font Color in the Add Emphasis Effect dialog box). After you make your choice, you will find a Font Color drop-down list in the Custom Animation task pane for choosing different colors.
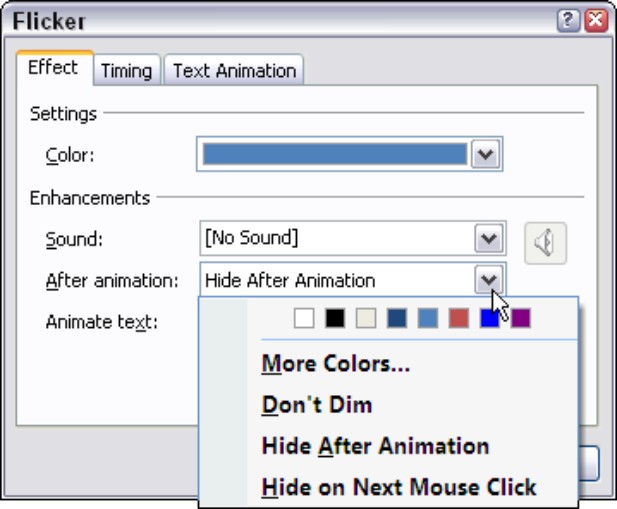
Hiding elements and changing their color after animation
To call attention to the fact that you’re finished discussing an element on a slide, you can make the element disappear or change color. Hiding elements and changing elements’ color is a great way to tell your audience that you’re ready to move on. Start with a complicated slide with many elements, and as you discuss each element, hide it on the slide or change its color, so that in the end you have a blank slide — a blank slate, so to speak.
As shown in Figure 1-19, PowerPoint offers these options for handling slide elements when you’re finished with them:
More Colors: Changes the color of the element when the animation is complete. Either select a color on the After Animation drop-down list or select More Colors and then select a color in the Colors dialog box.
Don’t Dim: Doesn’t do anything to the element (this is the default option).
Hide After Animation: Removes the element from the slide when the animation is complete.
Hide on Next Mouse Click: Removes the element from the slide when you next click the mouse button.
|
Figure 1-19: Choose an After Animation option to signal that you’re finished with an element. |
|
Follow these steps to choose an After Animation option:
1. Select the animation that needs an afterlife in the Custom Animation task pane.
2. Open the animation’s drop-down list and choose Effect Options.
The Effect Options dialog box appears. You can also open this dialog box by double-clicking the animation in the task pane.
3. On the Effect tab, open the After Animation drop-down list and choose an animation (refer to Figure 1-19).
I explained these animations just a wee moment ago.
4. Click OK.
Of course, you can always use an exit effect to remove an element from a slide when you’re done with it, but by hiding the element instead, you can make use of it again before going on to the next slide.
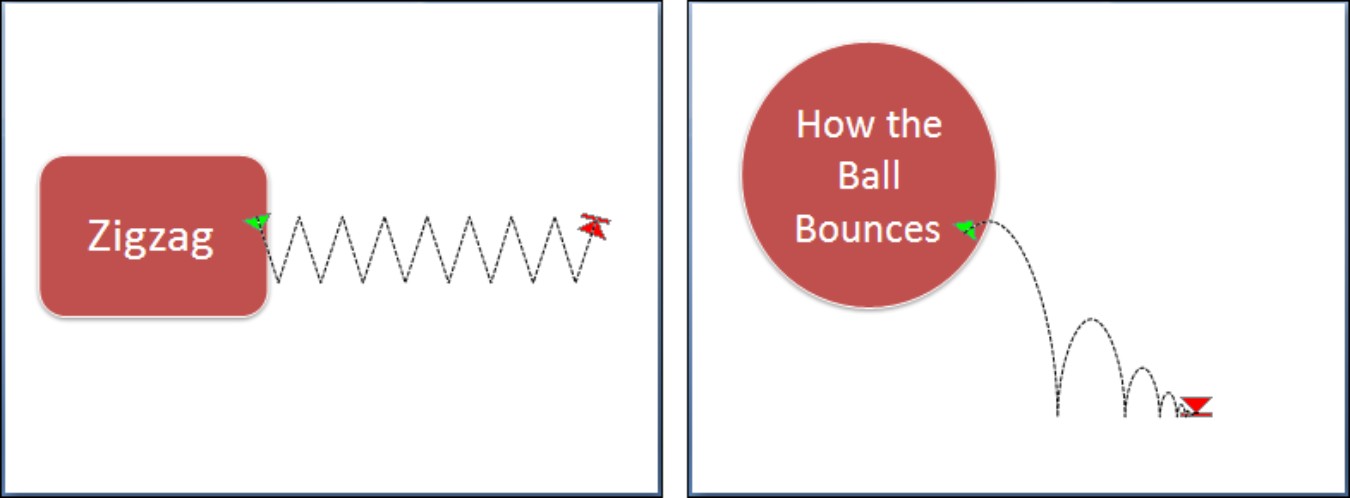
Motion paths for moving elements across a slide
Moving elements across a slide? Now that’s real animation. In the cartoons, Bugs Bunny and Daffy Duck do more than just fly in, fade out, and “burst.” They move around. They chase each other. They leap from place to place.
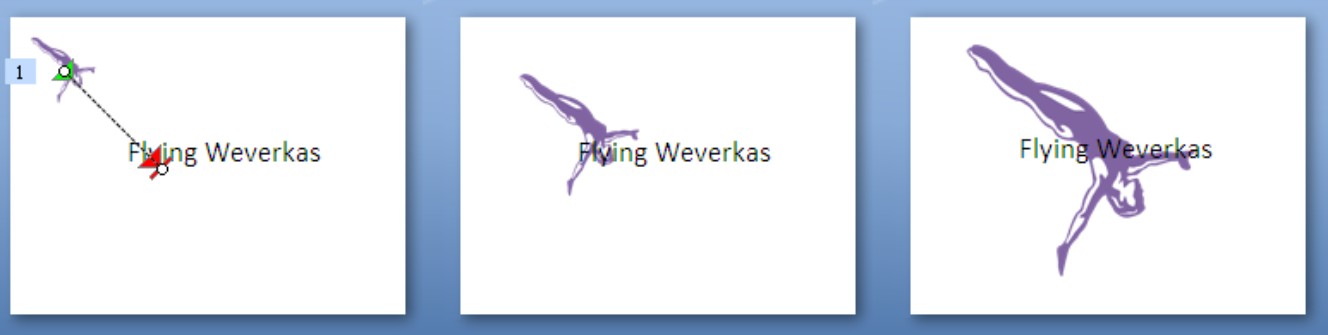
You can make elements on your slide behave like cartoon characters by making use of a kind of animation effect called a motion path. As shown in Figure 1-20, a motion path is a route that an element follows around a slide. On the slide on the left in Figure 1-20, the element travels in a zigzag; on the slide on the right, it “bounces” to the ground. The dotted line shows where the motion path is.
|
Figure 1-20: Examples of motion paths. |
|
Read on to find out how to select a ready-made motion path, edit a motion path, and draw your own motion path.
Choosing a readymade motion path
PowerPoint offers about 65 different motion paths. Unless you’re extremely picky, you can find one that suits you by going to the Animations tab and following these steps:
1. Click the Custom Animation button.
The Custom Animation task pane opens.
2. Select the element on your slide that you want to move during the presentation.
3. Click the Add Effect button.
4. Select Motion Paths on the drop-down list.
You see a submenu of motion paths.
5. Either select a motion path on the submenu, or select More Motion Paths and choose a path in the Add Motion Path dialog box.
After you make your selection, PowerPoint places the motion path on the slide so that you can see how the element moves when it is animated (refer to Figure 1-20).
Altering a motion path
To make the element move where you want it to move and do what you want it to do, follow these instructions:
Lengthening or shortening a motion path: Click the motion path to select it. You see round selection handles on the path, two if it is straight, and eight if the path is crooked, as shown in Figure 5-21. Move the pointer over one of the selection handles and start dragging.
Changing the shape of a motion path: Click the motion path to select it. Then drag a corner handle to change the path’s shape but keep its proportions; drag a side handle to change its shape as well as its proportions.
|
Figure 1-21: Wrestling with motion paths. |
|
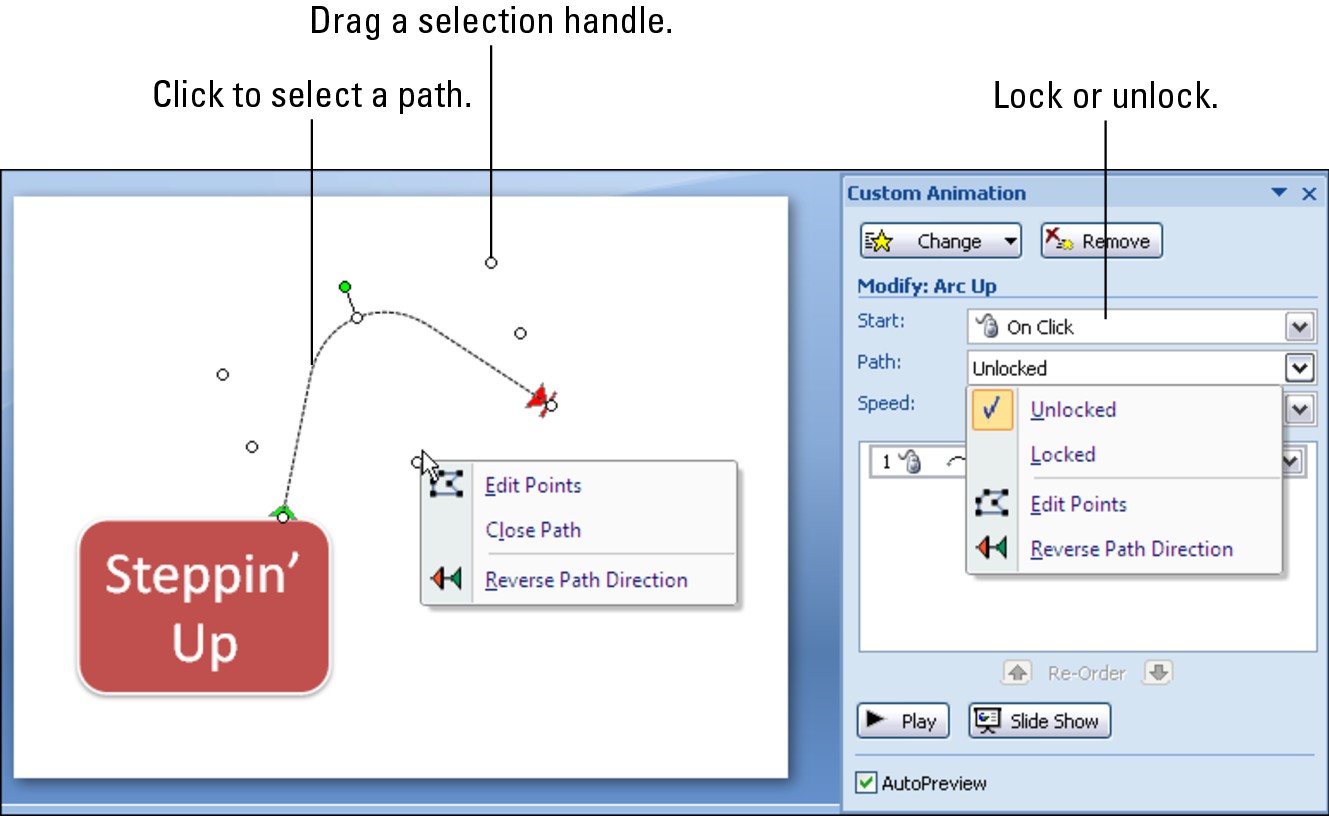
Reversing the direction of a motion path: Right-click the motion path and choose Reverse Path Direction on the shortcut menu, or choose Reverse Path Direction on the Path drop-down list in the Custom Animation task pane (refer to Figure 1-21). Reversing the path direction makes for an interesting effect. The element jumps to the end of the path and then glides back home.
“Rewinding” a motion path: To make an element slide along its motion path and then slide back to its original position, open the Effect Options dialog box (by double-clicking the motion-path animation) and select the Auto-Reverse check box on the Effect tab.
Bending and crimping a motion path: Click the motion path to select it; then open the Path drop-down list in the Custom Animation task pane (refer to Figure 1-21) and choose Edit Points (you can also right-click a motion path and choose Edit Points). Black squares — the edit points — appear on the motion path. Tug at the edit points until the motion path travels the right direction (see “Editing a motion path,” later in this chapter, for details).
Moving an element and its motion path across a slide (Unlocked): Before you can move an element along with its motion path, you must unlock the element. Click the element to select it (if you have trouble selecting the element because the motion path is selected, click the Esc key before you select the element). Then open the Path drop-down list in the Custom Animation task pane and choose Unlocked (refer to Figure 1-21). Next, with the four-headed arrow showing on the element, drag the element on the slide.
Moving an element separately from its motion path on a slide (Locked): Select the element (press the Esc key if the motion path is selected and you have trouble selecting the element). Then choose Locked on the Path menu in the Custom Animation task pane (refer to Figure 1-21). Next, drag the element on the slide. Placing the motion path apart from the object makes an unusual effect. The object jumps across the slide to the motion path and does its thing.
See “Editing a motion path,” later in this chapter, for more pointers about changing the direction of motion paths.
Drawing your own motion path
If you want to get off the beaten path and draw your own motion paths, it can be done; just follow these steps:
1. Select the element that needs a customized motion path.
2. On the Animations tab, click the Custom Animation button.
The Custom Animation task pane appears.
3. Click the Add Effect button.
You see a drop-down list.
4. Choose Motion Paths ⇒Draw Custom Path.
Yet another submenu appears with options called Line, Curve, Freeform, and Scribble.
5. Choose the option that most closely approximates the path you want to draw.
6. Drag on-screen to draw the path.
A motion path appears on your slide. Notice the direction arrows on the motion path.
The rules for drawing custom motion paths are the same as the rules for drawing lines(see Book IV, Chapter 1). If you’re a wiz at drawing lines, you know what to do next, but if you’re not a wiz, either turn to the aforementioned chapter or follow these thumbnail instructions to draw a motion path:
Line: Drag on-screen to draw the motion path. You can draw only straight lines with this option.
Curve: Drag on-screen and click where you want the curve to bend. You can draw more than one curve. When you’re finished drawing, double-click. Use this option to draw full, elegant curves.
Freeform: Drag on-screen. As soon as you start dragging, you see the pencil pointer. Draw your motion path and double-click when you’re finished drawing. Use this option to draw an erratic motion path.
Scribble: Drag on-screen with the pencil pointer and double-click when you’re finished dragging. Use this option to draw a very erratic motion path.
Editing a motion path
Before you can edit a motion path you drew, you have to display the edit points on the path. Edit points appear on the line to show where each curve or change of direction is located. By dragging an edit point, and by right-clicking between points and choosing options on the shortcut menu, you can make motion paths go precisely where you want them to go.
Here are ways to edit a motion path that you drew:
Displaying the edit points: Right-click the motion path and choose Edit Points, or open the Path drop-down list in the Custom Animation task pane and choose Edit Points (refer to Figure 1-21).
Changing a path’s direction: Drag an edit point. You can also right-click the path and choose Add Point to add a point and then drag the new point.
Removing a bend or crimp from the path: Right-click an edit point and choose Delete Point.
Putting a bend in the path: Right-click where you want the bend to go, choose Add Point on the menu, and drag the new point.
Turning a straight path into a curvy path: Right-click the path and choose Curved Segment. Then drag the line where you want the curve to be.
Straightening a curvy path: Right-click a curve in the path and choose Straight Segment.
Closing a path: To make a path come all the way around to the place it started from, right-click on the path and choose Close Path.
Changing the beginning point and ending point of the path: Right-click the segment of the path prior to where you want the path to begin and choose Delete Segment.
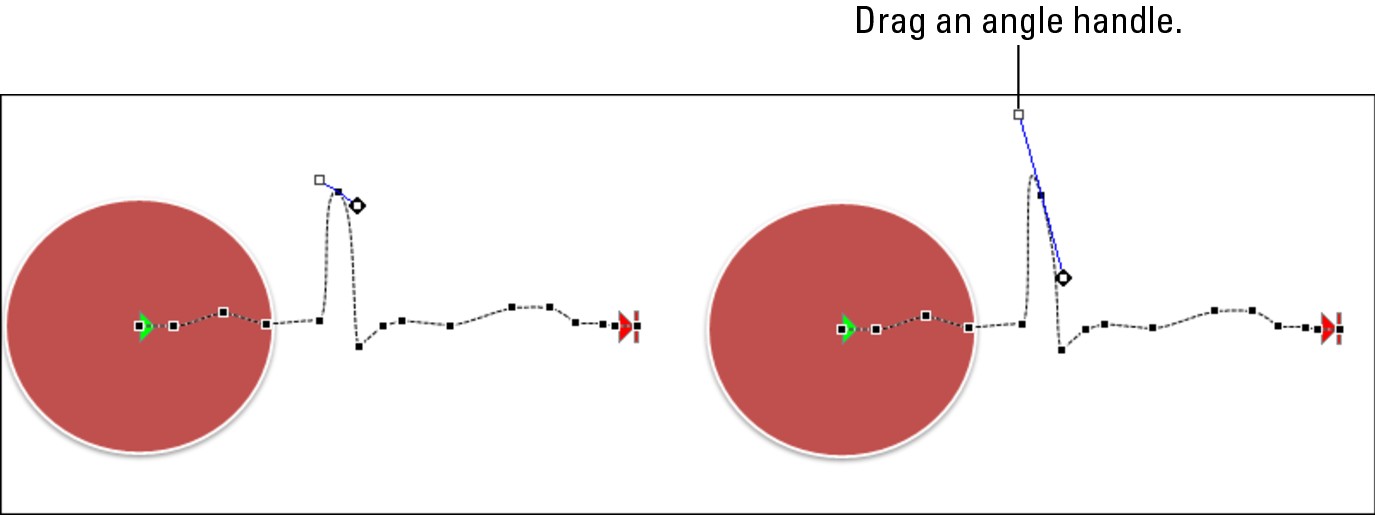
Changing the angle of a curve: Right-click an edit point and choose Smooth Point, Straight Point, or Corner Point. Then, to make the curve steeper or smoother, drag one of the square angle handles, as shown in Figure 1-22.
|
Figure 1-22: Drag an angle handle to make a curve smoother or sharper. |
|
Playing choreographer with animations
Imagine for a moment that each animation on your slide is a dancer and your slide is a stage. Your job as choreographer is to make the animations work in concert with one another to make a pleasing outcome. You have to make sure that elements arrive on-screen and depart gracefully in time with one another. You have to make sure that animations work well together, start at the right time, and end at the right time.
As you know, PowerPoint places each animation in the Custom Animation task pane as you apply it. To begin with, animations occur in the order you apply them. In other words, the first animation you make on your slide is first on the list; the second is second; and so on. But very likely the order you apply animations to elements on your slide is not the order in which you want the animations to play, and that means you have to move animations up and down the Custom Animation list.
As shown in Figure 1-23, the timing of an animation’s occurrence is determined by these factors:
Order: Where in the Custom Animation list the animation is located. PowerPoint plays the animations in order on the list. Numbers next to elements on the slide (in Normal view) also tell you the order in which animations are played. (See “Order: Changing the order of animations,” the next section in this chapter.)
Start: Whether the animation starts when you click the mouse (On Click), at the same time as the previous animation in the task pane list (With Previous), or after the previous animation in the list (After Previous). Choose how an animation starts on the Start menu found in the Custom Animation task pane. (See “Start: Deciding when an animation starts playing,” later in this chapter.)
|
Figure 1-23: Determining when and how an animation starts. |
|
Timing: If the animation starts with or after the previous animation (if you don’t start by clicking), how many seconds it starts after the previous animation begins or after it ends. You decide these matters on the Timing tab of the Effect Options dialog box (refer to Figure 1-23). (See “Timing: Using With Previous and After Previous animations,” later in this chapter.)
I take up these all-important matters, as well as the Advanced Timeline, in the pages that follow.
Order: Changing the order of animations
Numbers on the Custom Animation list and the slide itself tell you the order in which animations are played. Select an animation in the list and use one of these techniques to change its order in the list:
Click a Re-Order button: Click the Up or Down Re-Order button until the animation lands in the right place.
Drag the animation: Drag the animation forward or backward in the list.
Start: Deciding when an animation starts playing
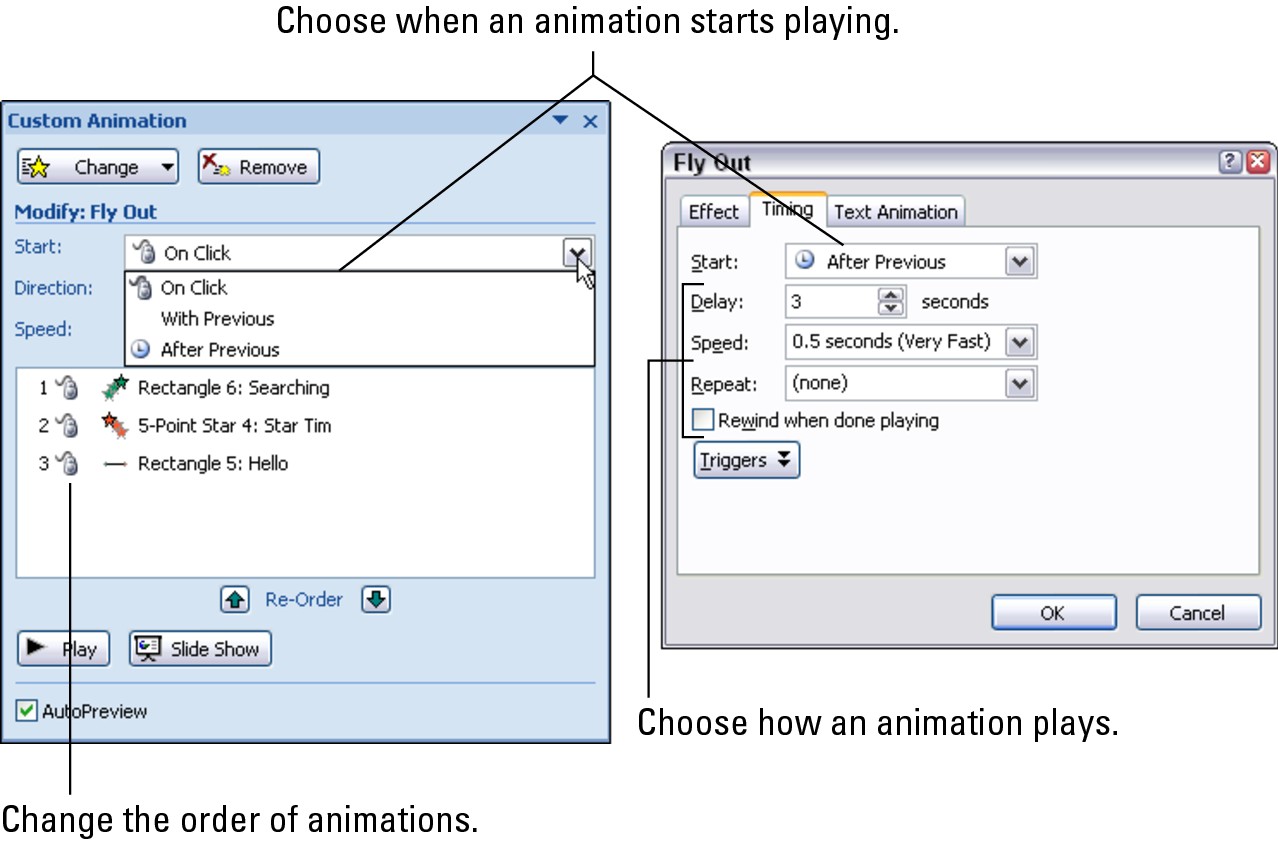
PowerPoint offers three ways (four if you count triggers) to start an animation. The options are available in the Start drop-down list on the Custom Animation task pane, animation drop-down lists in the task pane, and in the Effect Options dialog box. Choose one of these options to tell PowerPoint when to start playing an animation:
On Click: When you click your mouse anywhere on the screen. For example, click on-screen to bring up each item in a bulleted list (you can click anywhere on the screen). Each time you click, a new element arrives. Choose On Click to build elements into the slide in the course of your discussion about information you’re presenting.
With Previous: Automatically when the previous animation in the Custom Animation task pane begins, or a certain number of seconds after the previous animation begins. Choose this option to make animations play simultaneously, or near simultaneously, on your slide.
After Previous: Automatically after the previous animation in the Custom Animation task pane ends, or a certain number of seconds after the previous animation ends. Choose this option to create animation sequences on a slide.
To tell PowerPoint how to start an animation, select the animation in the Custom Animation task pane and use one of these techniques (refer to Figure 1-23):
Open the Start menu in the Custom Animation task pane and choose an option (On Click, With Previous, or After Previous).
Open the animation’s drop-down list in the task pane and choose an option (Start On Click, Start With Previous, Start After Previous).
Open the animation’s drop-down list, choose Timing, and make a selection (On Click, With Previous, or After Previous) on the Start drop-down list in the Effect Options dialog box (refer to Figure 1-23).
See “Starting an animation with a trigger,” later in this chapter, to discover how you can start an animation at any time by clicking a slide element.
Timing: Using With Previous and After Previous animations
Use the With Previous and After Previous options to chain animations together and make them occur simultaneously, nearly simultaneously, or in sequence. These options are similar in that both make an animation defer to the animation before it in the Custom Animation list. They take effect either when or after the previous animation starts running:
With Previous: The animation starts when the previous animation starts or, if you ask for a delay, a certain number of seconds after the previous animation starts.
After Previous: The animation starts after the previous animation finishes or, if you ask for a delay, a certain number of seconds after the previous animation finishes.
If you want a delay, go to the Timing tab of the Effect Options dialog box and make an entry in the Delay text box (refer to Figure 1-23). Follow these steps:
1. On the Animations tab, click the Custom Animation button.
The Custom Animation task pane opens.
2. Open the animation’s drop-down list and choose Timing.
You see the Timing tab of the Effect Options dialog box (refer to Figure 1-23).
3. Enter the number of seconds you want for the delay in the Delay scroll box.
Click the arrows to enter half-second intervals. Enter the amount of time you want to elapse after the previous animation starts or after the previous animation finishes.
4. Click OK.
You can also create a delay between animations by dragging an animation on the Advanced Timeline. See the next section in this chapter.
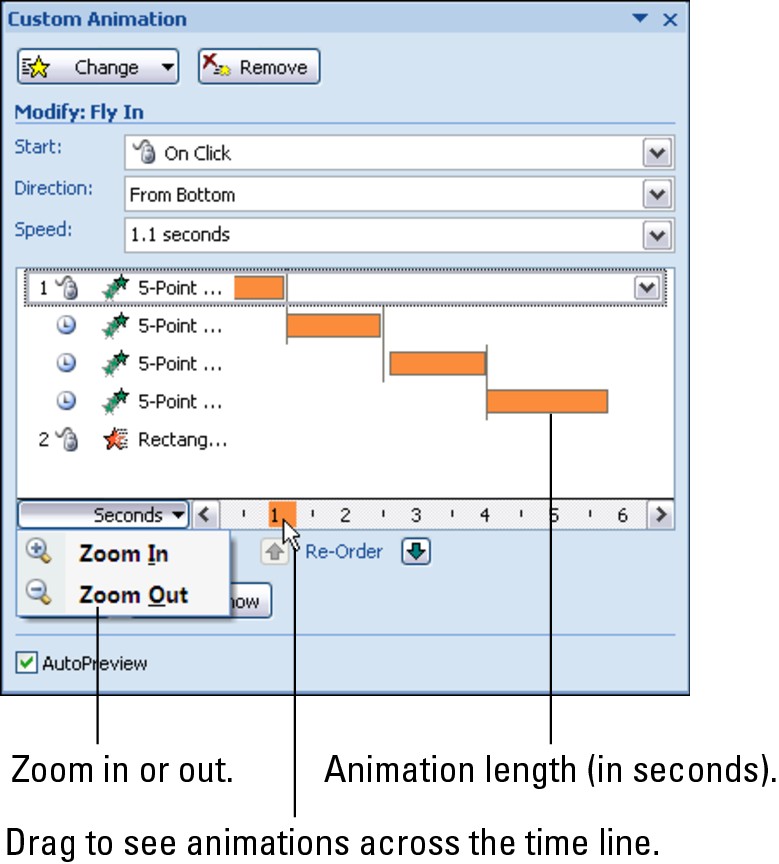
Handling animations with the Advanced Timeline
In effect, you create animation sequences when you use the With Previous and After Previous options because each animation is chained to the one that precedes it. On the Custom Animation task pane list, PowerPoint assigns one number to each chained-together sequence, as shown in Figure 1-24. In the figure, there are two sequences, and not coincidentally two numbers on the animation list. (If all the animations on the slide are With Previous or After Previous because all animations are automated, all animations are numbered 0.)
|
Figure 1-24: The Advanced Timeline shows how animation sequences work together. |
|
Because animations in a sequence aren’t numbered, it’s hard to tell how long each lasts and when each begins and ends with respect to the others. You can, however, display the Advanced Timeline to get a fix on when animations begin and end. You can also change the duration of an animation on the timeline and even create a delay between animations. Figure 1-24 shows the Advanced Timeline. Follow these instructions to display or hide it:
Displaying the Advanced Timeline: Open any drop-down list on the animation list and choose Show Advanced Timeline.
Hiding the Advanced Timeline: Open any drop-down list in the animation list and choose Hide Advanced Timeline.
For each animation sequence on your slide, the Advanced Timeline shows how long it lasts in seconds and when it begins or ends relative to the animations before and after it in the animation list. While the timeline is displayed, test-drive these amenities:
Zoom in and out: Click the Seconds button and choose Zoom In or Zoom Out to shorten or lengthen the Seconds timeline (refer to Figure 1-24).
Advance or reverse the timeline: Drag the scroll-box on the timeline to advance or reverse through animation sequences.
Play the animations: Click the Play button and watch the animations on your slide as well as the timeline to see how animations work in concert.
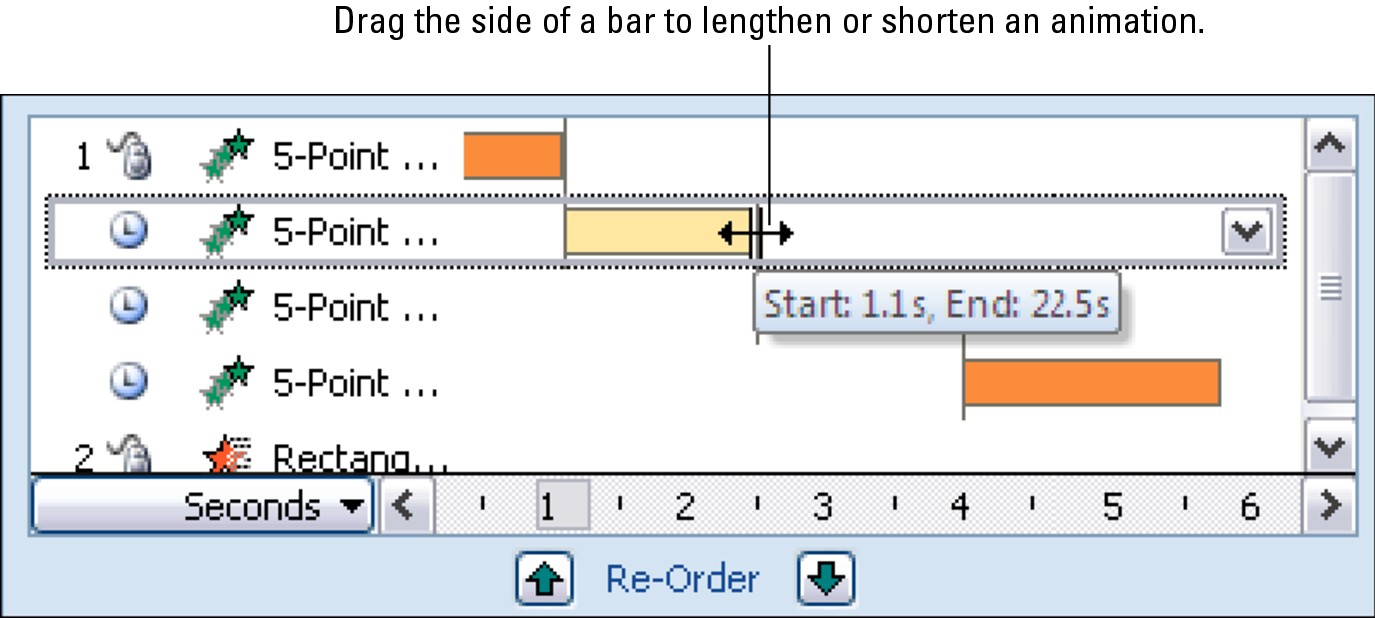
Shortening or lengthening an animation: Move the mouse pointer over the left (Start) or right side (End) of the bar on the timeline that represents the animation, and when you see the double-arrow, click and start dragging, as shown in Figure 1-25.
Changing when an animation begins: Move the pointer over the bar that represents the animation, and when you see the double-arrow, click and start dragging. With this technique, you move the bar to the left or right. You can drag “with previous” animations forward or backward on the timeline; “after previous” animations cannot be moved ahead of the animation before them in the list.
|
Figure 1-25: You can change the length and start time of animations in the Advanced Timeline. |
|
Starting an animation with a trigger
A trigger, also called an event trigger, is a means of playing an animation without regard to the order of animations on the Custom Animation list. Use a trigger to play an animation on a slide whenever you want to play it. To play a trigger animation, you just click the element on the slide that has been “triggered.” You can also arrange to click a trigger element and play an animation on another part of your slide.
Triggers offer these advantages over conventional animations:
You can bypass the Custom Animation list and play an animation whenever you want. Simply click an element to animate it.
You can choose not to play an animation on a slide. If during your presentation you decide not to play an animation, don’t click its trigger.
You can change course in the middle of a presentation and use an animation to enlighten your audience about some aspect of the slide. For example, suppose your slide shows a table and someone in the audience asks about data on the table. Using a trigger, you can click the table and bring a chart on-screen that helps explain information in the table (use the Fly In entrance effect animation).
You can connect elements on a slide to one another and make the connection a part of your presentation. For example, your slide shows a photograph with a caption. Using a trigger, you click the photograph to enlarge the caption and make it easier to read (use the Change Font Size emphasis effect). As another example, you can dismiss items on a bulleted or numbered list as you finish explaining them. By placing a trigger on each list item, you can click each item and make it leave the slide (use the Fly Out exit effect animation).
Setting up the trigger
To set up a triggered animation, start by applying the animation you want to play when the trigger is clicked and deciding which element on your slide you will click to trigger — that is, play — the animation. For example, if you want a text box to spin when you click a five-pointed star on your slide, apply a spin effect to the text box and take note of how the five-pointed star is listed in the Custom Animation task pane. As part of setting up a trigger, you have to tell PowerPoint which element you want to click to trigger the animation.
Follow these steps to set up a triggered animation:
1. Select the animation that will play when you click the trigger.
2. Open the element’s drop-down list on the Custom Animation task pane and choose Timing.
You see the Timing tab of the Effect Options dialog box.
3. Click the Triggers button.
As shown in Figure 1-26, options appear at the bottom of the dialog box.
|
Figure 1-26: Selecting the element you will click to “trigger” an animation. |

|
4. Select the Start Effect on Click Of option button.
5. Open the drop-down list and choose the element on your slide that you will click to start the animation.
6. Click OK.
PowerPoint places the trigger icon, a trigger finger, next to the animation that plays when you click the trigger element. Triggers on the slide are listed in the Custom Animation task pane.
Handling trigger animations
For the trigger-happy, here are instructions for handling trigger animations:
Previewing a trigger animation: The only way to preview a trigger animation is to click the Slide Show button in the Custom Animation task pane and test-drive the slide at full screen. Clicking the Play button doesn’t do anything.
Locating (and changing) the trigger element: You know where the trigger animation is on your slide because you can see its trigger icon, but how can you tell which element gets clicked to start the trigger animation? To find out, open the trigger’s drop-down list in the Custom Animation pane (triggers are located at the bottom of the task pane), choose Timing, and, in the Effect Options dialog box, find out which element is listed at the top of the Start Effect On Click Of drop-down list (refer to Figure 1-26). To change trigger elements, choose a different element from this menu and click OK.
Removing a trigger animation: Select the trigger and click the Remove button in the Custom Animation task pane.
Playing Sounds along with Animations
To tickle your audience’s ears as well as its eyes, you can make sound accompany an animation. PowerPoint offers applause, the ching of a cash register, a drum roll, and 16 other sounds. If none of the sounds suit you, you can play a .WAV (wave) sound file of your own with an animation. Starting on the Animations tab, display the Custom Animation task pane and follow these steps to play a sound when an animation begins:
1. Select an animation in the animation list.
2. Either double-click the animation in the list or open its drop-down list and choose Effect Options.
You see the Effect Options dialog box (showing Fly In, in this case), as shown in Figure 1-27.
|
Figure 1-27: Attaching sound to an animation. |

|
3. Open the Sound drop-down list and select a sound.
4. Optionally, click the Volume icon to open a Volume slider and make the sound louder or softer than the volume settings on your computer.
5. Click OK.
PowerPoint plays the sound you chose.
To quit playing a sound along with an animation, go to the Effect Options dialog box and choose [No Sound] on the Sound drop-down list.
Book V, Chapter 3 explains how you can choose sounds from the Transition Sound drop-down list and add your own sounds to the list.
Suggestions for Animating Slides
To round out this chapter, for you and for you only, I offer some of my favorite animation techniques. These animations are fairly simple to set up and can really bring pizzazz to a presentation. Herewith are instructions for animating lists, combining motion paths with other effects, building a slide one piece at a time, and animating a chart.
Animating bulleted and numbered lists
Your average PowerPoint presentation is weighed down with bulleted and numbered lists. One way to make these lists a little more interesting is to animate them. Instead of list items appearing all at one time, you can bring them on-screen one at a time so that the audience can focus on each item. For that matter, you can start with a whole list and dismiss items one at a time as you finish discussing them.
The Animate drop-down list offers generic options for animating the items in a list one paragraph at a time (see “The Quick Way to Animate a Slide,” earlier in this chapter). If you want something beyond the generic, you can animate the lists on your own (see “Animating text frames and text boxes,” earlier in this chapter). You can even make the lists arrive on-screen one word or one letter at a time.
Changing elements’ size as they move
One of my favorite uses for animations is to combine a motion path with the Grow/Shrink effect to make an element move and grow larger at the same time, as shown in Figure 1-28. This technique is especially useful on title slides at the start of a presentation. Seeing an element such as a company logo moving on-screen and growing larger starts a presentation off with a bang. To get really fancy, you can add a “fade in” effect to the mix. Then you get a flying, growing, fading-in image, which is really something.
|
Figure 1-28: Combining a motion path with a grow/shrink effect. |
|
However, an element has to be capable of “growing” for it to change size. Clip-art, .GIF, and .JPEG images can grow in size without suffering from distortion, but bitmap images can’t grow without losing focus (Book IV, Chapter 3 looks into graphic formats and how they work or don’t work in PowerPoint presentations).
Earlier in this chapter, “Modifying an animation” explains how to make an element grow or shrink in size. “Motion paths for moving elements across a slide” explains how motion paths work. If you want the element to grow at the same rate as it moves, be sure to visit “Playing choreographer with animations,” which explains how to make animations begin at the same time (choose With Previous on the Start drop-down list in the Custom Animation task pane).
Building a slide one element at a time
Building a slide one element at a time adds a bit of suspense to a presentation. You start with a blank or nearly blank slide and bring elements on-screen one at a time. The audience naturally wonders, “What’s next?” As you finish discussing one element, you bring on the next.
Bringing elements on-screen one at a time is the easiest animation sequence to construct. Just select each element and choose an Entrance option on the Add Effect drop-down list. Then, during your presentation, click on-screen to bring the next element on board.
Here’s an interesting corollary to building a slide one element at a time: Start with a whole slide and remove each element as you finish discussing it. You can do that by choosing Exit options on the Add Effect drop-down list.
Animating different parts of a chart
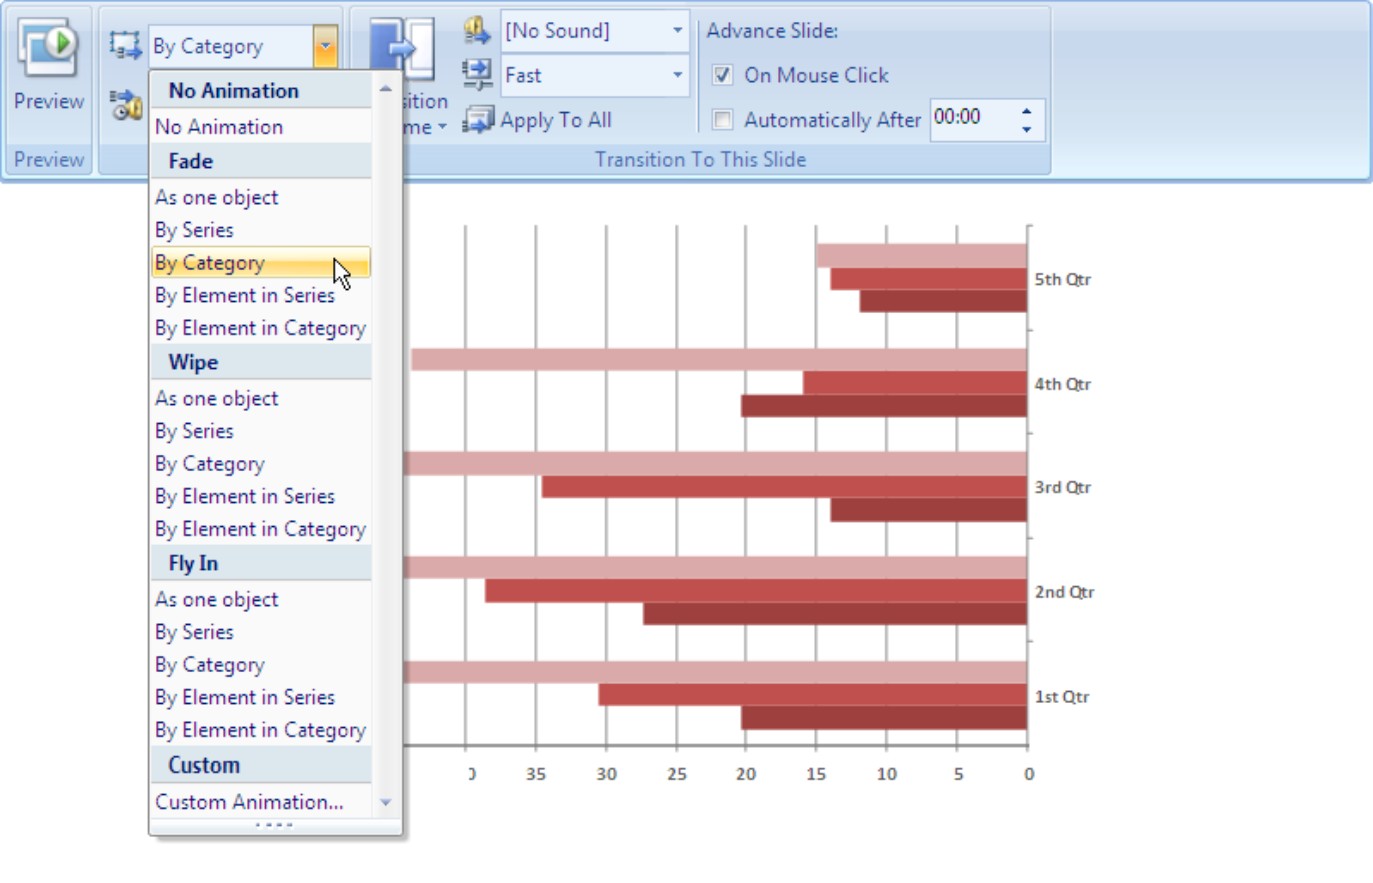
PowerPoint offers a special command for animating parts of a chart, as shown in Figure 1-29. It would be difficult to construct a chart one piece at a time on your own, but the Animate drop-down list offers commands for displaying a chart by category or series. Book III, Chapter 2 explains charts in detail. Visit that chapter if you need to know what a series or category is. You will also find detailed instructions in that chapter for animating a chart.
|
Figure 1-29: PowerPoint offers special commands for animating charts. |
|