Chapter 2: Making Video Slides
In This Chapter
 Storing your video files correctly and understanding video file formats
Putting videos on slides
Starting and pausing videos
Handling the volume, looping, and other controls
Adjusting the size of the video screen
If a picture is worth a thousand words, what is a moving picture worth? Ten thousand?
This chapter looks into turning your PowerPoint presentation into a mini-movie theater. It explains how to include video in a presentation as well as the technical background information you need to make the video play correctly. You also find out how to fine-tune video, make it play automatically or when you want it to play, hide video screens, and play them at full screen size.
Looking before You Leap
It always pays to look before you leap. Before you attempt to put a video on a slide, consider how to store video files and which video file formats work with PowerPoint. As I explain shortly, video files aren’t stored inside PowerPoint presentations, which makes transferring a presentation to another computer problematic if a presentation includes video files. And not every kind of video file can be played on a PowerPoint slide. Better keep reading.
Storing video files correctly
.jpg)
How PowerPoint plays videos on slides needn’t concern you if you never have to move your presentation to a different computer or give your presentation to someone else. But if your presentation will travel, you have to consider how to handle video files so that people who get your presentation can play videos during the presentation.
 Keep video files in the same folder as your presentation file: One way to handle this problem is to store the video files in the same folder as your presentation file, and when you pass along the presentation, pass along the video files as well. Tell the person to whom you give the presentation to keep the video files in the same folder as the presentation file. It doesn’t matter what the folder is called or where the folder is located; as long as the video files and presentation file are in the same folder, the videos will play.
Package your presentation for a CD: With this technique, you copy all the files associated with a presentation — the video files and sound files — along with the presentation itself into a single file. The Package for CD command is meant to help you store your file so that you can move it to another computer or take your presentation on the road, but it also suffices as a means of bundling all files associated with a presentation into one file. Book VI, Chapter 5 explains the Package for CD command.
I hope you’re reading this before you place video in your PowerPoint presentation. If you’ve already included video, you may have to move the video files into the same folder where you keep your PowerPoint presentation and re-insert the videos on slides. Keeping video files in the same folder as your presentation file can spare you a lot of grief down the line if you intend to pass along your presentation to friends or co-workers.
Understanding how video files strain your computer
Playing video files puts a huge strain on your computer. More than one computer has suffered a hernia from playing video files in PowerPoint presentations. To make your videos play without a hitch, follow these recommendations when you play video:
Close all programs except PowerPoint when you give your presentation. This cuts down on the amount of RAM (random access memory) that gets used when you play video. If you can help it, close down programs that play in the background as well. These programs can include instant-messaging software and Google Desktop Search.
Defragment your hard drive. Defragmenting makes it easier for your computer to access the files it needs to access in the course of a presentation.
Understanding video file formats
When I think about video file formats, I feel as though I’m drowning in alphabet soup. There are AVI and WMV, DVR-MS, MPG and MPEG, MOV, and others. Some of these file formats can play in PowerPoint and some can’t. (You can identify a video file format by noting its three-letter file extension or by right-clicking it in Windows Explorer or My Computer and choosing Properties on the shortcut menu.)

Either MCI or Windows Media Player works in the background to play videos in PowerPoint slides. For that reason, you are wise to use video file formats in your presentations that work with MCI and Windows Media Player. Those video file formats are the following:
.AVI (Audio Visual Interleaved)
.MPEG, .MPG (Motion Picture Experts Group)
.WMV, .ASF (Windows Media Video)
The following video file formats are not friendly with MCI and Windows Media Player, and you should not use them in PowerPoint presentations unless you have no choice in the matter:
.MOV (QuickTime Video)
.RM (RealVideo)
.VCD (Video Compact Disc)
If you’re keen on using a video file in one of the video formats that PowerPoint can’t handle, either convert the video file to a format that PowerPoint can handle, or link your slide to a video by way of an action-button hyperlink (I explain how later in this chapter, in “Inserting a video that isn’t compatible with PowerPoint”). But why torture yourself that way? Do your very, very best to stick with video files that PowerPoint can handle and you’ll spare yourself a fair amount of time and sorrow.
A tedious digression about codecs
Media files, especially video files, can be quite large, and to make them smaller, they are compressed using a codec. A codec (the term stands for COmpressor/DECompressor) is software that compresses media files to make them smaller, and when the files are played, decompresses them so that they can be read and understood by media players. Unless the right codec is installed on your computer when you play a media file, the media file can’t be decompressed — it can’t be played. To decompress and play a media file, you need the same codec that was used to compress the media file in the first place.
Each media file holds information concerning which codec was used to compress it. Before MCI or Windows Media Player plays a media file, it gets information about the codec used to compress the file, and it checks to see whether the codec is installed on your computer. If the codec is installed, all is well, and the media file is decompressed and played. But if the codec isn’t installed, Windows Media Player downloads the codec to your computer (if your computer is connected to the Internet, of course) so that the media file can be played.
As long as Windows Media Player is installed on your computer, you very likely don’t have to bother yourself with codecs because Windows Media Player can download them automatically. (To download the latest version of Windows Media Player, go to this Web page: www.microsoft.com/windows/windowsmedia/download.)
To find out which codecs are installed on your computer, follow these steps:
1. Click the Start button and choose Control Panel to open the Control Panel.
2. Double-click the Sounds and Audio Devices icon (select Switch to Classic View if you don’t see this icon).
The Sounds and Audio Devices Properties dialog box opens.
3. Select the Hardware tab.
4. In the Devices list, select Audio Codecs (to Investigate codecs for decompressing audio files) or Video Codecs (to Investigate codecs for handling video files).
5. Click the Properties button.
You see the Codecs Properties dialog box.
6. Select the Properties tab.
You see a list of codecs installed on your computer.
You can download codecs at this Microsoft Web page:
www.microsoft.com/windows/windowsmedia/forpros/format/codecdownload.aspx
Placing Videos on Slides
Placing a video on a slide is easy enough if the video file is compatible with MCI and Windows Media Player (see “Understanding video file formats” earlier in this chapter to understand which kinds of video files are compatible with PowerPoint). These pages explain how to insert a video on a slide, insert a video that isn’t compatible with PowerPoint, and play the same video across several different slides.
Inserting a video on a slide
How you place a video on a slide depends on what kind of slide you’re dealing with and where the video file is located on your computer or network. Here are the three ways to insert a PowerPoint-compatible video on a slide:

Slide with a content placeholder: Click the Insert Media Clip icon. You see the Insert Movie dialog box. Select a video file and click OK.

Slide without a content placeholder: On the Insert tab, click the Movie button. Then select a video file in the Insert Movie dialog box and click OK.
Movie file stored in the Clip Organizer: On the Insert tab, open the drop-down list on the Movie button and choose Movie from Clip Organizer on the drop-down list. The Clip Organizer opens in a task pane (Book IV, Chapter 4 explains how to handle media files with the Clip Organizer). Locate the video and double-click it.
A dialog box asks how you want the video to start playing:
Automatically: Click the Automatically button to make the video play automatically as soon as the slide appears.
When Clicked: Click the When Clicked button to play the video when you or another presenter clicks it.
Don’t waste too much time deciding, because changing your mind is easy enough. Later in this chapter, “Fine-Tuning a Video Presentation” explains how to change these Play Movie settings as well as other settings that control how a video is played.

|
Figure 2-1: Lights, camera, action! A video on a slide. |

|
Inserting a video that isn’t compatible with PowerPoint
Earlier in this chapter, “Understanding video file formats” explained that certain file formats — namely .MOV, .RM, and .VCD — aren’t compatible with PowerPoint. The only way to play these video file types in PowerPoint is to set up a hyperlink such that clicking the link opens QuickTime, Real Player, or another media player besides MCI or Windows Media Player and the file is played inside that program.
Linking to a video file this way is similar to what happens on the Internet when you click a video link. A media player opens on your computer, and the file is played, as shown in Figure 2-2. Playing video files this way, unfortunately, disrupts a presentation. You have to wait while the media player launches and finds the video file in order to play it. And when the video plays, it does so inside a media player, not on a slide. Still, if you have to play a .MOV, .RM, or .VCD file, linking is your only option.
|
Figure 2-2: When you play a .MOV file, the QuickTime Player appears. |
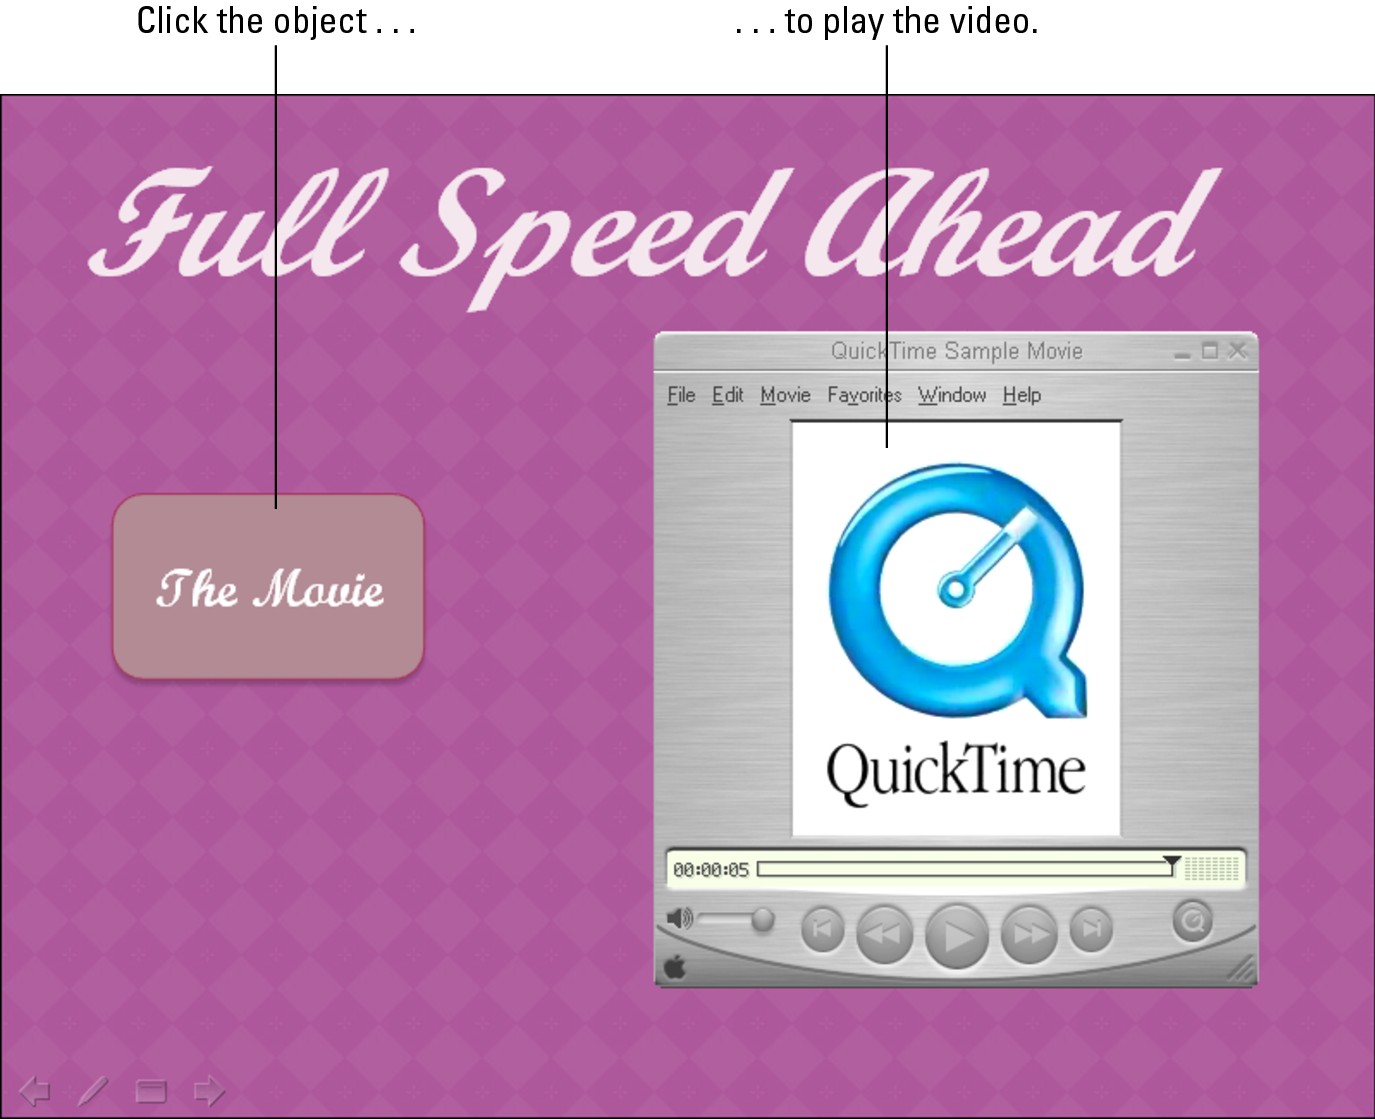
|
Before you create the hyperlink, place a copy of the video file you want to play in the same folder where you keep your PowerPoint presentation. Otherwise, as “Storing video files correctly” describes earlier in this chapter, you will have trouble playing the video later on if you move your presentation to another computer.
Follow these basic steps to link a slide to a video file:
1. Create an object or phrase to serve as a hyperlink.
For example, create an action button or shape. You can also create a hyperlink from a word or phrase.
2. Select the object or phrase.
3. Insert a hyperlink to the video file.
Book VI, Chapter 4 explains in detail how to insert hyperlinks. On the Insert tab, click the Hyperlink button, and then select a video file in the Insert Hyperlink dialog box.
Playing the same video on several different slides
Here’s a neat trick: You can play the same video on several slides. For example, you can start playing the video on slide 4 and keep playing it until you reach slide 7. The video remains in the same place on each successive slide. It keeps playing, no matter how many slides appear on-screen, until it is played out. For that matter, by looping the slide so that it plays continuously, you can make the video play on all slides in your presentation.
Before you consider playing the same video across many different slides, remember that playing a video this way can be distracting. The audience will very likely focus on the video, wondering why it appears on successive slides, and not focus on you or your presentation. Make sure that your video isn’t too flamboyant before you undertake this trick. Animated GIFs, the graphics that move ever so slightly on-screen are good candidates for playing across slides because they aren’t especially intrusive.
Follow these steps to make the same video play across successive slides:
1. Select the video and move it to a corner of the slide.
Unless you put the video in an out-of-the-way place, it will obscure what is on the successive slides.
2. Select the (Movie Tools) Options tab.
3. On the Play Movie drop-down list, choose Play Across Slides.
If you want your video to play throughout your presentation, not just until it finishes playing, select the Loop Until Stopped check box on the Options tab.
4. Better click the Slide Show button and rehearse your presentation to see what playing a video across slides does to the slides.
Starting and Pausing a Video during a Presentation
The slide with the video arrives on-screen. A hush falls across the audience as it waits with bated breath to find out what the video will be. Only the sounds of people munching popcorn and scraping jujubes from their teeth is heard. Everyone is anxious and ready. How do you control when the video starts and how do you pause or stop playing a video?
Starting a video: A video either plays automatically when the slide displays, plays a few seconds after the slide appears on-screen, or plays when you click it. (The next section in this chapter explains how to tell PowerPoint when to start playing a video; the sidebar “Playing a video after a few seconds have elapsed” explains how to delay the start of a video.)
Pausing a video: Click a video to pause it. To resume playing, click the video again.
Fine-Tuning a Video Presentation
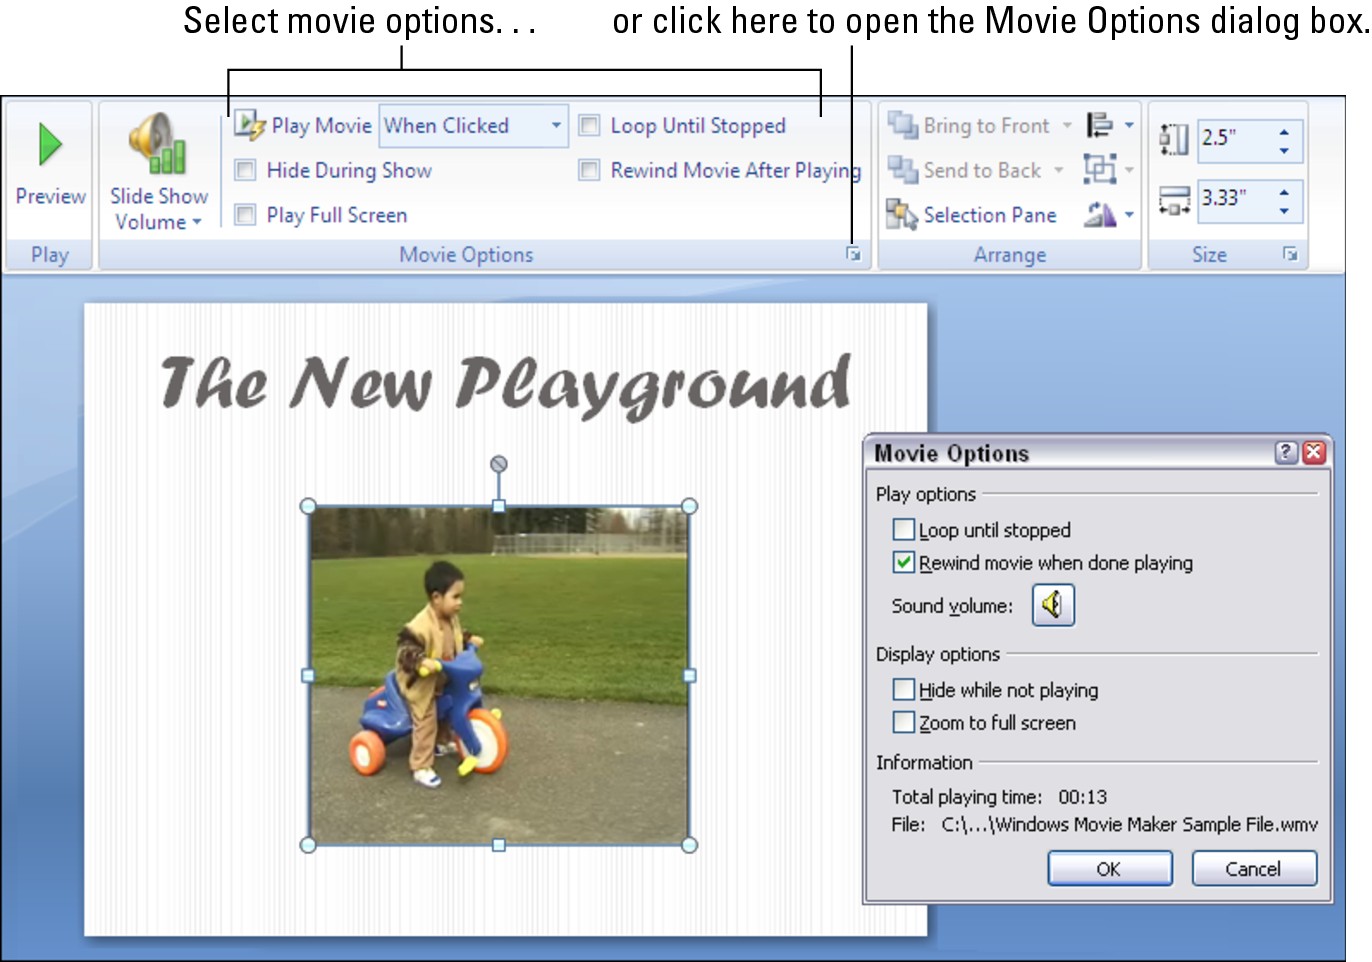
Select the video and go to the (Movie Tools) Options tab to fine-tune a video presentation. As shown in Figure 2-3, the Options tab and the Movie Options dialog box offer all kinds of commands for making a video play the way you want it to play. Click the Movie Options group button (refer to Figure 2-3) to open the Movie Options dialog box. Here are different ways you can fine-tune a video presentation:

Controlling the volume: Click the Slide Show Volume button (on the Options tab) or the Sound Volume icon (in the Movie Options dialog box) to control how loud the video sound is. To change the volume, the Options tab offers Low, Medium, High, and Mute options, and the dialog box offers a slider.
|
Figure 2-3: Visit the Options tab or Movie Options dialog box to fine-tune a video presentation. |
|
Playing the video automatically or when you click: Videos can start playing as soon as the slide arrives on-screen or when you click. Open the Play Movie drop-down list on the Options tab and choose Automatically or When Clicked to tell PowerPoint when to start playing a video. You can also delay the start of a video (see the sidebar “Playing a video after a few seconds have elapsed”).
Hiding the video until you give the order to start playing: You can hide the video until you start playing it by selecting the Hide During Show check box (on the Options tab) or the Hide While Not Playing check box (in the Movie Options dialog box). If you decide to hide the video screen, be sure to start the video when you click, and click in the middle of the slide to start playing the video. If you opt to start the video automatically, the video starts playing as soon as the slide on which it appears comes on-screen, which defeats the purpose of hiding the video screen.
Continuously playing, or looping, the video: Play a movie continuously or until you go to the next slide by selecting the Loop Until Stopped check box on the Options tab or Movie Options dialog box.
Playing the video at full-screen: Make a video fill the entire screen by selecting the Play Full Screen check box (on the Options tab) or the Zoom to Full Screen check box (in the Movie Options dialog box). Be careful of this one. Videos can look terribly grainy when they appear on the big screen. Unless you’re a grain merchant, preview your video to make sure that it’s suitable for showing at full screen size.
Rewinding the video when it’s finished playing: Rewind a video if you want to see the first frame, not the last, when the video finishes playing. Select the Rewind Movie After Playing check box (on the Options tab) or the Rewind Movie When Done Playing check box (in the Movie Options dialog box) to make the start of the video appear after the video plays; unselect this option to freeze-frame on the end of the video when it finishes playing.
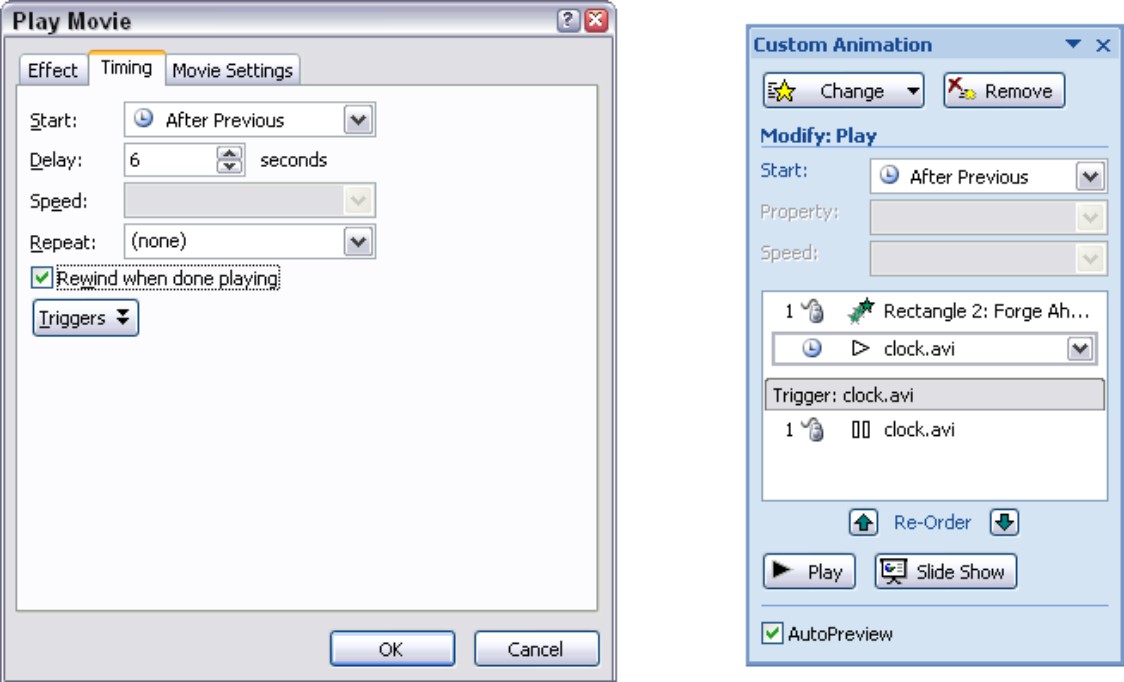
Playing a video after a few seconds have elapsed
Besides playing a video automatically when the slide arrives on-screen or when you click, you can make it play automatically a few seconds after the slide arrives on-screen. Waiting a few seconds to play a video heightens dramatic tension. It makes the audience wonder what’s what. Audience members who think they’re seeing a photo, not a video, are pleasantly surprised to see the photo start moving and turn into a video.
Follow these steps to make a video start playing a certain number of seconds after its slide arrives on-screen:
1. Select the video.
2. On the Options tab (refer to Figure 2-3), open the Play Movie drop-down list and choose Automatically.
3. Select the Animations tab.
4. Click the Custom Animation button.
The Custom Animation task pane opens.
5. In the task pane, select the instruction to play the video.
This part can be tricky. Two animation instructions in the task pane pertain to your video, one to start playing it and one to pause it. The instruction to play shows the Play symbol, a triangle pointing to the right; the instruction to pause shows the Pause symbol, two vertical rectangles (refer to the illustration).
6. Open the drop-down list on the instruction to play and choose Timing.
The Timing tab of the Play Movie dialog box appears.
7. In the Delay box, enter the number of seconds you want to elapse before the video starts playing.
8. Click OK.
9. Click the Play button in the task pane to test your video.
The video starts playing after the time you entered in the dialog box elapses. The previous chapter in this book explains animation in gruesome detail.
Adding Spice to Your Video Presentation
It’s not as though video presentations need much more spice, because they’re very spicy to begin with. Still, you can make a video presentation a little more interesting by adjusting its size and giving it a border.
Adjusting the size of the video screen
Be careful about changing the size of the video screen, because video looks jerky and grainy if the screen is too large. Select the video screen and use one of these techniques to change its size:

Dragging: Move the pointer over a selection handle on the corner, and when the pointer changes into a two-headed arrow, click and start dragging.
Entering measurements: On the (Movie Tools) Options tab, enter new measurements in the Height and Width boxes.
To change the screen’s position, click and drag it. You can also click the Size group button on the Options tab and enter measurements on the Position tab of the Size and Position dialog box.
Earlier in this chapter, “Fine-Tuning a Video Presentation” explains how to make a video play at full screen size.
Putting a border around a video
As Figure 2-4 shows, a border around the video screen looks mighty nice. Select the video, visit the (Picture Tools) Format tab, and use one of these techniques to put a border around a video screen:
Open the Picture Styles gallery and choose an option.
|
Figure 2-4: Borders show where the video screen begins and ends. |

|

Click the Picture Border button and choose a color for the border on the drop-down list.
Click the Picture Border button, choose Weight on the drop-down list, and select a line thickness or click More Lines to open the Format Shape dialog box and enter a width there.
Book IV, Chapter 2 describes in detail how to put a border around a video screen or other object.