Chapter 1: Giving an In-Person Presentation
In This Chapter
 Rehearsing and timing how long a presentation takes
Moving from slide to slide during a presentation
Drawing on slides with the Pen or Highlighter
Pointing to part of a slide with the Arrow
Blanking out the screen during a presentation
Creating a custom presentation tailored for a specific audience
At last, the big day has arrived. It’s time to give the presentation. “Break a leg,” as actors say before they go on stage. These pages explain how to rehearse your presentation to find out how long it is and show your presentation. You also discover some techniques to make your presentation livelier, including how to draw on slides with a pen or highlighter, use the Arrow to point to different parts of slides, and blank out the screen to get the audience’s full attention. The end of this chapter describes how to make custom presentations, smaller versions of a presentation designed for a specific audience.
Rehearsing and Timing Your Presentation
Slide presentations and theatrical presentations have this in common: They are as good as the number of times you rehearse them. Be sure to rehearse your presentation many times over. The more you rehearse, the more comfortable you will be giving your presentation.
Rehearsing also gives you the advantage of finding out exactly how long your presentation is. In most conferences and seminars, PowerPoint presenters are given a certain amount of time to give their presentations. Your goal is to not exceed or fall short of the amount of time you are given, and to help you meet this goal, PowerPoint gives you the opportunity to time a presentation during rehearsal and record how long each slide is displayed. After you know how long your presentation takes, you can lengthen or shorten if necessary.
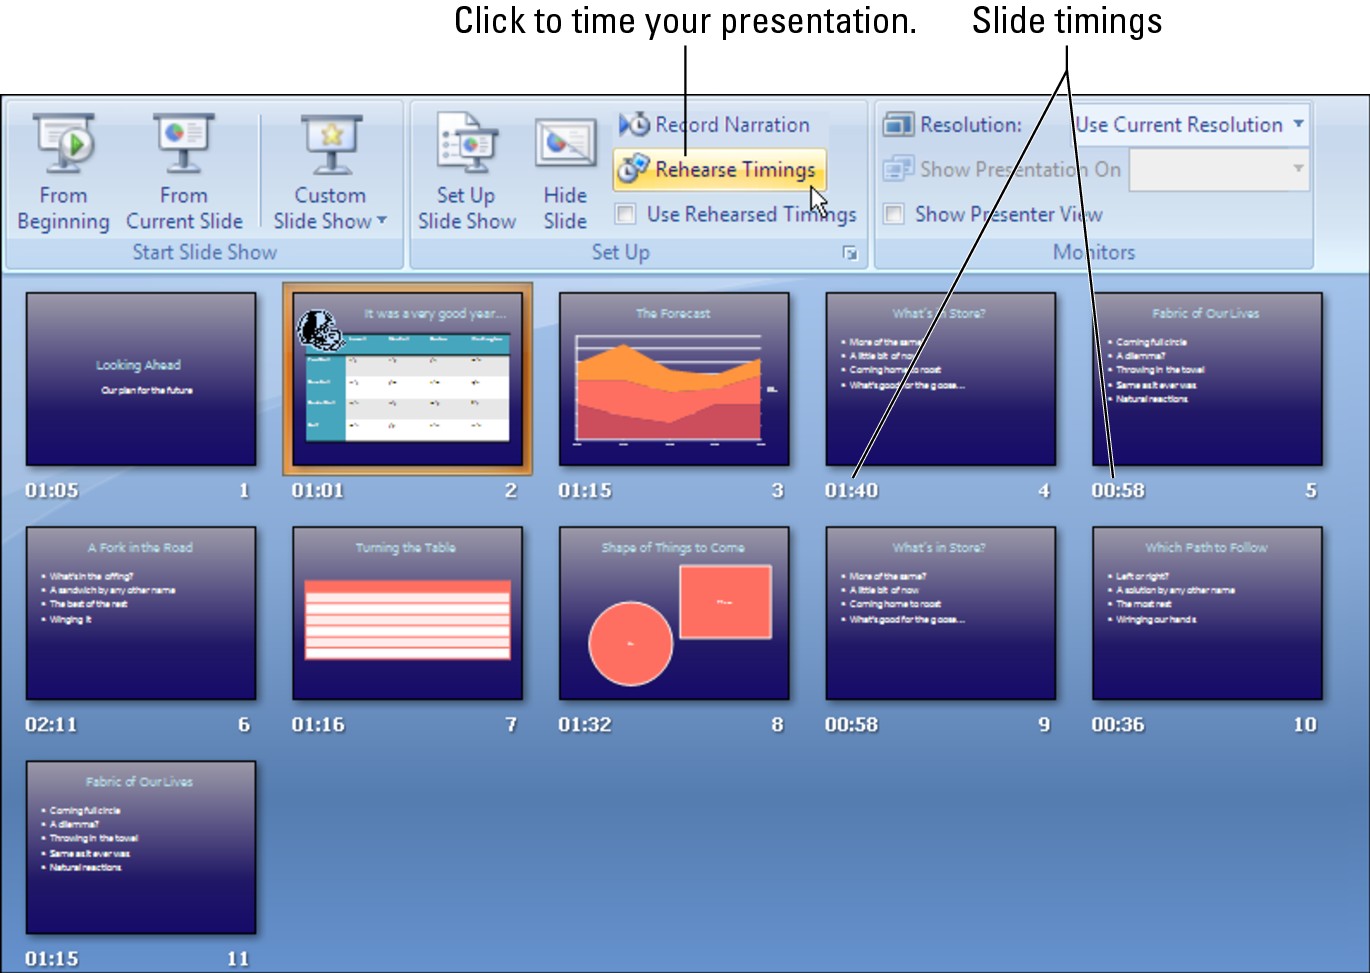
The Rehearse Timings command keeps count of how long your presentation is and how long each slide is on-screen. When the dress rehearsal is over, you can see in Slide Sorter view how long each slide was on-screen, as shown in Figure 1-1. You can tell whether a slide was on too long and perhaps needs to be divided into two slides. You can tell whether your presentation fits the time you are allotted.
|
Figure 1-1: You can record how long each slide is on-screen during a rehearsal. |
|
Follow these steps to rehearse a presentation, record its length, and record how long each slide is displayed:
1. Select the first slide in your presentation.
2. Click the Slide Show tab.

3. Click the Rehearse Timings button.
The Rehearsal toolbar appears, as shown in Figure 1-2, and you switch to Slide Show view.
4. Give your presentation one slide at a time, and click the Next button on the Rehearsal toolbar to go from slide to slide.
As each slide appears, imagine that you are presenting it to an audience. Say what you intend to say during the real presentation. If you anticipate audience members asking questions, allot time for questions.
|
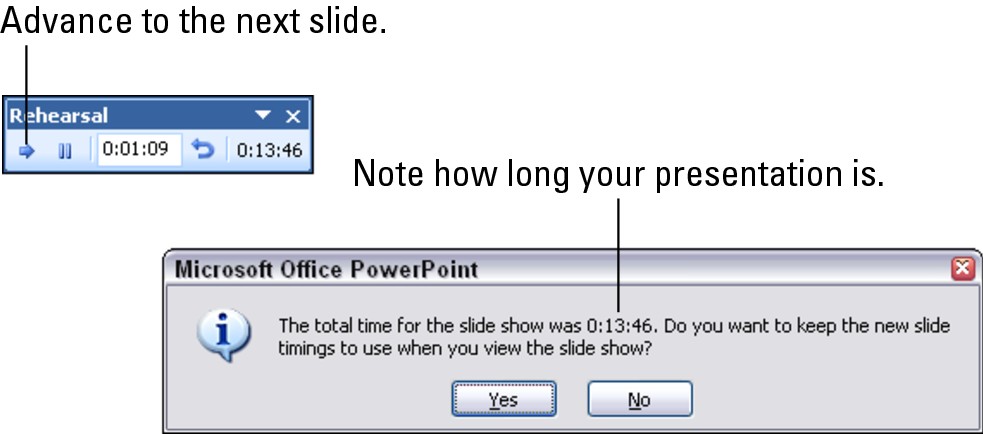
Figure 1-2: Timing the rehearsal. |
|
The Rehearsal toolbar tells you how long each slide has been displayed and how long your presentation is so far. You can do these tasks from the Rehearsal toolbar:
• Go to the next slide: Click the Next button.
• Pause recording: Temporarily stop the recording so that you can feed the dog or take a phone call. Click the Pause button a second time to resume recording.
• Repeat a slide: Click the Repeat button if you get befuddled and want to start over with a slide. The slide timing returns to 0:00:00.
5. In the dialog box that asks whether you want to keep the slide timings, note how long your presentation is (refer to Figure 1-2).
Is your presentation too long or too short? I hope, like baby bear’s porridge, your presentation is “just right.” But if it’s too long or short, you have some work to do. You have to figure out how to shorten or lengthen it.
6. Click Yes in the dialog box that asks whether you want to keep the slide timings.
By clicking Yes, you will be able to switch to Slide Sorter view and see how long each slide was on-screen during the presentation rehearsal (refer to Figure 1-1).
.jpg)
 On the Slide Show tab, uncheck the Use Rehearsed Timings check box (refer to Figure 1-1).

On the Slide Show tab, click the Set Up Slide Show button. You see the Set Up Slide Show dialog box. Select the Manually option button (you can find it under Advance Slides) and click OK.
Putting on the Finishing Touches
Don’t be nervous. Everything is going to be all right. You’ll come off like a champion, I’m sure. And to boost your confidence, here is a checklist of things to do before you give your presentation in front of an audience:
Run the spell checker one last time: Misspellings are glaringly apparent on PowerPoint slides. With headings in the 30-point and above range, an audience can spot misspellings and typos on a slide more readily than it can the printed page. As Book II, Chapter 4 explains in detail, you can correct spelling errors by pressing F7 or going to the Review tab and clicking the Spelling and Grammar button.
Print your speaker notes: The next chapter explains what speaker notes are, how speaker notes assist in a presentation, and how to print speaker notes. Before you go into your presentation, be sure to print and bring along speaker notes if you sometimes get stage fright or you intend to speak from notes.
See whether your presentation is linked to other files: If your presentation includes sound and video, you need the sound and video files to show your presentation, and if you intend to show your presentation on another computer, you need to copy the files as well as your presentation to the other computer. Book VI, Chapter 5 looks into problems associated with taking a PowerPoint presentation on the road.
Showing Your Presentation
Compared to the preliminary work, giving a presentation can seem kind of anti-climactic. All you have to do is go from slide to slide and woo your audience with your smooth-as-silk voice and powerful oratory skills. Well, at least the move-from-slide-to-slide part is pretty easy.
These pages explain how to start and end a presentation, all the different ways to advance or retreat from slide to slide, and how to jump to different slides. You also find out how to switch to a different program during a presentation.
Starting and ending a presentation
Here are the different ways to start a presentation from the beginning:

On the Slide Show tab, click the From Beginning button.

Select the first slide and then click the Slide Show view button.
You can start a presentation from the middle by selecting a slide in the middle and then clicking the Slide Show view button or going to the Slide Show tab and clicking the From Current Slide button.
Here are the different ways to end a presentation prematurely:
Press Esc, Ctrl+Break, or the hyphen key (-).
Click the Slides button and choose End Show on the pop-up menu. This button is located in the lower-left corner of the screen.
Right-click and choose End Show on the shortcut menu.
“End of slide show, click to exit”
Presentations end with a black screen and the words “End of slide show, click to exit.” Not everyone likes to mark the end of a slide show with this ominous black screen. Here are other ideas for ending a presentation:
Put a company logo or other symbol on a blank slide. Instead of seeing the black screen during your closing remarks, the audience sees the logo or symbol.
Close presentations without the black screen. To tell PowerPoint not to show a black screen after a presentation, click the Office button and choose PowerPoint Options. In the Advanced category of the PowerPoint Options dialog box, unselect the End with Black Slide check box and click OK. Viewers will see the PowerPoint window instead of the black screen.
Display an all-black or all-white screen. Right-click, choose Screen, and then choose Black Screen or White Screen to display an empty screen. See “Making Use of Blank Screens,” later in this chapter, for details.
Going from slide to slide
In a nutshell, PowerPoint offers four ways to move from slide to slide in a presentation. Table 1-1 describes techniques for navigating a presentation using the four different ways:
Use the slide control buttons: Click a slide control button — Previous, Slides, Next — in the lower-left corner of the screen, as shown in Figure 1-3. If you don’t see the slide control buttons, press Ctrl+U or right-click and choose Pointer Options⇒Arrow Options⇒Visible.
Click the Slides button: Click this button and make a choice on the pop-up menu (refer to Figure 1-3).
Right-click on-screen: Right-click and choose a navigation option on the shortcut menu.
Press a keyboard shortcut: Press one of the numerous keyboard shortcuts that PowerPoint offers for going from slide to slide.
|
Figure 1-3: Besides using keyboard shortcuts, you can move from slide to slide by clicking on-screen. |

|

Going forward (or backward) from slide to slide
To go forward from one slide to the following slide in a presentation, click on-screen. As soon as you click, the next slide appears. If all goes well, clicking is the only technique you need to know when giving a presentation to go from slide to slide; but Table 1-1 lists other ways to go to the next slide in a presentation, as well as techniques for going backward to the previous slide.

Jumping forward or backward to a specific slide
If you find it necessary to jump forward or backward across several slides in your presentation to get to the slide you want to show, it can be done with these techniques:
Either click the Slides button or right-click and choose Go to Slide, and then select a slide in your presentation on the submenu (refer to Figure 1-3).
Press Ctrl+S. You see the All Slides dialog box. It lists all slides in your presentation. Select the slide you want to show and click the Go To button.
Press the number of the slide number you want on your keyboard (if you can remember its number) and then press the Enter key. For example, to show the third slide in your presentation, press 3 and then Enter.
Switching to another program during a presentation
If the need arises to switch to a program apart from PowerPoint during a presentation, you can do it by displaying the Windows taskbar using one of these techniques:
Press Ctrl+T.
Right-click and choose Screen⇒Switch Programs.
Click the Slides button and choose Screen⇒Switch Programs.
On the taskbar, click the name of the program you want to visit. When you want to return to PowerPoint, click its button on the taskbar. You return to PowerPoint, and the taskbar disappears.
Drawing on Slides
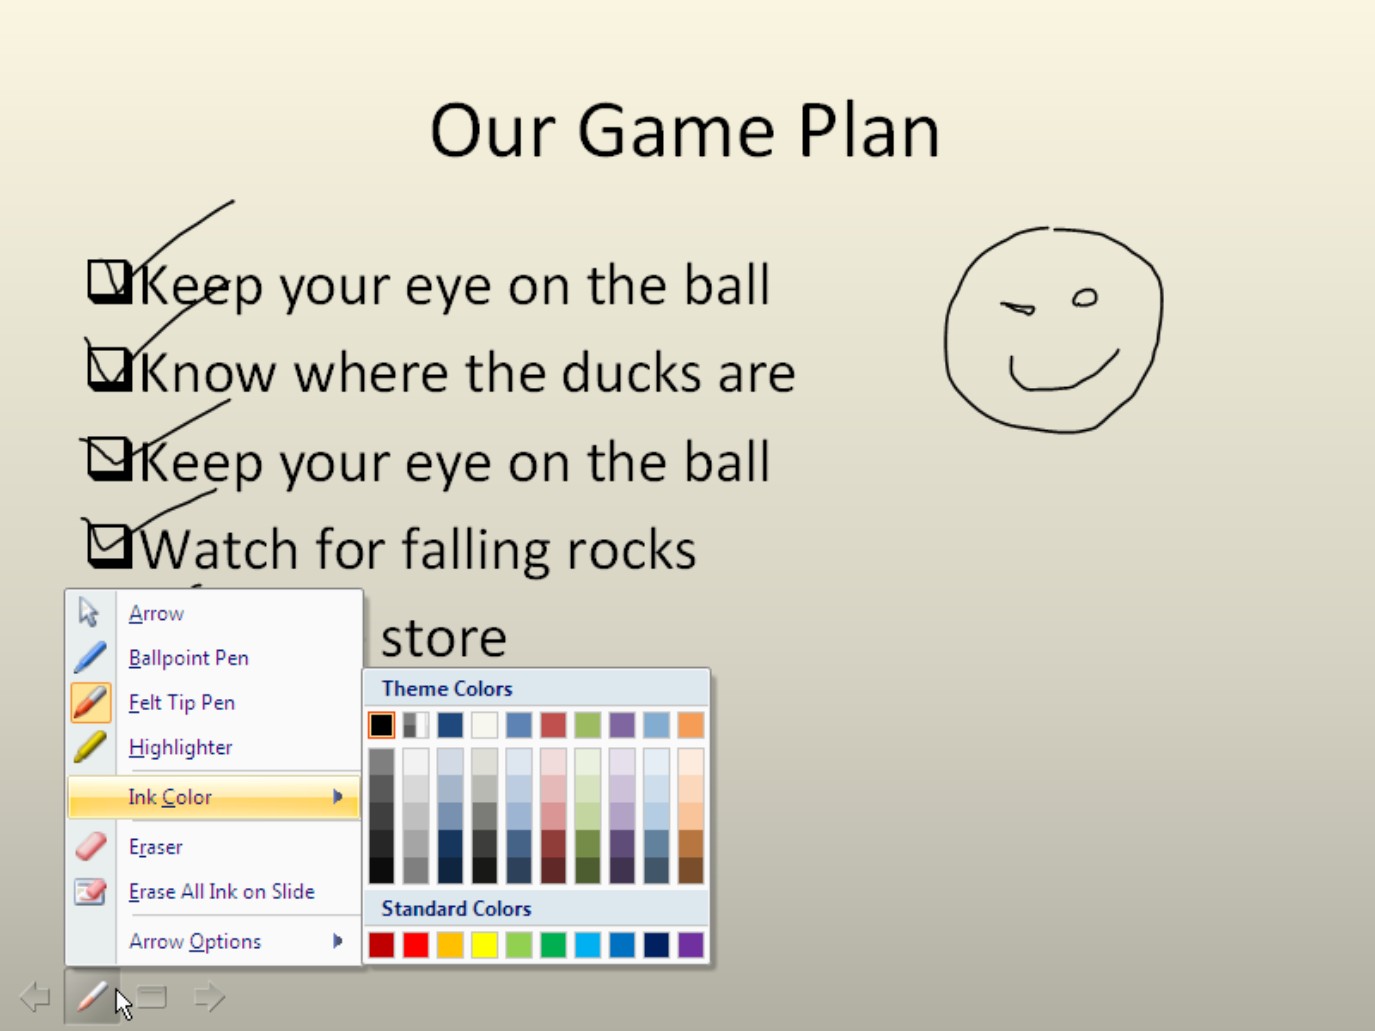
To make presentations a little livelier, whip out a pen and draw on a slide. Draw to underline words or draw check marks as you hit the key points, as shown in Figure 1-4. Drawing on slides is an excellent way to add a little something to a presentation. Wielding a pen in a presentation involves selecting the pen you want, selecting an ink color for drawing, and understanding how to erase pen marks. These pages explain how to do all that.
Wielding a pen or highlighter in a presentation
Follow these instructions to be able to draw on a slide:
Selecting a pen or highlighter: PowerPoint offers the Ballpoint Pen (thin) and Felt Tip Pen (thicker), as well as the Highlighter for highlighting text on a slide. To select a pen or the Highlighter, click the Pen button and make a selection, as shown in Figure 1-4. You can also right-click, choose Pointer Options, and make a selection on the submenu.
Choosing a color for drawing: After you’ve selected a pen or the Highlighter, click the Pen button, choose Ink Color and select a color on the submenu (refer to Figure 1-4). You can also right-click and choose Pointer Options⇒Ink Color and then select a color on the submenu.
Press Esc when you are finished using a pen or the Highlighter.
|
Figure 1-4: Choose a pen and ink color on the Pointer Options submenu. |
|
Erasing pen and highlighter drawings
Follow these instructions to erase pen and highlighter drawings:
Erasing lines one at a time: Click the Pen button and choose Eraser (refer to Figure 1-4). You can also right-click and choose Pointer Options⇒Eraser. The Eraser appears. Using the Eraser, click the line you want to erase. Press Esc when you’re finished using the Eraser.
Erasing all the lines on a slide: Press E or click the Pen button and choose Erase All Ink on Slide (refer to Figure 1-4).
Erasing lines you told PowerPoint to keep: As I explain shortly, PowerPoint asks at the end of a presentation that you drew on whether you want to keep the lines. If you elect to keep them, the lines become part of your presentation, and you can’t delete them by clicking with the Eraser or by choosing the Erase All Ink on Slide command. To discard these lines, go to the Review tab, open the drop-down list on the Delete button, and choose one of these options:
• Delete All Markup on the Current Slide: Deletes lines you drew on a slide you selected.
• Delete All Markup in This Presentation: Deletes lines you drew on all the slides in your presentation.
Press Esc when you’re finished using a pen (but be careful not to press Esc twice, because the second press tells PowerPoint to end the presentation).
Pen marks are not permanent, although you can keep them. At the end of a presentation in which you have drawn on slides, a dialog box asks whether you want to keep or discard your scribblings. Click the Keep or Discard button. (If you prefer not to see this dialog box because you intend never to keep your drawings, click the Office button and choose PowerPoint Options. In the PowerPoint Options dialog box, select the Advanced tab and then unselect the Prompt to Keep Ink Annotations When Exiting check box.)
Keyboard shortcuts for the Pen, the Eraser, and the Arrow
Fans of the Pen and the Arrow will be glad to know that they can switch back and forth between the two, and wield the Eraser as well, without having to click the Pen button and choose pointer options on the pop-up menu. Use these keyboard shortcuts to use a pen, the Eraser, or the Arrow:
Display and use a pen: Press Ctrl+P
Display and use the Eraser: Press Ctrl+E
Display and point with the Arrow: Press Ctrl+A
Pointing with the Arrow

Showing the arrow: Press A or = (the equals sign), click the Pen button and choose Arrow Options⇒Visible, or right-click and choose Pointer Options⇒Arrow Options⇒Visible.
Hiding the arrow: Press Ctrl+H or click the Pen button and choose Arrow Options⇒Hidden.
Making Use of Blank Screens
Follow these instructions to blank out the screen during a presentation:
Black screen: Press B or the period key, or right-click and choose Screen⇒Black Screen.
White screen: Press W or the comma key, or right-click and choose Screen⇒White Screen.
To see a PowerPoint slide again, click on-screen or press any key on the keyboard.
Customizing Shows for Particular Audiences
Here’s a neat little trick: You can designate a subset of slides in a presentation as a custom show and show audiences this shorter, customized version of the presentation instead of the entire show. Rather than set up four different presentations for four regional offices, a salesperson can keep all the slides he or she needs in one PowerPoint file. Then, from the collection of slides, the salesperson can put together four custom shows. This way, the salesperson has to deal with only one PowerPoint file, not four. Thanks to custom shows, the salesperson has the means to put together a presentation tailored for whatever audience he or she is addressing.
To set up a custom show, you choose which slides in a PowerPoint file belong in the show. Then you tell PowerPoint to run the custom show, not the full-blown one.
Assembling slides for a custom show
Follow these steps to assemble slides in a PowerPoint presentation for a custom show:

1. On the Slide Show tab, click the Custom Slide Show button and choose Custom Shows on the drop-down list.
The Custom Shows dialog box appears, as shown in Figure 1-5. It lists custom shows you’ve already put together, if you’ve put any together.
|
Figure 1-5: Tailoring a show for a particular audience. |

|
2. Click the New button.
The Define Custom Show dialog box appears (refer to Figure 1-5). The Slides in Presentation box lists all the slides in the presentation.
3. Enter a descriptive name for your custom show in the Slide Show Name text box.
4. Ctrl+click to select the slides you want for the custom show; then click the Add button.
The slides appear in the Slides in Custom Show box. To change the order of slides in the custom show, select a slide and click an arrow button.
5. Click OK to return to the Custom Shows dialog box; then click Close.
The name you gave your custom show appears in the drop-down list that you see when you click the Custom Slide Show button on the Slide Show tab. To rehearse a custom show, choose its name on the drop-down list.
Editing a custom show
If a custom presentation you created needs editing, open the Custom Shows dialog box (click the Custom Slide Show button on the Slide Show tab and choose Custom Shows), select the show that needs editing, and click the Edit button. You see the Define Custom Show dialog box (refer to Figure 1-5), where you can add slides to and remove slides from your custom show.
Presenting a custom show
You can present a custom show from the beginning or start playing it in the middle of the main show. And just as important, if you jump into a custom show in the middle of a main show, you can return to the main show after you’ve finished showing its customized version. Keep reading.
Presenting a custom show from the beginning
PowerPoint offers three ways to present a custom show from the beginning:
Slide Show tab: On the Slide Show tab, click the Custom Slide Show button and choose the name of the show on the drop-down list.
Custom Shows dialog box: On the Slide Show tab, click the Custom Slide Show button and choose Custom Shows on the drop-down list. You see the Custom Shows dialog box (refer to Figure 1-5). Select a presentation and click the Show button.
Automatically: With this technique, the custom show begins whenever you give the command to start a slide show (by clicking the From Beginning button or the Slide Show view button). On the Slide Show tab, click the Set Up Slide Show button. You see the Set Up Show dialog box shown in Figure 1-6. Under Show Slides, click the Custom Show option button and choose a custom show from the drop-down list.
|
Figure 1-6: Choosing which custom show to play automatically. |

|
Interrupting a presentation with a custom show
Suppose you’re in the middle of a presentation and you realize that the audience would be better served with a custom show. Follow these instructions to steer a presentation toward a custom show and, later on, return to the main show:
Starting a custom show in the middle of a main show: As shown in Figure 1-7, right-click and choose Custom Show on the shortcut menu. Then select the name of a custom show.
Returning to the main show from the custom show: Press Ctrl+S. As shown in Figure 1-7, you see the All Slides dialog box, which lists the names of slides in the custom presentation. Open the Show drop-down list and choose All Slides to see the names of all slides in the main presentation. Select the name of a slide and click the Go To button.
|
Figure 1-7: Starting a custom show (left) and returning to the main show (right). |

|