Chapter 3: Creating a Self-Running Presentation
In This Chapter
 Examining when to use self-running presentations
Designing a self-running presentation
Telling PowerPoint how long to display slides
Declaring that a presentation is “self-running”
Starting a self-running presentation
This short chapter delves into self-playing, kiosk-style presentations. This type of presentation doesn’t require anyone to deliver it. You can make it play from a kiosk or simply send the presentation to co-workers so that they can play it themselves. In a self-running presentation, slides appear on-screen one after the other without you or anyone else having to advance the presentation from slide to slide. When the presentation finishes, it starts all over again from Slide 1.
Read on to discover the pitfalls of self-playing presentations and the uses for these presentations. You also find out how to tell PowerPoint how long to keep each slide on-screen and how to start a self-running presentation.
Good Uses for Self-Running Presentations
Self-running, kiosk-style presentations usually fall into the “show and tell” category. These presentations can’t go into very much depth because, without a narrator, all descriptions must be done on the slides, and slides don’t have any room for lengthy descriptions. Usually, a self-running presentation is no more than a dozen slides long because people can’t sit through more than a dozen slides unless a speaker is there to explain each one.
A self-running, kiosk-style presentation is ideal under these circumstances:
 Product demonstration: A product demonstration in pictures and words makes for a good self-running presentation. Hit the highlights of the product and show it off in a good light. Try to pique viewers’ interest so that they inquire about the product.
Information booth: A short, five- or six-slide presentation describing, for example, what is being offered at a seminar or conference makes for a good self-running presentation. People arriving at the seminar or conference can find out what is scheduled without bothering the staff.
Advertisement: As long as the audience is captive (it can’t run away), short PowerPoint presentations can serve as advertisements. Last week, in the dentist’s chair, waiting for the dentist to examine me, I watched the same PowerPoint presentation about 20 times. It was about cosmetic dentistry. I wasn’t interested, but I watched anyway. When the audience is trapped in a waiting room or cashier’s line, you can make it watch a self-running PowerPoint advertising presentation.
Challenges of a Self-Running Presentation
Self-running presentations exhibit a new set of challenges. Normally, the speaker is half the presentation, and the PowerPoint slides are the other half, but in a self-running presentation, the slides are everything. The slides have to communicate everything that the presentation wants to communicate.
For that reason, self-running presentations tend to lean on photographs and on the written word — on bulleted lists and short descriptive paragraphs. The slides tend to read like pages in a catalogue or informational booklet.
If you’ve created a PowerPoint presentation for delivery in front of an audience and now you want to make yours a self-running, kiosk-style presentation, you have some work to do. You have to rethink your presentation. You have to imagine how to communicate to your audience by slides alone, and that usually means more pictures and more words. (Be sure to look at Book II, Chapter 5, which explains running text into columns; formatting text frames for normal paragraphs, not bulleted lists; and other topics worth knowing about if your presentation is heavy on text.)

Making sure that the audience knows which slide it’s seeing
Most people who watch a self-running presentation arrive in the middle. They will arrive at slide 4, for example. They arrive not knowing whether the presentation just started or is about to end.
You can help the audience understand how far along a presentation is by including the current slide number and the total number of slides in slide footers. For example, if there are eight slides in the presentation, the footer on the first slide reads “1 of 8”; the footer on the second slide reads “2 of 8”; and so on. The audience always knows which slide it is viewing, how many slides are in the presentation, and how long it must wait for the presentation to come around again to the first slide.
Unfortunately, you can’t enter this kind of footer by going to the Header and Footer dialog box (see Book II, Chapter 5) or by entering a footer on the Slide Master (see Book II, Chapter 2). Believe me, I tried. The only way to do it is to create a text box for each slide, put the text box in the lower-left or -right corner, and enter a slide number, the word of, and the total number of slides in your presentation. Having to enter the text box on each slide is a lot of work, but I think it’s worthwhile, because the audience deserves to know which slide it’s looking at in a self-running presentation.
Deciding How Long to Keep Slides On-Screen
After you’ve created your self-running presentation, the next task is to tell PowerPoint how long to keep each slide on-screen. As you decide, imagine how long viewers would like each slide to remain. Try to calculate how long it takes the average viewer to take in a slide.
PowerPoint offers three ways to indicate how long you want each slide to stay on-screen. You can keep all slides on-screen the same amount of time, choose a different time for each slide, or “rehearse” the presentation and tell PowerPoint to keep each slide on-screen for the amount of time it remained on-screen during the rehearsal.
Entering time periods yourself
Follow these steps to keep all slides in a self-running presentation on-screen for the same amount of time:
1. Switch to Slide Sorter view.
2. Click the Animations tab.
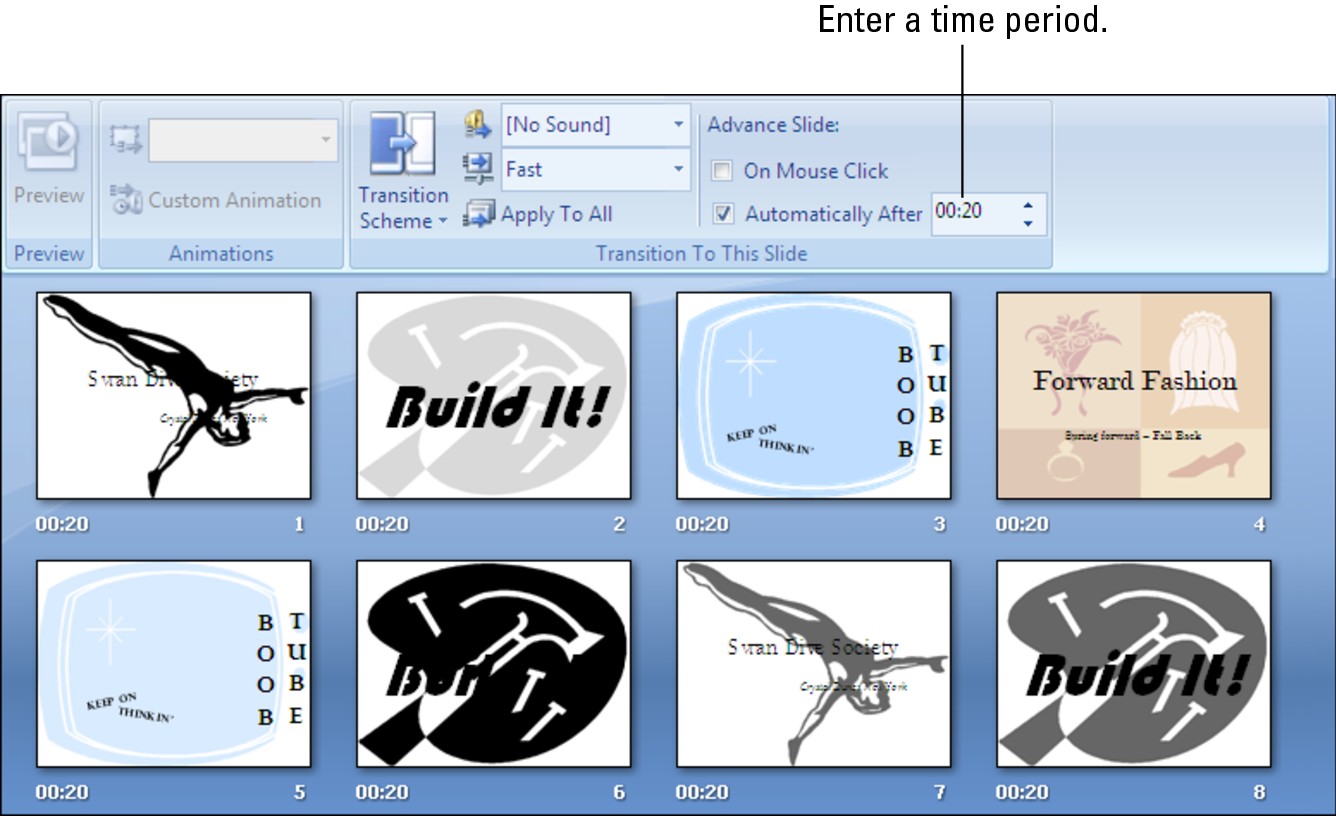
3. Deselect the On Mouse Click check box, as shown in Figure 3-1.
Deselecting this check box tells PowerPoint to advance slides after a certain amount of time has elapsed.
|
Figure 3-1: Enter how long you want each slide or all the slides to remain on-screen in the Automatically After box. |
|
4. Select the Automatically After check box.
5. Click the Apply to All button.
By doing so, you tell PowerPoint to advance all slides in the presentation after a certain amount of time has elapsed. Later, you can adjust time periods for individual slides.
6. Enter how long you want the slide or all the slides to remain on-screen.
How you do this depends on whether you want the slides to stay on-screen the same amount of time:
• All slides the same time: Enter a time period in the Automatically After text box and click the Apply to All button again.
• Each slide a different time: One by one, select each slide and enter a time period in the Automatically After text box.

In Slide Sorter view, you can see how long each slide is supposed to remain on-screen, as Figure 3-1 shows.
“Rehearsing” slide times
Another way to enter time periods for individual slides is to rehearse the presentation and save the timings. The timings you save are entered automatically on the Animations tab (refer to Figure 3-1). Book VI, Chapter 1 explains rehearsing in detail, but to spare you the onerous task of going to that chapter, here are shorthand instructions for “rehearsing” slide times:
1. Select the first slide in your presentation.
2. Click the Slide Show tab.

3. Click the Rehearse Timings button.
You go to Slide Show view, and the Rehearsal toolbar appears.
4. Note how long each slide remains on-screen, and when it remains as long as you want it to remain in your self-running presentation, click the Next button on the Rehearsal toolbar.
Try to imagine how long a viewer would like each slide to remain on-screen.
5. Repeat Step 4 until you advance through all the slides and come to the end of the presentation.
6. Click Yes in the dialog box that asks whether you want to keep the slide timings.
While you’re at it, take note in the dialog box of the total time of your presentation. Is the presentation too long or short?
In Slide Sorter view, you can see how long each slide remained on-screen. You can adjust slide timings by going to the Animations tab, selecting a slide, and entering a new time period in the Automatically After box (refer to Figure 3-1).
Telling PowerPoint that Your Presentation Is Self-Running
Before you can “self-run” a presentation, you have to tell PowerPoint that you want it to “self-run.” Self-running presentations don’t have the control buttons in the lower-left corner. You can’t click the screen or press a key to move forward or backward to the next or previous slide. The only control you have over a self-running presentation is pressing the Esc key. Pressing Esc ends the presentation.
Follow these steps to make yours a kiosk-style, self-running presentation:
1. Click the Slide Show tab.

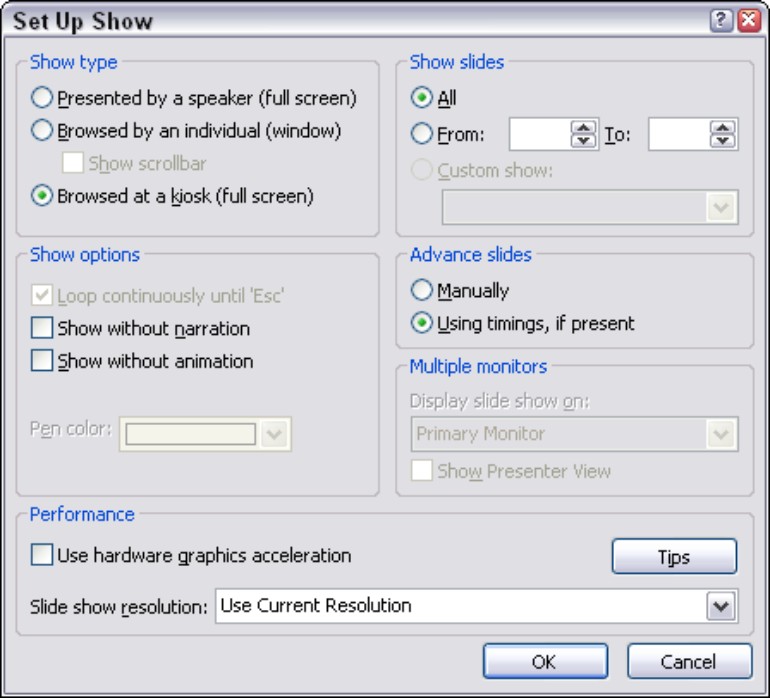
2. Click the Set Up Slide Show button.
You see the Set Up Show dialog box shown in Figure 3-2.
|
Figure 3-2: Make a presentation “self-running” in this dialog box. |
|
3. Under Show Type, select the Browsed at a Kiosk (Full Screen) option.
When you select this option, PowerPoint automatically selects the Loop Continuously Until ‘Esc’ option.
4. Make sure that the Using Timings, If Present option button is selected.
The previous section in this chapter explains how to declare how long you want each slide to remain on-screen in a self-running presentation.
5. Click OK.
That’s all there is to it.
Starting and Ending a Self-Running Presentation
Use one of these techniques to start a self-running, kiosk-style presentation:

On the Slide Show tab, click the From Beginning button (or press F5).

Click the Slide Show view button.
Self-running presentations “loop” when they are finished playing. You return to the first slide and start all over. The controls in the lower-left corner aren’t there for clicking. The keyboard shortcuts for getting from slide to slide are inoperable.
To end a self-running presentation, press Esc.