Chapter 4: Creating a User-Run Presentation
In This Chapter
 Understanding how user-run presentations work
Looking at uses for user-run presentations
Examining the challenges of creating a user-run presentation
Declaring your presentation a “user-run” presentation
Comparing action buttons with hyperlinks
Creating action buttons
Creating hyperlinks
Preventing a user-run presentation from stalling
This chapter explains how you can take the rest of the day off and still manage to deliver a PowerPoint presentation. It shows how to go to the beach, spread your things under a beach umbrella, relax in the warm weather, and still give an important PowerPoint presentation to customers or co-workers.
How do you do it? By creating a user-run presentation designed for others to view on their own. This chapter looks into the pitfalls of creating a user-run presentation. It offers suggestions for user-run presentations and shows how to create the action buttons and hyperlinks that others need to get from slide to slide in your absence. You also find out how to keep a presentation from stalling in the middle. Surf’s up!
What Is a User-Run Presentation?
A user-run, or interactive, presentation is one that the viewer gets to control. The viewer decides which slide appears next and how long each slide remains on-screen. User-run presentations are similar to Web sites. Users can browse from slide to slide at their own speed. They can pick and choose what they want to investigate. They can backtrack and view slides they saw previously or return to the first slide and start anew.
PowerPoint also makes it possible in a user-run presentation for viewers to launch another program and view, for example, a Word document, a Web page on the Internet, or a picture in a graphics program. Users can click to play a video or hear a sound recording or MP3 file.
.jpg)
To get around and launch other programs, users click action buttons, click hyperlinks, or use the scroll bar:
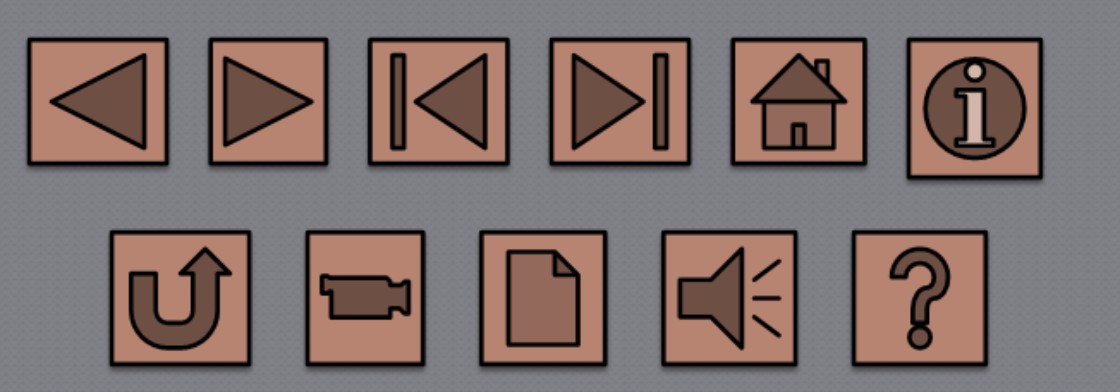
 Actions buttons: An action button is a button that you can click to go to another slide in your presentation or the previous slide you viewed, whatever that slide was. PowerPoint provides 11 action buttons in the Shapes gallery. Figure 4-1 shows the 11 action buttons. See “Action Buttons for Going from Slide to Slide,” later in this chapter.

Hyperlinks: A hyperlink is an electronic shortcut from one place to another. If you’ve spent any time on the Internet, you’ve already clicked many hyperlinks. On a Web page, clicking a hyperlink takes you to another Web page or a different part of a Web page. Similarly, clicking a hyperlink on a slide takes you to a different slide. You can tell when you encounter a hyperlink on a slide because the pointer changes into a hand when you move the pointer over a hyperlink.
You can turn any PowerPoint object — a text frame or text box, clip-art image, graphic, shape, or WordArt image — into a hyperlink (Book IV, Chapter 2 explains objects in detail). You can turn a word or phrase into a hyperlink as well. Later in this chapter, “Creating Hyperlinks” explains hyperlinks.
|
Figure 4-1: Action buttons. |
|
Scrollbar: You can place a scrollbar along the right side of the screen and allow viewers to scroll downward or upward to get from slide to slide. See “Making Yours a User-Run Presentation,” later in this chapter.
Uses for User-Run Presentations
Any setting in which viewers need information is a candidate for a user-run presentation. Here are some suggestions for user-run presentations:
Directions: To keep staff members from being badgered by requests for directions, set up a presentation explaining how to get from here to there. Your staff will be most grateful.
Product demonstrations: At trade shows, a presentation explaining the merits of a product allows visitors to examine a product at leisure. You can go into great detail, with photographs and explanations.
Employee training: A presentation explaining to employees how to perform tasks can make a good introduction in a job-training program.
Listings: Schedules, product specifications, guides, and program notes are candidates for user-run presentations. Often, looking up a listing in PowerPoint is easier than looking it up in a booklet or pamphlet.
Quizzes: Everybody likes a quiz. Create a user-run quiz to attract visitors to your trade-show booth.
Challenges of a User-Run Presentation
Nobody said that creating a user-run presentation would be a piece of cake. Before you start creating your presentation (or begin converting a standard presentation into one that viewers can show themselves), you have to consider a few important matters. These pages explain what those matters are.
Helping viewers understand how to run the presentation
The biggest challenge of a user-run presentation is telling the audience how to run it. Depending on how computer literate your audience is, some people will see the hyperlinks and action buttons and understand that they can click them to go from slide to slide, but others won’t have a clue what the hyperlinks and buttons are for.
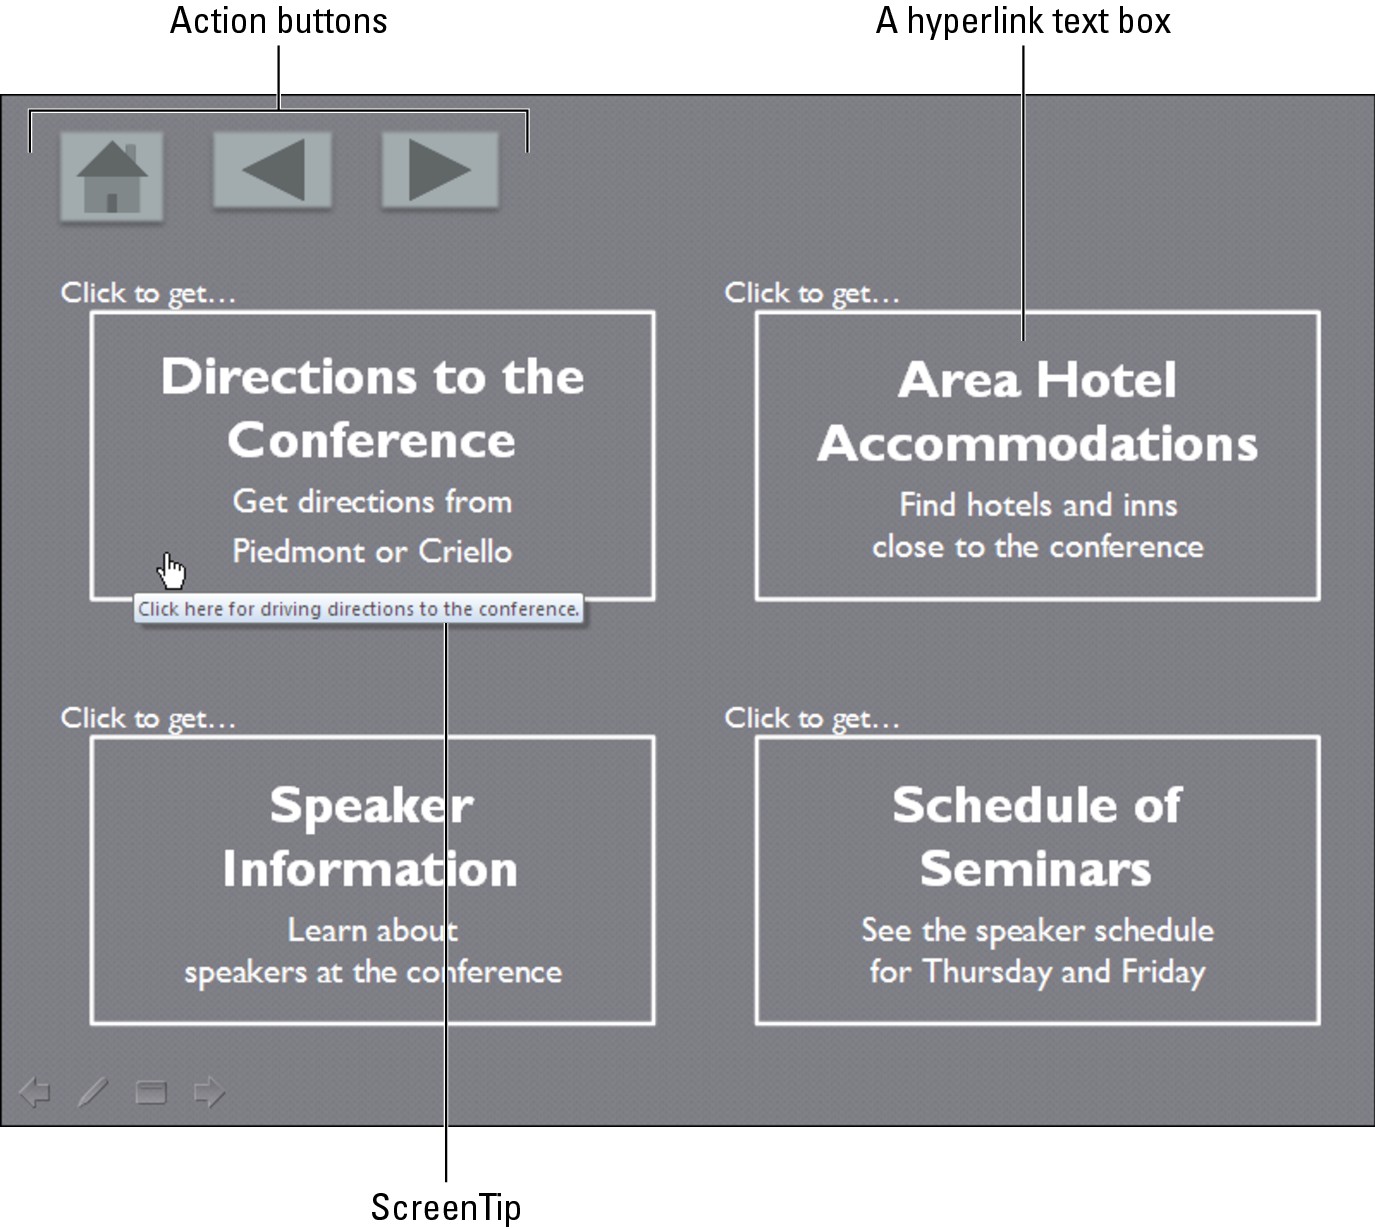
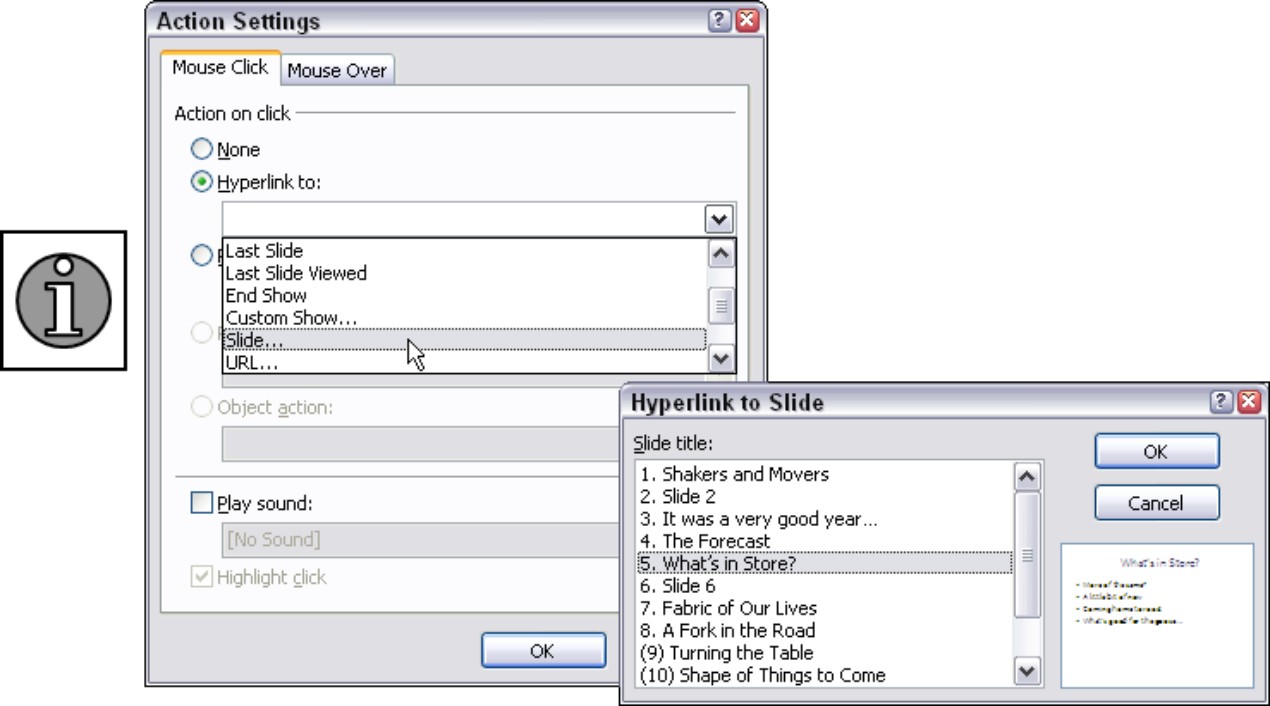
Typically, to make sure that viewers understand what kind of presentation they are looking at, the first slide informs viewers that they can run the presentation on their own, and it gives rudimentary instructions for running the presentation. The opening slide in Figure 4-2, for example, tells viewers that they can click to get different information about a conference.
Someone viewing a user-run presentation can find out how to navigate the presentation by these means:
Written instructions: Viewers can read instructions you write on slides to find out how to get from slide to slide.
ScreenTips:
ScreenTips are short instructions that appear when you move the pointer over a hyperlink (but not an action button). In Figure 4-2, the ScreenTip tells viewers to “click here for driving directions to the conference.” Every hyperlink should have a ScreenTip. These short instructions can help viewers decide whether the hyperlink is worth clicking.
Action button symbols: Each action button has a symbol that suggests what will happen when the button is clicked (refer to Figure 4-1). The Next action button, for example, points to the right, indicating that the next slide in the presentation appears when the Next action button is clicked. Some action button symbols are more comprehensible than others.
Text on hyperlink objects: As I mentioned earlier, any object — including text boxes, text-box shapes, and WordArt images — can be made into a hyperlink. You can help readers decide whether to click a hyperlink by describing on the object what clicking the hyperlink does. On a text box, for example, the words “Discover the botanical secrets of Madagascar” tells readers that they can click the link to learn about the flora and fauna of that lovely island. Figure 4-2 includes four text-box hyperlinks.

|
Figure 4-2: An opening instruction screen in a user-run presentation. |
|
Backtracking
A user-run presentation is a little like a Web site in that viewers don’t have to view it from start to finish. They poke into a few slides and then retreat to an earlier slide and start searching a different topic. For that reason, a user-run presentation needs hyperlinks that take viewers back to the first slide, as well as Previous action buttons and hyperlinks that permit viewers to backtrack.
Fitting action buttons on slides
If you decide to use action buttons to get from slide to slide, you have to find room for these buttons. They have to fit into a corner of each slide where they don’t get in the way of the text and graphics on your slides. Fitting actions buttons on slides is one of the biggest challenges of a user-run presentation.
Preventing a presentation from stalling
Unless you take precautions, a user-run presentation can get stuck in the middle if the person viewing it walks away. If someone viewing slide 6, for example, gets a cell phone call from the Lottery Commission and learns that he or she has won $10 million, that person will immediately abandon the presentation. The presentation will languish on slide 6. The next person who comes along — assuming that your presentation is being given in a public place — may not understand that the presentation is stuck in the middle. Later in this chapter, “Making Sure That Your Presentation Doesn’t Stall” explains how to “unstall” presentations and make them return to slide 1 if they are abandoned.
Making Yours a User-Run Presentation
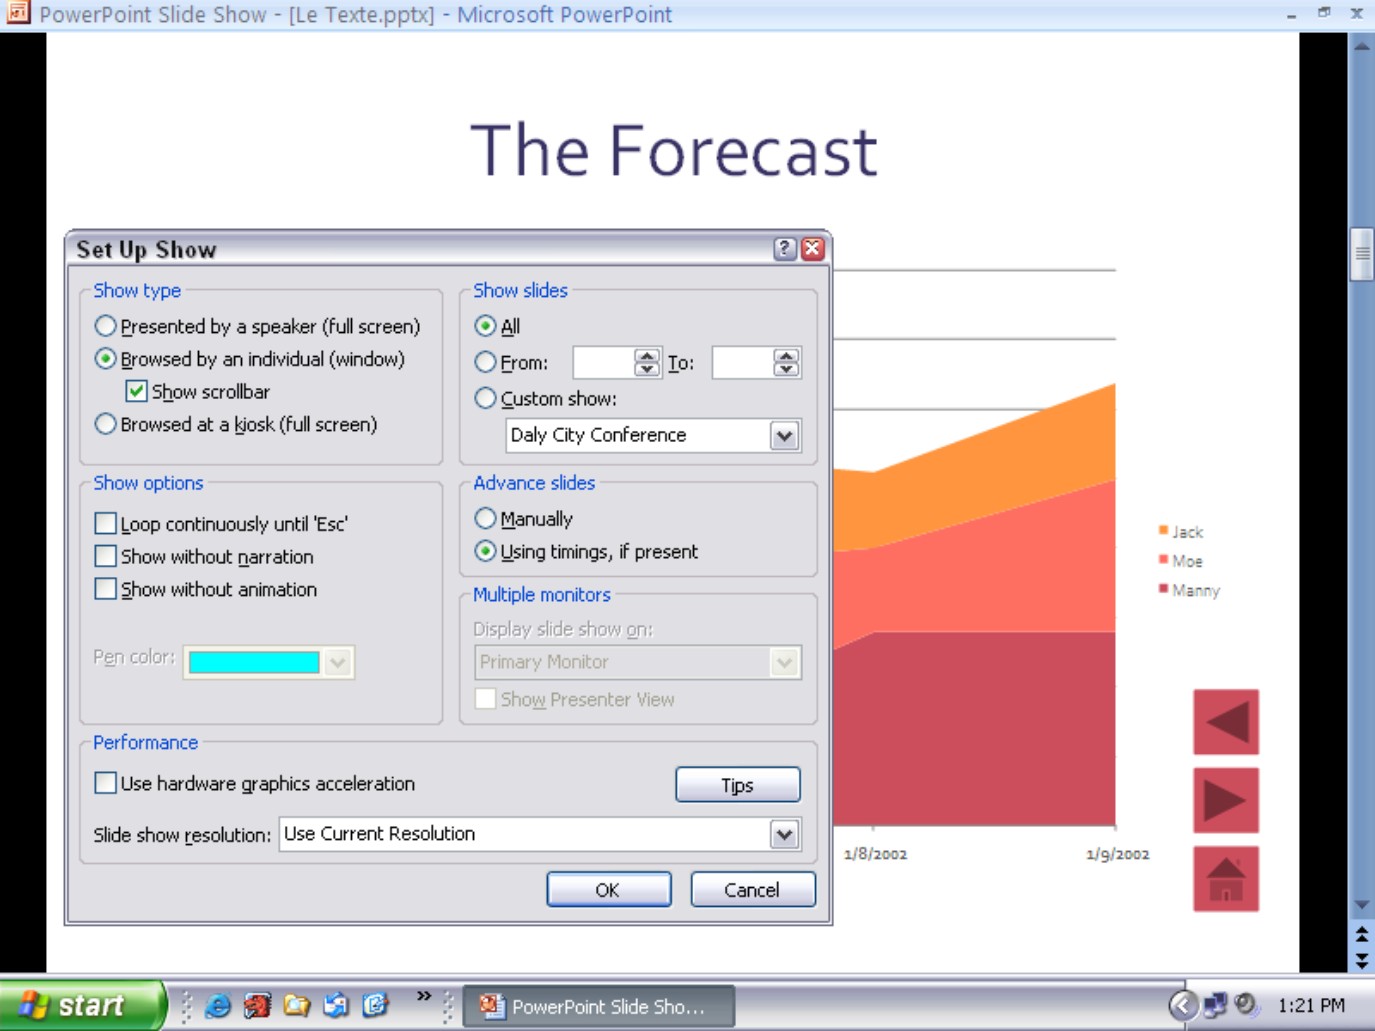
As shown in Figure 4-3, the taskbar appears along the bottom of the window in a user-run presentation. If you so choose, you can also make a scrollbar appear along the right side of the window as well so that people viewing your presentation can scroll from slide to slide. Notice in the figure that the slide control buttons for getting from slide to slide — Previous and Next — don’t appear in a user-run presentation. To get from slide to slide, users have to click action buttons and hyperlinks. The presentation in Figure 4-3 has action buttons in the lower-right corner of all slides to help users get around.
Follow these steps to declare your presentation a “user-run presentation” and maybe allow users to navigate from slide to slide with the scrollbar:
1. Select the Slide Show tab.

2. Click the Set Up Slide Show button.
You see the Set Up Show dialog box shown in Figure 4-3.
3. Select the Browsed by an Individual (Window) option button.
This option button is found under “Show Type.”
4. Optionally, click the Show Scrollbar check box.
Figure 4-3 shows what a presentation window looks like when the scrollbar is displayed.
5. Click OK.
Your presentation is no longer quite yours. It also belongs to all the people who will view it in your absence.
|
Figure 4-3: As you can with the taskbar, you can make the scrollbar appear during a user-run presentation. |
|
Action Buttons vs. Hyperlinks
Action buttons are really nothing more than prefabricated hyperlinks. When you create an action button, a dialog box appears with commands to help you link the button to another slide in your presentation. You can arrange for users to click your action button and go immediately to the next slide, the previous slide, the first or last slide, the last slide they viewed, or a specific slide.
Most of these same commands — to go to the next slide, previous slide, first or last slide, or a specific slide — are also available when you create a hyperlink from one slide to another. So what’s the difference between action buttons and hyperlinks?
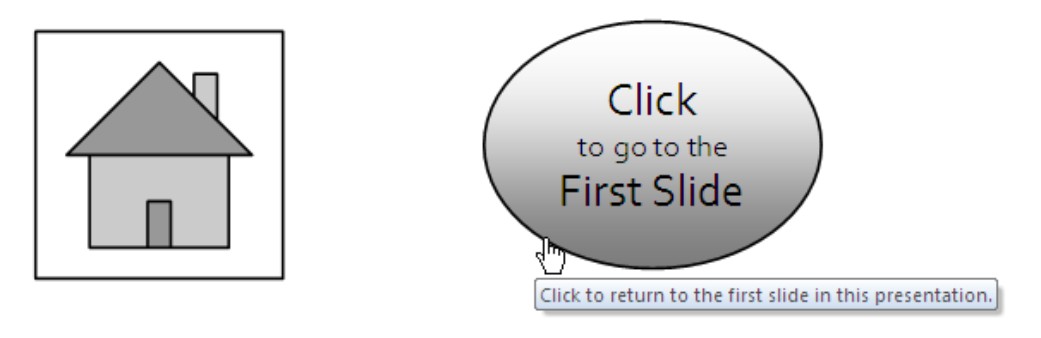
Action buttons can save you the trouble of creating a shape or picture to serve as the hyperlink. Instead of creating a shape, text-box shape, or picture for users to click, you can simply use one of the action buttons. These buttons take only a moment to draw. The action button and hyperlink in Figure 4-4 go to the same place, the first slide in the presentation, but creating the text-box shape for the hyperlink took considerably longer than drawing the action button.
|
Figure 4-4: This action button (left) and hyperlink text box (right) go to the same place. |
|
Action buttons have it over hyperlinks in one important way: You can’t return to the last-viewed slide with a hyperlink. Clicking the Return action button takes users immediately to the slide they viewed previously, and being able to jump to the last slide you viewed is invaluable when you’re working with hidden slides and custom slide shows. No hyperlink command can return you to the last-viewed slide.
In some situations, however, hyperlinks are better than action buttons. On a text-box shape hyperlink, you can give explicit instructions as to what clicking the hyperlink does. In Figure 4-4, for example, it’s plain to see that clicking the text-box shape takes you to the first slide in the presentation; the Home icon on the action button in Figure 4-4 is harder to interpret. Unless you explain what the action buttons do somewhere in your presentation, users may have trouble understanding that they can click action buttons to get from slide to slide. The symbols on some action buttons are hard to fathom.
Figure 4-4 also illustrates an important advantage of hyperlinks over action buttons — you can include a ScreenTip with a hyperlink. ScreenTips appear when you move the pointer over a hyperlink. ScreenTip instructions tell users precisely what clicking a hyperlink does. It would be nice if you could put a ScreenTip on an action button with a simple command, but alas, you can’t do it without jumping through hoops, as the sidebar “Including a ScreenTip on an action button” explains later in this chapter.
Action Buttons for Going from Slide to Slide
An action button is a handy button that users may click to go elsewhere in a presentation. If you so choose, users can “mouse over” — they can move the mouse point over— an action button to activate that button. Because user-run presentations don’t have conventional controls for moving from slide to slide, they require action buttons (and hyperlinks) so that users can get around. Most user-run presentations have a Back, Forward, and Beginning action button on every slide to help users get from place to place. Table 4-1 describes the 11 kinds of action buttons.
Read on to find out how to put an action button on a slide, create your own action button, and place action buttons on master slides so that the buttons appear in the same place on all slides.

Drawing an action button hyperlink
The Shape gallery offers 11 action buttons (12 if you count the Custom button). As soon as you draw an action button shape, a dialog box appears to help you direct PowerPoint where to go when the action button is clicked. Select the slide (or master slide) that needs action and follow these steps to adorn it with an action button:
1. On the Home or Insert tab, open the Shapes gallery and scroll to the Action Buttons category at the bottom.
2. Click an action button to select it.
Table 4-1 explains what these action buttons are.
3. Draw the button on the slide.
To do so, drag the pointer in a diagonal fashion. (As far as drawing them is concerned, action buttons work the same as all other shapes and other objects. Book IV, Chapter 2 explains how to manipulate objects.)
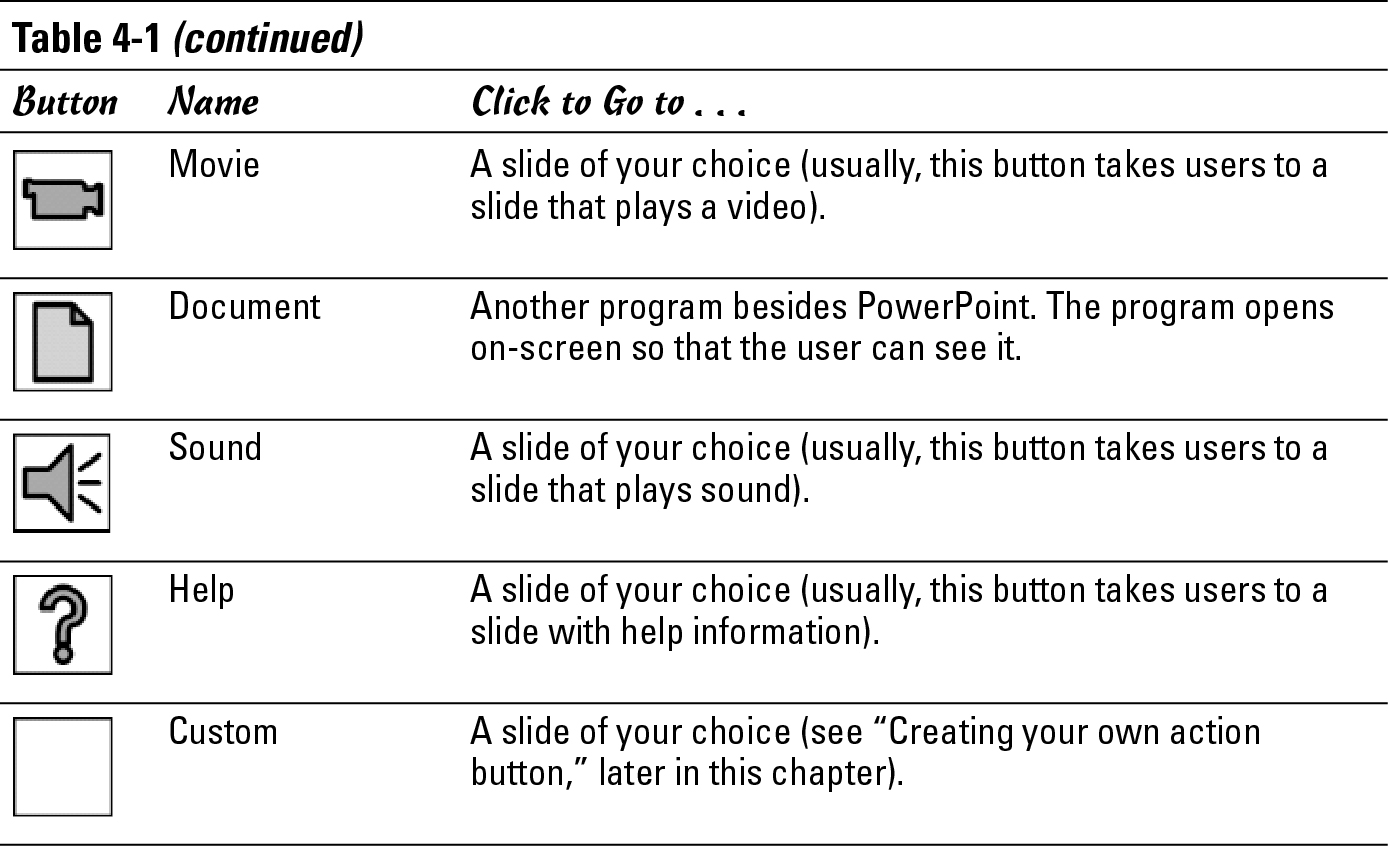
The Action Settings dialog box shown in Figure 4-5 appears when you finish drawing your button.
|
Figure 4-5: Making an action button. |
|
4. Select the Mouse Over tab if you want users to activate the button by moving the mouse pointer over it, not by clicking it.
5. Select the Hyperlink To option button.
6. On the Hyperlink To drop-down list, choose the action you want for the button.
You can go to the next slide, the previous slide, the first or last slide in a presentation, the last slide you viewed, or a specific slide.
To make clicking the action button take users to a specific slide, choose Slide on the list. You see the Hyperlink to Slide dialog box, which lists each slide in your presentation, as shown in Figure 4-5. Select a slide and click OK.
7. To play a sound when your action button is activated, click the Play Sound check box and select a sound on the drop-down list.

“Mouse-over” hyperlinks need sound accompaniment so that users understand when they have activated an action button.
8. Click OK in the Actions Settings dialog box.
To test your button, switch to Slide Show view and click it.
Repairing, removing, and reshaping action buttons
Now to make the button look right and adjust its size and position:
Choosing a different button: Sorry, the only way to choose a different action button for an action is to start all over and redraw the button.

Changing a button’s action: Select the button and then click the Action button on the Insert tab, or right-click the button and choose Edit Hyperlink. In the Action Settings dialog box, choose a new action.
Changing an action button’s appearance: Select the button and go to the (Drawing Tools) Format tab. This tab offers commands for changing the button’s shape, fill color, and outline color (see Book IV, Chapter 2 for details).
Changing the button’s size: Select the button and, on the (Drawing Tools) Format tab, enter measurements in the Height and Width boxes. (Depending on the size of your screen, you may have to click the Size button to see these boxes.)
Changing the button’s position: Click the button to select it. Then drag the button elsewhere.
Removing the hyperlink: Right-click the button and choose Remove Hyperlink to strip the button of its linking capabilities.
Creating your own action button
PowerPoint offers an action button called Custom in case you want to create an action button of your own. After you draw a custom action button and declare what happens when someone clicks it, you can decorate the custom button as you please, perhaps with a halo or garland of flowers.
To create a custom action button, open the Shapes gallery and select the last shape on the drop-down list, the Custom action button. Then draw your button and choose a hyperlink slide in the Action Settings dialog box (see “Drawing an action button hyperlink,” earlier in this chapter).
To enter text on the button, right-click it and choose Edit Text. Then enter some descriptive text. You can also go to the (Drawing Tools) Format tab to change the color, border, and size of your button (see Book IV, Chapter 2 for details).
Including a ScreenTip on an action button
In my opinion, action buttons have one great failing — they don’t show ScreenTips. A ScreenTip is an explanatory word or two that appears when you move the pointer over a link. I like to look before I leap, and I depend on ScreenTips to tell me where clicking a hyperlink will take me.
After some experimentation, I discovered a way to include a ScreenTip on an action button, although you have to jump through hoops to make it happen, and you can’t include a ScreenTip on the Return action button. Follow these steps to create a ScreenTip for an action button:
1. Open the Shapes gallery and draw a conventional shape.
For example, draw a square or rectangle. Which shape you draw doesn’t matter because you will exchange it for an action button in Step 9.
2. Select your shape, and on the Insert tab, click the Hyperlink button.
You see the Insert Hyperlink dialog box.
3. Create a hyperlink to a different slide in your presentation.
Later in this chapter, “Creating a hyperlink to a slide” explains hyperlinks.
4. Still in the Insert Hyperlink dialog box, click the ScreenTip button, enter some commentary in the Set Hyperlink ScreenTip dialog box, and click OK.
The commentary you enter will appear on the action button when you move the pointer over the button.
5. Click OK in the Insert Hyperlink dialog box.
6. Select the Shape you just created.
7. Click the (Drawing Tools) Format tab.
8. Click the Edit Shape button and, on the drop-down list, choose Change Shape.
The Change Shape drop-down list appears.
9. Select an action button at the bottom of the list.
The shape you created in Step 1 assumes the shape of the action button you selected, and when you move the pointer over the action button in a presentation, you see the ScreenTip you wrote in Step 4.

Placing action buttons on a master slide
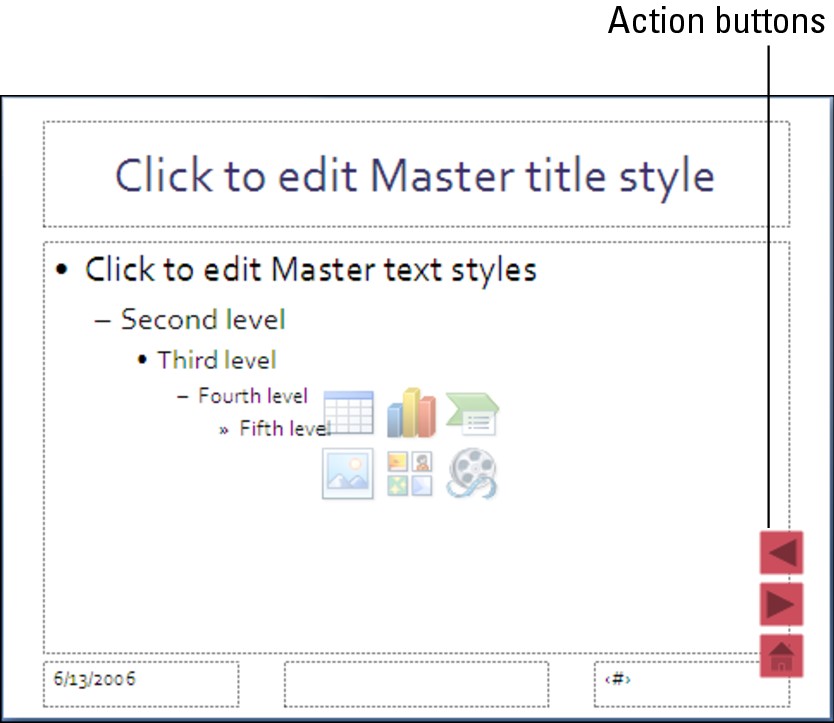
Book II, Chapter 2 explains what master slides are and how, by placing an object on a master slide, you can make the object appear in the same position on several different slides or all the slides in your presentation. Action buttons are perfect candidates for master slides because placing them in the same position on every page helps users find them. Of course, placing action buttons on a master slide also spares you the trouble of placing the buttons on each slide in your presentation. As shown in Figure 4-6, you can place the buttons on a master slide and be done with it.
|
Figure 4-6: Action buttons on a master slide. |
|
Visit Book II, Chapter 2 to examine master slides in detail. To place an action button on a master slide, click the View tab, click the Slide Master button, select the Slide Master or a slide layout, click the Home or Insert tab, and draw your action buttons. Be sure to put them to the side, on the top, or on the bottom of the slide in an out-of-the-way place.
Creating Hyperlinks
For navigation purposes, you can create a hyperlink to any slide in a presentation. You can fashion the link out of a word or phrase as well as any object — a clip-art image, text box or text frame, shape, or picture. These pages explain how to insert a hyperlink to another slide in a presentation as well as create links to Web pages and to files on your computer. You also discover how to enter an e-mail hyperlink and make it easy for others to e-mail you about the subject matter of a presentation.
Creating a hyperlink to a slide
Follow these basic steps to create a hyperlink to another slide in your presentation:
1. Select the object or text that will form the hyperlink.
For example, select a text box if you want viewers to be able to click it to go to another slide. You can also select a word or phrase to turn it into a hyperlink. Hyperlinked text is underlined on slides.

2. On the Insert tab, click the Hyperlink button (or press Ctrl+K).
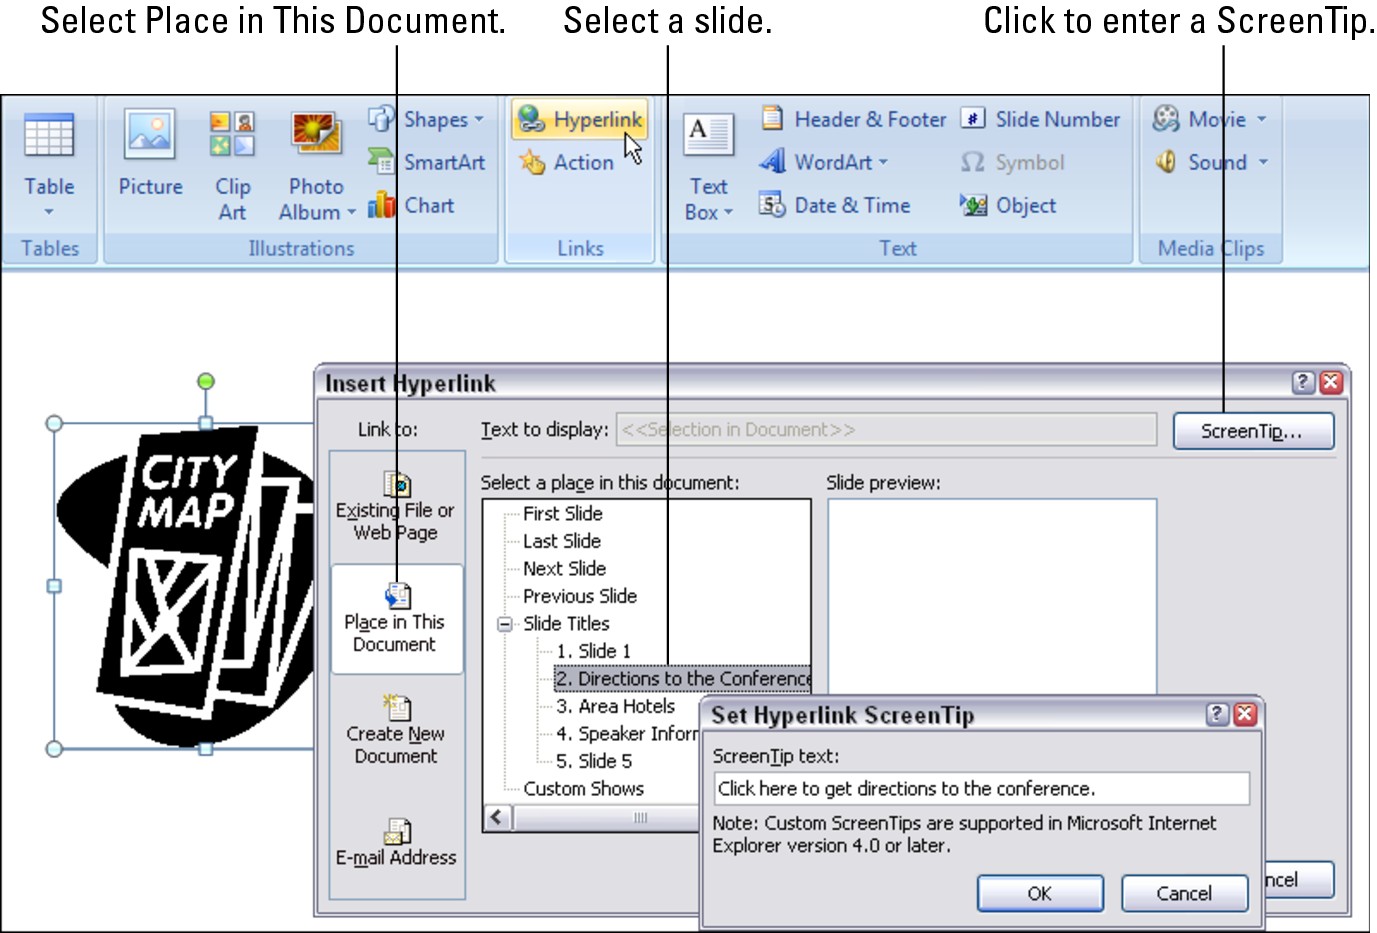
You see the Insert Hyperlink dialog box shown in Figure 4-7. You can also open this dialog box by right-clicking an object or selected text and choosing Hyperlink on the shortcut menu.
|
Figure 4-7: Select the target of the hyperlink in this dialog box. |
|
3. Under Link To, select Place in This Document.
You see a list of slides in your presentation, as well as links to the first, last, next, and previous slide.
4. Select a slide to be the target of the hyperlink.
To jump across several slides, select a slide name under Slide Titles.
5. Click the ScreenTip button.
You see the Set Hyperlink ScreenTip dialog box shown in Figure 4-7.
6. Enter a ScreenTip and click OK.
When viewers move their pointers over the link, they’ll see the words you enter. Enter a description of where the hyperlink takes you.
7. Click OK in the Insert Hyperlink dialog box.
To test your hyperlink, switch to Slide Show view and move the pointer over it. The pointer should change into a hand, and you should see the ScreenTip you wrote. Click the link to see whether it takes you to the target slide.
Creating a hyperlink to a Web page
It could well be that a Web page on the Internet has all the information your visitors need. In that case, you can link to the Web page so that viewers can visit it in the course of viewing your presentation. To make this little trick work, however, the computer on which you will show your presentation must be connected to the Internet. Moreover, Internet Explorer 4.0 or higher must be installed on your computer, and you must know the address of the Web page you will link to.
When a viewer clicks the link, Internet Explorer opens on the computer, and the taskbar appears along the bottom of the screen. When viewers are finished looking at the Web page, they can return to your PowerPoint presentation by clicking its button on the taskbar.
Follow these steps to hyperlink to a Web page on the Internet:
1. Select the object or text that will form the hyperlink.
2. On the Insert tab, click the Hyperlink button (or press Ctrl+K).
You see the Insert Hyperlink dialog box. Another way to open this dialog box is to right-click and choose Hyperlink on the shortcut menu.
3. Under Link To, select Existing File or Web Page.
4. Enter the address of the Web page to which you want to link in the Address text box, as shown in Figure 4-8.
From easiest to hardest, here are techniques for entering Web page addresses:
• Click the Browse the Web button (Figure 4-8 shows where this button is). Internet Explorer opens. Go to the Web page you want to link to and return to PowerPoint without closing the Web browser. The Web page’s address appears in the Address text box.
• Click Browsed Pages. The dialog box lists Web pages you recently visited, as shown in Figure 4-8. Select a Web page.
• Enter a Web page address manually in the Address text box.
|
Figure 4-8: Enter the Web page target in the Address text box to create a hyperlink to a Web page. |

|
5. Click the ScreenTip button, enter a ScreenTip in the Set Hyperlink ScreenTip dialog box, and click OK.
Viewers will be able to see the ScreenTip you enter when they move their pointers over the hyperlink (refer to Figure 4-4).
6. Click OK in the Insert Hyperlink dialog box.
I would test the hyperlink if I were you. Make sure that it takes viewers to the right Web page. To test a hyperlink, right-click it and choose Open Hyperlink on the shortcut menu.
Hyperlinking to a file in another program
Suppose in the course of a presentation that you would like to give users the opportunity to open and view a file in a program apart from PowerPoint. For example, you want users to be able to view a Word document or PDF file during a self-run presentation. It can be done. You can create a hyperlink that opens a file found on your computer. The user can gaze at the file and, to return to the PowerPoint presentation, click its button on the taskbar.
Follow these steps to create a hyperlink that opens a file on your computer:
1. Select the object or text that will form the hyperlink.
2. On the Insert tab, click the Hyperlink button (or press Ctrl+K).
You see the Insert Hyperlink dialog box.
3. Under Link To, click Existing File or Web Page.
4. Click the Browse for File button.
You can find this button — it looks like a folder — next to the Bookmark button. The Link to File dialog box appears.
5. Find the file you want users to be able to open, select it, and click the OK button.
You return to the Insert Hyperlink dialog box.
6. Click the ScreenTip button and, in the Set Hyperlink ScreenTip dialog box, enter a word or two that explains to users that clicking the link opens a file; then click OK.
Users will be able to read the words you enter when they move their pointers over the hyperlink.
7. Click OK in the Insert Hyperlink dialog box.
Test your hyperlink to make sure that it successfully opens a file. Another thing: Be careful not to move the target file, because doing so renders the hyperlink invalid.
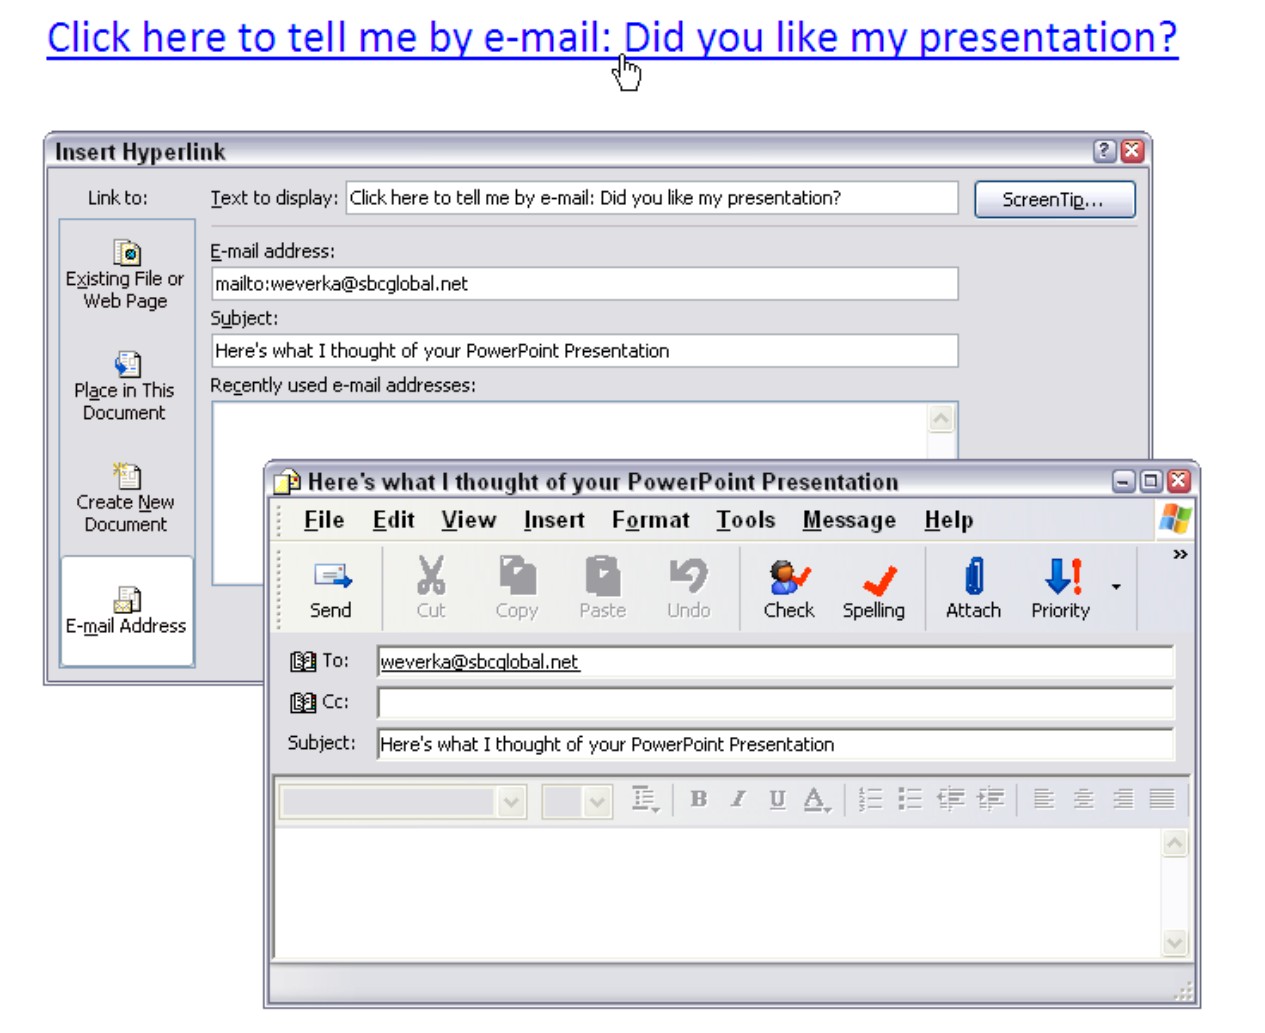
Creating an e-mail hyperlink
An e-mail hyperlink is one that opens an e-mail program. These links are sometimes found on Web pages so that anyone visiting a Web page can conveniently send an e-mail message to the person who manages the Web page. When you click an e-mail hyperlink, your default e-mail program opens. And if the person who set up the link was thorough about it, the e-mail message is already addressed and given a subject line.
Follow these steps to put an e-mail hyperlink in your presentation so that others can get in touch with you:
1. Select the words or object that will constitute the link.
2. On the Insert tab, click the Hyperlink button (or press Ctrl+K).
The Insert Hyperlink dialog box appears.
3. Under Link To, click E-Mail Address.
As shown in Figure 4-9, text boxes appear for entering an e-mail address and subject message.
4. Enter your e-mail address and a subject for the messages that others will send you.
PowerPoint inserts the word mailto: before your e-mail address as you enter it.
5. Click OK.
Test the link by clicking it during a slide show. Your default e-mail program will open. The e-mail message is already addressed and given a subject.
|
Figure 4-9: An e-mail hyperlink opens the default e-mail program. |
|
Repairing and removing hyperlinks
From time to time, check the hyperlinks in your presentation to make sure that they work. Clicking a hyperlink and having nothing happen is disappointing. Hyperlinks get broken when slides are deleted, Web pages are moved around, and files are moved to different folders.
To repair or remove a hyperlink, right-click the link and choose Edit Hyperlink on the shortcut menu (or click in the link and then click the Hyperlink button on the Insert tab). You see the Edit Hyperlink dialog box. This dialog box looks and works just like the Insert Hyperlink dialog box.
Repairing a link: Choose a target slide in your presentation, a Web page, or a file you want users to be able to open, and click OK.
Removing a link: Click the Remove Link button. You can also remove a hyperlink by right-clicking the link and choosing Remove Hyperlink on the shortcut menu.
Making Sure That Your Presentation Doesn’t Stall
No matter how good your presentation is, someone will abandon it in the middle. And if your presentation is being given at a trade show or other public place, that can have untoward consequences, because the next person who comes along will not be able to make heads or tails of your presentation. Your presentation will sit there, stalled in the middle, a floundering fish, a car stuck in the mud.
To prevent a presentation from stalling, you can “loop it” so that it returns to slide 1 when it is over, and you can make sure that dormant slides yield to other slides after a certain amount of time has elapsed. If your presentation stalls on slide 6, for example, you can make it move on to slide 7 automatically after a minute has passed, and eventually make it come around to slide 1 again, where it will remain until someone new comes along to view your presentation.
First, to make your presentation “loop” to the first slide when it is complete, follow these steps:
1. On the Slide Show tab, click the Set Up Slide Show button.
The Set Up Slide Show dialog box appears.
2. Select the Loop continuously until ‘Esc’ check box.
3. Select the Using Timings, if Present option button.
4. Click OK.
Second, follow these steps to limit the amount of time each slide apart from Slide 1 stays on-screen:
1. Switch to Slide Sorter view.
2. On the Animations tab, click the Automatically After check box.
3. Enter a time period in the Automatically After text box.
For example, to limit the amount of time that slides remain on-screen to one minute, enter 60 in the text box. Try to gauge the longest amount of time that a viewer of the presentation needs to see the slides.

4. Click the Apply To All button.
In Slide Sorter view, you can see that each slide in your presentation is scheduled to remain on-screen for the amount of time you entered in Step 3. Your next task is to tell PowerPoint to show the first slide indefinitely.
5. Select the first slide in your presentation.
6. Unselect the Automatically After checkbox.
Now your presentation will “loop” around to slide 1 and remain there until somebody comes along to start the presentation. Your presentation is no longer in danger of stalling.