Chapter 5: Alternative Ways to Distribute Presentations
In This Chapter
 Getting your presentation in shape before you send it off
Sending a presentation over the Internet without leaving PowerPoint
Copying a presentation and the PowerPoint Viewer to a CD
Distributing a presentation to people who don’t have PowerPoint
Saving a presentation as a Web page for viewing in a Web browser
There’s more than one way to skin a cat, and there’s more than one way to deliver a presentation. If you can’t be there in person, you can still deliver your presentation with the techniques outlined in this chapter. It explains how to send a presentation by e-mail, copy it to a CD, and save it as a Web page so that it can be viewed over the Internet. You also find out how people who don’t have PowerPoint can view your presentation with a software program called the PowerPoint Viewer.
By the way, you can also distribute a PowerPoint presentation the old- fashioned way — by printing it and handing out the pages. Book VI, Chapter 2 explains how to print PowerPoint presentations.
Putting On the Finishing Touches
Before you send a PowerPoint presentation into the world to make friends, consider putting the finishing touches on your presentation:
 Examine the document properties: As Book I, Chapter 2 explains, document properties can help you organize presentations, search for presentations on your computer, and record what presentations are about. Perhaps, however, the comments you wrote in the document properties aren’t meant for just anyone to read. To examine a presentation’s document properties and perhaps edit them, click the Office button and choose Prepare⇒Properties.
Inspect your presentation for metadata and personal information: PowerPoint can inspect your document for comments, document properties (otherwise known as metadata), shapes, and objects that have been rendered invisible. To conduct the inspection, click the Office button and choose Prepare⇒Inspect Document. You see the Document Inspector dialog box, shown on the left side of Figure 5-1. Tell PowerPoint how to conduct the inspection and then click the Inspect button. As shown on the right side of Figure 5-1, the Document Inspector dialog box informs you whether dubious matter was found. Click a Remove All button if you want to remove metadata or personal information in one of the categories.
Make your presentation read-only: A read-only file is one that can be read but not changed in any way unless it is saved under a new name. To make your presentation a read-only file and keep it from being tampered with, click the Office button and choose Prepare⇒ Mark As Final.
|
Figure 5-1: Inspecting a document for illicit cargo. |

|
Sending Your Presentation in an E-Mail Message
As long as you handle your e-mail with Outlook 2007, you can send a PowerPoint presentation to a friend or co-worker without having to open Outlook 2007. You simply choose a command in PowerPoint and send the thing over the Internet. Follow these steps to send the presentation you are working on to a friend or co-worker:

1. Click the Office button.
2. Choose Send ⇒Email.
An Outlook 2007 message window appears with the name of your PowerPoint presentation on the subject line and the presentation itself in the Attach box. Your presentation is ready to be sent along with the e-mail message.
3. Enter the recipient’s address in the To box and a message in the Message box.
4. Click the Send button.
That was fast! It’s faster than opening Outlook and attaching the presentation to the e-mail message on your own.
Packaging Your Presentation on a CD
The Package for CD command copies a presentation to a CD so that you can take a presentation on the road or distribute it to others on CDs. Using the Package for CD command, you can even distribute a presentation to people who don’t have PowerPoint on their computers. Along with the presentation, the command copies a program called PowerPoint Viewer to the CD. PowerPoint Viewer is an abridged version of PowerPoint. It has all of PowerPoint’s slide-show commands but none of its slide-creation commands. As soon as someone pops the CD in a computer, PowerPoint Viewer opens, and the presentation you copied starts playing in PowerPoint Viewer. With the Package for CD command, you don’t have to be concerned when you go on the road whether PowerPoint is installed on the computer where you are expected to give your presentation.
The Package for CD command offers another important benefit. As Book V, Chapter 2 (about video) and Book V, Chapter 3 (about sound) explain, video files and most sound files aren’t embedded in presentations. To keep presentations from getting too large, video and most sound files are kept separate from PowerPoint presentation files. To play a video or sound, PowerPoint reaches into the folder on your computer where the video or sound file is kept, and it plays the video or sound file from that location. A video or sound you insert in a slide isn’t really part of your presentation — it’s really on loan from elsewhere.
You don’t have to bother about sound and video files if your presentation isn’t going to be shown on a different computer or be passed to anyone else. But if your presentation will travel and it includes sound and video, you have to consider how to transport the sound and video files along with your presentation file. The easiest way to transport these files is to bundle the files with your PowerPoint presentation by using the Package for CD command. You can be certain that all the files you need to play a presentation are with you when you take your presentation on the road or give it to someone else.
These pages explain the ins and outs of the Package for CD command. You find out how to copy a presentation (and PowerPoint Viewer) to a CD, copy more than one presentation to a CD, assemble all the video and sound files in one folder, and play a presentation in PowerPoint Viewer.
Packaging a presentation on a CD
Follow these steps to copy your presentation along with all its attendant files and the PowerPoint Viewer to a CD:
1. Open the presentation you want to “package.”
2. Click the Office button.
3. Choose Publish ⇒Package for CD.
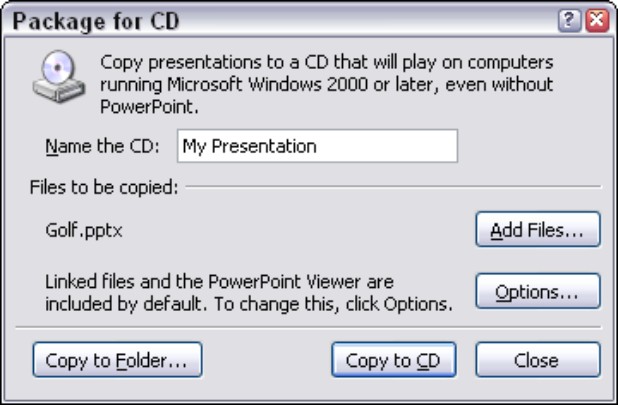
You see the Package for CD dialog box, shown in Figure 5-2. (See the next section in this chapter if you want to copy more than one presentation to a CD.)
4. Enter a name for the CD in the Name the CD text box.
The name you enter will appear as the name of the CD when you view the CD in Windows Explorer or My Computer.
5. Click the Copy to CD button.
|
Figure 5-2: The Package for CD command assembles all files needed to play a presentation. |
|
6. Click Yes in the message box that asks whether you want to include linked content in the presentation.
It can take PowerPoint several minutes to assemble the files and copy them to the CD. Besides the files, PowerPoint needs to copy the PowerPoint Viewer program (pptview.exe) to the CD.
PowerPoint asks whether you want to copy the same presentation to another CD.
7. Either insert a fresh CD and click Yes, or click the No button.
That wasn’t so hard, was it?
Packaging more than one presentation on a CD
Follow these steps to copy more than one PowerPoint presentation (as well as PowerPoint Viewer) to a CD:
1. Open one of the presentations you want to copy to a CD.
2. Click the Office button and choose Publish ⇒Package for CD.
You see the Package for CD dialog box (refer to Figure 5-2).
3. Enter a name for the CD in the Name the CD text box.
The name you enter will appear as the name of the CD when you view the CD in Windows Explorer or My Computer.
4. Click the Add Files button.
The Add Files dialog box appears.
5. Select the presentation (or presentations) you want to copy to the CD and then click the Add button.
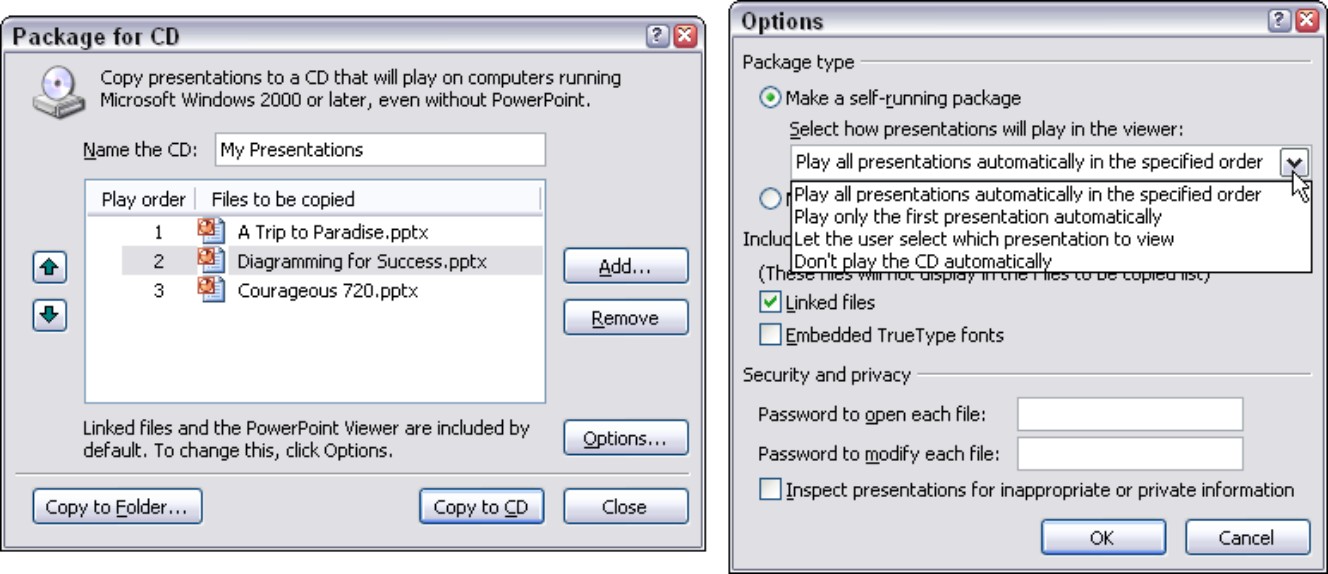
You can select more than one by Ctrl+clicking presentations’ names. As shown in Figure 5-3, the Package for CD dialog box lists the presentations you selected.
As you will find out very shortly, the order of presentations matters. You can select a presentation and click the Up or Down button to change its position in the order.
|
Figure 5-3: Choose the order of presentations (left) and how they are staged on the CD (right). |
|
6. Click the Options button.
The Options dialog box shown in Figure 5-3 appears.
7. Choose an option on the Select How Presentations Will Play in the Viewer drop-down list.
These options pertain to how a presentation is staged on the CD and whether the person viewing the presentation in PowerPoint Viewer gets to decide which presentation is played. Choose one of these options:
• Play All Presentations Automatically in the Specified Order: Presentations appear one after the other in the order they are listed in the Package for CD dialog box (refer to Figure 5-3).
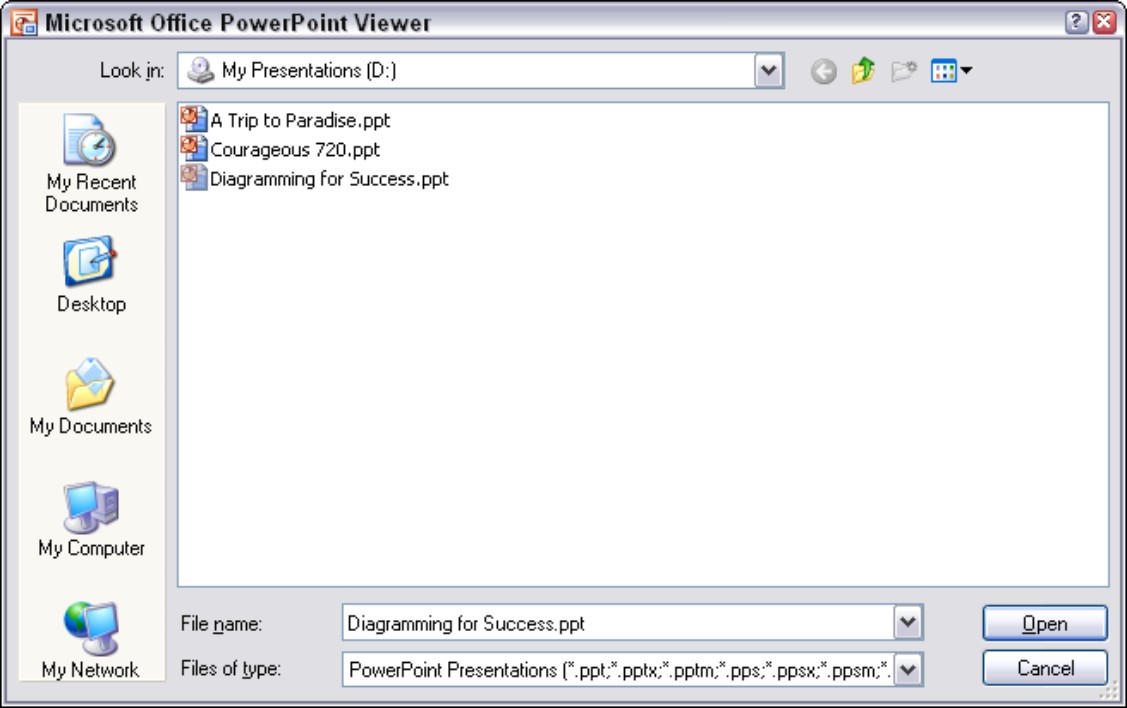
• Play Only the First Presentation Automatically: The first presentation listed in the Package for CD dialog box appears, after which viewers see the Microsoft Office PowerPoint Viewer dialog box, shown in Figure 5-4. From there, they can select a presentation and click the Open button to start playing it.
|
Figure 5-4: Choosing which presentation to play in PowerPoint Viewer. |
|
• Let the User Select Which Presentation to View: The Microsoft Office PowerPoint Viewer dialog box, shown in Figure 5-4, appears as soon as a user puts the CD in his or her machine. The person viewing presentations can decide which one to play first. Select a presentation and click the Open button to start playing it.
• Don’t Play the CD Automatically: No presentation on the CD appears automatically in PowerPoint Viewer. To make the presentations play, the user must display the CD’s contents in My Computer or Windows Explorer and double-click the pptview.exe (the PowerPoint Viewer) program.
8. Click OK in the Options dialog box.
9. Click the Copy to CD button in the Package for CD dialog box, and click Yes in the message box that asks whether you want to include linked content in the presentation.
Twiddle your thumbs while the presentation files are copied to the CD.
When PowerPoint asks whether you want to copy the same presentation to another CD, either insert a new CD and click Yes or take the rest of the day off, and give yourself a raise while you’re at it.
Using the Package command to assemble sound and video files
If the files needed to play your presentation are scattered hither and yon on your computer, you can use the Package for CD command to assemble the files in one folder. The command gathers together all video and sound files and places them in a folder where they are easier to find and edit, not to mention copy elsewhere. Follow these steps to make a copy of all the files used in your presentation as well as the presentation itself and place all files in a folder:
1. Open your presentation, click the Office button, and choose Publish ⇒Package for CD.
You see the Package for CD dialog box (refer to Figure 5-2).
2. Click the Copy to Folder button in the Package for CD dialog box.
The Copy to Folder dialog box appears.
3. Click the Browse button, select a folder in the Choose Location dialog box, and then click the Select button.
4. Click OK in the Copy to Folder dialog box, and click Yes when PowerPoint asks whether you want to include linked content in the presentation copy.
Your presentation and its attendant video and sound files are copied to the folder you selected in Step 3. You can go to the folder and open your presentation from there in PowerPoint.
Playing a presentation from a CD in PowerPoint Viewer
If you distribute your presentation on a CD, be sure to include instructions for playing the presentation. Tell the people to whom you give the CD that the CD plays automatically when you put it in a computer’s CD drive (or that users can select a presentation to play, as shown in Figure 5-4, if you opted to give them the opportunity to decide when a presentation plays).
Here are methods for running a presentation in PowerPoint Viewer:
Getting from slide to slide: Click on-screen or right-click and choose Next on the shortcut menu.
Retreating: Right-click and choose Previous or Last Viewed.
Going to a specific slide: Right-click, choose Go to Slide, and select a slide on the submenu.
Ending the show: Press Esc or right-click and choose End Show.
If your presentation includes video or sound, inform users that they may have to click the sound icon or video screen to hear the sound or watch the video. Whether users have to click or the sound or video plays automatically depends on which option you choose — Automatically or When Clicked — when you inserted the sound or video on your slides.
Distributing Your Presentation to People Who Don’t Have PowerPoint
Not everyone has PowerPoint. Not everyone is so blessed. Some people live along in ignorant bliss without knowing anything about PowerPoint and its slide-show capabilities.
Don’t be discouraged if you want to send your PowerPoint presentation to someone who doesn’t have or may not have PowerPoint. Someone who doesn’t have PowerPoint on his or her computer can still play a PowerPoint presentation by way of PowerPoint Viewer, a software program you can download for free from Microsoft starting at this Web page (enter PowerPoint Viewer in the Search text box and click the Go button):
What’s more, as “Packaging Your Presentation on a CD” explains earlier in this chapter, you place a copy of PowerPoint Viewer on the CD when you use the Package for CD command to copy a PowerPoint file to a CD. When you distribute a presentation by CD, you also distribute PowerPoint Viewer, and anyone who receives your presentation can play it right away with PowerPoint Viewer.
Putting a presentation on a DVD
How’d you like to burn a PowerPoint presentation on a DVD and watch it on a TV screen? I can’t vouch for these two programs, but they claim to be able to turn PowerPoint presentations into TV shows:
PowerPoint to DVD: Burns PowerPoint presentations on a DVD for viewing on a regular television. This program costs $99. Address: www.powerpoint-to-dvd.com
PowerPoint DVD Burner: Burns PowerPoint presentations onto DVDs. The cost is $169.95. Address: www.ppt-to-dvd.com
Saving Your Presentation as a Web Page
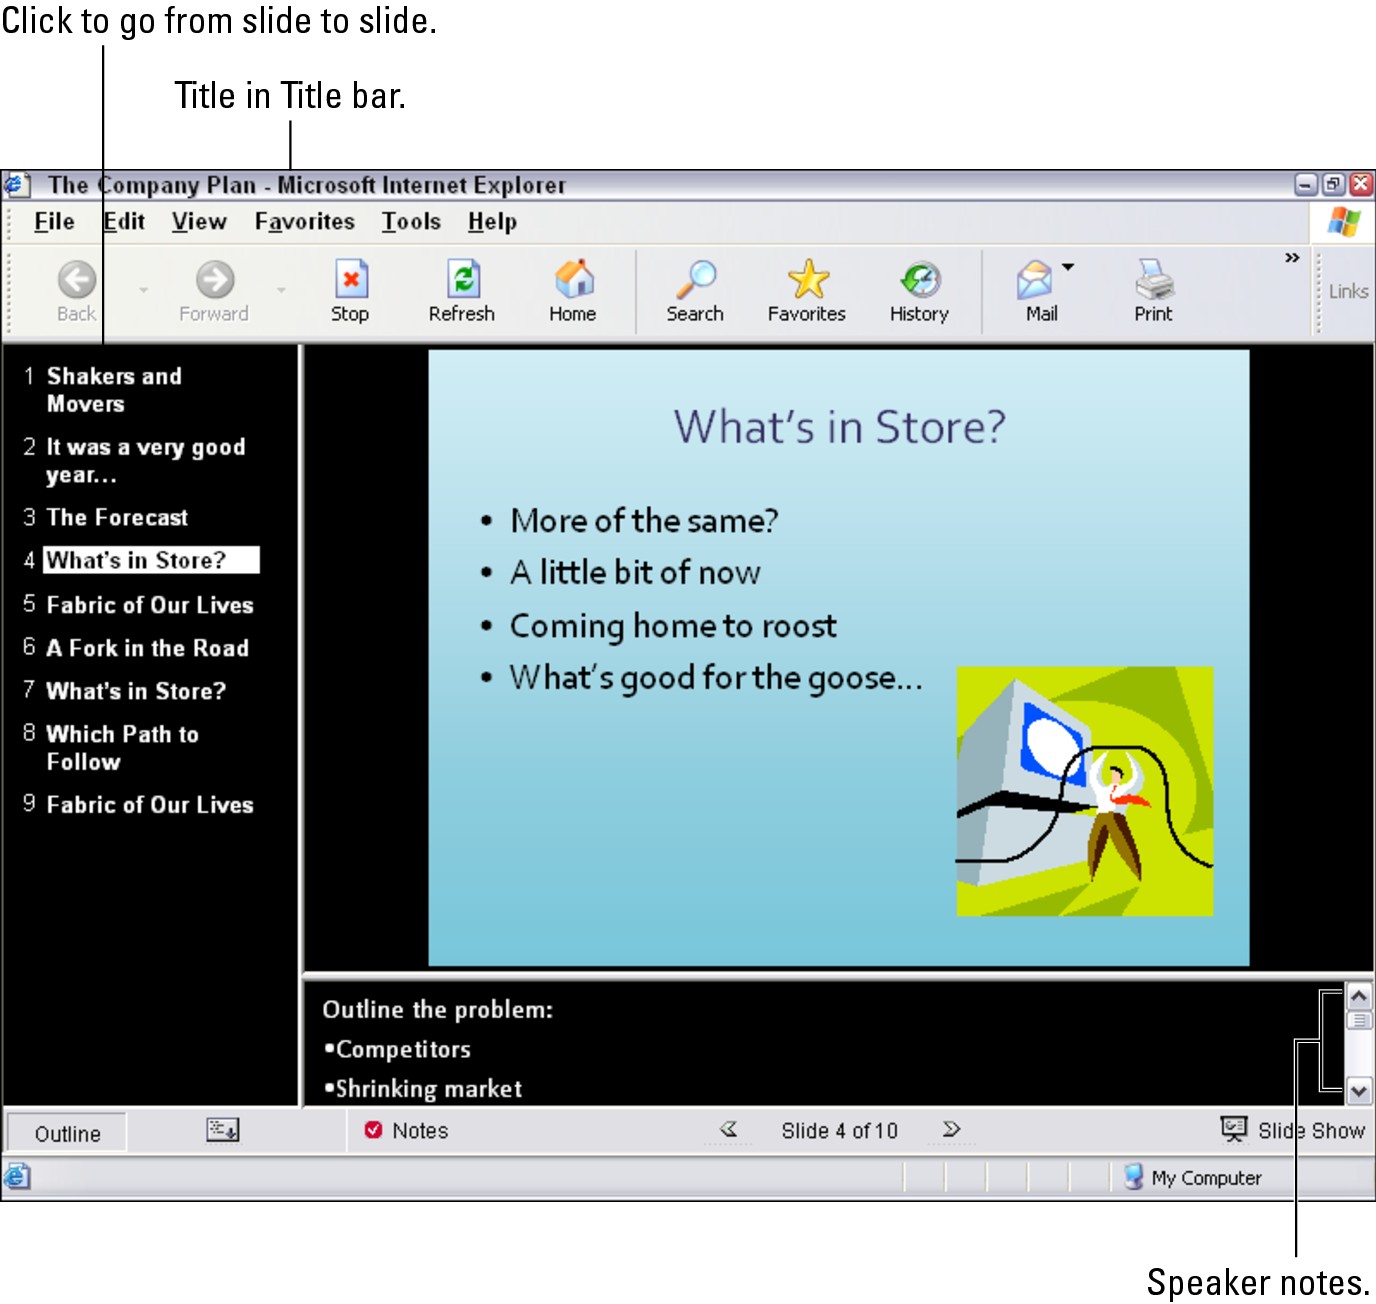
Figure 5-5 shows what a PowerPoint presentation looks like after it is saved as a Web page and displayed in a Web browser. Looks like a normal presentation, doesn’t it? Similarly to the Slides pane, slide titles appear in a frame on the left side of the browser screen. By clicking a slide title, you can display a different slide. Speaker notes appear in a frame along the bottom of the screen (although you can dispense with the notes, as I explain shortly).
These pages describe how to save a presentation as a Web page, open a Web page you created in a Web browser, and fine-tune your Web page.
|
Figure 5-5: Viewing a PowerPoint presentation in a Web browser. |
|
Turning a presentation into a Web page

Follow these steps to save a PowerPoint presentation as a Web page:
1. Click the Office button and choose Save As on the drop-down list.
The Save As dialog box appears.
2. Open the Save As Type drop-down list and choose Web Page.
New buttons — Change Title and Publish — appear in the Save As dialog box.
3. Click the Change Title button, enter a descriptive title in the Set Page Title dialog box, and click OK.
The title you enter will appear in the title bar along the top of the Web browser window (refer to Figure 5-5). PowerPoint gets the title from the title you entered in your presentation’s document properties (click the Office button and choose Prepare⇒Properties to see a presentation’s document properties). However, your presentation probably needs a more descriptive title suitable for the Internet.
4. Click the Publish button.
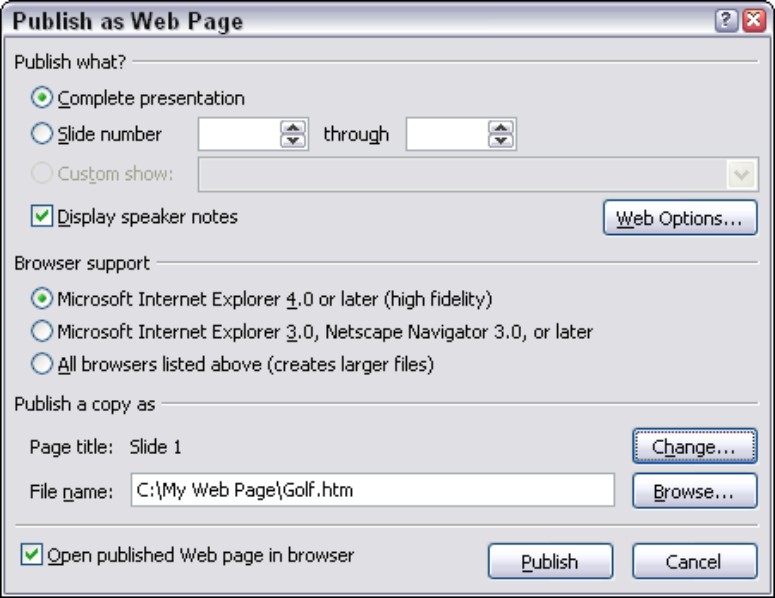
As shown in Figure 5-6, the Publish as Web Page dialog box appears. As “Fine-tuning your Web page” explains later in this chapter, this dialog box offers many options for deciding what the Web page looks like and how its files are organized. For now, you need to tell PowerPoint where to save the Web page you’re creating from your PowerPoint presentation.
5. Click the Browse button, and in the Publish As dialog box, select the folder where you will keep the Web page and its support files; then, click OK.
You return to the Publish as Web Page dialog box.
6. Click the Open Published Web Page in Browser check box.
By checking this box, you can see your presentation in a Web browser as soon as you save it as a Web page. The presentation will open in your default browser, the one that opens automatically on your computer when your computer encounters a Web page.
|
Figure 5-6: Telling PowerPoint how to publish a Web page. |
|
7. Click the Publish button.
PowerPoint creates the Web page and its support files. It stores them in the folder you selected in Step 5.
The Web page you created opens in your browser if you selected the Open Published Web Page in Browser check box.
Opening a PowerPoint Web page in your browser
To open a Web page you fashioned from a PowerPoint presentation, open the folder where you stored the Web page in My Computer or Windows Explorer and click the .htm file named after your PowerPoint presentation. For example, if your presentation is called Sales Projections, double-click the Sales Projections.htm file to open the Web page.
While you’re at it, you may consider bookmarking the Web page so that you can open it in your browser. To bookmark a Web page in Internet Explorer, open the Web page you want to bookmark and choose Favorites⇒Add to Favorites.
Fine-tuning your Web page
By way of the Publish as Web Page dialog box (refer to Figure 5-6), PowerPoint offers a bunch of different ways to decide what your Web page looks like and how its files are organized. To open the Publish as Web Page dialog box, click the Office button and choose Save As. If you’ve already saved your presentation as a Web page, the Change Title and Publish buttons already appear in the Save As dialog box. (If they don’t appear, open the Save As Type drop-down list and choose Web Page.) Click the Publish button to open the Publish as Web Page dialog box.
Starting in this dialog box, you can fine-tune your presentation. You can also click the Web Options button and open the Web Options dialog box to fine-tune a presentation, as shown in Figure 5-7. Many of the options in these dialog boxes are quite esoteric and not worth bothering with, but a handful are worth knowing about, as the following pages explain.
|
Figure 5-7: The General tab (left) and Files tab (right) of the Web Options dialog box. |

|
Removing the speaker notes and slide navigation controls
Speaker notes and slide navigation controls appear by default on PowerPoint Web pages (refer to Figure 5-5). To remove the speaker notes or navigation controls and make your Web page look more like a genuine PowerPoint presentation, do the following:
Unselect the Display Speaker Notes check box in the Publish as Web Page dialog box (refer to Figure 5-6).
Unselect the Add Slide Navigation Controls check box on the General tab of the Web Options dialog box (refer to Figure 5-7).
Changing the look of the Web page
To begin with, PowerPoint Web pages show white text on a black background (refer to Figure 5-5). If you prefer another color scheme, open the Colors drop-down list on the General tab of the Web Options dialog box (refer to Figure 5-7) and select one.
Choosing a target browser
“Browser support” refers to which Web browser your presentation is targeted. Choosing a late-model browser allows for more PowerPoint features to translate to the Web page, but fewer people have late-model browsers than have older ones. To choose which browser to make the target of your presentation, click the Web Options button in the Publish as Web Page dialog box, select the Browsers tab in the Web Options dialog box, and choose an option on the People Who View This Web Page Will Be Using drop-down list.
Organizing the support files
To turn a PowerPoint presentation into a Web page, PowerPoint creates two or three dozen support files. These support files are kept in the same folder as the .htm file that forms the home page of your PowerPoint presentation. But if you prefer to herd the support files into their own folder, go to the Files tab of the Web Options dialog box and select the Organize Supporting Files in a Folder check box (refer to Figure 5-7).