Chapter 4: Linking and Embedding for Compound Presentations
In This Chapter
 Understanding what object linking and embedding (OLE) is
Creating and editing embedded objects
Creating and updating linked objects
A compound file is a computer file that brings together data created in different programs. A year-end report is a classic example of a compound file. Typically, a year-end report includes word-processed text, worksheet tables, and graphics. Thanks to object linking and embedding (OLE), PowerPoint presentations can also be compound files. They can include data from different sources — Excel worksheets, Word text, Paint graphic files. What’s more, you can copy and continuously update material from other programs without leaving PowerPoint.
All this magic is accomplished with something called object linking and embedding (OLE). This chapter explains OLE, tells you how to embed data from another file in PowerPoint, and explains how to link data from another file so that your slides are updated automatically.
By the way, OLE is pronounced “olay,” the very same word that the bullfight audience shouts when the bull passes under the matador’s cape. ¿Loco, verdad?
What Is OLE, Anyway?
Object linking and embedding (OLE) is a means of bringing programs besides PowerPoint into the mix without leaving PowerPoint. You can think of OLE as a high-powered version of the standby Copy and Paste commands. As you probably know, the Copy and Paste commands are for copying material from one place or program to another. For example, using the Copy and Paste commands, you can copy text from a Word file into a PowerPoint slide. You can copy columns and rows from an Excel worksheet and paste them straight into a PowerPoint table.
Linking and embedding
Object linking takes the copy-and-paste concept a step further. When you copy text from a Word file to a PowerPoint slide, you can link the Word file and PowerPoint slide so that changes made to the Word text are made as well to the same text on your PowerPoint slide. In effect, object linking means being able to run the Copy and Paste commands in the background without having to actually choose Copy or Paste. Linking establishes a connection between the two objects — in this case the Word document and PowerPoint slide — so that the one updates the other.
Similarly, object embedding enables you to keep, or embed, foreign data from other programs in a PowerPoint slide. PowerPoint understands that the data is foreign. When you click the data, the PowerPoint menus and commands disappear, to be replaced by menus and commands belonging to the program designed to handle the data. For example, when you click an Excel worksheet embedded on a PowerPoint slide, you see Excel menus and commands for handling the worksheet data. In effect, you can open another program inside PowerPoint and use the other program to create data without having to copy the data from the other program. The object — the Word document or Excel worksheet — isn’t connected to another file but is contained within your PowerPoint file.
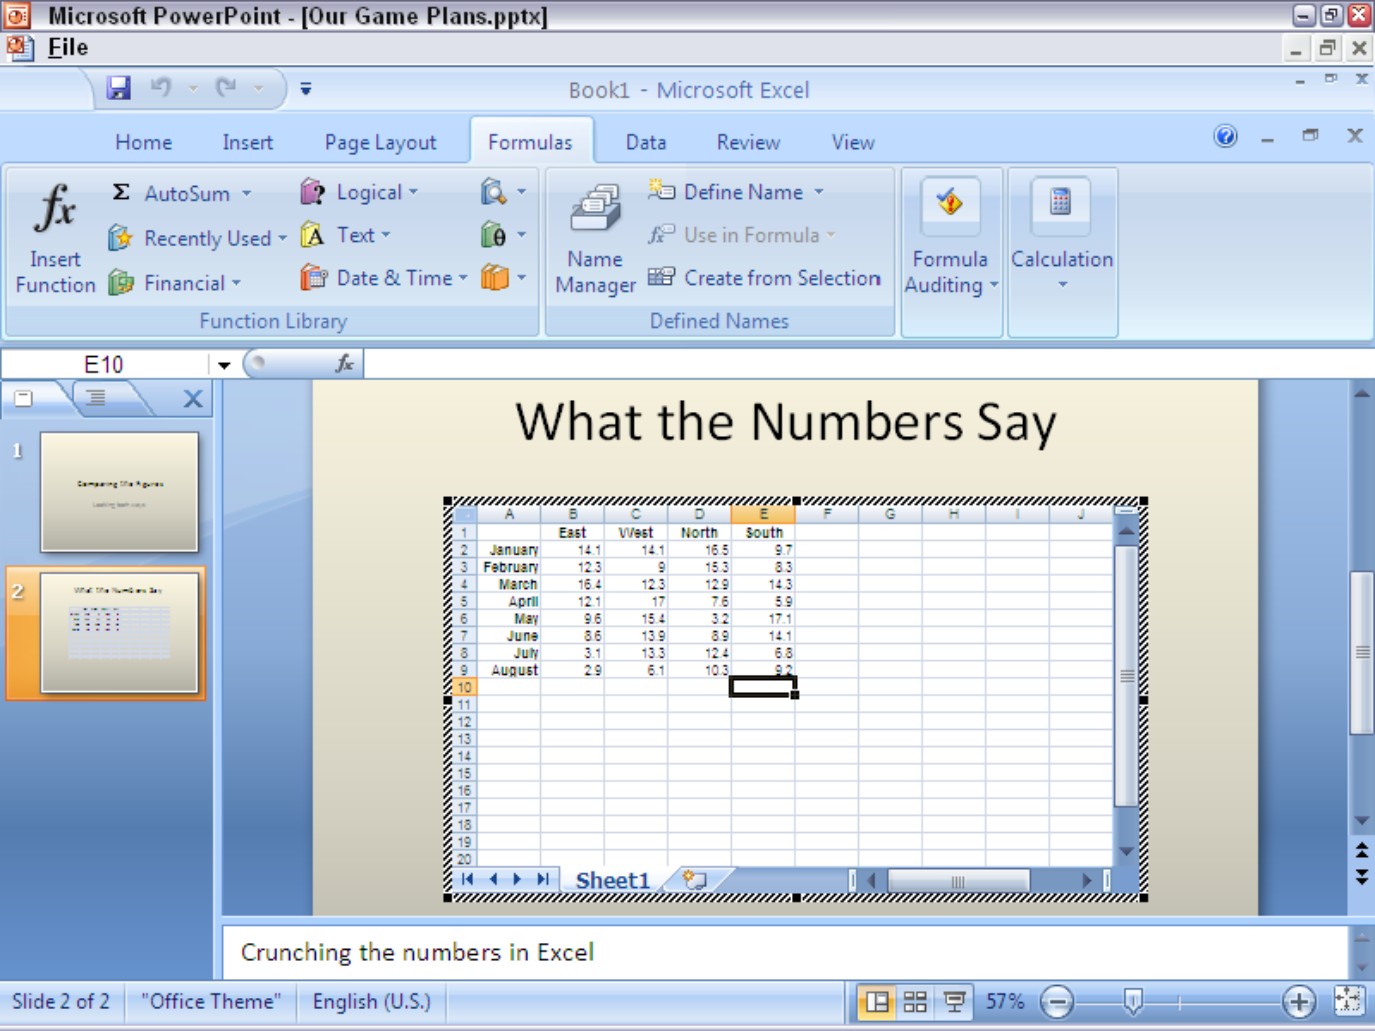
Figure 4-1 shows an Excel worksheet in a PowerPoint slide. This is an example of an embedded object. Notice the Excel menus and commands in the window. The menus and commands are at the ready. When you finish using them, you can click outside the embedded object — you can click outside the Excel worksheet — and go back to using the PowerPoint menus and commands. Although the table data was made in Excel, it looks like a PowerPoint table. Embedding an object in PowerPoint spares you from having to open a different program, construct material there, and copy it into PowerPoint.
A linked object is a little bit different from an embedded object. When you double-click a linked object, PowerPoint shouts out to the program where the material was created to find out whether the material has been edited or altered in any way. If the material has been updated, you can tell PowerPoint to gather the updated material and incorporate it into your PowerPoint presentation. Linking is an opportunity for you to keep your PowerPoint presentations up-to-date. You can fold the work that you or a co-worker did to the original file into your PowerPoint presentation without having to go outside PowerPoint to copy and paste it.
|
Figure 4-1: An Excel worksheet embedded in a PowerPoint slide. |
|
Uses for object linking
Object linking was designed to let files dynamically share information. The object — the Excel worksheet or Word file in PowerPoint, for example — remains connected to its source. As the source file is updated, the files to which it is linked can be updated, too.
Object linking saves you the trouble of updating a file twice. Co-workers can maintain a library of source files and use them to update the files to which the source files are linked. Here are some examples of object linking coming in handy:
 Your presentation contains sales data and you want the data to be up-to-date. You create a link to the Excel worksheet where the sales data is stored so that your PowerPoint slide remains up-to-date as sales data changes.
A co-worker has created a slide with demographic data that often changes. In your presentation, you create a link to your co-worker’s slide so that demographic data appears on your slide and is always up-to-date.
Your company maintains a Word file with a list of branch office addresses and telephone numbers and you want this list to appear on a slide. You link to the Word file. Your address and telephone slide stays up-to-date as addresses and telephone numbers change.
Uses for object embedding
Object embedding enables you to work inside PowerPoint on data that PowerPoint isn’t equipped to handle or display — columns such as the kind you can make in Word, Excel worksheets that include calculations, or an equation from the Equation Editor. Embed an object in a PowerPoint slide to do something in PowerPoint that you can’t normally do.
Pitfalls of object linking and embedding
Object linking and embedding isn’t for everybody. Here are some OLE pitfalls:
File size: Including embedded objects in a presentation makes the presentation grow in size — and I mean really grow. A large presentation can be unwieldy and hard to store. It takes longer to load on-screen. By linking, you solve the file-size problem because the item has to be stored only once — in its original location.
Carrying charges: Links are broken if you move your presentation file or you or someone else moves a file to which your presentation is linked. A presentation with links can’t be sent over the Internet or copied to a laptop without the links being broken. Linking is out of the question in the case of presentations that will travel to other computers. If you link to files over a network, establish a scheme for storing files with your co-workers so that files aren’t inadvertently moved.
Formatting embedded and linked objects: Unfortunately, linked and embedded objects are hard to format for a PowerPoint slide. Choosing the same fonts and colors as the fonts and colors on your PowerPoint slide can be difficult because you have to rely on the commands in the source file to do the formatting. The end result is that linked and embedded objects sometimes look out of place on a PowerPoint slide.
.jpg)
Embedding Data from Other Programs on a PowerPoint Slide
By embedding data in a PowerPoint slide, you can edit the data on your slide without leaving PowerPoint. An Excel worksheet, for example, can be embedded in a PowerPoint slide. So can Excel charts and bitmap graphics and any number of other things. The data appears on the PowerPoint slide in the form of an object. When you double-click the embedded object, the computer program with which it was created opens so that you can edit the object.
Embedding an object
PowerPoint offers no fewer than three ways to embed an object — by creating it inside PowerPoint, copying data from a source file, and copying the entire source file. Better read on.
Creating an embedded object inside PowerPoint
Create an embedded object in PowerPoint if the data you need hasn’t been created yet. You can create an equation (with the Equation Editor), an Excel chart or worksheet, a Word document, and one or two other object types. Follow these steps:
1. Select the Insert tab.
By the way, if your aim is to create an Excel table, click the Table button, select Excel Spreadsheet on the drop-down list. and be done with it.

2. Click the Insert Object button.
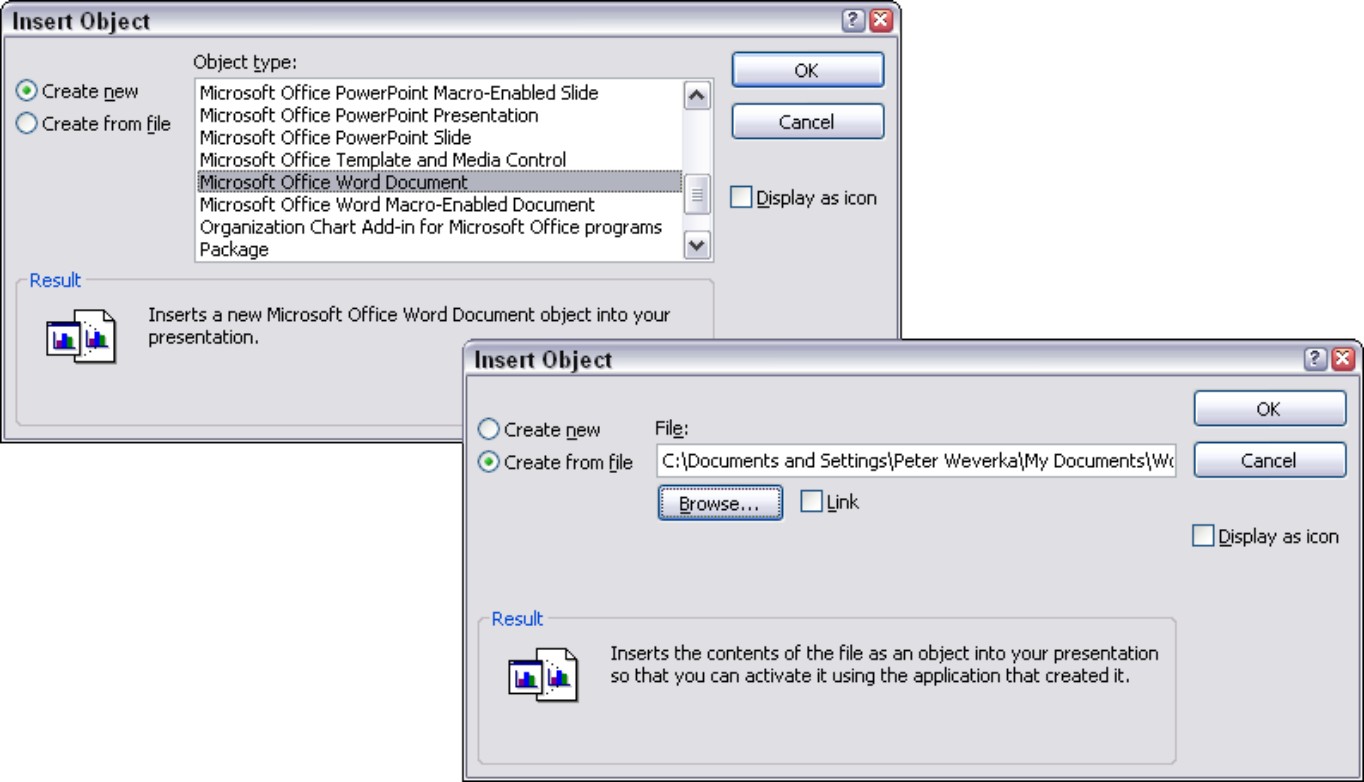
You see the Insert Object dialog box shown on the left side of Figure 4-2.
3. Select the Create New option button.
4. In the Object Type list, select what type of object you want.
5. Click OK.
6. Where the PowerPoint menus and commands used to be, you see different menus and commands. Use them to create the embedded object.
Click outside the object when you’re finished creating it.
|
Figure 4-2: Create an embedded object in PowerPoint (left) or from an existing file (right). |
|
Importing part of a file as an embedded object
If you want a portion of a file to appear on your slide as an embedded object, follow these steps to bring the small portion onto a PowerPoint slide:
1. Open the file in the program with which it was created.
2. Copy the portion of the file you want to embed on a PowerPoint slide with the Copy command.
3. In PowerPoint, select the Home tab.
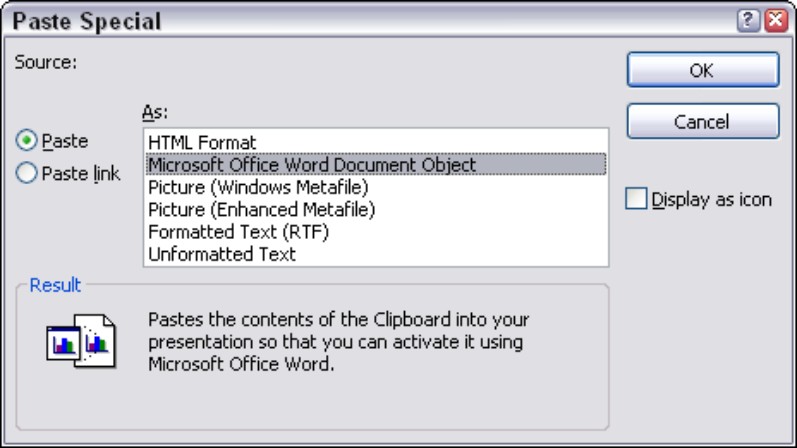
4. Open the drop-down list on the Paste button and choose Paste Special.
You see the Paste Special dialog box shown in Figure 4-3.
|
Figure 4-3: Choose the program you will use to create the embedded object. |
|
5. Select the Paste option button.
6. In the As list, choose an option with the word “Object” in its name.
Which options appear in the list depends on which type of object you are embedding. The options without “Object” in their names are for pasting the data in picture format.
7. Click OK.
The object lands on your slide.
Creating an embedded object from an entire file
As long as the file you want to bring into a PowerPoint slide is small enough to fit on a slide, you can import the entire file as an embedded object by following these steps:
1. On the Insert tab, click the Insert Object button.
You see the Insert Object dialog box (refer to Figure 4-2).
2. Select the Create from File option button.
You see the version of the Insert Object dialog box shown on the right side of Figure 4-2 (shown previously).
3. Click the Browse button.
The Browse dialog box opens.
4. Select the file you want to insert as an embedded object and click OK.
5. Click OK in the Insert Object dialog box.
I sure hope your file is small enough to fit on a slide.
Editing an embedded object
To edit an embedded object, double-click it. Where the PowerPoint menus and commands used to be, you see a new set of menus and commands — ones belonging to the program normally used to edit the type of object you are editing. When you’re finished editing the object, click outside it to return to PowerPoint.
The techniques for changing the size and position of embedded objects are the same as the techniques for resizing and repositioning shapes, graphics, clip-art images, and other objects (Book IV, Chapter 2 enumerates these techniques). To reposition an embedded object, move the pointer onto its perimeter and drag when the pointer changes to a four-headed arrow. To resize an embedded object, move the pointer over a corner selection handle and drag when the pointer changes to a two-headed arrow. (Don’t drag a selection handle on the side because you will stretch your embedded object out of shape.)
Linking a PowerPoint Slide to Data in Another File
Link a slide to another file so that changes made to the other file are made automatically to your slide. Earlier in this chapter, “Uses for object linking” explains the benefits of placing a linked object in a PowerPoint slide. These pages explain how to establish the link between your slide and another file, how to update the link, how to break a link, and how to mend broken links.
Before you link a slide to another file, save your PowerPoint presentation. PowerPoint needs to know precisely where OLE objects will go in order to execute OLE commands. Therefore, your PowerPoint file must be completely up-to-date for OLE commands to work.
Establishing the link
For the purposes of linking a slide to a file, the original file that your slide is linked to is called the source. Follow these steps to establish a link between your slide and the source file so that your slide can be updated whenever the source file is changed:
1. Open the source file with the data that you will link to your PowerPoint slide.

2. Select the data you need for your slide and copy it to the Windows Clipboard.
You can do that by clicking the Copy button or pressing Ctrl+C.
3. Click in the PowerPoint slide where you want the linked object to appear.

4. Click the Save button.
As I explained earlier, all files must be saved and up-to-date for the link to be made successfully.
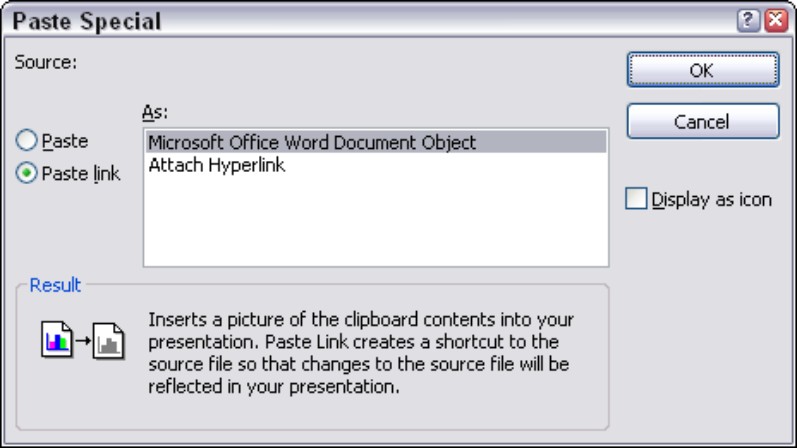
5. On the Home tab, open the drop-down list on the Paste button and choose Paste Special.
The Paste Special dialog box appears (refer to Figure 4-3).
6. Select the Paste Link option button, as shown in Figure 4-4.
In the As list, PowerPoint selects an Object option for you, depending on which type of data you selected in Step 2.
|
Figure 4-4: Pasting a linked object on a PowerPoint slide. |
|
7. Click the OK button.
PowerPoint pastes the data and creates a link in your PowerPoint file to the source data in the source file.
8. Save your PowerPoint presentation.
Congratulations. The link has been established.
To change the size of a linked object, move the pointer over a selection handle in a corner and drag when the pointer changes to a two-headed arrow. To move a linked object, move the pointer over the object and drag when you see a four-headed arrow.
Updating a link
