
The global pantry — stocked with durable cooking containers made of clay and metal — is a recent innovation. For most of our existence, we humans have used naturally occurring objects and substances as utensils. Cooks have manipulated wood and other plant fiber; stone, including raw clay; and animal parts, like bone, shell, sinew, and hide, to mediate between fire and food. For hundreds of thousands of years, that’s what our kitchen equipment looked like. The world of pots and pans didn’t begin to exist for most of us until an explosion of technologies in the Neolithic period ushered it in, among many sweeping changes.
In this cook’s opinion, the game-changing technologies of ceramics and metallurgy were the children of one mother skill — cooking. Sure, it could be a coincidence that the pottery kiln and the smelting furnace developed in the same region as had the cylindrical masonry oven known as the tannur. But it requires less imagination to picture the tannur’s salient characteristic — furious heat, produced by containing fire while controlling its draft — as the underlying concept that set humans on the path toward pottery and metalworking. Whether the raw material was sheets of dough, vessels of clay, or lumps of ore, understanding the tannur principle allowed the artisan to wreak unprecedentedly dramatic effects on the product.
We’ll get to tannur baking in chapter 4. For the moment we’re more interested in the cooking tools produced in the pottery kiln and the smelting furnace, and how you can use them in your hearth.
We’ll start with the griddle, since it can be made of good old stone, fired earthenware, or hammered or cast metal; then move on to cooking pots, first clay, then metal.
A griddle is a flattish surface of clay, stone, or metal that is supported or suspended directly over a fire or coals. Anyone who has ever tried to bake bread on a hot rock near a fire will have an innate understanding of the griddle’s convenience. If you could add only one item to your wood-fired batterie de cuisine, the griddle is the A-number-1 artifact to beg, borrow, or steal. It supports the addition of more techniques to your repertoire and foods to your menu than any other one piece of equipment, save a wood-fired oven, but without any of the work or money entailed in acquiring one of those. Plus it takes up very little room.
To cook all the recipes in this section, you will need two different shape griddles — flat and convex. Aside from that basic requirement, though, there is a great deal of latitude in what constitutes a griddle. Along the way to discovering your ideal utensils, you may find yourself trying out all kinds of found objects. What ultimately works for you will depend as much on your willingness to experiment as on your fire setup and your desired menu.
Flat cast-iron griddles are widely available; unless you plan to carry it around a lot, select the largest one for greatest flexibility. A sheet of steel or a piece of cast iron salvaged from a scrap pile can work just as well, or better, since most purpose-made griddles are designed for indoor use and needlessly small for an outdoor fire.
All the recipes in this section may be cooked on a flat griddle, with the exception of the large wheat-based flatbreads. These prefer a convex baking surface, a more specialized griddle type known as a saj among Arabic and Turkish speakers and a tava among South Asians (including those in the Caribbean). Online shopping or a visit to an ethnic grocery may reward you with such a pan, but be careful to avoid aluminum and nonstick tavas.
A steel wok inverted over the fire worked very well as a saj for me for years, although try as I might to protect the wooden handles from the heat, they got pretty scorched from this perversion of the wok’s design. Recently we came across a very heavy piece of a defunct industrial artifact — a perfectly smooth dome-shaped iron boiler cap 16 inches in diameter. Its weightiness calls for a bit of care in the setup, but allows it to heat very evenly; its size has pushed me to pursue the challenge of making huge, delicious flatbreads.
The only recipes in this section that cannot be easily cooked on a convex griddle are those for foods that would tend to slide off (asparagus, shrimp . . .) or that require a level surface (English muffins).
The classic way of supporting a saj, or convex griddle, is to arrange three similar-size stones as a tripod. I prefer to set the stones up stably and try for symmetry, height, and levelness before even starting the fire. Then, so that I have a nice coal bed, I’ll remove the saj and make a fire of hardwood sticks and split kindling between the rocks. Once you’re an old hand with your griddle setup, you may be able to roll any three rocks into a fire and be good to go, but it’s wise to be methodical at least the first few times out.
Observe the height the saj stands from the ground when it’s supported on the tripod; your fuel will need to fit easily under it, along with some air and maneuvering room. Prepare a nice pile of fuel accordingly. I use finely split pine or dry twigs from the forest floor, fuels which I have in abundance; depending upon their location and lifestyle, other cooks favor agricultural by-products like straw or dried dung. I take an 8-inch wrought-iron tava with me camping, and have always found something suitable locally, from loblolly pine needles to desiccated cowpats. Having read about gorse (a thorny evergreen bush) as a cooking and baking fuel in early modern England, I decided to try snipping up some of the briers that grow around my neighborhood. Except for the lacerations to my hands and arms, this experiment was very successful; even green, that stuff really goes up! Half an hour’s work using heavy leather gloves and long-handled pruning snips yields enough potential flame for stacks of flatbreads.
Whatever fuel you choose, have enough, properly sized and on hand, so that you can easily keep a brisk small fire going throughout your cooking process without the distraction of juggling a rolling pin and a Gurkha knife. Learning to make flatbreads is challenge enough for one day.
Having a nice bed of small coals before you start makes it easier to maintain a moderate fire to heat the metal plate evenly; with practice you may learn to keep light quick-burning fuels, like straw, burning steadily. But, once again, there’s already plenty to tend to in forming and cooking the breads. Have fun with the multitasking inherent in this kind of cooking by learning in partnership with a friend.
The nature of your griddle will have an effect on how much fire you need. Something thin that transfers heat quickly will need a very even low fire under it; you may need to increase the distance between the griddle and the heat. A heavy cast-iron griddle will distribute the heat and take longer to heat and cool.
The food on the griddle also determines the type of fire you want. Seared vegetables, for example, can take all the heat you throw at them, as long as you move them around and don’t leave them too long. Some very thin breads are extra delicious if the fire licks around the edges of the griddle and chars them directly just a little. Thicker griddle-breads like English muffins, on the other hand, need to bake through to the middle without immolating the exterior; a low flame is key.
If you’re not much for crouching on the ground or in your hearth, consider setting up your griddle along the lines of a British bakestone or Mexican comal. Experiment with stacking bricks to build a sturdy support for a piece of sheet metal, cast iron, or heck, even a real comal. This arrangement is comfortable to use, especially if you are engaged in a time-consuming cooking project like baking a huge pile of tortillas or crackers.
Pull up a chair, or at least a stump. Seventeenth-century Dutch genre paintings are full of pancake makers, both housewives at home and professionals on the street, working their griddles while sitting on little milking stools. You’ve got to be comfortable, or this is no fun.
Arrange a work surface with all the ingredients and equipment you need at hand. It’s nice to have enough surface area to have a bread or two “on deck” waiting for the griddle. It’s a wonder to watch Middle Eastern bakers working with trays and cloths around them on the ground, tending fires, baking, rolling, and stretching dough, and telling stories all at once. Take their cue and have everything organized and at arm’s reach before you start.
Part of the fun of griddles is that they are global. Many, many cultures feature characteristic foods cooked on them. It’s tempting to say that the griddle’s utter simplicity has dictated its dispersal all over the planet, but a brief consideration of the complex processes undergirding so many griddle-cooked foods (contemplate corn tortillas, for example) suggests we think again. This deceptively simple baking technique is in many places simply the last link in a chain of ancient and intricate cultural evolution.

The fact is that baking technologies develop to suit the grains available. With its smooth horizontal surface allowing even and controlled baking, the griddle has been used by cooks the world over to convert gluten-free grains and even tubers into tremendous breads.
By contrast, the tannur, and later, the wood-fired oven, developed in tandem with gluten-bearing wheat. For many centuries, these ovens remained localized to the complex societies situated in the swath of the planet where domestication of that grain family had first occurred. To bake in these specialized ovens is to appreciate wheat’s particular handling and baking characteristics. Wheat’s gluten allows it to stretch and cling to a blazing hot tannur wall in the form of naan; it traps fermentation gasses and lets loaves rise when enclosed in a dome-shaped oven.
Before so much of the world was ruled by wheat, the griddle was all you’d need to convert the dough or batter that was the end result of your agricultural efforts into the tasty staple of your region, whether you were making an oatcake on the far reaches of the Shetland archipelago or a corn pupusa in ancient El Salvador or a lentil dosa in South India.
Unlike the tannur or wood-fired oven, the usually portable griddle can be used quickly and almost anywhere, to bake breads made out of a great array of ingredients, from millet to cassava. This is not to say that the griddle is inappropriate for wheat-based breads. On the contrary, some of the very tastiest combinations of flour-water-yeast-salt I’ve ever tried were baked in seconds on a fire-heated slab of scrap iron propped up on three rocks.
Some griddled breads have survived as the dominant staples in their home regions into the twenty-first century. In most cases, these breads — chapati, tortilla, pita — successfully made the leap to industrial production and global diffusion. At the same time, though, many home bakers still provide them for their families.
In other parts of the world, even those whose populations once relied entirely on griddles to bake their daily bread, the tradition has all but vanished. Especially in Europe, many regional griddle breads remained inseparable from small-scale home cooking and resisted large-scale production and marketing. The lefse of Norway, the oatcakes of Yorkshire, the many bakestone cakes of Wales and Brittany — those are still celebrated today as a part of regional heritage, but they are rarely made and eaten among populations who now share the same commercial white bread habit dominant in much of the world.
Consider, though, that those European griddled breads, when they were first described as distinctive regionalisms a couple of centuries ago, were really just the last holdovers for a continent fed on a huge variety of local non-wheaten flatbreads since the inception of agriculture. The further north and west one travelled into Europe away from the wheat center of, say, Anatolia, the longer these regional breads held sway.
Even centuries after the introduction of wheat into Western Europe, it remained the luxury of the well heeled and well connected. In the early modern period, people of moderate fortunes might rejoice to eat wheaten bread during a flush year or season, conscious that they may soon lower their sights to barley, oats, millet, or rye when weather ruined the harvest, or when war, chicanery, or politics propelled the wheat elsewhere. (By extension, the real dearth experienced once in a generation or so kept cooks up on how to make bread out of lupine seeds, acorns, or bark.)
Makes 14 or 16 small pita
For home cooks, pita is a great entry into the world of flatbreads, even into baking in general. Its formula is simple and the dough is easy to handle. The loaves’ thickness and relatively small diameter doesn’t demand any daredevil dough-stretching skills. You don’t need anything fancy in terms of equipment; because pita may be small, you can get away with using a 10-inch cast-iron frying pan. The dough can be held over in the fridge for a day before baking, helping it fit conveniently into a busy schedule. A bagful of pita in the freezer is like gold at lunch-making time. I find the griddle method irresistibly fun, but if you’d rather, you may bake the prepared pita in a hot wood-fired oven.

Note: You may use a saj or other convex griddle to bake this dough into larger, flatter breads that are decent for wrapping falafel or other fillings. Divide the dough into twelve 4-ounce portions, preshape, and roll out into 9-inch circles. Bake on the preheated saj, turning once.
Makes 8 large flatbreads
A close relative of the more familiar Armenian or Persian lavash, shrak is a spectacularly large thin sheet of flatbread made by Levantine bakers. I first encountered it integrated into one of the most delectable meals I’ve ever eaten, the Palestinian roast chicken dish, mussakhan (see recipe).
To make your shrak, you’ll need a large saj, at least 16 inches in diameter. So scrounge up some convex sheet metal, or flip over your wok for this one. Have plenty of nice, dry light fuel. Shrak is best baked very hot, with flames reaching around the lip of the griddle to lightly scorch and flavor the bread.
Making shrak is a great opportunity to try out a virtuosic Middle Eastern dough stretching technique, an ancestor, surely, of the Neapolitan pizza toss. While it’s admittedly unlikely that most of us will master this skill at its spectacular best, it is nonetheless possible to imperfectly use the technique to bring about some pretty awesome results. I would recommend starting privately until you build a little confidence. A hole or two in your shrak makes no never mind.
In its most authentic form, shrak is baked on a hearth of river pebbles in a tabun (see Baking in Antiquity — The Tabun). A similar Persian bread, sangak, is baked on a bed of blazing hot pebbles in a very large wood-fired oven, even when commercially produced. Very good versions of this wonderful bread, however, are also made on the saj, the large convex griddle.
Archaeologists have turned up shards of large perforated clay griddles on Iron Age sites in the Levant. These griddles seem to have been installed in hearths and were certainly the predecessor of the saj. It’s impossible to say, based on the current research, what sorts of breads were baked on these clay griddles, and why they would be used in one place and tabuns in another not so far away.
Diffused during the Ottoman Empire, the brass, and then steel, saj has played a part in Middle Eastern baking for centuries. It is relatively portable and very efficient on fuel if well used.
Makes 14 or 15 flatbreads
Have you ever ordered a “wrap” that didn’t prove to be constructed with damp light-gauge cardboard? No matter how they flavor or tint the dough, the “bread” usually has very little to offer beyond holding the filling together. These naturally leavened whole grain breads are pliable, strong, and tasty. They are best made on a convex griddle, but it needn’t be large; ten inches will do.

These boreks are adapted from types still found in central Turkey. The first is a quick-to-put-together turnover using a straight yeast dough. When I bake pita, I’ll often squirrel away eight ounces of dough in order to make a couple of these for breakfast or lunch the next day. The second borek, a crispy packet of goodness, uses a very simple unyeasted dough and affords a great opportunity to develop your rolling and stretching skills. You may use a flat or convex griddle for both versions. You may also mix and match doughs and fillings.
4 servings, as an appetizer or accompaniment
Improvise the filling with what you have on hand — I like to use part feta, or other salty cheese, and part mozzarella for the stretchy, melty quality.
2 servings
This filling is not authentic to Central Asia, or anywhere, exactly, but it is really delicious in these little griddled pies. Substitute the previous cheese filling (in Half-Moon Borek), or experiment for yourself with any filling you like, as long as it’s not too wet.
If you haven’t already done so, start preheating your griddle over a medium-low fire as previously described. Place one or more packets on the hot surface, brushing any exposed unbuttered surfaces with butter. Bake for about 4 to 6 minutes per side, until golden brown and puffed up. (If you have a large griddle, you may be able to cook all four at once.) Enjoy soon.

4 servings
I am resigned to the fact that I will never have the hand-skills to roll or stretch yufka or filo like a pro, but I still enjoy trying to improve. Putting together a down-home version of this palace sweet in minutes and cooking it on a campfire elevates that fun to an almost perverse level.

Make the dough from the Crispy Mushroom Borek recipe above, and treat it in exactly the same way.
Borek is the very ancient root name for a constellation of foods made by layering, wrapping, or stuffing filling in a wheat-based dough before cooking. The first Anatolian borek was probably the common ancestor of almost any treat we can think of today that fits that ridiculously broad description — from tortellini to pierogi to strudel to scallion pancakes. Today, the borek family encompasses a great variety of dough types and fillings, and derivatives of the word are found across two continents, from Italy to Tunisia to Armenia to India. Some versions are baked, boiled, or fried; the doughs used are appropriate to the technique (that is, boiled variants use a pasta dough, while baked borek might use filo or, more recently, puff pastry). Probably the oldest is the griddled type.
4 to 6 servings
Central Asian wheat techniques — stretching or rolling and layering or stuffing — migrated west, as we have seen, to the lands of lasagne and strudel and brik and pastizzi, but they also strove eastward. Ever wilder dough-stretching techniques were invented by cooks of many cultures — from the Uygur to the Indonesians. Many of the more virtuosic are the province of professionals, whether in the palace kitchen or at a brazier on a street corner. But a few of these techniques may be easily mastered by mere mortals and are very handy to know and adapt to your own purposes. These chive pancakes employ what has got to be the simplest way of creating flakiness in a griddled bread.
The griddled breads we’ve discussed so far originated in antiquity in the wheat belt from Mesopotamia to Central Asia. But, meanwhile, on the other side of the globe, people in south-central Mexico were also busy inventing both a grain and the techniques necessary to transform it into bread. These folks had to start from whole cloth, though, since — unlike wheat — corn’s natural parent plants barely even provided gatherable food. And, if that weren’t troublesome enough, they then had to somehow figure out that corn treated with calcium hydroxide would not only make a delicious tortilla but be far more nutritious than corn in its natural state. This “nixtamalized” corn was and is the basis for many elaborate breads and other dishes. To this day, despite the deep cultural disruptions of colonialism, the corn tortilla has not only persevered as the staple of a large region but has diffused, in commercial form, over much of the world.
For the reasons discussed in the introduction to this chapter, the griddle is the ideal cooking surface for breads made of glutenless grains like corn. For most of the tortilla’s lifespan, that griddle, the comal, was a smooth disk of burnished earthenware. The clay comal is still made and used today, but the sheet-metal comal has eclipsed it in availability and popularity.

Traditionally, beautiful clay comals have long served as tortilla griddles in Central America. As pictured, a not-so-lovely piece of broken refractory clay chimney flue works, too.
Makes 14 tortillas
I’m not lucky enough to live in an area where freshly made tortilla masa is commonly sold, so I use the dry masa harina sold in grocery stores. (See Resources.) My tortillas, as a result, cannot compare in exquisiteness with those made by someone who nixtamalizes his or her own corn and grinds it with a mano and metate. On the other hand, the simple tortillas I make at home, even with my cheating on ingredients and methods, are tremendously superior to any premade tortillas available in stores and even most restaurants.
Because tortillas are small and cook quickly, it’s no problem just cooking them in a cast-iron pan, if that’s what you have. A large griddle or true comal, of course, will let you crank out a lot more if you’re a great multitasker or have a cooking-partner. You may multiply the formula as needed.
Makes 16 tortillas
The post-Hispanic flour tortilla is unlike its predecessor, the corn model, in most every way except that, no matter how imperfect looking, fresh homemade is invariably better than store-bought.
Cold and damp areas that favored the culture of rye, oats, buckwheat, and barley also favored the bakestone, since those glutenless grains respond so well to unleavened baking. For most of the bakestone’s preindustrial heyday, it literally consisted of a slab of appropriate rock installed in a hearth. Particular, geologically appropriate quarries were dedicated to sourcing bakestones, which must be “capable of withstanding high degrees of Heat, without melting or falling to pieces,” according to an early English geologist. Bakestone mining left behind both place-names (in Britain) and a dense archaeological record (in Norway). The reputedly superior bakestones from Hardanger, Norway, accompanied the Norse folk on their famous sea adventures of the early medieval period; tell-tale shards have turned up in quantity in the British Isles, especially the Shetland archipelago, and in Iceland.
Evidence seems to show that the people of ancient Britain, whose cultural toolbox held much in common with that of the Scandinavian cultures, possessed their own preexisting bakestone tradition dating back to at least the Iron Age, if not much earlier. (Once again, consider Stonehenge, a much larger-scale quarrying project.)
The breads baked on these bakestones varied over time, and with cultural tradition, microclimate, and harvest. Two or more varieties of grain were frequently milled and baked in combination, because until the modern period, Northern European farmers often sowed a couple of cereals together in one field, a hedge against total crop failure. Marginal conditions also encouraged the use of short-season cultivars such as bere, a barley relative that could be baked into flatbreads and malted for ale, and which is still grown and milled in Orkney. Thus the characteristics of the breads reflected the agricultural reality of life on the chilly, wet edge of Europe’s arable zone, at least until well into the nineteenth century.

Ancient Scandinavians solved their grain storage problems by baking loads of flatbreads and stringing them up in their warm, dry rafters. They not only keep well, they are crunchily delicious.
Makes 4 medium flatbreads; multiplies easily
There’s nothing like thinking about charred remains in cremation burials to make you want to get cooking! Nonetheless, that’s the best source of physical evidence for the actual breads people lived on over a millennium ago in Scandinavia. Charring is an excellent preservative, and archaeologists have found hundreds of fascinating ancient bread specimens in Swedish cremation interments from the Viking period and much, much earlier. These excavated flatbreads were shaped as disks, rings, or half-circles, from tiny to large, and composed of mixed cereals, legumes, flax seeds, and animal fats or even blood.
This recipe is based on that data, uses ingredients easy to lay hands on today, and surprisingly results in a completely addictive treat. The ancient Scandinavians are said to have accompanied their many sorts of crisp flatbreads with a range of dairy products — butter, curds, whey, buttermilk, or skyr, a strained yogurt. And, indeed, this bread’s crunchy nuttiness proves to be a delicious complement to any kind of cheese. Also, broken up in a bowl of whole-milk yogurt, it makes a soul-satisfying supper or breakfast, better only with a handful of blueberries or lingonberries.
In the bakestone lands of Northern and Western Britain, industrialization brought access to sheet- or cast-iron and wheat, changing the nature of the griddles as well as the composition of the breads on them. Bannock, made of whole-grain, roughly milled local flours (mixed simply with a little dripping from the roast and some water) gave way to those made with patent wheat flour, chemical leavenings, and currants or sultanas. And in turn those soon upgraded from grease to butter, and acquired sugar and a genteel attitude to go with it. But from the perspective of the modern baker, every one of those bakestone breads, from havercake to bannock to scone to muffin, is fun to make and splendid served with a cup of tea or something stronger.

Cream Scones bake on a griddle over hot coals.
Makes 4 very filling oatcakes
Even today, oatcakes from the traditional oat-growing regions of the British Isles vary from crunchy biscuits (Scotland) to flexible pancakes (Staffordshire). This traditional Welsh version has every earmark of being quite an ancient type of bakestone bread.
Those who don’t care about authenticity may add the optional sugar for extra crispness and a fugitive sweetness.
If you have a grain mill, you can grind 73⁄4 ounces of whole oat groats coarsely; if not, the proportions below allow you to use a food processor to work up commonly available forms of oats into a nicely textured result.
3 or 4 servings
Originating in the northern tier of ancient Britain as a homely griddle cake of barley, oats, or peas, “bannock” transitioned to life in 17th-century America by assuming a composition of corn, and adopting the regional nickname “johnnycake.”
Through a wide swath of 19th-century Anglo-America, the word endured to describe any griddle-baked bread you threw together when you didn’t have a “proper” oven, or when you ran out of bread between bakings. Still pretty good for a stopgap, this bannock is like a missing link between the ancient bakestone cakes, Irish soda bread, and the scone.
Makes 8 muffins
Even though current-day Brits generally repudiate them, American “English muffins” are our only contemporary specimen that even vaguely resembles the 18th-century English small bread called a “muffin.” The concept certainly sprang from one of the bakestone backwaters of the British hinterland. But once introduced into London, the original muffins were a big hit in tea and coffee houses — a tasty, crisp receptacle for lots of butter. Soon they were propelled into posterity by best-selling cookbook author Hannah Glasse, who gave them a very full run-down in her 1774 Art of Cookery. Besides the simple and wonderful formula, another highlight of her recipe is her description of how an iron-topped brick and mortar muffin griddle could be built into a cooking range: “Build a place just as if you was going to set a copper, a piece of iron all over the top fixed in form just the same as the bottom of an iron pot, and make your fire underneath with coal as in a copper.”
Mrs. Glasse wrote her recipe on an industrial scale, and she uses fresh yeast from a brewery (from which she carefully washes the bitterness). I’ve divided the recipe by 32 (yes, 32) and adapted it for instant yeast.
Makes 8 scones
You may, of course, bake these scones in a wood-fired oven, well after the fiercest heat has abated. But the griddle is the original, and to my mind, still the best, way to cook them. I am indebted to my friends Liz Lodge and Tom Gerhardt for this recipe. These are just great with butter and marmalade.

Makes about 80 crackers
Using a hand-cranked pasta machine makes it easy to form the thinnest and crispiest all-purpose crackers. They can also be baked in a hot wood-fired oven.
Once you get comfortable cooking things on a slab of metal perched over a fire, your culinary gears may start turning: what else can I slap on this thing?

Well, what about meat and vegetables? For sturdy meats, I’ll generally prefer a grill over a griddle, if one is available; the flavor impact of the extra smoke and sizzle from the direct exposure to the coals cannot be lightly dismissed. However, if no grill is at hand, most any grillable food can be cooked on cast iron or sheet metal, as long as you give some thought to a couple of issues.
The critical aspects to consider are mainly two: release and temperature. And generally speaking, they are intertwined; if the surface is hot enough, and you are patient enough, the food will release. But you can help yourself out by applying the finest coat of neutral oil to the food just before dropping it on the blazing-hot griddle. Then stand back and just wait for it to begin to carbonize just a bit before molesting it in the slightest. Turn it once, returning to the griddle in a new spot, which will be hotter, and cleaner, than the one just vacated by the food.
Conversely, some foods that are notoriously tricky to cook on a grill, like fish fillets, or that are just plain silly, like green beans, do extremely well seared on iron or steel.
And then there’s the issue of cooking things together for a delicious melding of flavors. I think of the full Sunday breakfasts made in the home of my friends Cairbre and Eithne McCann — where the fat rendered from rashers of the most incredible Irish bacon provided the foundation for a griddle full of sizzling mushrooms and tomatoes and eggs, to be accompanied by platters of the world’s best toast, amply buttered. All those components cooked separately simply wouldn’t have the same impact.
2 to 4 servings
This technique works best with tender vegetables of small diameter. The long structured ones can be cooked on any large slab of metal; the unruly spherical ones — cherry tomatoes, especially — need a railing to keep them from abandoning ship. A skillet or steel wok works fine. You want a hot fire.
A bed of salt diffuses the heat of the iron without overseasoning the shrimp. Use head-on shrimp by all means if you can get them.

Serves a gathering of 10 or 12, but not for long
One of the culinary joys of life in my southeastern Massachusetts home is the Atlantic sea scallop. Our major port, New Bedford, rules the waves when it comes to fishing these delectable bivalves.
A shopping trip to one of New Bedford’s many Portuguese groceries inspired these simple appetizers, which are, of course, no more than a reworking of the old scallops-wrapped-in-bacon standby. The difference with these is that, because both presunto (Portuguese air-cured ham) and super-fresh scallops are delicious raw, there’s no need to overcook the poor shellfish — just a blazing hot quick sear to crisp up the edges and take the chill off. You’ll need a pile of bamboo skewers, and you may substitute prosciutto for presunto.


So far we’ve seen how small and thin foods are natural candidates for cooking on a blazing hot sheet of metal — by the time the heat has penetrated to the center, the outside has developed a perfect deep sear. Quite reasonably, bulkier and thicker foods don’t immediately suggest themselves for griddling. But an Argentine tradition brings in a second sheet of metal, and yes, a second fire, to sandwich the food in a “little hell” of great heat. An encasement of salt around the food diffuses the heat, prevents burning, and seals in the moisture. The whole thing is basically a clever way to create an oven-like atmosphere just by using two pieces of sheet metal and some bits and bobs to hold it up.
While I suppose you could hire a fabricator to build you an infiernillo, I suggest looking around your garden shed and basement for parts that can serve. We’ve had good luck with stacking a bunch of mismatched castoff items into an unsightly, but effective, pyre. We started with a stable base of steel angle-iron driven into the soil beneath the fire pit. Crosspieces athwart those held the piece of sheet iron, basically the griddle to support the food. Upon that we sat a fabricated steel tripod that was all that remained from a friend’s cracked chiminea. It just so happened that a saucer-shaped patio “firepit” someone gave us fit right in there, to perfectly suspend the fire from above.
Preheat the infiernillo with a nice big hardwood fire above and below, while setting up the food. For the greatest ease in sliding the food in and out of “hell,” use a sturdy half-sheet-pan.

Serves 12 to 15
Although these potatoes are a great first project for your infiernillo, we love them for themselves and do not think of them as a mere training exercise. They are the apotheosis of potatoes, as more than one true spud-lover has told me.
Once you have mastered this technique on tubers, though, apply the same principles to cook other foods that you might otherwise roast or bake with medium-high heat, like a chicken, a whole fish, or a tender joint of meat or small whole animal. (Conversely, you may also, if you like, make salt-roast potatoes in a wood-fired oven.)
Incidentally, the first few times we made this we included thyme sprigs and garlic, thinking that the potatoes would be perfumed by them. Nope; the garlic was good (if surprising) to eat, but, perhaps because of the desiccating effect of the salt, neither it nor the thyme imparted anything discernible to the potatoes.


Clay and metal pots really opened up a world of cooking in liquid. While much fun may be had using hot rocks to boil food in an animal hide or stomach, sometimes it’s a relief to just use a purpose-made container. The metal pot seems like the lowest common denominator of ordinary cooking equipment, and so it has become, virtually worldwide, since the Industrial Revolution. But the real revolutionary moment came thousands of years before, when the fired clay pot came onto the scene. Perhaps I’m revealing a presentist attitude, but I can’t help but imagine how exciting it was to move up to a clay pot after preparing food in a bitumen-and-plaster–lined basket.

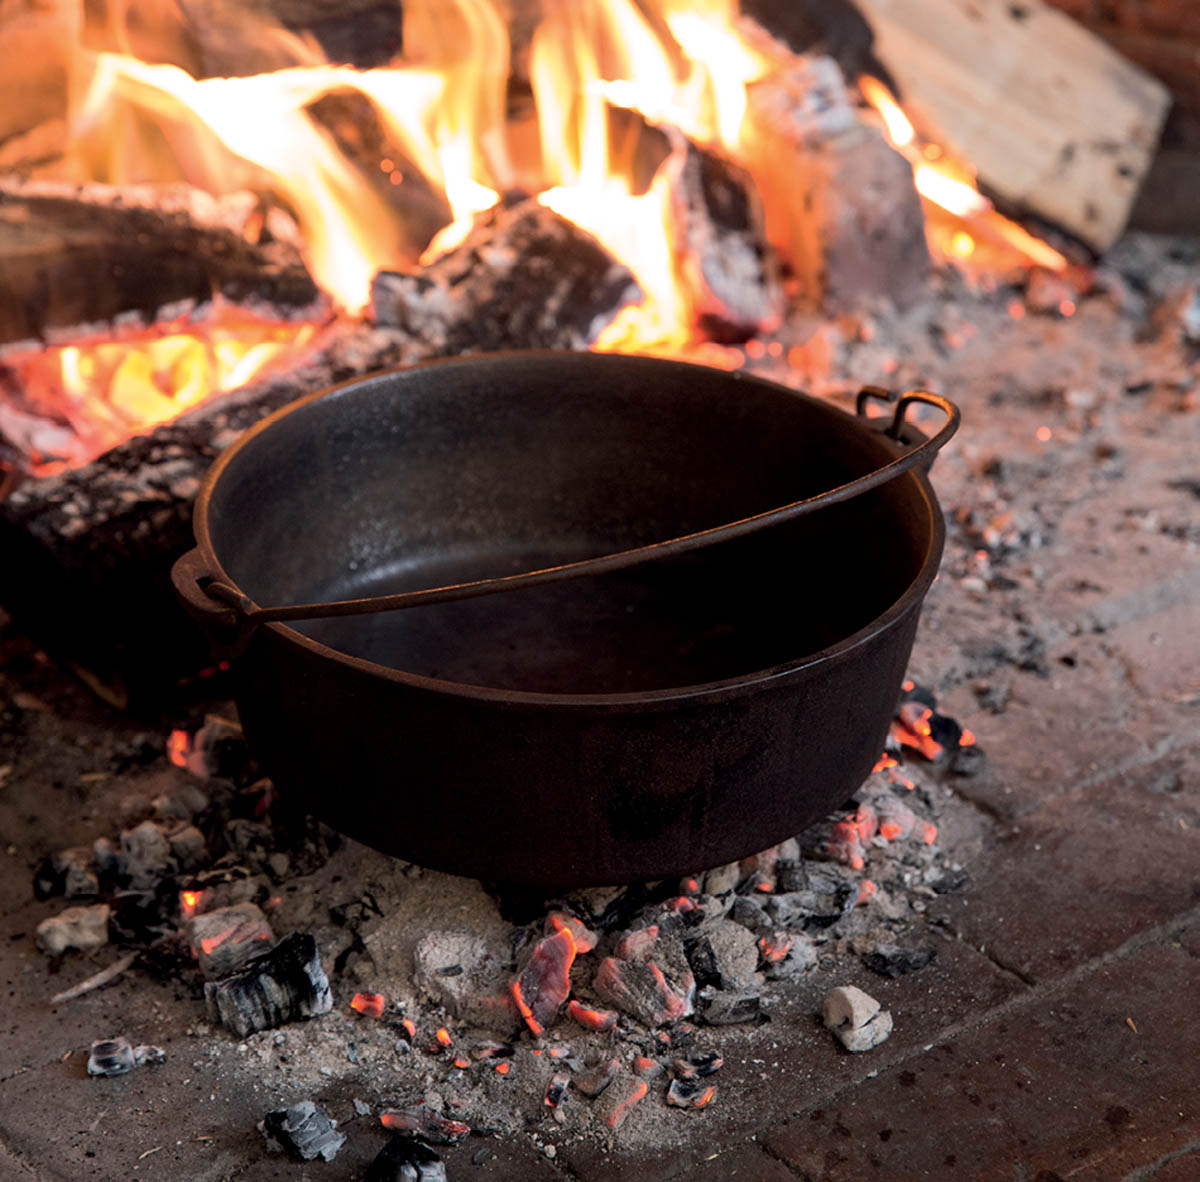
Beef Shanks with Chile and Cranberry Beans simmer near a roaring fire.
Even during the Neolithic Period, when widespread ceramic technology was new and developing, potters were already working out how to compose and fashion clay vessels in the service of cooking in some very sophisticated ways. Neolithic potters at Tell Sabi Abyad in Northern Syria, for example, used several strategies to increase the usefulness and lifespan of their wares. They selected clay types that were especially suited to the rigors of the hearth; isotope analysis shows that the clay for their best cooking pots was imported from a region over a hundred miles away. They tempered the clay with minerals or crushed pottery, now a time-honored method for conferring resistance to heat-shock on cooking pots; then, cutting-edge technology. In building the pots, they strove for even wall thickness and smoothly arced forms, both helpful in creating resistance to thermal shock; they added lug handles to give the cook something to grab. The artisans enhanced the naturally low porosity of their special clay by burnishing, intentionally smoothing the surfaces of the cooking pots before firing them, improving their cooking and storage qualities. In short, to a startling degree, some of the earliest known cooking pots were highly functional, and often beautiful, implements.
Today, potters are still making great cooking pots all over the globe, even though cooks now have many other choices. I have acquired pots of all sorts on my travels and, although I’m fiercely protective of those from the remotest locations, I do use every one of them, whether in a hearth or in a wood-fired oven. And even here in the States, I never enter an ethnic market without inspecting the housewares aisle for a hidden pottery gem. Southeast Asian grocery stores are especially fruitful in this regard.
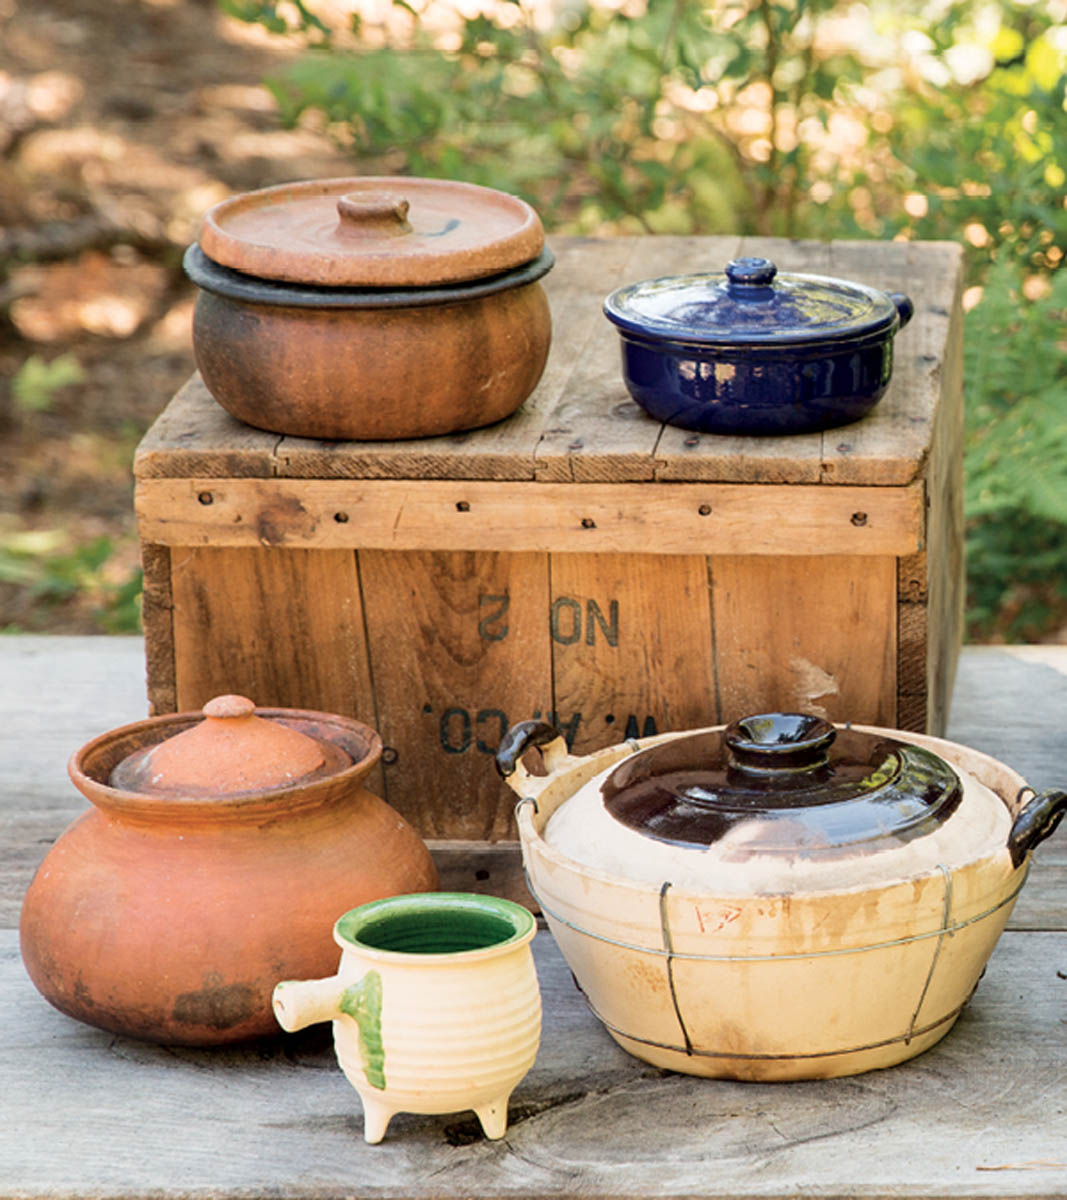
This is a small sampling from the global clay pot tradition, including examples from Turkey, Italy, Vietnam, England, and Thailand.
Most of the pots I have collected over the years have proved extraordinarily durable. I used to expect them to break at any moment, but have found that with a few ordinary precautions, they can provide many years, even decades, of tasty and beautiful service.
When you get a new pot, wash it in hot soapy water, rinse it well, and fill it with hot water. Put it on a very low flame and bring it to a simmer slowly. Then let it cool down slowly.
Leery of thermal shock, I tend to use certain clay pots only for simmering and baking. I’m very careful not to add cold liquid to a hot pot, and I always set a hot pot down on a forgiving surface like a folded up towel. But some pots are more bulletproof than others. Asian “sand pots,” particularly those cased in wire, have considerable antishock qualities. Since they are inexpensive and easily available to me, I have been a bit cavalier, and have subjected them to some pretty rigorous treatment. I reach for a sand pot when a recipe starts out with sautéing, which is a particularly challenging technique for the vessel since one section of the pot, the base, is subjected to much higher temperatures than the rest.
So far I’ve talked about the safety of the cookpot — what about the safety of those eating from it? Most of the pots I have accumulated over the years come with no guarantee as to their composition, so one wonders a bit about the dangers of lead contamination in the food. First, many of my more interesting pots are unglazed, so are unlikely to be a problem. I do have a few with particularly beautiful lustrous glazes, some from Mexico, and some made by a friend down the road. While I’m pretty sure that the Mexican pots have lead in the glaze, I’m utterly certain that my friend’s do, since he told me so. He feels that lead, skillfully handled, shouldn’t be accessible to contaminate the food. I take no position on the matter except to say that I do not serve salads or any other acidic foods in those nice shiny pots.
This is one of the simple joys of hearth cooking. Have a moderate hardwood fire underway; you’ll need the supply of coals and ashes it provides. Use a fire shovel to rob a nice mix of the two and deposit it a few feet from the main fire. Select a spot that is easy to tend, yet is unlikely to get in the way. (I know more than one person who broke an earthen pot by upsetting an andiron onto it.) Nestle the pot, full of the food to be cooked, down into the coal bed.
If you are nervous about your clay pot’s durability, or if you are heating it for the very first time, make a thermal cushion by laying a second shovelful of ash over the first little pile of mixed ashes and coals. When the heating capacity of that coal bed begins to slacken, merely pick up the pot with a potholder or rag and set it aside — in a warm place! — while you steal more coals from the fire to fortify your little cooking hearth.

Buttered Gooseberries are underway, in a clay pot nestled in a custom coal bed.
If the food I intend to cook is small enough to fit in a clay pot, I will most always choose clay, which transfers heat slowly and can be maintained on a coal bed at a very gentle heat, poaching more than boiling the food. The difference may be appreciated by thinking about cooking a chicken covered with a gallon of seasoned water in an iron pot hung over a fire, versus tucking that same chicken in a snugly fitting clay pot with a glass of wine and some salt, pasting the pot lid on with a flour and water slurry, and setting it down in the coals and ashes. Each result is excellent in its own way; it all depends on whether you are looking to make chicken in an excellent broth or an elixir of chicken.
Some seventeenth-century cooks intensified this effect with a technique called “smoring”: sealing the seasoned chicken or rabbit or duck into a small clay pot and immersing that in a kettle of simmering water. (A bit reminiscent of the recent sous vide craze . . .)
In a rather extreme case of pot-abuse, an Anatolian lamb dish is made by seasoning small kebab-sized bits of meat with onions, herbs, spices, and tomatoes; forcing the mixture into a tall vaselike pot with a narrow neck; stopping up the top; and burying it in coals and ashes to cook slowly for several hours. Serving is accomplished by means of a skillful sharp rap with a hammer, bisecting the pot neatly with a single blow. This is single-service disposable cookware, convenient as long as you have a production potter at hand.
One of the real advantages of clay is obvious to those of us who do not smash our pots after one cooking, but use them over and over. Earthenware vessels absorb some mojo from each delicious food that has gone before, as fat carries each dish’s essence deep into the clay. You would think that there would be a limit to the benefits from this tendency, that the cookware would develop sour, off, or rancid aromas. But I clean the pots promptly after use and do not store foods in them; perhaps these practices account for my lack of trouble on this score. Somehow, the effect of the je ne sais quoi imparted by the pots seems altogether positive, merely adding depth and nuance to dishes. (This characteristic of clay vessels also helps archaeologists learn what people cooked in those pots. The residual lipid profile in a cookpot shard reveals all.)
Another culinary advantage of clay over most metals is its nonreactive nature. For our simple boiled chicken example that may not matter, but if you want to make an intense little sauce for your chicken using, say, tart fruit like grapes, or maybe the juice of a lemon, or even a glass of wine, and then you thicken that sauce with an egg yolk, a small clay pot is far and away the superior choice. Acids and compounds, when exposed to reactive metals, can unleash some powerful funky aromas and flavors (wet golden retriever, anyone?) and unusual colors (George Carlin was wrong — there are blue foods).
That same theoretical sauce also illustrates another wonderful benefit of cooking in clay. Whereas a metal pot transfers heat quickly to the foods within it, clay diffuses it. Thickening a sauce with egg yolks or making a crème anglaise in even a nonreactive metal pot will always be more fraught with the risk of curdling than cooking the same food in a friendly, gentle clay pot.
Any of the clay pot cooking done in the wood-fired oven in chapter 5 may be done in a gentle coal bed in your hearth.
This recipe is straight from the manuscript recipe book of a 17th-century English noblewoman. Both the ingredients (acid fruit and egg) and the technique (thickening with yolks) cry out for a clay pot to cook it in.
When a bumper crop of gooseberries first persuaded me to try this recipe, I was astounded: this is what English ladies ate before they invented lemon curd! Since gooseberries are very seasonal, I have on occasion substituted other tart fruits like cranberries and diced rhubarb. You can use it as a filling between cake layers or in tart shells, or just straight-up lashed with crème anglaise or whipped cream.
When it comes to rapidly heating large volumes, metal vessels are impossible to beat. Copper alloy and cast-iron pots and pans have long been valued for their quick heat transfer and relative durability and portability, but their ubiquity is rather recent. The culinary presence of these useful pots and pans has waxed and waned over thousands of years with the availability of raw materials and the vagaries of metallurgical technology — with hot spots from the ancient Indus Valley to fifth-century BCE China to Classical Rome to medieval Tanzania to early modern Europe. Only with the Industrial Revolution did metal pots begin to rule kitchens worldwide.
The largest pots, whether cast in one piece or assembled out of sheet metal, were usually built into a masonry surround, which both supported the pot and created a very efficient, safe containment for the fire. This arrangement was called a furnace, and was used by early modern Europeans in many industrial applications (salt making, sugar boiling, brewing) and in feeding crowds (crews at sea, orphans). Households with many mouths (human and otherwise) to feed, heaps of laundry to boil, and barrels of beer to brew also made use of a “copper” built in along the hearth. Along with an oven, it supplied the full range of kitchen needs.
Less capacious brass and iron pots were furnished with bails so they might be suspended from the lug pole up in the chimney by means of pot hangers, chains, or trammels. In eighteenth-century Europe and America, the crane became a common hearth furnishing. A convenient wrought-iron arm, the crane didn’t just hold the pots up, it allowed the cook to swing them right out into the room at working level.
Three long or short legs built into the base of a pot made them efficient cookers without hanging, as they could be set upon a great heap of coals to just simmer away on the hearth.
Learning to use metal pots with a wood fire is pretty intuitive, although pots vary a great deal as to their strengths and weaknesses. The best way to learn is to do — just make your favorite soup or stew in a cast-iron kettle to find out how the process is the same yet different from how you always do it. Remember that cast iron, although strong, is brittle. Don’t drop it on a hard surface. And, as with virtually any cooking vessel, try not to add very cold liquid to a very hot pot.
It’s wonderful that a few companies are still turning out good quality, inexpensive cast-iron pots and frying pans. That small investment should provide you with a lifetime of great cooking, indoors and out. (See Resources.)
However, the range of sizes and shapes available today pales in comparison with the panoply of terrific pots churned out in the last few centuries. Keep your eyes open for sound but disused and inevitably rusty old pots shoved aside by people eager for the dubious conveniences of aluminum and Teflon. Unless your salvaged pot has been at the bottom of the Gulf of Mexico for a few centuries, it is likely that it can be brought back into good working order with just a little care. And as you use it, it will grow more and more beautiful and functional.
First, make sure the pot is sound — that it has no fatal cracks hidden by the rust. A chip, or even a small crack by the rim, probably will not spell doom, so I’d commit a little time and work to a full investigation.
Aside from big bumpy accretions, which might merit the application of a heavy paint-scraper, most of the cleanup work is best tackled with a wire wheel attachment of a handheld electric grinder or electric drill. Don’t forget the safety goggles, gloves, and ear protection. And for goodness’ sake, don’t do this job in a bikini top, no matter how hot it is out; when those hot little wires dart into your flesh, they don’t want to come out!
Once you’ve run the grinder over both the inside and outside of the pot to your satisfaction, rub it clean with an old chunk of towel. Fine steel wool can be helpful for touchups in out of the way spots. Wash it all over very well with hot soapy water.
Rub it all over with neutral vegetable oil, and pop it in a cooling oven (wood-fired or otherwise). Remove when cool, wipe with paper towels, and enjoy.
All the proof you’ll ever need that al dente is not the only path to essential vegetal goodness.
(If all the greens don’t fit in the pot at once, add them by degrees a s they cook down.)
True fish chowder is unthinkable without a cast-iron kettle.
Admittedly, in chowder’s scrappy multinational seaborne infancy on the fishing grounds of the North Atlantic, a brass pot or even a clay marmite was more liable to be the cooking vessel available. The shadowy but fascinating first generations of chowder eaters — a mix of sailors and fishermen from France, Brittany, the Basque country, Cornwall, Wales, and England — were simply using the materials at hand, flavored and filled out with the provisions (and traditions) in their boat’s cookroom, to make a filling and tasty quotidian dish. In its first appearance in documents in the eighteenth century, it’s clear that chowder was defined as the technique of layering freshly caught fish with common shipboard ingredients like salt pork, onion (if there were still some left), and ship’s biscuit, and perhaps some wine and other oddments, depending on the voyage; the whole thing then covered with water and simmered a bit.
In New England, chowder survived the transition from innovative working people’s food to charter fishing party standby. By the mid-nineteenth century, it reached its apogee as de rigueur celebratory summer fare, the kettle banging along out to the beach in a catboat, on a wagon, or simply suspended on a stick between two chowder-loving pedestrians. The technique of layering the food in the kettle, “building the chowder,” was so intrinsic to the dish that its abandonment in the early twentieth century spelled doom for real chowder everywhere. The ultimate result has been a sad proliferation of flour-thickened nasty messes winning awards in every once-proud chowder town ever since.
This situation need not be. With a little trouble sourcing equipment and ingredients, anyone can experience the real deal. Once you have your kettle, the trickiest part of chowder is getting the essential pilot or water crackers. One bakery in the world still makes them (see Resources) or you can make your own (see chapter 5). The next-trickiest part is the salt pork. Commercial salt pork can be used, but if you can find a butcher or local farmer selling some, stock up the freezer; or, again, make your own. The difference is astounding.
8 servings
This recipe captures a very common style of chowder for Plymouth, Massachusetts, in the second half of the 19th century. It’s way more delicious than the sum of its parts.
*If you have fish heads and frames, make simple fish stock first in a separate pot. Just cover with water, bring to a simmer, and cook, uncovered for 20 minutes. Remove from the heat. Proceed with the recipe, straining in this broth instead of the boiling water.
4 servings
You may substitute other firm, tasty dried beans and other tough flavorful cuts of beef, but there’s no getting around the New Mexico red chile, the cast-iron pot, and the campfire to get this right.

Note: You can cook a small top round or piece of chuck this way, browning it whole, braising until tender, and then slicing or shredding. Return it to the broth to finish flavoring the beans.
If you’ve already learned to use the griddle and cast-iron pots, you really already know how to shallow fry over a live fire. The skills are simple and the essential tools — cast-iron skillets — are available widely, both new and old.
When it comes to shallow frying, you have a lot of latitude in your cooking arrangement. Three support stones stably cradling your pan (a favorite since Neolithic times at least) can work fine, with nice hot coals shoveled in between the stones. Or, a strong trivet of about a foot of height can be a good support, as long as everyone moves with deliberation around it. Have a pile of light pine, split small, to jump the heat up. As ususal, you’ll need a decent coal bed before you start cooking.

Fried food is irresistible when the fat is kept good and hot. A good bed of coals under a frying pan keeps the heat steady and makes for snappy ignition of softwood bits when the temperature starts to drop.
Makes 12 to 16 small appetizer pizzas
Fried pizza was big news to me when my Roman friend, the archaeologist and bon vivant Gaetano Palumbo, showed this off. We were working in a very remote section of the Jordan Valley and amusing ourselves during our non-digging hours by beating the bushes for promising ingredients and cooking improbable foods for each other and drinking Ramos Gin Fizzes on the roof of the dig house. Gaetano was shocked by my ignorance concerning the real foods of Rome, and I in turn was amazed by how great these simple pizzas are.
The basil we used on these Jordan Valley pizzas was a sort that grew in pruned woody hedges, like privets, around the dig house. At least it tasted and smelled like basil, and made pretty decent pesto, and no one ever told us not to eat it. Whatever sort is growing in your garden will be great.
You’ll only need about an inch of oil for frying these, so you can get away with a deep cast iron frying pan if you don’t have a wide-mouthed open pot. (Also, if you’ve ever wondered what might be a good use for less-than-virgin olive oil, this is it.)
You’ll note that this pizza is made without cheese. The richness and flavor created by frying in olive oil take its place subtly and deliciously. You may, however, find that you need to salt your sauce a bit more than usual. And it may not be authentic, but I sometimes melt a couple of anchovies in the olive oil before adding the garlic and tomatoes to the sauce.

A note about advance preparation: You may prepare both sauce and dough the day prior and chill airtight. Take the dough out, preshape the balls, and cover about an hour before you want to roll out the pizzas and cook.
Serves 2 or 3 hungry folks
My Georgia friends Pat and Shirley Puckett taught me this most foolproof of all breakfasts, a legacy from their mother’s Louisiana childhood. This “recipe” has saved my bacon many a morning when a guest or two has shown up and the cupboard was bare. But there’s almost always a tub of leftover rice in the fridge! The proportions are extremely elastic; it seems that no matter how I make it, everyone is always surprised by how good something so simple can be.

2 servings
A half loaf of stale bread and a few eggs could result in French toast, but our tastes generally run a little earthier. Migas is the brilliant Spanish dish of soaked and fried bread, a concept we enjoy taking in, whichever direction the contents of our larder point us.
This imaginary Hungarian version is merely an example of the versatility of the idea. Made with week-old caraway sour rye, duck eggs, and duck fat, it results in a remarkably meaty and serious breakfast, although it contains very little actual meat. Change it around as you like — bacon fat, hen’s eggs, an old focaccia, garlic?
4 servings
Since at least the Bronze Age, Mediterranean peoples have been converting their forests into charcoal to fuel metalworking and other proto-industrial pursuits. The process involves a lot of chopping and stacking of hardwood, the burying of that wood in a mound of earth, and the controlled burning of the wood in the resulting oxygen-starved environment. Thus, although the name doesn’t show up in printed cookbooks until the 20th century, “charcoal-makers’ spaghetti” is by definition a vestigial campfire dish, quick-cooking food for folks working and living in the woods away from home. Its ingredients, dry pasta, salt pork, salt, butter, onion, and hard cured cheese, are long-keeping and easy to transport. Having cooked it myself on several occasions while actually engaged in making charcoal, I can indeed vouch for it as the ideal dish — hearty, sustaining, basic, yet delicious — for hard-working people whose weary bodies are inundated with smoke and dirt.
This is where I throw aside my usually cavalier attitude to safety, and begin with an admonishment: always use utmost care when deep-frying over an open fire. Double-check your cooking gear ahead of time for stability, have all the tools you need present, including a fire-shovel, and select your fuel carefully so that you can anticipate the size of your blaze. Have plenty of headroom in your pot so that there is never the slightest fear of overflow. Keep careful tabs on the pace at which your oil heats; if it seems like it is gaining heat faster than you like, make an adjustment to the fire, rather than trying to adjust the heavy kettle full of hot oil. Brief your guests sternly on safety, especially if there are children involved.

(Reading these sensible words will amuse people who have seen me fry doughnuts for a hundred on an open fire in a thatched underground hovel, walled away from the only exit by planks of rising crullers, while wearing a devil costume, all because I thought that “Dungeon Donuts” was a great concept for Halloween entertainment. Or what about the time we made Scotch eggs in a fire pit dug into a glare sheet of ice on a hillside while drinking Bloody Marys? My friend Stephen had to keep pushing me in my tractionless boots back up to the high side of the fire pit; I’d slide back down, tending the frying as I went, and he’d slide me back up. Who knew that crampons were essential deep-frying tools?)
Think through the process before committing to heating the oil, so that you can anticipate all of your equipment needs. I like to have the eventual serving platter standing by in a warm spot, a roll of paper towels handy just in case, a pair of tongs, a wire skimmer or slotted spoon, and for draining, wire cookie racks (which I feel leave fried food much crisper and less greasy than the spell they’re commonly given on absorbent paper). Definitely use an instant-read thermometer if you’re new to this; but once you gain experience and build confidence, you’ll probably find that you can leave it in the drawer.
Ideally, the temperature in your pot should remain steady throughout the process, but achieving this goal requires some focus. Each time you add a lump of cold dough, you’re bringing down the temperature of the whole shebang, so calibrate your additions both to the oil and to the fire accordingly. Try to anticipate by keeping a steady flame under the pot. The bed of coals helps tremendously here. And if the heat should suddenly climb more quickly than you like, push the fire aside for a moment and take advantage of the fact that the most efficient way to cool down a pot of hot fat is to introduce some cold food to it.
Although they’ll never be confused with healthy choices, well-fried foods should not seem greasy or heavy. They should taste like the apotheosis of their ingredients, not like the frying medium — whether it’s lard, clarified butter, seed oil, or whale blubber. (Yes, blubber. American whalers joyously celebrated rendering a voyage’s thousandth barrel of whale oil with doughnuts for all hands — fried right on deck in the seething try-pots. One 1858 verdict: “right good were they too, not the least taste of oil — they came out the pots perfectly dry.”)
Once I started deep-frying outdoors, I realized I would never voluntarily do so in my house again. Much as I love the occasional deep-fried food, I hate the mess, and worse, the lingering smell. Outdoors, none of that is an issue (but do remember that a greasy paper towel thrown in the fire will flare up). When the fun is over, there will still be used oil to deal with; I advise cultivating friendships with folks who power their vehicles with biodiesel.
4 to 6 servings
You’ll need a medium hardwood fire to start, and some small dry softwood to spike the heat. Select an open-mouthed cast-iron pot that can safely hold 2 to 4 inches of oil and still have an equivalent amount of freeboard.

Treats for 10 to 12
A delicious and fun cool weather treat. Twenty-first-century Dutch children still enjoy these fritters under a different name, but the formula has endured substantially unaltered. Why mess with success?
The original recipe calls for turnip-seed oil, the ancestor of the modern canola, as the frying medium, a striking regional practice in a mostly lard-frying post-medieval Europe.
I’ve halved the proportions of the 1668 recipe and adapted it from ale yeast to commercial yeast.

The masonry oven is not the end-all and be-all of wood-fired baking. As we’ve seen, people have baked bread on earthen and iron griddles, on planks, and right under the coals and ashes, all over the world and for centuries. For a small investment and with a little enjoyable practice and experimentation, you can also bake a very tasty loaf of bread in cast iron.

The earliest full description of the baking technique that I’ve come across demonstrates the ingenuity of the desperate. A British military officer posted to deepest Scotland in 1746 simply couldn’t deal with the flat local oat and barley breads; he began keeping his own leaven and churning butter and used the buttermilk as the liquid for his bread. And as for baking:
“[H]aving not the conveniency of an oven, I made use of a large iron pot that would bake two large bricks or loaves at a time. I prepared it by covering it with what they call an Irish gridle [sic] for baking oaten bread over the fire, and putting fresh coals under the pot of turf or wood, until the air within the pot became sufficiently warm, I then caused my bread to be fixed in the pot and covered again, and fresh coals to be put under the pot, and the griddle covered all over with them, and thus constantly supplied, till your bread be sufficiently baked, which will be in a very little time; and when you take it out, put it before a good fire, constantly turning it to harden the crust; and after this manner I have as good French bricks, and wheaten and household bread baked as ever you saw come out of a baker’s shop.”
By sometime in the late eighteenth century, enthusiasts like this anonymous officer would no longer need to improvise to bake in the hearth. The Industrial Revolution and the migration of Europeans all over the globe brought on an explosion in the production of cast iron for domestic and industrial purposes. Iron foundries extended their repertoires of holloware to include the “bake pot” or “bake-kettle,” the ideal utensil for the purpose: a straight-sided round pot with a bail, three short chunky legs, and a tight fitting lid cast with a peripheral ridge. The legs allowed it plenty of room to nest on coals and embers without smothering them. The shape of the cover made it easy to heap coals on top, as well as to look inside without sullying the food.
Because a portable mini-oven was so helpful when cooks were on the move, the innovation really took off in restless North America. Iron foundries throughout the Northeast and the Midwest of the United States turned them out in quantity. The bake-kettle became a standard feature of the kit of any cook on the cattle drive, at the logging camp, in the wagon train. But though they are associated with American frontier life, their use was by no means limited to that context. During the nineteenth and early twentieth centuries, they also pop up in accounts of travelers and settlers and even recreational campers throughout the rest of the British sphere of influence: Canada, Kenya, South Africa, Australia, and the West Indies.
Baking in a kettle was not just for travelers; many cooks in America and the British Isles who had no masonry oven relied on the technique for all their home baking. Others who had ovens turned to their bake-kettles when unexpected company turned up for tea, or when they had only one or two things to bake and couldn’t justify firing a big oven. Biscuits, shortcake, and other quick breads using the newly developed chemical leavenings like bicarbonate of soda, were often cooked in bake-kettles because they could be thrown together easily in no more time than it took to prepare the fire and kettle for baking.
Acquiring your equipment. If you are lucky, you may find a bake-kettle at a junk shop or yard sale. Snap it up and marvel at your good fortune if it still has its original, snug-fitting cover.
Thanks to a small, but persistent, market of enthusiasts, new bake-kettles are still available, squat legs, straight sides, ember-holding lid, and all. A quick web search (“dutch oven”), a few mouse-clicks, and a valid credit card number will have one at your door in a jiffy.
A fire-shovel, a pothook, and a whisk broom are handy to have around, but their absence is not a deal breaker. Much can be accomplished with an old shingle, a stick, and a rag or two.
Preparing your fire. It only takes a few minutes to heat the kettle enough for baking, but naturally you need to have an ample supply of coals all ready to go before you start.
If I am making a dedicated fire for this purpose, I like to burn small-diameter round hardwood stock (i.e., sticks), for a few reasons. A big pile of oak or maple sticks or brush combusts aggressively and quickly, even if it’s not 100 percent dry, leaving a nice bed of coals. And small-diameter wood, even as half-burned embers, will fit conveniently underneath your bake-kettle without putting it off-kilter.
Err on the side of abundance, and, later, when you are baking in the kettle, keep a little fire going to the side so that you will have a source of coals should you need them to refresh the heat under or over your kettle.
If, however, you already have a hearty cooking fire going, just use a shovel to steal some coals from beneath the fire and set them in a little heap, making a new hearth about the diameter of your kettle a couple feet away. Do not overdo it. Remember that the rule of thumb is to use about half as many coals below the bake-kettle as above. Cast iron is an excellent diffuser of heat, but restraint is key — the trick here is setting up just the right amount of heat to bake your food through without scorching it.
Preheating the kettle. Place the empty covered bake-kettle upon this small nest of coals and allow to preheat about 5 to 10 minutes. This is a convenient time to accomplish the final mixing and any necessary shaping for quick breads. This is also the time to check and make sure you’ll have everything you need close by.
When the preheating time has elapsed, pick up the kettle by the bail with a pothook or potholder, and have a look beneath. (Check with a quick touch first, but it is unlikely you will need to use a pothook or potholder yet.) Add another small shovel of coals to the bed unless it’s screaming hot. When you put the pot back into its nest, turn it 180 degrees from how it was sitting before, and try to get it pretty level, especially if you’re baking something with a liquidy batter like cornbread.
Baking the bread. Bread at hand, remove the kettle’s cover. (Again, you will probably be able to bare-hand it still.) Nestle the bread in the kettle, close it back up, and place the lid on top. Check to see that it’s really seated down. Sometimes they catch where the end of the bail curls back from the pot. As you’re baking, any visible steam, or even more than a subtle aroma, may mean that your lid is ajar.
Retrieve a good shovelful of small coals from your source fire and rain them evenly on your pot lid. If you are baking out-of-doors and it’s cold or windy, make a little skirt of coals and ashes around the perimeter of the pot, too. Look at the clock or set a timer, since you won’t get many physical cues from this food when it’s ready.
Throw an armload of very small-diameter hardwood — twigs, really — on the main fire. Quick-burning small stuff will replenish the coals should you, in a pinch, require more.
A little before halfway through the cooking time, pick up your pot by the bail and rotate it 180 degrees. This time, you’ll probably need your pothook or potholder. Turning the kettle compensates for hot spots in your coal bed, and for one-sided exposure to the main fire.
When you think it’s about time, use whatever comes to hand to brush the coals back into the fire from the lid. Use a whisk broom if you like to clean off the ashes, too. Lids can be tippy when lifted, and grittiness is unwelcome seasoning.
Finding the center balance point, lift the lid straight up and out of the way. If things look very underdone, instantly close it back up, and refresh the coal supply over and under. Some foods — biscuits, in particular — are very steamy-seeming when first opened. If they’ve browned on top, keep the lid off, and put some new coals beneath. They should crisp up in just a minute or two and be wonderful.
For large yeast- or naturally leavened loaves, you’ll want to turn the loaf out of the pot to test the bottom by tapping, same as you would with any kind of baking. Usually, the bread draws away from the sides of the pot and releases without a fight, but a long, thin spatula (like for cake frosting) is helpful in the case of recalcitrance. If you’re baking in the rough without a frosting spatula at hand, any bowie knife will do.
The anonymous British officer quoted earlier mentioned placing his loaves near the fire to crisp up the exterior after their time in the bake-kettle. I have never had to do this, but be aware that it is an option.


Makes 1 big loaf
This 21⁄4-pound loaf of bread bakes perfectly in my ten-inch bake-kettle. The recipe was inspired by looking at mid-20th-century photos of Welsh home bakers and their beautiful loaves of kettle-baked bread.
Makes 8 biscuits
If these are all you ever make with your bake-kettle, your investment has paid off. I like to use about one-quarter whole-wheat flour, and we mash together butter and molasses or sorghum molasses on our plates as the accompaniment.