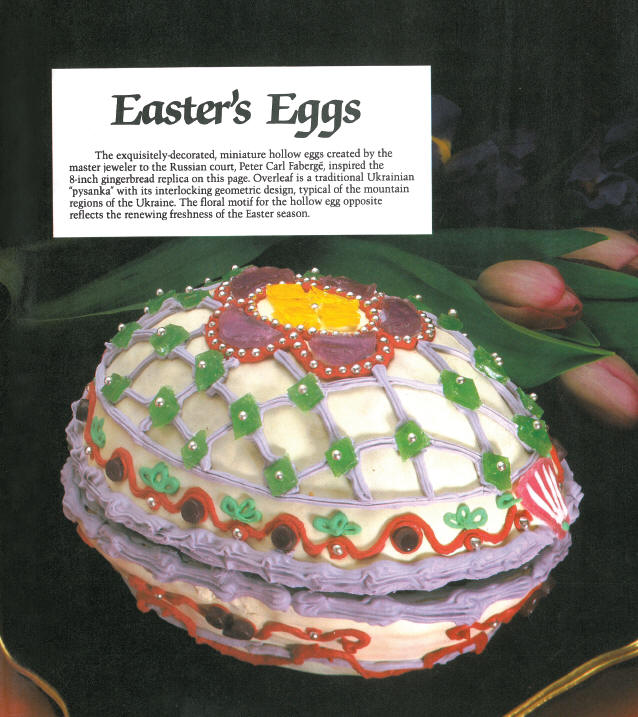
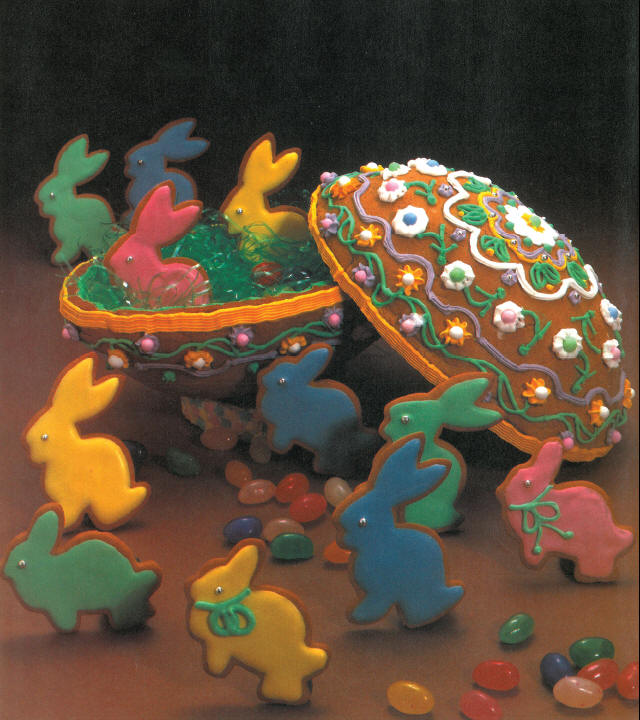
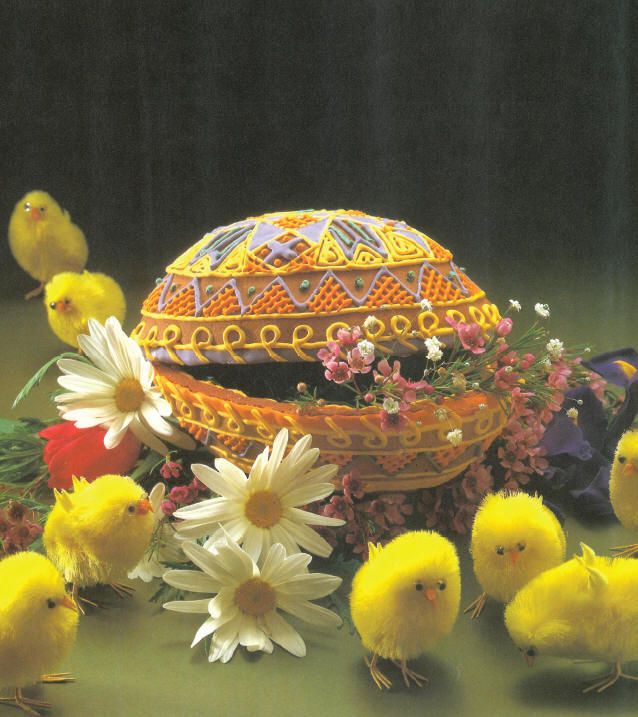
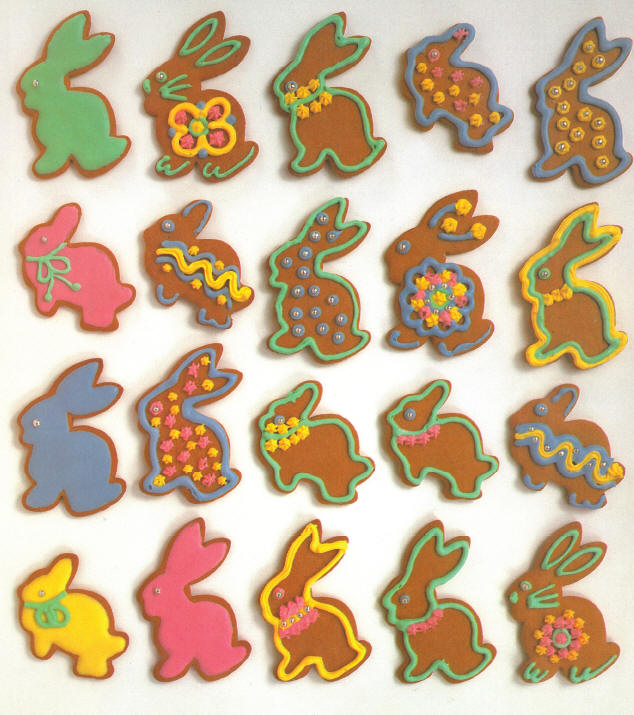
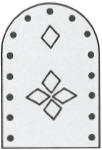
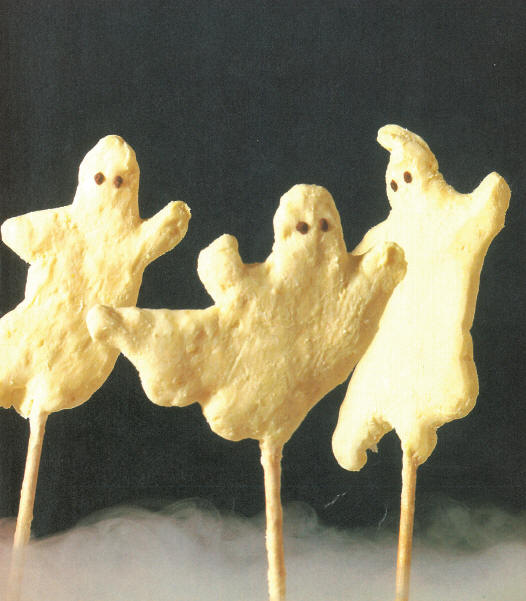
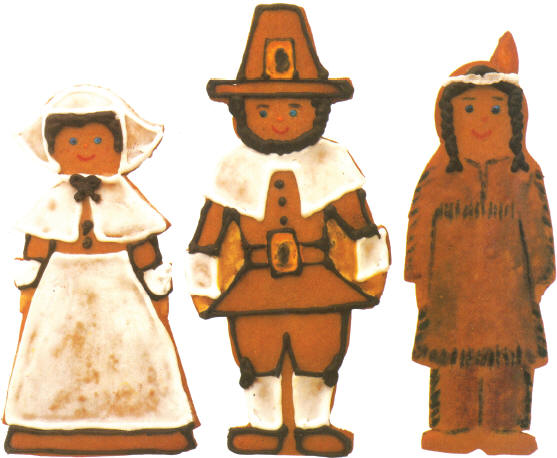
This project consists of three hollow eggs made from six halves baked on molds, each measuring approximately 5x8 inches. They will be decorated in the styles of Faberge, bejeweled and glazed with an assortment of candies; Ukrainian, frosted in one of the geometric designs typical of this region; and Floral, decorated in spring-like Easter colors. Two Easter bunny shapes are decorated in 20 different patterns and colors. A string of “gingerbeads” is threaded as soon as they are cool enough to touch, then glazed when hardened.
Grouped together in a straw basket, or displayed individually, these unusual eggs lend themselves to a variety of display ideas—brighten an entrance hall table or fireplace mantel, for example. The Faberge egg, opened to display a string of glazed gingerbread beads, makes a spectacular centerpiece for a sideboard or dining table. For a special Easter treat for six people, nestle each open egg-half in yellow paper “grass” on a doily-covered plate and fill it with an Easter gift of cookies, chocolates, or fresh flowers. For an Easter morning that a young child won’t soon forget, fill the Ukrainian or Floral egg with a collection of small decorated gingerbread bunnies and leave it next to the bed as a special, special gift from the Easter Bunny.
This project is rewarding, but challenging. It will go much more quickly, and be more fun, with two pairs of hands. The baking, assembling, and decorating of the eggs (the dough should be mixed the night before the rolling and baking day) can be accomplished by two people in two weekends, but three weekends would be more comfortable.
A SHORT HISTORY OF FABERGE
One of the most famous jewelers of all time, Peter Carl Faberge is probably best known for his fanciful and ingenious Imperial Easter Eggs, commissioned by Czar Alexander III for his ailing wife. The son of a jeweler, Faberge was born in 1846 in St.
Petersburg (now Leningrad). He was popular with royal families throughout Europe and the Far East, and was particularly noted for his enamel work and unprecedented combinations of materials: metals, precious jewels, and stones. He delighted in the unexpected, often including a mechanical device or some ingenious surprise element in his designs.
The Russian Revolution brought confusion and upheaval and Faberge s shop was taken over to manufacture war arms. He continued making his eggs and other creations, however, until he was forced to flee the country. He died in 1920 in Lausanne and with him his great firm, the House of Faberge, came to an end.
UKRAINIAN EASTER EGGS (“PYSANKA”)
This unique method of egg coloring developed in the Slavic countries where decorating eggs has long been a popular tradition, especially at Easter time. Using a wax-resist technique similar to batik fabric dyeing, the Easter Eggs are decorated with various designs, ranging from geometric to floral, depending on the region of the country. Each village also produces its own designs, such as fir trees, priests’ robes, bell towers, horses, and flowers. The eggs are generally given away as gifts—from families to their priests, or young women to their beaus—and are saved and treasured as heirlooms.
YOU WILL NEED:
See Basic Skills chapter for general equipment and materials.
Oval-shaped metal mold (or any oven-proof mold or bowl) that closely resembles half of an egg in shape. Dimensions should be about 4x6 inches (the finished egg half will be approximately 5x8 inches). If you want to bake 2 halves at the same time, have on hand 2 molds or bowls. Stands for eggs, if to be displayed separately, should be circular and about 1-inch wide and 3 inches in diameter. You can use small, simple children’s bracelets. Or, cut sections off a wide cardboard tube, then glaze with Flow Frosting and decorate to suit your taste.
Heavy-duty foil, vegetable cooking spray (optional), pastry brush, buttonhole twist thread, 2 (or more) small bunny cookie cutters, pastry bags (as many as needed for different icing colors), cake decorator tips #’s 2, 3, 14, 30, 47.
Assorted candies:
1 dozen jelly candies in jewel tone colors
1 jar silver and/or gold decors (small balls)
1/4 pound small French mints in different pastel colors
Any other small gem-like candies which are suitable for decorating and produce a jeweled look
1 batch Royal Icing (make more as needed); Flow Frosting
MIXING THE DOUGH
8 ounces margarine or butter
3 cups sugar
1 cup molasses
3 tablespoons ginger
1 tablespoon cloves
1 egg
2 tablespoons baking soda
1 cup heavy cream
9 cups flour
1. Melt margarine in a large stainless steel saucepan, then add sugar, molasses, and spices and stir over low heat until well blended.
2. Stir in egg and baking soda (mixture will froth slightly).
3. Add heavy cream and stir until well blended.
4. Remove from heat and stir in flour. You may find it easier to work the last cup of flour into the mixture with your hands.
5. Cover dough and refrigerate several hours or overnight.
Yield: this recipe makes enough dough for 10 egg halves, 90 to 100 beads, and 4 dozen small bunny cookies.
CUTTING AND BAKING THE EGGS
1. On floured work surface, roll out a handful of dough to ’/s-inch thickness. You will use about ¾ of the dough for 6 egg halves.
2. Cover mold with heavy-duty aluminum foil, then spray it with vegetable cooking spray or grease it and dust lightly with flour.
3. Place mold on a plate or tray, then drape rolled-out dough on mold, allowing dough to extend about ½-inch beyond bottom edge of mold. This will make it easier to trim edge of egg after baking.
4. Place mold in freezer for about 10 minutes before baking.
5. Line cookie sheet with aluminum foil and spray it with vegetable cooking spray or grease it, then place mold on foil.
6. Bake at 350°F for 10 to 12 minutes or until a golden brown. Remove from oven.
7. While still warm, carefully remove excess dough from bottom edge of mold with a sharp knife. Do not tear baked dough.
8. Before completely cooled, carefully separate mold from baked egg half, then gently form the ends to resemble an egg shape.
9. Cool for at least 24 hours before decorating.
GLAZING THE EGGS
1. When baked egg halves are completely cooled and hardened, and before you decorate the outside, glaze insides with 2 coats of Flow Frosting, applied with a paint brush. Color frosting to your taste and thin it slightly before applying. Allow at least 4 hours between first and second coats.
2. If you wish, decorate insides of eggs in a motif complementary to the outside decoration.
DECORATING THE EGGS
1. Before decorating outsides of egg halves, glaze with Flow Frosting in your choice of tint and allow to dry completely (at least 4 hours). Of course you can apply decorations directly to the gingerbread without glazing first, if you wish.
2. Draw designs on eggs in pencil before beginning to decorate them, following patterns in book.
Decorate the egg halves using the color photographs and patterns as guides, but exercise your own imagination as well.
Hint: work on only 1 egg half at a time.
3. Put Royal Icing into small bowls and tint in colors you desire.
4. Glue candies to eggs and pipe on various designs using Royal Icing applied in pastry bags fitted with decorator’s tips. See Basic Skills chapter for instructions on using pastry bags and selecting proper sized tips.
Hint: to attach the candy, pipe an “X” with a #3 tip to mark the spot, then press candy on egg.
Hint: work on one area of egg half at a time, adding decoration then allowing icing to set about 5 minutes before continuing.
5. Prepare stands for eggs if needed.
Note: if using real flowers in Floral Egg, make sure stems are not wet, or line inside of egg with plastic wrap.
MAKING THE GINGER-BEAD NECKLACE
1. Roll small bits of dough between the palms of the hand into balls
 -inch in diameter (the finished beads will be about ½-inch in diameter). You will use approximately 1 cup of dough for beads.
2. Arrange about 12 beads at a time on a greased cookie sheet and bake at 350°F for 5 minutes.
Hint: bake the beads in a toaster oven with a glass door—you can see when they are ready to come out and your oven is left free for other uses.
3. Remove beads from oven and immediately string onto buttonhole twist thread. The needle will go through easily when beads are still warm and have not yet hardened.
4. Allow beads to cool thoroughly before glazing.
5. Make Royal Icing and mix Flow Frosting following recipe in Basic Skills chapter.
6. For glaze, tint Flow Frosting to desired color.
Hint: if you want a necklace with a pearl look, then tint to an off-white—1 or 2 drops of yellow coloring gives this shade. The necklace can also be left “natural” (gingerbread color) if you wish.
7. With soft paint brush, glaze beads on 1 side.
Hint: it’s easier if you space beads a bit apart along thread. Allow to dry (about 4 hours), then turn beads over and glaze other half. Dry completely.
8. Glaze each side once more, following step 7, to get a really rich jewel look.
MAKING THE BUNNY COOKIES
1. On floured work surface, roll out a handful of dough to  -inch thickness. You will need about 2 cups of dough for the cookies.
Hint: if you want a necklace with a pearl look, then tint to an off-white—1 or 2 drops of yellow coloring gives this shade. The necklace can also be left “natural” (gingerbread color) if you wish.
2. Using small bunny cookie cutters, cut out desired number of cookies.
3. Place on greased cookie sheet and bake at 350°F for 5 minutes.
4. Allow cookies to cool, then decorate with Royal Icing, Flow Frosting, and/or candies. Copy the decorative patterns in the color photograph, if you wish.
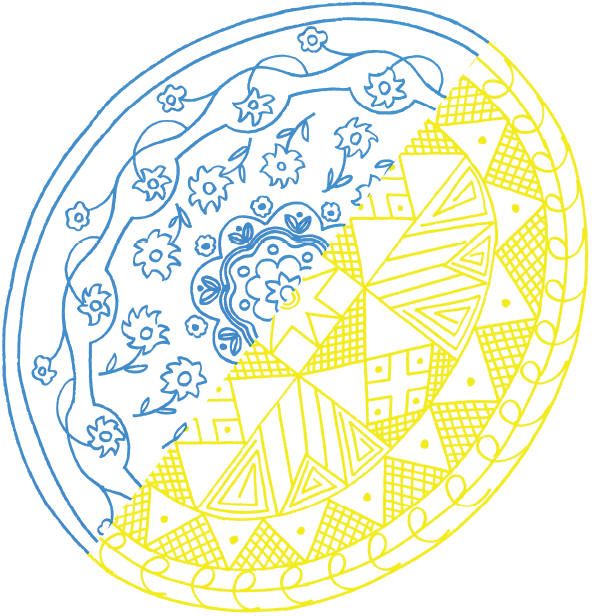
This is a full-sized pattern for one side of the top half of the Faberge Easter egg. Since both sides are identical, trace this pattern; transfer it, with carbon paper, to one side of the baked egg half; reverse it to trace the other side.
Half-pattern, full-sized, of Fabergé Easter Egg
These are full-sized patterns for one side of the top halves of the Flower Easter egg (blue) and Ukranian Easter egg (yellow). Both sides of each egg are identical.
Whoooo dares come close enough to peek through the broken panes in the stained glass window? Look out! A licorice tile slipped off the roof (or was it thrown) from the teetering turret? A crystalized ginger stone from the chimney is loose and could crash down any second if you sneak by to look in through the leaded window made of edible gelatin. What, you see a skeleton in the chimney? I don’t. But there are blue lights flickering inside and…I just heard a scream!
The designer of this Halloween centerpiece has turned the cheerful, chuckly, gingerbread medium into a tower of terror. The house slants, the shutters are broken, the slabs of dough are thick, and the frosting sags in sinister gobs.
The dough recipe, baking instructions, and decorating technique are in the Middle-European tradition—spicy, rolled out thick, and decorated with chunky clumps of icing—the perfect style for a Halloween horror-piece. The back has been left open so you can string tiny blue Christmas tree lights inside with an on-off-on flasher so they will flicker through the windows. Record a terror-tape, or buy one with screams, creaking doors, rattling chains, and owl’s who-whoooos on it, and tuck a tiny tape player inside. Just before your guests enter the room, turn on the blue lights, start the tape player, and flick off the light in the room. (If that doesn’t get ’em, the Bat Cookies will!)
YOU WILL NEED:
See Basic Skill chapter for general equipment and materials.
In addition, have on hand full food cans, cardboard tubes from paper towels, and thick (sandwich) toothpicks.
3 batches gingerbread dough
1 batch icing
A 12 x 18-inch base of ½-inch plywood Paste food coloring: black, egg yellow, and brown
Orange liquid food coloring
2 packages sheet gelatin (2 sheets)
Edibles: Salmiak (Dutch licorice), Black peppercorns, Australian crystalized ginger (very soft), Black licorice whips, Black licorice laces, Black licorice chips, Crumbled, dark bittersweet chocolate or ground coffee, Florist’s wire, White chocolate, Red nonpareils
MAKING THE PATTERNS
The patterns for The Haunted House are given in reduced dimensions. To make full-sized patterns, use the dimensions indicated.
1. With ruler, T-square, and triangle, make full-sized tracing paper patterns following instructions in Basic Skills chapter.
2. Make and cut out cardboard patterns following instructions in Basic Skills chapter. Be sure to draw door and window openings on pattern pieces and cut them out. Note that H and I are the same width, but I is 2¼ Vi inches longer than H.
MIXING THE DOUGH
Make 3 separate batches. Do not triple.
12 cups unsifted flour
12 tablespoons baking powder
2 tablespoons ground cinnamon
2 teaspoons ground cloves
2 teaspoons ground ginger
½ teaspoon ground cardamom
¼ teaspoon salt
1½ cups honey
3½ cups sugar
½ cup butter
Juice and grated peel of 1 lemon
2 eggs, extra-large
2 egg yolks, extra-large
1. In large bowl, combine flour, baking powder, cinnamon, cloves, ginger, cardamom, and salt.
2. In a 4- or 5-quart saucepan, bring honey, sugar, and butter to a boil over high heat, stirring with large wooden spoon until sugar is dissolved and butter is melted. Remove from heat and stir in lemon juice and peel. Cool to room temperature.
3. When cool, beat in 6 cups of flour mixture until well blended. Beat in eggs and egg yolks, and then beat in remaining flour mixture.
4. Flour hands and knead dough until it is smooth and pliable but still slightly sticky. If too moist to handle, beat in more flour one tablespoon at a time.
BAKING AND CUTTING
One batch of dough will fill two 12 x 18 x ½-inch jelly roll or Strudel pans. You will need to bake 6 pans of dough, so you can prepare and bake 2 at a time. The gingerbread becomes firmer and easier to handle as it ages. Therefore, you can do the baking over a period of several days as long as you cut out the pieces 5 minutes after the dough is baked.
Note: this gingerbread is unusual because it is ½-inch thick. This makes it stronger, especially after the house has dried thoroughly for at least a week.
1. Grease two 12 x 18 x ½-inch pans and line with parchment or waxed paper. Grease and flour paper.
2. Place half the dough in each pan.
3. With a lightly floured rolling pin, press and roll out dough to an even ½-inch thickness, forcing it into corners with your fingers.
4. To make rough-looking walls, push your fist into the dough. The impressions will remain after baking.
5. Bake in preheated oven at 325°F for 40 minutes or until gingerbread is firm and top is brown. Cool in pan 5 minutes.
6. Cut out cookie shapes following instructions in Basic Skills chapter.
Note: unlike other projects in this book, the dough is baked and cooled just 5 minutes, then the shapes are cut out. The basic instructions for cutting out pieces apply, but be very careful when positioning patterns and cutting because the freshly-baked dough is fragile.
Cut 1 piece A with 4 windows and door (for the front) and 1 with a big square hole large enough to pass a small tape recorder through (for the back). Cut 1 piece B with all 4 windows (left side) and the other with only the 2 right-hand windows (right side). Likewise, cut 1 piece D with round window (front) and the other without (back). Be sure to reserve door and window pieces because they will be used to make door and shutters.
7. Very carefully set pieces on waxed paper until they cool completely. The sides are especially fragile due to the cutouts.
8. To make house slant, cut ¼ inch off bottom edge of right house side B and slightly shave right corners of house front and back A.
MAKING THE ICING
4 egg whites, extra-large
5 cups confectioners sugar
2 teaspoons cream of tartar
1. In large bowl (a copper bowl will produce the greatest volume), beat egg whites with whisk or electric mixer at medium speed until they are frothy and slightly thickened.
2. Add confectioners sugar to whites ½ cup at a time, beating thoroughly after each addition. After all sugar is added, beat for 5 minutes until a stiff icing is formed.
3. Divide icing into 2 bowls. Color 1 with black food paste and the other with egg yellow and brown food paste (creating an ochre color), following instructions in Basic Skills chapter.
Note: The Haunted House is decorated as it is assembled.
ASSEMBLING AND
DECORATING THE HOUSE
As you assemble the parts of the house, hold pieces in place until set (about 5 minutes) before proceeding to the next step. Remember “allow to dry completely” means you must let iced parts dry at least 4 hours before continuing assembly.
1. With #10 or #12 decorator’s tip, pipe icing along bottom and right back edge of house front A; then position on base. Follow instructions in Basic Skills chapter for applying icing with pastry bag or parchment cone and decorator’s tip.
2. Pipe icing along bottom and left edge of right house side B and position on base along back edge of A.
3. Pipe icing along bottom and left edge of house back A and position on base and along back edge of right house side B.
4. Pipe icing along bottom and right edge of left house side B and position on base and along back edges of house back and front A.
5. Ice and position supports C in 3 inside corners of house (all except front right).
6. Prop house in position using full food cans, following instructions in Basic Skills chapter, then allow to dry completely.
MAKING THE
STAINED GLASS WINDOWS
1. With scissors, cut out of sheet gelatin 4 x 3-inch rectangles for the house windows, and a 2½ x 3-inch rectangle for the tower window.
2. Using a small paintbrush, paint one side of gelatin with orange liquid food coloring.
3. On other side, pipe leading with black icing and #2 or #3 decorator’s tip. Follow pattern in gelatin for house windows. Use the color photograph as your guide for decorating oval tower window.
4. Pipe ochre icing on house windows and position them. Then pipe ochre icing on tower window and position it in tower front F.
5. For broken window effect, tear holes in gelatin.
DECORATING AND ATTACHING THE SHUTTERS AND DOOR
1. Spread ochre icing on walls of house and tower. See Basic Skills chapter for applying icing with a paintbrush or kitchen knife or spatula.
2. Spread black icing on roofs of house and tower.
3. With sharp knife, cut reserved window pieces in half to make shutters, using extra shutter pieces if necessary.
4. Spread black icing on shutters, then ice in place.
Note: shutters must be iced closed on left bottom front window to conceal internal support.
5. Spread black icing on door and decorate with salmiak and peppercorns, using the illustration as a guide. Then ice in place.
ASSEMBLING THE TOWER AND ROOF
1. Using ochre icing, join tower front and back D and sides E following instructions for assembling the walls of a gingerbread house in Basic Skills chapter.
Note: to strengthen tower, cut remaining support C in half lengthwise. Ice pieces together in an X-shape; then ice to inside of tower.
2. Pipe icing along all edges of tower roofs F and join to top edges of tower front, sides, and back. Don’t worry if they don’t meet exactly. This will be covered by licorice ridgepole later.
Note: if house roof G has not dried rockhard, you might want to reinforce it before proceeding. Cut a roof piece out of cardboard, spread icing on it, and attach to underside of gingerbread roof.
3. Pipe icing along bottom edges of tower and join to wider part of roof G.
4. Pipe icing along top edges of house and join roof to house. Roof and tower should extend somewhat beyond left side of house. Allow to dry completely.
ASSEMBLING OVERHANGS
To prop overhangs until they dry completely, press thick toothpicks into roof and back of overhangs; then prop bottom of overhangs with cardboard tubes from paper towel rolls.
1. Pipe icing along top edges of front overhang H and side overhang I and join to house roof G. Allow to dry completely.
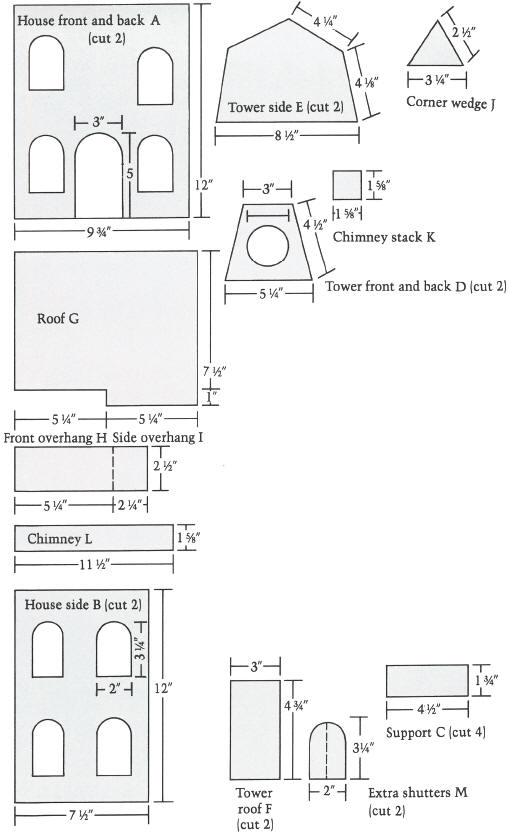
2. Pipe icing along side edges of corner wedge J and join to right edge of overhang H and left edge of overhang I.
ASSEMBLING THE CHIMNEY
1. Spread ochre icing on chimney stack K and join to roof G with black icing.
2. Spread ochre icing on chimney L and join to right house side B with ochre icing.
FINISHING TOUCHES
1. To make ginger stones, shape crystalized ginger pieces by shaving them with a knife. Using ochre icing, position on chimney and stack, around windows, and on left tower side.
2. Using black icing, position licorice whips on roof and tower ridge and around base of tower as shown in photograph.
3. Using black icing, position licorice laces around tower window.
4. Using black icing, position licorice chips on overhangs and roof.
5. For that really “haunted look,” make sure that doors and shutters lean crookedly, and that a few roof tiles and stones are loose.
6. Ice a toothpick in black and stick in tower roof.
7. Pipe on cobwebs with black icing and #1 decorator’s tip.1
8. Spread black icing on base; then, before it dries, sprinkle with crumbled chocolate or ground coffee.
9. Shape tree using licorice whips stiffened with black icing or florist’s wire glazed with black icing.
10. Carve a 3 x 1 x ½-inch tombstone of white chocolate and ice it to base. Make a grave mound by heaping crumbled chocolate or ground coffee around tombstone.
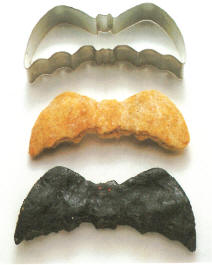
MAKING BAT COOKIES
You should be able to make at least 1“ dozen bat cookies with the extra dough. Use a purchased bat-cookie cutter, or design your own. Leave plain, or ice black with red nonpareils for eyes.
Boo!
YOU WILL NEED:
See Basic Skills chapter for general equipment and materials.
1 pound white chocolate
1 bar milk chocolate
Six 6-inch lengths of 3/16-inch wooden dowel or ice cream sticks
In addition, have on hand: double boiler or saucepans that fit one on top of the other, soup spoon, butter knife.
MAKING THE PATTERNS
1. Make tracing paper patterns following instructions in Basic Skills chapter. You do not make cardboard patterns for this project.
2. Cut a piece of aluminum foil into 6 rectangles slightly larger than the patterns.
3. Place tracing paper patterns over pieces of foil and draw pattern outlines on foil with a pencil. The pressure of the pencil tip will impress the outlines into the foil. Do not cut out foil patterns.
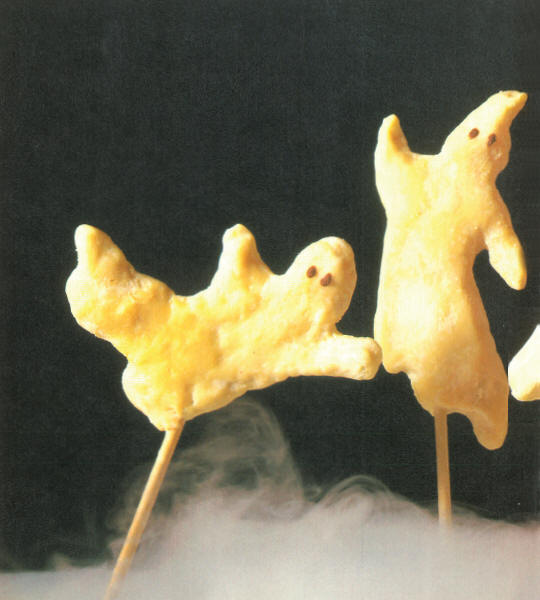
MAKING THE SPOOK STICKS
1. Break white chocolate into 1-inch pieces and place inside top portion of double boiler over hot water.
2. Bring water to simmer over medium heat, then reduce heat to medium low. Cook, stirring occasionally, until chocolate is completely melted.
Note: before proceeding, make sure you have room in either your refrigerator or freezer to hold a cookie sheet.
3. Place foil rectangles on large cookie sheet.
4. Dip wooden sticks into melted chocolate until 2 to 3 inches of them are coated. Vigorously stir melted chocolate each time you use it.
5. Place sticks on foil patterns so chocolate-covered portion is centered within pattern outline.
6. Using a soup spoon, pour melted white chocolate within spook shape.
Hint: for best results, first pour entire outline of shape, then fill in with additional melted chocolate.
Note: the white chocolate must remain over hot water the entire time you are working. If chocolate begins to thicken, turn heat up to medium and stir vigorously.
7. Refrigerate or freeze each spook stick on its foil pattern as soon as you finish it. Make all 6 sticks before adding eyes.
MAKING THE EYES
1. Fill the bottom of a double boiler with a small amount of hot water.
2. Break milk chocolate bar into small pieces and place in top of double boiler.
3. Bring water to simmer over medium heat, then reduce heat to medium low.
Cook milk chocolate, stirring occasionally, until completely melted.
4. One at a time, remove chilled spook sticks from refrigerator or freezer.
5. Dip the tip of a butter knife into the milk chocolate and make 2 oval eyes (refer to patterns for placement and size). Return to refrigerator or freezer until ready to serve.
6. Peel off aluminum foil just before serving spook sticks.


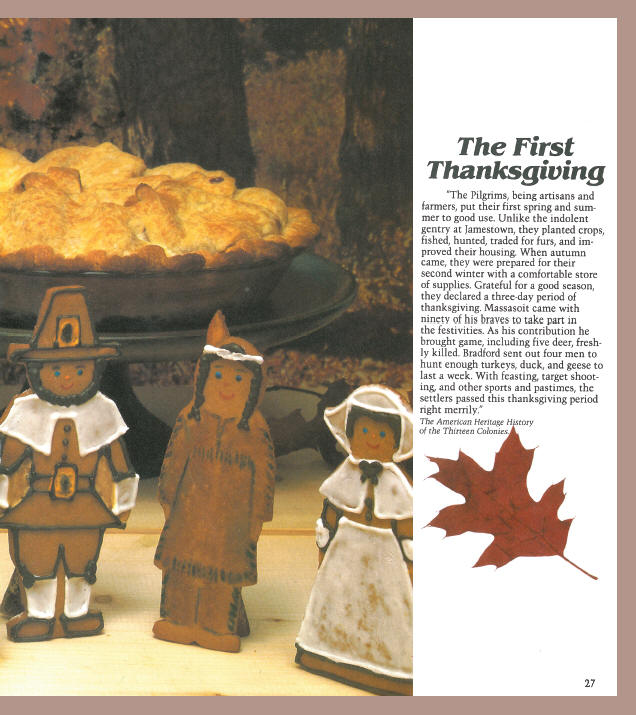
YOU WILL NEED:
See Basic Skills chapter for general equipment and materials.
1 batch Basic Molasses Gingerbread Dough
1 batch Royal Icing; Flow Frosting
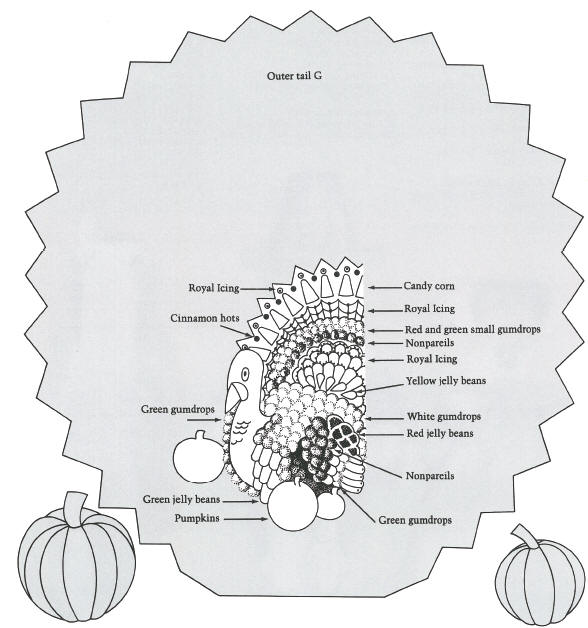
Candy for decorating: candy corn, cinnamon hots, silver dragees, small gumdrops, green jelly beans, nonpareils.
In addition, have on hand metal spatula, pastry bag with #4 metal tip.
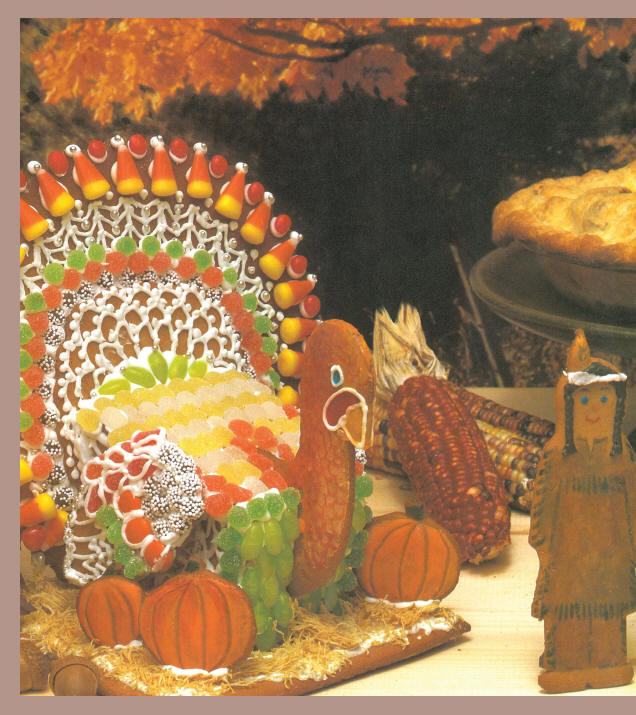
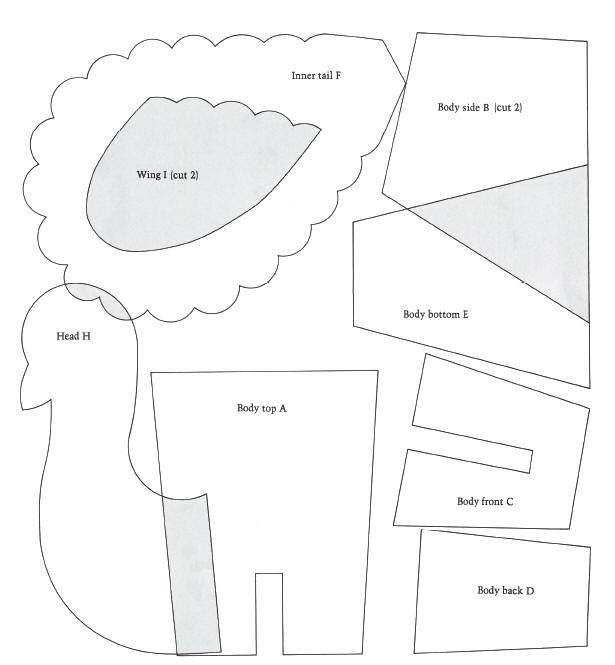
Make patterns, mix and roll out dough, cut out cookie pieces and mark design details, and bake the pieces following instructions in Basic Skills chapter. In order to make a flat gingerbread base on which to attach the turkey and pumpkins, also measure and cut a 6 x 7-inch rectangle.
DECORATING
1. Make 1 batch Royal Icing and mix Flow Frosting, following recipes in Basic Skills chapter.
2. Following chart and color photograph, decorate pieces with frosting and candies before assembling.
ASSEMBLING THE TURKEY
1. Using a #4 metal tip on a pastry bag, pipe a small amount of Royal Icing along side edge of body top A, and along top edge of body side B. Place pieces together to form an angle the same as the upper angle of body front C. Hold in place about 5 minutes or until set. Repeat for opposite side of body.
2. Pipe small amount of icing along front edge of body top A and both front edges of body sides B. Position body front C against A and B so that slits of A and C line up and side edges of C meet front edges of B. Hold in place until set.
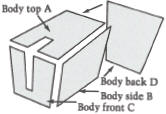
3. Pipe small amount of icing along back edge of A and both backs of B. Position body back D, matching top to back of A and sides to backs of body sides B. Hold in place until set. You now have a 5-sided, somewhat angled box.
4. Pipe small amount of icing along all 4 edges of body bottom E. Position assembled body on top of E. Hold in place about 5 minutes or until set. You now have a 6-sided, somewhat angled box.
5. With metal spatula, spread small amount of icing on surface of body bottom E and properly position on base. Allow to set.
6. With metal spatula, spread back side of inner tail F with icing. Properly position on front of outer tail G, centering and lining up bottoms. Allow to set.
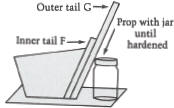
7. With metal spatula, spread small amount of icing on surface of body back D and join assembled tail to body back D, matching up bottom edges. Hold in place until set. Prop with jar until completely dry.

8. Pipe small amounts of icing along edges of slits in body front and top. Carefully position head H by sliding head H bottom into slit. Hold in upright position until set.
9. To position wings, pipe a small amount of icing in middle of ’undecorated side of one wing. Carefully position wing along body side B. Back of wing should angle out slightly. Hold in place until set. Repeat for other wing.
ASSEMBLING THE CENTERPIECE
1. Spread Flow Frosting on base. Before frosting dries, sprinkle with crumbled shredded wheat.
2. Pipe small amount of icing on bottom edge of decorated pumpkins. Place pumpkins in proper positions. Hold in place until set.
3. To make figures stand upright, pipe small amount of icing along longest edge of support J and fix at right angle to undecorated side of figure. Hold in place until set.
4. You can make a permanent, unbreakable base for the turkey and other elements of the centerpiece (a good idea if you plan to move it around very much). After you have attached the turkey and pumpkins to the 6x7-inch gingerbread base, arrange everything the way you want it, then cut a piece of ¼-inch plywood or other stiff material large enough to hold the entire scene. Conceal the edges with icing, fall foliage, or other decoration.
GINGER APPLE PIE
1 batch of your favorite double crust pastry dough
 cup sugar
1 tablespoon cornstarch
½ teaspoon ground ginger
2 pounds apples, peeled, cored, sliced (about 6 cups)
1 tablespoon lemon juice
1 tablespoon butter or margarine
1. Preheat oven to 425°F.
2. Line 9-inch pie plate with half the dough rolled to a circle about 11 inches in diameter and -inch thick.
3. In large bowl, combine sugar, cornstarch, and ginger. Add apple slices and lemon juice and toss mixture until apples are well coated.
4. Turn mixture into pie plate and dot top with butter or margarine.
5. Roll out remaining dough to a 12-inch circle -inch thick, then carefully lay over apple mixture. Seal and flute edges all around.
6. Make several slits in top to permit steam to escape.
7. Bake in 425°F oven 50 minutes or until crust is golden.
MARMALADE APPLE PIE
1 batch of your favorite double crust pastry dough
½ cup sugar
2 tablespoons tapioca or instant flour
teaspoon salt
½ 2 teaspoon cinnamon
½ teaspoon ginger
¼ teaspoon nutmeg
3 tablespoons ginger marmalade
6 large tart apples, peeled, cored, sliced thin
1. Preheat oven to 415°F.
2. Line 9-inch pie plate with half the dough rolled to a circle about 11 inches in diameter and -inch thick.
3. In large bowl, combine 6 dry ingredients and marmalade. Add apple slices and toss mixture until apples are well coated.
4. Turn mixture into pie plate.
5. Roll out remaining dough to a 12-inch circle -inch thick, then carefully lay over apple mixture. Seal and flute edges all around.
6. Make several slits in top to permit steam to escape.
7. Bake in 415°F oven 20 minutes, then reduce heat to 350°F and bake for 50 minutes.
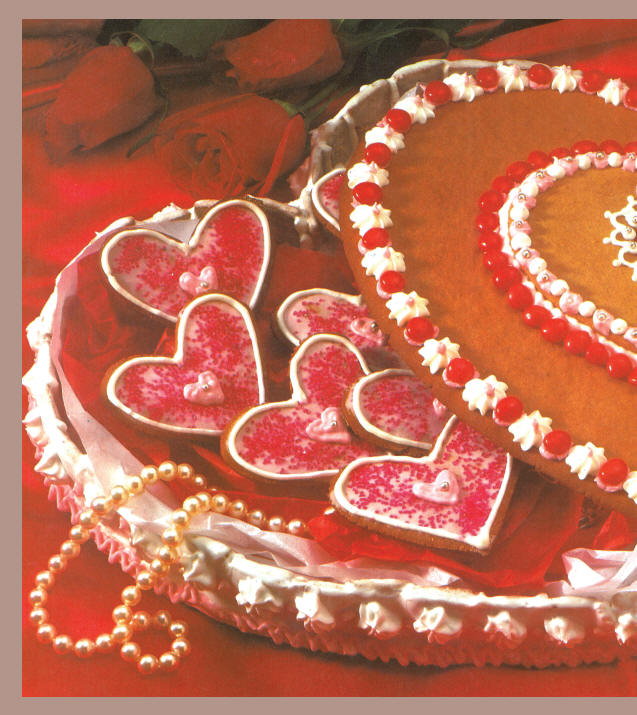
You can easily turn heart-shaped cookies into “matchmaking fortune cookies” for a Valentine’s Day mixer party. Make as many pink-trimmed cookies as there will be male guests and as many blue-trimmed ones as there will be female (or vice versa, if you must). Then, with red, pink, or silver ink, add the initials of an invited guest of the opposite sex and your prediction.
YOU WILL NEED:
1 batch Basic Molasses Gingerbread Dough
1 batch Royal Icing; Flow Frosting
MAKING THE PATTERNS
1. For both large- and medium-sized hearts, make tracing paper and cardboard patterns following instructions in Basic Skills chapter.
2. Make cookie pattern from small heart shape within medium heart.
MIXING THE DOUGH
Prepare 1 batch Basic Molasses Gingerbread Dough following recipe in Basic Skills chapter. Refrigerate at least 1 hour before rolling out.
CUTTING AND BAKING
1. Roll out dough and cut out box pieces on large foil-covered cookie sheet, following instructions in Basic Skills chapter.
2. Cut small heart out of medium heart, then transfer medium heart to a separate cookie sheet.
3. Place both sheets in 350° F oven.
4. Bake large heart pieces for 10 to 15 minutes or until edges have browned and pieces have set.
5. Bake medium heart for 5 minutes, then remove from oven and evenly sprinkle crushed cherry-colored hard candy into the center cut-out, making sure the edges are filled. Return to oven and bake about 7 to 10 minutes longer.
6. Cool pieces completely on rack before removing from cookie sheets and peeling off foil.
7. Roll, cut, and bake small heart cookies as directed above. Decorate to suit your own fancy.
ASSEMBLING AND DECORATION THE TOP
1. Prepare 1 batch Royal Icing, and mix some pink icing in a small bowl, following instructions in Basic Skills chapter.
2. Using metal spatula or kitchen knife, spread icing on underside of medium heart. Position in center of large heart and allow to set, about 5 minutes.
3. With small writing tip, pipe white “lace” around candy heart center of medium heart, and, before icing sets, position silver dragees.
4. Decorate rest of box top with white and pink icing, cinnamon hots, and silver dragees. Use color photograph and line art as guides, but let your own imagination work a bit as well. Allow top to dry completely, about 4 hours.
ASSEMBLING AND DECORATING THE SIDES
1. Using a #4 decorator’s tip, pipe icing on bottom edge of 1 of 40 side pieces and position at a right angle along edge of box bottom. Hold until set.
2. Pipe icing along side and bottom of second side piece and position next to first. Repeat until all 40 side pieces are in place. Allow to dry completely.
3. Mix Flow Frosting, following instructions in Basic Skills chapter.
4. Spread white frosting around sides of box. When dry, apply final decorative touches with star and writing tips.