Microsoft Teams provides a variety of different policies for managing collaboration between users within teams and channels. You can control the general abilities of users to use chat, edit or delete their sent messages in conversations, and configure the collaboration features and settings that are available to them. You can also effectively manage the Microsoft Teams experience through different administrative tools.
Create and modify messaging policies.
Design teams’ policies for channel creation and discovery.
Configure the organization-wide settings for teams.
Manage the creation of private channels within the Teams client.
Control the email integration of teams.
Organize the file sharing functions from the Teams client.
Understand how to set up channel moderation in teams.
Understand Teams admin center details, including each and every task.
Microsoft Teams Authentication
How Microsoft Teams User Authentication Works
Microsoft Teams uses Azure AD as the identity service to authenticate Teams users. Azure AD is purely a cloud-based identity and access management service for Office 365. Azure AD is a cloud-based identity service, but that doesn’t mean you cannot use the on-premises Active Directory Domain Service (ADDS) identity service. You as an admin need to synchronize your on-premises user identities to Azure AD, so that user identity will be available in the Azure AD cloud and then it will authenticate users using their user principal name (UPN) and password. For example, my UPN is balu@bloguc.com, and I can sign in to Teams using my password.
Now you know Azure AD is a crucial part of the overall deployment and work of Teams. The million-dollar question is this: What is Azure AD, and how does Teams leverage it?
Azure AD is the cloud-based identity and access management service for Microsoft Office 365 services. Microsoft Teams leverages identities stored in Azure AD for collaboration and communication purposes. From a license requirements standpoint, Teams and Azure AD are included in a large number of different licensing bundles including Small Business Plans like Office 365 Business, Enterprise Plans like Office 365 Enterprise E1, E3, and E5, Education Plans like Office 365 Education, and Developer Plans like Office 365 Developer.
Another important question occurs: How do I manage the cloud identity that is Azure AD? Because Teams is a cloud-only service and highly dependent on Azure AD, as a Teams admin you must know how cloud identity is managed in your Teams deployments, and specifically how Teams credentials are managed and securely stored. Azure AD provides managed identities, which offers access to Azure and Office 365 resources for custom applications and services including Teams. The facility provides Azure services with an automatically managed identity in Azure AD. You can use this identity to authenticate to any service that supports Azure AD authentication, such as Teams, Exchange Online, SharePoint, OneDrive, and Yammer. [65]
Now, you know the importance of Azure AD, but how do you make sure the access permissions that users have as protected? Because Azure AD allows users to collaborate with internal users (within the organization) as well as external users (users outside the organization, like vendors or partners), it’s crucial that you as an admin regularly review users’ access to ensure that only the right people have access to cloud resources. This can be achieved through an Azure AD feature called Access Reviews, which enables organizations to effectively manage group memberships, access to enterprise applications, and role assignments.
Using the Azure AD Access review feature requires an Azure AD Premium P2 license.
Microsoft Teams Sign-in Process
Microsoft Teams leverages Azure AD for authentication, and it uses Modern Authentication for sign-in and to protect login credentials. What is Modern Authentication and why does Teams use it? It is actually a method that allows Teams apps to understand that users have previously registered and logged in their credentials (like their work or institutional email and password) somewhere else, and they are not required to enter credentials again to initiate the Teams app.
Remember, Teams does have clients for Windows, macOS, iOS, and Android, so the user experience might be different for the different client platforms. Another reason for the experience variation is the authentication method that an organization chooses. Usually there are two authentication methods: single-factor authentication (based on user account and password) and multifactor authentication (involving more than one factor, like verification over the phone or PIN along with user account and password). User experience will differ depending on the authentication method.
As a Teams admin, you must understand the different login experiences for Windows and Mac users.
Using Teams Client on macOS
When users use Teams on macOS, their Teams client cannot pull the credentials from their Office 365 enterprise account or any of their other Office applications. As an alternative, they will get a credential prompt asking them to enter a single-factor authentication (SFA) or multifactor authentication (MFA) credential based their organization setting. As soon as they enter the required credential, Teams will sign them in and they won’t have to enter their credential again. Instead Teams will allow them to automatically sign in on the same macOS desktop.
Using Teams on a Windows Machine
When users are using Teams on a Windows desktop, their Teams client will be able pull the credentials from their Office 365 enterprise account or any of their other Office applications (where they are already logged in), so users are not required to enter their credentials. If a user is not signed on to their Office 365 enterprise account anywhere else, when they start Teams, they are asked to provide either SFA or MFA, depending on what their organization requires.
Specific to the Windows Teams client, there is another change. When users using their domain-joined desktop log in to Teams, they might be asked to go through an additional authentication prompt depending on whether their organization has chosen to require MFA or if their desktop already requires MFA to sign in. If their desktop has previously required MFA to sign in, then users will automatically be signed in to Teams as soon as it opens.
If a user signs out (by clicking their avatar at the top of the app and then signing out) from the Teams app after completing Modern Authentication, to log in again, they need to enter their login credentials to start the Teams app.
Keep in mind that Modern Authentication is offered for each organization that uses Microsoft Teams, so if users are unable to complete the login process, there could be a problem with their Office 365 tenant, domain, or enterprise account itself. If there is a federation used, for example, authentication happens with a client on-premises AD via secure AUTH, ping, or OKTA (these are the third-party identity providers).
Step-by-Step Teams Client Login Process
- 1.
First, the user enters a login credential in the Teams client.
- 2.The Teams client resolves DNS record ➤ teams.microsoft.com. Once it resolves, the Teams client connects to Teams services.
- A.
Name: s-0005.s-msedge.net Addresses: 2620:1ec:42::132
- B.
52.113.194.132 - Aliases: teams.microsoft.com and teams.office.com
- A.
- 3.
Teams services redirects the Teams client to Azure AD to get a token from Azure AD.
- 4.
Azure AD gives the client access token to the Teams client.
- 5.
The Teams Client gives the access token to Teams Cloud Service.
- 6.
The Teams user is logged in to Teams services.
Manage and Configure Multifactor Authentication and Conditional Access for Teams
What Is Conditional Access in Authentication?
As you learned, Microsoft Teams leverages Azure AD for authentication and there are two different kinds of authentication: SFA MFA. However, an organization can consider securing the authentication by allowing Teams access through specific conditions like use of a specific operating system or version, client version, network subnets, and so on. That’s were conditional access policies come in handy. Fundamentally, a conditional access policy is a set of regulations for access control based on several specifications such as client version, service, registration procedure, location, compliance status, and so on. Conditional access is used to decide whether the user’s access to the organization’s data is allowed. By using conditional access policies, you as an admin can apply the right access controls when needed to both keep your organization secure and allow users to access applications.
Conditional access policies are applicable to all Microsoft Modern Authentication–enabled applications including Teams, Exchange Online, and SharePoint Online.
How Conditional Access Flow Works

Azure AD conditional access [21b]
Managing Teams, Channels, and Their Types
In Chapter 1 you learned about teams and channels and their structure, as well as how to create organization-wide teams. We will now address how to manage teams and channels.
- 1.
Open the Teams app, log in, and click Teams, as shown in Figure 2-2. Then select Join or Create a Team.

Create or join teams
- 2.Once the Join or Create Team page opens, click Create Team, as shown in Figure 2-3.
 Figure 2-3
Create Team button
- 3.Once you click Create Team, it will display options to create a team from scratch or create a team using an existing Office 365 Group. In Figure 2-4 Build a Team from Scratch is selected.
 Figure 2-4
Select an option to create a team from scratch or use an existing Office 365 Group
- 4.
After selecting Build a Team from Scratch, you will be asked to choose what kind of team you will create, private or public. Remember for private teams, users need permission to join; for public teams, anyone in the organization can join without team owner permission. Figure 2-5 shows selection of a private team.
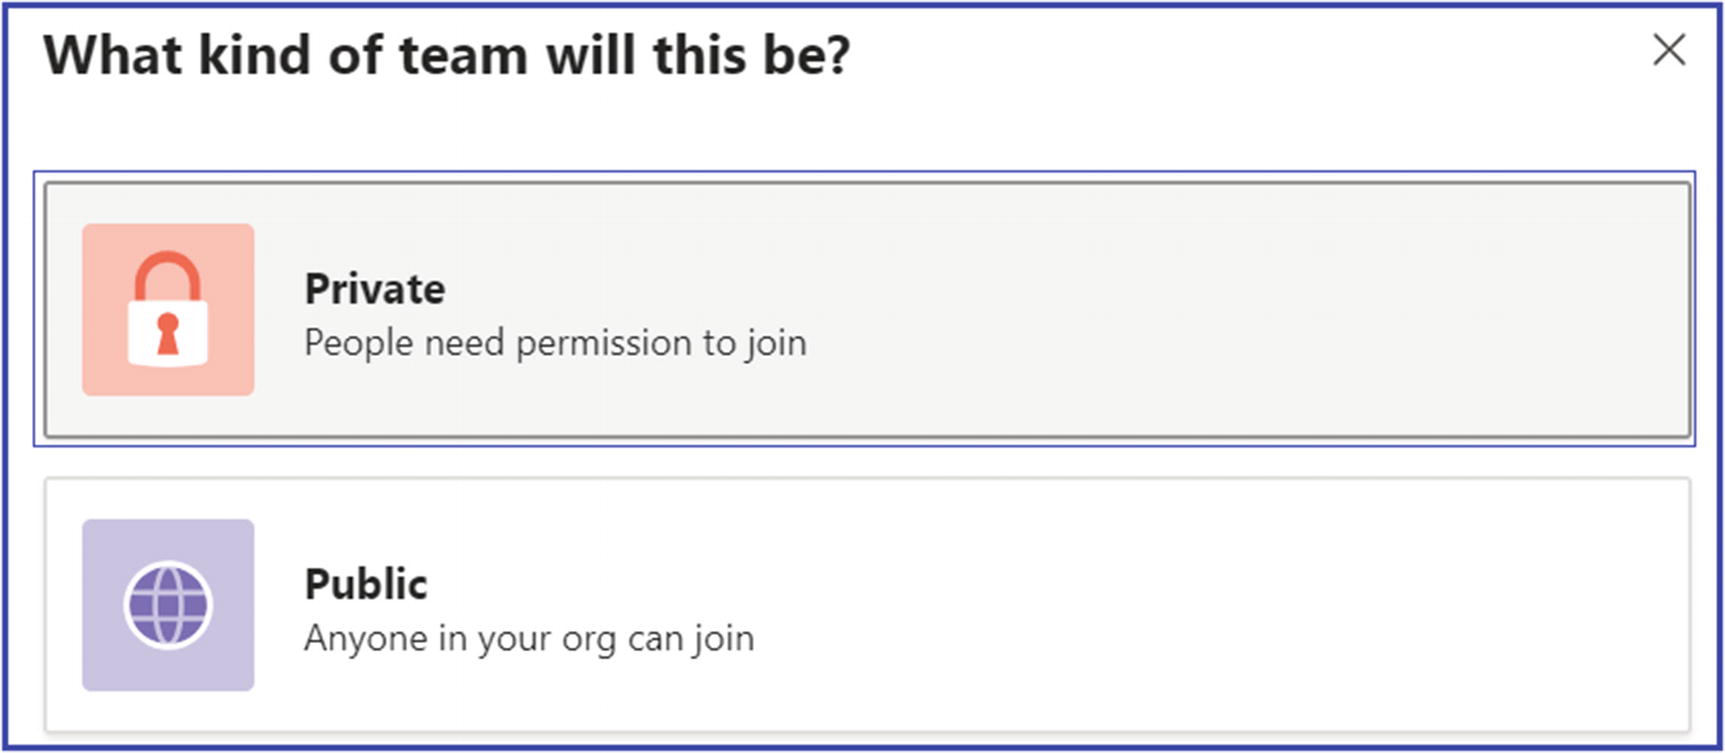
Team type can be private or public
- 5.
Next, provide an appropriate name and description for your team. Figure 2-6 shows the name Teams Administration Project and an appropriate description. Click Create; Teams will take some time to create the new team. Remember creating a team means it will also create an Office 365 Group, SharePoint Team site, and Exchange mailbox. Provisioning all these requires some time.

Team name and description
- 6.
Next, add members for your team after team creation. Once you add member, click Close to exit the member adding window. Figure 2-7 shows an added member Balu Ilag.
Note You can add a member by typing their name or adding a distribution list.

Add a team member
- 7.
Now you will see the team is created and a default channel is also added, General. Figure 2-8 shows a team named Teams Administration Project with the General.

Team created with general channel
Creating a new team will automatically create a General channel that you cannot disable or delete.
Creating a Channel in a Team
- 1.
Click … next to team name to display multiple options. From that list, select Add Channel to create a channel, as shown in Figure 2-9.
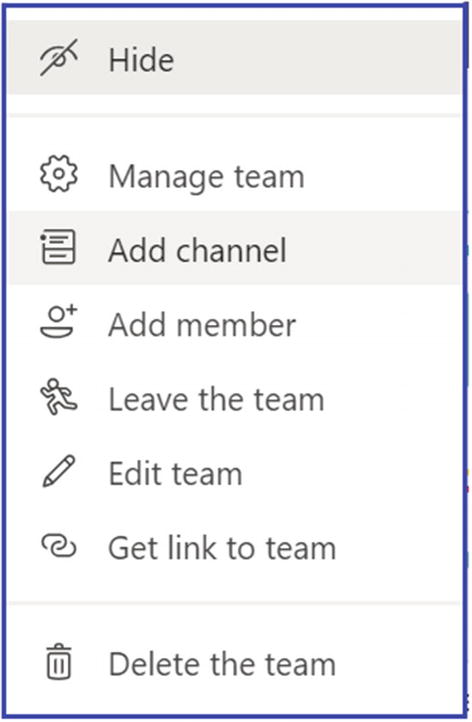
Adding a channel
- 2.After selecting the Add Channel option, you will see new windows where you can give a meaningful name and description to the channel, as well as select a privacy mode for the channel. Figure 2-10 shows the Standard channel privacy type selected. Remember, there are two privacy modes.
Standard: This privacy mode allows anyone (team members) to access this channel content within the team.
Private: This privacy mode allows only a specific group of users to access this channel content. These users are added by the owner of the channel.

Creating a channel and selecting a privacy mode

Channel created
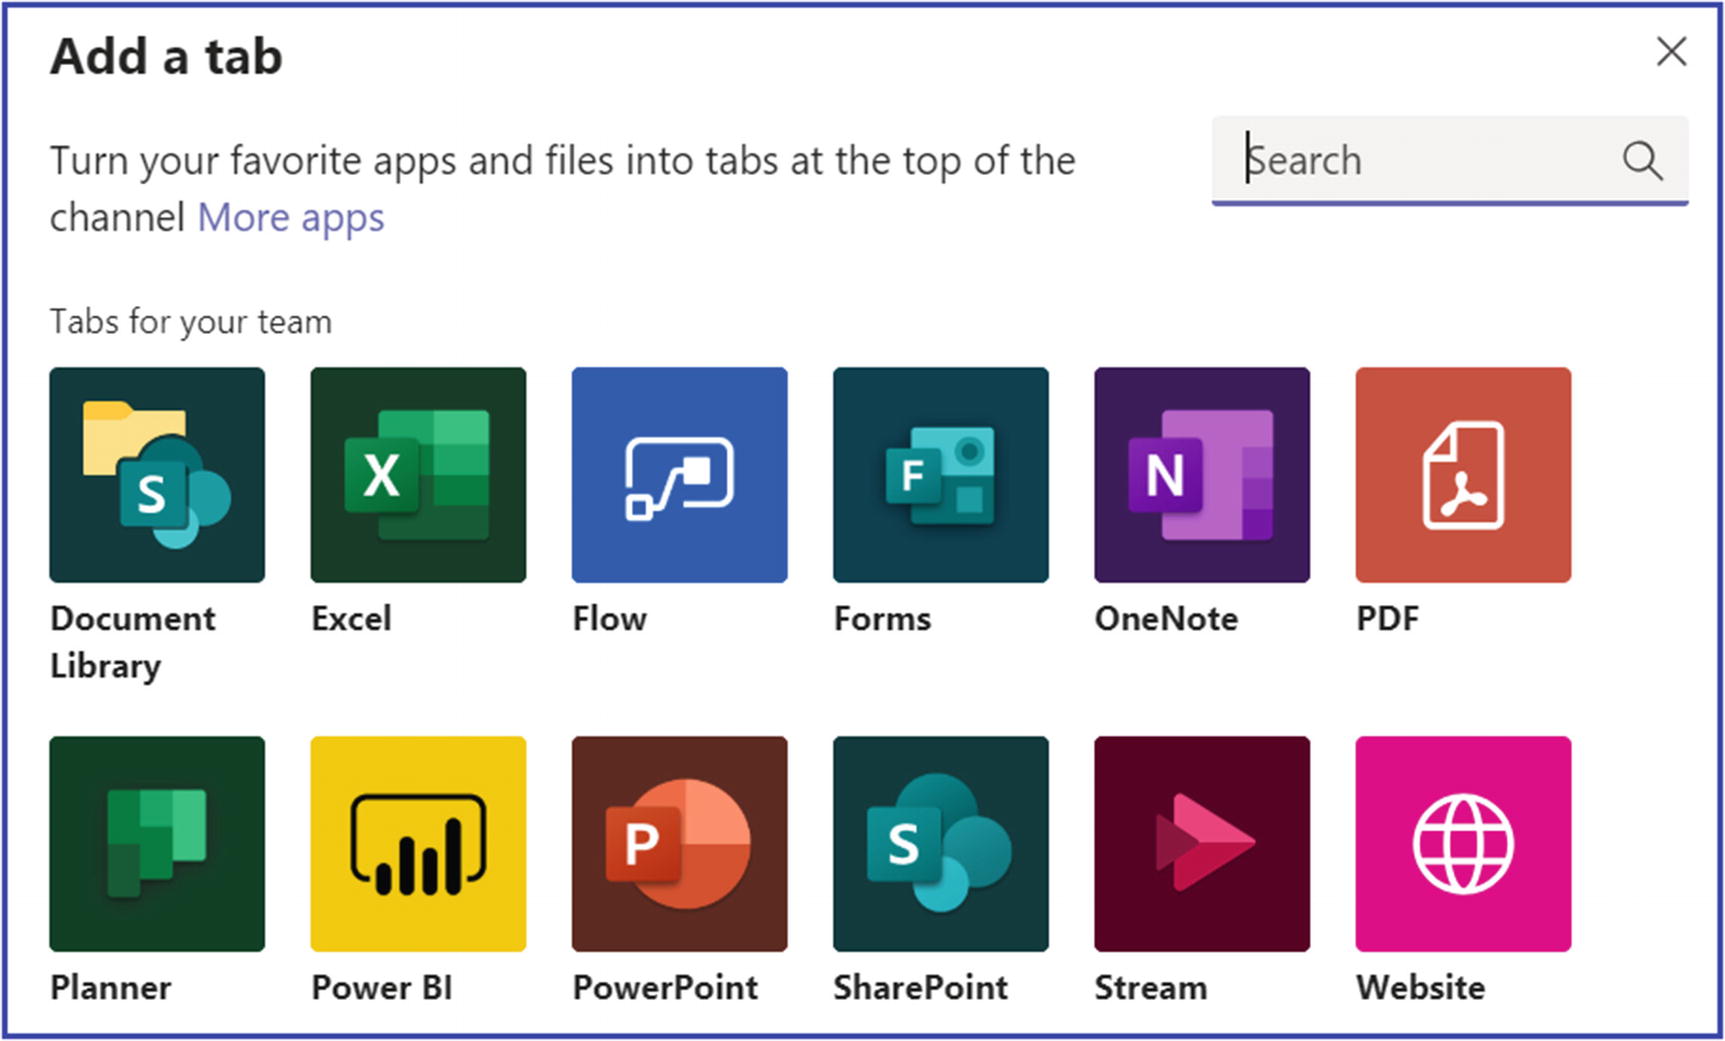
Applications to add as tabs
The other channel privacy mode is private. This type of channel focuses on private collaboration within a team. Private channels are different than standard channels, and they are already rolled out and available in Teams for use. It is important to notice from an architecture perspective that things are a bit different for private channels; for example, information that is shared in a private channel is stored differently than information stored in a standard channel because each private channel has its own SharePoint site collection with enabled file sharing. Microsoft is making sure that information shared in a private channel is only available to the private channel members, not for all Teams members. Because each private channel has its own SharePoint site collection, Microsoft has increased the site collection count from 500,000 to 2 million. Individually team can hold a maximum of 30 private channels, and every private channel can hold a maximum of 250 members. The 30 private channel limit is in addition to the 200 standard channel limit per team. When the team owner creates a team from an existing team, any private channels in the existing team will not carry over to the new team.
How Private Channels Work
Microsoft took a while to made private channels available because it was complex to make sure the private channel is truly private.
Remember, a private channel has its own SharePoint site collection. That means if your Teams has more private channels, then the site collection count will grow as well. It is therefore important to inform your users to create private channels only if it is necessary.
Private channel chat is also a different than chat in standard channels. Any chat that happens in a private channel will not be stored in the Exchange Online mailbox of the Office 365 Group, but instead those chats will be stored in the individual mailbox of the members of that private channel.
Who Can Create Private Channels
By default, anybody in your organization can create a private channel. You as an admin can control private channel creation ability at the tenant level or at the team level.

Private channel restriction setting
Creating a Private Channel

Give a meaningful name and description to the private channel

Adding members to a private channel

Private channel with a lock icon next to its name
Team Management Options

Team settings

Guest permissions settings

Member permissions to control member access
Every team has two roles: users and administrators. Users can be either owners, members, or guests of a team. The team owner is the person who creates the team. Team owners have authority to make any member of their team a co-owner when they invite them to the team or at any point after they have joined the team. It is best practice to have multiple team owners, which allows owners to share the responsibilities of managing team settings and membership, like adding and removing members, adding guests, changing team settings, and handling administrative tasks. Team members are simply the individuals who the owners invite to join their team. Members can talk with other team members in conversations. They can view and usually upload and change files. They also can participate in the usual sorts of collaboration that team owners have permitted. Guests are individuals from outside of your organization, such as vendors, partners, or consultants, that a team owner invites to join the team. Guests have fewer capabilities than team members or team owners, but there is still a lot they can do.
Team Owner, Member, and Guest Permissions to Execute Tasks [19a]
|

As you know, a team can be created from an existing Office 365 Group. If this is the case, permissions are inherited from that group.
All users who have Exchange Online mailboxes can create a team.
Deploying and Managing Teams Clients
Microsoft Teams clients are available for all platforms, such as web clients, desktop (Windows, Mac, and Linux), and mobile (Android and iOS). So far, all clients require an active Internet connection and do not support an offline or cached mode, although this might change in future. As a Teams admin, you will need to provide an installation method to distribute the Microsoft Teams client to computers and devices in your organization. For example, you can use System Center Configuration Manager (SCCM) for Windows operating systems or JAMF Pro for macOS.
Installing Teams Client on Desktop and Mobile?
You can download the Teams desktop client (Windows or macOS) or mobile client by visiting https://teams.microsoft.com/downloads.
The Teams desktop client comes with a stand-alone (.exe) installer for user installation and works with MSI for Admin client rollouts. It is also available by default as part of Office 365 ProPlus. There is no special licensing for Teams clients. The desktop clients provide real-time communications support (audio, video, and content sharing) for team meetings, group calling, and private one-to-one calls. Also, Teams desktop clients can be downloaded and installed by an end user directly from the Microsoft Teams Download site if the user has the appropriate local permissions.
Admin rights are not required to install the Teams client on a Windows machine, but they are required to install the Teams client on a MacOS machine. Besides manual installation, admins can perform a bulk deployment of the Teams desktop client to selected users or computers in their organization. Microsoft has provided MSI files (for both 32-bit and 64-bit) that let admins use Microsoft System Center Configuration Manager, Group Policy, or any third-party distribution mechanism for broad deployment. These files can be used to remotely deploy Teams so that users do not have to manually download the Teams app. [76]
Distribution of the client through software deployment is only for the initial installation of Microsoft Team clients and not for future updates.
Getting the Teams Client Download for All Devices

Get Teams client for all devices
Microsoft Teams client is part of Office 365 ProPlus, which means when you install Office 365, the Teams client comes with it. The Teams client is part of update channels, including Monthly channel and Semi-Annual channel. For more information you can visit the Microsoft documentation for deploying Teams at https://docs.microsoft.com/en-us/DeployOffice/teams-install.
Teams Desktop Client Software and Hardware Requirements
Teams Client Hardware and Software Requirements [76a]
|

You might be wondering if you need to allow admin permission for a user to install the Teams client. The answer is no; you don’t need admin permission to install the Teams client.
Teams Desktop Client for Windows
When a Microsoft Teams call is initialized by a user for the first time, the user might notice a warning with the Windows firewall settings that prompts for users to allow communication. However, the user might be instructed to ignore this message because despite the warning, when it is dismissed the call will still work. On Windows, the Teams desktop client requires .NET Framework 4.5 or later. If this is not installed on the computer, the Teams installer will offer to install it automatically.
Where Can I Find Teams Client Installation?
- Teams application itself
%LocalAppData%\Microsoft\Teams
%LocalAppData%\Microsoft\TeamsMeetingAddin
%AppData%\Microsoft\Teams
- Update directories
%LocalAppData%\SquirrelTemp

Teams installation directory
For Teams admin control of installation, all of the directories just mentioned can be accessed and controlled.
Microsoft Teams Desktop Client MSI Deployment
Microsoft allows for Teams (MSI) client rollout though existing standard deployment processes such as Group Policy, SCCM, Intune, or third-party tools. You as admin must determine which computers already have the Teams client installed and which are newly built with an operating system. Usually you can add the Teams client in the operating system build so that all newly built computers will have the Teams client installed.
Deploying Teams MSI Client
As an admin, you can use MSI deployment for the Teams client; however, you cannot deploy the client updates. When the Teams client is deployed, the Teams MSI installer is located in the Program Files directory. Whenever a new user signs in, Teams will be installed and then started automatically. After the Teams client starts, the user is signed in and the update process begins. If the Teams version is new enough, the user will be able to use the Teams client (the update happens in the background). If the Teams version is old, the Teams client will update itself but the user will have to wait for the update to be completed.
Teams MSI installer also allows you to disable client auto-start. Once the Teams client rollout is complete, all users will have the Teams client on their computer and it automatically starts when they log in to their computer. However, if end users don’t want Teams client to start automatically, MSI installer allows you to disable the initial auto launch of Teams. Also, the Teams client shortcut will be placed on the user’s desktop [76].
Once the user manually starts the Teams client, it will automatically start at startup.
To disable the Teams client auto start for the 32-bit version, run this command at the command prompt: msiexec /i Teams_windows.msi OPTIONS="noAutoStart=true". For the 64-bit version, run this command at the command prompt: msiexec /i Teams_windows_x64.msi OPTIONS="noAutoStart=true".
If you run the MSI manually, be sure to run it with elevated permissions. Even if you run it as an administrator, without running it with elevated permissions, the installer will not be able to configure the option to disable auto start.
Managing Teams Desktop Client
Microsoft made Teams client management simple and easy to operate.
Uninstalling Teams Completely from a Computer
If the Teams client is installed but not working correctly or you want to uninstall the Teams client for any other reason, make sure to uninstall the client completely; otherwise the MSI installer won’t install the Teams client again. To completely uninstall the Teams client on your computer, first uninstall the Teams client from every user profile that was installed earlier using Start ➤ Control Panel ➤ Program files. Locate Microsoft Teams, then click Uninstall. After uninstallation, delete the Teams directory recursively under %LocalAppData%\Microsoft\Teams.
Microsoft has provided the cleanup script for uninstallation steps for SCCM, which you can from https://aka.ms/AA2jisb.
Updating the Teams Client
Microsoft designed the Teams client to be updated automatically so that users will always have an updated client with the latest bug fixes, feature improvements, and new capabilities. Hence you as an admin cannot control or manage Teams client updates.
The Teams client update process includes multiple checks. For example, when a user signs in to Teams, validation occurs. If the Teams client version is not up to date (more than three versions old), then Teams updates are made before the client can sign in. If the Teams client is not outdated, the user can sign in and use the client, but the Teams client will check for new updates after 15 minutes in the background. If an updated version is available, Teams will download the updated Teams full client package. It will be installed when the Teams client is idle for 30 minutes. After the Teams client installs the updated version, it will restart and send a notification to the user indicating that the Teams client has been updated.
As per Microsoft, Teams client updates are expected every two weeks, excluding hotfixes, which are deployed whenever required.
If the Teams client is older three versions, the Teams client cannot sign in before client updates.
Managing Teams Client Configuration
Currently Microsoft Teams client behavior is controlled via policies that are defined and managed in the Teams admin portal and PowerShell. As of now, there are no options to manage the Teams client via Group Policy or the registry keys. For example, the features that Teams client displays, including voice and video calls, are controlled via Teams admin center policies for all the clients. As another example, Outlook add-ins can be enabled or disabled through Teams admin center meeting policies. However, there is nothing that can be managed or controlled via Group Policy or registry key. Microsoft might or might not change this behavior in the future.
Microsoft Teams Outlook Add-in Is Not Installed
- 1.
Make sure Outlook is open before the Teams client is started. You can simply close both the Teams client and Outlook client (you can use Task Manager to completely close teams.exe and outlook.exe; see Figure 2-22).

Close the Teams client completely
- 2.
Open or start Outlook first and then start the Teams client.
Most important, the Teams outlook add-in will be disabled depending on the Teams upgrade coexistence mode selected for the tenant or the specific user in Teams admin center. For example, if a user’s Teams upgrade mode selected Skype for Business Only, then the Teams meeting add-in will not show in Outlook. Also, as mentioned earlier, the meeting add-in can be disabled via Meeting Policy in Teams admin center.
- 1.
Visit the Teams download page at https://teams.microsoft.com/downloads#allDevicesSection. Under Desktop, click Mac to download the file.
- 2.
Double-click the PKG file.
- 3.
Follow the installation wizard to complete the installation.
- 4.
Teams will be installed to the /Applications folder; it is a machine-wide installation.
On Linux operating systems, the Teams client for Linux is available for users as native Linux packages in .deb and .rpm formats. To download the Linux DEB (64-bit) or RPM (64-bit) client, visit https://teams.microsoft.com/downloads#allDevicesSection, click Linux DEB or RPM, and then install the same.
Virtual Desktop Infrastructure (VDI) is virtualization technology that hosts a desktop operating system and applications on a centralized server in a datacenter. With VDI, users can enjoy a fully personalized desktop experience with a fully secured and compliant centralized source [76a].
Deploying Teams Mobile Client?
As previously mentioned, Microsoft Teams mobile apps are available for Android and iOS. Users can download the mobile apps through the Apple App Store and the Google Play Store. Currently there are two supported mobile platforms for Microsoft Teams mobile apps, Android (5.0 or later) and iOS (10.0 or later). Once the mobile app has been installed on a supported mobile platform, the Teams mobile app itself will be supported provided the version is within three months of the current release [76].
Teams mobile app distribution is not currently supported using an Mobile Device Management (MDM) solution. Microsoft might support Teams mobile app distribution through MDM in the future.
Monitoring Teams Client Usage
As a Teams admin, when you roll out Teams desktop and mobile clients in your organization, the next important step is to monitor the Teams client usage per operating system or device. You can monitor the Teams client device usage using Teams admin portal.

Teams client device usage report
The Teams device report is available for different durations, including 7 days, 30 days, 90 days, and 180 days. The report will allow you to receive per-user basis usage as well.
Configuring and Managing Live Events and Microsoft Stream
Microsoft Teams provides different formats for interactive and large broadcast event such as Teams meetings and live events within your organization, with both internal and external meeting participants. As an admin you must understand the configuration, settings, and policies that can be used in Teams live events and Microsoft Stream.
Chapter 1 covered topics like what live events and Microsoft Stream are, their architecture, live event scheduling, how Stream stores users’ meeting recordings, how users can access the recordings, and so on. If you are still new to live events and Microsoft Stream, review Chapter 1 before continuing.
In this topic, you are going to learn the step-by-step process for configuring policies and settings so that you as an admin can provide your users with the optimal user experience during live events and using Microsoft Stream for meeting video recording and sharing content [38].
Configure live events settings.
Manage and create live events policies.
Manage Microsoft Stream.
Overview of Live Events
Microsoft Teams live events are a scalable and ideal solution for online meetings for an audience up to 10,000. Live events scales online meetings to audiences with thousands of concurrent viewers. In the background, it leverages artificial intelligence for meeting assistance for features like captions and translation. Captions are very useful when attendees have audio limitations or need language translation. Optionally you can enable Q&A manager and Yammer social feed integration to interact with audience members. You can record the event with video and after the live event provide an attendee engagement report for consumption insights, like how many people joined and how long they stayed with an event.
Live events work very well because they enable high-quality, adaptive video streaming that can be consumed on any Teams-enabled devices, including Windows, macOS, and mobile devices, and devices that don’t have the Teams client installed through a browser. Live events are delivered with minimal lag from worldwide Microsoft datacenters, so no matter where your tenant is located and users are located, live events always find a shorter path for users to connect to the event to avoid latency. Also, large organizations can use a third-party eCDN partner to save corporate bandwidth.
With limited knowledge, anyone can use live events and they can be scheduled easily in teams. Users can present and produce live events from the macOS or Windows Teams client with one or more presenters, including application sharing. You can present from the Teams room system, or presenters can dial in from a phone line to a live event using Teams audio conferencing. As a live event organizer, you can control access to the event, for everyone from an organization to specific groups or people.
Before configuring a live event policies, and settings, an admin must know who can use and schedule live events based on license requirements and permissions. To use live events, users must have a user account in Azure AD; the user cannot be a guest or from another organization. Apart from the Azure AD account, users must have an Office 365 Enterprise E1, E3, or E5 license or an Office 365 A3 or A5 license. User must also have permission to create live events in the Microsoft Teams admin center and in Microsoft Stream for events produced using an external broadcasting app or device. Finally, users must have private meeting scheduling, screen sharing, and IP video sharing turned on in a Team meeting policy with an Exchange Online mailbox.
Configuring and Managing Live Events Settings
Teams live events settings allow you to control organization-wide settings for all live events that are scheduled. An admin can decide to include a support URL when live events are held and set up a third-party video distribution provider for all live events organized and scheduled by people in an organization.
Settings for the live events that are organized within your organization can be configured in the Microsoft Teams admin center. Remember, live event settings will be applied to all live events that are going to be created in the organization.
Microsoft has provided two different ways to configure Live event settings: using Teams admin center and using PowerShell.
Configuring Live Event Settings Using Teams Admin Center
- 1.
Log in to Microsoft Teams admin center with your admin credential (you must have Teams service admin or global admin permission configure live event settings).
- 2.
After you log in to Teams admin center, navigate to Meetings and then select Live Events Settings (see Figure 2-24). If you have an internal support URL, replace the default URL with the support URL that will be shown to the attendees who will participate in the live event. You can also enable third-party video distribution providers.

Live event settings

Third-party distribution providers
- 3.
Finally, click Save button to commit the configuration changes.
Configuring Live Event Settings Using PowerShell
If you want to create live events using an external encoder or device, you must first configure your eCDN third-party provider with Microsoft Stream admin center as well.
Configuring and Managing Live Events Policies
As an admin, you can modify existing live event policies or create new policies. A live event policy allows admins to control which users in the organization can host live events, as well as which features are going to be available in the events they create. By default, Global (Org-wide default) live events policy is available. Admins can modify this policy or create one or more custom live events policies. After a custom policy is created, it should be assigned to a user or groups of users within the organization.
Live event Global (Org-wide default) policy is already assigned to every individual in your organization. If you have not created and assigned any custom policy, all users will receive the default policy.

Default Global (Org-wide) policy in live event
Microsoft has provided two different ways to configure live event policies: using Teams admin center and using PowerShell.
Creating New Live Event Policy Using Teams Admin Center
Global policy: This organization-wide policy is the existing default policy. You can click Edit to make changes to this policy.
New policy: This option is used to create a new custom policy.
Choose existing policy: By selecting this option, along with an existing policy and the Edit button, you can make changes to that policy.
Creating a New Policy

Create a new live event policy
Allow scheduling: You must allow this so that the users will able to schedule live events.
Allow transcription for attendees: This allows transcription.
Who can join scheduled live events: Select from Everyone, Everyone In The Organization, and Specific Users Or Groups. In this example, Everyone In The Organization is selected.
Who can record an event: Select from Always Record, Never Record, and Organizer Can Record. Figure 2-28 shows Always Record as the selected setting.

Who can record a live event
Finally, click Save to commit the new policy changes.
Managing Microsoft Stream
An overview of Microsoft Stream and its architecture was covered in Chapter 1. Here we specifically cover Microsoft Stream management.
To review, Microsoft Stream is a Microsoft enterprise video solution that is part of Office 365. Customers can use Microsoft Stream to securely carry and deliver videos to their organization. Stream supports live events through Teams, Stream, and Yammer. Microsoft provides a portal to upload, share, and discover videos such as executive communication or training and support videos. Microsoft Stream allows users to upload videos, search groups and videos, broadcast their live events, and provide a way to categorize and organize videos. Users can also create a group, and Stream allows users to embed video in Microsoft Teams.
Stream supports Teams video recording, as when a user records a Teams meeting by clicking the record button in a Teams meeting. That recording goes over Stream and all of the sources are fully integrated with Stream, including automatic transcripts, a search function, and the enterprise security that customers expect from Microsoft Office 365 services.
- 1.
You can access Microsoft Stream by visiting this URL: https://web.microsoftstream.com.
- 2.
You can access Stream using the Office portal. Log in to office.com. Click the Office 365 app launcher icon, select All Apps, and then select Stream. Alternatively, go to stream.microsoft.com and sign in with your work or school credentials.

Microsoft Stream Groups view
Organizing and Managing Groups and Channels in Stream
When you create a group in Stream it actually creates a group in Office 365, which means groups in Stream are built on top of Office 365 Groups. When you make a group in Stream, it creates a new Office 365 Group that can be used across Office 365, giving the group an email address, calendar, group site, and so on. If you already use Office 365 Groups in your organization from Microsoft Teams, SharePoint, Yammer, Planner, and so on, you can start using those groups in Stream right away [69a].
In Microsoft Stream, you can use channels and groups to organize and grant permission to your videos. Specifically, groups in Stream are used for controlling video access and organizing videos. Each group has both owners and members. Each group gets its own video portal, with a highlights page showing trending and new content within the group. A group’s videos can be further organized by creating channels within the group. It is best practice to put a video into one or several groups to help viewers find it more easily.
Remember, deleting a group in Stream will also permanently delete the Office 365 Group and everything associated with the group. This includes videos, conversations, files, and content for all the Office 365 Group enabled services like Outlook, SharePoint, Teams, Planner, Yammer, and so on.
Channels provide an organization technique for videos, but not a permission approach. Channels don’t have any permissions on their own. If viewers follow your channel, they can get updates when new videos are added. You can put a video into one or several channels to help viewers find it more easily.
When you create a channel, you decide whether it’s an organization-wide channel that anyone in your organization can add and remove videos from, or if it’s a group channel where you can limit contributors. If you are interested in learning more, visit the Microsoft documentation at https://docs.microsoft.com/en-us/stream/groups-channels-overview.
Administrative Tools
Managing Teams Using Microsoft Teams Admin Center
Microsoft Teams admin center is one place where most of the Teams service-side configuration and management resides. Using Teams admin center, admins can manage the Teams services the way an organization wants to manage the Teams experience for its users. This is similar to other Office 365 applications. There are multiple admin tools available; however, from a graphical user interface (GUI) perspective, there are three main admin tools, including Microsoft Teams admin center. This is where you manage all Teams-related settings and policies for communications and Teams-specific features such as Teams meetings, messaging and calling policies, Teams organization-wide settings, guest and external access, application permissions, and so on.
This topic will provide extensive details about Microsoft Teams administration including all that Teams admin center provides.
Accessing Teams Admin Center
Admins can access Teams admin center through the Office 365 portal or directly visiting the Teams admin center URL at https://admin.teams.microsoft.com/.
Apart from the previously mentioned GUI tools, you can use PowerShell to manage the Teams experience. Microsoft provides a Teams module as well, and to some extent you can use the Microsoft Teams graph API as well. It’s entirely up to you to use whichever solution is suitable for the Teams management perspective in your organization.
Understand the Teams Admin Role
Many organizations that use Teams have more than one admin managing the Teams workload and supporting the Teams functionality. In many cases you don’t want to have same the access permissions for every admin, and that’s where the Teams admin role comes in.
Teams Service Administrator: This admin role can manage the Teams service and manage and create Office 365 Groups.
Teams Communications Administrator: This admin role can manage calling and meeting features within the Teams service.
Teams Communications Support Engineer: This admin role can troubleshoot communication issues within Teams using advanced tools.
Teams Communications Support Specialist: This admin role can troubleshoot communications issues within Teams using basic tools.
If you are interested in learning more about each role and its capabilities, visit https://docs.microsoft.com/en-us/microsoftteams/using-admin-roles.
Teams Administration Through Teams Admin Center
To log in to Microsoft Teams admin center, you must have one of the role permissions just covered or the Office 365 Global admin permission. When you log in to Teams admin center, you will see different views based on your access permissions. For example, if you have Teams Communication Support Engineer or Teams Communications Support Specialist role permissions, you will only see the Users and Call Quality Dashboard options on the Teams admin center dashboard.
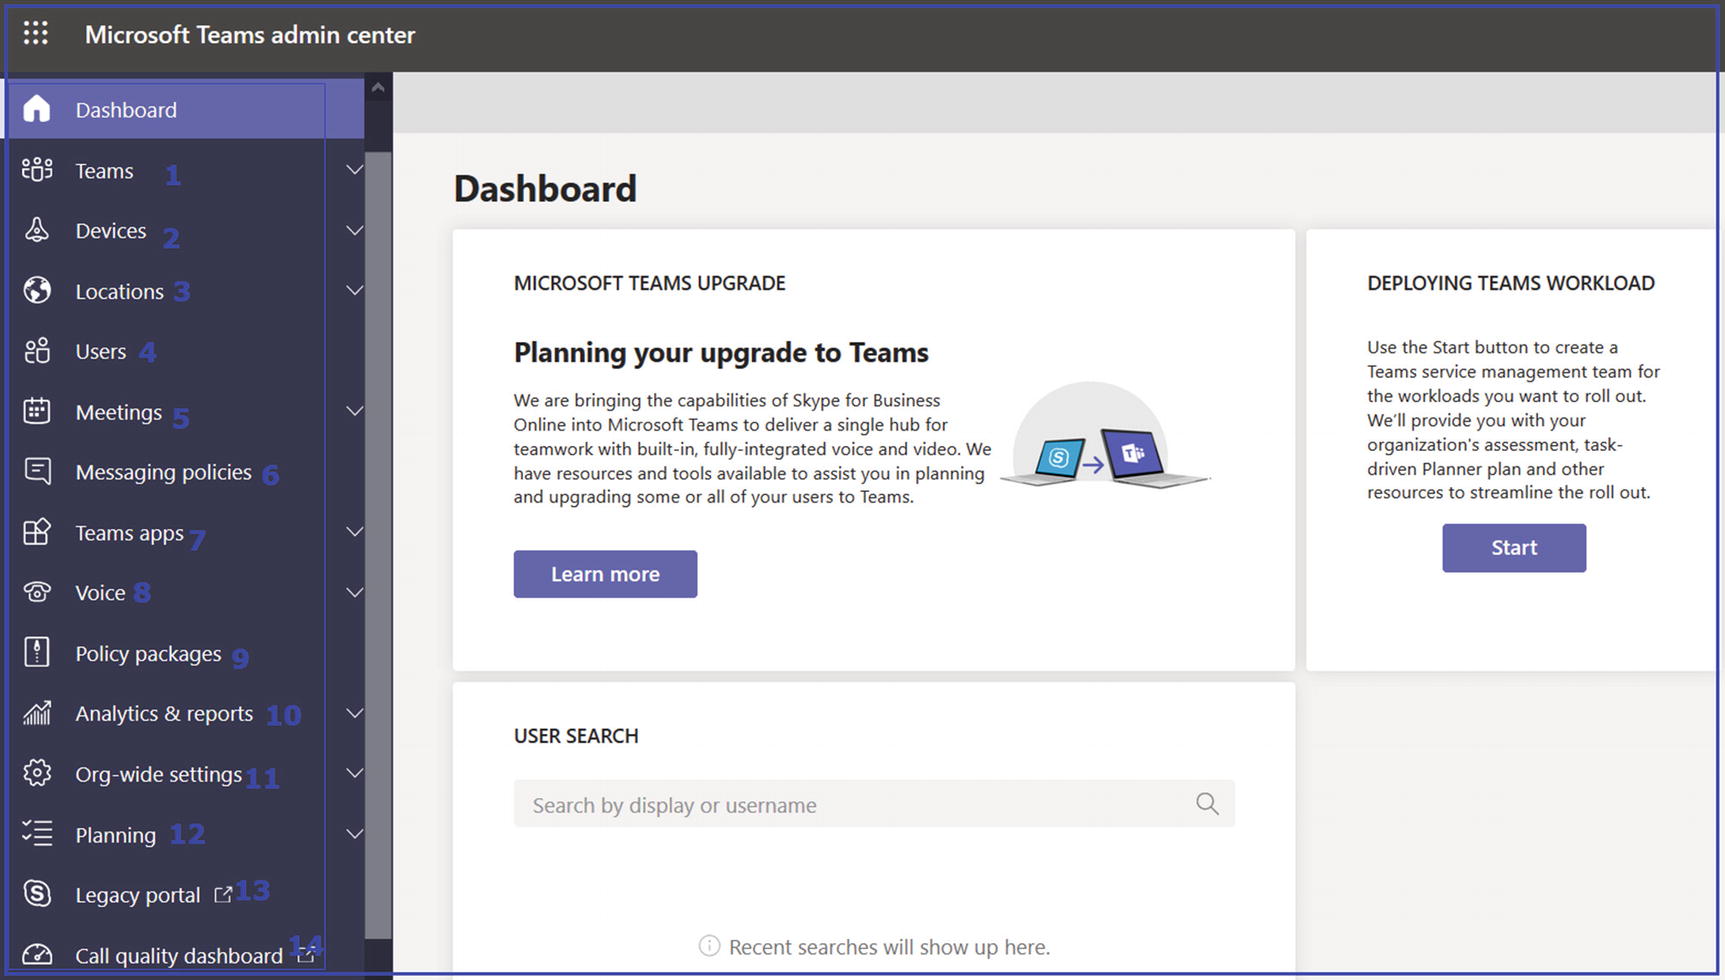
Teams admin center dashboard
Admin Center: Teams Tab
- a.
Manage Teams: When you click Manage Teams, you will see a global view of teams that have been created in your organization. As an admin, you can manage each and every team from this tab. You can also add or create teams. For example, you can see four teams created in Figure 2-31.

The Manage Teams tab

Manage a team and channel
Creating and Managing Teams Policies

Teams policies
Creating a New Teams Policy
To create a Teams policy, log in to Teams admin center, then navigate to Teams and select Teams Policies. Click + Add. Once the new Teams policy form opens, enter a meaningful name and description and turn on or off discovery of private teams and creation of channels. Figure 2-34 shows new Teams policy settings.
Discover Private Teams: This setting lets people search for and find private teams that have been created. When they find the private team, they can then request access to it.
Create Private Channels: You can create private channels for a specific group of users in your organization. Only those people who are added to the private channel will be able to see and write messages.
Admins can modify this behavior and assign custom policy to targeted users to allow or block private channel creation.
Consider the increased SharePoint workload before allowing private channel creation for everyone in your organization.

Creating a new Teams policy
Admin Center: Devices Tab
Managing and Deploying Teams Phone Endpoint
Microsoft Teams has clients available for desktop (Windows and macOS), mobile platforms (Android and iOS), Linux clients, and web clients. The end user using Teams on any of these devices will have the same experience. Apart from desktop, mobile, and web clients, there are different devices available that support Teams, such as desk phones, conference rooms, and common area phones. Teams does have native Teams phone and conference rooms available that you can use in meeting rooms and common areas. However, you need to set up a resource account for these room devices.
Phones
Devices allows you to control the IP phones and peripheral devices such as headsets and webcams that have been certified for use with Teams. You can create and upload configuration profiles for each type of device you have, so you can make changes to their settings, including applying firmware updates so they can be easily updated.

Phone devices in Teams admin center
Creating and Managing Configuration Profiles in Teams
Admins can create and assign configuration profiles to a device or groups of devices to manage them. Device management settings include, device status, device updates, restart, monitor diagnostics for devices, and device inventory. These are all management tasks that admins can perform using the Teams admin center.
To manage settings and features for Teams devices in your organization, you can use configuration profiles. As an admin, you can create or upload configuration profiles to include settings and features that you would like to enable or disable and then assign a profile to a device or groups of devices. To set up a profile you need to create a profile configuration with custom settings, such as general setting with device lock setting, language, time/date format, time daylight saving, device setting with display screen saver, office hours for device, and network setting with DHCP enabled, hostname, IP address, subnet mask, DNS, and gateway.
Out of the box there will no configuration profiles. Admins have to create configuration profiles to assign profiles to devices or groups of devices.
Creating a Configuration Profile to Manage Devices
- 1.
Log in to Microsoft Teams admin center. On the left navigation pane, select Devices and click Phones.
- 2.
On the Phones page, select Configuration Profiles, and then click Add.
- 3.On the Devices\New page, enter the name of the configuration profile and an optional description. Assign a meaningful name so that the profile configuration can be easily identified.
- a.In the General section, select if you will enable Device Lock and PIN, Language, Timezone, Date Format, and Time Format. For example, Figure 2-36 shows a sample configuration.
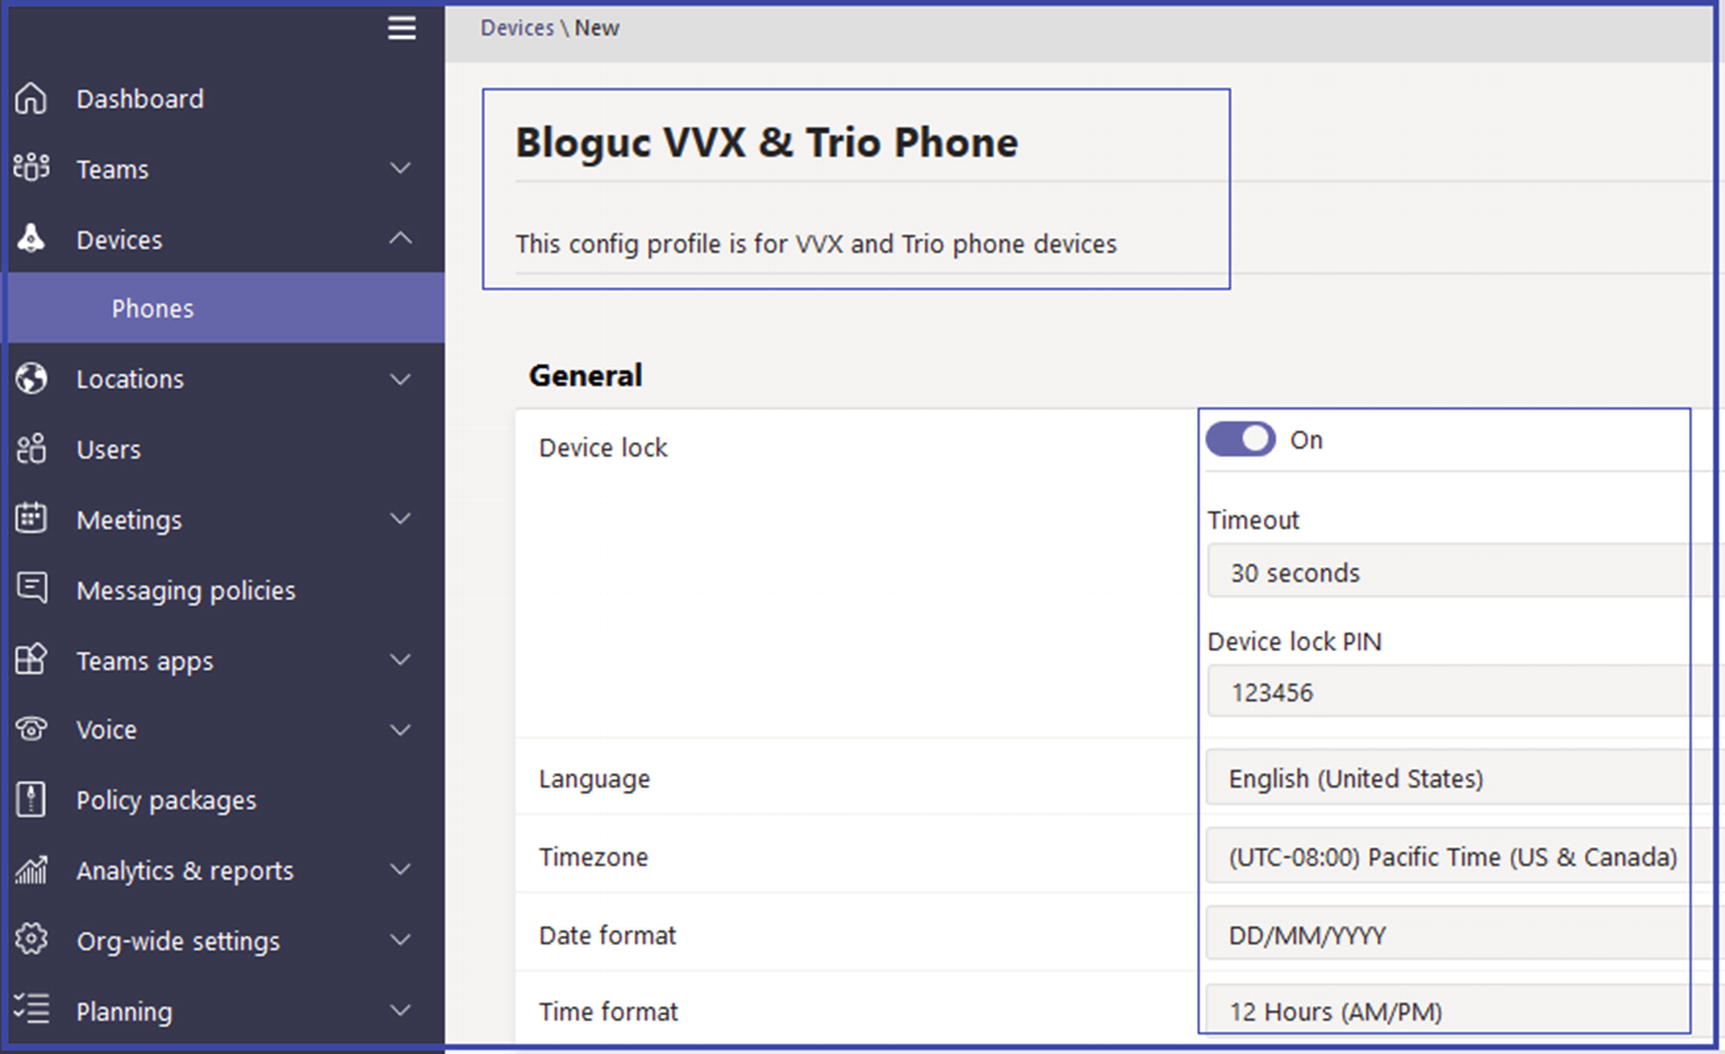 Figure 2-36
Phone configuration
- b.In the Device Settings section, select whether you will you enable display of a screen saver, brightness, backlight timeout, contrast, silent mode, office hours, power saving, and screen capture. Figure 2-37 shows sample device settings.
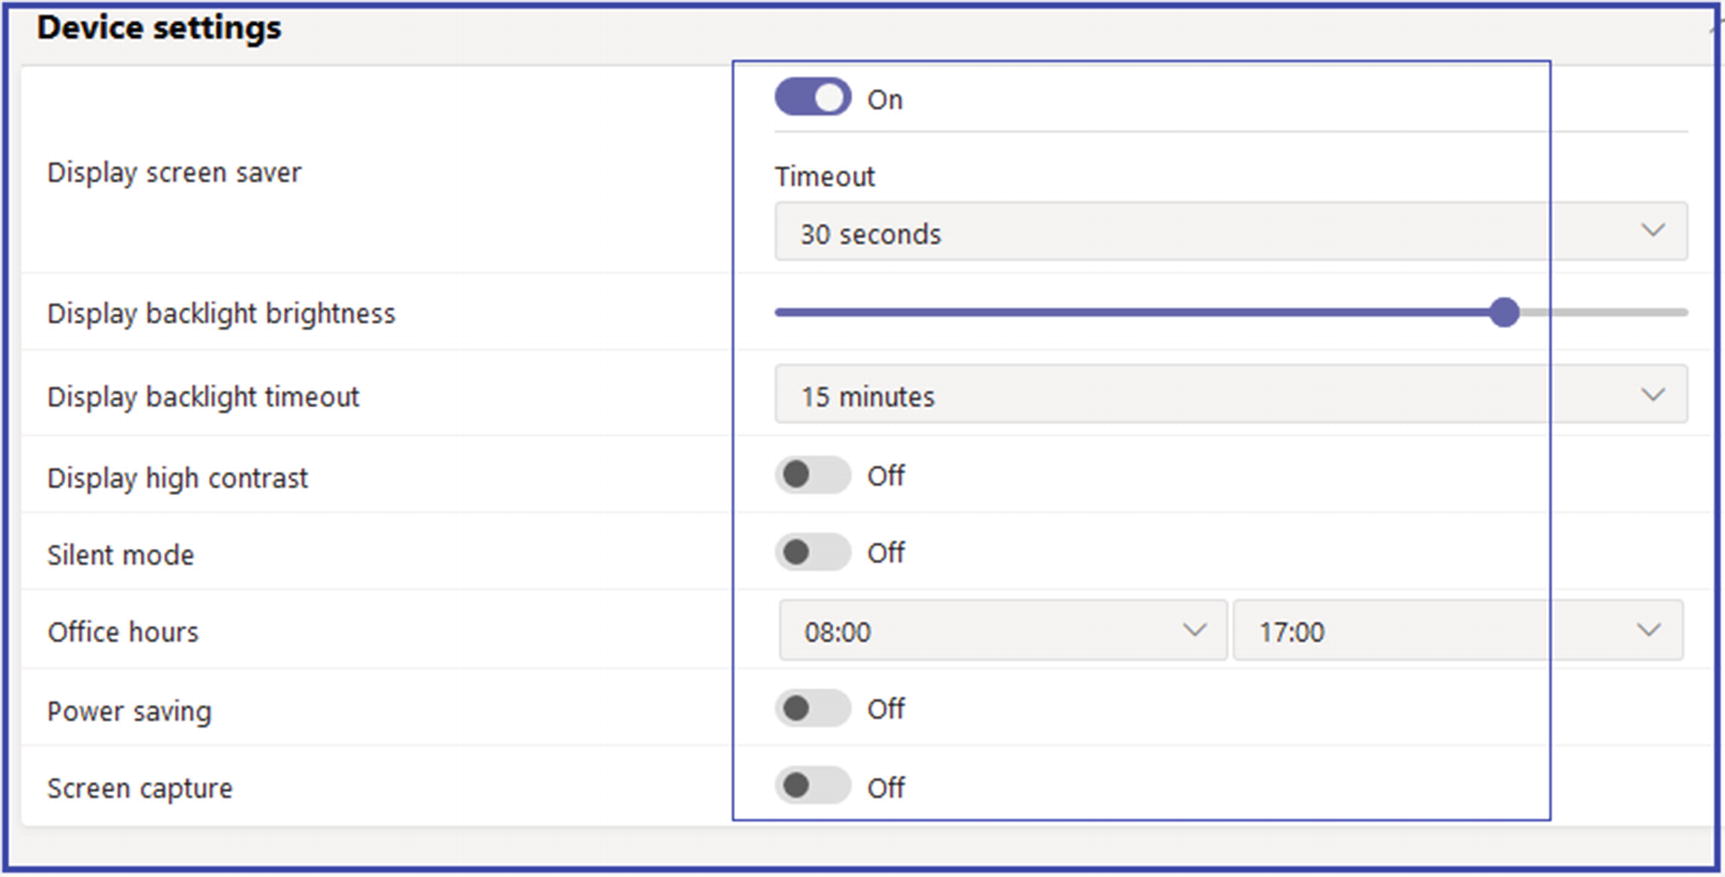 Figure 2-37
Device settings
- c.Under Network Settings, select if you will enable DHCP or logging, and if you will configure Host Name, Domain Name, IP Address, Subnet Mask, Default Gateway, Primary DNS, Secondary DNS, Device’s Default Admin Password, and Network PC Port. Figure 2-38 shows a sample profile configuration with network settings.
 Figure 2-38
Configuration profile network settings
- a.
- 4.
Once you complete the configuration profile settings, click Save to commit the profile configuration. The next step is to assign the configuration to a device or group of devices.
Assigning the Configuration Profile to Devices
- 1.
In Microsoft Teams admin center, on the Phones page, select Configuration Profiles.
- 2.
Select the policy (just select the check mark) you want to apply (e.g., Bloguc VVX & Trion Phone in Figure 2-39), and then click Assign To Device.
- 3.
On the Assign Devices To A Configuration Profile page, select the appropriate devices and then click Apply. Figure 2-39 shows assignment of the configuration profile to a phone device.

Assign configuration profile to a device
After a configuration profile is assigned, the settings of this profile will be applied to the selected devices.
Managing for Phone Inventory

Phone management options
Configuring and Managing Microsoft Teams Rooms
Managing Microsoft Teams Rooms
Before configuring a Microsoft Teams Rooms resource account, an admin must understand the environments, room size, layout, and purpose. You can then identify the capabilities you want each room to have in the future. When you create an inventory of the equipment and capabilities in each existing room, your requirements for that room feed into your device selection planning to create a rich conferencing solution. The audio and video capabilities that are needed for each room, as well as the room size and purpose, all play an important role in deciding which solution will be optimal for each room. You must also check and confirm that the room doesn’t have excessive echo, noisy air conditioning, or furniture getting in the way of the equipment. You should also confirm there is enough power for the screens and Microsoft Teams Rooms.
- 1.
As an admin, have a proper plan for managing and configuring the local accounts that are created by the Microsoft Teams Rooms application installer.
- 2.
You can consider using Microsoft Azure Monitor to monitor the Microsoft Teams Rooms deployment and report on availability, hardware and software errors, and Microsoft Teams Rooms application version. As of this writing, this monitoring facility is not available, but Microsoft plans to provide such monitoring in the future.
- 3.
An additional consideration is whether the Teams Rooms will be domain-joined or a workgroup member. Domain-joined deployment includes multiple advantages, such as granting domain users and groups administrative rights and importing your organization’s private root certificate chain automatically. I would recommend joining your Teams room to the domain so that you don’t have to manually install the root certificate.
After addressing these considerations, you can start preparing to host accounts for Rooms. Remember, every Microsoft Teams Rooms device requires a dedicated and unique resource account that must be enabled for both Microsoft Teams or Skype for Business Online and additionally for Exchange Online. This account must have a room mailbox hosted on Exchange Online and be enabled as a meeting room in the Teams or Skype for Business deployment. In Exchange, you need to configure calendar processing so that the device can automatically accept incoming meeting requests [77].
Meeting scheduling features will not work without a device account.
There are several best practices to adopt when managing Teams Rooms. Create a resource account for a Teams room with a meaningful display name and description to easily locate the Microsoft Teams room. The display name is very important because users will see it when searching for and adding Microsoft Teams Rooms systems to their meetings. As an example, you could use following convention: city initials, followed by room name and maximum capacity The Lincoln room with an eight-person capacity in San Jose might have the display name SJ-LN-8.
Creating a Microsoft Teams Room Account
Once the Teams room account is ready, you can proceed to room device installation. Once your Teams Rooms system is physically deployed and the supported peripheral devices are connected, including screens, speakers, microphones, console panels, and so on, the next matter is providing the Teams account and the login to the Teams room using the resource account and password that you created earlier, in our example, Bl-svl-6-01@bloguc.com. You use a script to create a Teams account (see https://docs.microsoft.com/en-us/microsoftteams/rooms/rooms-configure-accounts).
To sign in, you first need to configure the Teams Rooms application to assign the Microsoft Teams Rooms resource account and password created earlier. That enables the Microsoft Teams Rooms system to sign into Microsoft Teams or Skype for Business and Exchange. It is important to leverage certified USB audio and video peripherals linked elsewhere in the document. Not doing so can result in unpredictable behavior. Additionally, the account also needs a rooms license or add-on license assigned [77].
As an admin, you can manually configure each Microsoft Teams Rooms system. Alternatively, you can use a centrally stored XML configuration file to manage the application settings and leverage a startup Group Policy object (GPO) script to reapply the configuration you want, each time the Microsoft Teams Rooms system boots. To leverage a centrally stored configuration, however, your room must be domain-joined.
After room deployment you can run multiple tests to make sure everything works as per your expectations. Frequently check call quality using the call quality dashboard.
Admin Center: Locations Tab
In Teams admin center, when you navigate locations, you will see three different options. Reporting labels is a way to upload your existing network’s IP subnets with their physical office addresses to identify the site correctly in Teams reports and the Call Quality dashboard. Emergency addresses allows you to update physical office addresses that can be used for emergency service like Enhanced 911. Network topology itself offers way to update network details including central and branch office designations with network site subnets and bandwidth details. Read each option carefully to understand Teams networking.
Reporting Labels
Reporting labels are used to give an IP subnet a name that links it to a physical location such as offices, buildings, or organizational sites within your organization. They are used by the Call Quality Dashboard or Call Analytics to make it easier to see the name of a place instead of just an IP subnet in reports. You can upload a text file (.csv or .tsv) that has a list of physical locations and their associated network subnets.

Upload Locations Data option

Uploading reporting labels
Emergency Addresses
Updating emergency addresses is critical because the emergency services such as 911 service are dependent on the emergency addresses updated in Teams admin center. You as a Teams administrator must understand the emergency address update process, including how to update addresses, validation, formatting, and how emergency calls are routed to the Public Safety Answering Point (PSAP).
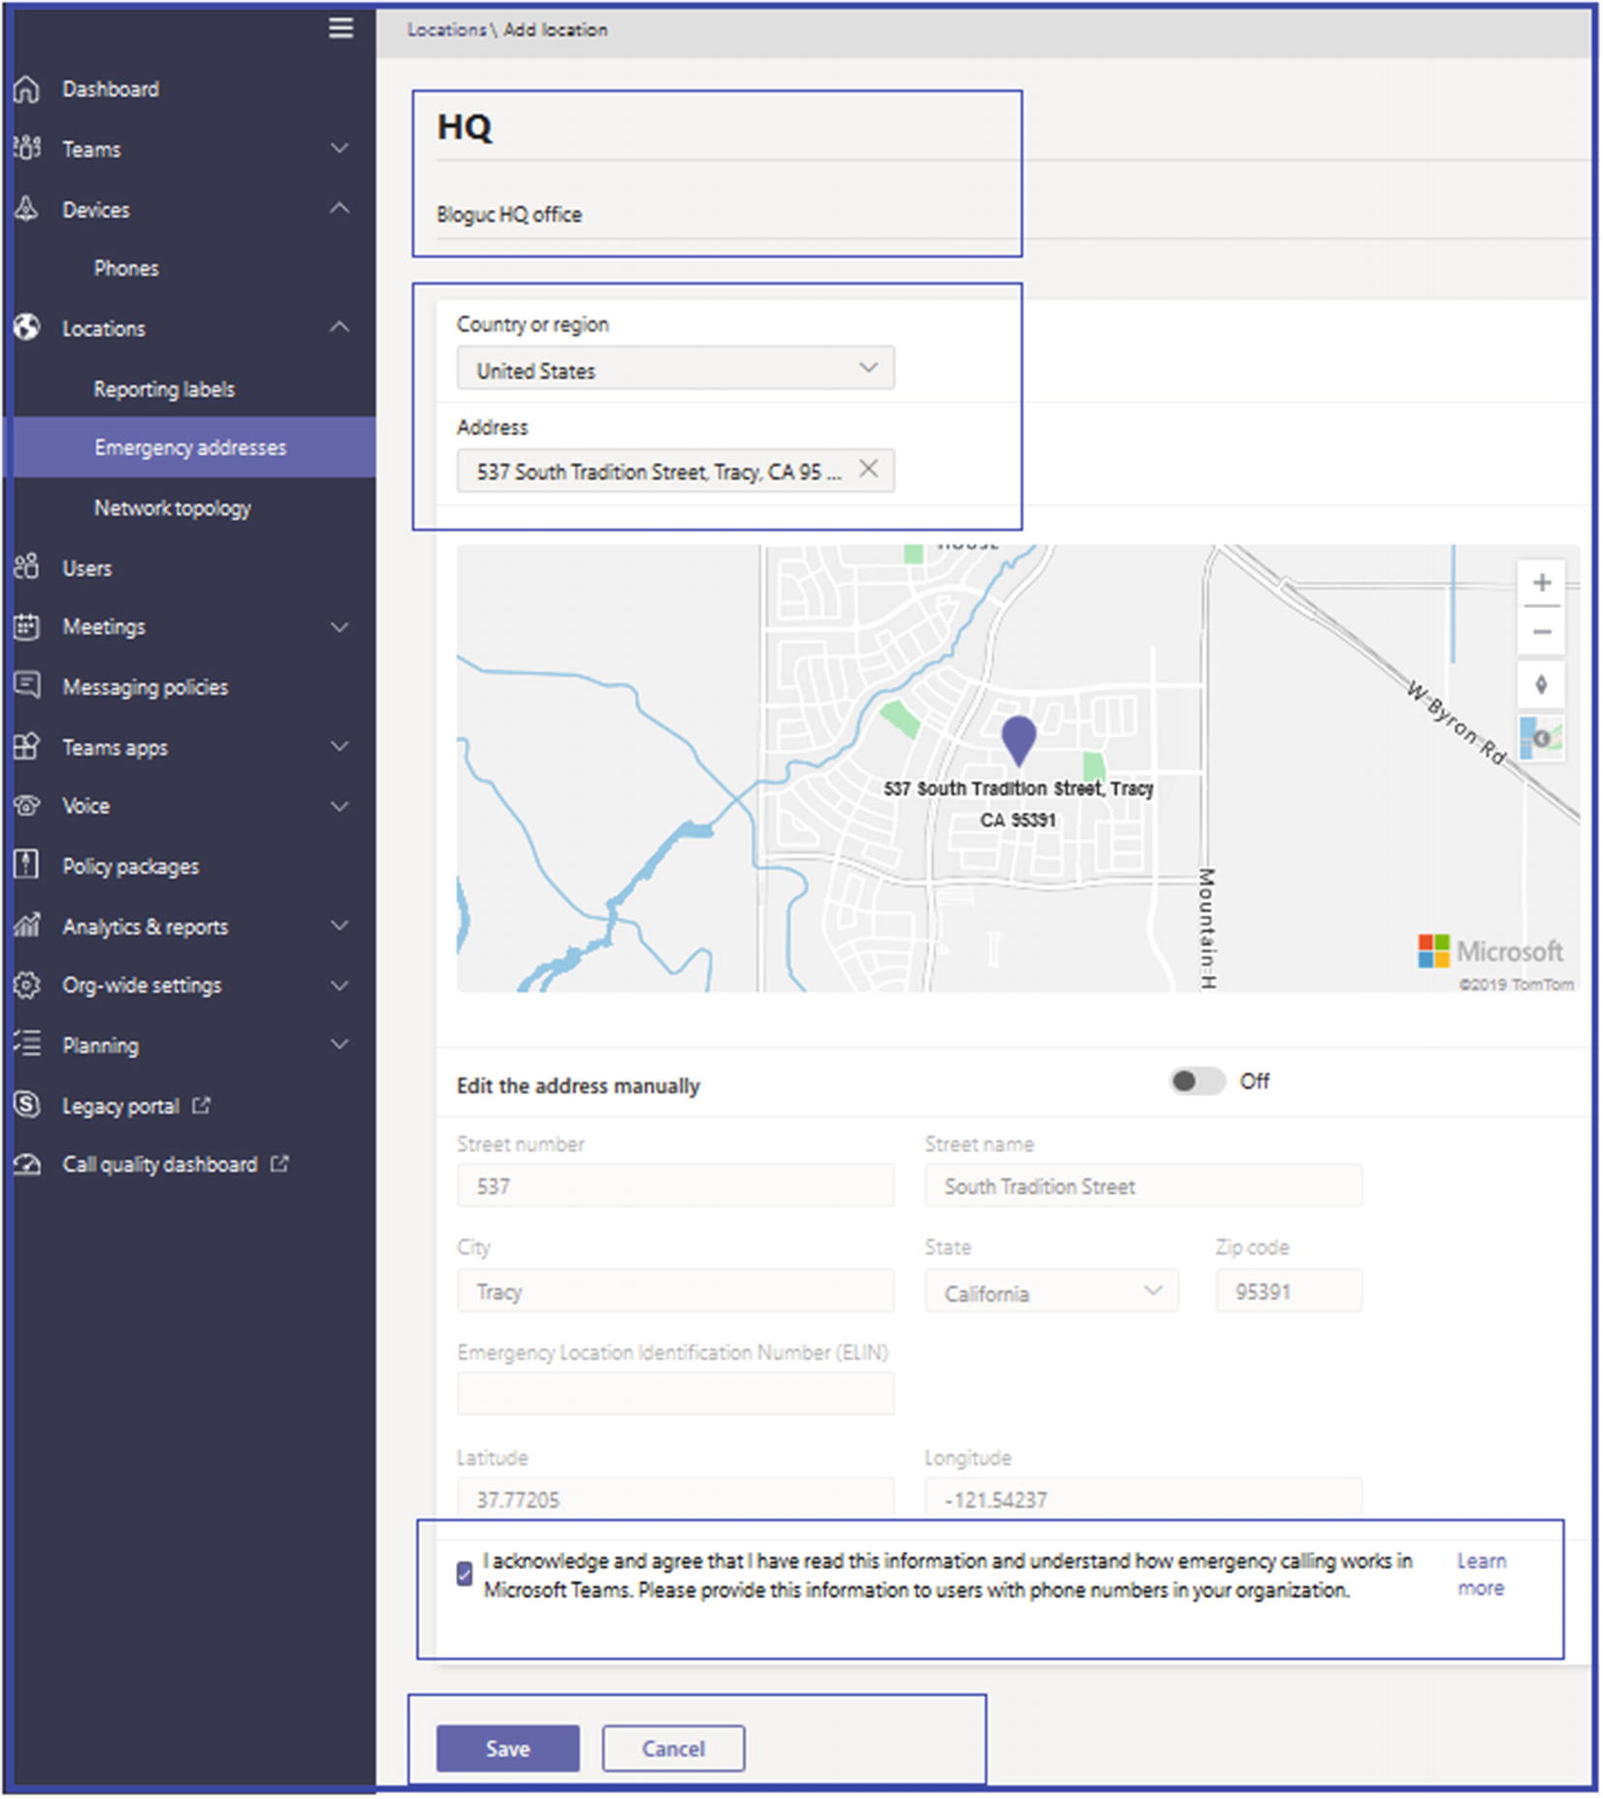
Emergency locations contain a physical address and if needed, a specific indicator, like a building, floor, or office, that is used to help locate a person in your organization if that user calls emergency services. You can create one or more addresses, depending on the number of physical locations you have in your organization. Basically, an emergency location could be referred to as a civic address, street address, or physical address. It is the street or civic address of a place of business for your organization that is used to route emergency calls to the appropriate dispatch authorities and to assist in locating the emergency caller. If your organization has multiple physical locations, you will need to add more than one emergency location.
After updating physical location addresses, your next task is to validate the emergency addresses that are added, making sure they are legitimate and correctly formatted for emergency response services. It is possible to add and save an emergency location that is not validated, but only validated locations can be associated with a user. After an emergency location is validated and saved, you can assign it to a user. You can also modify an emergency location that is saved and validated.
When an emergency location is assigned to a user, you will assign a location ID that references the location. The location ID includes the referenced emergency address (the street or civic address). A default place is included with an emergency location for cases in which in-building specifiers are not needed.
When a Teams user dials an emergency number, how the call is routed to the serving PSAP varies by country or region. In some countries or regions, such as the United States and the United Kingdom, the calls are first screened to determine the current location of the user before connecting the call to the appropriate dispatch center. In other areas, calls are routed directly to the dispatch center serving the phone number associated with the emergency caller [78].
- 1.
First, list all emergency locations, meaning all the physical addresses of your organization offices.
- 2.
Once you are ready to add emergency locations, log in to Teams admin center and navigate to Locations ➤ Emergency Addresses. Click + Add and then type the name of your location. Select the country and then type the address starting with office number, road, city, state, and area code. The example in Figure 2-43 shows the Bloguc HQ office address.
Updating emergency addresses

Emergency address added and validated
You can only change the address information for a location when the address is not validated. If the address was previously validated, you must delete the location and then create a new location.
Managing Emergency Location
- 1.
Log in to the Teams admin center and navigate to Location. On the Emergency Addresses page, select the location that you want to change from the list, and then click Edit.
- 2.
Make your changes.
- 3.
Click Save.
To remove or delete an emergency location visit the Emergency Addresses page in the Microsoft Teams admin center. Find and select the location that you want to remove from the list of locations, and then click Delete [78].
Network Topology
You can use network topology to define the network regions, sites, and subnets that are used to determine the emergency call routing and calling policies that are to be used for a given location.
- 1.
Log in to Teams admin center and navigate to Location. On the Network Topology page, select Network Sites and then click Add.
- 2.
Once the Add Network Site page opens, enter a network site name and description, then set whether location based routing is enabled for this site or not. Select an emergency location, and finally click New to add the subnet. Figure 2-45 illustrates adding a network site.

Network site

Adding a subnet
Adding Trusted IPs

Adding a trusted IP
Admin Center: Users Tab
As an admin, most of your time will be spent managing users. In Teams admin center, the Users tab allows you to manage all your users with different settings such as audio conferencing settings, the policies assigned to them, phone numbers, and other features for users in your organization who use Teams and Skype for Business. Figure 2-48 shows a list of users and their different settings.

Users and their different settings
Admin Center: Meetings Tab
Microsoft Teams meetings are one of the most used and best features Teams provides. We already covered the basic details of Teams meetings in Chapter 1. If you are new to Teams meeting, I encourage you to review Chapter 1. Once you are aware of how to set up teams, channels, and applications within Microsoft Teams, the next step you can take is to add and customize settings and policies for meetings, including audio conferencing, video, and application sharing.
Users can schedule and join Teams meetings from a variety of clients. For example, using audio conferencing, users can attend meetings from landline or mobile phones by dialing in to the meeting. As a Teams admin you can enable or disable certain types of meetings in addition to disabling modalities such as video or screen sharing, according to organization regulations. Because there is integration between Teams and Office 365 tools such as Microsoft Outlook, you can use an add-in to schedule Teams meetings directly from your calendar. Based on your organization’s needs and requirements, you can configure the appropriate settings for meetings and conferencing that your employees are going to use in Microsoft Teams. Because Teams offers so many options and advantages, it is very important for you as an admin to review and confirm that your environment is properly configured to provide your users the best possible experience.
Meeting Policies
Meeting policies are used to control what features are available to users when they join Microsoft Teams meetings. You can use the Global (Org-wide default) policy and customize it or create one or more custom meeting policies for people that host meetings in your organization. Along with Meeting policies, you can permit or restrict the features that will be available to users during meetings and audio conferencing. You must first decide if you are going to customize the initial meeting policies and whether you need multiple meeting policies. Then you must determine which groups of users receive which meeting policies. By default, there are six policies available including Global (Org-wide default), AllOn, AllOff, Restricted Anonymous access, Restricted Anonymous No Recording, and Kiosk.
Creating a New Meeting Policy or Customizing an Existing Policy
Per organizer: All meeting participants inherit the policy of the organizer.
Per user: Only the per-user policy applies to restrict certain features for the organizer, meeting participants, or both.
Per organizer and per user: Certain features are restricted for meeting participants based on their policy and the organizer’s policy.
Remember that a policy named Global (Org-wide default) is created by default, and all the users within the organization will be assigned this meeting policy by default. As a Teams admin, you can decide if changes must be made to this policy, or you can choose to create one or more custom policies and assign those to users.
Creating a New Meeting Policy
- 1.
First, log in to the Teams admin center. From the left-hand navigation menu, select Meetings, and then click Meeting Policies. Click + Add to create a new meeting policy.
- 2.Once the New Meeting Policy page opens, enter a meaningful name for the new policy, and optionally enter a description. In the General section, select whether to turn the following options on or off.
Allow Meet Now In Channels: This option allows users to host a meeting in a team channel.
Allow The Outlook Add-In: This option is important because users can schedule Teams meetings through Outlook.
Allow Channel Meeting Scheduling: This feature allows users to schedule channel meetings.
Allow Scheduling Private Meetings: This feature allows users to schedule private meetings.
Figure 2-49 shows all of those options turned on in the General section.

Setting meeting policies
- 3.In the Audio & Video section, turn the following options on or off.
Allow Transcription: You can turn on or off transcription for a meeting.
Allow Cloud Recording: This is a popular feature that most users like.
Allow IP Video: You can also enter the media bit rate in KBs. This setting determines the media bit rate for audio, video, and video-based app sharing in meetings.
Figure 2-50 shows the Audio & Video meeting settings.

Audio & Video settings
- 4.In the Content Sharing section, first select a screen sharing mode, such as Entire Screen, Single Application, or Disabled. Then turn the following options on or off.
Allow A Participant To Give Or Request Control
Allow An External Participant To Give Or Request Control
Allow PowerPoint Sharing
Allow Whiteboard
Allow Shared Notes
Figure 2-51 shows all available content sharing features.

Content Sharing section
- 5.In the Participants & Guests section, you can elect to turn these options on or off.
Let Anonymous People Start A Meeting
Allow Dial-In Users To Bypass The Lobby
Allow Meet Now In Private Meetings
Make selections for the other feature options as well.- Automatically Admit People: Select one of the following options:
Everyone
Everyone In Your Organization
Everyone In Your Organization And Federated Organizations
- Enable live captions: Select one of the following options:
Disabled But The Organizer Can Override
Disabled
- Allow chat in meetings: Select one of the following options:
Enabled
Disabled
Once you have finished entering your settings, click Save to commit the changes. Figure 2-52 shows all the recommended feature selections.

Participants & Guests features
As another example, if you turn off Allow Channel Meeting Scheduling, then the Schedule A Meeting option will not be available to users when they start a meeting in a Teams channel, and the Select A Channel To Meet option will not be available to users when they schedule a meeting from Calendar in Teams.
Meeting Policy Assignment
- 1.
To assign a policy using the Meeting Policies tab, simply log in to Teams admin center, then navigate to Meetings and select Meeting Policies. Select the required meeting policy and then click Manage Users. In the Manage users window, begin to enter a username. Once the full username shows, click Add and then click Apply to apply the policy. Figure 2-53 shows user Chanda Ilag added to the applied policy.

Policy assigned to user
- 2.
To assign a policy using the Users section in Teams admin center, log in to Teams admin center, then navigate to Users. Select the users to whom you want to apply the policy and then click Edit. Under Edit User Policies, select the required meeting policy, and then click Apply, as shown in Figure 2-54.

Assigning policies from the Users tab
As previously mentioned, you can also create a meeting policy using PowerShell. To do so, you must use the New-CSTeamsMeetingPolicy cmdlet. Once the policy is ready and you can modify settings, then use the command Set-CsTeamsMeetingPolicy.
Managing Meeting Settings
Microsoft Teams provides meeting settings that determine whether anonymous users can join Teams meetings, customize meeting invitations, enable Quality of Service (QoS), and set port ranges for real-time traffic. If you change any of these meeting settings, the changes will be applied to all Teams meetings that users schedule within your organization. There are three main settings.
Participants
This option determines whether anonymous participants can join a meeting. Anonymous participants are users who can join without logging in, as long as they have the link for the meeting. An admin can turn on this feature as per organization requirements. To enable anonymous users to join a meeting, log in to Teams admin center and navigate to Meetings. Select Meeting Settings, and under Participants, turn on the Anonymous Users Can Join A Meeting option. See Figure 2-55 for meeting settings.
Email Invitation

Email invitation customization
Network
If you are using QoS to prioritize network traffic, you can enable QoS markers and set port ranges for each type of media traffic. It is important to note that if you enable QoS or change settings in the Microsoft Teams admin center for the Microsoft Teams service, you will also need to apply matching settings to all user devices and all internal network devices to fully implement the changes to QoS. When you turn on Insert Quality of Service (QoS) Markers For Real-Time Media Traffic, all the real-time media traffic for meetings will be marked. If they have this marking, the network packets can be prioritized.

QoS settings
Admin Center: Messaging Policies Tab
Microsoft Teams provides optimal chat capability through one-to-one chat, group chat, or channel chat. For this reason, Teams is often called a chat-based workspace. Teams not only provides chat capability, but also provides granular control to manage the Teams chat experience through Teams messaging policies that are used to control chat and channel messaging features for users such as the possibility to delete sent messages, access to memes and stickers, or the ability for users to remove other users from a group chat.
Out of the box, all users are assigned to the Global (Org-wide default) policy. A Teams admin can create additional custom policies and assign them to individual users, but any user can only be assigned to one messaging policy at a time. Also, messaging policies can be used to activate or deactivate messaging features, and to configure or enforce messaging settings. All messaging policies are managed from the Microsoft Teams admin center and through the Skype for Business Online PowerShell commands.
Any user can only have one messaging policy assigned at a time, regardless of policy type.
Some of these settings, such as using Giphys, can also be configured at the team level by team.
Creating New Messaging Policies
By default, there will be one Global (Org-Wide default) messaging policy available that has been assigned to every user in your organization. If different settings for individual users are required, such as when an organization wants to deny regular users the ability to delete sent messages, a Teams admin must create a new messaging policy and assign it to a user.
- 1.Log in to Teams Admin Center. In the left-hand navigation pane, select Messaging Policies. Click + Add. On the top section in the Messaging policies \ Add window, enter the following information.
New Messaging Policy: A name for the policy.
Description: A description for the policy.
Turn on or off all settings as required, including allowing or blocking deletion of sent messages, read receipts, chat, Giphy content rating, URL preview, and so on. Figure 2-57 shows recommended settings, but the admin can customize the policy.

Messaging policy
- 2.
Once you have selected the desired settings, click Save to commit the policy setting and create the new messaging policy.
- 3.After a new messaging policy is created, it will be displayed in the Messaging Policies window, where it is ready for assignment to individual users. To assign the newly created policy to a user, you should perform the following steps:
- a.
Log in to Teams Admin Center, then select Users. Select a user and open User Setting, then select the Policies tab. Click Edit beside Assigned Policies.
- b.
Use the Messaging Policy drop-down menu to select the newly created messaging policy and then click Apply, as shown in Figure 2-58. The new messaging policy is now assigned to a user and its configured settings will be applied after up to 24 hours.
- a.

Messaging policy assigned to user
Modifying or Deleting Message Policies
When changes to an existing messaging policy are required, or if the Global policy settings need to be changed, they can be edited, or in the case of custom policies, they can be deleted.
The default Global (Org-wide default) policy cannot be deleted, but it can be reset to default settings.
Click Edit to delete the policy.
Click Duplicate to create a copy of the selected policy with a “copy” suffix.
Click Delete to remove the policy.

Modifying the messaging policy
Managing Messaging Policies Using PowerShell
Get-CsTeamsMessagingPolicy
New-CsTeamsMessagingPolicy
Set-CsTeamsMessagingPolicy
Grant-CsTeamsMessagingPolicy
Remove-CsTeamsMessagingPolicy
Admin Center: Teams Apps Tab
In Teams admin center the next policy area is the Teams Apps tab. Microsoft Teams brings together all of the applications that end users use on a daily basis in one location. To manage applications as an admin is not difficult; however, you must know how to set up and assign policies.
Permission Policies
Microsoft Teams admin center has app Permission policies settings that control what apps are available to Teams users in your organization. You can use the Global (Org-wide) default policy and customize it, or you can create one or more policies to meet the needs of your organization. Basically, you can allow Microsoft apps, third-party apps, or tenant apps.
Using app permission policies, you can block or allow apps either organization-wide or for specific users. When you block an app, all interactions with that app are disabled, and it will no longer appear in Teams. For example, you can use app permission policies to disable an app that creates a permission or data loss risk to your organization, gradually roll out new third-party or custom-built apps to specific users, and simplify the user experience, especially when you start rolling out Teams across your organization.

Teams global app permission policy
Managing Organization-wide App Settings
As a Teams admin, you can use organization-wide app settings to control which apps are available across your organization. Organization-wide app settings govern behavior for all users and override any other app permission policies assigned to users. You can use them to control malicious or problematic apps.

App Org-wide settings
Creating Teams App Permission Policy
Admins create a custom app policy to control the apps that are available for different groups of users in an organization. You can create and assign separate custom policies based on whether apps are published by Microsoft or third parties, or whether they are custom apps for your organization. It’s important to know that after you create a custom policy, you can’t change it if third-party apps are disabled in org-wide settings.
- 1.
To create a custom app policy, log in to Microsoft Teams admin center, and then navigate to Teams Apps. Select Permission Policies then click + Add to create a new policy.
- 2.
Once the app permission policy page opens, enter a name and description for the policy (e.g., Bloguc App Policy1).
- 3.
The default setting for Microsoft apps is Allow All Apps.
- 4.
Then, under Third-Party Apps, select Allow Specific Apps And Block All Others, as shown in Figure 2-62. You then have to add the apps that you want to allow.
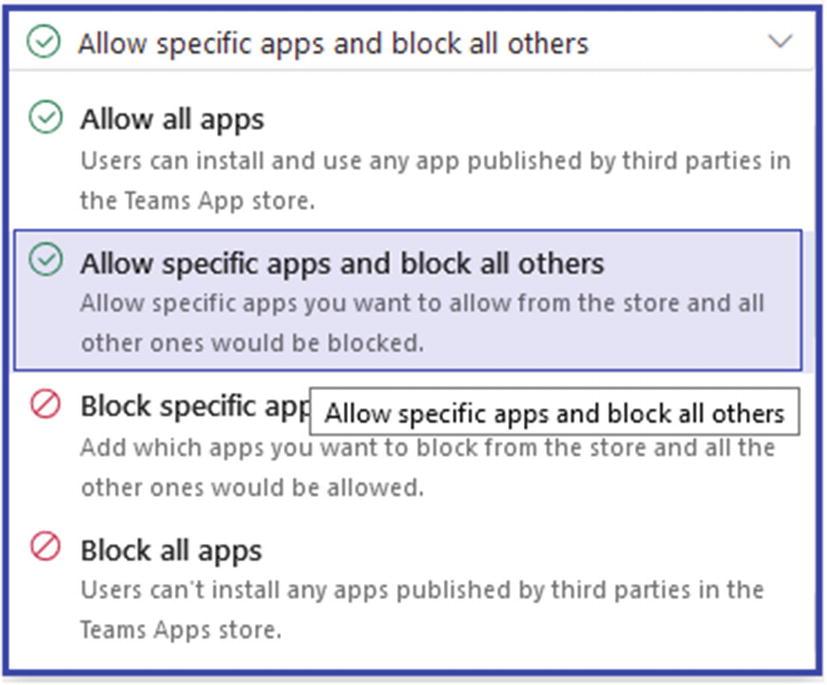
Allowing specific apps and blocking all others
- 5.
Select Allow Apps and then search for the app(s) that you want to allow. Make your selections and then click Add. The search results are filtered to the app publisher (Microsoft apps, third-party apps, or tenant apps). The example in Figure 2-63 shows that Twitter apps are allowed.
- 6.
Once you have chosen the list of apps, select Allow. Similarly, if you selected Block Specific Apps And Allow All Others, search for and add the apps that you want to block.
- 7.
Click Save to save the app policy. For the example shown in Figure 2-63, the Bloguc organization requirement is to allow all Microsoft apps and custom apps but block all third-party apps except Twitter apps.

Teams app permission policy
All allowed apps will show in Teams client apps and users can add to their teams and use them.
Assigning the App Permission Policy to Users
Once you create a custom policy, the next thing you need to do is to assign the policy to users so that the policy takes effect. As an admin, you can use the Microsoft Teams admin center to assign a custom policy to one or more users. Alternatively, you can use the Skype for Business PowerShell module to assign a custom policy to groups of users, such as all users in a security group or distribution group.
- 1.
Log in to Teams admin center and then navigate to Teams Apps. Select Permission Policies.
- 2.
Select the check box for the custom policy name and then click Manage Users.
- 3.
In the Manage Users window, search for the user by display name or by username, select the name, and then select Add. Repeat this step for each user that you want to add, as shown in Figure 2-64.

Assigning a policy to a user
- 4.
Once you add the required users, click Apply to commit the change and assign the policy to those users.
You can assign custom app permissions to users on the Users tab in Teams admin center. Simply log in to Teams admin center, navigate to Users, and select the users. Click Edit Settings and then under App Permission Policy, select the app permission policy you want to assign; click Apply.
Assigning a Custom App Permission Policy Using PowerShell
As previously mentioned, you can assign a custom app permission policy to multiple users with PowerShell for automation. For example, you might want to assign a policy to all users in a security group. You can do this by connecting to the Azure AD PowerShell module and the Skype for Business Online PowerShell module and using the Grant-CsTeamsAppPermissionPolicy command.
Depending on the number of members in the group, this command could take several minutes to execute.
Setup Policies
In Teams apps, the next thing is setup policies. This is actually where you as an admin can control how apps will appear in the Teams client for users. You can use app setup policies to customize Microsoft Teams to highlight the apps that are most important for your users. You can select the apps to pin to the apps bar and the order in which they appear. App setup policies let you showcase apps that users in your organization need, including those built by third parties or by developers in your organization.
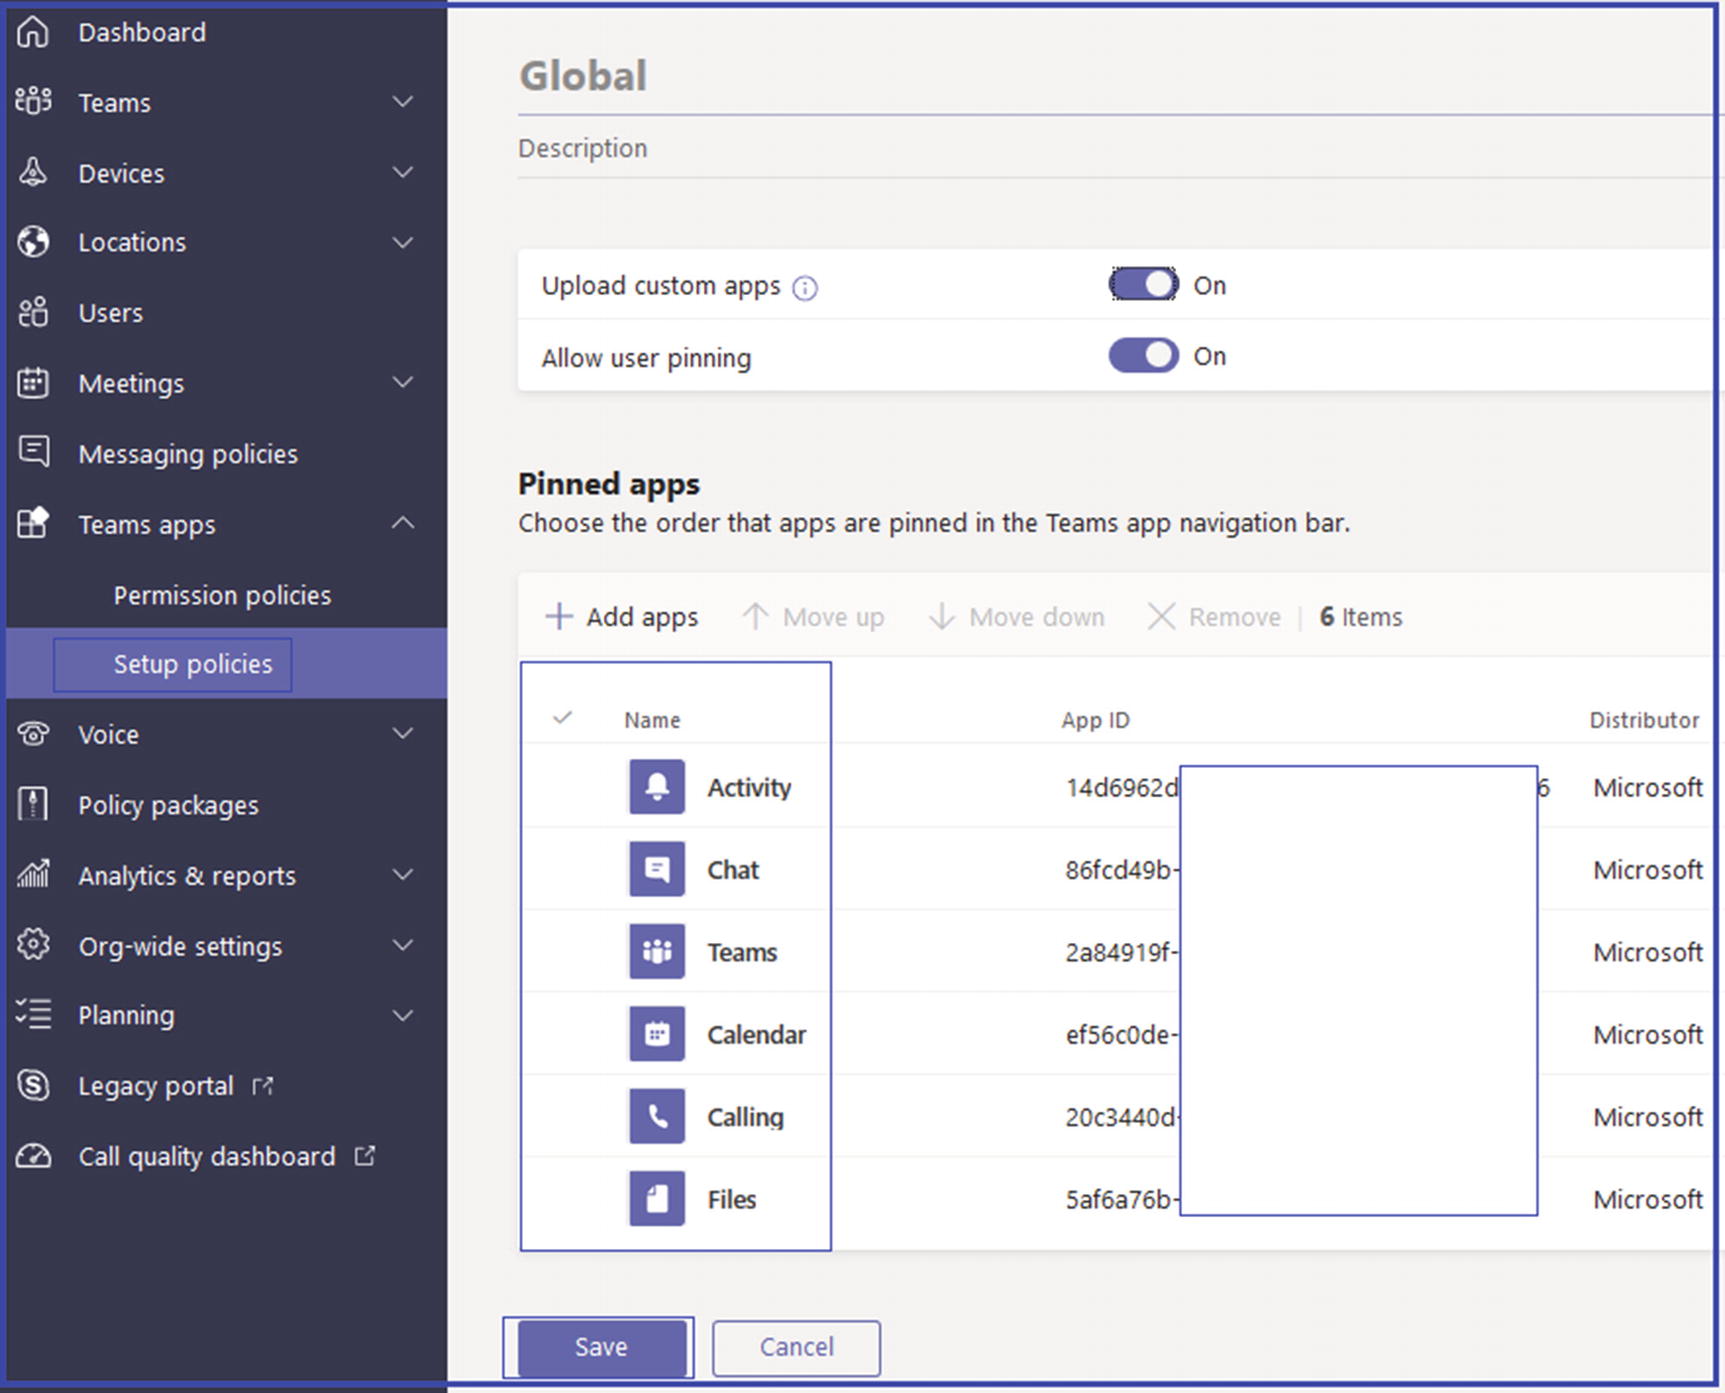
Setting setup policies

Teams apps set in a Teams setup policy
Managing the Teams Setup Policy
- 1.
Log in to Teams admin center, navigate to Teams Apps, and select Setup Policies. On the App Setup Policies page, select Add and then enter a name and description for the app setup policy.
- 2.
Turn the Upload Custom Apps setting on or off, depending on whether you want to let users upload custom apps to Teams. You cannot change this setting if Allow Third-Party Or Custom Apps is turned off in the org-wide app settings in app permission policies. For this example, I have enabled Upload Custom Apps because Bloguc Organization wants users to allow custom apps.
- 3.
In the Pinned Apps section, click Add Apps to search for the apps you want to add. When searching, you can optionally filter apps by app permission policy. Once you have selected your list of apps, click Add. In this example, we are adding Planner apps because Bloguc Organization wants to allow the Planner app, as shown in Figure 2-67.

Adding apps to pinned apps

An app added to pinned apps
Assigning a Custom App Setup Policy to Users from Teams Admin Center and PowerShell
After creating a custom app setup policy, you need to assign the policy to users to show the custom apps added under pinned apps. There are multiple ways to assign an app setup policy to your users in the admin center. You can assign users either in setup policies or in Users in Teams admin center or PowerShell.
- 1.
Log in to Teams admin center, then navigate to Teams Apps. Select Setup Policies and then select the policy by clicking to the left of the policy name. When you are done, click Manage users.
- 2.
In the Manage Users window, search for the user by display name or by username, select the name you want, and then select Add. Repeat this step for each user that you want to add, as shown in Figure 2-69. Click Apply.

Assigning an app setup policy to a user
- 3.
Once you are done adding users, click Save.
You can also perform the following steps if you want to assign users within the Users pane. Log in to Teams admin center then navigate to Users. Select the appropriate user and click Edit Settings. Under App setup policy, select the app setup policy you want to assign, and then click Apply.
Assigning a Custom App Setup Policy to Users Using PowerShell
As an admin, you might want to assign an app setup policy to multiple users that you have already identified. For example, you might want to assign a policy to all users in an IT group. You can do this by connecting to the Azure AD PowerShell for Graph module and the Skype for Business Online PowerShell module.
Depending on the number of members in the Bloguc IT group, this command could take several minutes to execute.
Admin Center: Voice Tab

Voice features
Phone Numbers
To set up calling features for users and services in your organization, you can get new numbers or port existing ones from a service provider. You can manage phone numbers including assigning, unassigning, and releasing phone numbers for people or for services like audio conferencing, auto attendants, or call queues.
Phone Number Management
Microsoft Teams admin center allows Teams IT admins to port their existing phone numbers, search for new numbers, and acquire new phone numbers from Office 365 Phone System (you might need to add using the legacy Skype for Business admin portal). In addition to acquiring new numbers, you can assign these new numbers to end users and resource accounts. Admins can manage locations for emergency calling and assign them to users. This means when you assign phone numbers to end users, they have their emergency location configured. When they make a call to emergency services, this location address can help them to get help quickly. Admins can see all order histories as well as updates to their records.
- 1.
Log in to Teams admin center, and navigate to Voice. Select Phone Numbers and then click + Add to add a new phone number.
- 2.
On the Phone Numbers \ Get Phone Number page, enter the order name and a description.
- 3.
Under Location And Quantity, select the country or region and then select appropriate number type and search location (if you have not added a location then you add a location first to search). Specify the quantity and then click Next. In the example shown in Figure 2-71, the order name is Demo order, the selected country is United States, the number type is user number, the location is HQ, the area code is 209, and the quantity is 5.
Note The number acquisition process takes some time, so be patient.

Phone numbers
- 4.
On the next page you will see the new number added and finally confirm.
Note If you are trying to acquire phone numbers without Phone System licenses, you will end up getting an error, because to acquire phone numbers and use them you must have Phone System licenses.
Porting Phone Numbers
Admins have the ability to port phone numbers from an existing service provider into the Office 365 cloud. There are two processes for porting the phone numbers. as the first is automated porting, which is supported for U.S.-based numbers only (Microsoft-developed API with carrier and partners to be able to automate the whole process end-to-end). The other porting option is through a service desk, which is available for all porting scenarios through support.
- 1.
To port a phone number, log in to Teams admin center, and navigate to Voice. Select Phone Numbers and then click Port to port phone numbers.
- 2.
On the Porting page, review the information before you start transferring your phone numbers. After you review it, we will walk you through the steps you need to complete the transfer of your numbers from your current service provider to Microsoft. When you’re ready, click Next to continue (see Figure 2-72).
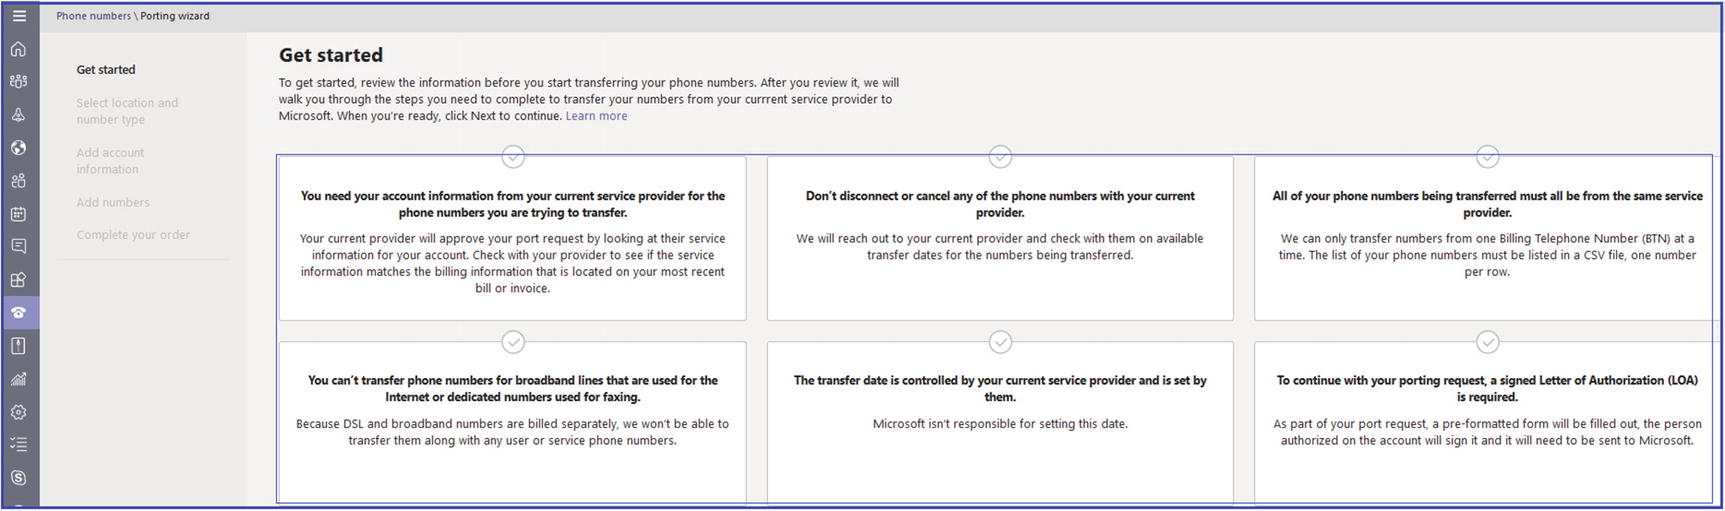
Porting the number
You can check the order history.
Emergency Policies
Emergency calling policies are used to control how users in your organization can use emergency calling features. You can use the Global (Org-wide default) policy and customize it or create one or more custom policies for those people within your organization.
Calling Policies
As a Teams admin you can manage emergency calling policies by going to the Teams admin center and then navigating to Voice. You can then use Emergency Policies and Calling Policies in the Microsoft Teams admin center or Windows PowerShell.
For users, you can use the Global (Org-wide default) policy or create and assign custom policies. Users will automatically get the Global policy unless you create and assign a custom policy. Keep in mind that you can edit the settings in the Global policy, but you cannot rename or delete it. For network sites, you create and assign custom policies [79].
If you assigned an emergency calling policy to a network site and to a user and if that user is at that network site, the policy that is assigned to the network site overrides the policy that is assigned to the user.
Using the Microsoft Teams Admin Center
- 1.
Log in to Teams admin center, and then navigate to Voice. Select Emergency Policies, and then click the Calling policies tab and click + Add.
- 2.On the next screen enter a name and description for the policy and then set how you want to notify people in your organization, typically the security desk, when an emergency call is made. To do this, under Notification Mode, select one of the following options:
Send Notification Only: A Teams chat message is sent to the users and groups that you specify.
Conferenced In But Are Muted: A Teams chat message is sent to the users and groups that you specify, and they can listen (but not participate) in the conversation between the caller and the PSAP operator.
Conferenced In And Are Unmuted: A Teams chat message is sent to the users and groups that you specify, and they can listen as well as participate in the conversation between the caller and the PSAP operator.
In the example shown in Figure 2-73, Conference In But Are Muted is selected.
- 3.
Enter the dial-out number for notifications and then search for and select one or more users or groups, such as your organization’s security desk, to notify when an emergency call is made. The notification can be sent to email addresses of users, distribution groups, and security groups. A maximum of 50 users can be notified. Figure 2-73 shows an example emergency calling policy.

Emergency calling policy
- 4.
Once all settings are complete, click Apply.
Assigning a Custom Emergency Calling Policy to Users in a Group
After creating an emergency calling policy, the next thing you need to do is assign a custom emergency calling policy to multiple users that you’ve already identified using Teams admin center or PowerShell.
Assigning an Emergency Calling Policy Using Teams Admin Center
Log in to Teams admin center and navigate to Users. Select the user and then click Policies. Under Assigned Policies, click Edit. Under Emergency Calling Policy, select the newly created policy. Finally, click Save to commit the changes. In our example, the policy name is EmergencyCallingPolicy1.
You can assign an emergency calling policy to users through the Emergency Calling Policy page itself by clicking Manage User.
As a best practice, assign an emergency call routing policy to users as well as network site to cover those who are not at the network site location.
Assigning Emergency Calling Policy Using PowerShell
For example, you might want to assign a policy to all users in a security group. You can do this by connecting to the Azure AD PowerShell for Graph module and the Skype for Business PowerShell module [79]. In this example, we assign a policy called Operations Emergency Calling Policy to all users in the Bloguc Security group.
Make sure you first connect to the Azure AD PowerShell for Graph module and Skype for Business PowerShell module by following the steps in Connect to all Office 365 services in a single PowerShell window. Connect-MsolService and Import-Module SkypeOnlineConnector Creds = Get − CredentialsfbSession = New-CsOnlineSession -OverrideAdminDomain “.onmicrosoft.com” -Credential CredsImport − PSSessionsfbSession.
Depending on the number of members in the group, this command might take several minutes to execute.
Assigning an Emergency Calling Policy to the Network Site
Emergency Call Routing Policies
After creating an emergency calling policy, you next need to create emergency call routing policies. These policies are used to set up emergency numbers and then specify how those emergency calls are routed. You can use the Global (Org-wide default) policy and customize it or create one or more custom policies for those users within your organization.
However, before creating an emergency call routing policy, you must understand why you are creating these policies. For example, if you have deployed Phone System Direct Routing in your organization, you can use emergency call routing policies in Microsoft Teams to set up emergency numbers and specify how emergency calls are routed. An emergency call routing policy determines whether enhanced emergency services are enabled for users who are assigned the policy, the numbers used to call emergency services (e.g., the 911 calling service in the United States), and how calls to emergency services are routed [80]. Out of the box, the Global (Org-wide default) policy is available, or you can create and assign custom policies. Users will automatically get the Global policy unless you create and assign a custom policy.
Remember, you can edit the settings in the Global policy, but you can’t rename or delete it. For network sites, you create and assign custom policies.
Creating and Managing Emergency Call Routing Policy
- 1.
Log in to Teams admin center and navigate to Voice. Select Emergency Policies, and then click the Call Routing Policies tab. Click + Add.
- 2.
On the Emergency Call Routing Policy page, enter a meaningful name and description for the policy.
- 3.
To enable enhanced emergency services, turn on the Enhanced Emergency Services option. When enhanced emergency services are enabled, Teams retrieves policy and location information from the service and includes that information as part of the emergency call. Figure 2-74 shows the enhanced emergency services enabled.

Emergency call routing policy
- 4.The next thing you need to do to identify one or more emergency numbers. To do this, under Emergency Numbers, do the following.
- a.
Emergency Dial String: Enter the emergency dial string. This dial string indicates that a call is an emergency call. Refer to Figure 2-75, which shows 911 as the dial string.
- b.
Emergency Dial Mask: For each emergency number, you can specify zero or more emergency dial masks. A dial mask is the number that you want to translate into the value of the emergency dial string. This allows for alternate emergency numbers to be dialed and still have the call reach emergency services. For example, you can add 112 as the emergency dial mask, which is the emergency service number for most of Europe, and 911 as the emergency dial string. A Teams user from Europe who is visiting might not know that 911 is the emergency number in the United States, and when they dial 112, the call will be made to 911. To define multiple dial masks, separate each value by a semicolon (e.g., 112;212). See Figure 2-75.
- c.
PSTN Usage Record: Select the PSTN usage record. The PSTN usage determines which route is used to route emergency calls from users who are authorized to use them. The route associated with this usage should point to a Session Initiation Protocol (SIP) trunk dedicated to emergency calls or to an Emergency Location Identification Number (ELIN) gateway that routes emergency calls to the nearest PSAP. See Figure 2-75.
- a.

Emergency numbers
- 5.
Once you are finished adding all emergency numbers, click Save. Remember, Figure 2-75 shows an example, not a real policy that you can follow. You as an admin need to come up with an emergency string and dial mask before creating the emergency number.
For Direct Routing, Microsoft is transitioning away from Teams clients sending emergency calls with a “+” in front of the emergency dial string. Until the transition is completed, the voice route pattern to match an emergency dial string should ensure a match is made for strings that have and don’t have a preceding “+”, such as 911 and +911. For example, ^\+?911 or .*. [80]
Dial strings and dial masks must be unique within a policy. This means that for a policy, you can define multiple emergency numbers and you can set multiple dial masks for a dial string, but each dial string and dial mask must only be used one time. [80]
Assigning a Custom Emergency Call Routing Policy to Users Using Teams Admin Center and PowerShell
- 1.
Log in to Teams admin center, and then navigate to Users. Select the user and then click Policies. and
- 2.
Under Assigned Policies, click Edit.
- 3.
Under Emergency Call Routing Policy, select the policy you want to assign (e.g., EmergencyCallRoutingPolicy1), and then click Save.
You can assign an emergency calling policy to users using the Emergency Calling Policy page itself by clicking Manage User.
Assigning an Emergency Calling Policy Using PowerShell
Depending on the number of members in the group, this command could take several minutes to execute.
Assigning a Custom Emergency Call Routing Policy to a Network Site
Dial Plans
Dial plans provide a method for admins to configure the way end users can dial phone numbers and have them converted into E.164 format (globally accepted format) for routing. Microsoft Teams gives the ability to have custom dial plans that are essentially a collection of normalization rules that are used to translate a user’s dialing behavior into something that can be routed on PSTN. In Teams the dial plan has been there, but it never had an interface to configure it using either the Skype for Business admin center or in the Microsoft Teams admin center. Traditionally this was all performed in PowerShell using the CsTenantDialPlan cmdlet object by prioritizing multiple normalization rules through the CsVoiceNormalizationRule cmdlet object created in regular expression (RegEx). Basically, regular expression is used to translate a dialed number to something that can be routed over PSTN.
Now, however, dial plans are available in the Teams admin center. There is a Global (Org-wide) dial plan that will be applied to all users in the Teams tenant or those who don’t have custom dial plan applied. A custom dial plan allows you to codify users’ dialing habits for each city or country, similar to handling voice routing policies.
Another important thing to understand is that normalization follows precedence. This means the first rule gets applied first if it matches; otherwise it will go to the next one, and so on. If nothing matches, then it will give an error with no match found and call processing will stop, resulting in a failed phone call. That is why dial plans are essential in phone call routing.

Default dial plan policy
Creating a Custom Dial Plan
- 1.
Log in to Teams admin center, then navigate to Voice. Select Dial Plans and then click + Add. Enter a name and description for the dial plan.
- 2.
On the Dial Plan \ Add page, under Dial Plan Details, specify an external dialing prefix if users need to dial one or more additional leading digits (e.g., 9) to get an external line. To do this, in the External Dialing Prefix box, enter an external dialing prefix (e.g., 9). The prefix can be up to four characters (including #, *, and 0–9). In Figure 2-77 the external dialing prefix is set to 9.
- 3.
Set the Optimized Device Dialing option to on. If you specify an external dialing prefix, you must also turn on this setting to apply the prefix so that calls can be made outside your organization. This setting is shown in Figure 2-77.

Configuring a dial plan
- 4.Under Normalization Rules, configure and associate one or more normalization rules for the dial plan. Each dial plan must have at least one normalization rule associated with it. To do this, follow this procedure.
- a.
To create a new normalization rule and associate it with the dial plan, click Add. You can then define the rule. Figure 2-78 shows a normalization rule named NorthAmerica-West.
- b.
To edit a normalization rule that is already associated with the dial plan, select the rule by clicking to the left of the rule name, and then click Edit. Make the changes you want, and then click Save.
- c.
To remove a normalization rule from the dial plan, select the rule by clicking to the left of the rule name, and then click Remove.
- a.
- 5.
Arrange the normalization rules in the order that you want. Click Move Up or Move Down to change the position of rules in the list and then click Save to commit the changes.
- 6.
After creating a dial plan, you must test it. Under Test dial plan, enter a phone number, and then click Test. Figure 2-78 shows five digits tested to make sure it normalizes correctly with E.164 format. For example, here the result shows +12096566625.

Normalization rule
Normalization Rule Types
Microsoft Teams provides two different types of normalization: basic and advanced. When you create a new dial plan it will give you these two options. Basic is a very basic option for conditions without regular expression, and advanced for complex dial plans with multiple conditions using regular expression. Figure 2-79 shows the normalization rule type. Choose the normalization rule type that best fits your requirements.

Normalization type selection
You can put in an external access prefix of up to four characters (including #, *, and 0–9) if users need to dial one or more additional leading digits (e.g., 9) to get an external line outside your organization. When you use this setting, you must also turn on optimized device dialing.
Assigning a Dial Plan to Users

Assigning a dial plan to a user
Dial Plan Management and Creation Through Windows PowerShell
As a Teams admin, you have to manage dial plans and use them for call troubleshooting. Microsoft has provided multiple PowerShell commands that help you to manage dial plans. Before even running PowerShell commands, you must first connect your Windows PowerShell module to your Skype for Business Online tenant to the Office 365 organization. You must have Skype for Business Online PowerShell installed; you can use this link to download the Skype for Business Online PowerShell module: https://go.microsoft.com/fwlink/p/?LinkId=532439.
For example, the domain name for my demo tenant is "bloguc.onmicrosoft.com ".
Direct Routing
Direct Routing allows the Teams admin to connect a supported Session Border Controller (SBC) to Microsoft Phone System to enable voice calling features (PSTN calls). For example, you can configure on-premises PSTN connectivity with an SBC to send and receive phone calls from a user with the Teams client. Direct routing provides another way to connect to the PSTN where customers interface existing PSTN services to Teams through an on-premises SBC.
If your organization has an on-premises PSTN connectivity solution (e.g., Bloguc Organization using Ribbon SBC to connect ATT SIP trunk), Direct Routing enables you to connect a supported SBC to Microsoft Phone System. Direct Routing enables you to use any PSTN trunk with your Microsoft Phone System and configure interoperability between customer-owned telephony equipment, such as a third-party private branch exchange (PBX), analog devices, and Microsoft Phone System [57].

Teams Direct Routing high-level connectivity
Scenarios in Which You Can Use Direct Routing
As mentioned earlier, Direct Routing provides a way for the Teams admin to connect a supported SBC to Microsoft Phone System to enable voice calling features (PSTN calls). Direct Routing can be deployed in organizations who want to leverage on-premises PSTN within the following scenarios:
Microsoft Calling Plan is not available in the organization’s country or region. Thus far, Microsoft Calling Plan is available in only some countries only. You can visit https://docs.microsoft.com/en-us/microsoftteams/country-and-region-availability-for-audio-conferencing-and-calling-plans/country-and-region-availability-for-audio-conferencing-and-calling-plans to find the countries and regions where Calling Plan is available.
The organization requires connection to third-party analog devices or call centers.
The organization has an existing contract with a PSTN carrier and wants to continue to use on-premises PSTN.
Prerequisites for Planning or Deploying Direct Routing
- 1.
The first step is to check your existing SBC for supportability. Microsoft has published a supported SBC vendor list with their product and software version. Validate your SBC, as it must be one from a supported SBC vendor. Read more details at https://docs.microsoft.com/en-US/microsoftteams/direct-routing-border-controllers.
- 2.
SBC must have one or more telephony trunks connected. The SBC can also be connected to third party PBXs or analog telephony adapters. On the other end, the SBC will be connected to Microsoft Phone System through Direct Routing; for example, PSTN carrier ➤ SBC ➤ Microsoft Teams Office 365 Cloud.
- 3.
You must have Office 365 Tenant where your organization’s Teams users are located or homed.
- 4.
To use Direct Routing capabilities, users must be homed in Microsoft Teams. In a hybrid environment, on-premises Skype for Business users cannot be enabled for Direct Routing voice in Microsoft Teams.
- 5.
Your domains must be configured to your organization’s Office 365 tenant; for example, Bloguc.com means the SBC FQDN looks like this: sbc1.bloguc.com. The default *.onmicrosoft.com domain cannot be used.
- 6.
The SBC must have a public DNS FQDN and a public IP address interface that will be used to connect SBC to Teams Office 365 Cloud.
- 7.
The SBC connection to the Teams Office 365 Cloud is secured, so you must have a public trusted certificate for the SBC that will be used for communication with Direct Routing.
- 8.The SBC public IP address interface must be allowed to communicate to Teams Direct Routing over certain ports and protocols. This is the firewall requirement mentioned here.
sip.pstnhub.microsoft.com: Global FQDN, must be tried first.
sip2.pstnhub.microsoft.com: Secondary FQDN, geographically maps to the second priority region.
sip3.pstnhub.microsoft.com: Tertiary FQDN, geographically maps to the third priority region.
- Firewall IP addresses and ports for Direct Routing and Microsoft Teams media should be opened. The Table 2-3 identifies the ports that should be opened.Table 2-3
Traffic Types and Related Ports
Traffic Type
From
To
Source Port
Destination Port
SIP/TLS
SIP Proxy
SBC
1024–65535
Defined on the SBC
SIP/TLS
SBC
SIP Proxy
Defined on the SBC
5061
- 9.
The Media Transport Profile should allow TCP/RTP/SAVP and UDP/RTP/SAVP. The media traffic flows to and from a separate service in the Microsoft Office 365 Cloud. The IP range for Media traffic should include 52.112.0.0 /14 (IP addresses from 52.112.0.1–52.115.255.254).
- 10.Specific to the Media traffic codecs perspective:
- The Direct Routing interface on the leg between the SBC and Cloud Media Processor (without media bypass) or between the Teams client and the SBC (if media bypass is enabled) can use the following codecs:
- 1.
Non-media bypass (SBC to Cloud Media Processor): SILK, G.711, G.722, G.729
- 2.
Media bypass (SBC to Teams client): SILK, G.711, G.722, G.729, OPUS
- 1.
- 11.
On the leg between the Cloud Media Processor and the Microsoft Teams client, media flows directly between the Teams client and the SBC, where either SILK or G.722 is used.
- 12.Teams Direct Routing licensing requirement. Users of Direct Routing must have the following licenses assigned in Office 365 to use Teams Direct Routing capabilities.
Microsoft 365 Phone System (either part of E5 or add-on license on top of E1 or E5).
Microsoft Teams and Skype for Business Plan 2 (from Office 365 subscription plan, like E1, E3, E5, etc.).
Microsoft 365 Audio Conferencing (either part of E5 subscription or add-on license on top of E1 and E3) is required in scenarios where a Teams user in a call wants to add a PSTN user in a call through the Audio Conferencing service.
Now that you aware of the requirements, let’s move on to configuring Teams Direct Routing .
Configuring Microsoft Teams Direct Routing
For Teams Direct Routing configuration, as of this writing, Teams admins can perform Direct Routing configuration through the PowerShell command line, such as New-CSOnlinePSTNGateway only. There is no option to configure Direct Routing through Team Admin center. Microsoft will be adding Direct Routing configuration capability for Teams admins in the Teams admin center portal to perform configuration of Direct Routing and controlling the PSTN trunk definitions to support customers’ on-premises PSTN connectivity with Microsoft 365. Using the Teams admin center portal, admins will include voice route support and assigning on-premises Telephone Numbers (TNs); however, as of this writing, it is not available through the admin portal, but can be done using the Skype for Business Online PowerShell command line. I am assuming when you read this book you will see a Teams Direct Routing configuration option in the Teams admin center portal [57a].
- 1.Connect the SBC to the Teams Direct Routing service of Phone System using Skype for Business Online PowerShell.
- a.To do so, first connect Skype for Business Online PowerShell using the following PowerShell command.Import-Module skypeonlineconnector$sfboSession = New-CsOnlineSession -OverrideAdminDomain "domain.onmicrosoft.com"Import-PSSession $sfboSession -AllowClobber
For example, my domain is Bloguc.onmicrosoft.com.
- b.After you are connected to Skype for Business Online PowerShell, run the following command to pair the SBC to the Office 365 tenant.New-CsOnlinePSTNGateway -Fqdn <SBC FQDN> -SipSignallingPort <SBC SIP Port> -MaxConcurrentSessions <Max Concurrent Sessions the SBC can handle> -Enabled $trueFor example,New-CsOnlinePSTNGateway -Fqdn sbc1.bloguc.com -SipSignallingPort 5061 -MaxConcurrentSessions 50 -Enabled $true
Note It is recommended that you set a maximum call limit in the SBC, using information that can be found in the SBC documentation. The limit will trigger a notification if the SBC is at its capacity.
- a.
- 2.
After pairing with the SBC, you must validate the SBC setting is expected. If not, then modify it using the Set-CsOnlinePSTNGateway command. Figure 2-82 shows an example of PSTN gateway details.

Validating PSTN gateway details
Validate if SendSipOptions is set to True or not. If not, then modify it to True because it is important to send option requests from SBC. When Direct Routing sees incoming Options, it will start sending outgoing SIP Options messages to the SBC FQDN configured in the Contact header field in the incoming Options message.
- 3.
Once an Online PSTN gateway is created, work with your SBC vendor to configure your SBC for Teams Direct Routing. That includes installing a certificate on SBC, adding a new public IP interface or network address translation (NAT) and FQDN on your SBC, opening communication between the SBC public IP interface and the Teams SIP proxy, actual call routing configuration, and so on.
- 4.The next thing you need to do is enable users for Teams Direct Routing. That includes creating a user in Office 365 or synchronizing your on-premises user through Azure AD, connecting to Office 365 and assigning a Phone System license, ensuring that the user is homed in Skype for Business Online, configuring the phone number, enabling enterprise voice and voicemail, and configuring voice routing. The route is automatically validated.
- a.
Once a user is available in Office 365 (Azure AD), then assign the licenses, including Microsoft Teams, Skype for Business Online, Microsoft Phone System, and Teams Audio Conferencing using the Office 365 admin center.
- b.Once licenses are assigned, configure the phone number and enable enterprise voice and voicemail for the user using the following PowerShell command. Before running this command you must connect to Skype for Business Online PowerShell.Set-CsUser -Identity "Balu Ilag" -OnPremLineURI tel:+12092034567 -EnterpriseVoiceEnabled $true -HostedVoiceMail $true
Note If the user’s phone number is managed on premises, use on-premises Skype for Business Management Shell or Control Panel to configure the user’s phone number.
- c.
Create and assign a voice routing policy to the user including an Online voice routing policy. To create a voice routing policy, PSTN usages, and so on, refer the Microsoft documentation at https://docs.microsoft.com/en-US/microsoftteams/direct-routing-configure.
- d.Once Online Voice routing policy available connect to Skype for Business online PowerShell and assign online voice routing policy to user. Refer below PowerShell command to assgn online voice routing policy.Grant-CsOnlineVoiceRoutingPolicy -Identity "Balu Ilag" -PolicyName "Bloguc-CA-International"
- a.
Managing Teams Direct Routing

Teams Direct Routing dashboard

Teams Direct Routing SBC view
Call Park Policies
Call park allows users to put a call on hold and retrieve the call from a different device within the organization. Call park policies allow a Teams administrator to control which users are enabled to use call park and make other call park setting changes for them. You can use the Global (Org-wide default) policy and customize it or create one or more custom policies and assign them to users.
It is important to know that the call park feature is available in Teams only mode. That enables a user to place a call on hold in the Teams service in the cloud. For example, a user’s phone battery is running low, so the user decides to park a call and then retrieve the call from a Teams desk phone. To park and retrieve calls, a user must be an Enterprise Voice user, and the Teams administrator must have granted the user a call park policy. The call park feature is disabled by default, but an admin can enable it for users and create user groups using the call park policy.
Creating a Call Park Policy
- 1.
Log in to Teams admin center then navigate to Voice. Select Call Park Policies.
- 2.
Click + Add and then give the policy a name. Set the Allow Call Park option to On. Figure 2-85 shows an enabled call park policy.

Call park policy
- 3.
Click Save to commit the changes.
Assigning a Call Park Policy to a User
- 1.
Log in to Teams admin center and then navigate to Voice. Select Call Park Policies.
- 2.
Select the policy by clicking to the left of the policy name and then select Manage Users.
- 3.
On the Manage Users page, search for the user by display name or by username. Select the name, and then select Add. Repeat this step for each user that you want to add. The example in Figure 2-86 shows that the policy is assigned to user Balu Ilag.

Assigning a call park policy
- 4.
Once you finish adding users, click Save to commit the changes.
Managing Call Park Policy Using Windows PowerShell
To create a call park policy using PowerShell, use the PowerShell command New-CsTeamsCallParkPolicy.
Example: New-CsTeamsCallParkPolicy -Identity "CallParkPolicy1" -AllowCallPark $false
To grant the call park policy, use the Grant-CsTeamsCallParkPolicy PowerShell command.
Example: Grant-CsTeamsCallParkPolicy -PolicyName CallParkPolicy1 -Identity "Balu Ilag"
To modify the default setting of a call park policy, use the Set-CsTeamsCallParkPolicy command.
Example: Set-CsTeamsCallParkPolicy -Identity Global -AllowCallPark $true
Calling Policy
Calling policies are used to control what calling features are available to users in Teams. As a Teams admin you can use the Global (Org-wide default) policy and customize it or create one or more custom calling policies for users who have phone numbers in your organization. In Teams, calling policies assist admins to determine which calling and call forwarding features will be available to your users. These policies determine whether a user can make private calls, use call forwarding or simultaneous ringing to other users or external phone numbers, route calls to voicemail, send calls to call groups, use delegation for inbound and outbound calls, and many more options.
Creating a Custom Calling Policy
- 1.
Log in to Teams admin center and navigate to Voice. Select Calling Policy and then click + Add.
- 2.On the Calling Policy page, shown in Figure 2-87 turn on the features that you want available in your calling policy (note that all features are turned off by default).
 Figure 2-87
Creating a calling policy
For example, to control whether users can route inbound calls to voicemail, for the Voicemail Is Available For Routing Inbound Calls feature, select Always Enabled or User Controlled. To prevent routing to voicemail, select Always Disabled.
- 3.
Once all features are set up, click Save to commit the changes.
Assigning the Calling Policy to a User
- 1.
Log in to Teams admin center and navigate to Voice. Select Calling Policy and then select the policy name. Click Manage Users.
- 2.
On the Manage Users page, shown in Figure 2-88, search for the user’s name, select the user’s name, and then click Add.

Assigning a calling policy to a user
- 3.
Click Apply.
Calling Policy Settings
User Can Make Private Calls: This option controls all calling capabilities in Teams, so if you want to turn off all calling functionality in Teams, this option should be turned off.
Call Forwarding And Simultaneous Ringing To Other Users: This option allows incoming calls to be forwarded to other users or to ring another person at the same time.
Call Forwarding And Simultaneous Ringing To External Phone Numbers: This option allows incoming calls to be forwarded to an external number (or to ring an external number at the same time).
Make Voicemail Available For Routing Inbound Calls To Users: This option allows inbound calls to be sent to voicemail. There are three options within this setting: Always Enabled, Always Disabled, and User Controlled (the user decides if he or she wants this option to be active).
Inbound Calls Routing To Calls Groups: This option allows incoming calls to be forwarded to a call group.
Allow Delegation For Inbound And Outbound Calls: This option allows inbound calls to be routed to delegates, who can then make outbound calls on behalf of the users (for whom they have delegated permissions).
Prevent Toll Bypass And Send Calls Through The PSTN: This option allows calls to be sent through the PSTN and incur charges (rather than sending them through the network and bypassing the tolls).
Busy On Busy Is Available While In A Call: This option, which is used in Teams calling policies, determines how incoming calls are handled when the intended user is already in a call. For example, you can set this option to reject the incoming call with a busy signal. This option is disabled by default, but it can be enabled at the tenant level or at the user level [82].
Caller ID Policies
Caller ID policies are used to change or block the caller ID (also called a calling line ID) for users. By default, the user’s phone number is displayed when a call is made to a PSTN phone number such as a landline or mobile phone. You can use the Global (Org-wide default) policy and customize it or create a custom policy that provides an alternate number to display, or to block any number from being displayed.
Caller ID is set up by default so that when a Teams user calls a PSTN phone, his or her phone number is displayed. Likewise, the phone numbers of PSTN callers can be seen when they call a Teams user. A Teams admin can manage caller ID policies in the Microsoft Teams admin center in the Voice section, under Caller ID Policies. You can select the Global (Org-wide default) policy or create custom policies according to your organization preferences and then assign them to users. If you do not create a policy, the users within the organization will by default have the Global policy assigned.
Creating a Custom Caller ID Policy
- 1.
Log in to Teams admin center and navigate to Voice. Select Caller ID Policies and then click + Add.
- 2.On the New Caller ID Policy page, enter a policy name and description for the policy and then configure the following policy settings.
Block Incoming Caller ID
Override The Caller ID Policy
Replace The Caller ID With: Display the user’s number; set a service phone number to display as the caller ID or display the caller ID as anonymous.
Replace the Caller ID With This Service Number: Use this setting to replace the caller ID. This option is available when you select Service Number in the Replace Caller ID With field. Figure 2-89 shows these Caller ID settings.

Caller ID policy
- 3.
Once you are done configuring the caller ID settings, click Save.
Assigning a Custom Caller ID Policy to Users Through PowerShell
Policy Packages
Policy assignment is another important area that the Teams administrator has to work on. Microsoft made policy assignment a bit easier by providing policy packages. Policy packages allow Teams admins to control Teams features that they want to allow or restrict for specific sets of users across the organization.

Policy packages
Policy assignment to security groups though PowerShell is not available as this writing, but Microsoft will be adding the functionality for assigning a policy to a security group in the future.
Analytics & Reports
Teams reporting is very important because it will improve the overall Teams deployment experience in your environment and how users will use Teams. Teams reporting provides user-level reporting and live event usage reports in Teams admin center. The Analytics & Reports tab in Teams admin center allows you to understand how your users are using Microsoft Teams, which features they are using, and their usage levels, which is important information for admins because it allows you to prioritize though training and readiness efforts.
To implement Microsoft Teams in the organization effectively, it is essential that you as a Teams admin generate reports that display usage activity in Teams, including the number of active users and channels. The Teams usage report helps you to understand users’ adoption and verify how many users across your organization are using Teams to communicate and collaborate. Teams usage reports are available in the Microsoft Teams admin center. These reports provide usage information for teams, including the number of active users and channels, guests, and messages in each team [83].
Reports Available in Teams Admin Center Under Teams Usage Reports

Available reports in Teams admin center
Teams User Activity: This report provides information on one-to-one calls, messages that the user has posted in a team chat or in a private chat, and the last activity date of a user.
Teams Device Usage: This report gives information on whether users are using Windows, Mac, iOS, or Android devices to access the Teams app.
Teams Usage: This report offers information about active users, active users in teams and channels, active channels, messages, privacy setting of teams, and guests in a team.
Teams Live Event Usage: This report provides information on total views of a live event; starting time; the status of the event; which users had a role as organizer, presenter, and producer; the recording setting; and the production type.
- PSTN And SMS Usage: This report offers usage information on Calling Plans as well as Direct Routing.
Calling Plans: This includes information on time stamp, username, phone number, call type, called to and called from, duration of the call, number type, charge, domestic or international call, conference ID, and capability (license).
Direct Routing: This includes information on time stamp, display name, SIP address, phone number, called to and called from, duration of the call, invite time, time of the call start, duration, failure time, number type, media bypass, SBC FQDN, event type, Azure region, final SIP code, final Microsoft subcode, final SIP phrase, and correlation ID.
PSTN Blocked Users: This report offers details of display name, phone number, reason, the type of action, and the date and time of the action.
Accessing Teams Reports
Now that you have seen how important the information is that Teams reports provide, the logical question is how you access these reports. To access the Teams usage reports, you should have one of the following roles: Office 365 global admin, Teams Service admin, or Skype for Business admin. All of these reports are accessed via the Microsoft Teams admin center. Some of the most useful and accessed reports are covered next.
Teams Usage Reports
- 1.
Log in to Teams admin center, then navigate to Analytics & Reports. Select Usage Reports.
- 2.
On the Usage Reports page, click the View Reports tab. From the Report drop-down list, select Teams Usage.
- 3.
From the Date Range drop-down list, select the duration (current Teams usage reports are available only for 7 and 28 days). Once you select the date range, click Run report. Figure 2-91 shows the Teams usage report for the last seven days for Bloguc Organization.

Teams usage report

Teams and channel active users
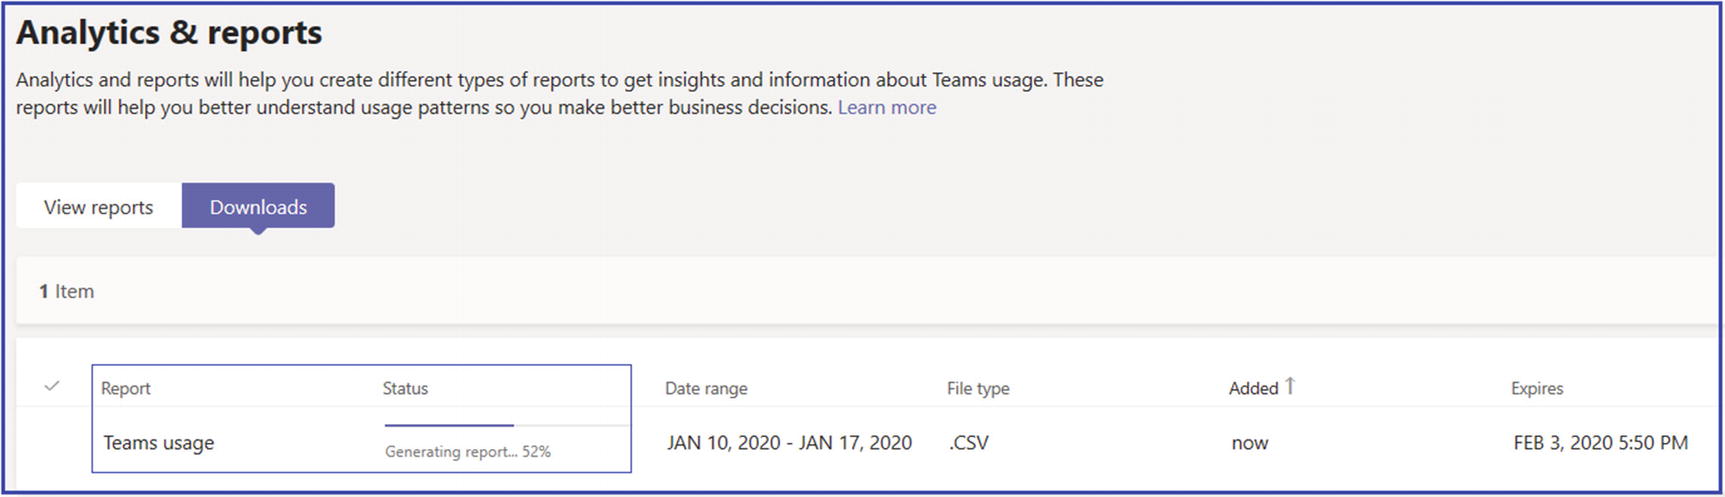
Exporting a report
Teams Reports Allow Customization Using Table Columns

Customizing Teams report columns
Active users is a measure of the number of unique users who perform an action in Teams during the specified date range.
Active channels measures the number of channels of a team in which users perform an action during the specified date range.
Teams User Activity Report
- 1.
Log in to Teams admin center and navigate to Analytics & Reports. Select Usage reports. On the View Reports tab, from the Report drop-down list, select Teams User Activity. Next, from the Date Range drop-down list, select a period of either Last 7 Days or Last 28 Days and then click Run Report (see Figure 2-96).

Teams user activity report
Every report has a date for when it was generated. The reports usually reflect a 24- to 48-hour latency from time of activity.
- 2.
You can filter what you see on the chart by clicking an item in the legend. For example, click 1:1 calls, Channel messages, or Chat messages to access only the information related to that metric. You can export the report to a .csv file for offline analysis. To do so, click Export to Excel, and then on the Downloads tab, click Download to download the report when it is available.
Teams Live Event Usage Reports
- 1.
Log in to Teams admin center, and navigate to Analytics & Reports. Select Usage Reports. On the View Reports tab, from the Report drop-down list, select Teams Live Event Usage.
- 2.
Select a predefined or custom date range. You can set a range to show data for up to a year, six months before and after the current date.
- 3.
(Optional) In the Organizer drop-down list, you can select to show only live events organized by a specific user.
- 4.
Click Run Report.

Teams live event report
The resulting table displays a breakdown of each live event (start time, organizer, producer, presenter, event status, and production type).
If you would like to see a summary of the details of a live event that lists all the files, including transcripts and recordings, associated with the event, you can do that on the Live Event Details page. If you would like to view or download the file, click the file name.
Teams Device Usage Reports
- 1.
Log in to Teams admin center, navigate to Analytics & Reports. Select Usage Reports. On the View Reports tab, from the Report drop-down list, select Teams Device Usage.
- 2.
Next select the date range, and then click Run Report. An example report is shown in Figure 2-98.

Teams device usage report
The resulting report gives you a breakdown of device usage by user (display name, what type of device was used [Windows, Mac, Android, iOS], period of last activity). You can export the report to a .csv file for offline analysis. Click Export to Excel, and then on the Downloads tab, click Download to download the report when it is ready.
Microsoft might add more analytics and reports in the future for per-team and usage scenarios.
Org-wide Settings

Teams org-wide settings
External Access
External access lets your Teams and Skype for Business users communicate with other users that are outside of your organization. By default, your organization can communicate with all external domains. If you add blocked domains, all other domains will be allowed but if you add allowed domains, all other domains will be blocked.
External access is a technique for external Teams users from a whole domain or tenant to find, call, chat, and set up meetings with your organization’s teams. It will be beneficial for users in your organization to use Teams to contact users outside of your organization domain. Also, Teams users can find and contact other organizations via external access. If you remember federation access in the Skype for Business (Lync) world, then this is the same federation access in Teams world.
External (federation) access always uses peer-to-peer sessions; it is not used for group chat or team or channel conversations.
For example, bob@microsoft.com and balu@bloguc.com are working together on a project, and their organizations’ other users are also working with each other using their individual Teams account through external access.
Both guest access and external access are used for Teams collaboration both within and outside of your organization. This external collaboration extends the boundaries of Teams to external organizations.
As an admin, you can enable external access for your organization. Before designing external access for your organization, however, understand the different options for setting up external access.
The first option is to enable external without any restriction (this was called Open federation in Skype for Business). This is the default setting and it lets people in your organization find, call, and send instant messages and chats, as well as set up meetings with people external to your organization. When you use this setting, your users can communicate with all external domains that are running Teams or Skype for Business and are using Open federation or have added your domain to their allowed list.
The second option allows you to add one or more domains to the allow list. To do this, click Add A Domain, enter the domain name, click Action to take on this domain, and then select Allowed. It is important to know that if you do this it will block all other domains.
The third option is adding one or more domains to the block list. To do this, click Add A Domain, enter the domain name, click Action to take on this domain, and then select Blocked. It is important to know that if you do this it will allow all other domains.
Enabling External Access in Teams
- 1.
To enable external access, log in to Teams admin center using the Teams service administrator role permission or global admin permission and navigate to Org-wide Settings.
- 2.
Under Org-wide Settings, select External Access and turn on or off external access for your organization.
- 3.
Once you turn on the option Users Can Communicate With Skype For Business And Teams Users, this switch will enable external communication with Skype for Business Online users and Teams users based on the domain allowed setting.
Enabling Skype For Business Users Can Communicate With Skype Users will enable Skype for Business Online users to communicate with consumer Skype users.

Allowing external (federation) access
Once you turn on the Users Can Communicate With Skype For Business And Teams Users option, the next thing you need to decide is how you want to control external access. For example, Bloguc Organization decides to allow specific domains and block all domains.
If you want to allow external access for all domains that are using Skype for Business Online and Teams, then turning on the Users Can Communicate With Skype For Business And Teams Users option under external access is enough, as shown in Figure 2-101.
However, if an organization wants to enable granular control by allowing specific domains for external access and blocking all other domains, Microsoft Teams does provide granular control through Teams admin center and Windows PowerShell. After you turn on external access you need to allow or block domains based on your organization’s requirements. As an admin you can allow specific domains, then add domains one by one. For example, Figure 2-101 shows that microsoft.com is allowed and all other domains are blocked.
Allowing Specific Domains and Block All Other Domains Using Teams Admin Center
- 1.Log in to Teams admin center and navigate Org-wide Settings. Select External Access and then click Add A Domain. In the Add A Domain box, enter the domain name. Figure 2-101 shows the microsoft.com domain typed. Select the Allowed option and then click Done.
 Figure 2-101
Allowing a specific external domain

Allowing and blocking specific domains
Guest Access
Microsoft Teams offers external collaboration through two methods: guest access and external access, also known as federation access. We already learned about external access in previous topic, so now we will cover guest access in detail.
Guest access permits teams in your organization to work together with users outside your organization by allowing them access to existing teams and channels on one or more of your tenants. Someone with an organization or consumer email account, such as Outlook, Hotmail, Gmail, or any other domain, can participate as a guest in Teams with full access to team chats, meetings, and files. Guest access is an org-wide setting in Teams admin center and is turned off by default. To allow guest access in Teams requires guest access in Teams, Azure AD, and Office 365 services. Before guest access is allowed and users add guests in their Teams, first you as an admin need to secure the environment so that guests will get specific access to what they need, not full access to everything.
The formal definition of guest access is access for users or individuals who do not have identity in your organization. For example, in the Bloguc.com Organization, a user added abc@microsoft.com to their team as a guest. That means a Microsoft user is added to Bloguc Organization as a guest. The guest organization (Microsoft) will control the authentication layer and Bloguc Organization controls the authorization layer that determines what the guest can access.
Don’t confuse external access and guest access. Guest access gives access permission to an individual. External access gives access permission to an entire domain. Guest access uses your existing licenses when using certain features. Teams doesn’t restrict the number of guests you can add. However, the total number of guests that can be added to your tenant is based on what your Azure AD licensing allows, typically five guests per Azure AD licensed user. External access allows you to communicate with users from other domains that are already using teams. Therefore, they need to provide their own licenses to use teams.
Adding Guest Users in Microsoft Teams
When a guest user wants access, he or she first needs to get invited through email or any other mechanism. Once the guest user accepts the invite, he or she gets added to Azure AD in the cloud only. Remember there is no on-premises data access. An invited guest account is not governed because there is no password to maintain. Guest authentication happens through its own tenant because it is federated with the Office 365 tenant.
Other than Azure AD tenants, user like Google (Gmail) can also get invited for guest access. Once they are accepted and sign in to Gmail, no secondary authentication is required. Office 365 gets federated to that organization. Pretty much everything that is based on Security Assertion Markup Language (SAML) or Web Service (Ws)-federated, is permitted to have guest access in Teams. Guest authentication is therefore managed by the guest’s own organization tenant and access is governed done by Teams, where the users gets specific access as a guest user.
Enabling and Managing Guest Access in Teams
As an admin, you can add guests in your tenant, and you can manage their access as well. As a security and Teams administrator, you have the capability to disable or enable guest access for Teams using the Teams admin portal and Windows PowerShell with Teams service administrator role permission or global admin permission.
You can add guests at the tenant level, set and manage guest user policies and permissions, and view reports on guest user activity. These controls are available through the Microsoft Teams admin center. Guest user content and activities are under the same compliance and auditing protection as the rest of Office 365.
Even if you activate guest access in Teams you have to make sure that guest access is enabled in Azure AD and SharePoint as well.
Azure AD: Guest access in Microsoft Teams depends on the Azure AD business-to-business (B2B) platform. This authorization level controls the guest experience at the directory, tenant, and application level.
Office 365 Groups: This controls the guest experience in Office 365 Groups and Microsoft Teams.
Microsoft Teams: This controls the guest experience in Microsoft Teams only.
SharePoint Online and OneDrive for Business: This controls the guest experience in SharePoint Online, OneDrive for Business, Office 365 Groups, and Microsoft Teams.
An admin has flexibility to set up guest access for organization tenant. For example, if you don’t want to allow guest users in Microsoft Teams but want to allow them in general in your organization, such as for SharePoint or OneDrive for Business, just turn off guest access in Microsoft Teams. In another scenario, you could enable guest access at the Azure AD, Teams, and Groups levels, but then disable the adding of guest users on selected teams that match one or more measures, such as a data classification of confidential. SharePoint Online and OneDrive for Business have their own guest access settings that do not rely on Office 365 Groups.
Theoretically a guest user is a new user object in your Azure AD tenant. On the first line, you can allow or restrict the creation of new guest objects in your tenant and then you can control whether guest access is allowed or if there are additional dependencies to access different locations, such as Teams, Office 365 Groups, and SharePoint.
- 1.
To enable guest access in Teams, log in to Teams admin center and then navigate to Org-wide Settings.
- 2.
Select Guest Access. Set the Allow Guest Access In Microsoft Teams option to On for your tenant organization, as shown in Figure 2-103.

Enabling guest access
- 3.Under Calling and Meeting, and Messaging, set functionalities depending on the capabilities you want to allow for guest users.
Make Private Calls: Turn this setting on to allow guests to make peer-to-peer calls.
Allow IP Video: Turn this setting on to allow guests to use video in their calls and meetings.
- Screen Sharing Mode: This setting controls the availability of screen sharing for guest users.
Set this setting to Disabled to remove the ability of guests to share their screens in Teams.
Set this setting to Single Application to allow sharing of individual applications.
Set this setting to Entire Screen to allow complete screen sharing.
- Allow Meet Now: Turn this setting on to allow guests to use the Meet Now feature in Microsoft Teams. Figure 2-104 shows the available calling and meeting settings.
 Figure 2-104
Guest access for calling and meetings
Edit Sent Messages: Turn this setting on to allow guests to edit messages they previously sent.
Delete Sent Messages: Turn this setting on to allow guests to delete messages they previously sent.
Chat: Turn this setting on to give guests the ability to use chat in Teams.
Use Giphys In Conversations: Turn this setting on to allow guests to use Giphys in conversations. Giphy is an online database and search engine that allows users to search for and share animated GIF files. Each Giphy is assigned a content rating.
- Giphy Content Rating: Select a rating from the drop-down list:
Allow All Content: Guests will be able to insert all Giphys in chats, regardless of the content rating.
Moderate: Guests will be able to insert Giphys in chats but will be moderately restricted from adult content.
Strict: Guests will be able to insert Giphys in chats but will be restricted from inserting adult content.
Use Memes In Conversations: Turn this setting on to allow guests to use memes in conversations.
- Use Stickers In Conversations: Turn this setting on to allow guests to use stickers in conversations. Figure 2-105 displays all available messaging settings.
 Figure 2-105
Guest messaging settings
- 4.
Once you set all options, click Save to commit the changes.
Any guest access setting changes could take 2 to 24 hours to take effect, so be patient when you modify any org-wide settings.
You can also use Windows PowerShell commands to set up guest access in Teams. Remember, for Teams settings, you have to use the Skype for Business Online PowerShell module with Teams service admin or global admin permission. The most used and useful command for guest access is Set-CsTeamsClientConfiguration.
If you want to limit guest user capabilities in a subset of teams, you can use the Microsoft Teams PowerShell module and the Set-Team command. This lets you configure the same limitations as the Teams admin center but instead of restricting it for all teams, you can focus on a single team. This can be useful if you need to create a team for your external consultants to exchange information without disrupting the existing structure.
Teams Settings
Teams settings allow you set up your teams for features such as email integration, cloud storage options, and device setup. When you make changes to the Teams settings, they will be applied to all the teams within your organization.
You can enable and manage different organization-wide Teams settings including notifications and feeds, email integration, files, organization, devices, and directory search (search by name). Let’s understand each setting in detail.
Notification and Feeds
- 1.
Log in to Teams admin center and then navigate to Org-wide Settings. Select Teams Settings.
- 2.
Under Notification And Feeds, turn on the Suggested Feeds Can Appear In A User’s Activity Feed option, as shown in Figure 2-106.
- 3.
Once you have made the required changes, click Save to commit the changes.

Notifications and feeds
Email Integration
Email integration is one of the most popular integration features among users. You as a Teams admin can use Teams admin center to configure email integration. This is very useful when you are integrating Teams into existing messaging workflows to provide information through email to team members. It is possible to retrieve email addresses for any individual channel within a team. Messages sent to these email addresses are then posted as conversation messages to the conversations of the channel, and other members can download the original message or add comments to the messages content.
Remember, the maximum message length for Teams messages is 24 KB, which can be reached very quickly when creating an email. Therefore, if you just want to post basic information into a channel, you should use a text-only email. Otherwise, only the very first part of the email is displayed as a team’s conversation, and all team members who want to read the message must download and open it using an electronic mail (EML) format. EML files can contain plain ASCII text for the headers and the main message body as well as hyperlinks and attachments.
Getting an Email Address for a Channel

Retrieving the email address of a channel
The format of these channel email addresses makes them difficult to recognize because they appear similar to this demo address: ChannelName - TeamName < UniqueID.TenantName .onmicrosoft.com@amer.teams.ms>. For example, demo channel email address, Demo1 - Demo Team fb181c9a.bloguc.com@amer.teams.ms.
For ease of management, team owners and users can remove the email address, or they can modify advanced settings to restrict message delivery to team members and certain domains only.
When an email is sent to the channel’s email address, the email is stored as an EML file in the folder Email Messages in the channel’s document library. All participants of a channel can download the files and open them in their preferred viewer for EML files.
Enabling and Managing Email Integration
- 1.
Log in to Teams admin center and then navigate to Org-wide Settings. Select Teams Settings.
- 2.
Under Email Integration, turn on the Allow Users To Send Emails To A Channel Email Address option.
- 3.
Add the SMTP domains from which channel emails will be accepted. Once you have made the required changes, click Save to commit the changes. As an example, Figure 2-108 shows the bloguc1.com and bloguc2.com SMTP domains added to accept the channel emails.

Email integration
Best Practices for Email Integration
Channel email addresses are lengthy and contain the Teams domain, which make them difficult to remember. It is best practice for users to create contact objects for the channel addresses, or for Exchange administrators to create mail contacts that provide an easily recognized mail address in their own organization custom domain. For example, bloguc.com, for my Demo Team, has few channels. One channel named Demo1 in the team Demo Team has the email address Demo1 - Demo Team fb181c9a.bloguc.com@amer.teams.ms.
When you create a mail contact with the alias demo1-team@bloguc.com and set its external email address to 123ab345.1.bloguc.onmicrosoft.com@amer.teams.ms, all email sent from internal users to the preceding email address will be forwarded to the team’s channel.
Files: You as an admin can turn on or turn off file sharing and cloud file storage options on the Files tab in Teams. Teams supports four types of file stores and a sharing option. The details of each option are as follows.
Citrix Files: Files controls the availability of Citrix files as a third-party storage provider in Teams. As an admin, you want to restrict the use of third-party storage providers on the tenant level in Teams to all, some, or no other providers. This can be required if storage providers with storage locations outside of Europe are not allowed in your organization.
DropBox: This controls the availability of DropBox as a third-party storage provider in Teams. As an admin you want to restrict the use of third-party storage providers on the tenant level in Teams to all, some, or no other providers. This can be required if storage providers with storage locations outside of Europe are not allowed in your organization.
Box: This controls the availability of Box files as a third-party storage provider in Teams. As an admin you want to restrict the use of third-party storage providers on the tenant level in Teams to all, some, or no other providers. This can be required if storage providers with storage locations outside of Europe are not allowed in your organization.
Google Drive: This controls the availability of Google Drive as a third-party storage provider in Teams. As an admin you want to restrict the use of third-party storage providers on the tenant level in Teams to all, some, or no other providers. This can be required if storage providers with storage locations outside of Europe are not allowed in your organization.
Enabling and Managing File Sharing and Cloud File Storage
- 1.
Log in to Teams admin center and then navigate to Org-wide Settings. Select Teams Settings.
- 2.
Under Files, turn on or off the options for Citrix files, DropBox, Box, and Google Drive.
- 3.
Once you have made the required changes, click Save to commit the changes. As an example, Figure 2-109 shows that Bloguc Organization allows all four types of file storage.
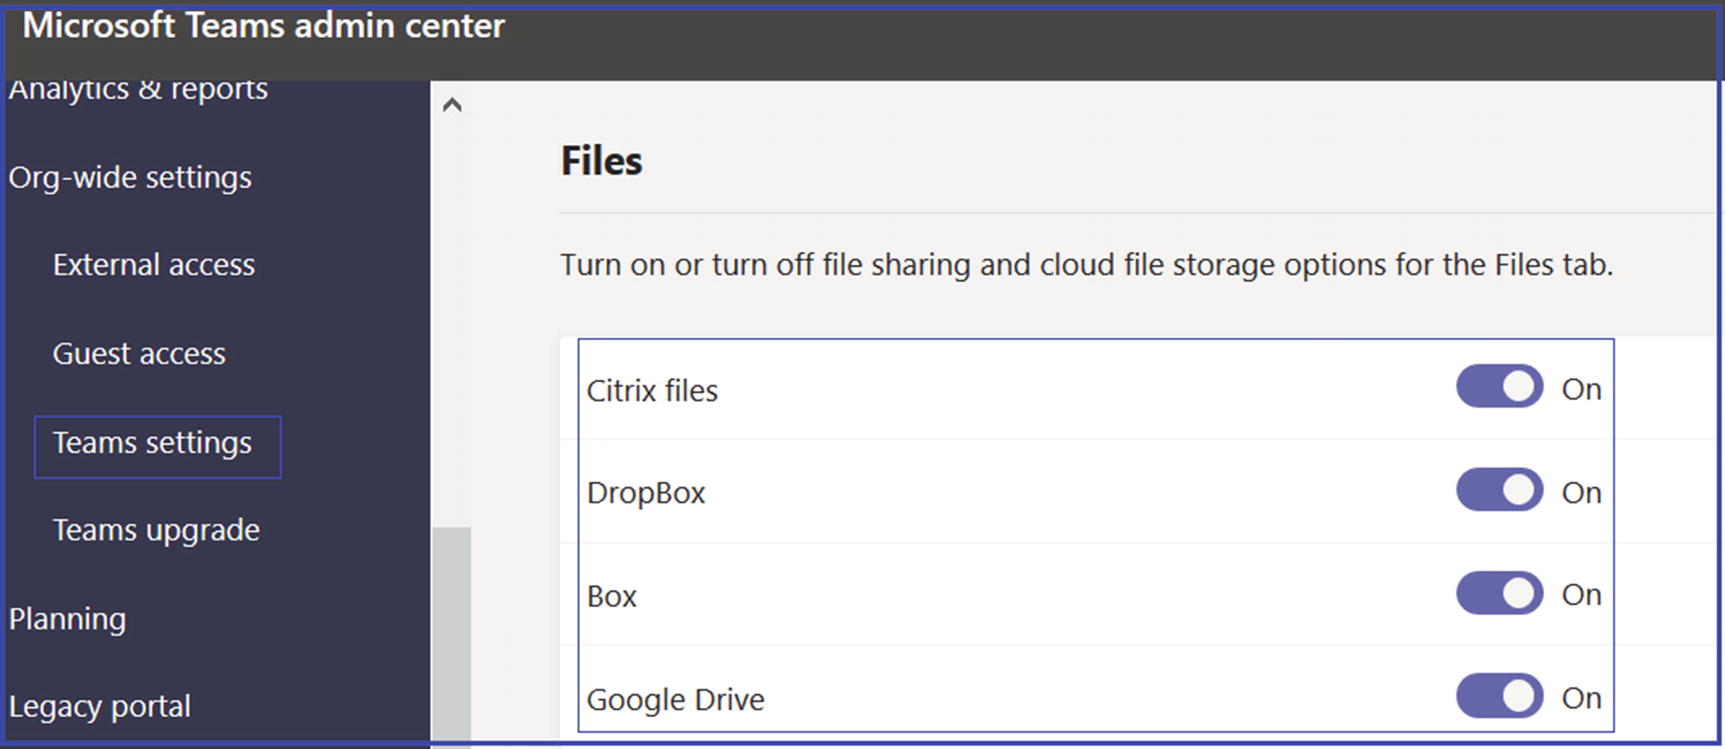
Teams settings for files
Organization
- 1.
Log in to Teams admin center and then navigate to Org-wide Settings. Select Teams Settings.
- 2.
Under Organization, turn on the Show Organization Tab In Chats option.
- 3.
Once you have made the required changes, click Save to commit the changes. The example in Figure 2-110 shows that Bloguc Organization allows the Organization tab to be displayed in chat.

Teams settings organization
Devices
Require A Secondary Form Of Authentication To Access Meeting Content: This setting controls whether users must provide a second form of authentication before entering a meeting. This setting is especially useful when using Surface hub devices, where users can possibly join a meeting with the identity of a different user who is already logged on. You want this setting to provide an additional security verification before users can access possibly sensitive content. This is especially helpful when using shared devices, such as Surface hubs, where users often forget to sign off after using a device.
Set Content PIN: This setting requires users to enter a PIN before accessing documents from a team. This also is a useful setting for multiuser devices, where users could access the session of a different user who was already logged on. You want to protect access to possibly sensitive content on shared devices, similar to the secondary security verification.
Resource Accounts Can Send Messages: This setting allows resource accounts to send messages to participants. You want to allow automatic messages by resources, or you might to restrict communication of these accounts. This setting can be helpful when configuring workflows for resources.
- 1.
Log in to Teams admin center and then navigate to Org-wide Settings. Select Teams Settings.
- 2.Under Devices, select the following settings.
- a.
Require A Secondary Form Of Authentication To Access Meeting Content: Full Access
- b.
Set Content PIN: Required For Outside Scheduled Meetings
- c.
Resource Accounts Can Send Messages: Select On or Off
- a.
- 3.
Once you have made the required changes, click Save to commit the changes. As an example, Figure 2-111 shows the Bloguc Organization devices settings.

Teams settings for devices
Search by Name
Using Microsoft Teams scope directory search, you as an admin can create virtual boundaries that control how users communicate with each other within the organization. Microsoft Teams provides custom views of the directory to the organization users. Most important, the Information Barrier policies support these custom views. Once the policies have been enabled, the results returned by searches for other users (e.g., to initiate a chat or to add members to a team) will be scoped according to the configured policies.
Users will not be able to search or discover teams when scope search is in effect. Note that in the case of Exchange hybrid environments, this feature will only work with Exchange Online mailboxes (not with on-premises mailboxes).
- 1.
Log in to Teams admin center and then navigate to Org-wide settings. Select Teams Settings.
- 2.
Under Search By Name turn on the Scope Directory Search Using An Exchange Address Book Policy option.
- 3.
Once you have made the required changes, click Save to commit the changes. The example shown in Figure 2-112 shows that the Bloguc Organization has enabled the scope directory search using an Exchange address book.

Teams setting a directory search by name
If it was not already turned on, you can turn on the scope directory search, as a prerequisite to using Information Barrier.
Remember, after enabling scope directory search, before you can set up or define Information Barrier policies you need to wait at least 24 hours.
Teams Upgrade
The Microsoft Teams upgrade organization-wide settings allow Teams admins to set up the upgrade experience from Skype for Business to Microsoft Teams for their organization users. As an admin, you can use the default settings or make changes to the coexistence mode and app preferences to fit your organizational needs. Migrating or moving from Skype for Business (on-premises) to Teams is more than a practical migration. Basically, this move signifies a change in how users communicate and collaborate, and change is not always easy. The perfect upgrade method should address the technical aspects of your upgrade as well as encourage user acceptance and adoption of Teams, driving a positive user experience and business outcome understanding.
For comprehensive migration and upgrade details, refer to Chapter 6. The material here is simply an overview of Teams upgrade settings.

Teams upgrade settings
- 1.
Islands mode: In the Islands upgrade coexistence mode for Teams, every client will use both Skype for Business and Microsoft Teams operating side by side. The Skype for Business client talks to Skype for Business, and the Microsoft Teams client talks to Teams. Users are always expected to run both clients and can communicate natively in the client from which the communication was initiated.
- 2.
Skype for Business Only mode: Using this Teams upgrade coexistence mode, users continue using Skype for Business as they are and there are no Teams capabilities, allowed such as chat, meeting, and calling capabilities. They do not use Teams for teams and channels. This mode can be used prior to starting a managed deployment of Teams to prevent users from starting to use Teams ahead of their readiness. This can also be used to enable authenticated participation in Teams meetings for Skype for Business users, if the users are licensed for Microsoft Teams.
- 3.
Skype for Business with Teams collaboration (SfBWithTeamsCollab) mode: In this upgrade mode, Skype for Business continues to support chat, calling, and meeting capabilities, and Microsoft Teams is used for collaboration capabilities such as teams and channels, access to files in Office 365, and added applications. Teams communications capabilities, including private chat, calling, and scheduling meetings, are off by default in this mode. This mode is a valid first step for organizations still relying on Skype for Business that want to provide a first insight into the collaboration capabilities of Teams for their users.
- 4.
Skype for Business with Teams collaboration and meetings (SfBWithTeamsCollabAndMeetings) mode: In this mode, private chat and calling remain on Skype for Business. Users will use Teams to schedule and conduct their meetings along with team- and channel-based conversations in this mode. This mode is as also known as Meetings First mode. This coexistence mode is especially useful for organizations with Skype for Business on-premises deployments with Enterprise Voice, who are likely to take some time to upgrade to Teams and want to benefit from the superior Teams meetings capabilities as soon as possible.
- 5.
Teams Only: In this mode, a Teams Only user (also called an upgraded user) has access to all the capabilities of Teams. They might retain the Skype for Business client to join meetings on Skype for Business that have been organized by nonupgraded users or external parties. An upgraded user can continue to communicate with other users in the organization who are still using Skype for Business by using the interoperability capabilities between Teams and Skype for Business (if these Skype for Business users are not in Islands mode). However, an upgraded user cannot initiate a Skype for Business chat, call, or meeting. As soon as your organization is ready for some or all users to use Teams as their only communications and collaboration tool, you can upgrade those users to Teams Only mode [43].
Even if the Skype for Business Only mode is meant to have the collaboration features of Teams disabled, in the current implementation, teams and channels are not automatically turned off for the user. This can be achieved by using the App Permissions policy to hide teams and channels.
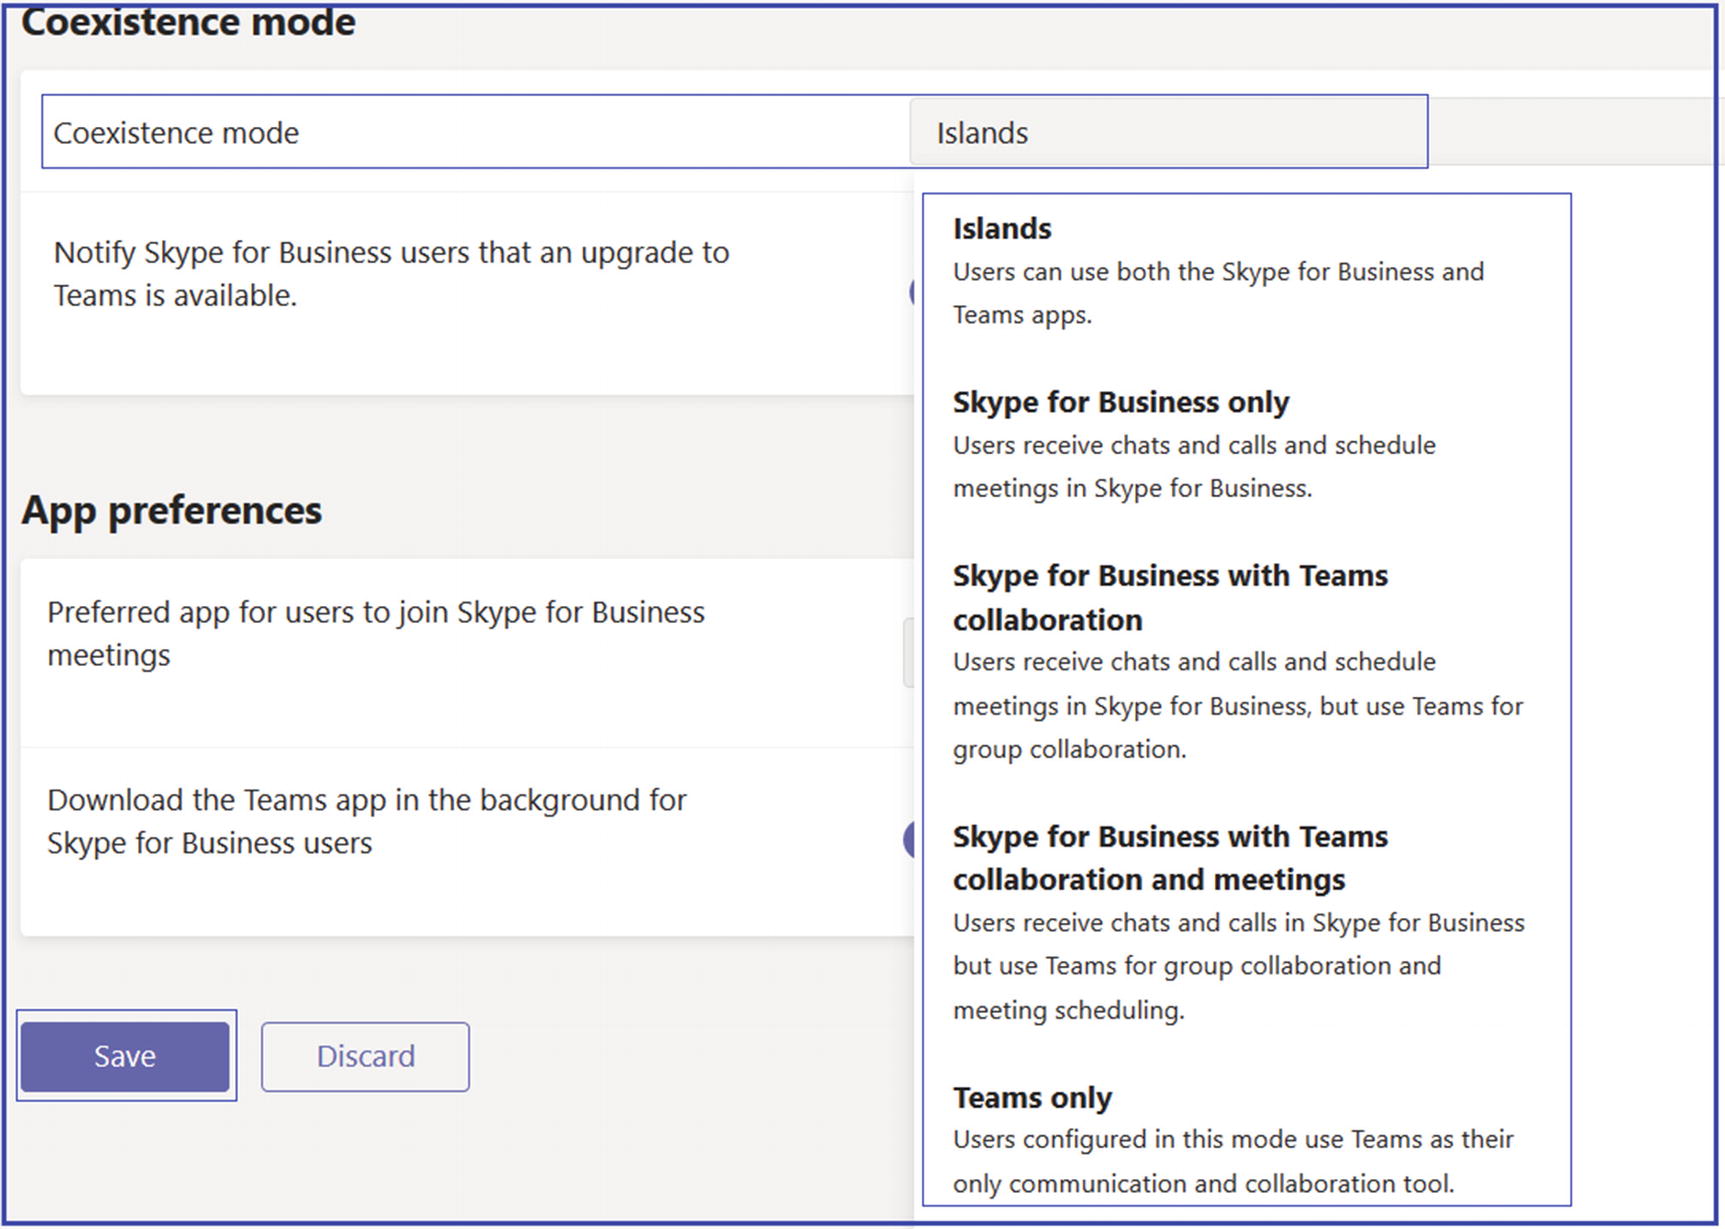
Teams coexistence modes
Setting Teams Upgrade Mode
Before enabling Teams upgrade mode for users, you as an admin must undertake extensive planning and preparation, including readiness of network infrastructure to allow Teams media traffic, setup of your firewall to allow Teams traffic seamlessly, Teams client deployment, and adoption. Once you are ready for the changeover from Skype for Business to Teams, you will need to choose the appropriate upgrade path and coexistence modes for a smooth transition to Microsoft Teams in your organization.
You can use the same coexistence mode for all the users and upgrade to Microsoft Teams all at once, or you can do the migration by region, site, or group by configuring different coexistence modes for different groups of users.
- 1.
Log in to Microsoft Teams admin center, and then navigate to Org-wide Settings. Select Teams Upgrade.
- 2.On the Teams upgrade page, from the Coexistence mode options, select one of the following options for your organization users:
Islands
Skype For Business Only
Skype For Business With Teams Collaboration
Skype For Business With Teams Collaboration and Meetings
Teams Only
- 3.
Under Coexistence Mode, you can enable the Notify Skype For Business Users That An Upgrade To Teams Is Available without selecting Teams Only mode.
- 4.Then under App Preferences, you can select the preferred app for users to join Skype for Business meetings. I would recommend using the Skype meeting app for seamless joining.
Skype Meetings App
Skype For Business
- 5.
Turn on the Download The Teams App In The Background For Skype For Business Users, which will download the Teams app on their machine.
- 6.
Click Save to save the changes. Figure 2-115 shows all options enabled for the demo tenant.

Teams upgrade options
Microsoft has announced that all new Office 365 tenants are onboarded directly to Microsoft Teams for chat, meetings, and calling. Therefore, you will not see the options to select a coexistence mode if you have a newly provisioned tenant.
Setting Upgrade Options for an Individual User Using Teams Admin Center
- 1.
Log in to Microsoft Teams admin center and then navigate to and select Users. Locate the user for whom you would like to set the upgrade options. For this example, I have selected Chanda Ilag as the user to whom to assign a coexistence mode.
- 2.
On the user page, on the Account tab, under Teams Upgrade, click Edit.
- 3.In the Teams Upgrade window, select one of the following options for the selected user:
Use Org-wide Settings
Islands
Skype For Business Only
Skype For Business With Teams collaboration
Skype For Business With Teams collaboration And Meetings
Teams Only
- 4.
At the end, click Apply. The example in Figure 2-116 shows Teams Only assigned to user Chanda Ilag.

Assign a Teams upgrade mode
If you select any coexistence mode (except Use Org-wide Settings), you will have the option to enable notifications in the user’s Skype for Business app, which will inform the user that the upgrade to Teams is coming soon. Enabling this for the user is done by turning on the Notify The Skype For Business User option.
Selecting Teams Upgrade Mode Using PowerShell
Planning
As a Teams admin, you need to ensure your existing environment is ready for handling the Teams workload and added media traffic before deploying Microsoft Teams in a production environment. You should check that the existing network infrastructure of an organization will meet the requirements needed for Teams collaboration and real-time communication.
In this topic you will study how to use Teams Advisor and plan for Teams deployment. When planning the implementation of Microsoft Teams within your network, you must ensure that there is sufficient bandwidth, accessibility to all required IP addresses, correct configuration of ports, satisfied performance requirements for real-time media.
Advisor for Teams
Microsoft Teams has a new onboarding tool that helps you with Teams deployment in your organization, called Advisor for Teams . This tool was previewed earlier and now it is available to use. Advisor for Teams is a new tool that helps to bring your project team together and it allows you to plan a successful Teams deployment for your organization. Advisor for Teams provides recommended plans and a collaboration space for the deployment team to streamline the rollout of all the Teams workloads, including messaging, meetings, and calling workloads.
What Advisor for Teams Can Do
There are multiple things that Advisor for Teams can provide, and here we cover a few of the them. Customers can select what workload they want to roll out and who they are rolling it out with. A tenant readiness assessment is provided based on common friction points that FastTrack has helped customers solve. Teams is created with the project team and populated with success resources to get started quickly.
Using Advisor for Teams

Deploying workloads

Two workloads are shown
On the Users tab, you add users who can execute the deployment tasks.

Advisor for Teams assessment
Advisor also gives recommended plans—basically step-by-step guidance—of how to best deploy this workload in Teams. This workload detail looks familiar, as it is actually coming from a planner. This is the plan that Microsoft Teams creates for the deployment team with all the details about how to deploy these workloads in Microsoft Teams.
On the Advisor for Teams main screen, you can see the deployment status as well. Advisor for Teams can open in your Teams and shows both the channels. Clicking on the individual channel and Planner tab, you can see all the tasks for that workload. Because it is a shared workspace for deployment Teams, all the members can update the tasks.
Before starting Teams deployment, you must add all the project team members who are going to execute deployment tasks. Adding a member is very easy; you can open the deployment team in Teams and add multiple members who are going to execute tasks.
Network Planner
Network planner helps you to determine and organize network requirements for connecting people who use Teams across your organization in a few steps. By providing your networking details and Teams usage, you get calculations and the network requirements you need when deploying Teams and cloud voice across organizational physical locations.
Using Network planner, an admin can create representations of the organization using sites and Microsoft-recommended personas (office workers, remote workers, and Teams room system devices) and then generate reports and calculate bandwidth requirements for Teams usage.
To use Network planner, you must have global administrator, teams admin, or teams communication administrator role permission.

Network planner
When you click Add, it will allow you to create a Network planner name. By default, there will be three user personas, but you can add custom persons on the Network planner page. Click the Users tab and then on the Add Persona page, provide the persona name and description. In the Permissions section, select from the following services: Audio, Video, Screen Sharing, File Sharing, Conference Audio, Conference Video, Conference Screen Sharing, and PSTN.
Building a Network Planner Plan
- 1.
Log in to Microsoft Teams admin center and then navigate to Planning and select Network Planner.
- 2.
On the Network Planner page, under Network Plans, click Add, as shown in Figure 2-120.
- 3.
On the Network Plan name page, enter the name for the network plan (e.g., Bloguc BW Planning 2020 in Figure 2-121), an optional description, and click Apply.
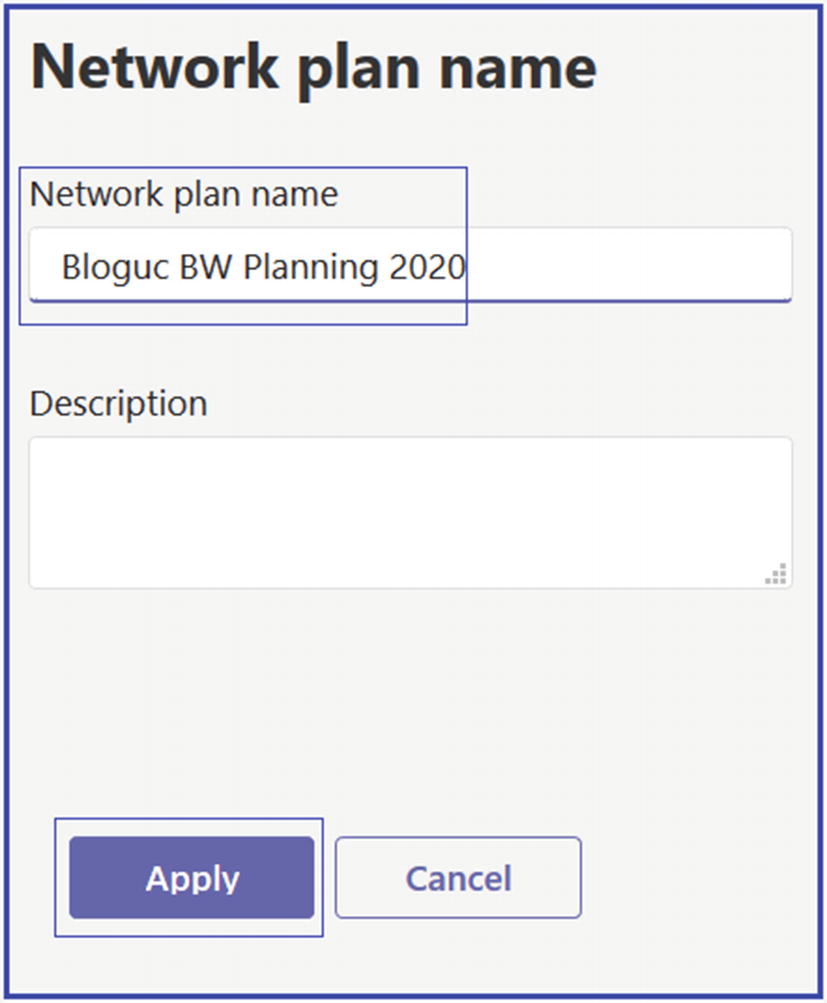
Assigning a network plan name
- 4.The newly created network plan will appear in the Network Plans section. Select the plan you created. On the plan page, in the Network Sites section, select Add A Network Site. On the Add A Network Site page, enter the following information:
Name of the network site
Network site address
Network settings: IP address subnet and network range
Express route or WAN connection
Internet egress
Internet link capacity
PSTN egress (VoIP only or local)
An optional description.
- 5.
Once you enter all details, as shown in Figure 2-122, click Save to commit the changes.

Adding a network site and subnet
Creating a Report
- 1.
Log in to Microsoft Teams admin center. Navigate to Planning and then select Network Planner.
- 2.
On the Network Planner page, under Network Plans, select your network plan (for this example, Bloguc BW Planning 2020).
- 3.
On the plan page, select Report, and then click Add Report. On the Add Report page, enter the report name, and in the Calculation section, choose the type of persona, such as Office Worker or Remote Worker, and the number of users for each persona.
- 4.
Click Generate Report, as shown in Figure 2-123.

Generating a report
- 5.
On the report page, review the report, including type of service, and required bandwidth for different services, such as audio, video, screenshare, Office 365 server traffic, and PSTN. Figure 2-124 shows the network planner report.

Network planner report
Legacy Portal
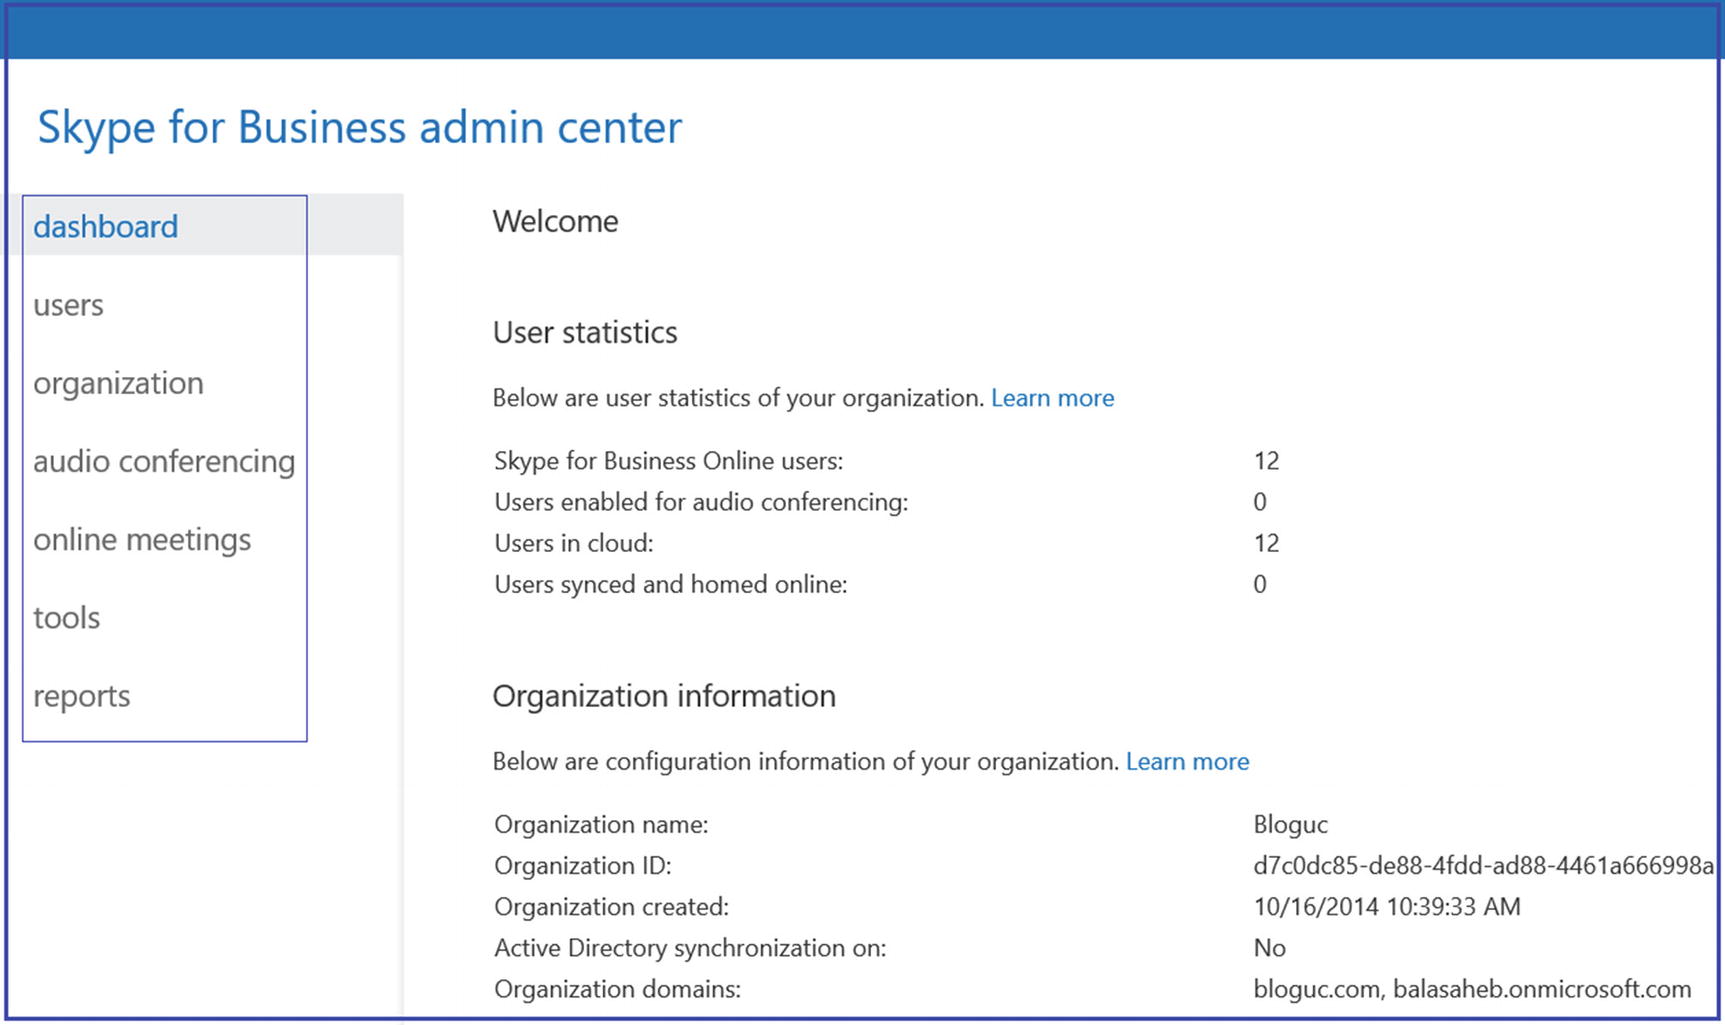
Legacy Skype for Business admin center
Call Quality Dashboard
Call Quality Dashboard (CQD) provides an overall view for analyzing Teams call quality. It supports Teams admin and network engineers in troubleshooting call quality problems with specific calls, and helps them optimize a network. The users’ individual call details are not visible in CQD, but the overall quality of calls made using Teams is captured. Another important use of CQD is to assess details on the audio and video call quality users are getting using Teams. It provides reports of call quality metrics that give you insights into overall call quality, server–client and client–client streams, and voice quality service-level agreements.
Using Call Quality Dashboard
First will always be considered Teams Cloud service because the Teams purely cloud-based service means their server endpoints include Audio Video Multi-Control Unit (AV MCU), Mediation Server, transport relay, and so on. If a Teams service is involved in the stream or call, consider it as first.
Second will always be a client endpoint unless the stream is between two server endpoints.
If both endpoints are the same type, such as client–client, the order for which is first or second is based on the internal ordering of the user agent category. This ensures the ordering is consistent.
The first and second classification is separate from which endpoint is the caller or the person being called. The First Is Caller dimension can be used to help identify which endpoint was the caller or the person being called.
Accessing the Call Quality Dashboard
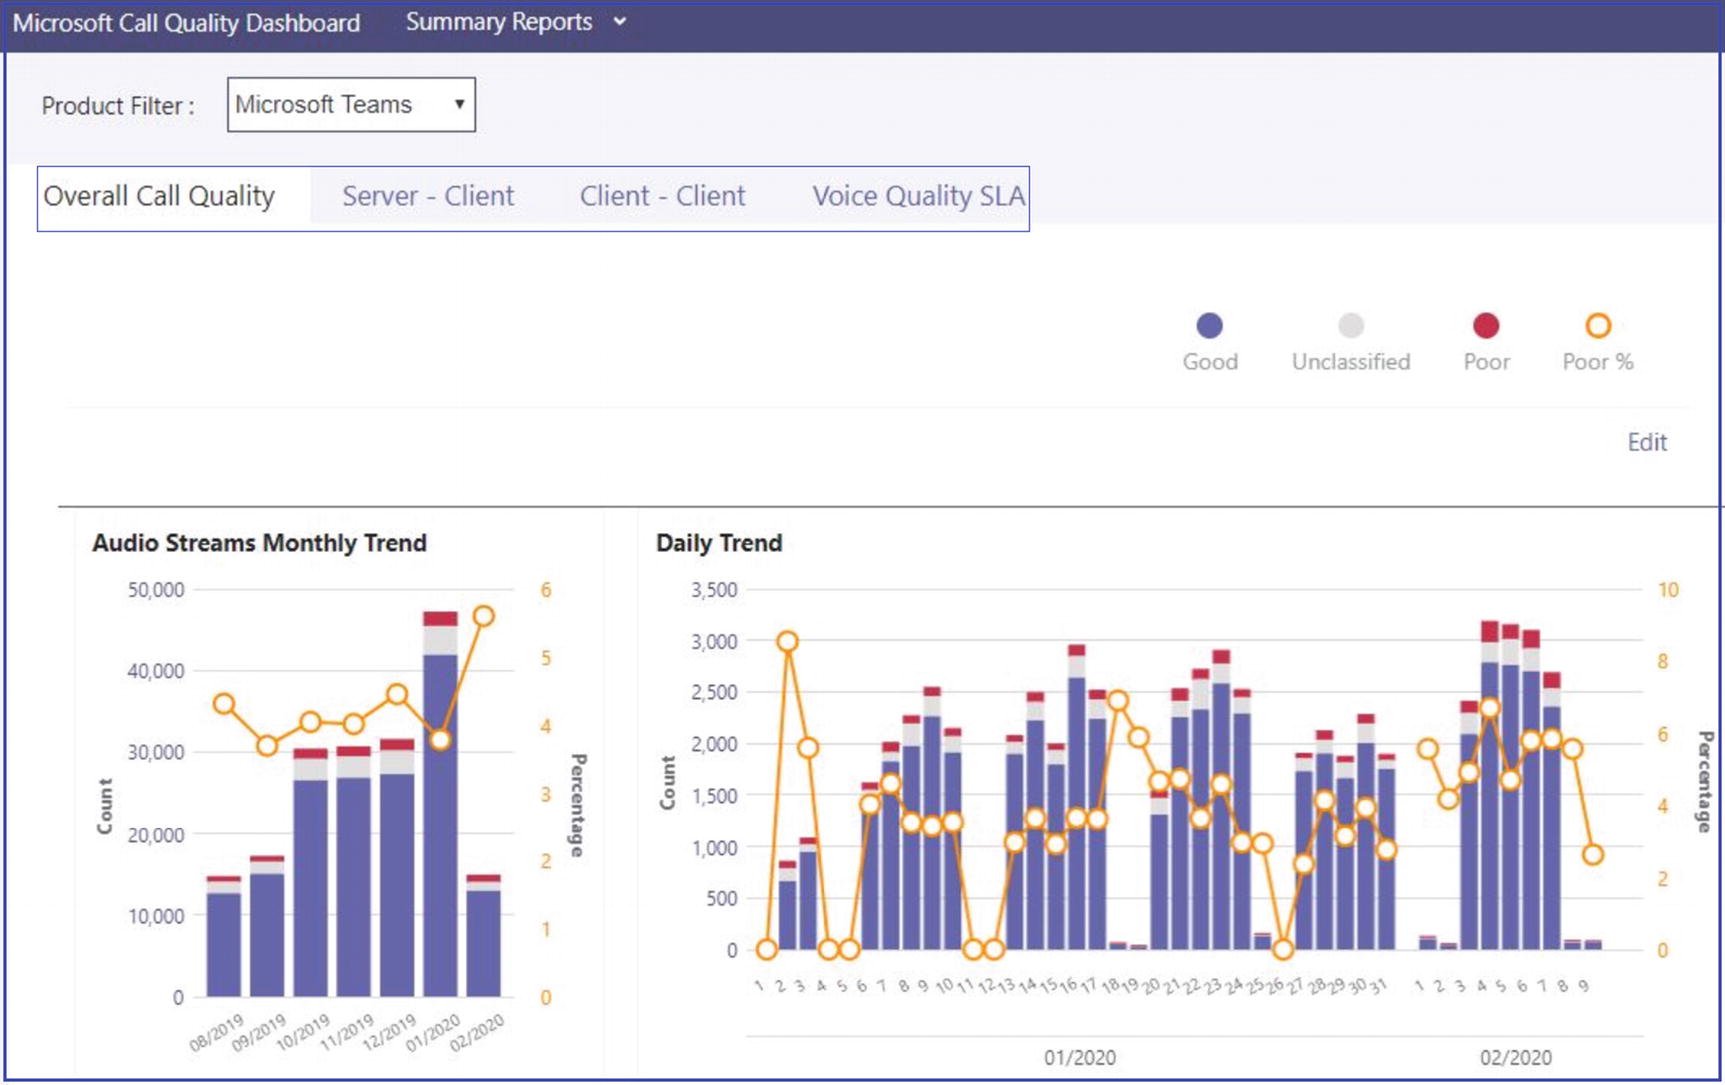
Call Quality Dashboard
You can see the CQD by directly browsing the URL at https://cqd.teams.microsoft.com/spd/#/Dashboard.
Displaying the List of Call Quality Reports

Summary Reports tab
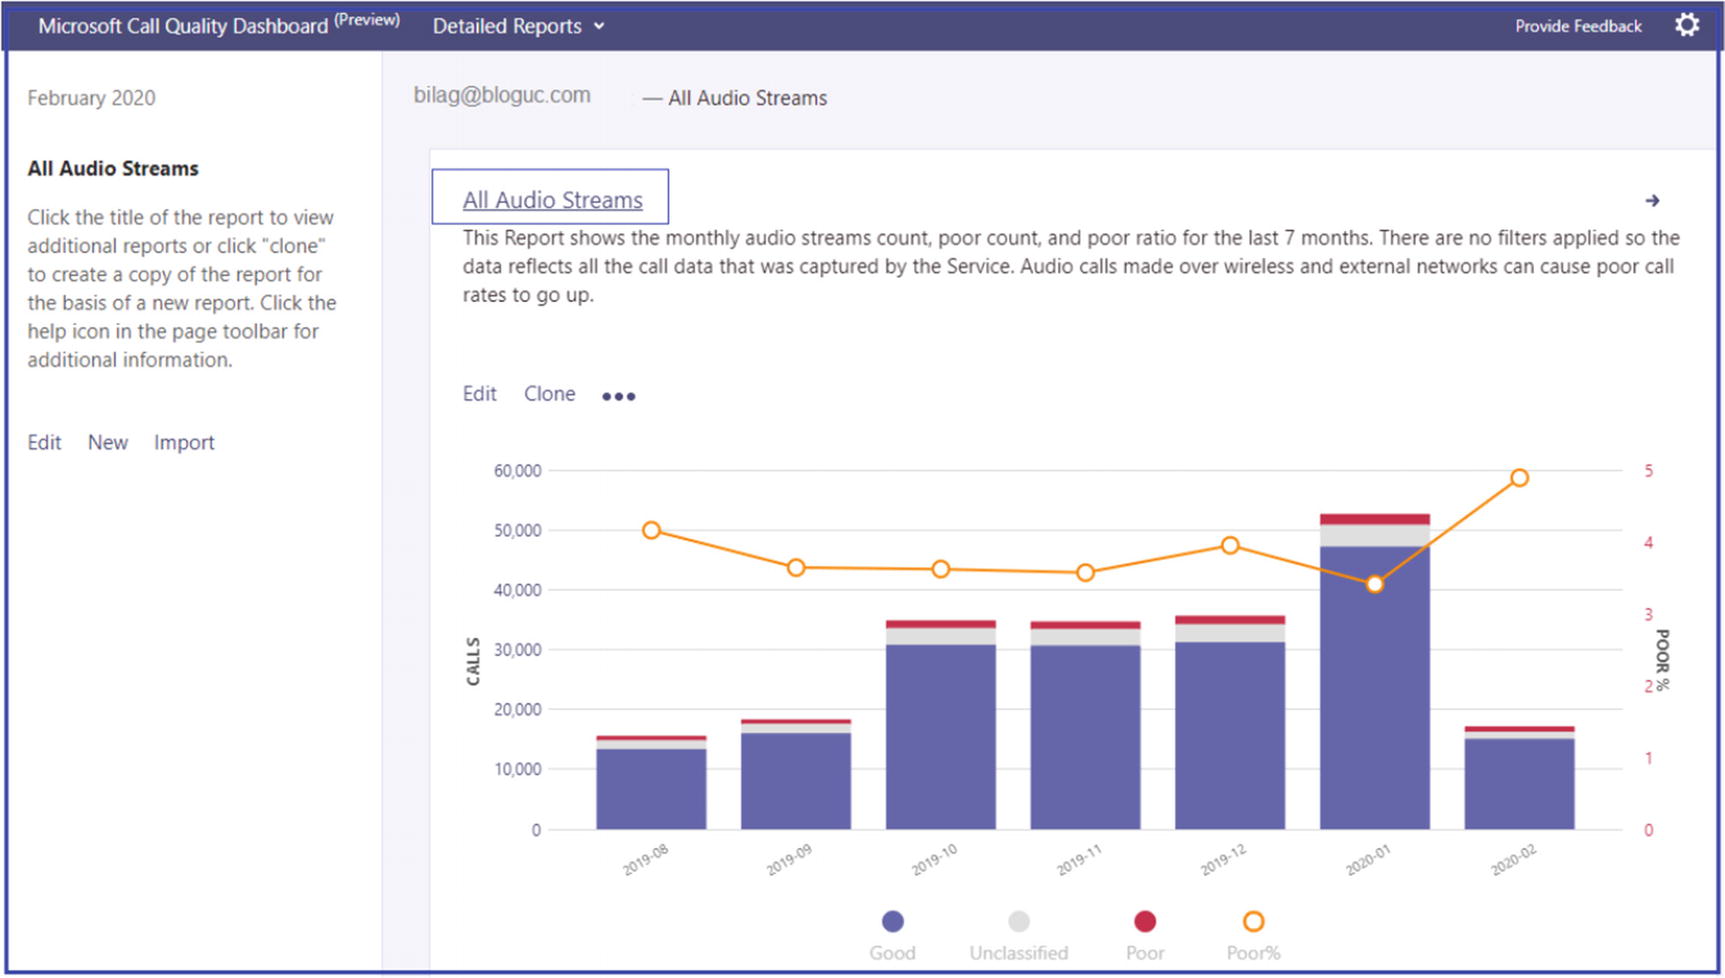
Detailed report for all audio streams
Click the title of the report to view additional reports or click Clone to create a copy of the report to use as the basis of a new report. For help, click the help icon on the page toolbar for additional information.
The All Audio Streams report in Figure 2-128 shows the monthly audio streams count ratio of and audio for the last seven months. There are no filters applied so the data reflect all the call data captured by the Teams Service. Audio calls made over wireless and external networks can cause poor call rates to go up.
Microsoft Azure Active Directory Center
In this section you will learn about Azure AD usage within Teams. As a Teams admin you must understand the role of directory services and identity management and the these came from Azure AD for Teams. Fundamentally, Azure AD is the cloud-based identity and access management service for Office 365. As such, it is an essential part of Microsoft Teams because Teams leverages identities stored in Azure AD for collaboration and communication. The license requirements for using Azure AD identities and for accessing Teams are included in a large number of different licensing packages, such as Small Business Plans like Office 365 Business, Enterprise Plans like Office 365 Enterprise E1/E3/E5, Education Plans like Office 365 Education, and Developer Plans like Office 365 Developer. This means almost every Office 365 plan includes Azure AD.
Managing Microsoft Teams Identify
Managing identity is the biggest challenge for any cloud application deployment and Teams is no exception. When designing and deploying cloud applications, one of the biggest challenges is how to manage the login credentials in the application for authenticating to cloud services while keeping users’ credentials secure. Azure AD resolves this problem with a feature called managed identities, which provides access to Azure and Office 365 resources for custom applications and services. As previously mentioned, Microsoft Teams leverages Azure AD for identity management. The feature provides Azure services with an automatically managed identity in Azure AD. As an admin, you can use this identity to authenticate to any service that supports Azure AD authentication, such as Microsoft Teams, Exchange Online, SharePoint, OneDrive, and Yammer without any credentials in the application code.
Azure AD has multiple features that provide granular control to Teams admins, such as Azure AD access review, which allows organizations to efficiently manage group memberships, access to enterprise applications, and role assignments. Conditional access is the set of rules for access control based on various specifications such as client, service, registration procedure, location, compliance status, and so on. Conditional access is used to choose whether the user’s has access to the organization data.
Accessing Azure AD
To access Azure AD, log in to Microsoft 365 admin center by going through http://portal.office.com/ and then clicking Admin or directly visiting the admin portal URL at https://admin.microsoft.com/Adminportal/Home or directly visiting the Azure AD admin center at https://aad.portal.azure.com.
Once the Microsoft 365 admin center page opens, click Show All to show all admin tools and then select Azure Active Directory. Once the Azure AD admin center page opens, click Azure Active Directory to show the Azure AD capabilities.
Using Azure AD, as an admin you can manage users, groups, organizational relationships, roles and administrators, devices, and so on. Figure 2-129 shows the Azure AD admin center.

Azure Active Directory admin center
Microsoft 365 Admin Center
You can create users or Office 365 Groups and manage them through Microsoft 365 admin center. Figure 2-130 shows the Microsoft 365 admin center. Again, complete details of the Microsoft 365 admin center are outside the scope of this book. I provide brief information about Microsoft 365 admin center here because Teams and add-on Phone System licenses are assigned and managed and Teams usage reports are available through Microsoft 365 admin center.
Accessing Microsoft 365 Admin Center

Microsoft 365 admin center
Accessing Teams Reports in Microsoft 365 Admin Center in the Reports Dashboard
- 1.
To view the Teams user activity and device usage reports, log in to Microsoft 365 admin center, select Reports, and then select Usage.
- 2.
Once the Usage page opens, click Select a report, and then click Microsoft Teams. Select Device Usage or User Activity to choose the report you want to view.
- 3.
You can then analyze the report, as shown in Figure 2-131.

Teams usage reports
Global administrator
Exchange administrator
SharePoint administrator
Skype for Business administrator
Reports reader (the Reports reader role can be assigned to a non-IT user who you would like to have access to these reports by assigning this role)
Office 365 Security & Compliance Center
The advanced security capabilities of Microsoft Teams help you create policies to secure your information and protect company data. Microsoft provides and displays the latest features that enable secure collaboration while helping customers meet their obligations under national, regional, and industry-specific regulations. Microsoft Teams is one of the fastest growing apps in Microsoft history.
As a Teams admin and compliance and information security admin in your organization, you must be aware of what Teams provides to securely maintain the data that Microsoft Teams generates. When the data are generated, admins’ concerns are who is accessing the Teams data and how it can be secured and accessed by the right set of users who need the data.
Microsoft is heavily investing in securing the Teams data and Teams is a first-party application that applies the all security, compliance, and identity investments that Microsoft has already made in information protection and compliance.
Most people believe that ineffective communication is the cause for workplace failures. There is a long list of applications that provide communication and collaboration, but they are lacking the facet of helping people come together, be more productive, and allow them to do everything that they want to do. That’s where Microsoft Teams comes in.
Microsoft Teams is hub a for teamwork, as everything that a team requires is in one place such as chats with threaded conversation, meetings with voice and video conferencing and application sharing, calls with voice and video and PSTN phone calls, files for collaboration, and applications and the workflows that allow users to create and integrate your application in one frame. These features are all crucial for teamwork and Microsoft Teams provides everything that users need to do their day-to-day work in more productive ways.
To understand the Teams security and compliance capabilities it is important to separate queues such as identity and access management, information protection, the ability to discover content and respond to it, application of data governance policies for the type of content that exists, the duration, and finally the ability to manage risks.
Understanding Identity and Access Management for Teams
Identities are key for any application or system. If bad actors compromise an identity, your data and content are at risk. Because Teams leverages Azure AD for identity, the investments and improvements that have occurred in Azure are directly applied to Microsoft Teams.
Does Teams have robust authentication? Teams has solid authentication because Teams uses smart protection policies and risk assessment to block threats. As an admin, you need to ensure that your organization’s users have strong passwords and have MFA enabled. Once you enabled MFA for SharePoint Online and Exchange Online, you automatically endorsed it for Teams because Teams used SharePoint and Exchange extensively. When users try to log in to Teams, they will challenge for the two-factor workflow or whether you have a PIN enabled; both have the same workflow.
Another aspect is what to authorize a user to access. This is specifically based on policy that is defined in conditional access in Azure AD, and Microsoft Teams is part of this feature as well. Conditional access flow is based on the signal that comes from the devices, applications, and users. Microsoft determines a risk score, and as an admin you configure the policies that determine who can access the Teams application.
Remember, the conditional access policies prevent access for authenticated users from unmanaged devices.
Accessing the Office 365 Security & Compliance Center

Office 365 Security & Compliance Center
Topics like managing sensitivity labels and data loss prevention policies, managing eDiscovery cases and supervision policies, configuring alert policies for events in Microsoft Teams, and how to create retention policies and information barriers are covered in Chapter 5.
Teams Management Through PowerShell
- 1.
Download and install the Skype for Business Online Windows PowerShell module from https://www.microsoft.com/en-us/download/details.aspx?id=39366.
- 2.After installing the PowerShell module, connect PowerShell using a Teams administrator account name and password. First open Windows PowerShell run as administrator. Once the command prompt opens, run the following PowerShell commands (without MFA). See Figure 2-133.Import-Module SkypeOnlineConnector$userCredential = Get-Credential$sfbSession = New-CsOnlineSession -Credential $userCredentialImport-PSSession $sfbSession
- 3.With MFA run the following command:Import-Module SkypeOnlineConnector$sfbSession = New-CsOnlineSessionImport-PSSession $sfbSession
Note When it prompts, enter the login credential.

Importing Skype for Business Online module
- 4.
Once you connect, you will be able to run Teams and Skype for Business PowerShell commands, as shown in Figure 2-134.

Connect and run Skype for Business Online and Teams commands
After connecting to the Skype for Business Online PowerShell module, you can run any Get, Set, or Grant PowerShell command. However, you cannot run Teams-specific commands like New, Get, or Set commands (e.g., Get-Teams, New-Team, etc.).

Connecting to Microsoft Teams PowerShell

Creating a team using PowerShell
To learn more about Teams-specific commands, refer to https://docs.microsoft.com/en-us/powershell/module/teams/new-team?view=teams-ps.
Summary
In this chapter you learned about Teams authentication, managing and configuring MFA and conditional access for Teams, Teams client rollout, team and channel management, configuring and managing live events and Microsoft Stream, Teams management tools including Teams admin center, Azure AD, Microsoft 365 admin center and Security & Compliance Center, as well as Teams management through PowerShell. You also learned about the different management tools that are available with Teams, and the different clients that can work with Teams collaboration and communication.