Before we get started, we need to decide what kind of app we’re going to build: an embedded system, a search engine, a Twitter clone, or what have you. We’ll need to sketch out just enough pieces to decide what technologies we’re going to use. Then, we can set up RSpec in our new project directory. Over the course of the project, you’ll see how outside-in development helps you build a better system.
We’ll need a project big enough to contain some real-world problems, but small enough to work on over a few chapters. How about a web service for tracking expenses? Customers will use some kind of client software—a command-line app, a GUI, or even a web app—to track and report their daily expenses.
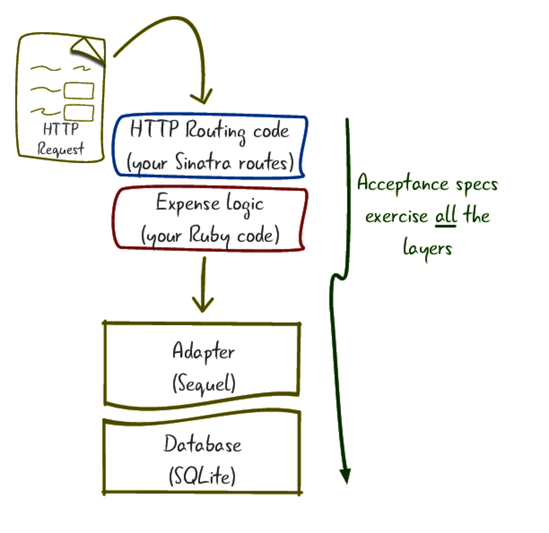
Here are the major parts of the app:
A web application written in Sinatra that will receive incoming HTTP requests (to add new expenses or search for existing ones)[22]
A database layer using Sequel to store expenses between requests[23]
A set of Ruby objects to represent expenses and glue the other pieces together
The following diagram shows how the pieces fit together:
We need to test all of these in different ways. We begin with acceptance specs that drive the entire app from the outermost layer, the HTTP request/response cycle.
You’ve already installed RSpec for a few stand-alone experiments. But this project has more dependencies than just RSpec. Customers deploying our app will want to use the exact same versions of Ruby gems we’ve tested with.
For this app, we’ll use Bundler to catalog and install all the libraries we depend on.[24] If you’ve never used Bundler, don’t worry; while we won’t be explaining it in depth, you won’t need any prior experience with it to follow along.
Create a new directory called expense_tracker. From there, install Bundler the same way you’d install any Ruby gem, and then run bundle init to set your project up to use Bundler:
| | $ gem install bundler |
| | Successfully installed bundler-1.15.3 |
| | 1 gem installed |
| | $ bundle init |
| | Writing new Gemfile to ~/code/expense_tracker/Gemfile |
We’ll need four Ruby libraries to get started:
To bring these dependencies into the project, add the following lines to the end of the newly generated Gemfile:
| | gem 'rspec', '3.6.0' |
| | gem 'coderay', '1.1.1' |
| | gem 'rack-test', '0.7.0' |
| | gem 'sinatra', '2.0.0' |
Then, tell Bundler to install the required libraries and their dependencies:
| | $ bundle install |
| | Fetching gem metadata from https://rubygems.org/......... |
| | Fetching version metadata from https://rubygems.org/.. |
| | Resolving dependencies... |
| | Using bundler 1.15.3 |
| | Using coderay 1.1.1 |
| | Using diff-lcs 1.3 |
| | Fetching mustermann 1.0.0 |
| | Installing mustermann 1.0.0 |
| | Fetching rack 2.0.3 |
| | Installing rack 2.0.3 |
| | Using rspec-support 3.6.0 |
| | Fetching tilt 2.0.7 |
| | Installing tilt 2.0.7 |
| | Fetching rack-protection 2.0.0 |
| | Installing rack-protection 2.0.0 |
| | Fetching rack-test 0.7.0 |
| | Installing rack-test 0.7.0 |
| | Using rspec-core 3.6.0 |
| | Using rspec-expectations 3.6.0 |
| | Using rspec-mocks 3.6.0 |
| | Fetching sinatra 2.0.0 |
| | Installing sinatra 2.0.0 |
| | Using rspec 3.6.0 |
| | Bundle complete! 4 Gemfile dependencies, 14 gems now installed. |
| | Use ‘bundle info [gemname]‘ to see where a bundled gem is installed. |
Now, set up the project to use RSpec. For now, we’ll always run rspec using bundle exec, to make sure we’re using the exact library versions we’re expecting. In Bundler, we’ll talk about another, quicker way to run our specs.
| | $ bundle exec rspec --init |
| | create .rspec |
| | create spec/spec_helper.rb |
This command will generate two files:
The default flags in .rspec will cause RSpec to load spec_helper.rb for us before loading and running our spec files.
You’ll need to add one line to the top of spec/spec_helper.rb:
| | ENV['RACK_ENV'] = 'test' |
Now that all the pieces are in place, we can write our first example.
Use the Right Rack Environment | |
|---|---|
|
|
Setting the RACK_ENV environment variable to test switches on test-friendly behavior in your web framework. Sinatra normally swallows exceptions and renders a “500 Internal Server Error” response. With this variable set, Sinatra will instead allow errors to bubble up to your test framework. |