Because there is more to making these handles than makes sense to dive into given the scope of this book, I will restrict myself to some of the most helpful tips. Think of making your own scythe handle as a journey; following these tips will get you a great deal of the way there, but not necessarily to the finish line. Your second handle may (or may not) be better than the first, and the third hopefully better still. Working with wild materials like raw, unfinished saplings requires the ability to see their important underlying geometry and ignore all the wiggles in between. The process of making a handle is imprecise for a tool that ultimately requires precision. The only way to achieve this is through experience. However, keeping these general guidelines in mind will help.
Use a bendy sapling. While you could make a handle from a straight piece, one with bends will often work better. Once you understand which bends and dimensions are important, you can easily scrutinize a sapling and decide if it’s worth harvesting, if it needs another year or two of growth, or if it’s too big.
Measure the diameter. It will save you a lot of time if the section of sapling you intend to take (generally a 5- or 6-foot length/1.5 to 1.8 m) is 1½ inches (3.8 cm) in diameter at one end and 2–3 inches (5–7.5 cm) at the other. The best place to find saplings like this is along the edge of the road, where saplings tend to bend outward to reach the light and then back upright when they find it, often achieving the correct sort of curves in the process.
Get permission. Roads also make it convenient to scout a large area, but get permission from the landowner before cutting on their land. In very rural areas, and throughout New England where trees are plentiful, keep in mind that the town technically owns 5 feet (1.5 m) from the road edge, so on small dirt roads this leaves a lot of saplings within the town’s management. Even so, if pursuing this form of public harvesting, find an area where it’s not going to be missed. Around me, road edges where I can’t see houses, and where the town is using a flail mower to keep the saplings down, seem like fair game. I also cultivate saplings specifically to use as scythe handles in the balsam grove.
Choose your wood. Any species of wood will work for the handle, although it’s worth shying away from the heavier woods such as hickory or oak. The first choice is probably ash, followed by maple and birch. Even light, relatively weak woods such as poplar and willow should work fine as long as you use a thicker piece.
Get a grip. The scythe handle’s grips are made from tree crotches, and finding the right angle is crucial. Ideally the angle between the two arms should be somewhere between 45 and 90 degrees. The best place to find such a fork is high up in the branches, so finding a tree that has been taken down is ideal; any treetop should offer several good pieces. The best species for finding the correct angles and proportions for grips tend to be birch, beech, and cherry. Don’t use poplar, even though its angles are often ideal, because the joints are weak and will rip apart under the stresses of use.
Keep your options open. It’s a good idea to keep a bunch of options on hand for handles and grips, since you never know what combination will work best. Also, make the grips several months before harvesting the handle, so they have a chance to dry and shrink before you install them. If you insert green, fresh grips into a seasoned handle they will shrink and loosen over time.

Having an assortment of potential saplings can make choosing a handle easier. Photo by Joshua Klein.

Grips are the hardest part to find, particularly the right-hand ones. I harvest them whenever I can. Photo by Lauren Bruns.

Carve scythe grips down with an axe and knife to be the shape of a stick of butter squeezed in your hand. Photo by Joshua Klein.
Build the handle. Build the handle by putting the blade on the ground and holding the sapling as if it was already the handle (figure 1). Make sure the sapling’s thin end is positioned at the blade so that the thick end up top can balance out the weight of the blade. Turn the sapling this way and that to figure out the right orientation, which will determine where to cut the tang face and the tooth hole for the blade to clamp onto, and where to place the grips. Cut a flat plane to support the tang (figure 2), and then cut a mortise for the tang tooth by drilling a hole and carefully trimming it square with the knife tip (figure 3). Finally, shave down the end of the handle until the ring clamp is able to slip down past the tang face (figure 4), then attach the blade to the handle with the ring clamp before determining which grips to use (figure 5). Grips should be fitted where your hands naturally fall when dangling at your sides with your back straight and your knees slightly bent. Figure out the precise placement of where the grips should go by holding the sapling in different places and paying attention to which positions feel the best and require the least effort to swing the blade.

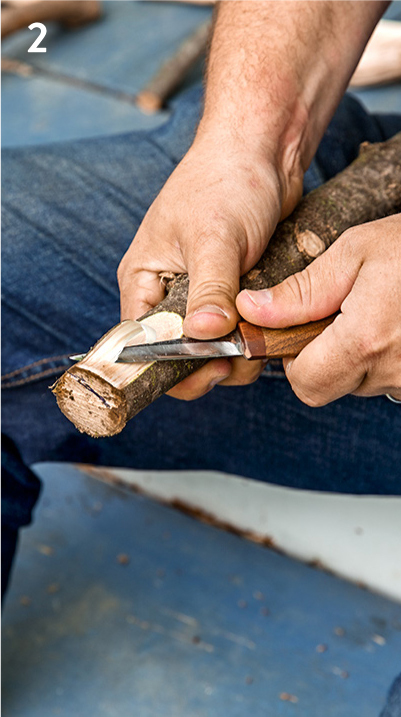


This sequence of photos by Joshua Klein.
Secure the grips. Drill holes with a ½- or ¾-inch spade bit (depending on the size of the grip stem), and remember the hole needs to match the direction of the grip stem, which might not be straight! When you’re not using machined parts, you need to be attentive to the actual angle of the wood, and adjust what you are doing to that. I drill using a spade bit, and stop when the pilot tooth just starts to poke through the back side of the handle. I then trim the length of the grip stem to place the grip where I want it in relation to my hands hanging at my sides, taking into account the depth of this mortise hole. Shave the stem down to the right size to fit snugly in the hole, checking often so that you don’t overcut it. Use wood glue or five-minute epoxy to secure the grips. I also use a short nail hammered in from the side of the handle (I drill a pilot hole first) to further secure the grips in the handle.
Oil it. No finish is necessary, but if you want, it’s fine once the handle has dried to brush the whole thing down with linseed oil cut with turpentine, or with tung oil. It usually takes several months for the handle to dry if the bark is still on. I used to remove the bark, but then it seemed like an unnecessary step so I stopped.

With longer blades, it can be helpful to choose a sapling that bends such that a line drawn from one grip to the next and continued on to the blade would hit the thickest part of the blade, which has the effect of balancing the blade’s weight from side to side. This helps keep the blade from feeling tip-heavy, reducing fatigue and minimizing the chance that the tip will catch on the ground.