FEED PAN CLOCK
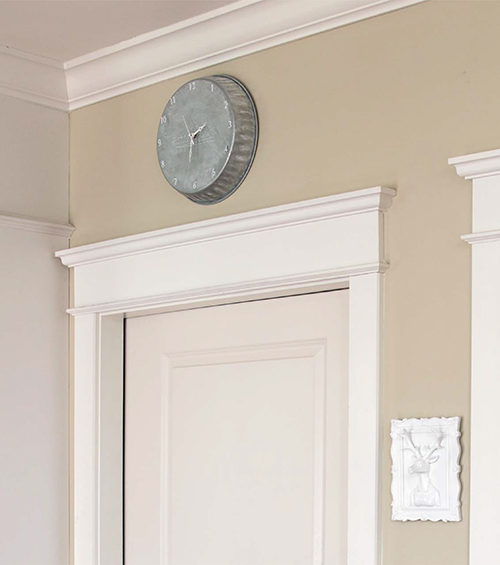
I kept looking for a wall clock that had clean lines and some vintage character, but I kept coming up disappointed and empty-handed. So, I turned to a DIY option to get just what I wanted. I chose to work with a white classic clock face, but that is just one option. The style of the numbers and the hands can set the whole direction of your clock, or you could even leave the numbers off all together or use something like dominoes or Scrabble pieces in their place.
MATERIALS
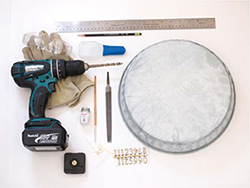
- Ruler
- Pencil
- Feed pan (the one I used had a 123⁄4" opening)
- Clock kit
- Drill
- Eye protection
- Work gloves
- Metal file
- Craft glue
- Paintbrush (I used an artist brush sized for detail painting)
- White gloss enamel paint
- Straight pin (optional)
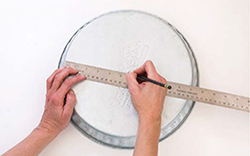
- Use your ruler and pencil to find and mark the center point of the bottom of your feed pan.
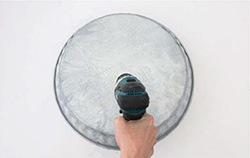
- Open up your clock kit and measure the width of the stem of this kit. Put on your eye protection and work gloves. Use your drill with a drill bit sized to the width of the stem to create a hole in your center point, then use your metal file to smooth out any rough edges in the cut metal. Insert your clock kit and add a dab of glue to the stem, away from any of the mechanisms, to keep it in place.
- Separate each of the numbers and the clock hands and use your paintbrush to paint them with the white gloss enamel paint. Do not add too much paint as it will cause the numbers to stick to the surface below them.
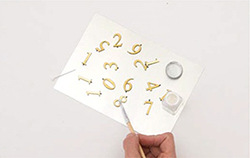
- Add the hands to the clock mechanism and glue the numbers in place. Start with 12 and 6, then add 3 and 9, and finish with the remaining numbers. If desired, you can use a straight pin to apply the glue, which can be helpful when attaching such small pieces.