END CAP SOY CANDLES

I first made my own soy candles a few years ago and I have loved making them ever since. Soy candles burn clean and fresh, and you can customize them with your own fragrance. They also make great gifts for holidays because you can easily make only a few or a whole bunch of them at a time. Here, you’ll learn how to make your own soy candles, and while you’ve probably seen them done many times in glass jars, you’ll love this fresh and unexpected approach of using a galvanized stove end cap.

MATERIALS

  1. Fill 4 cups of candle flakes into a measuring cup. Work with 4 cups of wax flakes at a time when melting. Working with smaller batches allows for easier monitoring when it melts. If you end up with any extra melted wax when you are done making your candles, you can store it in a glass container to melt at a future date or wait for it to cool and dispose of it.

  2. Microwave the flakes on high for 1 minute and then stir the mixture with a metal spoon.
  3. Microwave the flakes for an additional 4 minutes or until completely liquefied. Note: You have about 15 minutes to work with the wax before it begins to set.
  4. If desired, add 20–25 drops of fragrance oil additive for every 4 cups of wax.
  5. Place the wick in the stove end cap so that the metal clip on one end sits at the bottom and in the center. Place the clothespin over the edges of the end cap and slide your wick into the opening. This will hold the wick in place while the wax sets.

  6. Put your stove end caps on a cleanable or disposable surface and pour your liquid wax into your stove end caps until it’s about 14" to 12" from the top. Let the candles sit overnight to completely set.

  7. Repeat each step with the remaining 4 cups of soy candle flakes and discard any remaining wax once all your end caps have been filled.

TIPS & RECOMMENDATIONS

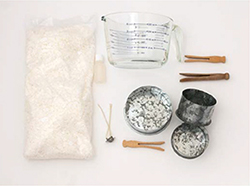
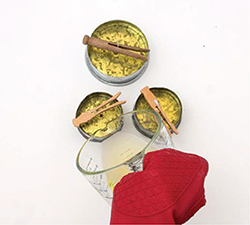
When working with the stove end caps, you’ll find that some of them are sealed tight; however, not all of them will be. Your best bet is to pour in a small amount of wax, wait a few minutes, and see if it is leaking out. If not, continue filling. If it does leak, let the amount you have in there set for about 1 hour, which will seal the opening. Then go back and add the remaining liquid wax to fill it. You will need to reheat your wax. Reheat in 1-minute increments until it is a liquid again.