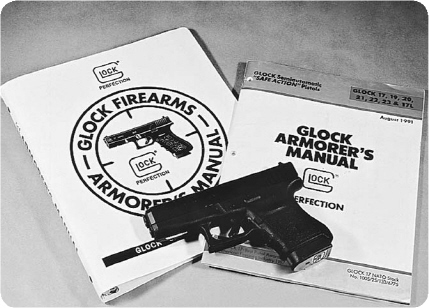
There have been several different versions of the Glock armorer’s manual, and they’re all slender volumes. It isn’t hard to learn how to keep a Glock running.
To paraphrase A Tale of Two Cities: “It is like any other pistol, and it is unlike any other pistol.” In many regards, the Glock is just like any other pistol. It is a modified Browning, tilt-unlock locked breech pistol that is actuated by recoil. It feeds from a magazine inserted through the grip, it fires one round per pull of the trigger (except for the extremely entertaining G-18) and it locks open when empty.
Of the eight steps to function for a self-loading pistol (feed, chamber, lock, fire, unlock, extract, eject, cock) it does seven of them. Well, seven and a half of them.
The ubiquity of the Browning tilt-barrel locking system is such that pistols that use some other system are notable by their rarity. One such is the H-K P7, or “Squeezcocker” pistol. It bleeds gas through a port just in front of the chamber, and the bled-off gas impinges against a piston that keeps the slide closed – at least long enough for the chamber pressure to fall to normal levels before the inertia of the slide overcomes the falling pressure against the piston. Then the slide simply blows back like any pocket pistol would. The extremely rare Auto Mag used a gas port to unlock and cycle a rotary bolt, like a rifle bolt as found on the AR-15. The immense Desert Eagle uses much the same type of system.
But non-Browning locking styles are rarities in handguns. Why is the Browning (and variants of it) tilt-barrel system used so much? For the size of the cartridge, the mechanism can be very compact. The Browning method uses fewer moving parts than others, and it does not depend on specific rates of gas flow or chamber pressure to work properly.

There have been several different versions of the Glock armorer’s manual, and they’re all slender volumes. It isn’t hard to learn how to keep a Glock running.

The Glock’s design makes Glock barrels much easier to manufacture. The hardness of the Tenifer finish prevents the kind of peening visible on this 1911 barrel.
The Browning system is very forgiving of powder burn rates. From the fastest to the slowest, the system really doesn’t care much. But anything that uses a gas port has a relatively narrow range of port pressures within which it will work properly. Get too far out of that range and you’ll have an unhappy gun. A friend of mine purchased the P7 when it was first available. He and his buddies (a bunch of them bought their own) basically killed their P7s by reloading ammo with the “wrong” powders. The ammo they loaded would work just fine in their Hi Powers, but not in the P7s.

The Glock’s barrel locks to the slide using the ejection port shoulders as engagement surfaces.
One big drawback to the gas-port system (HK P7 or Automag) is its inability to work with cast bullets. While this is a concern mostly of American shooters, it still is a drawback that the Browning tilt-barrel system does not have at all. The gas-port acceptable range of gas pressures to work limits reloaders to a handful of powders. If the pressure is too high the system is worked too hard. If the gas port pressure is too low, the system doesn’t work at all. (Except for the H-K P7, where things work in the opposite: a too-high port pressure reduces function, and a too-low port pressure leads to excessive function.) The Browning system depends on the momentum of the bullet and powder overcoming the inertia of the moving parts. Within a very broad range, much broader than other systems, the Browning tilt-barrel system will function with 100 percent reliability.
Having set upon a crash course in pistol design at the beginning of the story, Gaston Glock knew that he had to use one of the variations of the Browning tilt-barrel locking system. What he settled upon was quite simple. Instead of locking lugs machined into the inside upper surface of the slide, as on the 1911, he used the ejection port itself as the locking lug area. The top of a Glock barrel is rectangular in shape, corresponding to the ejection port of the slide. The barrel locks into place in the opening, and the simplicity of the arrangement makes manufacturing much easier. Rather than the elaborate machining setup of the 1911, the Glock is very simple. Unlike the tall barrel/locking block system of the Beretta M-92, the Glock’s is compact and low.
On the bottom, the unlocking occurs via the cam. Instead of the separate link and pin, as found on the 1911, the Glock design uses a cam surface, similar to the P-35 or Browning Hi-Power.
Like some variations of the P-35, and unlike the CZ-75 variations, the Glock’s cam is not an oval. It is an angled cam surface underneath the chamber. Again, the design allows for a simpler manufacturing process and a simpler job for an armorer or gunsmith replacing a barrel.
Let’s pick up the process halfway through your firing a Glock.
You’ve just fired a round out of your Glock. As the slide finishes its recoil trip, it begins its next cycle. As the slide moves forward, propelled by the recoil spring, it strikes the top round in the magazine. If we assume that the round is of the correct caliber, and properly proportioned, it slides forward out of the magazine feed lips until its nose hits the barrel ramp. There it tilts up, camming out of the magazine, up the ramp, and its rim slides under the extractor. Having inserted the round in the chamber, the slide then pushes the barrel forward. The barrel cam rides up the locking block until the locking surfaces on the top have fully engaged the slide. The last bit of travel covers (and re-establishes) the locked dwell time, and once the slide has completed its forward travel it is ready.
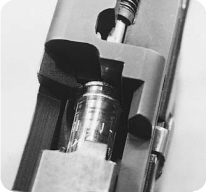
The Glock’s extractor on the rim of a testing dummy, shown in a Glock cutaway model.

The Glock’s barrel camming surfaces. No need for a link as in the 1911.
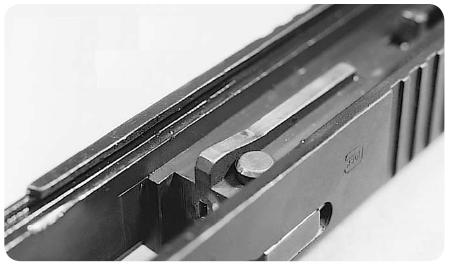
In the center is the pickup rail. It strips the top round out of the magazine. Next to it, the firing pin safety plunger.

When the round feeds up in the ramp, the extractor slides over the rim.
You pull the trigger again, and the chambered cartridge fires. The force of the combustion through the case thrusts backwards on the slide. Locked together, the slide and barrel travel together for a short distance (the “dwell time”) before the angled face of the cam strikes the locking block. Once the cam engages the block, the barrel cams down out of engagement with the slide and then stops. The slide keeps moving, extracting the now-empty case from the chamber. When the slide travels far enough, the empty case strikes the ejector and is propelled out of the pistol. The slide in its travel uncovers the next cartridge, and it pops up to the feed lips and awaits its destiny. When the slide bottoms out, you are back at the beginning of this exercise. What we have missed is the entirety of “Cock” and part of “Fire.”
Simple, it doesn’t. At least not as other pistols do. When the 1911 cycles, the hammer is cammed back until the tip of the sear is beneath the full-cock notch of the hammer. When the slide goes forward, the hammer impacts the sear tip and then the hammer stays cocked. (Or at least that’s the plan.) The Glock design uses a striker instead of a hammer and firing pin. I can see someone in the back getting a bit nervous. “If the Glock uses one part instead of two, and it doesn’t cock when it cycles, then is the striker resting against the primer each time?” Every time this question comes up, the class squirms. No one wants to be handling, let alone carrying, a pistol where the striker or firing pin rests directly against a live primer. The answer is no, it doesn’t rest against the primer.
The Glock design has two internal safeties and one external safety, and the striker has two positions besides striking the primer when fired.
The internal safeties are the passive firing pin safety and the drop safety. The external safety is the trigger safety. The striker positions are full-cock just before release, and the disconnector position.
The five-sentence summary of the Glock trigger operation is like this: When you pull the trigger, you cock the striker from its resting (but not contacting the primer) position until it reaches full cock, where the trigger bar is cammed downwards out of engagement. When the trigger cams down, the striker goes forward and fires. When the slide cycles, it flexes the connector inwards away from the trigger bar, allowing the trigger bar to pop back up into the striker path. When the slide closes, the striker is held back by the rear of the cruciform (i.e., the back end of the trigger bar). When you release the trigger you re-set the mechanism, allowing the trigger to move forward until the connector clicks back outward and once again lines up with the trigger bar tip, preparing the Glock for firing. Let’s take these one at a time and look at them in detail.

The firing pin tail in its normal at-rest position.

No external safeties on the Glock. If you don’t want to fire, don’t press the trigger,

The firing pin resting against the firing pin safety plunger.
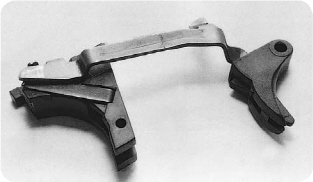
The trigger bar assembly, attached to the ejector block.

The firing pin safety as it appears on the bottom of the slide.
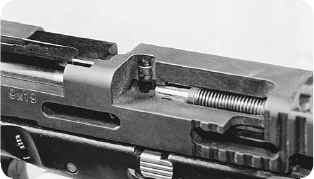
The firing pin and its safety at full cock, moments before firing.

The firing pin safety plunger at the moment the firing pin strikes the primer.
The external safety is on the trigger. If you don’t depress the safety, the trigger can’t move and the pistol won’t fire. When your finger depresses the safety, the trigger is free to pivot. Back in the ejector block, the trigger reset spring determines the feel of the initial trigger pull, or “slack” as it is called. A light spring means a light slack. A heavier, or early-engaging spring, means a heavier initial pull, similar to a revolver trigger pull. Most shooters know this kind of pull as the “New York Trigger” after the New York Police Department, who wanted a trigger pull that as completely as possible replicated the pull of a double-action revolver. There are now two New York Trigger springs, an olive-colored one (the lighter of the two) and an orange one.
On the top forward part of the trigger bar is the passive safety arm. Up in the slide there is a spring-loaded plunger that blocks the striker. The safety arm pushes the striker safety plunger out of the striker’s path when you pull the trigger. If you don’t pull the trigger, the plunger blocks the striker and prevents firing. Drop the Glock, beat it with hammer, or drag it along behind your car (I’ve seen all three) and it won’t fire, because the passive safety blocks the striker. When the slide cycles, the trigger bar loses contact with the passive firing pin safety plunger. The plunger is free to press downwards. When the striker is stopped by the rear of the cruciform, the plunger snaps up to block the striker path.
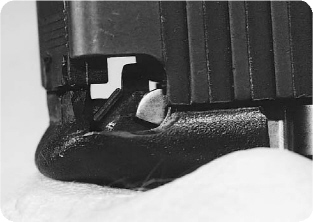
The trigger bar tip and the connector just before the trigger stroke.
Back to the pre-firing sequence. As you pull the trigger, the trigger bar is cocking the striker. As it is moving, the trigger bar is sliding along the shelf of the drop safety. The drop safety prevents premature downward movement on the part of the trigger bar, keeping it firmly in engagement with the striker tail. A sudden jar, drop or impact can’t jolt the trigger bar out of engagement with the striker, releasing it. At the rear of its travel, the trigger bar clears the drop safety and strikes the cam. The cam pushes the trigger bar downward out of engagement with the striker, releasing the striker.
The angle of the cam determines the force needed to disengage the trigger bar from the striker, and thus the felt trigger pull. It is possible to fine tune the Glock trigger pull into many variations by changing the cam and the trigger return spring. You can have a light and clean trigger pull very much like that of the 1911, with no apparent force needed in the slack, or you can have a long and persistent trigger pull very much like that of a double action revolver. We’ll go into that more in later chapters, but keep one thing in mind until you get there: you can’t just swap parts willy-nilly. Some combinations of springs and cam will create inoperative Glocks. Some will have trigger pulls so heavy you can’t fire them, and other won’t re-set.
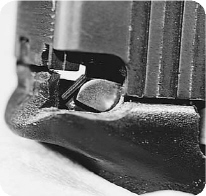
The trigger bar contacting the connector.

The trigger bar cammed down out of contact with the firing pin, releasing it to strike the primer.
The trigger safety blocks the movement of the trigger simply by bearing against the frame. Until it pivots out of the way, nothing is going to happen. Some criticize the Glock for this feature, posing the possibility of something getting into the trigger guard and depressing the safety. True, but the Glock isn’t unique in that regard. On almost every other handgun made, if you let something get in the way of the trigger while holstering (the most common object being a finger…I’m not kidding),they will fire. To be fair, the Glock does not have a slide-mounted or frame-mounted safety. So if you do allow your shirt, jacket, keys or something else to get into the triggerguard when holstering, you’ll have a loud noise as a result.
The trigger safety came about from the extreme drop tests Glock performed. Apparently, if you dropped an original-design Glock from enough height, and it landed on the back of the slide, the mass of the trigger was enough to cock the striker and release it, firing the pistol. One might call it poetic justice, as the pistol would be pointed at the person who dropped it. One might also call it an aspect crying out for another mechanical block, which is what Glock did.
The passive safety blocks the striker until the trigger has been pulled. In operation it is similar to the firing pin safety found on Colt Series 80 pistols and the firing pin safety of a host of other pistols. Unlike the Colt, the Glock passive safety doesn’t interfere with a good trigger pull, or cause firing malfunctions, and it shouldn’t be altered or “tuned.” Make sure it is clean, very lightly oiled and properly assembled, and leave it alone. The Colt passive safety is over-rated as a detriment to good trigger pull. Many are just fine asis, and a good gunsmith can easily make a Series 80 trigger pull feel just like a Series 70. The smart gunsmith doesn’t bother working on the Glock passive safety; it doesn’t need any work.
The drop safety is the simplest, as it doesn’t even move. Its purpose is to block the trigger bar and prevent its inadvertent disengagement from the striker until the trigger bar has been pulled fully to the rear. With the drop safety in place, the striker is tightly locked from ever reaching the primer until you pull the trigger.

The drop safety at rest.
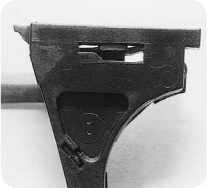
The drop safety, with the pistol ready to fire.
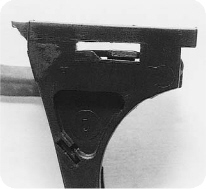
The drop safety in the fired position.
On many pistols, the disconnector is a separate part. The disconnector acts as a link between the trigger and the sear. On the Glock, the disconnector is a raised portion of the slide track. The raised portion flexes the connector inwards, out of the path of the trigger bar, letting the trigger bar overtravel the connector cam surface. When you release the trigger, the trigger bar moves forward, and before it comes to rest the connector can flex outwards so as to once again line up with the trigger bar cam tip.
A pull of the trigger fires the Glock again.
For complete disassembly the early Glock ads pushed the fact that all you needed was the famous Glock Armorers Tool Kit: a single 3/32" punch. Well, that’s all you’ll need unless you plan to go swapping sights and such. To change sights you’ll need more. But not much. A small screwdriver like those used to fix eyeglasses, a dental pick and a small needlenose pliers are all the extras you’ll need for most work. A sight pusher is a definite asset when it comes time to change or adjust your rear sight. And in any case you’ll need safety glasses. The Glock is typical in that it has parts that are worked by springs. When you go to take some of those assemblies apart, you release them from their compression. There is the distinct possibility of parts being launched across the room. It is depressing to have to patch drywall. It is expensive to have to replace glass or china. It is a tragedy to have to go to the emergency room and have a Glock part removed from your face. Trust me, outside of romance novels women do not find eye patches appealing.

The rear of the slide, with the firing pin tail, disconnector shoulder and the anti-seize compound Glock daubs on. (Don’t clean off the compound – let it work in.)
To disassemble your Glock, first make sure is it unloaded. No, I mean make sure! Unlike other pistols, an essential step of disassembly of the Glock is to dry-fire it. If you get casual in checking, sooner or later you’re going sit down to disassemble your Glock and in short order put a hole through something. Save yourself the razzing from your shooting buddies and the frosty looks from your wife, and check. I make light of it, but it is possible to put a hole through more than just your TV or bookshelf. Check it, and check it again.
A note that may not be out of place here: At the last couple of classes I attended at Gunsite, they had dealt with the problem of accidental discharges in the hotel rooms with two approaches. For those of you who don’t know, Gunsite is in Arizona, which is an Open Carry State. If you want to carry a handgun, just don’t let your coat cover it, and you’re fine. As a result, many of the students at Gunsite drive to their hotel at the end of the class wearing a loaded pistol. It has to be unloaded in order to clean it, and to do draw and dry-fire practice.

Unload and dry-fire to disassemble…

…then retract the slide a short distance.
With hundreds of people in a year’s time practicing tens of thousands of draw and dry-fire strokes, you can bet one will be a live-fire stroke. Heck, one of the guys in my party did it. Noisy and nerve-wracking? Sure is. Dangerous? You bet.
So, Gunsite did two things: they made special pistol cases, and they told the students that anyone who has an “ND in Quarters” (a negligent discharge in the hotel room) that they’d be dismissed from class. The pistol case? A hard-plastic single pistol case with a carpet-covered slab of steel cemented in it and a target stenciled on the carpet. For draw and dry-fire practice, open the case, stand it on a desk, unload and show clear, and commence. In the event of an AD/ND, the steel will stop and fragment the bullet.
I thought it was such a neat deal that I have ever since used a piece of steel with a target on it as my dryfire and Glock disassembly target. If the firearm is loaded (shame on me!), yes, I will lose a bit of my hearing, but at least I won’t put a hole through the wall.

While holding the slide back, press the disassembly lever down on both sides at once and let the slide go forward.
A few years ago I ran into Steve Camp of Safe Direction, LLC. He makes pistol cases that are built of Kevlar. You use the case both as a transport case, and as a safe direction (thus the name) in which to point when loading or unloading. With so many States now issuing carry permits on a regular basis, a lot more people are carrying, and thus loading and unloading on a daily basis. I now use a Safe Direction case or wall target, instead of the steel plate. The biggest advantage of the Safe Direction method is that if I do have an AD, the bullet will be contained in the case, and not splattered and launched by a steel plate.
To return to disassembly: with your unloaded and magazine-less Glock in your hands, dry fire it. Now, keeping your firing hand thumb where it is, pivot your fingers up over the slide, and pinch the slide back a fraction of an inch. (The manual suggests 2.5 millimeters, or a tenth of an inch.) If you pull too far you’ll reset the mechanism and have to dryfire again. Hold the slide back. With your other hand, pull the disassembly lever down on both sides at once. Holding it down, ease the slide assembly off the frame. You now have two assemblies, slide and frame. Once you get a feel for the gyrations of Glock disassembly, you can do it so quickly and smoothly that someone who isn’t familiar with the process won’t see what you did. Not that Glock disassembly is a parlor trick or magician’s sleight of hand, but it can go quickly.
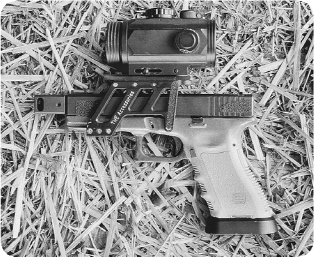
With a little imagination, you turn turn your Glock into just about anything, including a competition Open gun.
Turn the slide over and look at the recoil spring. It should be a contained assembly. Glock upgraded recoil spring assemblies in 1991 to a captured system, where the spring is held to the guide rod even after it comes off the slide assembly. If yours isn’t a captured system, Glock will change it for you. Upgrade it when you get the chance. (One good way is to go to a GSSF match. The on-site armorer will upgrade anything on your pistol that is out of date.)
The rear of the recoil spring assembly rests in a circular cutout on the bottom of the barrel. Press the base of the guide rod forward, and lift it out of the barrel seat. Set it aside. Now press the rear of the barrel up (you’re holding the slide upside down) from the ejection port, and pull the barrel out of the slide. Unless you need to get into the striker assembly, you’re done taking the slide apart. To clean, wipe the crud off the rails and breechface. Get the small end of your brush under the extractor to get the grunge out of that area.
If your Glock is brand-new, you’ll notice a copper-colored goo on the underside of the slide, to the side of the cartridge rail. It is a special anti-seize compound and lubricant that Glock intends to be burnished into the surface of the steel. Leave it alone. It will gradually disappear over time, as the cycling wears it in. Once it is worn away or obscured by firing residue, feel free to scrub the underside of the slide. Swab the barrel out and lightly oil it, and reassemble in the reverse order.
What if you have a comped barrel, like those found on Open Division guns in USPSA/IPSC competition, and the barrel won’t come out? Lift the chamber end out of the ejection port and run the barrel forward. You’ll now have clearance to swab the barrel and wipe the slide and breechface clean.
At the rear of the slide you’ll see a cover plate. Underneath the slide is the clearance slot for the striker tail. At the forward end of the slot you’ll see a second, polymer shoulder. Stand the slide on its muzzle on a hard surface. With your disassembly punch, press the striker sleeve shoulder toward the muzzle. The slide of the Glock is thin at this point, and you may, if you are overenthusiastic, chip the slide. Not to worry, your Glock will work just fine with this small “ding” on it.
The striker sleeve bears against the rear plate. Once you’ve pressed the sleeve forward, you can prepare to slide the rear plate down out of the slide. The striker assembly is under a good deal of spring tension. If you simply slide the cover plate off and pull the punch out you can launch the assembly across the room or into your face. Slide the plate partway down until you can see the edge of the striker assembly. Then get your thumb over the assembly and slide the cover plate the rest of the way off.
The factory says to slide the “slide cover plate” down with your thumb. They must have people with really strong thumbs in Austria. Here is where your little screwdriver comes in handy. Use it to pry the plate down a bit, enough that you can get some leverage with your fingertips to pull it free. When you have the slide cover plate out, turn it over. You’ll note a recess moulded into its face, a recess that fits the rear of the striker spacer sleeve. The spacer sleeve rides in that recess and prevents the plate from dropping down when you reassemble.

If you aren’t careful in pressing the striker sleeve on disassembly, you’ll chip the slide. (It’ll still work fine, though.)

A small screwdriver is useful in prying open a tight rear plate during disassembly.

The extractor plunger and spring in their correct orientation.
Pull the striker assembly out, and then pull the extractor spring and plunger assembly out. They are one piece, and you needn’t pry them apart. Turn the slide onto its side, with your hand under the ejection port. Depress the firing pin safety plunger and the extractor will fall out of the slide into your hand. Then lift the firing pin safety and its spring out.
At this point you have a slide with only the sights attached to it, and the channel sleeve or striker liner installed. You don’t need to remove the striker liner unless you are going to replace it. And you only need to replace it if you’ve been shooting in a very sandy and or dusty environment and need to replace it because it has gotten chewed up – or because you haven’t paid attention to the owner’s manual, which told you not to oil the striker liner or any part of the striker assembly. Oil attracts grit, which chews up the plastic of the striker liner, the striker cups and the spacer sleeve. Once the sleeve, liner or cups get chewed up, you start getting light firing pin hits due to the added friction on the striker as it travels forward on its merry trip to the primer. (The typical need to replace the striker sleeve comes from two groups: one law enforcement and one military. The law enforcement group are marine officers, who spend a lot of time on boats, near beaches and in the salt air. The military group are those who have to swim to shore and or wade ashore. The result for either group is a pistol with lots of salt and/or sand in it, and a premature demise of the channel liner.)
What to do if you’ve got a chewed up sleeve on your hands? Replace it. I must say that in the nearly 15 years after the introduction of the Glock that I spent gunsmithing, I never had to replace one. The subject is covered so quickly in the armorer’s class that I have no recollection of the process from the class. How to remove it? Rather than spend large amounts of money for the custom Glock tool (if it exists) go to the hardware store. Buy a three and a half inch long 5/6" lag bolt, and a section of 3/8" dowel. Turn the lag bolt into the channel liner and once it has enough bite, pull the bolt and liner out.
This is obviously a destructive removal. However, you should not remove the liner except to replace it. Since it has to come out anyway, and you are replacing it, who cares that it gets chewed up? If you find that the bolt can’t get a bite on the liner, use a fine cut file to cut the end of the bolt like a tapered tap. (Those who have one can simply use a 5/16" tap.) Scrub the striker channel out and use the dowel to press the new liner in. The new liner goes in beveled end towards the breech.
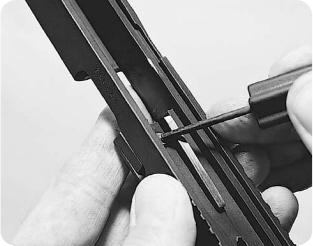
Once the plunger is out, press the firing pin safety.

The firing pin tail in the slide stop.

Pivot the extractor out while holding down the firing pin safety.

The extractor and firing pin safety.

The recoil spring is a captured unit, at least on guns made since the early 1990s.
The striker assembly itself sometimes needs cleaning, either from large amounts of ammunition leaving powder deposits behind, or from getting dirty or muddy. Usually, hosing it with a cleaner and letting it dry before reassembly is quite sufficient. Sometimes, however, you need to take it apart due to the extreme amount of crud that has built up. You can disassemble it with your bare hands, but a disassembly fixture makes it much easier. Luckily, you have a disassembly fixture lying on the table in front of you: the slide.
Turn the assembly around and insert it backward into the slide. Rotate it slightly so the tail of the striker stops on the outside of the channel. Now gently compress the striker spring and remove the retaining cups from the front of the striker. Ease the spring forward. Lift it off the striker, then pull the striker and spacer sleeve out of the slide. Remove the striker from the sleeve. You’re done except for the cleaning.
All told, an experienced Glock Armorer can have the slide off and detail-stripped in less than a minute flat.
One curiosity that you’ll probably never see are the amphibious spring cups. The regular striker assembly fills the channel liner so well that if the striker tunnel is filled with water it may not fire. Glock developed the amphibious cups so that they provide gaps for water flow. The cups are so strictly controlled that Glock will not release them to regular armorers. They only go to law enforcement agencies and military organizations, when requested on letterhead. (One Glock rep told me they are a “factory install” item only. You want amphibious cups, send your Glocks in and they’ll swap them for you.) Are they dangerous? Will using them out of water make your Glock malfunction? Explode? No. It is simply another demonstration of the European firearms manufacturing mindset. The cups were developed for a secret, special operations military organization, and as a result they must forever remain a controlled item.

Hook your thumb on the recoil spring rod, press toward the muzzle, and lift it away from the barrel.
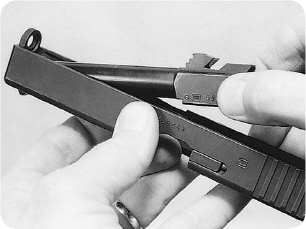
The barrel lifts out and away from the muzzle. It’s a convenient way to make pistols, but it’s tough on gunsmiths when they’re trying to install competition compensators.
Yep, it’s the infamous “reverse the above,” with a few additional instructions along the way. To reassemble the striker, push the striker through the sleeve until the tail of the striker bottoms out in the slot on the sleeve. Put the sleeve and striker back into the slide (backward) as you did when taking it apart. Put the spring over them and compress it. Wrestle the tiny and lightweight spring cups into place and ease the spring forward to capture them. Then set the striker assembly aside.
Install the firing pin safety and its spring. Depress the firing pin safety then press the extractor into its slot. Release the pressure on the firing pin safety. The extractor should be flush with the slide and stay in place even as you handle the slide. Slide the extractor depressor plunger assembly into the slide, long end first and plastic end to the rear. Slide the assembled striker into the tunnel. Start the slide cover into its rails, recessed side towards the striker assembly. Compress the striker spacer, and then the extractor depressor, as the plate bumps up against each in turn. Once in place, you should not be able to pull or press the plate down off the slide.
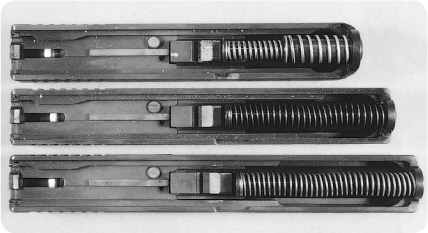
The recoil springs on current-production Glocks are captured and length-specific. The early ones were not captured.
When you are done, none of the parts should fall off. Turn the slide over onto its sights. Look at the breechface and press the striker tail forward. If the striker protrudes, either the firing pin safety is not correctly assembled or the striker rode past it in assembly. Pull the striker tail back until the firing pin safety clicks in place, and try pushing forward again. The striker should not protrude. If it does, disassemble and start over again. If there is no firing pin tip protruding, then press the firing pin safety down with a fingertip or punch and press the striker forward. It now should protrude. When you pull the striker back to its original position, the firing pin safety should audibly snap back up. Flex the extractor slightly. It should return to its original location. If it falls out, the firing pin safety isn’t locking it in the slide.
Once you’re done, install the barrel. Slide the muzzle into the front of the slide, and then press the breech end of the barrel back and down until it locks into place in the ejection port. Press the front of the recoil spring assembly into the front of the slide, and compress the spring enough to get the end cup of the guide rod into its recess on the bottom of the barrel. Once in place, the recoil spring assembly should be centered between the rails of the slide, and parallel to them. There should be a gap between the recoil spring guide rod and the bottom corner of the barrel lug. If there is no gap, the recoil spring guide rod is resting in the disassembly notch, and you won’t be able to reassemble the slide to the frame.
To reinstall the slide on the frame, line the rails of the slide up with the front rails of the frame. Slide the slide back until it the rear frame rails ride into the slide rails. Once you have all four rails encompassed in the slide, run the slide all the way back. Release it forward and it sill snap into the locked closed position.

The beginning of slide disassembly.

The locking block, nestled snugly in the moulded frame.
The frame can be a puzzle to the uninitiated. No screws, no obvious levers, no knobs to grab and pull. What to do? First, notice the metal rails sticking up above the polymer of the frame? Those are the slide rails, and they don’t come out. They don’t need the sharp edges rounded, and they don’t need to be fitted to the slide rails. All the rail technology that gunsmiths love (or hate) to fuss over on the 1911 is as useful as a compression gauge is to a computer mechanic.

Glock compacts do not have light rails, not even in the third generation pistols. But for compact and durable power, it’s hard to beat a compact Glock in a big caliber.
Look at the frame above the trigger. On early G-17s (pre-2000) you’ll see a single cross pin. On other models and post-2000 G-17s you’ll see two. The pin/pins hold the locking block in place. The larger pin passes through the slide stop lever and trigger, and the slide stop rides in a notch turned in the pin. The slide stop lever spring acts to keep the slide stop lever riding in that notch. If you simply try to pound it out, the pin will become damaged. Push out the small pin, relieving pressure on the slide stop lever. Grab the lever with one hand and lift it and push it forward. Press the second pin to the side with your punch pin, and wiggle the slide stop lever. When the hole in the lever lines up to clear the pin, the pin will push out to the side. Pull out the pin, and then the lever.

Hold the slide stop lever and press the front pins out.
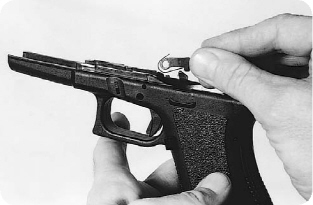
Lift the slide stop clear.

Press the rear pin out.

Pry the locking block out.
The locking block is now free to slide up. If you use a punch or screwdriver as a lever, avoid resting it on the trigger bar as you might bend it. Lever the locking block up and lift it out.
At the rear of the frame you’ll see another cross pin. It holds in the ejector assembly. Press it out. (None of the pins in a Glock are “sided,” that is, it doesn’t matter which direction you push them out. Glock says to push them out from left to right. I’ve measured the pins and can’t see a difference, and I’ve disassembled hundreds of Glocks in each direction and haven’t seen a difference.) Notice that while the other pins are steel and have sections turned out of them, the rear pin is polymer and smooth.
Hook your punch pin under the ejector and lever the ejector block up out of the frame. You can now lift the entire trigger bar/ejector assembly out of the frame as one assembled section. Keep them together until you have had a chance to observe the relationships between them.
There are two things left on the frame to take apart. (Refreshing, isn’t it, not having to deal with grips and screws, grip screw bushings, and all the rest?) The disassembly latch is in front of the locking block and is worked by a flat spring. To remove the latch, press the flat spring down. While holding it down, turn the frame on its side and let the latch fall out. Note that the latch is “sided” in that the rear face has a slight groove milled or stamped into it. The groove catches the tiny ledge on the front of the barrel lug and prevents the latch from being depressed until the slide is slightly retracted. As for the spring, it is pressed into place. It can be replaced, but I’ve never seen or heard of one needing replacement. (Heck, I’ve never heard of latches breaking or wearing out. Only getting lost from disassembly.)
The magazine catch is held in by a section of wire spring. Hold the frame up toward a light, with the rails toward you and the magazine opening toward the light. You’ll be able to see the spring, and the assembly notch in the magazine catch. With your screwdriver, press the spring toward the notch while you hold the magazine catch in place. When the spring gets to the notch, twist the blade to pop the spring up. When the spring clears, you can slide the mag catch out. If you need to, you can remove the spring by reaching in with your needlenose pliers and pulling it. Replacing is simply shoving the spring back into its seat, prying it to clear the magazine catch, and pushing the magazine catch into the frame until you can line up spring with notch.
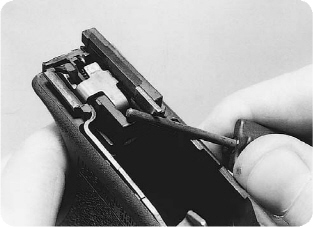
Cam the ejector out. . .
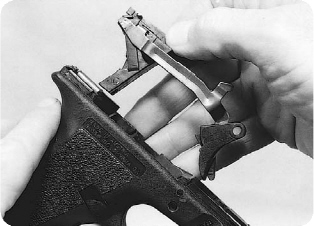
. . .and the whole trigger assembly comes out.
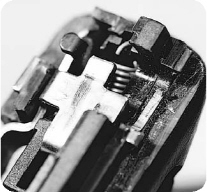
The rear of the frame, with the trigger bar cruciform and trigger view in plain sight.
You now have the heart of the firearm itself, the serial-numbered part that the government is so interested in keeping track of. All the rest are just parts, but this is the controlled piece. When I went through the armorers course lo, these many years ago, the parts list they supplied us with (yes, the same one that listed magazines at $10.50 each) showed a replacement frame listing at just over $20. That price alone showed the beauty of the Glock. After all, once the moulding machine was paid for, all it cost to produce a frame was a few cents worth of polymer, a stamped tab with the serial number, and a precision-blanked set of slide rails. At twenty bucks each they were probably making a killing.
The interesting part is the trigger assembly. Take a moment to study it. Actually, take a few.

The assembly latch rests in a slot moulded into the frame just forward of the locking block.

The magazine catch spring is down in the frame. Use a strong light to see when working on it.
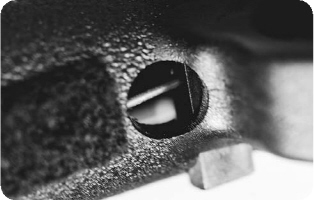
The magazine catch spring is the simplest spring in a Glock – just a rod of spring steel.
At the front is the trigger, a plastic part with the trigger safety in it. The trigger safety acts by pivoting under the pressure of its spring to stop against the frame. When your finger rests on the trigger it pivots the safety out of the way and allows the trigger to move. On top of the trigger bar is the firing pin safety cam. The nose of the cam rests in front of the firing pin safety plunger when the system is at rest. As you pull the trigger, the bar moves back and the cam pushes the plunger up into the slide and out of the path of the firing pin. When the firing pin is released at the end of the trigger stroke, the cam holds the plunger up out of the way.
The disassembly catch spring hardly ever breaks, and it usually breaks only if someone has tried to remove it.

A plain stamped piece of flat stock. You can’t get much simpler than that.

What keeps the cam from holding the path open to the firing pin when the slide closes after firing? Nothing. But the striker never gets that far. When the slide goes forward, the striker is stopped by the rear face of the cruciform and held back from the breechface. There is no way for the striker to ride over the cruciform, as there simply isn’t enough space available. It has no other choice.
At the rear of the trigger bar you see the cruciform section and the trigger bar nose. On the right side of the ejector block, the trigger bar nose runs up against the connector. On the top, the rear end of the cruciform section rides against the tip of the firing pin. As you press the trigger back, the trigger bar compresses the firing pin against its spring. When the trigger bar contacts the connector, the angle of the connector presses the trigger bar down until it releases the firing pin. The trigger bar has already pushed the firing pin safety plunger up out of the way, so the firing pin is free to snap forward and set off the primer.
So far, so good. Remember that section of the slide that had the copper-colored goo on it? When the slide cycles to the rear, that machined shoulder pushes the connector out of the path of the trigger bar. The trigger bar is thus freed to snap upwards and back, propelled by your trigger finger, back into the path of the firing pin tail, and past the cam surface of the connector. Upon slide return the cruciform section catches the tail and holds the firing pin back. When you release the trigger, its return spring pushes it back out in front of the angled section of the connector, starting the whole cycle over again.
Turn the assembly over. On the other side you’ll see the lefthand side of the cruciform section, the drop safety. Since the assembly is out of the frame, the spring has it contracted, so the cruciform is in the rear, or fire, position. In the Glock, it rests in the front of the slot, where the shoulder prevents it from moving out of the path of the firing pin tail. This is what allows the Glock to be abused and not fire. The cruciform can’t move down, so it can’t release the firing pin. (Even if it did, the firing pin safety would prevent its going very far.)
Despite all the descriptions, I still found when describing the Glock system that I needed a quick mental picture that would convey the situation to students and prospective buyers. Here it is:
The firing pin is trapped until you pull the trigger. The firing pin safety keeps it from going forward. Pressing the trigger clears the firing pin safety from the path. The firing pin can’t go backwards, as the striker spring is pushing it forward. Until you push the trigger, it can’t compress the spring that will launch it. The cruciform tip holds the firing pin tail in place. The cruciform can’t move down out of the way because the drop safety ledge keeps it up, blocking the firing pin.
And as the final safety, the trigger can’t move because the trigger safety spring keeps it pivoted out, blocking the trigger movement.
Just banging around, the Glock can’t fire. Something (like your finger) has to press the trigger safety and then the trigger.
The trigger assembly has to come apart for cleaning and to replace the trigger spring to change trigger pull. Hold the trigger in your right hand and the ejector block in your left. Twist the trigger to push its rear towards you and out of the ejector block. Disassembly finished, for cleaning. For trigger spring swapping, you’ll need to remove the coil spring, and that and the connector are covered in the Trigger chapter. To reassemble, twist the trigger bar back into the ejector block.

To strip the striker assembly, stick it backward in the slide, with the tail to the side.

Compress the spring and let the cups fall free. (Catch them – don’t let them get lost!)

The cups are small, plastic and easily lost. It makes sense to have spares.

The striker, spring, cups and sleeve.

The stripped Glock frame with all of its parts.
If you’re starting with a bare frame, install the magazine catch first. Then the disassembly lever. If that is out, press the spring back in place. Be careful to press where you won’t bend it, or grasp it on the sides with a needlenose pliers to hold it. Take the trigger assembly and press the rear down into the frame. Insert the rear cross pin and press it flush.
Press the locking block down over the front of the trigger assembly. Press the locking block pin (the upper one) through and flush. Now, start the trigger pin in from the right side, and capture the trigger with it. Once you have the trigger held, grasp the frame in your left hand with a fingertip over the end of the trigger pin. Insert the slide stop with your right hand. Line the slide stop hole up with the trigger pin and press the pin through. Release the slide stop. It should snap down to the frame. The frame is done.
If you do the trigger pin first, you will find that you have to catch and compress the slide stop spring in order to get the locking block pin through. It is easier to do it the way I have described.

On reassembly, press the striker sleeve in and slide the plate part way up.

Then press the extractor plunger and slide the plate the rest of the way on.
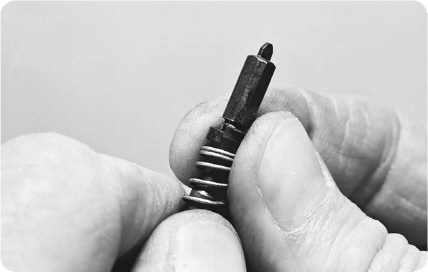
One of the “fiddly” parts of reassembly is getting the tiny plastic cups back in place on the firing pin. Practice makes it easier.
If you haven’t seen a modern manufacturing plant, you will be amazed.
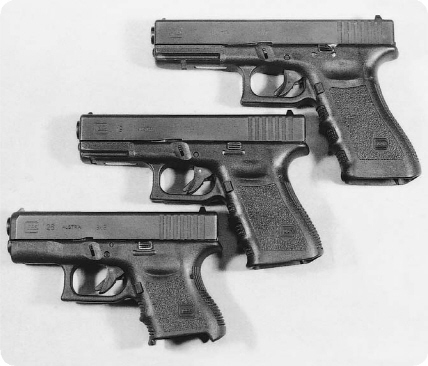
Glocks differ between models in slide and frame length, but many internal parts are interchangeable nevertheless.
If, like me, you’re a student of tools and manufacturing, you’ll recall film clips of the dawn of mass production: Huge forges, stamping machines and row upon row of lathes, mills, surface grinders and assembly benches nearly to the horizon. Each machine performing a single operation, and its operator grabbing a part out of a rack, performing that single operation and returning the part to the rack. Once the rack was completed, it was wheeled to the next line of machines. Dawn to dusk, hundreds or thousands of trained machinists performing the same task over and over and over.
Not any more.
The modern plant features rows of computer-controlled machines, each one referred to as a “machining station.” A row of machining stations is also called a gold mine, at least if they are all working. The most modern stations are known as five-axis machines. If you grew up thinking of the three axes, up and down, right to left and forward and back, add turning the part over and swapping it end for end and you’ll have the modern five. The result is a machine that can pluck the parts out of the rack itself, insert or swap its own cutting tool, make many cutting operations with that one or swapping to other cutting tools, then putting the part back in the rack. It is possible, but not always efficient, to have a single machine perform every machining operation necessary to a part.
The newer a machine, the greater the number of cutting tools it can have in its “package.” That is, early machines would have five, 10 or more cutting tools. The newest (and more expensive) ones now can hold up to 128 tools. That is 128 different-diameter cutters, or special-radius cutting tools, or rough and finish-cut tools – so many tools a part need not come out of the machine until it has to be turned over to do the other side.
As if all this wasn’t enough, the machine remembers how many times it has used each cutter (each of which has its own bar code or microchip for easy identification) so they can be resharpened on a regular schedule. How precise is all this? Precise enough that parts interchangeability between manufactured items is taken for granted. Precise enough that the really high-tech machines require temperature and humidity controls so the finished dimensions aren’t out of spec. So precise that modern firearms parts are a dream compared to the rough parts we used to have to deal with in the old days.
The modern machining plant is not all peaches and cream for the owner. There are downsides. You as the manufacturer must have people known as programmers. The programmers write the software that dictates the cutting, or cutter paths as they are called. Where does the cutter cut, how deep, how fast does it travel, where does it lift? How much lubricant is needed to cool the part being cut? A good programmer creates cutter paths that are efficient and leave a smooth surface behind. A bad one busts cutters, leaves parts that require polishing, and costs you tools, wasted parts and slows your output.

The precision of modern manufacturing means these Glocks can have any part exchanged and still work.
You also have to pay for the machines as well as feed them electricity, metal and lubricant. Since a single machine can easily run hundreds of thousands of dollars (and the really big and new ones over a million) each, you have a heck of a lease note to cover. Yes, lease. The dictates of modern economics hardly ever include actually buying these things. Long before they’re paid for, the latest models are so much better that sticking with the old one will give your accountants an attack of the vapors.
All of this explains what everyone who has a better idea of how to make anything runs smack into: it costs a whole heck of a lot of money to start up a new widget factory, let alone a firearms factory.
Glock slides are machined from bar stock. The alloy, heat treatment and actual cutting operations are all closely-held secrets. After all, it took a while to figure out the most efficient method, and there’s no point in simply announcing it to the world. One tidbit I have learned is that it takes eight hours of machine time for a slide to be done. Now, I was not able to pry the details from my source, as he either didn’t know them for sure or had taken a blood oath not to reveal them. So I don’t know if “eight hours” is the total time from raw steel in, to finished parts out, including time to be bolted into trays, unbolted, walked from machine to machine, etc., or if “eight hours” is the total of just the machine-tool-cutting-steel time. (I kind of doubt that, as that would be a whole lot of cutting time.)
Once machined, gauged, inspected and serial number stamped, the slides go to the Tenifer section. There they receive the surface treatment that Glock is so well known for, the one that turns out tough slides. Once the Tenifer treatment is finished, the slides then get their black oxide coating. The black is not the Tenifer. The black is simply the coating required to make the surface dark and non-reflective. If you were to buff off the black oxide (not an easy thing to do unless you get sandpaper or power tools involved) the slide would still be protected by the Tenifer treatment, which provides the real hardness and rustproofing protection.
You may see the occasional Glock where the owner has had the black oxide stripped off and then hard chromed the gun. If it’s for looks, fine. But any additional protection is hardly worth the cost, as the hard chrome isn’t much harder than the Tenifer-treated steel it covers. As for rust protection paint would work as well, compared to what the Tenifer offers.
Frames are a different matter. The skeleton of the frame is the steel stamping that forms the slide rails. Modern fine-blanking and sheet metal forming technology allows the manufacturing engineer to produce a product that is as precise as a machined object.
The stamped and formed skeletons are heat-treated and fed to the moulding machine. Feeding in from the other side of the machine are the serial number plates. In between is the mould itself, with moveable parts of the mould and power feed tubes to pump the polymer mix in. The complete assembly requires three steel parts: the front and rear rails, and the serial number plate.
Each frame is formed when the rails and a serial number plate are placed in the mould, the mould closed and the polymer fed into it. As with the machining stations, the details on temperature, feed rate, production rate and curing are closely-held production secrets. I do know that each one spends something just over a minute in the mould. Everyone I talk to keeps repeating the same figure: 80 seconds. Color me cynical, but when everyone has such a precise and consistent number, I have to wonder if it really is “80 seconds” or if the number was selected for some reason and once it was uttered by a single source has been repeated ever since. Anyway, we can think of frames coming out of a moulding machine at one every two minutes. That sounds fair.
Glock has a Quality Assurance staff and program.
Each part is inspected, and selected production samples are measured to minute tolerances.
The striker falls off of an automated lathe, the rotational equivalent of the machining stations that made the slide. Other parts, like the trigger bar and cruciform, are fine-blanked and folded before heat treatment and nickel plating. They all end up on the assemblers’ benches. There, experienced factory assemblers install each part in turn and check them against the list. After a day or two, you’d think the list could be dispensed with, but memory can fail. Then it’s off to the test-fire room. There each Glock is test-fired before it is boxed with its owners manual, brush and other accessories.

While the Glock’s durability has been proven by dragging the pistol behind a truck, I’ll leave that test to the factory.
Are they assembled in Austria, disassembled, then shipped to the United States? Are they made in Austria, then shipped as parts and assembled here? I had conflicting reports, but the latter seems to be the answer.
We do have one update on the manufacturing process since the first edition: the E-series recall. As it turns out, there were three individual machines stamping rail sections, hidden deep within caves in the Austrian mountains. Apparently, one of those machines was suddenly not punching rails to spec. Rebuilt? Overhauled and set up incorrectly? Mountain trolls creating mischief? No one would say, but I have to suspect there is someone now working in the Sales Department in a very unchoice location. The problem was quickly caught, the machine corrected, and the offending frames replaced.
The information did come with an extra tidbit that was even more interesting: there are apparently people who work in Glock’s Smyrna, Georgia, location and who have been with the company for years, who have not set foot inside the Austrian plant. It is apparently entirely possible to work for Glock until retirement and never see the inside of the plant, never see Glocks being made.

Banging on a Glock with a hammer proves what we all know: plastic flexes more easily than steel. But Glock was the first to apply that knowledge to a workable pistol design.
When Glock began offering their G-17 here in the United States, they were very aggressive about proclaiming its superiority. It didn’t take long for tales to be told at matches and clubs, tales of Glocks being towed behind the rep’s car as he drove into the parking lot of the range where he would demonstrate the new G-17. Of Glocks thrown into running cement mixers (sans cement, of course) tossed over walls, thrown out of speeding vehicles and dropped from helicopters. Even of Glocks being fired underwater. And, it would be hard to find such a tale that was indeed a tale and not the truth. For the then-new and subsequent Glocks have gone through all that and more.
And Glock still extolls the abuse. The question is, could other pistols do the same? Let’s go through the biggest ones, and see how they’d stack up. As it just so happens, I replicated the Glock tests in my own book Gun Digest Book of the 1911, Volume 2.
First, let’s look at the single greatest advantage the Glock has over all others that came before it, and those still based on earlier designs: the flexibility of a polymer frame. A steel or aluminum frame, when struck hard enough, will bend and deform, where the Glock frame will bend and flex back. The physical resistance to deformation is known as the modulus of elasticity, where any material has a distance within which it can be flexed without remaining permanently altered. A piece of glass doesn’t flex much before it breaks. Steel, depending on the alloy, flexes more, but finally bends and remains bent. Plastics bend a great deal before they finally crack.

There is a 1911 underneath that truck tire.

1911s can take it, too. Under that mud and silt there is a ferociously expensive 1911 being abused. And it worked afterwards, too.
So, impacts that would bend our 1911 will be shrugged off by the polymer frame of the Glock. How much of a problem is this? Good question. In nearly 20 years of gunsmithing next to a town known for lots of carry guns, lots of shootouts and lots of people who carried guns for a living, I recall exactly one pistol that had been dropped and was inoperative as a result. It was a S&W 9mm. The magazine was trapped in the frame. However, while you couldn’t get the magazine out, the pistol still worked. By locking the slide open and driving the magazine down far enough, I could remove the slide. I loaded the magazine, reinstalled the slide, pounded the magazine back up, and the pistol shot fine.
The customer didn’t want me bending it back, or filing the frame to clear the magazine, so it was sent back to the factory, where they replaced the frame for a reasonable fee. Now, it is entirely possible that bent frames are a more common problem that I realize, and that those who drop theirs simply turn them back into the departmental armorer for repair or replacement. I cannot say.
The following is just a sampling of the kind of reliability testing Glock has performed on its own pistols. How does the Colt 1911 compare?
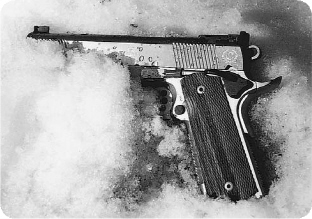
1911s can take winter weather, too.
A G-17 was frozen into a block of ice and left that way for two months. The ice was broken away (I would have been more impressed if they got it free by throwing the block onto the pavement) and the thawed pistol fired 100 rounds without fail.
A 1911? Sure thing. I’ve fired frozen pistols, and all manner of firearms left in the cold for long periods of time. A tie.
The G-17 (I assume all the test were done to the same pistol) was buried in five different types of soil, and then fired for 100 rounds after each soil test. No failures.
Again, a proper 1911 (not a super-tight Match pistol) would do the same thing. And did. I buried the test 1911s (I used four of them) and found they would still work just fine after being buried and then dug up. My only question is, who got to fire the wet and muddy G-17 after each time it got buried? Nothing like needing a face shield as a piece of range equipment. I sure did when conducting the experiment. A tie.
Mud. As if the soil wasn’t enough, thick, runny river mud was used. Hmm.
I used mud of several consistencies. I tried sandy mud, silty mud and clay-ey mud. While some of the 1911s had trigger pulls that got a lot heavier, they all worked just fine. The Glock didn’t show the trigger pull variances that the 1911s did, so I have to reluctantly give the nod to the Austrians. Advantage: Glock, barely.

While it lasts, my dwindling supply of TriChlor strips oil off parts quickly. (It’s banned now, of course, but other stuff works equally well.)
Water. Left submerged to three feet for one hour, then retrieved and fired for ten rounds. Repeated ten times for 100 rounds.
The only problems with this test are boredom and getting wet. Sloshing pistols around in a bucket and then shooting them splashes water all over the place. A tie. The worry for some (and I was a bit concerned myself) is trapped water bulging the barrel. You need not worry. The water will begin to drain out as soon as you lift the pistol from the bucket. While I can’t suggest you try this, it isn’t dangerous. Instead, learn from my tests and save yourself the soaking. If you don’t clean properly and thoroughly afterwards, you’ll let rust get started, which can be worse than the experience of shooting it while wet. Another tie.
Chemical degreaser. Detail stripped, the parts were hosed with a chemical degreaser until they were bone dry. Then they were reassembled without lubricant and fired 100 rounds without fail.
In the first edition, I gave this one to Glocks, and I should not have. My own test showed that dry 1911s work fine, at least up to 100 rounds. I didn’t try to extend that past the 100 rounds specified, what’s the point? In the first edition, advantage Glock, again marginally. Now, I’d have to call it a tie.
The truck tire. Left lying on a gravel parking lot, the G-17 was run over from every direction by a “large SUV.” That could mean as much as four or five tons. Once it was run over, then the truck was parked on it for an hour. The Glock went through its apportioned 100 rounds without fail.
A 1911? With four manufacturers 1911s on hand, I was willing to try this one. My gun club’s parking lot was gravel a long time ago. It now has enough grass and weeds growing in it that it requires mowing. It is still a gravel surface under the green stuff. I placed 1911s on the range and drove over them, and then parked on them and took photos. The unspectacular end result was four 1911-shaped depressions in the parking lot. No cracked grips, no bent frames, no inoperative pistols. It would take a truck a lot heavier than my fully-loaded Ford Ranger to stress pistols. Certainly more than the 3,000 pounds or so it was able to muster. A tie.
Score in the first edition: Glock two, Tie four, 1911, none.
Score in the Second Edition: Five ties, one for Glock (barely), 1911 none.
What of the legendary tests? Dragging the pistol, dropping it, etc.? All fall into the category of “How much does it take to bend this frame?” Dropping a pistol several stories out of a building, or throwing it out of a moving vehicle while racing down a deserted airstrip, are simply testing the deformation limits of steel. I’m sure if we went to the trouble of subjecting a 1911 frame and slide to being built of tougher alloys and better heat treatment, we could improve its performance. But we’d still fall short of the ability of polymer to shrug off impact.
The better question is: how useful is it to us? Viewed from some perspectives, very. Lets say you’re a SWAT member, and while rappelling down a building to crash in through the window, your sidearm falls out of the holster (not possible if you’d bought the right holster) onto the sidewalk. First of all, no one except fellow team members will be endangered, as they are the only ones it might fall on. No Glock pistol will discharge. A 1911 without a firing pin safety might, if it fell directly onto its muzzle from a great enough height. (How high? From personal testing, I can tell you eight feet isn’t enough.)
Will you go down and get it? Heck, no. If you weren’t carrying a shoulder weapon, you aren’t going through the window now. If you were, you’re going regardless of where your pistol ended up. Later on you can retrieve it. As to whether it works or not, that ends up being an economic problem. Will you, personally, have to buy a new one? Will the department replace it, or require you buy another? All questions that are unrelated to the mechanical integrity of the firearm being abused.

On the second go-round, I ran over my guns. Glocks and 1911s both passed the test.
It might be a bit different if your pistol falls out during a vehicle chase. But unless your vehicle stops close enough, (like, less than 50 feet away) again, you aren’t going to go running after it.
OK, so there you are, a highly-trained operator, going into an area of operations in a helicopter, and your sidearm goes overboard. I think you know where this is going. Unless you are right over the landing zone, you’ll never find it again. And until you have the time to go looking, you’ve got a plethora of weapons to use against the enemy du jour.
Dropping pistols is something we personal users, not employees of law enforcement agencies or military organizations, have to think about. Thinking of it from the viewpoint and question of “How expensive is this gonna be?” as we watch our pistol sailing through the air should put it in perspective. For an administrator, the ruggedness of the Glock system is very comforting. After all, he (or she) won’t have to spend nearly as much of the budget replacing dropped and damaged pistols, if they are Glocks. Dropping is expensive to personal owners and administrators. To the guys on the sharp end, dropping is a matter of personal image and paperwork. Having dropped firearms more times than I care to recount, I can tell you from personal experience that various 1911s, having traveled up to seventeen feet, still work.

In a rough-and-tumble environment, a lanyard makes sense.
When I was waiting for the arrival of my personal Gunsite ATP, (a 1911, as you’d imagine) the shop manager of the Gunsmithy told me of the experience of one of their customers: He had been chasing a suspect across a city street when his pistol fell out of its holster and into the gutter. A passing streetsweeper sucked it up, and rattled it around the containment tank an unknown number of times before the owner could climb on board, show his badge and get the driver to stop the vehicle. As you could imagine, it looked horrible, but it still worked.
Yes, Glocks are better, there is no getting around that, but how much should we expect a pistol to take?
And if it can take more than we can, what would we look like, falling out of a moving vehicle, or falling from a helicopter? I hope none of you ever need find the answers to those questions.
Now we’re getting somewhere. After all, “everyone knows” that a Glock simply gobbles ammunition and never quits, right? Much more so than any other pistol, right? The question of “how much ammo does it take” has been an evergreen for gun writers for as long as I can remember. And probably before. I recall one article that the late Skeeter Skelton wrote about the 1911 in .45 in the early or mid-1970s. He had heard that a particular military competition team was in the habit of replacing the barrels on their pistols every year. Since each pistol was fired about 5,000 rounds in a season, it then (of course) became gospel that barrels were worn out after 5,000 rounds. This is hardly logical. In fact, the Latin term for this logical fallacy is “post hoc, ergo propter hoc.” Translated: “After that, therefore because of that.” In other words, “Y happened after X; therefore Y happened because of X.” Not necessarily.
Skeeter set out to find out if the number was true. He managed to talk several ammunition companies into donating a total of just over 15,000 rounds of ammunition to his project.
(As a gun writer, I was then and still am, in awe of him. 15,000 rounds, for a magazine article? Wow. I managed to talk a dozen ammunition companies into donating approximately 40,000 rounds of ammunition and components for reloading for my book “The Gun Digest Book of the 1911” and that was work. If I were to ask for 15,000 rounds for a single magazine article, I’d be deaf after hearing so many phones being slammed.)
A large part of the resulting article was devoted to just how much work all this was. Skeeter had two assistants to help him, and they spent months shooting “all that ammo” in the Herculean labors that resulted. By todays standards, not that much work or shooting. 15,000 rounds today would be a good couple of months’ work for an aspiring IPSC Grand Master, or one who wanted to move up from the middle of the ranks. A good shooting school will get you through 1,000+ in a week’s time, and you’ll spend more time getting lunch, lectures and feedback than you will actual on the line trigger time. I would often end up doing a significant fraction of Skeeter’s number in my annual spring warmups before the Second Chance match.
At the end of it, Skeeter couldn’t see where the pistol was any worse for the experience. In the interests of science, he sectioned the barrel and even viewed it under a magnifier. He couldn’t see much wear at all.
So what can we expect from any good pistol? I have some high-mileage 1911s that I’ve put close to 100,000 rounds through. I know from talking to Jerry Barnhart that he owns a 1911 that he’s put over 300,000 rounds through. Still not enough. Glock has a rental program, and as part of the rental agreement the range has to keep track of how many rounds each pistol goes through. How about 350,000 rounds and up? And still counting.
I talked to Al Allen, co-owner of Double Action, an indoor range in the Detroit area. (Madison Heights, to be specific.) He has been running rental Glocks for many years and had had some very high-mileage ones back before the rental program changed. In the old days, range owners bought rental guns from Glock and then were responsible for maintenance and returning them for upgrades and factory service. His record Glock was a G-17 that had a total of 465,000 known rounds through it. When he returned it at the change in the Glock rental program, he says, “Glock wasn’t impressed with that figure. They’d seen some with lots more rounds through them.” Now, Glock retains ownership of the rental guns, and they are returned each year for factory service and inspection. As such, the most Al sees going through an individual pistol is “only” 250,000 rounds.
In the decade since the change, one pistol at Double Action has had to be significantly serviced. (The old G-17 went through two or three trigger return springs in its 465K run.) That one was a G-22C, which cracked a slide. A minor crack, but Glock replaced it.
So, unless you win the lotto I wouldn’t worry about putting enough ammo through your Glock to wear it out. ![]()