Seaming: many crocheters simply dread it. Some motifs can be crocheted together as you go, and some crocheted garments are specifically designed to keep seaming to a strict minimum. However, for most crochet patterns involving more than one piece, seaming is necessary. The right seaming technique, skillfully executed, can make all the difference in your project, taking it from amateurish to outstanding.
You can use one of several seaming techniques to assemble your crocheted pieces. As you’ll see, the different techniques are appropriate for different projects. And personal preference definitely plays a role: Experiment with the various kinds of seams to see which one suits both your taste and your project.
A NOTE ABOUT NOTIONS: Most seaming is done with a large-eye, blunt needle (e.g., a tapestry needle) and the same yarn used in the project. Whatever needle you use must have an eye large enough to accommodate the yarn.
A NOTE ABOUT YARNS: Seaming with the yarn you used in the project ensures that the seams blend in with the overall color and texture of your project. However, if the project yarn is thick or fuzzy, the seams may be too bulky. If the project yarn is too fragile (e.g., a single-spun yarn), it might not stand up to seaming without breaking. In either of these circumstances, you can use a thin smooth yarn in a matching color. Try to use a yarn with a similar fiber content. You’ll want to be sure the seaming yarn is colorfast and can be washed in the same way as the yarn used in your project.
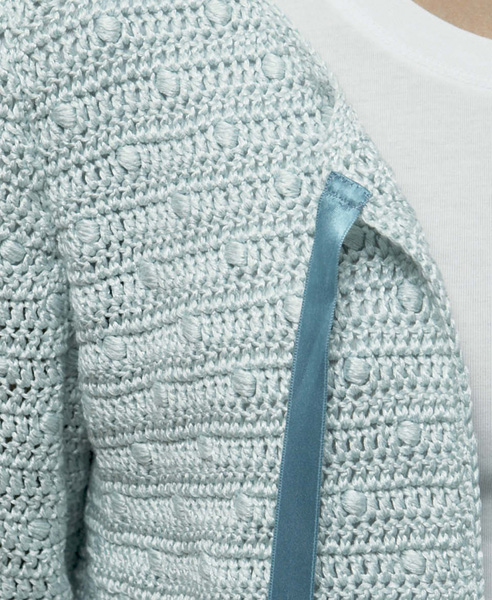
Detail of Ocean Pearls Cardigan, page 112.
Preparing for Good Seams
You start preparing for seaming at the very moment you begin your project. The quality of your seams will depend on the quality of the edges of your fabric. Try to make your edges as neat and consistent as possible.
Be sure to block your crocheted pieces before you start seaming. Blocking will help set the shape of your pieces and can even out edges and stitches, which can help with the seaming. You can also slightly adjust the finished pieces to make them more uniform so they fit together nicely for seaming.
When your pieces are finished, make sure the pieces you’re going to seam together are the same size where they meet. Don’t just measure them with a measuring tape; check the pieces against one another. The edges of pieces crocheted at very different gauges or of very different dimensions won’t match well enough to be seamed together neatly. If you do find that your gauge is slightly inconsistent, however, it’s more important to match numbers of rows or stitches than to have the exact same measurement within a fraction of an inch. You’ll find seaming much easier if the size of the pieces and the gauge are consistent.
Study the edges of the finished pieces to determine where you will place the seam. Generally, you place a seam one stitch from the edge of each piece. One stitch, then, will be hidden in the seam. If you’ve turned your rows counting the turning chain as a stitch, then in every second row, the seam will run between the turning chain and the first real stitch of the row. If you’ve turned your rows without counting the turning chain as a stitch, the seam will always run inside the first real stitch of the row.
If your project is made in a very bulky yarn, you may want to work the seam in the center of the first stitch of each row to avoid a seam that is too thick. Also, if the stitches are particularly tall, you may want to work through rather than between the stitches.
I generally recommend securing the end of the seaming yarn at the beginning of the seam, working two to three stitches in the same spot. If you prefer, you can leave a tail of yarn to be woven in after the seam is finished. The latter approach is especially useful if you are seaming with a yarn other than the one you used in the project because you can hide all the yarn tails in the finished seams.
Seaming Techniques
I describe five types of seams—woven, backstitch, whipstitch, single-crochet, and slip stitch—each of which will be right for certain projects. Woven seams are especially useful for matching crocheted elements, such as rows. Backstitch seams are sturdy and can withstand pulling. Whipstitch seams have the advantage of being simple, but they’re bulky. Single-crochet seams are entirely crocheted, but they, too, are bulky. Slip-stitch seams, also crocheted, are sturdy, but you must closely control stitch tension.
Woven Seams
A woven seam is the crocheter’s equivalent of the knitter’s mattress stitch. The seam is worked with the right sides of the pieces facing you. This makes the woven seam particularly useful in situations where you want to match rows, stitches, or stripes.
Place the pieces you’re assembling side by side on a flat surface in front of you, right sides facing you. The edges to be seamed should line up row by row or stitch by stitch.
STEP 1: Secure the seaming yarn on the wrong side of piece A at the start of the seam. Pass the needle through to the right side at the bottom of the first stitch.
STEP 2: Put the needle through the bottom of the first stitch of piece B and pass it up to the right side again at the top of the stitch (or in the stitch above, if you’re working in single crochet).
STEP 3: Put the needle through the bottom of the first stitch of piece A, exactly where you previously passed the needle to the right side, and bring the needle to the right side at the top of the stitch.
STEP 4: Put the needle through piece B, where you previously passed the needle to the right side, and bring the needle to the right side at the top of the stitch.
STEP 5: Put the needle through piece A, where you previously passed the needle to the right side, and bring the needle through to the right side at the top of the stitch in the next row.
Repeat Steps 4 and 5, gently tightening the seam as you go, being careful not to distort the fabric. Allow the rows to line up but don’t make the seam tighter than the edges themselves. The edges will roll to the wrong side of the work. Secure the end of the seaming yarn.
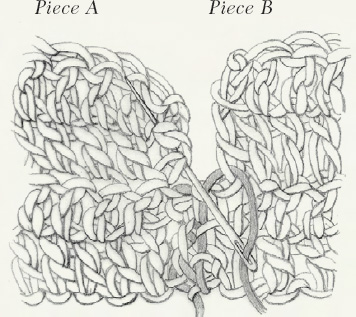
Woven seam applied “row to row”
This technique can also be used for seaming stitch to stitch. To do so, pass your needle through to the right side at the first stitch of piece A (through both loops at the top of the stitch), put it through the first stitch of piece B and pass it up to the right side again at the second stitch of piece B. Continue seaming in the same weaving fashion as described above, catching a new stitch every time you pass your needle through the fabric.
Backstitch Seams
Backstitch seams are very sturdy and are especially suitable for seams that will be exposed to pulling and tugging, such as the shoulder seams of a garment or the seams of a crocheted bag. Backstitch seams are useful when you assemble pieces “row to stitch.” They’re also valuable for joining pieces of a different nature, such as one crocheted piece and one knitted piece. And backstitch seams work well if the pieces you’re assembling have uneven edges, but the seam needs to be straight. However, backstitch seaming isn’t suitable if you want the seam to be stretchy.
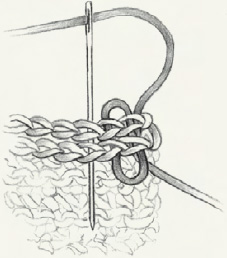
Backstitch seam applied stitch to stitch
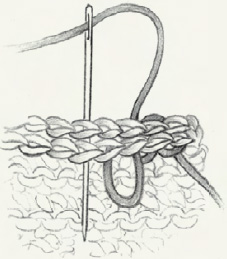
Step 3 of backstitch seam
For this seam, bring the right sides of the pieces together. Hold the pieces in your hand with the two edges facing you and piece A closest to you. Work from right to left.
STEP 1: Secure the seaming yarn on the wrong side of piece A at the start of the seam. Pass the needle through both pieces, from front to back in the first stitch. Then pass the needle through the first stitch to the left, back to front.
STEP 2: Pass the needle through from front to back, at the same spot worked front to back in Step 1. Then pass the needle through from back to front in the second stitch to the left.
STEP 3: Pass the needle through from front to back in the first stitch to the right at the same spot where the needle came through back to front in the previous stitch. Then pass the needle through from back to front in the second stitch to the left.
Repeat Step 3 to complete the seam. Secure the end of the seaming yarn.
Whipstitch Seams
A whipstitch seam, which is simple and almost intuitive to execute, is a good seam for beginners. However, whipstitch seams are relatively bulky. Be careful if your yarn is heavy or if you’re assembling a close-fitting garment. In those cases, it might be worthwhile to use a woven or backstitch seam. In the example (above), the whipstitch seam is worked from the wrong side of the pieces to create a seam that will be invisible from the right side. Place the pieces with right sides together. Hold the pieces in your hand with the two edges facing you.
STEP 1: Secure the seaming yarn on the wrong side of one piece, at the start of the seam. Pass the needle through the pieces from back to front at the start of the seam. This creates a small stitch to begin the seam.
STEP 2: A little farther to the left, pass the needle through the pieces, again from back to front.
Repeat Step 2 to complete the seam. Secure the end of the seaming yarn.
You can also work the whipstitch seam on the right side to create a visible seam that becomes part of the project’s overall design.
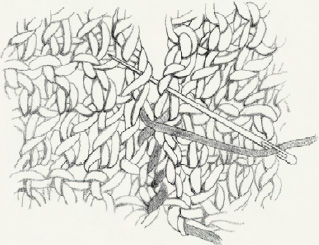
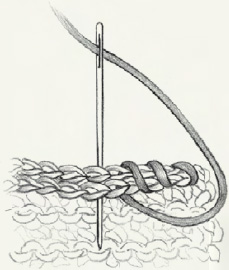
Whipstitch is a very simple, though bulky, seam.
Top: Whipstitch worked row to row.
Bottom: Whipstitch worked stitch to stitch.
Single-Crochet Seams
A single-crochet seam is entirely crocheted, which makes it easy to work and appealing to many crocheters. However, be sure to take into account that the seam will be bulky. You can use that quality to your advantage as a design element—perhaps by working single-crochet seams on the right side of your pieces in a contrasting color.
Place the pieces together with the wrong or right sides facing depending on whether you want your seam to be hidden on the wrong side or show on the right side of your work. Hold the pieces in your hand with the two edges facing you.
Insert the hook through both pieces at the beginning of the seam and pull up a loop, chain one. Work a row of single crochet by inserting your hook through both pieces at the same time. Complete the seam and secure the end of the seaming yarn.
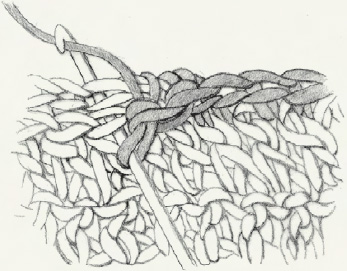
To seam with single crochet, make stitches as usual, but insert the hook through both pieces of fabric at the same time.
Slip-Stitch Seams
The slip stitch creates a neat and sturdy crocheted seam. However, you must control the tension of your stitches. If they’re worked too tightly, the seam will pull in and be somewhat inflexible. As you might guess, this seam isn’t well suited to lacy fabrics.
Begin by placing the pieces with right sides together. Hold the pieces in your hand with the two edges facing you.
Attach the yarn by inserting your hook through both pieces at the beginning of the seam, pulling up a loop, and chaining one. Work slip stitches, inserting your hook through both pieces at the same time, from front to back, and pulling up the yarn from behind. Complete the seam and secure the seaming yarn.

Detail of Luna Sweater, page 58.
Seaming Without Dread
Now that you’ve reviewed the instructions for these five seaming techniques, I hope you’ll feel able to choose an appropriate technique for each of your projects and execute that seam with confidence. Good seaming will give your crochet projects the well-made finish they deserve.

 ): #40 silver grey, 5 (6, 6, 7, 7, 8) balls. Yarn distributed by Tahki Stacy Charles.
 This fabric grows when worn, particularly the sleeves. Keep this in mind before deciding to lengthen.


