Chapter 8
Quiz Answers
Quiz #1:
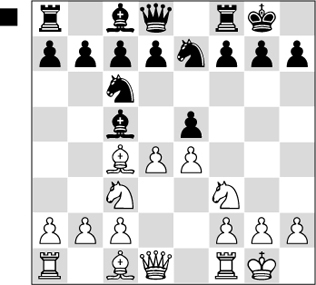
Answer: Black has 3 attackers of d4 vs. 2 defenders, so he can win the pawn: 1…Bxd4 2.Nxd4 Nxd4.
If instead 1…exd4, White plays 2.Nb5 and wins back the pawn on the next move. On 1…Nxd4 White plays 2.Nxe5.
Quiz #2:
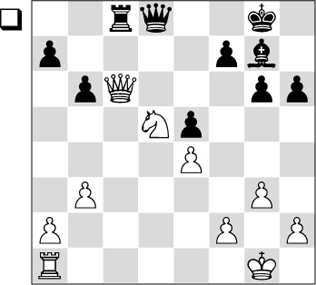
Answer: White wins a rook with 2.Qxc8! Rxc8 3.Ne7+!, forking K+Q! The Takes Takes Bang! combination is covered in Power Chess Vol. 1.
Quiz #3
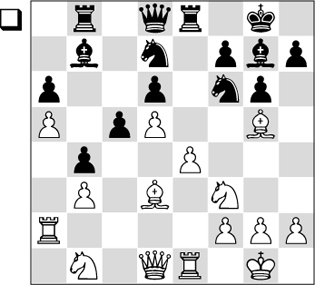
Answer: The knight finds a powerful post on c4 with the maneuver 1.N1d2 followed by 2.Nc4.
Quiz #4
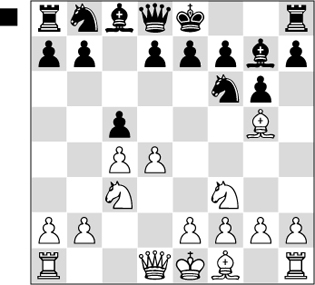
Answer: Black should avoid 1…Nc6? because the knight lacks a central anchor and gets pushed around with 2.d5!.
Instead, either 2…cxd4 3.Nxd4 and now 3…Nc6 when the knight is secure, or 2…d6 followed by developing the knight to d7, are both fine for Black.
Quiz #5:
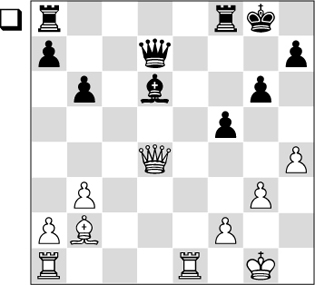
Answer: White mates with 1.Qh8+! Kf7 2.Qg7# (or 2.Qxh7#).
Quiz #6:
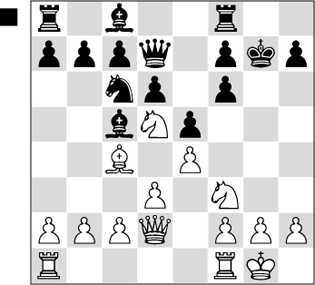
Answer: White threatens 1.Nxf6! because 1…Kxf6 2.Qg5 is mate.
Quiz #7:
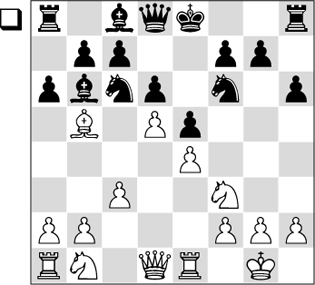
Answer: White plays 1.Ba4!, maintaining the pin and winning the Nc6.
Quiz #8:
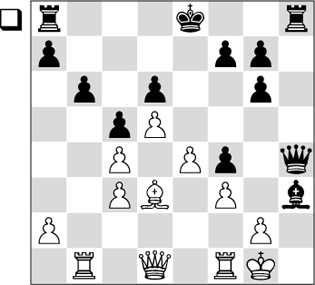
Answer: On 8.gxh3 Qg3+! 9.Kh1 Rxh3 is mate.
Quiz #9:
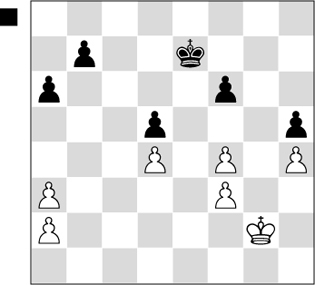
Answer: The solution is long, but good practice in looking ahead!
1…Kd6 2.Kf2 Kc6 3.Ke3 Kb5 4.Kd3 Ka4 wins a pawn, for starters.
Quiz #10:
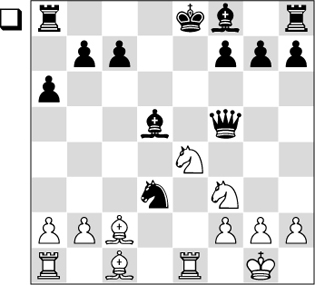
Answer: The double check 1.Nf6+! forces the king to move, to escape both checks by the Nf6 and Re1: 1…Kd8 2.Re8#.
Many double checks are shown in Power Chess Vol. 2.
Quiz #12:
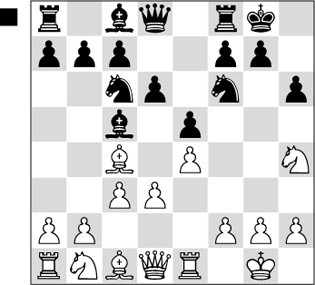
Answer: Black found 1…Ng4!, attacking the f2-pawn while discovering a queen attack on the Nh4. Now 2.Nf3 Bxf2+! wins the exchange plus a pawn, but White’s defense was much weaker:
2.Rf1? Qxh4 3.Qf3 Qxh2#!
Instead of 1.Nh4?, White could play 1.d4!, achieving the big center; also good were 1.b4, gaining queenside space, 1.Be3, or 1.Nbd2 (if then 1…Ng4 2.Re2! defends f2 without difficulty).
Quiz #13:
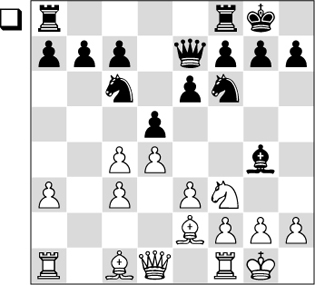
1.a4
This threatened 2.Ba3!, skewering the black queen and the Rf8 to win the exchange. Black should defend with 1…Qd7, 1…Rfe8, or 1…Rfd8.
Quiz #14:
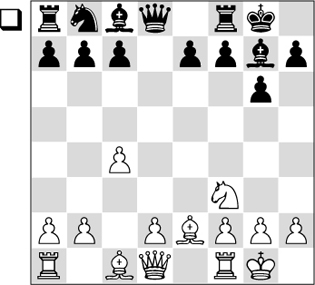
Answer: No way should White waste a precious development tempo with 9.h3? For starters, 9…Bg4 isn’t even a pin – White’s Be2 shields the queen. White should develop ideally with 9.d4!, making a central pawn duo. He probably feared that after 9.d4 Bg4 the d-pawn would come under attack, but White simply defends with 10.Be3!.
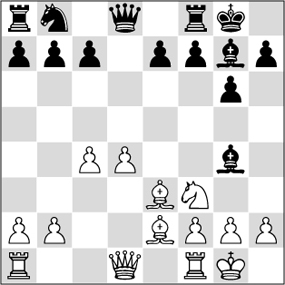
With a lovely, strong position. If then 10…Nc6 11.d5! Bxf3 12.Bxf3 Ne5 (not 12…Bxb2? 13.Rb1).
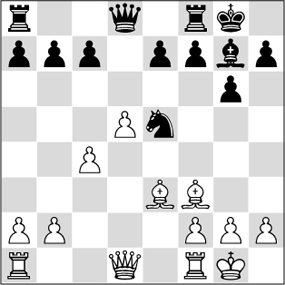
10…Nc6 11.d5! Bxf3 12.Bxf3 Ne5 – analysis
After 13.Be2! White is better, with central space and two strong bishops.
Quiz #15:
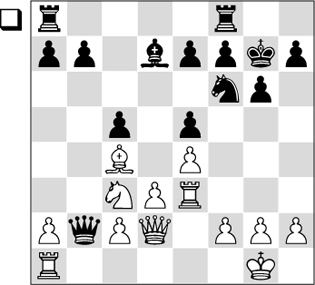
Answer: 1.Rb1! Qa3 2.Rxb7 recovers the pawn with advantage.
Quiz #16:
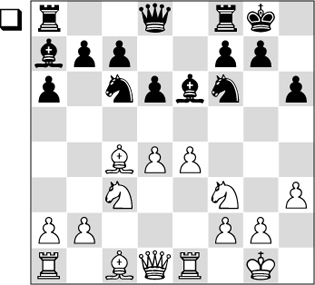
1.Bd3? Nxd4! 2.Nxd4 Bxd4 and if 3.Bxa6 (discovery on d4) 3…Bxf2+!. Instead White should win with the aggressive 1.d5!, forking B+N. If 1…Na5 2.Bf1 Bd7 3.b4! the knight is trapped and lost on the edge.
Quiz #17:
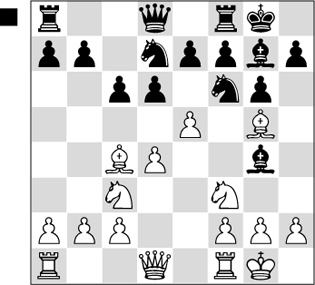
Answer: Black wins a pawn with 1…dxe5 2.dxe5 Bxf3! 3.Qxf3 Nxe5.
Instead of 2…Bxf3!, 2…Nxe5? is a blunder due to 3.Qxd8 Nxf3+ 4.gxf3 Raxd8 5.fxg4, losing a piece!
Quiz #18:
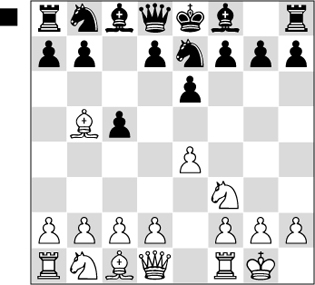
Answer: 3…a6! forces the passive retreat 4.Be2 or the clunky 4.Bd3. Worse is 3…a6 4.Ba4?? b5! 5.Bb3 c4, trapping the bishop.
Quiz #19:
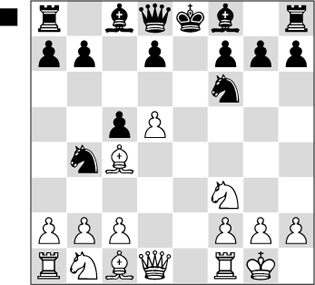
Answer: 1…Rb8? loses at once to 2.Re1+ Be7 3.d6!.
Black must instead play 1…d6 2.Re1+ Be7 with a tough, but not lost position.
Quiz #20:
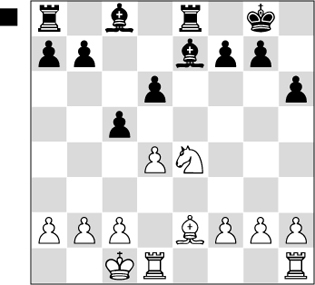
Answer: Simplest is 1…Bf5, with nothing to fear after 2.Ng3 Be6 or 2.Bf3 Rad8 3.Ng3 Bc8!.