Chilling Effects: Cooling Your Wort
Whether you are a malt-extract, mash-extract or all-grain brewer, the task of cooling boiling-hot wort down to yeast-pitching fermentation temperatures presents itself as an exercise in expediency. The methods range from simple, requiring no additional equipment, to complex, employing sophisticated equipment requiring an initial onetime investment of time and resources and great attention to sanitation. The method chosen depends on whether a full wort boil or concentrated wort boil is employed and whether the brewer has access to water cold enough to facilitate adequate cooling.
THE PRINCIPLES OF WORT CHILLING:
WHY AND HOW
The primary reason for cooling wort is to reduce the temperature for optimal yeast activity and fermentation.
It is desirable to cool the wort as quickly as possible to minimize the time the wort is susceptible to contamination. Once the temperature of the wort falls below about 140 degrees F (60 C), the risk of contamination by spoilage microorganisms greatly increases. At temperatures between about 80 and 130 degrees F (27–54 C), most wort-and beer-spoiling bacteria thrive.
Also, a wort cooled slowly over more than an hour may develop compounds that will later result in excessive levels of DMS (dimethyl sulfide), undesirable flavor compounds reminiscent of the taste and aroma of sweet cooked corn. This is a factor when lager malt is used. English pale-type malt and other similarly higher-temperature-kilned malts do not present this problem.
Various methods, techniques and equipment may be used to cool wort. They all employ various means of heat exchange, that is to say, taking the heat away. Let’s briefly examine the principles of heat exchange in order to more fully appreciate what’s going on and to allow yourself the opportunity for further creativity.
THE PRINCIPLES OF HEAT EXCHANGE
Time for a homebrew. Heat is a form of energy, and your hot wort has a lot of it. You can’t make energy disappear, but you can convert heat energy to a different form of energy, remove it or “dilute” it. Consider heat as an entity. It can travel. (“Cold” does not travel; only heat does.) In order for heat energy to be removed, it must be carried away. Cold water passing through the hot wort by means of pipes or tubes, or surrounding a hot pot of wort, will carry heat away. The cooler water must be moving away; otherwise, the heat removal will stop when that cool water is no longer cooler than the hot wort, because there’s no reason for the heat to leave the wort. Got it?
There has to be movement to carry the heat away. It has to go somewhere. Now consider this: The greater the differential (that means “the difference” to nontechy types) between the hot wort and the cooling water, the faster the heat will leave your wort. Eventually the hot wort will reach “equilibrium” temperature with whatever it is in contact with. But remember, the greater the difference, the faster the cooling. That’s why boiling-hot water will freeze faster than (or as fast as) room-temperature water given the same cooling conditions; and vice versa for ice water and warm water brought to a boil. “No way,” you say? Well, try it yourself before you make any conclusions about my sanity. But just to give you an example, 3 cups of 120-degree F (49 C) water will increase 15 degrees F in the same time 3 cups of 65-degree F (18 C) water will increase about 35 degrees F using identical heat sources. (I just did it!)
Commercial breweries use many different systems to cool wort. Some utilize large, shallow “pans” called cool-ships, where the wort fills to a depth of about 1 foot (0.3 m.). These cool-ship rooms are ventilated with sterile air systems. The hot break settles out of the hot wort while cooling to about 160 degrees F (71 C). Leaving the trub behind, the wort is drained and piped to counterflow-type (heat exchanger) wort chillers (discussed below) for cooling to fermentation temperatures. Other breweries will employ whirlpool tanks to receive the hot wort and then direct the hot flow out to a counterflow wort chiller. The system is completely enclosed and requires diligent cleaning and sanitation.
Homebrewers are little people making big beers. Their wort-chilling techniques are home adaptations of the commercial systems.
EQUIPMENT AND TECHNIQUES FOR EXTRACT AND MASH EXTRACT HOMEBREWERS
Sanitary procedures are essential through the 80–130 degree F (27–54 C) temperature range and until the yeast is pitched and begins to create an environment that inhibits the few microorganisms that find their way into the wort. (Absolute sterilization is impractical and highly improbable.)
For those employing brewing methods that boil concentrated worts, the process of chilling the wort is instantaneous and simple. Hot concentrated wort is passed through a sanitized strainer (sanitize the strainer by immersing it in the boiling wort during the final 15 minutes of boiling) to a fermenter containing adequate cold foundation water to reach fermentation temperature. In warmer climates the natural water source may not be cold enough to facilitate adequate cooling. In this case there are a few options for the homebrewer to consider.
Chill the foundation water in sanitized gallon jugs in your refrigerator. Utilize the cool-ship principle by immersing your covered brewpot of hot wort in cold water for 10 to 20 minutes. This will cool the wort to about 150 to 170 degrees F (66–77 C) within 10 to 20 minutes. It isn’t essential to create a flow of water to carry the heat away, though it will speed up the process. Between the two procedures of chilling the foundation water and/or partially cooling the wort, fermentation temperatures can easily be achieved.
FULL WORT BOILS: EXTRACT AND
ALL-GRAIN BREWING
With a 5-gallon (19-l.) batch you have all 5 gallons of boiling hot wort to chill. You want to chill it as quickly as possible and give careful consideration to sanitation. Let’s consider the simplest ways first.
The pot-immersion method requires an investment in a long-handled stainless steel spoon. Use stainless steel because it can be effectively sanitized. Never use a wooden or plastic spoon. You will immerse your brewpot in a flow of cold water, cooling the wort by the principle of heat exchange. Recall that the heat must be carried away. The flow of cold water facilitates this. As well, the hot wort must be stirred constantly for best results; stirring carries the hot wort from the center of the pot to the cooler sides, where the heat is actually exiting through the walls of the pot.
The room where this is done must be draft- and dust-free. Roll up the sleeves of your shirt and wash your hands and arms before hovering over your pot while stirring. You don’t need to create turbulent rapids. With careful wort agitation, a slow flow of adequately cold water will drop the temperature to yeast-pitching level within 30 minutes.
The cooled wort may be transferred to the fermenter by ladling with a sanitized saucepan, through a strainer and funnel if necessary. The strainer will remove spent hops (if still present). Aerate the cooled wort well as it splashes into the fermenter or after it is in the fermenter.
If you live in a climate where tap water isn’t cold enough to chill your wort adequately, then sanitary methods of cooling with ice during the final temperature drop can be used. Never add ice directly to your wort. Water exposed to the air in your freezer will be contaminated. Add 3 quarts (2.8 l.) of water to an unused one-gallon-size (3.8-l.) Ziploc-type heavy-duty freezer bag. Employ sanitary procedures by double-bagging, inserting one bag inside another in order to protect the surface of the inner bag containing the water. Place the double-bagged water in a paper bag before placing in the freezer to reduce the risk of nicking and puncturing the plastic. Freeze the water solid. When you have reduced the wort temperature to about 80 to 85 degrees F (27–29 C), add the bagged ice. Carefully remove the inner bag of ice from its protective outer bag. Immerse in the warm wort and let sit. Stir occasionally, but take great care to avoid puncturing the bag. Two one-gallon-size bags, each containing 3 quarts of 0- to -5-degree F (–18 to –21 C) ice, should reduce the wort temperature to 70 degrees F (21 C) with the greatest of ease.
If the ice bag method doesn’t suit your fancy, you can add 80-degree F (27 C) wort to the fermenter and facilitate further cooling by wrapping the fermenter with a wet towel or large T-shirt. This works particularly well in drier climates and can reduce the temperature of the wort 10 degrees F (about 5 C) below room temperature. It takes a few hours, but a clean wort will wait without suffering too much.
The next simplest method of wort chilling involves immersing a coil of copper (or stainless steel) tubing into the hot wort. Cold water flows in one end and out the other end of the coil. The heat of the wort travels through the copper coiling and into the cold water and is carried away.
Copper is easier and less expensive to work with than stainless steel. About 15 to 20 feet (4.5–6 m.) of 3/8- to ½-inch (0.95- to 1.27-cm.) outside-diameter copper tubing is required. Form a coil by rolling the tubing in an 8- to 10-inch diameter (20- to 25-cm.) cylinder of some kind. (Stainless steel soda canisters [see sections on “fermenters,” Fermentation Equipment for the Homebrewer, and “kegging,” Kegging and Draft Equipment] work well.) To reduce the risk of crimping the copper tubing while fashioning the coil, you can fill the copper tubing with water and temporarily seal the ends. When the coil is immersed in the brewpot, the ends of the coil must extend up and out of the pot. Bend the ends downwards in a U shape to prevent the attached plastic hoses from crimping. Attach hoses to both ends and secure with hose clamps. You will need to adapt the end of your “in with the cold water” hose to be able to connect with your water source. Adaptors will vary, but you can figure that out.
When using the coil-immersion method, care must be taken to minimize contamination. Immerse the washed, clean coil and stainless steel stirring spoon in the boiling wort during the final 15 minutes of boiling. This will sanitize the surface. Don’t worry about the shinier appearance of the coil; everything is still copacetic.
Place the pot near your sink. Air drafts and dust should be minimal in the room. Roll up your sleeves. Wash your hands and arms thoroughly. Attach the in-hose to your source of cold water. Begin flow, stir the wort constantly and don’t sneeze into the wort or scratch your beard (or your nose) while peering into the stuff that will soon be beer. Aerate the wort with agitated stirring once temperatures fall below 110 degrees F (43 C). Monitor the temperature and quit once you’ve reached 60 to 70 degrees F (16–21 C). Carefully transfer the wort (and spent hops if still in the wort) through a sanitized strainer (sanitize the strainer by immersing in boiling wort during the final 15 minutes of boiling) to the fermenter.
For those living in warmer climates, ice bags or wet towels as explained in the preceding section may be employed to finish reducing the temperature.
Requiring more time and/or expense in fabrication, the counterflow chilling system has advantages and disadvantages. This heat exchanger is designed so that hot wort passes through the inside of the coils (copper or stainless), while cold water bathes the outside of the coils and flows in the opposite direction of the wort (counterflow), carrying the heat away. Because the wort travels inside the coil, the care, cleaning and sanitation of the coils must be given tremendous attention. Sanitizing solutions are often corrosive, so they cannot be in contact with the copper or stainless for any length of time. The coils, connections and fittings require thorough rinsing with very hot or near-boiling water and must be cleaned before and after each use. It has an advantage in that it is a closed system. If the system is sanitary to begin with, there is virtually no risk of contamination. The system requires that all of the spent hops be removed before the wort enters the system. Gravity (or a pump) can be utilized to siphon hot wort into the counterflow device and out directly into the fermenter.
There are several designs employed by homebrewers, using all types of fittings, adapters, tubes and clamps. Two configurations are presented to seed your mind for more thorough development. The copper tubing usually used for these systems is about ¼ inch (0.64 cm.) inside diameter.
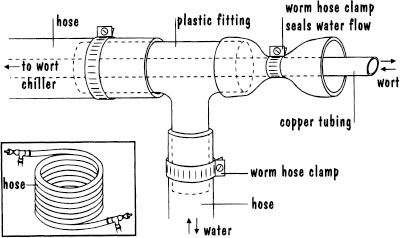
The garden hose system calls for an approximately 15- to 20-foot (4.5- to 6-m.) length of copper tubing to be inserted into a hose of slightly shorter length. The copper tubing’s diameter is smaller than the inside diameter of the hose in order to allow water to flow through the hose and around the tubing. The tubing protrudes 3 to 5 inches (7.5–13 cm.) out either side of the hose ends. The hose-tube is coiled for convenience. Additional short lengths of plastic tubing, T connectors and hose clamps are configured at the ends to allow wort from the brewpot to flow into the copper tubing and exit to the fermenter, while cold water flows in the opposite direction into the hose and out as warm water that can be collected for cleaning or directed down the drain.
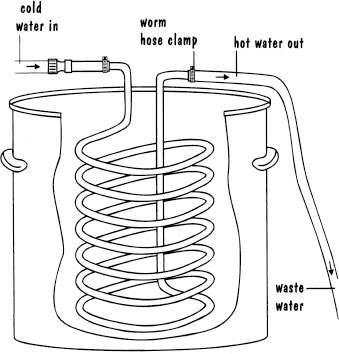
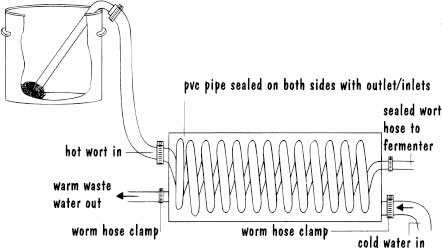
Another simple method utilizes ice chilling and is ideal for use in warmer climates where tap water is warm at best. Quite simply, hot wort passes into a coil of copper tubing that is immersed into a bucket or container of ice and water. The water-ice mixture is stirred constantly until the temperature of the cooled exiting wort reaches 70 degrees F (21 C). The flow of wort is temporarily stopped while fresh ice and cold water replace the increasingly warmer water.
Be sure to clean, sanitize, hot-water-rinse and drain these systems before storage. Place a piece of foil over each end to deter homeless spiders and roaches from loitering.