Natural conditioning with the addition of a measured amount of fermentable sugar prior to bottling or kegging is the most common method employed by homebrewers to carbonate beer. Three-quarters of a cup (178 ml.) of dextrose (corn sugar) added to 5 gallons (19 l.) of fully fermented beer will adequately carbonate bottled beer. For kegged brew and draft beer, about 1/3 cup (79 ml.) of dextrose per 5 gallons (19 l.) will create appropriate carbonation.
All-malt enthusiasts may substitute dried malt extract for dextrose. In this case, the process is called kraeusening. Use 1¼ cups (296 ml.) of dried malt extract for bottling or ½ cup (118 ml.) for kegging. Whether dextrose or dried malt is used, priming sugar should be dissolved and boiled for 5 minutes in about 1 cup (237 ml.) of water before adding to the beer prior to bottling.
Malt extract will take comparatively longer to carbonate beer than corn sugar. There is a solid theoretical basis for this phenomenon. Yeast does not require dissolved oxygen to metabolize dextrose, but does require dissolved oxygen or the development of nutritional equivalents to metabolize most of the sugars in malt extract. Neither the fully fermented beer nor the added priming solution contains dissolved oxygen, thus time is needed to develop nutritional equivalents, resulting in slow carbonation. Patience and time are the easiest remedies, but it is perhaps truer to the tradition of kraeusening to expedite a normal bottle fermentation by introducing yeast to a well-aerated malt extract solution and letting it metabolize oxygen for 4 to 6 hours before adding it as priming. An alternative for those using dried yeast would be to simply add some fresh dried yeast to the batch along with the malt extract solution. Dried yeast has its oxygen requirement stored, having taken it up prior to being suspended in its dried state.
Each has its advantages and disadvantages, though batch-priming methods help assure consistent and contamination-free results. Batch primers rack (transfer) the finished beer off of any sediment to another vessel to which all of the priming sugar is added and evenly mixed. Bottle primers attempt to add a carefully measured amount of priming sugar to each bottle and bypass the extra transfer.
There are two significant problems that are likely to be encountered with bottle priming: (1) Without being dissolved and boiled in water, granulated dextrose may contain beer-spoiling microorganisms, and (2) a 10 to 20 percent difference would not be visually noticeable, but can have drastic effects resulting in under- or overcarbonation. Until someone produces sanitarily packaged, premeasured dextrose pellets for bottle priming, batch priming is a preferred means of priming.
Other fermentable sugars may be used as priming. Some will contribute unique flavor. The following table shows equivalents.
SUGARS FOR PRIMING: VOLUME MEASUREMENTS OF VARIOUS SUGARS FOR BATCH PRIMING 5 GALLONS (19 L.)
Sugar Type: dextrose
Bottles: ¾ c. (180 mI.)
Draft/Keg: 1/3 c. (80 mI.)
Sugar Type: honey
Bottles: 1 c. (240 ml.)
Draft/Keg: <½ c. (100 ml.)
Sugar Type: maple syrup
Bottles: 1¼c. (300 ml.)
Draft/Keg: 5/8 c. (130 ml.)
Sugar Type: molasses
Bottles: 1 c. (240 ml)
Draft/Keg: <½ c. (100 ml.)
Sugar Type: brown sugar
Bottles: 2/3 c. (155 ml.)
Draft/Keg: <1/3 c. (70 ml.)
Sugar Type: cane or beet sugar
Bottles: 2/3 c. (155 ml.)
Draft/Keg: <1/3 c. (70 ml.)
Sugar Type: dried malt extract
Bottles: 1¼ c. (300 ml.)
Draft/Keg: 5/8 c. (130 ml.)
NOTE: Milliliter equivalents are rounded off to the nearest whole number divisible by 5.
If you brew enough, you may encounter the rare batch of beer that does not carbonate. You did add sugar. You did rinse out the sanitizer properly. You did everything correctly. But your beer never carbonated. Without ever finding an explanation, you can salvage your flat beer. You could blend it with carbonated beers at your next party. But more seriously, each bottle can be uncapped and a pinch of dried yeast or a drop or two of rehydrated dry yeast can be added. Quickly recap and briefly agitate the bottle, store for another few weeks, and in most cases the beer will carbonate.
When particularly strong beers do not carbonate, it may be the result of the yeast’s intolerance to alcohol. In these special circumstances wine or champagne yeast can be used to salvage carbonation, if wine yeast was not used for initial fermentation.
Just as some breweries inject carbon dioxide gas into flat beer right before it is packaged, homebrewers with scaled-down techniques can also artificially carbonate their beer prior to or after the beer is packaged. This method is particularly convenient when you need 5 gallons of homebrew tomorrow and you only have 5 gallons of unbottled yet fully fermented, clear beer in your carboy.
To artificially introduce carbon dioxide into your homebrew, you will need a carbon dioxide draft system complete with fixtures. The principle one takes advantage of is that carbon dioxide gas will dissolve into a liquid solution when introduced under pressure. The amount of carbon dioxide that can be dissolved into beer and the level of carbonation that will result are determined by the pressure applied and the temperature of the liquid. Average carbonation levels for most German, American or British styles of beer fall into a range of 2.0 to 2.7 volumes of carbon dioxide. British styles are on the low end of this range, German styles in the middle, and American styles on the high end. By referring to the Carbon Dioxide Volume Table, one can choose a desired amount of carbon dioxide and then determine the temperature of the beer and required carbon dioxide pressure.
In practice, after chilling your flat beer, the desired pressure is applied to the keg through the regulator, and the keg is shaken until equilibrium is achieved. If time is short, an extra few pounds of pressure can be applied for quicker dissolution of the gas into the beer. If time is on your side, the correct pressure can be applied and the keg left to sit over a period of a day or two with occasional agitation until equilibrium is reached; i.e., no more gas is heard moving into the cold beer when it is shaken.
Volumes of Carbon Dioxide (CO2)
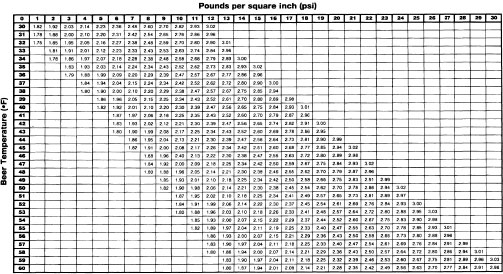
Draw a line straight across from the temperature of the beer to the desired volumes of CO2 then straight up to find the correct psi of your regulator.
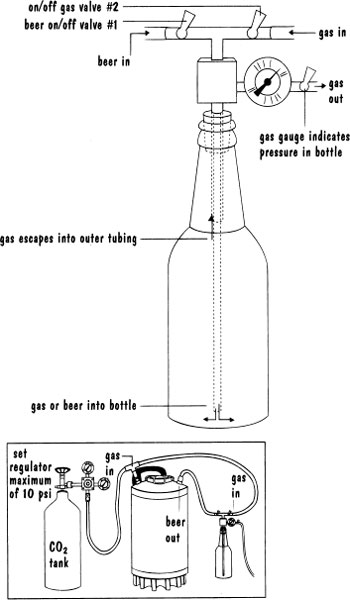
Artificially carbonated bottled beer is within the means of the homebrewer who wishes sediment-free or quickly carbonated bottled beer, but the methods are significantly more complex. The beer must be fully carbonated before it is transferred to the bottle. The conditioning method may be natural or artificial. Homebrewers will begin with a kegged container of chilled and fully carbonated beer and then transfer the beer to bottles under pressure. Pressure is maintained throughout the transfer system of hoses, tubes and the “counterpressure” bottling gadget so that the carbonated beer will not release any of its dissolved carbon dioxide. The system is referred to as a counterpressure system because the gas pressure exerted by the carbon dioxide in the beer is countered by artificial carbon dioxide pressure from a regulated carbon dioxide source.
The counterpressure bottling device is first placed atop a sanitized bottle, temporarily sealing it with a rubberlike stopper through which gas or liquid can enter or escape. The first step after temporarily sealing the bottle is to purge air out of the bottle by allowing carbon dioxide to flow in and displace the original air by exhausting it. This is accomplished by opening and closing different valves. After the air has been evacuated from the bottle, a valve is shut and carbon dioxide is allowed to continue entering the bottle under a pressure equal to that of the kegged beer, thus pressurizing the bottle at a pressure equal to the pressure of the kegged beer. Next a valve is opened, allowing beer to flow into the bottle, but because of equal pressure in the bottle and keg, there can be no flow until the carbon dioxide in the bottle is slowly evacuated (as the original air was) by opening a valve. Beer slowly flows into the bottle to the desired level. The vent and beer flow valves are shut, the device is removed and the bottle is quickly capped.
The operation is much simplified when four hands are employed. Safety glasses should always be worn when operating this device because of the risk of an imperfect bottle bursting under pressure.
If you have time to consume, an idle mind and the hankering to try something different, counterpressure bottling may suit your homebrewing hobby. Hand-operated counterpressure devices can be purchased for as little as $40.
Most homebrewers consider themselves slaves to bottling when it comes time to package homebrew. Bottling can be a time-consuming chore, requiring extensive preparation time and scheduling, but it doesn’t need to be. It can be a procedure as spontaneous as having another beer, taking less than an hour of your time.
When to Bottle
Until you feel in touch with your fermentation, the trusted hydrometer will continue to give you a true indication of when to bottle. If you’ve brewed and bottled enough times, you will begin to realize that beer is ready to bottle when it appears a certain way. Easily observable in glass fermenters, an apparent darkening of the brew brought on by clarification and the cessation of bubbles are accurate indications that your beer is ready to bottle (or cold lager). Hydrometer readings should be taken and recorded during the bottling process, but visual observation can serve well to indicate when the brew is ready to bottle. Practice and confirm with regular hydrometer readings until you are confident about making these judgments.
Preparing the Bottles
Contrary to the methods you may have been employing, all of your empty bottles should be ready to be filled with beer within a few moments’ notice. How can this possibly be?
Between batches of beer, while the beer is fermenting and you have leisure time, take the opportunity to immerse your beer bottles in a 10- to 15-gallon (38- to 57-l.) clean plastic trash can to which about 1/3 cup (79 ml.) of household bleach and nearly a total volume of cold tap water have been added. It’s a mindless task perfect for soothing a stressed mind numbed from a day’s work. It will take all of 5 minutes to totally immerse two to four cases of empties in the sanitizing solution. Let soak overnight or until you are in the mood to take the next step. This could be days or weeks later. Take about 15 minutes to drain each bottle (do not rinse) and affix a piece of aluminum foil atop it. Place the bottles in their boxes and store for weeks, months or years until ready to use. Meanwhile immerse another round of empties in the pail and repeat only when you’re good and ready. You’ll find that the bottles will be sparkling clean, with stubborn stains vanished. If a particular bottle doesn’t come clean, discard the bottle as it isn’t worth your valued time. Rubber gloves should be considered to protect your hands from the drying effects of the bleach solution.
When you’ve decided to bottle, simply remove the foil and give the bottle a quick rinse with hot tap water. A homebrew-type bottle rinser will complete this step in 3 seconds, enabling you to prepare and bottle 5 gallons (19 l.) of beer as well as clean up within one hour.
Dishwashers are not recommended for cleaning because they are comparatively high energy users and may not remove stains and bacterial deposits inside the bottles. There are other sanitizing chemicals that can be substituted for bleach, but they should be tested against the stain-removing capabilities of a dilute household bleach solution.
Iodine-based sanitizers are available and commonly used in the dairy industry and by many breweries. They are effective sanitizers. When diluted with water in proper proportions, they may be used to sanitize equipment without subsequent rinsing. However, the correct sanitizing proportion of 12½ parts per million (titratable iodine) represents very low concentrations and must be carefully measured. If concentrations exceed the recommended limit, the iodine residue will give beer an undesirable iodine flavor and will be toxic to yeast. A drawback of iodine-based sanitizers is that they stain equipment a yellow-orange color very easily, a stain that’s almost impossible to remove.
Moving the Beer and Air Space
As discussed earlier, care should be taken to minimize aeration and oxygen uptake whenever transferring beer. To minimize the detrimental effects of oxidation in bottled beer, reduce the air space, which will reduce the amount of oxygen in the bottle. A half-inch (13- mm.) air space is perfectly all right for all bottled beer.
The magical 1- to 1½-inch (25- to 38-mm.) air space that we’ve become so accustomed to seeing in commercially bottled beer is little more than the space dictated by high-speed counterpressure bottling machines. As commercial beer undergoes the counterpressure process of bottle filling, there is a brief moment in the assembly line when a filled bottle of beer is open to the air. It is during those split seconds that a needle-thin stream of sterile water is injected into the bottle. The agitated beer foams over perfectly, evacuating the space with carbon dioxide gas released from the beer. A light tap on a bottle can produce the same effect. The bottle is capped as the “fob” barely oozes over the lip. When the foam subsides, there is “that air space.”
A small amount of air space is required for proper bottle conditioning, while excessive air space increases the risk of the explosive effect of overcarbonated bursting bottles.