
CHAPTER 3
Program Instructions
_______________________________________
The Protocol
The protocol runs for six months. There are two versions, the short version and the long one, described in detail below. The short version has a simpler regimen and requires fewer materials. It can more easily be performed within the school (or early intervention) environment. The long version adds scents and music to the day and has a larger base of exercises to draw from. Objectively, the two regimens are similarly effective in terms of the gains seen in IQ and in the Autism Diagnostic Observation scores (ADOS). However, parents who completed the long version found that scents were helpful in providing increased regulation and calming to their child, and they would therefore do them again. Although the studies did not note any benefit from listening to classical music, music and music therapy have been shown to be helpful in reducing behaviors, and stimulating social skills in children with autism.
The Activities
The core of the program consists of two 15-30 minute enrichment sessions in which the child performs 4-7 activities. This section lists the exercises, describes the effort needed to perform them, and then discusses alternative exercises that were created for children of different abilities. The next chapter provides thorough details for performing all exercises.
The 34 exercises of the long version of the protocol are listed in the table below. The short version uses only 15 of these (indicated in bold type in the table).
Activity Number |
Activity |
1 |
Place hands and feet in water of different temperatures |
2 |
Squeeze objects of different shapes and textures |
3 |
Draw imaginary lines on the child’s face and arms |
4 |
Walk on a pathway of different textures blindfolded |
5 |
Draw lines on the child’s face, arms, and legs with objects while listening to music |
6 |
Find the twin of an object in a pillowcase |
7 |
Take a scented bath then get a massage with scented oil or scented lotion |
8 |
While speaking or singing, touch arms and legs with a cooled or warmed spoon |
9 |
Draw lines on arms and legs with cooled or warmed spoons |
10 |
Match a picture of an object to the real object |
11 |
Walk on a 2 x 8-inch x 5-foot plank with eyes open, then blindfolded |
12 |
Remove a colored bead from a dish filled with ice cubes |
13 |
Use a sound cue to distract attention away from a visual task |
14 |
Remove objects from bowls of cool and warm water |
15 |
Pull a button from between someone’s fingers |
16 |
Walk on a bouncy surface of foam or large pillow with eyes open, then blindfolded |
17 |
Point to objects in a picture and name them |
18 |
Place a finger on a cool object, then on a warm one |
19 |
Create a small depression in dough and then put rice in it |
20 |
Select a textured square that matches its photo |
21 |
Draw imaginary circles on the child’s face using textured objects |
22 |
Place ice-filled straws into dough, alternating hands |
23 |
Walk on a 2 x 8-inch x 5-foot plank while carrying a chilled tray |
24 |
Rub fingers and toes in turn while child watches |
25 |
Place coins in a piggy bank using only a mirrored reflection of hands |
26 |
Pick up small objects using a thin pole with a magnet attached |
27 |
Track a red object as it moves around a picture |
28 |
Walk up and down stairs while holding a big ball or pillow |
29 |
Draw shapes using pencil and paper to match the shapes being drawn on the child’s back (over shirt) |
30 |
Draw lines on paper using both hands simultaneously |
31 |
Match colored beads to the colors of objects in a photo |
32 |
Blow aluminum foil or a small feather on the floor as far as possible |
33 |
View two pictures as they repeatedly move from back to front and back again |
34 |
Listen to music that corresponds in subject matter to a photo |
The activities are simple but the setup may take a bit of time. Let’s look at the first activity: Place hands and feet in water of different temperatures. Assuming that containers such as bowls or pails have been obtained, setup for this exercise is simple. Fill the containers with water of different temperatures. Contrast that exercise with the fourth exercise in which the child walks on a pathway of different textures. The setup may entail moving furniture to make room for a walkway near a wall, and then creating the pathway.
The activities can be and should be adjusted for each child, depending on their age, functional skills and sensory skills. To that end, most activity descriptions (in the next chapter) have both easier and harder alternate activities to be done in place of the original activity. The activity also notes safety and sensory considerations and workarounds to problems.
Short version
Here is the short version of the protocol:
• Perform 4-7 prescribed multi-sensory activities (from a total set of 15 sensory activities) twice each day, separated by three or more hours, for 15-30 minutes at a time.
Time commitment: 40-75 minutes total daily for setup and facilitation of the two exercise periods.
Long version
Here is the long version of the protocol:
1. Listen to classical music for 15 minutes over headphones.
2. Smell natural scents while receiving a one-minute back rub 4 times a day.
3. Perform 4-7 prescribed multi-sensory activities (from the total set of 34 sensory exercises) twice each day for 15-30 minutes at a time.
4. Sleep with a scented cotton ball in the pillowcase.
Splitting up the work for the long version: There is a considerable time commitment in doing the long version of the protocol, but there is also a great deal of flexibility in how it gets done. Exercises can be done in the home by parents alone, or by a combination of parents, aides and therapists who come to the home. Likewise, they can be done during the week in a school or early intervention setting and in the home on weekends and holidays. Here are sample schedules for the child receiving the program entirely at home (top schedule) or in a combination of school and home.
Sample home schedule
Time |
Activity |
8:30–8:31 am |
Scent and back rub |
10:00-10:30 am |
Exercises plus scent and back rub |
2:00-2:30 pm |
Exercises plus scent and back rub |
5:30-5:31 pm |
Scent and back rub |
8:30-8:45 pm |
Classical music |
8:45 pm |
Place scented cotton ball in pillow |
Sample school/home schedule
Time |
Activity |
Facilitator |
7:30–7:31 am |
Scent and back rub |
Parent |
10:00-10:30 am |
Exercises plus scent and back rub |
School aide (Parent on weekends) |
2:00-2:30 pm |
Exercises plus scent and back rub |
School aide (Parent on weekends) |
5:30-5:31 pm |
Scent and back rub |
Parent |
8:30-8:45 pm |
Classical music |
Parent |
8:45 pm |
Place scented cotton ball in pillow |
Parent |
To decrease the load, you can trim the two exercise sessions to 15-20 minutes instead of 15-30 minutes. You can also perform a scent and back rub activity immediately before or after the exercise sessions, and combine the music and last scent activity with the child’s bedtime routine.
Should I do the short version or the long version?
Start with the short version. If you can add in scent one or more times per day, do that. Likewise, try to find time each day for calming music. Add additional exercises from the long version, as desired, for variety and to decrease the rigidity of the exercise schedule.
The Mix-ins
Following the 34 enrichment exercises (in chapter 4) are additional exercises to facilitate speech, gross motor, and rhythm and timing. The speech exercises are designed to encourage expressive communication. They include reading books together, playing simple instruments and doing activities that make noise. The motor exercises were selected to increase functional and novel movement, and to enhance the child’s sense of motor rhythm.
Most of the mix-ins are fun and can be added into the exercise sessions as an interlude or offered at the end as a reward for completing the exercises. They do not replace the original set of exercises.
Program Instructions
Instructions are given for the long version. If you are doing the short version of the program, optionally skip the sections covering scent and music.
About the Exercises
Weeks 1 & 2: For the most part, the 34 exercises are ordered by difficulty. On the first day, start with exercises 1-5 just as they are. As you are doing them, informally assess the challenge of each exercise for the child. If one exercise is too hard, select one of the “easier activities” (at the end of that exercise) to do in place of the original. Likewise, if the activity is too easy, select a “harder” activity.
If you are not able to complete five exercises within the time period (i.e. 30 minutes), scale the number of exercises back to four. Alternately, if you complete all five and have time to do more, add one or two more. Perform this group of exercises for two weeks, using additional easier or harder activities as seems logical.
Weeks 3 & 4: Before adding the next set of exercises (e.g., numbers 6-10) to the regimen, you need to decide whether to continue with any of the current activities. Here are some general guidelines for making that decision:
• If the child struggled with the easier activities in the exercise and was not able to accomplish the base (original) exercise, continue with it. If he dislikes the exercise, don’t force him to do it, but continue to expose him to those materials so that he becomes accustomed to them.
• If he seems to enjoy a particular activity, and there is nothing similar to it in the upcoming exercises, you can optionally continue working with it.
• If the child is tired of an exercise, but you think he needs to continue with it, drop it for now. (You can come back to it later.)
• Drop any exercise the child seems to have mastered unless you want to continue with some of the harder activities suggested at the end of that exercise. For example, if the child appears comfortable with playing in different temperatures of water (exercise 1), but upon looking at the harder exercises, you decide that he could benefit from some fine-motor play with warm and cool objects, then you might keep the first exercise or mark it and come back to later.
Once you have decided which exercises to keep, add additional ones to the child’s regimen. The 34 exercises are generally graded by difficulty, and so the best plan is to do them in the order in which they are presented.
Additional weeks: Every two weeks, set up exercises for the next period following the rules given above for weeks 3 and 4. Eventually, all of the exercises will have been completed and you will need to repeat the ones done previously. Do not stop at that time, but continue the program for the full six months. Use one or more of the following methods to choose which activities to revisit during the remainder of the six-month period.
1. Continue to rotate in order through the 34 basic exercises for the six month period.
2. Select activities based on need. For instance, if the child is still struggling with balance, make sure that walking with and without blindfold exercises are in the mix.
3. Select activities that give the child a variety of different sensations.
4. Randomly select activities from the basic exercises, while making sure that there is variety within the group of them.
5. If the child is doing very well, you might try substituting similar activities from the sensory enrichment chapter (chapter 5).
Recurring themes in the activities
There are recurring themes graded by difficulty in the exercise sets. The lists below map the exercises by sensory element (hot/cold, touch, motor, visual, scent, and hearing) and by overall topic (play with cold items, manipulation control, naming objects, and so on). The numbers next to each topic are the exercise numbers that pertain to that topic. For example, visual matching can be found in exercises 10, 12, 20 and 31. Numbers in bold are exercises in the short version of the protocol. A few activities are listed in multiple categories.
You can make use of the lists as you select new activities by skipping ahead to a harder one if the current one is too simple. For example, if exercise 12 (motor, fine motor) is too simple, skip ahead to exercise 15. Likewise, you can fall back to an easier one (or to the easier activities) if the child is struggling.
Cold / Hot
• Hands, feet in bowls: 1, 14
• Coolness /warmth on skin: 8, 9, 18
• Play with cold items: 12, 22
• Carry cooled item: 23
Touch
• Textured objects: 2, 19, 20, 22
• Draw lines on skin + texture: 3, 5, 21
• Matching objects with blindfold: 6
• Touch and fine motor: 15, 25
• Massage: 24
Motor
• Walk path, blindfold, textures: 4, 11, 16, 23
• Fine motor: 12, 15, 19, 25, 26
• Climb stairs: 28
• Draw: 29, 30
• Blowing: 32
Visual
• Blindfold match, blindfold walk: 4, 6, 11, 16
• Matching: 10, 12, 20, 31
• Attention and tracking: 13, 27, 33
• Naming objects: 17
• Visual-auditory: 34
Scent
• Bath scent, oil: 7
• Smell odorant 4 times a day
• Put scent in pillowcase every night
Hearing
• Visual-auditory: 34
• Distract from visual: 13
• Listen to music once each day
Performing the Exercises
The exercises session is 15-30 minutes long. Have the child perform each activity in the session for three to five minutes. Try these suggestions to fill the time: repeat each exercise multiple times, vary an exercise by making little games as you do it, talk about the sensations he feels, name the objects used, and ask questions about his experience.
To help ensure you keep track of the three to five minute period, set a timer. A visual timer with a bell is best. Look to see if your phone or tablet has one. Optionally, download an app or purchase an egg timer. To help with transition from one exercise to the next, use a visual (picture) schedule. Each of the activities in this book has a picture associated with it that you can copy and use in the child’s visual schedule. Better yet, make use of your phone or camera to make your own pictures.
It is important to do the exercises consistently both during the week and on weekends. However, good results were obtained by parents in the studies who completed the protocols 77% of the time. If a child is getting the protocol in school, arrangements should be made for parents to continue the work at home on weekends. In most cases, the materials and equipment needed are easy to find, so access to materials should not limit participation. However, in cases where certain activities are too difficult to perform in the child’s home environment, the parent can substitute a complementary exercise. For example, if the child is scheduled to do exercise 6 (climbing stairs while holding a pillow), but stairs aren’t available at home, think of an alternate way of doing it, such as stepping up and down off of a stool while holding a pillow.
Using scents
If you are doing the scent exercises, you will need seven odorants (scents) to work with. You will be preparing seven jars of odorants using essential oils, and you’ll need seven clean vials or jars with caps, a bag of clean cotton balls and seven different (small) jars of essential oil. Woo and Leon used child-friendly scents including anise, apple, hibiscus, lemon, sweet orange, banana, and apricot. Prepare seven jars to hold the odorants in the following way: put a cotton ball into each empty vial, put 1 drop of essential oil on the cotton ball, and close the jar tightly. Label each jar with the odorant it contains (apple, sweet orange, and so on).
Four times during the day, expose the child to an odorant—each time using a different scent. To do this:
1. Open a jar of odorant and tell the child to breathe in the smell.
2. At the same time, gently rub the child’s back with a fisted hand.
3. Continue doing this for one minute.
4. Reclose the jar tightly.
5. Add a drop of oil to the cotton ball whenever the scent begins to fade.
Rotate through the odorants in order. If the child finds a scent disagreeable, replace it with a different scent. Children are also exposed to a fragrance at night by placing a scented cotton ball in their pillowcase before bedtime. You can simplify this routine by making up several cotton balls at once and storing them in an airtight jar.
Make sure that the essential oils are pure oil and plant (fruit, spice or flower). Chemically derived scents are potential allergens. Avoid adult scents like lavender which may contain estrogens or other elements not meant for children. You can find essential oils in health food stores. An online source is www.EssentialOil.com.

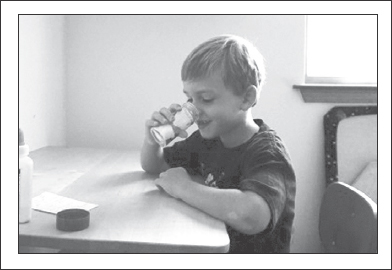
A boy sniffs essential oil on a cotton ball in a jar.

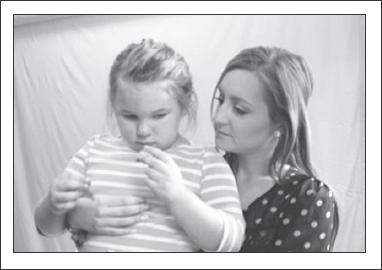
Girl smells a fresh herb.

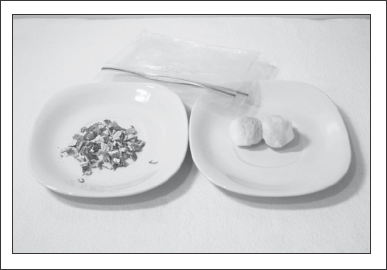
Dried citrus or vanilla on cotton balls can also be used
Listening to music
The child listens to classical music once a day for 15 minutes using a portable CD player or music device and headphones (see the materials list, below).
The original study used the album, Classical Music for People Who Hate Classical Music, Vol. 1, on the Direct Source label. In fact, there are many albums of classical music for children available online and in resale shops. Also consider other types of soft instrumental music, ethnic or folk instrumental music, and ambient music. Avoid music with a strong bass line which can be harmful to a child’s ears. When possible, rotate through several different albums and set the music player to play the cuts randomly so that the child does not tire of or obsess on individual pieces.

Selecting and obtaining music and headphones
CDs are easily found in resale shops, your local library and online. If you can manage it, get several albums, avoiding overlapping content.
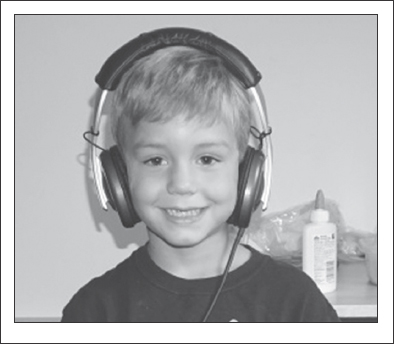
We want the child to listen to the music over headphones. The quality of his listening experience will be affected by the quality of the headphones. Look for headphones that fit well and that have a mellow sound. You may find good used headphones in a resale shop or online.
To introduce headphones to the child, plug them into the TV and then put on the child’s favorite cartoons. Explain that the sound is now in the headphones. Most children will put on the headphones to hear their cartoon, and in the process, adapt to the headphones. Optionally, the child can listen over speakers.
Materials for the Activities
Materials needed for the exercises are listed below. For the most part, they are easily found at home, in school and in resale shops. You don’t need all of the items at once, so focus on locating materials you will need within the next month. You will want to look through the alternate exercises (“easier activities” and “harder activities”) to see what additional items might be useful.
Many of the items are bulky. Try to keep your materials organized in bags and bins so that the program doesn’t fall apart due to loss of key items.
Here are the materials needed for all 34 activities. Note that the short version exercises are indicated in bold.
Activities |
Materials |
1 |
Three or four bowls, buckets or bins large enough to fit hands or feet; water of different temperatures. |
2 |
Objects of different shapes and textures (hard, soft, smooth, rough, or fuzzy) for the child to touch and squeeze. |
3 |
None. |
4 |
Scarf or blindfold; materials of different textures to use as a walking pathway such as carpet, tile, wood, bubble wrap, and plastic mat. |
5 |
Calm or classical music, music player, headphones or speakers. |
6 |
Pillowcase; doubles of small common objects like keys, coins, unsharpened pencils, small toys, stones, pine cones, spoons, and so on. |
7 |
Naturally scented bath salts, soaps and oils; bathtub. Alternatively: scented lotion. |
8 |
Two spoons; a cup of very hot water and a cup of very cold water. |
9 |
Two spoons; a cup of very hot water and a cup of very cold water. |
10 |
Objects and pictures of the objects. For small children use actual images such as printed photos or photos taken and displayed on a phone or tablet. For older children, drawings of the objects should work. |
11 |
Blindfold; a wooden plank for walking on such as a board that is approximately two inches (5 cm) thick, eight inches (20 cm) wide and about five feet (1.5 m) long. |
12 |
Ice cubes, large colorful beads; bowl or plate. |
13 |
A book with pictures; bell, buzzer or other sound maker. |
14 |
Several bowls filled with water of different temperatures; a few small objects to put in the bowls. |
15 |
Buttons large and small. |
16 |
Large pillows, foam or a sleeping bag. |
17 |
Books with pictures of objects the child is familiar with. |
18 |
A cool and a warm object. (Cups of water will work.) |
19 |
Grains of rice, dough (see dough recipes in the sensory chapter, touch-desensitization section). |
20 |
Small 2x2 inch (5x5 cm) squares of differently textured materials: plastic, cardboard, carpet, bubble wrap, aluminum foil, etc. |
21 |
Textured objects as in exercises 2 and 20. |
22 |
Ice-filled straws or ice cubes, double wrapped in plastic wraps. |
23 |
A tray or plate that has been chilled. Use metal or non-breakable glass if available. |
24 |
None. |
25 |
Piggy bank, coins, large cardboard box or three-fold display board (like those used for science projects). You will need to construct a viewing device. The instructions can be found in Enrichment 25. |
26 |
Purchased or home-made magnetic pole; paper clips. |
27 |
Letter-paper sized picture; red object such as a red-marker cap or very large bead. |
28 |
Stairs; pillow or bolster. |
29 |
Paper and pencil. |
30 |
Two pencils; paper. |
31 |
Pictures or a book of colorful pictures; colored beads. |
32 |
Small feather; small pieces of aluminum foil. |
33 |
Two or more postcard-sized pictures. |
34 |
Music from other countries or music with a theme; books showing pictures of the theme. |