

CHAPTER 11
Multi-Day and Multi-Sensory Projects
This chapter has the instructions for projects that can span a few days to a few weeks. Some of the projects are also multi-sensory.
Multi-Day Project 1
Small-Piece Mosaic
Create a mosaic pear by gluing small—sometimes very small—pieces of cut paper tiles onto the entire surface.
This activity requires a great deal of patience. Consider doing it over a period of several weeks as an intervention for attention-to-task, attention-to-detail, and patience as well as for visual immersion.
Materials: A drawing of a shape (the pear shape is in the Appendix); colored paper, giftwrap, and scrapbook paper; scissors, glue; Optional: cardstock, glitter or glitter glue.
Instructions:
1. Make a copy of the pear (or a shape of your choosing).
2. Cut squares (or irregular pieces) of five colors of paper. To get the perspective correct, make the left section the brightest and lightest color, and the right side the darkest color. See the photo caption for ideas.
3. Glue the tiles on the drawing, occasionally mixing colors to make it fun and interesting.
4. Optionally, glue the mosaic to a paper frame.
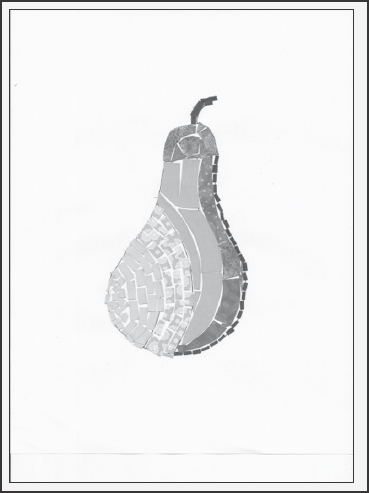
This mosaic uses very small tile pieces in the two leftmost sections of the pear. The remaining sections have larger tiles. The right border and stem is made of tiny black tiles.
Multi-Day Project 2
Multi-Sensory Immersion Project: Fruit-Scented Mobile
This activity creates a two-tiered mobile with scented fruit-shaped objects hanging from the branches. This is a multi-day project in which “fruit” can be made over a series of days. You can increase the sensory immersion by adding scented essential oil to the fruit while the work is in process.
The mobile has two unconnected tiers with four “branches” each. Each tier is independent and hangs from the same hook with one tier hanging lower than the other. If you wish to use just one tier, make longer rods to accommodate the fruit or use less fruit.
There are nine fruit shapes to choose from. You will want to use at least one piece of fruit for each “branch” of the mobile. If you use two tiers, as in the photo, you will need a minimum of eight pieces of fruit. Multiple pieces of fruit can be hung on a branch, and fruit can also be hung at the center where the two dowel rods meet. The fruit is attached to the branch with thread.
If you are adventurous and patient, you can alter the design and hang tiers from the branches of other tiers. This will be quite exciting to look at and provide a wonderful sensory break for a child who seeks visual movement.

Materials:The fruit: Colored felt or wool; scraps of cotton, silk, linen or wool; fruit shapes (in the Appendix); needle and thread; several different fruit-scented essential oils. The mobile: String or cord; thin dowel rods; snippers, scissors; a hook for hanging; glue.
Instructions:
Making the scented fruit
1. Make a copy of the fruit shapes you plan to use. Cut them out.
2. For each piece of fruit: Trace the shape onto felt or wool and cut out two copies (for front and back).
3. Cut scraps of green felt for the stems, rind and leaves on the fruit. You will need front and back trim for rinds and small button ends of the watermelon, strawberry, orange and lemon. You only need one stem for the grapes, apple, cherry and peach. Glue the trim in place.
4. If you are using a wool felt or wool fabric for the fruit, put the two copies of each shape together and glue them lightly (neatly) at the edges.
5. Otherwise, first place a scrap of natural fabric (cotton, linen, wool or silk to hold the scent) between the two copies of the shape, and then glue them neatly at the edges.
6. When the fruit has dried, make thread hangers:
a. Cut thread in doubled lengths varying from 30-40 inches (76-100 cm), or at a pleasing finished length plus three inches (10 cm) for a loop and a knot at the ends.
b. For each piece of fruit, use a needle to draw a thread through the top of the piece of fruit. Tie the ends in a knot.
Make the mobile
If you are making two tiers, make each separately. Remember to make the cords for the lower tier longer than those for the upper tier. When you hang the second tier, adjust the fruit so they are pleasant to look at.
Create the mobile(See the photo)
1. Cut two dowel rods 12 inches (30 cm) or longer.
2. Cut the cord for hanging the mobile to the hook. The cord’s length is the distance from the hook to where you want the dowel rods, plus a few extra inches (eight cm, or so) for attaching the two dowels together. Add an additional few inches if you plan to make two tiers. (See below and the photo.)
3. Make a loop on one end of the cord. This will be used to hang the mobile on the hook.
4. Lay the two dowel rods crosswise on a table and wrap the cord crisscross three times at their intersection. Tie the cord tight. Optionally, place a drop of glue on the knot.
5. If you are making two tiers, leave a few inches (8 cm, or so) of cord between the tiers. Then repeat step 4 to add the second tier. Snip the short loose-end of the cord.
Hang the mobile
1. Attach the hook for the mobile in place (from a ceiling, doorway, bunkbed, etc.).
2. Hang the dowel onto the hook from the cord’s loop.
3. To arrange the mobile pieces on the dowel rods so they balance, use this technique: Hang a piece of fruit onto whichever branch is tilted highest. Repeat this process until all pieces of fruit are in place. To level a tilted dowel, do this: On a section that is tilted upward, move the fruit closer to the end. If it is tilted downward, move it closer to the center.
4. Place a drop of glue on each thread where it sits on the dowel. Do this quickly, so that if adding the glue changes the balance, you can adjust the pieces of fruit slightly.
5. Once the glue has dried, repeat this process for the second tier.
Add the scent
1. Each day or so, place a drop of essential oil at the center of each piece of fruit.
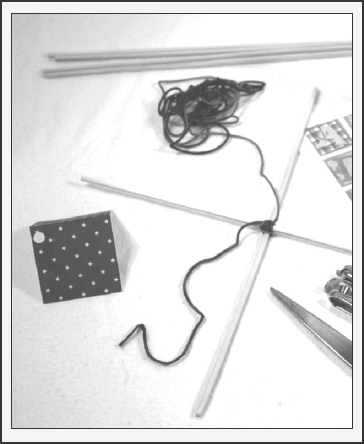
Wrap cord crisscross around the dowel rods three or four times. Knot cord tightly.
Multi-Day Project 3
Carrel for Visual Distraction
Create a soft colored study-carrel to put on a desk at home or in school. The carrel is made of calming soft blues and greens and decorated with a single butterfly. This project will take the child several hours to complete, so it serves as visual immersion for a child who also needs calming.
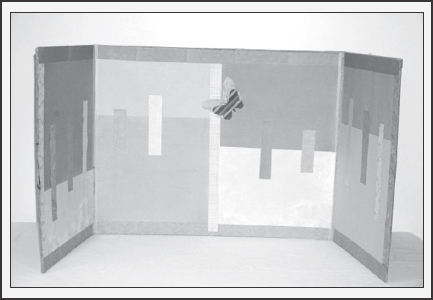
Materials:
• A 3-fold science project board;
• A variety of paper such as construction paper, gift wrap and scrap booking paper in different shades of soft blues and greens. Use paper that is solid in color or has soft, abstract prints. It is important that there is nothing in the decoration that will distract the child;
• School glue or several glue sticks;
• Scissors and, optionally, a paper cutter;
• Butterfly shape (in the Appendix);
• Packing tape, colored duct tape or decorative tape to bind the carrel edges and folds.
You will also need a large enough work area and a place to store the paper and partially completed carrel between steps.
Instructions:
Let the glue dry between steps so that previous work does not become spoiled.
1. Shorten the 3-fold board to the appropriate height using a utility knife.
2. If the backside of the 3-fold board is unattractive, cover it with colored paper. Do not cover the folds (they need to move).
3. Lay the 3-fold board flat and lay out the different styles of solids and prints on it until you find a pleasant arrangement.
4. Cut the background pieces to fit the entire surface of each of the three panels. Glue them in place. Do not paper over the top of the folds.
5. Use decorative tape to bind the edges on all four sides. Optionally, cover the edges with strips of paper and bind them with clear packing tape.
6. Lay the carrel flat and put decorative tape along the folds.
7. Cut strips for the decoration using varied papers and glue them in place.
8. To make the butterfly, use the shape in the Appendix. Cut it out and glue it in place.
Multi-Day Project 4
Collage With or Without Dried Flowers
The child can select the colors and shapes, as well as the materials. For the child who likes things “just so” follow the instructions below. Otherwise, let the child use her creativity to make this picture her own. Does she want to pick real flowers, dry them for a week between the pages of a fat dictionary and then add them to the picture? Lovely idea! Does he want lions’ heads for flowers? Great idea! How about rockets in the sky? Perfect! Find pictures of lions or rockets in a magazine and cut them out or hand draw the images onto the background.
Remember to keep a cup of water and a towel nearby for those who do not like gooey materials.
Materials: Cardstock for the backing; green and blue paper or paint for the sky, grass and hill; scraps of colored paper and fabric for the clouds, flowers and other objects, glue and scissors; optional: dried flowers and small leaves; cut out colors or pictures from magazines; decoration such as beads and glitter glue.

Drying the flowers:
1. Collect small flowers and leaves.
2. Place them in a large heavy book such as an encyclopedia. Put the book in a safe place where it will not be disturbed. If possible, add additional heavy books on top to increase the weight. Let the flowers and leaves dry in the book for a week or two.
3. Delicately remove them from the book and place them on flat surface where they will not be disturbed.
Construction:
1. Create the grass, hill, and sky from layers of construction paper. Lightly glue them together.
2. Add clouds, sun and tree trunks.
3. Make other objects for the collage such as drawn flowers, along with fun things such as lions’ heads, giant frogs or rockets.
4. Add cut-out images from magazines.
5. Arrange the objects on the collage and glue them in place.
6. Add beads, glitter and other decorations.
Multi-Day Project 5
Multi-Sensory Immersion Project: Dish Garden
Here is a project with many different sensory components: desensitization to touch and immersion in touch as the child coats a dish in sand and pebbles; visual immersion through sorting colored pebbles and making a pattern with them; and the sensory aspects of the plants themselves. You can select plants with scents, for example, the spaghetti sauce group of basil, oregano, parsley, rosemary and parsley or a prickly touch grouping of cactus plants, soft-to-the touch plants like moss or fuzzy purple passion plant, or frilly plants that give the eyes soft stimulation such as a spider fern or the coleus.
Making the Pot
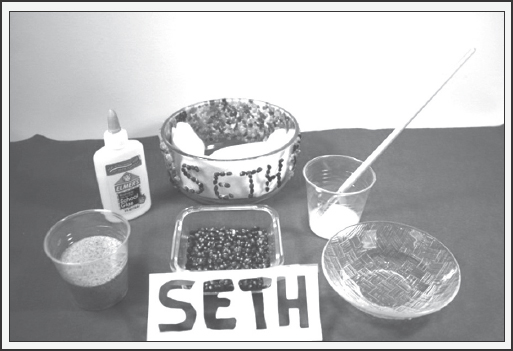
Materials: Medium-large glass dish 3” or more deep; sand; glue; contrasting colors of pebbles, popcorn, beans or tiles; small tub larger than the bowl; cardstock or index cards for the stencil; optional: varnish and brush. Plants such as moss (touch), mint (smell), coleus (visual).
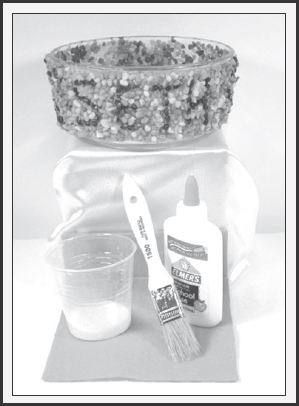
Instructions: First, glue a light covering of sand onto the bowl, dry it and then glue on the pebbles. If you plan to put a name or pattern on the bowl, put those pebbles first and put the background pebbles on last. When the bowl is completely covered and dry, optionally cover it with 50-50 mixture of glue and water or have an adult varnish it.

Planter contains mint (scent) moss (touch) and coleus (visual). They were planted in potting soil and have a woodchip covering. Pebbles would work, too.
You will be working sections of the bowl (whatever lies flat at the top) one at a time. If the bowl is round you may be limited to putting pebbles on just 2-3 inches at a time. Beyond that, the bowl angles too much causing the glue to run and the pebbles to fall.
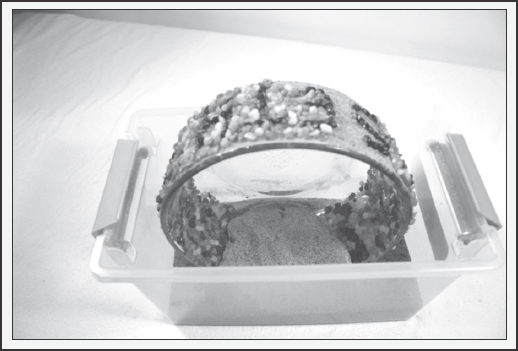
The bowl sits in sand in a tub so that the section to be worked on is level.
Instructions:
Stabilize the bowl: To keep the bowl steady and level as you work with it, put sand in the tub, turn the bowl on its side and lightly bury the bottom in sand.
Glue sand on the bowl: To help the pebbles to adhere, glue sand on the bowl as a first layer. Work on the section of the bowl that is on top and is reasonably flat. Turn the bowl and continue gluing sand on it. Let the section you worked on dry for several hours and then continue until complete.
Create a pattern: If you plan to put a pattern or name on the bowl, create a stencil for your pattern. As an example, if you are putting a name on the bowl, draw it in block letters on the cardstock, and then carefully cut out the insides of the letters.
Put the pattern or name on the bowl: Carefully position the stencil on the bowl and put glue in a small portion of the stencil. Lift the stencil and carefully place pebbles on the glue. Work only on level sections of the bowl so that the glue and pebbles do not run. Let that section dry before proceeding.
Cover the background in pebbles: Once the pattern is dry, you can begin to glue in the background pebbles. Again, make sure that the glue does not run and pebbles do not slide.
(Optional) Varnish the bowl: To waterproof the bowl for use as a planter, have an adult cover the pebbles with one or more layers of varnish or another waterproof covering.
Planting the dish garden
Material: pebbles; potting soil; small fragrant plants such as basil, rosemary, dill (or seeds and peat pots to grow them).
The process using small plants: Place ½ inch of small pebbles in the dish for drainage. Fill the bowl to within 1 inch of the top with potting soil. Place small one or more small plants in the soil and firmly tamp them down. Make sure to leave 3-4 inches between plants to allow them to grow. Water the plant and place it in a sunny window or under a grow light.
Multi-Day Project 6
Monkey Yarn Doll with Cap
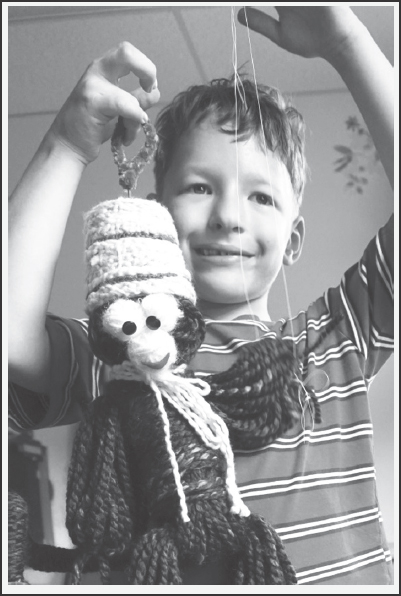
Here is a multi-day project constructed of easy steps for the child with construction assistance from an adult. The monkey is made of yarn balls and wrapping. His hat is made of yarn chains glued to a plastic cup. His head, body and hat are held together with wire (either a hanger or picture-hanging wire) which extends into a tail. The doll’s face is decorated with buttons, pipe cleaner and felt. Decoration is optional. The inventive therapist, teacher or parent will think of alternate methods for constructing and decorating the yarn doll, as needs dictate. The finished monkey, including hook, is approximately 20 inches (50 cm)tall. The measurements given are actual, but feel free to modify them for a different appearance.
Monkey materials: One skein of yarn, plus other colors of yarn for face and for ties; wire or pliable wire hanger, tape for ends of wire; corrugated cardboard or other firm material cut in strips for wrapping; 4 or more 12-inch (30 cm) pipe cleaners in a complementary color; decorations like ribbons, beads, felt for eyes, nose and mouth; glue.
The finished monkey.
Hat materials: A small-medium size paper or plastic cup (author used 3 inches (7.5 cm) diameter at the brim, 3 inches (7.5 cm) tall); two skeins of thick yarn – different colors, plus scrap yarn of a third color (for the hat trim and ties); white school glue; bowl of water to wash glue off finger tips.
Step 1: The hat
The child will be wrapping and gluing yarn chains or thick yarn around the surface of the cup and also making a spiral on the cup bottom. Optionally, the child can first make chains of the yarn and then glue it.
1. (Adult) Pierce a hole in the bottom center of the cup for the wire to pass through (during the construction phase).
2. Make a yarn chain long enough to wrap around the cup once or twice.
3. Pull each end of the chain tight and snip off the yarn ends close to the chains.
4. Glue the chain around, starting at the top rim.
5. Make additional chains in the three different colors and glue them onto the cup in a striped pattern. Tuck the ends in and glue them.
6. To cover the bottom of the cup, make a short chain and roll it into a spiral. Glue it at the center of the cup bottom. Add one or two rows of chain of another color on the outside edge of the cup bottom and glue it.
7. Let the hat thoroughly dry before handling.

Create the hat by gluing yarn to the side and the bottom of a plastic cup. The yarn can be simply wrapped on the cup or it can be chained first.
Step 2: The monkey’s head
Roll yarn into a ball for the head. It should be sized so that the cup can sit on the head as a cap – (approximately 10 inches (25 cm) in circumference.) Cut the yarn, leaving an extra 10 inches on the end. It may be needed for adjusting the size of the head. Dab bits of glue under the top layer of yarn to keep it from unrolling.
Step 3: Connect hat and head (adult)
1. Gently push the wire through the ball of yarn so that it extends for 13 inches (34 cm).
2. Push the hat onto the wire.
3. Bend the wire and thread it through the cap again, leaving a two inch (5 cm) loop at the top of the hat. Pull apart the hat and head so that you can twist the two wires together inside the hat at the top, making the hat secure.
4. Bend the wire loop on top of the hat into a circle.
5. Push the raw end of a pipe cleaner into the hole in the cup and wrap it tightly three times around the base of the wire loop.
6. (Child) Wrap pipe cleaner around the loop wire. Use additional pipe cleaners, as needed. Trim and bury the raw ends of pipe cleaner.
7. Push the head up the wire to the hat, gently pushing the raw wire end into the head as you do so, so that it is safely inside the center of the head.
8. Pull the head and hat tight together and then softly bend the wire so that they (hat and head) remain tight while the rest of the monkey is constructed. (The wire will need to be re-straightened later.)
9. Set aside.
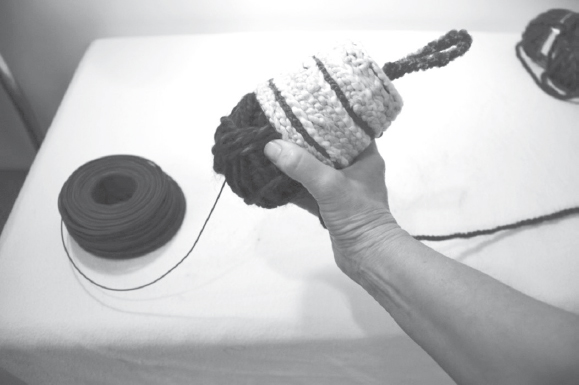
Wire is gently pushed through the yarn ball and through the top of the hat. It is then bent and looped back through and the raw end is hidden in the yarn ball. The loop sticking out of the hat is wrapped with a pipe cleaner.
Step 4: Make arms and legs
1. Wrap yarn on a 13 inch (34 cm) strip of cardboard. (Wrapping bulky yarn 14 times produced arms that were four inches (25 cm) around.)
2. Use small pieces of yarn for ties. Put a tie through each end of the wrapped yarn (through the loops of yarn) and tie it securely. Slip the arms off of the cardboard.
3. Repeat for the legs.
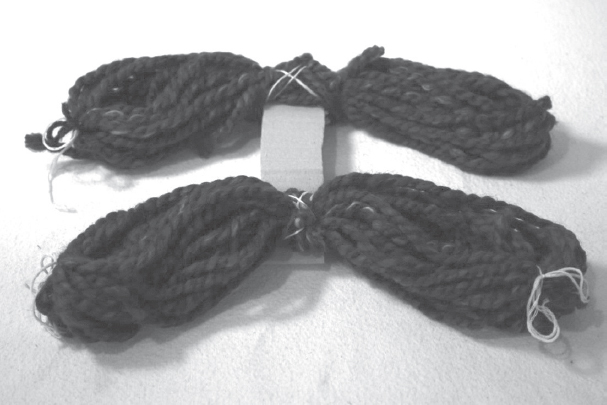
Lash the arms and legs onto the ends of the cardboard strips using scarp yarn.
Step 5: Attach the arms and legs
1. Cut two strips of corrugated cardboard 6.5 x 2 inches (17cm x 5 cm). Place them back to back. (The wire will slip through these during the construction phase.)
2. Lay the arms and legs in place at each end of the cardboard (see photo) and lash them to the cardboard by wrapping crisscross-style with scrap yarn.
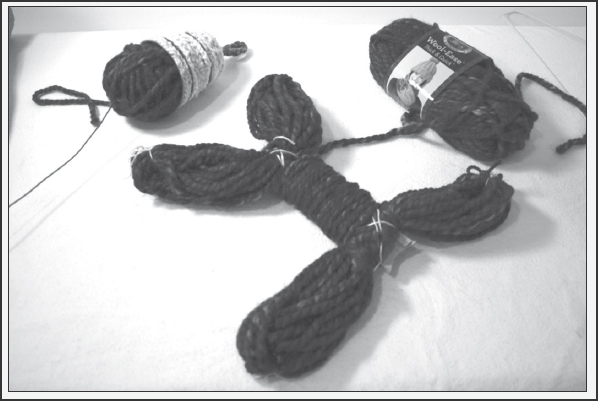
The head and body, ready for assembly.
Step 6: Make the body
Wrap yarn around the cardboard lengthwise and widthwise until the cardboard is completely covered and the body is the desired thickness— about 8.5 inches (22 cm) around the belly.
Step 7: Connect the body, form the tail: (adult)
1. Read all Step 7 instructions before cutting the wire. Cut the wire to about twice the length of the body and tail. See photo.
2. Gently push the wire into the body between the two layers of cardboard.
3. Create the tail: Extend the wire about 13” (33 cm) out for the tail, then bend it, doubling back to the body. Trim it. (See photo.)
4. Slip about 2” (5 cm) back into the body (between the two cardboards). Twist the two tail wires together, leaving a small loop on the end for decoration.
5. Push the body snugly up to the head and then bend the tail to the side to keep it snug.
6. Wrap pipe cleaner tightly around the wires where the monkey’s tail meets the body, burying the raw ends of pipe cleaner.

Wire is pushed between the two cardboard strips and is bent to form a tail. The end of the wire will be safely tucked back into the body between the cardboard strips.
Step 8: Make the tail
You will make a yarn tail the same size as the wire tail, attach it to the wire tail at both ends and then wrap both together (along the length) with more yarn. That is, you will wrap the yarn in circles around the whole length of the tail. Next, you will secure the body with pipe cleaner and decorate the end of the tail.
1. Wrap yarn seven times around the same card you used to make the arms and legs. Put ties around the yarn at each of the ends and remove the wrapped yarn from the card.
2. Use pipe cleaner to attach the yarn tail to the wire tail at each end of the tail. At the body end, wrap the pipe cleaner around the tail tightly, leaving extra pipe cleaner for later use.
3. Wrap yarn in small tight circles from one end of the tail to the other. Tie off the yarn and secure it to the tail.
4. Neatly wrap the ends of the tail with the remaining pipe cleaner. Bury the raw ends of the pipe cleaners.
5. (Optional) Decorate the end of the tail with additional tied-on scraps of yarn.

Yarn is wrapped onto the twisted wire tail and tied. Pipe cleaner is attached to the wire at both ends of the tail and wrapped several times over-top. Next the entire length of yarn and wire will be wrapped in yarn and secured with the remaining ends of pipe cleaner.
Face: There are many ways of finishing the monkey. Here are some possibilities.
1. Our solution: Roll three yarn balls for the eyes and mouth, occasionally adding a dab of glue to keep the yarn from slipping.
2. Glue three pom-poms or cotton balls together, as shown.
3. Simply add beads or button eyes and nose.
4. Glue on red yarn, bead or button for mouth, or twist on red pipe cleaner for mouth.
5. Anchor the face onto monkey’s head using needle and thread. Optionally glue the face in place.
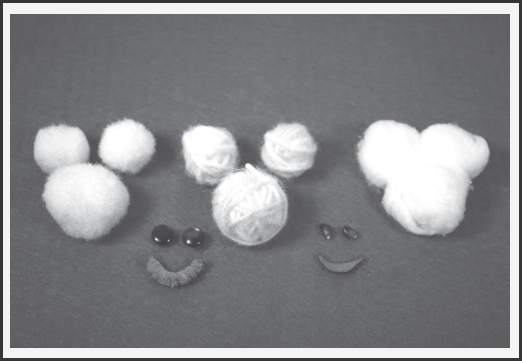
You can use pompoms, rolled-yarn balls or cotton balls for the face. Decorate them with beads or buttons for eyes and red felt or pipe cleaner for the mouth.