A man of words and not of deeds is like a garden full of weeds.
—ANONYMOUS
Because we plant our crops so intensively, we make sure that weeds are under control before our crop seed germinates. Even with crops like baby-leaf salad, which occupy the ground for only a short period of time, too many weeds, such as quick-growing chickweed, can slow harvest dramatically. (Unlike some salad growers, we do not consider chickweed a desirable addition to our baby-leaf salad mix.) The yield increase possible from close spacing on fertile greenhouse soil makes any efforts of the grower toward solving weed problems a worthwhile investment of time.
It is always a better idea to prevent weeds rather than confront them. So our first approach is to see that no weed ever goes to seed. We hand-weed in the fields and greenhouses whenever necessary. We have even hand-weeded green manures to prevent weeds from producing seed, or tilled the green manure under and started again when there were too many weeds. Studies have shown that the serious weed-seed load in a soil can be greatly reduced over three to five years if no new seeds are introduced. However, even under the best of conditions weeds will appear.
Flaming for Weed Control
Given that reality, our second approach is to dispatch the weeds after they germinate but before the crop appears. The best way to accomplish that goal is with preemergence flaming, which means using a propane flame to kill the weed seedlings on a seeded area just before the crop emerges. The not-yet-emerged crop seeds are insulated from the heat of the flame by the soil. Timing is the key. In practice we like to prepare the area up to two weeks, if possible, before the sowing date, but any length of time is helpful. We will irrigate the area during the pre-sowing time, if necessary, to ensure weed-seed germination. We seed that area without further cultivating, wait the ideal number of days (as explained below), and then flame off the small weeds. This is especially important for the crops planted in rows 2¼ inches apart for which we have never found a cultivating tool that works well.
There are two ways to choose the ideal moment for flaming. In the 1970s we were taught the system used by our European friends who introduced us to flaming. For field crops, they gauged when to flame by using panes of glass about a square foot in size and held about an inch off the ground in a wooden frame. After sowing they placed these randomly on the surface of the field to speed up germination of the crop seeds. They would then flame immediately upon seeing the first crop seed germination under the glass. That works well in early spring, but for summer sowings, when it would get too hot under the glass, we have found it simpler to pay attention and keep notes on days to germination for different crops at different seasons of year and then, leaving a one- or two-day fudge factor, flame off the weeds when the time comes.
When you plant crops in close succession and grow mostly quick-germinating salads, there is not much time for weeds to germinate ahead of the crop, so it’s difficult to rely on preemergence flaming with lettuce or arugula. But for the crops that take a while to germinate, like carrots, onions, or parsley, flaming can be effective even if you sow right after preparing the soil; especially against the quick-germinating chickweed, which can be the most troublesome weed in winter greenhouses since it thrives on fertile soils and can both germinate and set seed at surprisingly low temperatures. I have seen a chickweed plant in full bloom in one of our cold houses on January 15.
It is important to remember that flaming involves wilting, not burning the weeds. Experience has shown that exposure to a temperature of 160°F (71°C) for one second is sufficient to melt the protein cells in small weeds
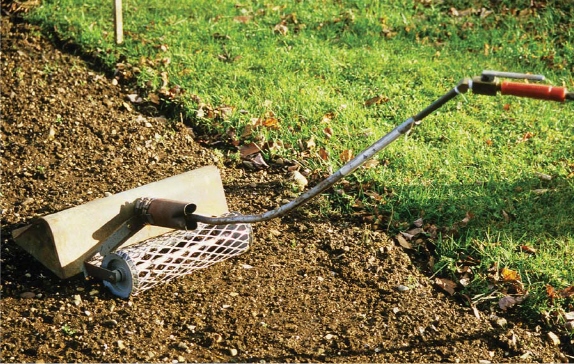
Experimental flame weeder with cover and roller.
(ideally those less than 1 inch tall). The weeds continue to look normal for an hour or two after being flamed, but then wilt and die. Although it may be a satisfying feeling to burn the little buggers to a crisp, keep in mind that burning rather than wilting uses three times as much propane. The design of the flame weeder itself is also helpful in minimizing fuel use.
All of the flamers available for handwork (as opposed to tractor mounted) have burners that I consider way oversized for the job they need to do. Consequently they burn far more propane than is necessary. If the rate of burn is too fast the tank will freeze up (evaporation is a very cooling procedure) and inhibit the flow of propane. The large open flame is also tricky to use near the side of a greenhouse because of the possibility of burning the plastic. The most economical flamer design would have properly sized nozzles for the area to be covered and have a hood over the flame in order to contain the heat. So I have been working on making a flamer with smaller nozzles covered by a hood and a roller behind to maintain optimum height above the soil and take the weight off the operator’s arms. A 15-inch-wide model would be very effective on a 30-inch bed with one pass down and back. I haven’t perfected it yet, but as I have said before I encourage other growers to design and make tools when the need arises and share the designs to help all of us be more efficient.
Cultivating
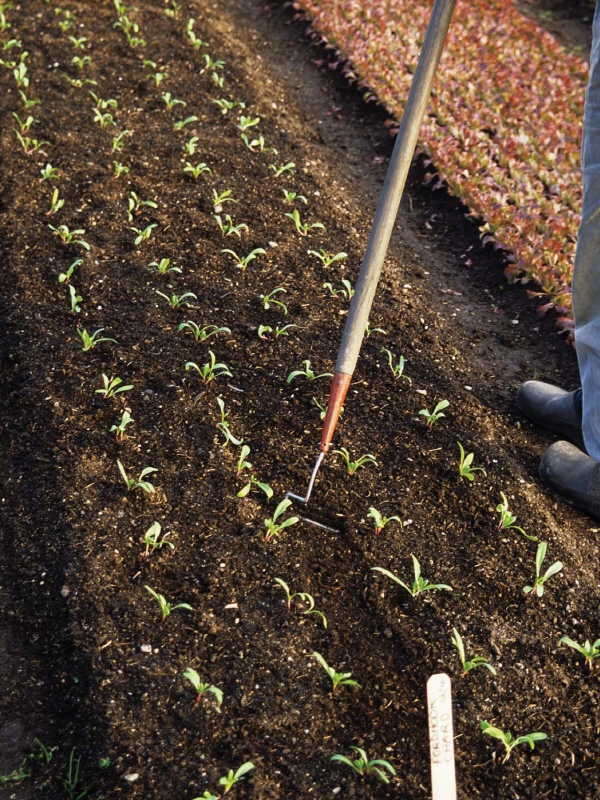
Once weed seedlings appear in the crop, successful control is like the old joke about successful voting in Chicago—do it early and often. I had never found a hoe I liked, so years ago so I designed two models—the “collineal hoe” and the “wire weeder.” Both of these hoes are ideal for dispatching small weeds accurately, efficiently, and rapidly. Sharpen the blades, choose the morning of a sunny day, and use these tools, as they are designed to be used, like razors rather than axes. They are perfectly angled to shave small weeds at the surface of the soil. The residues quickly wilt afterward. Shallow hoeing also minimizes any damage to the roots of your crop plants. If rain comes unexpectedly and the cut weeds re-root or another flush of seeds germinates, do it again. Early and often, shallow and efficient, accurate and rapid—with the right tools and the right technique weed control can be consistently successful.
The right technique often depends on the weeds. Always try to get to the job before the weeds have grown one inch tall. For small weeds, the technique is to walk in the path between the beds, standing upright and holding the hoe handle with your thumbs pointing up the handle like you would hold a broom to sweep. Always work forwards toward the uncut weeds. Position the hoe blade about 3 to 6 inches away from you (depending on the size and type of the weed seedlings and their quantity) over the area to be weeded. Then place it on the soil and shave just under the surface back toward you. You can then see if the weeds have all been cut on the area you just passed over. If not do it again. Then move the blade forward another three inches and repeat. (This is somewhat like mowing with a scythe. You move the blade into the uncut area and the motion of the cutting stroke takes the blade back to the cut area.) The return stroke of the blade (moving it back for the next cutting stroke) can be used to further disturb the cut weeds if necessary by keeping the blade in the soil. These are quick motions but since they are short they can be very accurate allowing you to cultivate closely to the stems of the crop plants. Each stroke only takes a second or so. This is a skill that doesn’t come naturally to many people (especially doing it with speed and efficiency) so it is worth teaching to your employees.
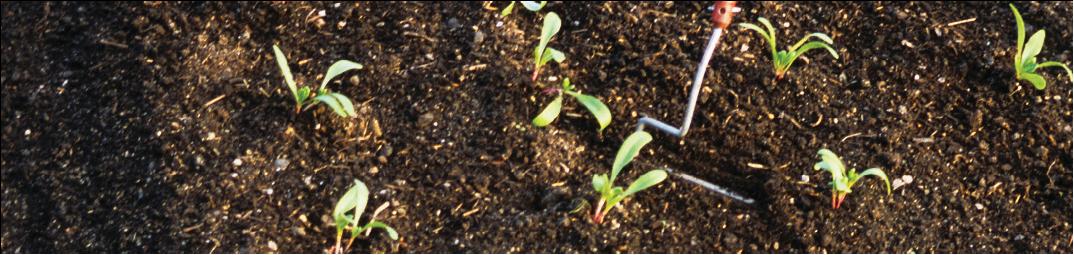
The long-handle wire weeder is very effective if used when weeds are tiny.
If the weeds are very tiny and it is a sunny day, you can cultivate a row very rapidly (working in this case in a direction toward the uncut weeds) simply by walking down the path holding the collineal hoe or wire weeder between rows in the bed just slightly under the soil surface. Think of yourself as a tractor and the hoe as one of your cultivators. You can adjust the forward angle of the blade to compensate for slight discrepancies in row spacing. If you keep the depth consistent (never more than ¼ inch) all those tiny weeds will be cut off or ripped out to wilt on the surface. This eliminates the forward/return stroke motion described above, so it takes less time. Always adjust your technique to the size and type of the weeds and the weather conditions.
This idea of adjusting your actions to the conditions is a good example for explaining the greater efficiency shown by a worker familiar with a job. With experience you will find that you are automatically making small efficiency adjustments based on having done it before. How do you become that person? By paying attention while you work no matter what the job. Attention to detail is the major secret to success in any endeavor.