“I learned that good judgment comes from experience
and that experience grows out of mistakes.”
—General Omar N. Bradley
A major portion of basic training focuses on building physical fitness and endurance. During basic training, your company will conduct an organized physical training session every morning, except Sundays. Each physical training session is comprised of three components:
Warm-up;
Conditioning;
Cool-down.
Generally, you will alternate between cardiovascular days and muscle building days.
Consult The Ultimate Interactive Basic Training Workbook for the fitness charts of the five military branches. If you do not pass these tests, your Drill Sergeants will restart (recycle) you and you will be required to start basic training all over again.
Each branch of service has their own fitness tests, let’s review them now.
Army
The APFT has three components:
Two-minute timed push-ups
Two-minute timed sit-ups
Two-mile timed run
One-minute timed push-ups
One-minute timed sit-ups
1.5-mile timed run
Navy
One-minute timed push-ups
One-minute timed sit-ups
1.5-mile timed run Sit-reach test
Marines
Males
Pull-ups (untimed)
Two-minute timed sit-ups
3-mile timed run
Females
Timed flexed arm hang
Two-minute timed sit-ups
3-mile timed run
Coast Guard
One-minute timed push-ups
One-minute timed sit-ups
1.5-mile timed run
100-meter swim
5 minute water tread
You should have no problem meeting the fitness standards by following the exercise program in this chapter for at least eight weeks prior to basic training. The tables mentioned in this chapter can be downloaded and printed in full size at UltimateBasicTraining.com/fitness.
Running Improvement
Running is the best way the military can test your cardiovascular fitness. Most people have never learned to run properly. However, by learning and applying a few simple techniques, the efficiency of your body movements can increase dramatically. Always try to run with a partner; it is motivating and easier to keep pace with someone running next to you. Just make sure your partner doesn’t slow you down. Also, running to music helps motivate people, but keep in mind, this is not allowed when you take your fitness test.
The running program in this chapter is to be performed every other day. You will alternate between sprint days and endurance days. By following this program at least eight weeks prior to basic training, you should have no problems passing (or even maxing) your fitness test.
Selecting the Proper Running Shoe
The first step in finding the proper running shoe is to determine your foot type. There are three main types of feet: high arch, normal arch, and low arch. To determine which type you are, wet your feet thoroughly and shake off the excess water. Next, step on a dark and dry surface. I recommend a brown paper bag or a piece of smooth wood. The imprint produced will form a shape similar to one of the three shown below in Figure 3:

Once you determine which foot type you are, you can shop for the proper running shoe. Don’t shop for shoes in the morning; your feet swell slightly when you sleep, which could give you a false assumption of your actual foot size. If you have a highly arched foot, you need a shoe with extra cushioning in the middle area of the shoe (Army and Air Force Exchange Service [AAFES] tag “C”).
If you have a normal foot type, your ankles pronate inward as you step. Therefore you will need a shoe with average cushioning (AAFES tag “S”). Do not buy a shoe with extra cushioning in one area or extra motion control features.
If you have a low arched foot, your ankles pronate inward, but more excessively than the normal foot type. Buy a straight or slightly curved shoe, such as a motion control shoe (AAFES tag “M”). AAFES tagged shoes can be found at Post Exchanges (PX).
Stretching
Always stretch before and after you do any physical exercise. The following stretching techniques will help you properly prepare your body for running:
Balance yourself against a sturdy object or wall. Grasp your right ankle behind your back with your right hand. Gently pull up with your hand. Figure 4 (on the right) shows a common mistake many people make when trying to perform this stretch. Be sure to pull at the ankle and not pull at the toes. Doing this will reduce the chance of an injury. Keep your head up, stand erect, and do not bend over at the waist. Do not bounce. Hold this stretch for a minimum count of 30 seconds for each leg.
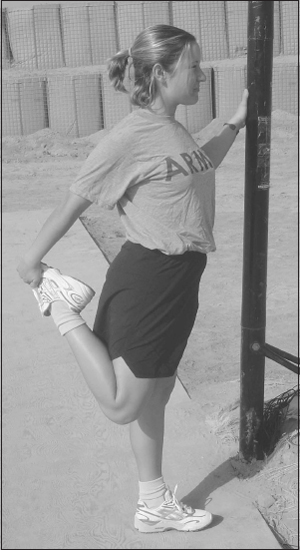
Figure 4: Common mistake when stretching the quadriceps. Grab your ankle, not your toe.
Groin Stretch (inner legs)
With your buttocks on the floor place the bottom of your feet together in front of you (Figure 5, next page). Slowly bring your feet as close to your body as possible. Gently grasp your feet and slowly push your knees toward the floor with your elbows. Hold this stretch for a minimum of 30 seconds.

Figure 5: Proper technique for stretching the groin.
Hamstrings (back of legs)
With your buttocks on the floor, straighten your legs in front of you about 18” apart (Figure 6, next page).
Gently reach for the toe on your right leg with your right arm, and hold this for about 30 seconds. When you are finished, repeat this with the left leg, and hold again for about 30 seconds. This simple exercise will stretch the hamstrings, but do it gently and slowly, so you do not risk injuring your low back or pulling a different set of muscles.

Figure 6: Proper technique for stretching the hamstrings.

Figure 7: Proper technique for stretching the calves.
Calves (back and bottom of legs)
Lean against a wall with the left leg behind you (Figure 7). The right leg should be in front of you bearing most of your weight. Keep the heel of the left foot on the floor with the toe pointed forward. Gently move your hips forward toward the wall. The farther forward your hips move, the greater the stretch. Hold for 30 seconds and repeat with the other leg.
Did You Know?
A stride is calculated by measuring the distance of ten normal sized steps, and dividing the distance you walked by 10.
Before you begin any running program, you must learn how to run properly. Practicing the various running techniques outlined here, you will greatly improve your efficiency and reduce the risk of injury. Below is a list of quick fix running tips you can implement immediately into your running program. If you find that these techniques change your stride significantly, then make your changes gradually. These new techniques could put stress on different muscle groups, which could result in injury until your body adapts to the new running style.
Below is a list of quick fix running tips you can implement immediately into your running program. If you find that these techniques change your stride significantly, then make your changes gradually. These new techniques could put stress on different muscle groups, which could result in injury until your body adapts to the new running style.
Quick Fix #1
Run straight in a vertical alignment. Your body should be angled forward to the point where you will almost feel like falling over. Be careful not to stick your buttocks out; doing so will create improper balance.
Quick Fix #2
Keep your feet on the ground as little as possible. It is common for people to run heel to toe as their foot strikes the ground. Land on the mid-foot, or forefoot if possible. When you land on your heels, you are placing your body’s center of gravity behind you. This forces your body to push harder with every step and wastes energy.
Do not bounce when you run. Use your energy to create horizontal and not vertical movement. The less vertical movement you have when running, the more energy you can use to propel your body forward.
Quick Fix #4
Your foot should land under your body when it strikes the ground, not in front of you. By doing this, you will ensure better leverage and balance.
Quick Fix #5
Don’t swing your legs back and forth. Instead, when your foot strikes the ground, pull your heel toward your butt by contracting the hamstring. This technique creates a shorter leg arch so your legs get in position faster for the next step without any wasted energy.
Summary
Quick Fix #1: Run straight in a vertical alignment.
Quick Fix #2: Keep your feet on the ground as little as possible.
Quick Fix #3: Don’t bounce when you run.
Quick Fix #4: Your foot should land under your body when it strikes the ground.
Quick Fix #5: Pull your heel toward your buttocks by contracting the hamstring.
Quick Fix #6: Resist the temptation to push off with your toes.
Quick Fix #6
Resist the temptation to push off with your toes. By contracting your hamstring muscles (as described in quick fix #5) you will save energy for those long runs.
8-Week Running Program
Running should be done every other day. Getting sufficient rest is just as important as exercising. Resting lets your body recuperate and allows your muscles to get stronger and more resilient after a workout.
This running program can be accomplished regardless of your current fitness level. If you find this program too easy, then add some distance and/or speed to the run. Just make sure that you follow the minimum requirements outlined in this chapter.
This program outlines eight weeks of training to get you in shape for boot camp. If you have more time than eight weeks, then take advantage and begin early. If you don’t have eight weeks to complete this program, start from the beginning and do what you can. Every little bit helps before you start basic training.
Warm-Up With a Jump Rope
Jumping rope is a great warm-up exercise. If you don’t have a jump rope, don’t worry, simply mimick the exercise as if you have a jump rope in your hands. Jumping rope is low impact on your muscles and gets your blood flowing, your heart rate up, and your muscles ready for the run. Jumping rope also builds the lower leg muscles that are essential for running. A proper warm-up is outlined in Table 1 and should be followed before every run and after every pre-workout stretch. If the jump rope gets tangled and you are forced to restart your movement, add the time you stopped jumping to the time limit you are trying to accomplish.
This running program will increase your running distance and improve your running speed. Don’t ever fall behind in a run in basic training. If you do, your Drill Sergeant will believe you are unmotivated, and you could lose privileges (such as passes) and receive special attention (which you don’t want). Before you begin this running program, you need to evaluate your level of fitness. You will need a stopwatch and a pedometer to do so.
Equipment Needed:
Stop Watch
Pedometer
A pedometer is a device that attaches to your hip and calculates how far you have run. A pedometer can be purchased at just about any sports store for a few dollars. If you are running on a standard track, a pedometer is not needed. One complete circle around a standard track is one-quarter (¼) mile, or 440 yards. If you don’t have a pedometer (or don’t want to get one), then plan your running route in advance and measure the distance in your car before your run. If you have a smartphone, there are even some apps that can track how far you have run. The key here is to plan your route so you know the distance you will be running.
After you have stretched and elevated your heart rate with jump rope exercises, you can begin your assessment. Use your stopwatch and determine how long it took you to run one mile. One mile equals four laps around a standard track. Go to UltimateBasicTraining.com/fitness and determine the minimum time you will need on the fitness test. Insert that time in Table 2 (under the date).
You can either push yourself hard on your own terms . . .
Complete the one-mile run as fast as possible. Log this one-mile run time on all three dotted lines in Table 2. Be sure to log your time in seconds. As an example, an 8 minute, 36 second one-mile run equals 516 seconds (simply multiply the 8 (minutes) by 60 (seconds in a minute) then add 36 seconds). Then, simply do the math as described in that table. The result will be your “sprint timegoal.” The .80 will increase your one-mile jog time by 20 percent. Since this might be your first time running in a while, do whatever it takes to keep running (unless you feel pain). Absolutely resist the urge to walk. When you alternate running and walking, your body (and your heart) will not be able to maintain a consistent rate. If you absolutely must stop running, then walk briskly. You need to keep your heart rate elevated to increase your fitness level. Stop if you feel pain.
. . . or be forced to push yourself on your Drill Sergeant’s terms.
Just remember: push yourself hard on your own terms, or be forced to push yourself on your Drill Sergeant’s terms. Take a one-day rest after the one-mile assessment.
Sprint Day
Initially, run ¼-mile. Be sure to beat the sprint time goal (from Table 2). If you run ¼-mile and do not beat the goal, then re-run the ¼-mile. It might sound tough, but again, better to be disciplined on your own terms than on your Drill Sergeant’s terms. Once you complete a ¼-mile run, then walk briskly for ¼-mile. You want to keep your heart rate up to increase your stamina. Log your time in Set 1 on Table 3.
After the ¼-mile brisk walk, complete a second ¼-mile sprint, log this time under Set 2. Again, walk briskly for ¼-mile. Repeat three more times until you have completed all five sets. After completion, be sure to stretch and drink plenty of water. You may drink water during your brisk walk as well. As a general rule of thumb, if your mouth feels dry, your body has been needing water for 20 minutes. Water helps your muscles recover faster too, so drink up.
After your first sprint day, you should have Set 1 through 5 of Day 1 filled out on Table 3. Any laps you completed where your sprint time goal wasn’t completed should have been re-ran until you beat the goal and logged appropriately in the repeated laps section.
Revisit this table on Day 5. Why? Because the next time you run will be Day 3, and that will be an endurance run. Remember, you are running every other day on this program and you are alternating between sprint days and endurance days, therefore you will only be doing a sprint day every 4th day.
After two weeks, fill in the evaluation chart (Table 4). Only use the run times in which you surpassed your sprint time goal. If you did not surpass your goal, use the “repeated laps” time instead. Remember, the “repeated laps” are those ¼-mile laps you had to redo because you failed to surpass your sprint time goal. Once completed, Table 4 will give you a new sprint time goal, which will force you to beat your prior results by 10 percent.
Once you complete Tables 3 and 4, continue your running program by completing Tables 6, 8, and 10. With each set of tables completed, your sprint goal is calculated (by filling in the evaluation chart) to be 10 percent faster than the previous two weeks. Once the tables are completed, run two miles to the best of your ability and be amazed at your results. Most people reading this book won’t take the trouble to fill out these tables. Too bad, the biggest motivation for progress is written proof that you’re progressing! Refer back to Table 2 and compare your new two-mile run score with the minimum score needed. Undoubtedly by now you are smiling. This might be a good time for you to post a review of this book online . Be sure to keep an accurate log with the tables. Charting your progress is important and motivational.
Endurance Day
On endurance days, your goal is to keep your heart rate up for a measured period of time. If your legs are sore, don’t run. Replace running with stretching your legs and perhaps some jumping rope. Be sure to focus on the running techniques outlined in the beginning of this chapter. Follow Table 11 during endurance days. You are running for a length of time during this session and not necessarily for speed, as you do during sprint days. During endurance days, I want you to focus on your running form. The six running quick tips outlined earlier in this chapter should help the efficiency of your run, so you can run longer with less effort. Each time you do an endurance run; focus on just one or two running quick tips. If you cannot continue running, stop the stopwatch and walk briskly. Continue the stopwatch once you begin running again. Since you are performing the running program every other day, you should alternate between sprint days and endurance days.
Did You Know?
The one-quarter billion skeletal muscle fibers in your body can be categorized as two main types? Type 1 fibers are used for endurance activities. Type 2 fibers are used when a task utilizes more than 25% of your maximum strength.
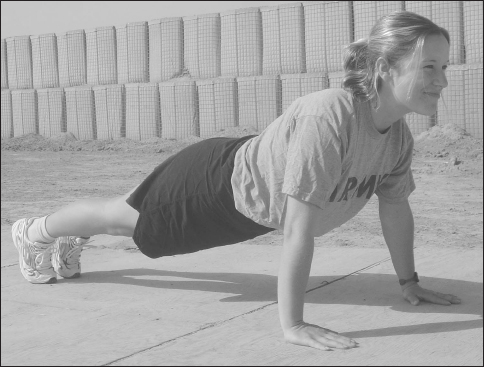
Figure 8: Proper push-up form—starting position.

Figure 9: Proper Push-up form (lowered position).
Push-Up Improvement
The push-up is used by the military to test your upper body strength. There are literally hundreds of exercises you can do to build upper body strength. However, the best way to increase the number of push-ups you can do is to actually DO the push-ups.
The push-up program I have set forth below should be performed every other day, as the same day as the sit-up program. Note, however, that practicing both push-ups and sit-ups too often does not allow for muscle recuperation, this is why I recommend performing these exercises every other day.

Figure 10: Proper technique for stretching the triceps.

Figure 11: Proper technique for stretching the chest.
Figure 8 (page 20) shows the proper starting position for a push-up. Note the back and legs are straight, the head is up, and the arms are at shoulder level. Your body should be lowered to the position as shown in Figure 9 (page 21, top). The upper arms are parallel to the floor and the back and legs are straight.
Stretching for Push-Ups
The push-up involves numerous upper body muscles, primarily the triceps, chest, and the shoulders. By stretching these muscles before each workout, you will reduce your muscle soreness and your chance of injury.
Triceps (back of arm)
Lift your right arm up over your head with your left hand pushing back on the right triceps just above your right elbow (Figure 10, page 21, bottom). Hold for 30 seconds and repeat with the left arm. This also stretches the shoulders.
Position your forearm on the edge of a wall or other stationary object (Figure 11, previous page). Place your feet in line with the wall’s edge. Lean out and away from the wall’s edge. Hold for a minimum of 30 seconds then repeat with the other arm.
Shoulders
Place your right arm behind your back with your right hand reaching toward your left shoulder (Figure 12). Grab your right wrist with your left hand and pull it gently higher. Hold for 30 seconds, then repeat with left arm.
Improving Push-Up Performance
This push-up program is designed to be rigorous, regardless of your current fitness level. The more you put into this program, the more you will get out of it. You will be doing both fast and slow push-ups.

Figure 12: Proper technique for kneeling diamond push-up.
Refer to UltimateBasicTraining.com/fitness to determine the number of push-ups you must complete to pass your fitness test. Enter that number at the top of Table 12. After proper stretching, see how many push-ups you can do in one minute. Do these push-ups as quickly as possible, but in a controlled manner. Only those push-ups with correct form should be counted. Remember the number of push-ups you just performed. Drop immediately to your knees and continue doing push-ups, but this time put your hands close together (as shown in Figure 13 above). This type of push-up is called a kneeling diamond push-up because your forefinger and thumbs form a diamond shape. These push-ups should be done very slowly—three seconds for the downward movement, and three seconds for the upward movement.

Figure 13: Proper technique for kneeling diamond push-up.
Keep doing push-ups until you can’t continue. When you are done, enter your numbers in line A and B in Set 1 of Table 12 (enter A for regular push-ups and B for kneeling diamond push-ups). Rest two full minutes and complete another set. Enter those numbers in Table 12, Set 2, lines A and B. Complete a third set and stretch afterward. After three days of performing three sets of one-minute timed push-ups (which equals Week 1 on Table 12), complete four days of 1:30 minute timed push-ups (which equals Week 2 on Table 12). You will always be performing kneeling diamond push-ups for 1 minute after each timed set. As your eight-week fitness program continues, continue to fill out Table 12. Be sure to notice the increase in the amount of timed push-ups in set A. Again, the kneeling diamond push-ups will always be performed for 1 minute and will immediately follow the timed push-ups. Perform this workout every other day along with the sit-up program.

Figure 14: Proper sit-up form (starting position).
Do not be discouraged if by the second or third set your number does not meet the minimum fitness standards. Your muscles will be tired before the sets even start, unlike when you take a fitness test at basic training. By following this routing, when basic training starts, you will be laughing at the minimum push-up standard your Drill Sergeants will require of you.

Figure 15: Proper sit-up form (vertical position).

Figure 16: Torso extension stretch.
Sit-Up Improvement
Figure 14 (previous page, top) shows the proper starting position for a sit-up. Notice the legs are bent at a 90-degree angle, the heel is in contact with the floor, and the fingers are interlocked behind the head. During the fitness test at basic training, a partner will be holding your ankles with his hands. Your body should be raised to the position as shown in Figure 15 (previous page, below). In the vertical position, the base of the neck is above the base of the spine. During a fitness test, raising your body to the vertical position and returning it to the lowered position is considered one full repetition. Similar to the push-up, you can save considerable energy during a fitness test by using gravity to let your body return to the lowered position. However, during practice you can build muscular endurance by lowering yourself slowly to the starting position. This sit-up program is intense, so stop immediately if you feel any abnormal discomfort, and rest and reduce the intensity.
The sit-up involves the torso and abdominal muscles. Recruits often injure their upper quadriceps (leg muscles) by using the wrong muscles to raise them to a vertical position. To thoroughly stretch before a sit-up, perform the stretch described for quadriceps in the running section. Note: sit-ups done improperly can be harmful to the back. The torso extension stretch (Figure 16) will stretch your abdominal muscles and the spine. To properly perform the torso extension stretch, lie on your stomach and use your forearms to hold your body weight. Relax and slowly raise your upper body, keeping your waist on the floor. Hold for a minimum of 30 seconds. To increase the intensity of the stretch, place the palms of your hands on the floor, instead of your forearms.
Improving Sit-Up Performance
This eight-week sit-up program is designed to significantly increase the amount of sit-ups you can do in two minutes. This program is not designed to give you a flat six-pack stomach or melt inches off your waist, if it does, consider it a bonus.
Perform this program on the same day as the push-up program. Before starting, get comfortable by placing a towel under your tail bone or use a soft surface, such as a mat, to lie on. Do not use a bulky surface such as a couch or mattress.

Figure 17: Proper technique for abdominal crunches.

Figure 18: Proper technique for upper half crunches.
Refer to UltimateBasicTraining.com/fitness to determine the amount of sit-ups you will need to do to pass your fitness test. Enter that number at the top of Table 13. After proper stretching, see how many sit-ups you can perform in one minute. If you do not have someone available to hold your ankles, then try placing your feet under a doorway, couch, or other object that will comfortably keep your feet in place. Do these sit-ups as quickly as possible and with correct form. Do NOT pull your head up with your hands behind your head. Your hands are placed behind your head for head support only and should not be used to try and push your body upward. Your elbows should remain straight and aligned behind your head. Breathe out on the way up. Remember the number of sit-ups you just performed. Immediately begin abdominal crunches (as shown in Figure 17, previous page). Place your hands behind your head or across your chest. Once your shoulder blades are off the ground, return to the starting position. Perform abdominal crunches until you cannot continue. When you are done, enter your numbers in line A and B in Set 1 of Table 13 (A for regular sit-ups and B for abdominal crunches). Rest two full minutes and complete another set.
This time, instead of performing abdominal crunches after the timed sit-ups, perform upper-half crunches. The mid-point of the sit-up is the starting position for this exercise (Figure 18, previous page). Enter those numbers in Table 13, Set 2, lines A and C. After three days of performing two sets of one-minute timed sit-ups (which equals Week 1 on Table 13), complete four days of 1:30 minute timed sit-ups (which equals Week 2 on Table 13). As your eight-week fitness program continues, continue to fill out Table 13. Be sure to notice the increase in the amount of timed push-ups in set A. The upper and lower half crunches will always be performed for 1 minute and will immediately follow the timed push-ups. Perform this workout every other day along with the push-up program. Table 14 outlines exactly what you need to accomplish, day-by-day, for eight weeks. Use Table 14 as a checklist. If you are unable to workout for a day, do not skip the workout! Instead, use it as a day of rest, and pick up the exercise program the next day where you left off.
Tips for Maximizing Your Fitness Test
- Lowering your body and raising it to the starting position is considered one full repetition for a push-up and sit-up. Save energy during a fitness test by using gravity to let your body fall. However, during practice you will want to lower your body in a controlled manner to build muscle.
- When taking the fitness test at basic training, you may have to wait in a long line before it is time to perform your exercises. About five minutes before it’s your turn, perform just a few push-ups or sit-ups (depending on which portion of the test you’re waiting to take). Doing this will increase your blood flow and prepare your muscles for the task at hand.
- Avoid muscle failure during an APFT when doing the push-ups and sit-ups. When your muscles approach failure, rest for a little while, and then start back up again. Be sure to rest in an authorized position, which will be explained to you by your Drill Sergeants.
- Sometimes the Drill Sergeant grading you will not count a repetition for various reasons (i.e., didn’t come up high enough on a sit-up, or down far enough on a push-up). When this happens, make a deliberate and obvious attempt to correct your form. Doing this will let the grader know that you heard his remark and the problem is being rectified. Always focus on form. Try not to waste energy on bad repetitions.
- Pace your breathing and speed on the running portion of the test. Many recruits get anxious during the run and take off running full speed (or nearly full speed) when the time starts. There are many reasons why you should avoid doing this. By starting slow on the run, you will be passing others one-half mile down the road, which is motivational.
Miscellaneous Exercises
Other than push-ups and sit-ups, there are several miscellaneous exercises you will need to know about before arriving at basic training. Some exercises you do in basic training are common knowledge, such as jumping jacks, military presses (using your weapon as a weight), and pull-ups. In basic training, you won’t go to a gym and lift weights. Many exercises you do will use your body weight as resistance. This is a good reason to lose weight before basic training starts. In basic training, you will become very familiar with the following exercises. Practice these exercises at home until you are familiar with the form. To see many of these exercises mentioned here via video, please go to UltimateBasicTraining.com/howto and watch the video entitled: Basic Training Exercises.

Figure 19: Starting position of a flutterkick.
Flutterkicks: Strengthens the Stomach
Lie on your back and place your hands under your buttocks. Raise your feet six inches above the ground with your legs very slightly bent and head off the ground (Figure 19). This is your starting position. To begin the movement, raise one of your legs about 12 to 16 inches. As that leg reaches the top, begin returning it to the starting position as you raise the other leg 12 to 16 inches. Repeat.

Figure 20: Starting position of overhead claps.
Overhead Claps: Strengthens the Shoulders
Extend both your arms to the side of your body, about shoulder level with your palms facing up (Figure 20, previous page). Your arms should be bent slightly. Raise your arms up and clap your hands above your head. Return them to the starting position and repeat.
Planks: Strengthens the Stomach
Assume the push-up position. Instead of resting on your hands, rest on your forearms (Figure 21, below). Your back should be straight. Hold this position for one minute. After about twenty seconds you will feel your abdominal muscles getting tight. The further you bring your elbows past your head, the more difficult this exercise will become.
Leg Spreaders: Strengthens the Inner Thighs
Assume the flutterkick starting position. Keep your legs slightly bent to reduce back strain. Spread your legs approximately 18 to 30 inches apart. Return your legs to the starting position and repeat.

Figure 21: Starting position of a plank.
Ski Jumpers: Strengthens the Legs and Calves
Stand upright, place your hands on top of your head, and your feet together. Jump to the left about 18 inches. As soon as you touch the ground, jump to the right about 18 inches. Repeat. The faster you perform this exercise, the more challenging it will become.
Front-Back-Go: Strengthens the Cardiovascular System
You will need a partner for this exercise. When your partner yells “front,” you will begin doing push-ups as fast as possible. After you do push-ups for a while, have your partner yell “back.” On the command of “back” you will start doing sit-ups as fast as possible. After some time elapses, have your partner yell “go!” On the command “go,” you will run in place with your arms extended in front of you. Your Drill Sergeant will certainly get you acquainted with this exercise.
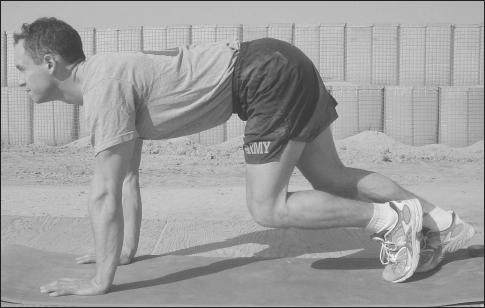
Figure 22: Starting position of mountain climbers.
Toe Touches: Strengthens the Legs
Stand upright with your feet shoulder width apart. Place your hands on your hips. This is the starting position. Begin by bending your legs and touching your ankles. Keep your back straight. Return to the starting position and repeat. Drill Sergeants often refer to this exercise as “dusting your boots.”
Donkey Kicks: Strengthens the Legs and Cardiovascular System
Stand upright and interlock your fingers behind your head. This is your starting position. Jump and kick your heels to your buttocks. Repeat. This exercise, also called “mule kicks,” is commonly done on gravel and sand to increase difficulty.
Mountain Climbers: Strengthens the Legs and the Cardiovascular System
Place your hands on the ground approximately three or four feet in front of your feet. Your back should be naturally arched (Figure 22, previous page). This is the starting position.
Begin the exercise by running in place without moving your hands. Move your knees close to your chest.