Slow cookers are inexpensive to operate; they use about as much electricity as a 60-watt bulb. They are also as easy to operate as flipping on a light switch.
Slow cookers operate by cooking food using indirect heat at a low temperature for an extended period of time. Here’s the difference: Direct heat is the power of a stove burner underneath a pot, while indirect heat is the overall heat that surrounds foods as they bake in the oven.
You can purchase a slow cooker for as little as $20 at a discount store, while the top-of-the-line ones sell for more than $200. They all function in the same simple way; what increases the cost is the “bells and whistles” factors. Slow cookers come in both round and oval shapes but they operate the same regardless of shape.
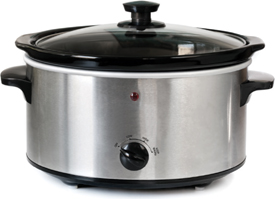
Food is assembled in a pottery insert that fits inside a metal housing and is topped with a clear lid. The food cooks from the heat generated by the circular heating wires encased between the slow cooker’s outer and inner layers of metal. The coils never directly touch the crockery insert. As the element heats, it gently warms the air between the two layers of metal, and it is the hot air that touches the pottery. This construction method eliminates the need for stirring because no part of the pot gets hotter than any other.
On the front of this metal casing is the control knob. All slow cookers have Low and High settings, and most also have a Stay Warm position. Some new machines have a programmable option that enables you to start food on High and then the slow cooker automatically reduces the heat to Low after a programmed time.
The largest variation in slow cookers is their size, which range from tiny 1-quart models that are excellent for hot dips and fondue but fairly useless for anything else to gigantic 7-quart models that are excellent for large families and large batches.
Most of the recipes in this book were written for and tested in a 4- or 5-quart slow cooker; that is what is meant by medium. Either of those sizes makes enough for four to eight people, depending on the recipe. In a few cases, such as for lamb shanks that take up a lot of room as they cook, a large slow cooker is specified.
Rival introduced the first slow cooker, the Crock-Pot, in 1971, and the introductory slogan remains true more than 35 years later: It “cooks all day while the cook’s away.” Like such trademarked names as Kleenex for paper tissue or Formica for plastic laminate, Crock-Pot has almost become synonymous with the slow cooker. However, not all slow cookers are Crock-Pots, so the generic term is used in this book.
Questions always arise as to the safety of slow cookers. The Food Safety and Inspection Service of the U.S. Department of Agriculture approves slow cooking as a method for safe food preparation. The lengthy cooking and the steam created within the tightly covered pot combine to destroy any bacteria that might be present in the food. But you do have to be careful.
It’s far more common for foodborne illness to start with meat, poultry, and seafood than from contaminated fruits and vegetables. That is why it’s not wise to cook whole chickens or cuts of meat larger than those specified in the recipes in this book because during slow cooking, these large items remain too long in the bacterial “danger zone”—between 40°F and 140°F. It is important that food reaches the higher temperature in less than two hours and remains at more than 140°F for at least 30 minutes.
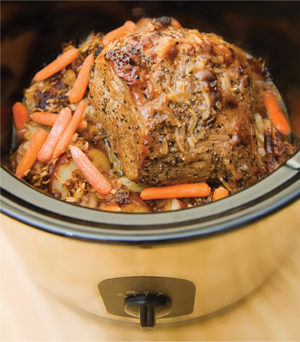
If you want to cook large roasts, brown them under the oven broiler or in a skillet on top of the stove over direct heat before you place them into the slow cooker. This will help the chilled meat heat up faster as well as produce a dish that is more visually appealing. Also begin with liquid that is boiling.
Getting a jump-start on dinner while you’re preparing breakfast may seem like a Herculean task, and it is possible to prep the ingredients destined for the slow cooker the night before—with some limitations. If you cut meat or vegetables in advance, store them separately in the refrigerator and layer them in the slow cooker in the morning. However, do not store the cooker insert in the refrigerator because that will also increase the amount of time it takes to heat the food to a temperature that kills bacteria.
Concern about food safety extends to after a meal is cooked and the leftovers are ready for storage. As long as the temperature remains 140°F or higher, food will stay safe for many hours in the slow cooker. Leftovers, however, should never be refrigerated in the crockery insert because it will take them too long to go through the “danger zone” in the other direction—from hot to cold.

Freeze or refrigerate leftovers in shallow containers within two hours after a dish has finished cooking. Also, food should never be reheated in the slow cooker because it takes too long for chilled food to reheat. Bacteria are a problem on cooked food as well as raw ingredients. The slow cooker can be used to keep food warm—and without the fear of burning it—once it has been reheated on the stove or in the oven.
One of the other concerns about food safety and the slow cooker is if there is a loss of power in the house—especially if you don’t know when it occurred in the cooking process. If you’re home, and the amount of time was minimal, add it back into your end time. If the time without power increases to more than 30 minutes, finish the food by conventional cooking, adding more liquid, if necessary.
However, if you set the slow cooker before you left for work, and realize from electric clocks that power was off for more than an hour, it’s best to discard the food, even if it looks done. You have no idea if the power outage occurred before the food passed through the “danger zone.” I subscribe to the “better safe than sorry” motto.
Always thaw food before placing it in the slow cooker to ensure the trip from 40°F to 140°F is accomplished quickly and efficiently. While adding a package of frozen green beans will slow up the cooking, starting with a frozen pot roast or chicken breast will make it impossible for the low temperature of the slow cooker to accomplish this task.
Slow cookers can be perplexing if you’re not accustomed to using one. Here are some general tips to help you master slow cooker conundrums:
![]() Remember that cooking times are wide approximations—within hours rather than minutes! That’s because the age or power of a slow cooker as well as the temperature of ingredients must be taken into account. Check the food at the beginning of the stated cooking time, and then gauge if it needs more time, and about how much time. If carrots or cubes of potato are still rock-hard, for example, turn the heat to High if cooking on Low, and realize that you’re looking at another hour or so.
Remember that cooking times are wide approximations—within hours rather than minutes! That’s because the age or power of a slow cooker as well as the temperature of ingredients must be taken into account. Check the food at the beginning of the stated cooking time, and then gauge if it needs more time, and about how much time. If carrots or cubes of potato are still rock-hard, for example, turn the heat to High if cooking on Low, and realize that you’re looking at another hour or so.
![]() Foods cook faster on the bottom of a slow cooker than at the top because there are more heat coils and they are totally immersed in the simmering liquid.
Foods cook faster on the bottom of a slow cooker than at the top because there are more heat coils and they are totally immersed in the simmering liquid.
![]() Appliance manufacturers say that slow cookers can be left on either High or Low unattended, but use your own judgment. If you’re going to be out of the house all day, it’s advisable to cook food on Low. If, on the other hand, you’re going to be gone for just a few hours, the food will be safe on High.
Appliance manufacturers say that slow cookers can be left on either High or Low unattended, but use your own judgment. If you’re going to be out of the house all day, it’s advisable to cook food on Low. If, on the other hand, you’re going to be gone for just a few hours, the food will be safe on High.
![]() Use leaf versions of dried herbs such as thyme and rosemary rather than ground versions. Ground herbs tend to lose potency during many hours in the slow cooker.
Use leaf versions of dried herbs such as thyme and rosemary rather than ground versions. Ground herbs tend to lose potency during many hours in the slow cooker.

![]() Don’t add dairy products except at the end of the cooking time, as noted in the recipes. They can curdle if cooked for too long.
Don’t add dairy products except at the end of the cooking time, as noted in the recipes. They can curdle if cooked for too long.
![]() Season the dishes with pepper or crushed red pepper flakes at the end of cooking time, because these ingredients can become harsh from too many hours in the pot.
Season the dishes with pepper or crushed red pepper flakes at the end of cooking time, because these ingredients can become harsh from too many hours in the pot.
![]() If you want a sauce to have a more intense flavor, you can reduce the liquid in two ways. If cooking on Low, raise the heat to High, and remove the lid for the last hour of cooking. This will achieve some evaporation of the liquid. Or, remove the liquid either with a bulb baster or strain the liquid from the solids, and reduce them in a saucepan on the stove.
If you want a sauce to have a more intense flavor, you can reduce the liquid in two ways. If cooking on Low, raise the heat to High, and remove the lid for the last hour of cooking. This will achieve some evaporation of the liquid. Or, remove the liquid either with a bulb baster or strain the liquid from the solids, and reduce them in a saucepan on the stove.
While in many households slow cookers are banished to the basement when screens replace storm windows during the warmer months, in my kitchen at least one lives on the counter all summer. Running the slow cooker doesn’t raise the kitchen temperature by even a degree, and you can be outside enjoying the warm weather while it’s cooking away.
Slow cookers are benign, but they are electrical appliances with all the concomitant hazards of any machine plugged into a live wire. Be careful that the cord is not frayed in any way, and plug the slow cooker into an outlet that is not near the sink.
Here are some tips on how to handle them:
![]() Never leave a slow cooker plugged in when not in use. It’s all too easy to accidentally turn it on and not notice until the crockery insert cracks from overheating with nothing in it.
Never leave a slow cooker plugged in when not in use. It’s all too easy to accidentally turn it on and not notice until the crockery insert cracks from overheating with nothing in it.
![]() Conversely, do not preheat the empty insert while you’re preparing the food because the insert could crack when you add the cold food.
Conversely, do not preheat the empty insert while you’re preparing the food because the insert could crack when you add the cold food.
![]() Never submerge the metal casing in water, or fill it with water. While the inside of the metal does occasionally get dirty, you can clean it quite well with an abrasive cleaner, and then wipe it with a damp cloth or paper towel. While it’s not aesthetically pleasing to see dirty metal, do remember that food never touches it, so if there are a few drips here and there it’s not really important.
Never submerge the metal casing in water, or fill it with water. While the inside of the metal does occasionally get dirty, you can clean it quite well with an abrasive cleaner, and then wipe it with a damp cloth or paper towel. While it’s not aesthetically pleasing to see dirty metal, do remember that food never touches it, so if there are a few drips here and there it’s not really important.
![]() Always remember that the insert is fragile, so don’t drop it. Also, don’t put a hot insert on a cold counter; that could cause it to break, too. The reverse is also true. While you can use the insert as a casserole in a conventional oven (assuming the lid is glass and not plastic), it cannot be put into a preheated oven if chilled.
Always remember that the insert is fragile, so don’t drop it. Also, don’t put a hot insert on a cold counter; that could cause it to break, too. The reverse is also true. While you can use the insert as a casserole in a conventional oven (assuming the lid is glass and not plastic), it cannot be put into a preheated oven if chilled.
![]() Resist the temptation to look and stir. Every time you take the lid off the slow cooker you need to add 10 minutes of cooking time if cooking on High and 20 minutes if cooking on Low to compensate. Certain recipes in this book, especially those for fish, instruct you to add ingredients during the cooking time. In those cases the heat loss from opening the pot has been factored in to the total cooking time.
Resist the temptation to look and stir. Every time you take the lid off the slow cooker you need to add 10 minutes of cooking time if cooking on High and 20 minutes if cooking on Low to compensate. Certain recipes in this book, especially those for fish, instruct you to add ingredients during the cooking time. In those cases the heat loss from opening the pot has been factored in to the total cooking time.
![]() Don’t add more liquid to a slow cooker recipe than that specified in the recipe. Even if the food is not submerged in liquid when you start, foods such as meats and vegetables give off liquid as they cook; in the slow cooker, that additional liquid does not evaporate.
Don’t add more liquid to a slow cooker recipe than that specified in the recipe. Even if the food is not submerged in liquid when you start, foods such as meats and vegetables give off liquid as they cook; in the slow cooker, that additional liquid does not evaporate.
Modern slow cookers heat slightly hotter than those made thirty years ago; the Low setting on a slow cooker is about 200°F while the High setting is close to 300°F. If you have a vintage appliance, it’s a good idea to test it to make sure it still has the power to heat food sufficiently. Leave 2 quarts water at room temperature overnight, and then pour the water into the slow cooker in the morning. Heat it on Low for 8 hours. The temperature should be 185°F after 8 hours. Use an instant read thermometer to judge it. If it is lower, any food you cook in this cooker might not pass through the danger zone rapidly enough.
Rules for slow cooking, along with all other modes of cooking, change when the slow cooker is located more than 3,000 feet above sea level. At high altitudes the air is thinner so water boils at a lower temperature and comes to a boil more quickly. The rule is to always cook on High when above 3,000 feet; use the Low setting as a Keep Warm setting.
Other compensations are to reduce the liquid in a recipe by a few tablespoons, and add about 5 to 10 percent more cooking time. The liquid may be bubbling, but it’s not 212°F at first.
Once you feel comfortable with your slow cooker, you’ll probably want to use it to prepare your favorite recipes you now cook on the stove or in the oven. The best recipes to convert are “wet” ones with a lot of liquid, like stews, soups, chilies, and other braised foods. Not all dishes can be easily converted to slow cooked dishes. Even if a dish calls for liquid, if it’s supposed to be cooked or baked uncovered, chances are it will not be successfully transformed to a slow cooker recipe, because the food will not brown and the liquid will not evaporate.

The easiest way to convert your recipes is to find a similar one in this book and use its cooking time for guidance. When looking for a similar recipe, take into account the amount of liquid specified as well as the quantity of food. The liquid transfers the heat from the walls of the insert into the food itself, and the liquid heats in direct proportion to its measure. You should look for similar recipes as well as keep in mind some general guidelines:
![]() Most any stew or roast takes 8 to 12 hours on Low and 4 to 6 hours on High.
Most any stew or roast takes 8 to 12 hours on Low and 4 to 6 hours on High.
![]() Chicken dishes cook more rapidly. Count on 6 to 8 hours on Low and 3 to 4 hours on High.
Chicken dishes cook more rapidly. Count on 6 to 8 hours on Low and 3 to 4 hours on High.
![]() Quadruple the time from conventional cooking to cooking on Low, and at least double it for cooking on High.
Quadruple the time from conventional cooking to cooking on Low, and at least double it for cooking on High.
![]() Cut back on the amount of liquid used in stews and other braised dishes by about half. Unlike cooking on the stove or in the oven, there is little to no evaporation in the slow cooker.
Cut back on the amount of liquid used in stews and other braised dishes by about half. Unlike cooking on the stove or in the oven, there is little to no evaporation in the slow cooker.
![]() For soups, cut back on the liquid by one third if the soup is supposed to simmer uncovered, and cut back by one fourth if the soup is simmered covered. Even when covered, a soup that is simmering on the stove has more evaporation than one cooked in the slow cooker.
For soups, cut back on the liquid by one third if the soup is supposed to simmer uncovered, and cut back by one fourth if the soup is simmered covered. Even when covered, a soup that is simmering on the stove has more evaporation than one cooked in the slow cooker.
These stocks are referenced in countless recipes in this book. Stocks are no more difficult to make than boiling water; all they are is lots of water into which other ingredients simmer for many hours to create water with an enriched flavor.
In the same way that you can use bits of leftover vegetables in soups, many of the vegetables that go into stocks would otherwise end up in the garbage can or compost bin. Save those carrot and onion peelings, parsley stems, the base off a celery stalk, and the dark green scallion tops. All of those foods might not wend their way into cooking a dish, but they’re fine for stock!
I keep different bags in my freezer in anticipation of making stock on a regular basis. There are individual ones for chicken trimmings, beef and veal (but not pork) trimmings, shrimp shells, fish skin and bones; and one for vegetables past their prime and their trimmings. When one is full, it’s time to make stock.
Once your stock is cooked—and the fat removed from chicken and beef stock—you should freeze it in containers of different sizes. I do about half a batch in heavy, resealable quart bags; they are the basis for soups. Bags take up less room in the freezer than containers. Freeze them flat on a baking sheet and then they can be stacked on a freezer shelf or in the cubbyholes on the freezer door.
I then freeze stock in 1-cup measures and some in ice cube trays. Measure the capacity of your ice cube tray with a measuring tablespoon; it will be somewhere between 1 and 3 tablespoons. Keep a bag of stock cubes for those recipes that require just a small amount.
