
Figure 11-9: There are several screens to configure for the Copyright Info function. It's times like these that you wish the camera had a touch screen.
Menu Position MENU --> 5 --> Copyright Info
What it Does Lets you specify the name of the photographer and the copyright holder – information which will be embedded into every image taken.
Recommended Setting: [Your name here]
At long last, Sony has caught up with other camera manufacturers in allowing you to store basic copyright info into the EXIF information field within every .jpg and .arw file the camera takes. In theory this could be useful in tracking down online image theft from stupid content creators who don't know how to erase this information from the image (it's not very hard).
For those of you who are wondering what EXIF info is, it's the information you see whenever you choose to view "File Info" from your favorite image editing program. (The user interface will vary of course.) Usually things like shutter speed, f/stop, ISO, white balance, lens used, time and date taken, GPS info (if your camera has one built-in – yours doesn't), and camera-specific features are stored within, and now you can store your own personal name here as well.
This menu function provides you with the following options (Figure 11-9a):
In order to enter your name, you have to use this video-game-like keyboard which is kind of a pain, but like setting the Wi-Fi settings, you only have to do it once.
Figure 11-9: There are several screens to configure for the Copyright Info function. It's times like these that you wish the camera had a touch screen. |
Menu Position MENU --> 5 --> Format
What it Does Formats the memory card, erasing all content and mapping out corrupted blocks
Recommended Setting: n/a
Many people wonder what’s the purpose of formatting – after all, isn’t it the same thing as deleting all the content off your memory card?
The answer is that formatting and deleting work completely differently internally, and do different things. Think of a memory card as a library, but instead of storing books it stores image files. Libraries have a collection of books on shelves, and a card catalog telling you where each book is located.
TIP: If the memory card is heavily fragmented, it could hamper the smooth recording of movies. Another good reason to use the Format function to erase the card. |
Using this analogy, when you erase a book (image file) from the library, it doesn’t actually remove the book from the shelf. Rather, it just removes the index card which points to the book’s location. The book doesn’t actually get removed from the shelves until a new book comes in to replace it.
Hard as it is to believe, all digital storage media is imperfect, just like some libraries have broken shelves and leaky ceilings where books cannot be stored. And so the process of formatting was designed to identify these bad shelves (known in computer terms as “bad blocks”). Using the Library analogy, formatting a library involves removing all the books, taking note of where the broken shelves are and where the roof leaks, painting the good shelves, re-numbering all the shelves, and putting bricks in the card catalog so you can never accommodate a card which points to those bad spots. You’re then open for business.
Clearly, erasing and formatting are now two different things – erasing actually leaves the image on your memory card. And they will stay there too, until you start taking more pictures, at which time your old images will be irrecoverably overwritten. Formatting a card erases all the information, blocks out bad sectors, and sets things up again so new images can be accommodated without the bad parts causing corruption.
Now that you sort of get the idea behind formatting, let me add a little more important detail. There are actually two kinds of formatting that are possible; the first one being a thorough format and is the kind of formatting I described above: A complete teardown and rebuild of the library shelves, tossing all books in the process.
So, to reiterate: When you delete an image from your memory card, the image doesn’t actually get deleted (for that would take too much time); rather, a pointer to it just gets deleted from the memory card’s card catalog. (This is usually true when you delete files from computer hard drives too.) Unintuitively, when you format a memory card using the camera, the same thing is true: The card catalog is erased, but the previous image data still remains!
You may recall reading in the camera manual that you should always format the memory card in the camera, and not the computer. Given that in-camera formatting is really an erasing of the card catalog and not a thorough formatting at all, what on earth was Sony thinking when they wrote that? For the answer, let’s think back to the ancient Apple vs. IBM wars of the early 1980s. Even before the Macintosh was introduced, Apple always had their own proprietary format for floppy disks. So even if the floppy disk was physically the same, if it was written to on an Apple, it could not be read by an IBM PC. This was still true when the Mac was invented, although Apple did go out of their way to make sure that their machines could read IBM floppies if they were inserted. (A technically difficult task, since the two machines would require different mechanical spin rates at different times.)
Today, there are still many different competing proprietary formats used by Apple, Linux, and Microsoft, and when you format a memory card in those machines, who knows what format it will use? A Windows PC might use NTFS, FAT32, or FAT16 formats; whereas a Mac might use HFS+. But when your camera formats a card, it will use the Microsoft FAT32 format, which seems to be the lowest-common denominator as far as formats go – everyone can read it. (Unless, of course, you’ve inserted an SDXC card, which can hold so much data that FAT32’s card catalog isn’t big enough to address all of it. And so this specific type of memory card requires the exFAT file system, which your computer needs to know how to read if you’re going to be extracting files off of it.)
So that’s where the advice came from: It was easier to say “Just format it in the camera” instead of giving a bewildering technical explanation and saying what I’m going to say next: Should extreme corruption occur on your memory card, your best course of action to make the card usable again is to format it on your computer and specify FAT32 (or ExFAT if your computer knows about it) and disable the “Quick format” option. Why? Because a thorough format will identify and map out the bad memory locations on your card, whereas a quick format might keep the bad memory blocks active, leaving them free to once again ruin one or more of your shots.
TIP: There do exist “undelete” programs which scour through your memory and try to recover the actual data that’s still there (if it hasn’t been overwritten or thoroughly formatted); there also exists image recovery software that can try to recover as much of that image as it can in the case of a corrupted memory card (this is not a rare event – sometimes it pays to shoot RAW+JPG so at least if one image gets corrupted you’ll probably still be able to read the other.) I know that Lexar brand memory cards come with an example of the latter software for free – so it’s worth getting at least one of their cards. Other freebies that have a good reputation are: “Recuva” from Pirisoft (Obviously a New Jersey outfit): http://tinyurl.com/c3eosk Transcend memory test utilities: http://tinyurl.com/7buzlv2 |
Menu Position MENU --> 5 --> File Number
What it Does Specifies whether the camera resets the file numbering scheme when you change memory cards
Recommended Setting Series
Every time your camera takes a picture, it writes a file to the memory card named “DSC0xxxx.jpg” (or .arw). This, and the practice of putting these images into a directory named DCIM/1xxMSDCF, is in accordance with the DCF industry standard created by JEITA (the Japan Electronics and Information Technology Industries Association; www.jeita.or.jp) to encourage interoperability between imaging devices. The last four xxxx’s in the filename are actually a 4-digit number, and they increase in sequence for each picture you take. But you almost certainly already knew that.
When you swap out a memory card, the camera can continue to number the files in the same sequence (“Series”), or reset the counter and start numbering the files starting with DSC00000.jpg (“Reset”). Notice that these commands only apply when you insert a fresh memory card – you can’t, for example, reset the filename counter to zero while a card is still in the camera.
I personally prefer “Series”, since after I take pictures I tend to move pictures from one directory to another all the time, and with “Series” each image has a slightly more unique identifier.
Menu Position MENU --> 6 --> Set File Name
What it Does Allows you to change the first three letters of image file names
Recommended Setting [it’s an intensely personal choice]
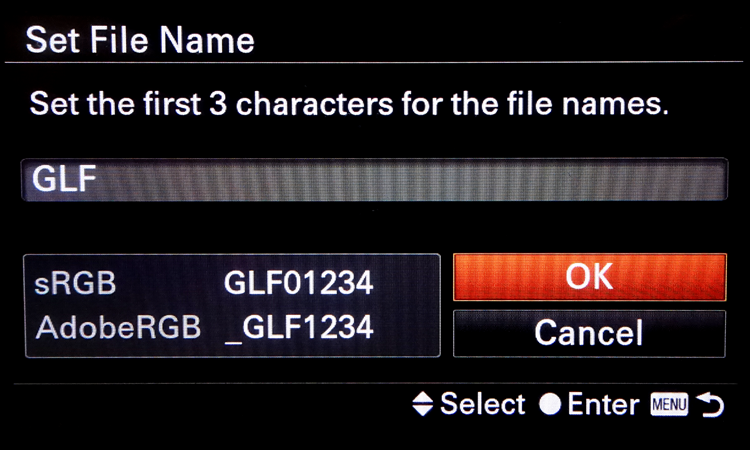
Figure 11-10: If you like the look of your own initials, you can have the camera employ them in image file names.
Normally, image file names look something like DSC00001.jpg. This feature allows you to change the first three characters from “DSC” to something of your choosing. In Figure 11-10, for example, I configured the camera to start writing file names like GLF01234.ARW or _GLF1234.ARW when shooting in AdobeRGB color space.
TIP: Because the underscore (_) is used as the first character in an AdobeRGB file name, the camera will not let you use it as one of the 3 characters. |