Most people, when learning about wireless flash for the first time, get the concepts of Groups and Channels confused. Groups were just explained – the ability to adjust one or more flashes as a “group”, whose output can all be adjusted at once, all from the comfort of behind the camera.
But what’s a Channel? Well, let’s say that you’re shooting with wireless flash in a room, and suddenly another Sony photographer comes in and sets up his own wireless flashes to shoot something else in another corner. And every time he snapped a picture, YOUR wireless flashes went off!! An undesirable situation? You bet!
For this reason the wireless flash system was given “Channels” to ensure that two Sony photographers can work in the same room without their equipment interfering with one another. Each flash can be programmed to work on either Channel 1 or 2, and it is essential that both the Master and the Slave be set to the same channel. From the factory all flashes (Master and Slave) are set to Channel 1 by default, and it is very likely that you will never need to change it in your lifetime.
On the 60 flash, the Channel is set straightforwardly via MENU --> Tab 1 --> WL CH --> [Choose from Channel 1-4]. On 43 flashes, the channel can be set by changing Custom Function 2. (You can access the Custom Function menus by holding the “Fn” button for more than three seconds.). Do this for each flash in your wireless setup.
TIP: The F20M flash is fixed at Channel 1 and cannot be changed. |
13.8 Will the Control Bursts Affect Exposure?
No. The pre-flash bursts all occur before the exposure begins, so none of that activity ends up in the shot. But, as mentioned in the “How it Works” section earlier, if you’re shooting with off-camera wireless flashes, the Morse Code “FIRE!” command does indeed occur during the exposure and might be noticeable in the shot. Generally all Morse Code commands are of such low intensity that they will not be detectable in the final image.
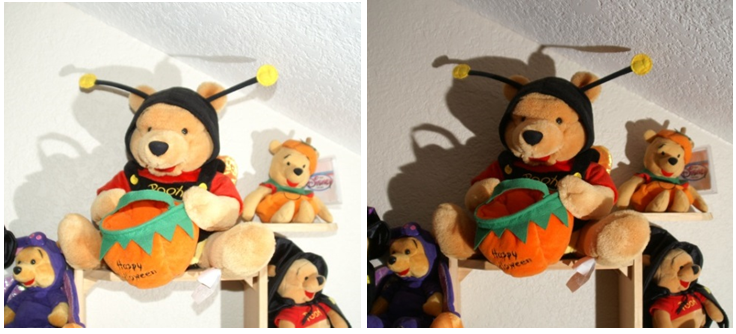
However, there are conditions under which the “FIRE!” Morse code command becomes visible and can affect the appearance of the subject. For example, if you’re shooting a close subject with the lens wide open (as I did in the examples in Figure 13-17), the intended dramatic lighting effect is washed out. This won’t happen very often but if it does there are two things you can do about it.

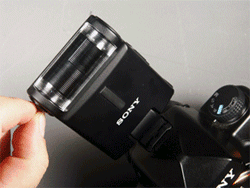
Figure 13-16: A strip of overexposed and developed color negative film makes for an ideal IR filter for your flash. The control signals still get through, but your shot is not affected by the “Fire!” command. I took my F20 flash apart and glued a strip onto that useless flash diffuser, so now I can roll the IR filter out of the way when I want to use the 20 as a pop-up flash. |
|
The first is to simply put a piece of cardboard between the master flash and the subject, so that there’s no direct illumination by the flash on the subject. (Make sure that there’s still a bounce path that the light can take to get to the off-camera flash!) The 2nd option is to place an Infrared filter on the front of the master flash – this way the slave flash will still be able to see the control signals, but the same light will NOT appear in the image because the camera’s sensor has an Infrared filter built right in! Snippets of overexposed and developed color negative film (yes, FILM! Remember that?) can act as an ideal IR filter for the master flash. (Figure 13-16.) I actually took my 20 flash apart and taped the exposed and developed film over the 20’s useless flash diffuser, and I explained how I did it in this article I wrote for Photoworld magazine: http://tinyurl.com/d9tgvfm .
There is also a third method: Use HSS flash, which I talk about in Section 13.11.

Figure 13-17: Usually the “FIRE!” Morse Code command from the Master flash has no significant effect on exposure, but you can create conditions where it makes a big difference (usually in shooting close subjects with large lens openings.) For these shots a wireless flash was placed below on the right, and the left image shows what a dramatic shot can look like when the “FIRE!” command affects the shot. Putting an IR filter in front of the Master flash, or simply blocking direct illumination with your hand or a piece of cardboard, produced the intended dramatically-lit scene on the right. |
|

