15.9 RAW Processing using Lightroom or Adobe Camera RAW
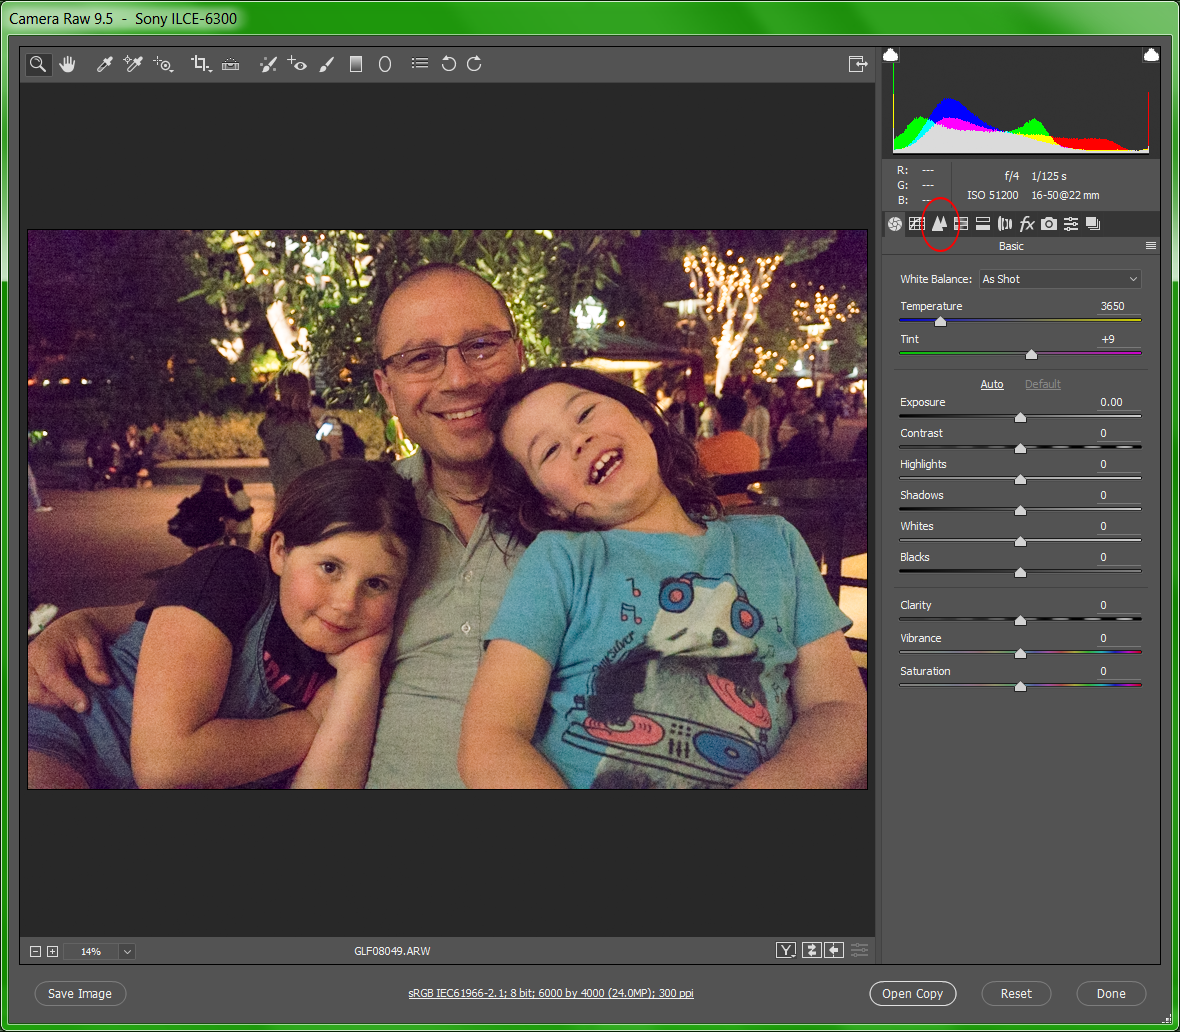
Adobe Photoshop Camera RAW 9.5 and Adobe Lightroom CC 2015.5 (earlier versions may not be able to open the new RAW files) use the same improved demosaicing and de-noise algorithms (and thankfully they both also have the same simplified controls) that can process Sony RAW files properly. Without going into great detail about the operation of these two behemoth software programs, here’s a quick rundown on how to use their controls to reduce the noise in high-ISO RAW files (we’ll use the same sample image as in the previous section; refer to Figure 15-17):
- (Photoshop only): Open the .ARW (RAW) file and the Adobe Camera RAW (ACR) window opens up, providing many controls for color balance, sharpness, noise, etc. – with the slider controls pre-set to the values that the camera took note of when the image was shot. (Remember, things like white balance aren’t actually applied to RAW files; however the camera’s settings are noted in the RAW file and Adobe’s software reads these values and then pre-adjusts the controls accordingly. This saves you a little bit of time.)
- (ACR only): Click on the “Detail” tab (red circle in Figure 15-17) to bring up the Sharpen and Noise Reduction controls. (Lightroom users have this available to them in the right side of the “Develop” work area.)
- Zoom in to 50% or 100% and look at a patch of noise (which will be easier to spot in the shadows). There are two major variables to control: Luminance noise and Color noise (often called “Chroma” noise). Chroma noise is easy to spot – it is the random distribution of color pixels that don’t belong in the image. That’s why I recommend quashing it first.
- Move the “Color” slider to the right until you see the splotchy color patterns fade away. (Don’t move it too far – too much noise reduction of either type can cause an undesired blurriness.)
- The “Color Detail” slider is a tool that can help restore some of the important edge color which the Color slider might have gotten rid of. You may not see any meaningful effect of this slider on your picture – and that’s OK. This slider has the least impact on image quality of the image than any other slider.
- The Luminance slider is next. Notice that moving it too far to the right blurs all that noise right out of existence – along with all that detail you paid so dearly to capture. Things can start looking kind of plastic-y. Clearly you want to apply no more noise reduction than necessary.

|
Figure 15-17: Both Lightroom and Adobe Camera RAW (which comes with Photoshop, and pictured above) use the same six sliders when it comes to reducing noise. The sliders you see on the right are typical of the values I use when de-noisifying most high-ISO RAW files. |
- In an effort to restore some of that detail which got blurred away in the previous step, the Luminance Detail and Luminance Contrast sliders are there. Both of these are actually employing a kind of sharpening to bring back some of the detail that was lost (yes, I know, that seems like a very backwards way to attack the problem; however when applied sparingly the combination of blurred luminance noise and sharpened edges really does degrade the noise while appearing to preserve detail.

|
Figure 15-18: The Details tab allows you to both de-noise the image and also sharpen a bit. |
- The value of the sliders you should use may vary considerably from picture to picture – there is no one-setting-fits-all for your images. Start to experiment and see what looks best to you – there is no other way to find the right settings.
- (ACR only) – hit the “Open Image” button in the lower-right-hand corner and the image is then opened in Photoshop, ready for further tweaking.
There’s more to it than that, but just the steps I outlined above are enough to produce dramatically better high ISO results than what your in-camera JPGs look like. If you’d like to delve more into understanding what all these variables do, Peachpit.com has posted a very nice video which provides a slightly more detailed overview: http://tinyurl.com/3gmsz8b. (This is for CS5, whose user interface is identical.)
 |
Figure 15-19: The original .jpg and the post-processed RAW file from ACR. The .jpg out of the camera prints better. Who could have predicted that? |
15.10 Image Size and Resolution
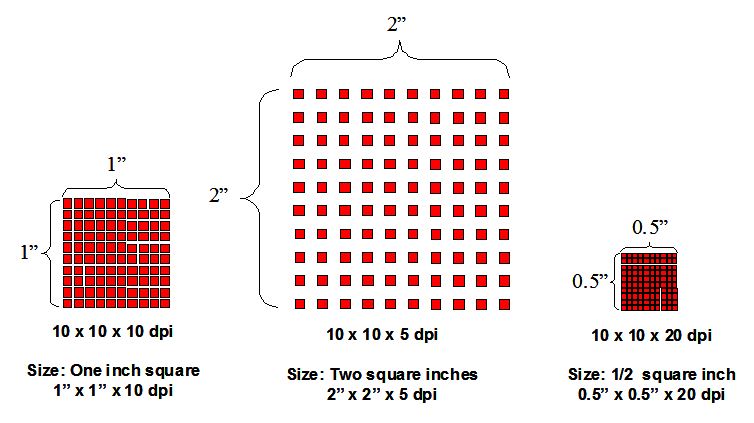
There are three variables which determine how large an image will appear when printed or when viewed on the web: the number of pixels (height), the number of pixels (width), and the number of pixels per inch (typically referred to as “dots per inch” by the majority of the populace). Figure 15-20 shows three IDENTICAL sets of pixels that can magically “change” dimensions when printed on printers of different resolution.
The gist of this is the same set of pixels can print in different sizes just by redefining the dots-per-inch setting of the printer.
This is an important concept to grasp if you will be printing the images yourself on your inkjet printer, for sizing them properly (using tools such as PlayMemories Home or Photoshop) to match the output resolution of the final imaging device (be it printer or web page) is critical to retaining the image quality.
So, how is this all relevant? Your A6300 has a 24 megapixel sensor which produces images that are about 83" x 55" x 72 dpi out of the camera. Taking the exact same set of pixels and changing to print resolution (300 dpi), the dimensions change to 20” x 13” x 300 dpi.

|
Figure 15-20: Same number of pixels, but each will print at a different size given different resolutions. |
If you wanted to make the image twice as large, you could decrease the dpi to 150 dpi and end up with an image 40” x 26" in size. Such large images are often viewed at a distance, and therefore, few notice the lower resolution needed to achieve such a large size.
Sometimes a small dot on every picture isn’t caused by a speck of dust; rather sometimes a single pixel can fail and remain a fixed color forever. Although it is not mentioned anywhere in the documentation, every Sony camera has a method for finding and “eliminating” stuck sensor pixels automatically and in a way that’s invisible to the user.
At the beginning of a month when the camera is turned off, it will test itself for a stuck pixel, and if it finds one it “maps it out” in its memory, replacing its value with the average of all the surrounding pixel’s values when it processes the image and writes it to the memory card. (That’s why it can sometimes take an extra 8 seconds or so for the camera to turn off.) So if you suspect your camera has such a “hot pixel”, set the camera’s date to the beginning of next month, turn the camera off and then on, and the problem should go away. (You can then move the date back to today once it’s done.)

|
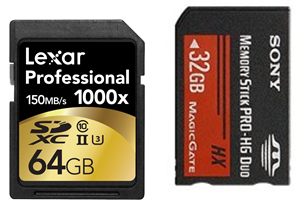
Figure 15-21: Newer cards are essential to use these camera’s latest video modes |
Your camera’s memory slot was cleverly designed to accept both SD-class and MemoryStick Pro Duo memory cards. Many flavors of these memory cards have evolved over the years, but here are the ones that are guaranteed to work with all of the camera’s high-bandwidth features (such as 4K and XAVC S HD video shooting):
SD Class: SDXC or SDHC, UHS-I or II, Class U3 (here’s an example: http://amzn.to/1NbotwR)
MemoryStick Class: PRO-HG Duo, although with this format you can't record movies with a bitrate of 100 Mbps or greater.
If you’re not shooting 4K or XAVC S video, then these kinds of cards will work:
SD Class: Any kind: SD, SDHC, SDXC. Speed class 4, or UHS class U1 or faster
MemoryStick Class: Pro Duo Mark 2, Pro-HG Duo,
If I were to recommend a brand, based solely on my personal experience I would highly recommend Lexar and Sandisk – both have had a strong, reliable (albeit not blemish-free) track record with me.
If you shoot a lot of RAW out in the field, you might also consider a USB 3 card reader if your computer has USB 3-compatible ports. Reader Bill Jacobsen writes, "When I downloaded 68GB of files from this last weekend using an old USB2 reader from the new card it took over 2 hours! ...So I bought the SanDisk ImageMate USB 3 reader and in a test it only took 5 minutes for the same 68GB of data....big difference."
TIP 1: When you buy memory cards, make sure you purchase them from a retailer that will accept returns, no-questions-asked. As an example of why I say this, here’s how Lexar handles their in-warranty returns for cards that fail bit-error tests: 1) You must wait two days to get an RMA number by email, 2) You must return the card at your own expense (including insurance), 3) You must wait 2-3 weeks for them to test it and send out a replacement (!). Being able to return a bad card immediately is a Good Thing. Note also that the Sandisk tend to be the most often counterfeited brand, so test it thoroughly (see next section) before going out to shoot! TIP 2: SDXC cards use an EX-FAT format which many computers don’t know how to read. How can you tell? Tether your camera to your computer and turn it on. If your computer prompts you to format the card, say no and disconnect the camera. You’ll have to use only SC or SCHD cards from now on. TIP 3: Large capacity cards make the camera take longer to turn on initially (it has to estimate the number of images remaining on the card the first time you turn it on). |
15.12.1 Memory Card Corruption Issues
Although all memory cards have been designed for reasonably rough usage (and some expensive models have been introduced, which are advertised as being designed for extremely rough usage), there may be times when the unthinkable occurs: several random bit errors occur within the card, resulting in “corruption” – the inability for the computers to reconstruct the image due to the missing or damaged information. This alone can be a compelling reason to shoot RAW+JPG all the time, since the chances of a random bit error affecting both files is extremely small.
There are several software tools on the market designed specifically to try to recover from these kinds of errors. Two tools I can highly recommend are Photo Rescue™ at
http://www.datarescue.com/photorescue. The other is Image Rescue™, which comes bundled for free with some Lexar memory cards (a bold move if you stop and think about it…). Both are worth every penny for recovering from corrupted media (assuming recovery is possible… some corruption is unrecoverable.) You can try Photo Rescue for free to see if it will do any good before you plunk down any money.
[Note: I get no compensation for endorsing these companies. But I’ve used both successfully to retrieve images off a corrupted memory card more than once.]
Since the last two memory cards I’ve purchased had such corruption issues, I’ve now learned a few things about minimizing the surprise factor involved:
- When you first get your card, format the card ON YOUR COMPUTER (not in the camera). Format it for FAT32, and make sure you have the “Quick Format” option disabled. (If you have an SDXC card, format it in your camera as “ex-FAT”.) One of the purposes of formatting is to find the bad memory blocks and “map them out” so your camera doesn’t try to use it.
- Test every new memory card you buy for bit errors. Here’s some free software originally distributed by Lexar for doing so: http://bit.ly/1LM4pxV The testing should occur after the formatting stage. Return the card immediately if your results consistently show bit errors.
