Home Sweet Homemade


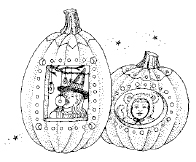
Picture-Perfect Pumpkins
pumpkin
pumpkin carving tools
digital photo
acetate sheet
computer printer
hammer and large nail
tacks or small nails
battery-operated candle
Remove top and hollow out pumpkin, then set aside. Print a digital photo onto an acetate sheet (available at office supply stores) and measure photo. Cut an opening on the front of pumpkin that’s slightly smaller than photo. Use a hammer and large nail to punch decorative holes into the pumpkin. Secure the photo to the pumpkin from the inside with tacks or small nails. Set a battery-operated candle inside the pumpkin and replace the top.
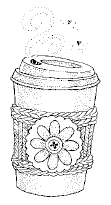
Knitted Coffee Cozy
size 10-1/2 (7mm) straight knitting needles
chunky wool yarn in 1 or 2 colors
wool needle
hot-glue gun and glue stick
vintage earring, button or felted flower
For a one-color cozy, loosely cast on 22 stitches and knit 3 rows. Purl one row and knit one row; repeat 2 more times for a total of 6 rows in stocking stitch. Knit 3 rows and bind off tightly, leaving a long end. Use a wool needle to sew seam.
For a 2-color cozy, loosely cast on 22 stitches in main color. Knit 3 rows then change to secondary color. Purl one row and knit one row; repeat 2 more times for a total of 6 rows in stocking stitch. Change to main color and knit 3 rows; bind off tightly, leaving a long end. Use a wool needle to sew seam. Use a hot-glue gun to attach a vintage earring or stitch on a button or a felted flower.
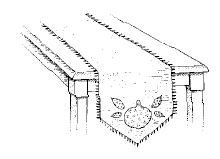
Harvest Table Runner
1 to 2 yds. burlap
fabric scraps
scissors
straight pins
double-sided fusible webbing
iron and ironing board
Place burlap on table, cutting so it covers the middle third of the table. If desired, fray the edges by gently pulling away 1/2 inch of burlap, one strand at a time. Pin fabric scraps to fusible webbing and cut into pumpkin or leaf shapes, or letters to create a monogram. Arrange shapes on the burlap, fusible webbing-side down. Carefully remove the pins, keeping the fabric and webbing together. Following the fusible webbing manufacturer’s instructions, use a warm iron to adhere the webbing to the pieces of burlap.
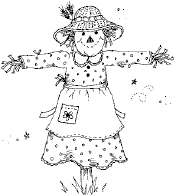
Silly Scarecrone
hollow foam pumpkin
pumpkin carving tools
4-foot 1"x2" wooden stake
6-foot 2"x4" wooden stake
saw
drill
one wood screw
old full slip, dress, apron and hat
hay
staple gun
mallet
Carve a face out of the foam pumpkin using pumpkin carving tools; set aside. So that dress will fit, trim the vertical piece a few inches shorter than span of the sleeves. Create a cross, laying the shorter stake horizontally across longer one, and 6 inches from the top. Drill a hole through the center of cross; insert wood screw to secure stakes together. Place slip and dress over vertical stake, slide horizontal stake through sleeves. Stuff slip and sleeves with hay, leaving about 6 inches of space at bottom of the slip. Gather slip tightly around stake; staple to secure. Use the mallet to secure the stake in the ground. Fill foam pumpkin head with hay and place on scarecrone. Tie on apron and add a hat.
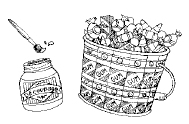
Boo-tiful Candy Wrapper Pail
paintbrush
découpage medium
tin bucket
candy wrappers
Use a paintbrush to apply découpage medium to outside of the bucket. While still wet, arrange candy wrappers on surface of bucket. Reapply découpage medium to the surface and let dry.
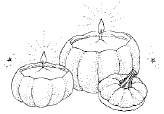
Pumpkin Votives
mini pumpkins
candle wicks with clips
shredded candle wax
saucepan
Hollow out mini pumpkins and make a small cut in the bottom of each pumpkin. Push clip end of the wick into skin of the pumpkin so wick stands up straight. In a medium saucepan, melt wax over low heat until it’s clear. Slowly pour wax into each pumpkin, keeping the wick upright. When wax has completely cooled, trim the wicks.
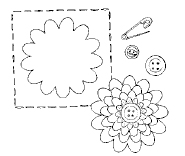
Blooming Mum Pin
fabric scraps
liquid starch
button
scissors
needle and thread
jewelry pin or safety pin
Following manufacturer’s instructions, heavily starch fabric scraps with liquid starch. Using the pattern below as a guide, copy the pattern in 4 different sizes onto a sheet of paper. Cut out at least 2 pieces of fabric in each size. Stack and arrange fabric into a flower shape, fanning out the different sizes. Place a button in the center of the top fabric and sew through the layers. Stitch a jewelry pin or safety pin on the back.
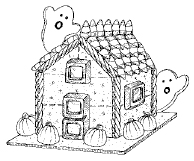
Haunted House
pint-size paper milk carton
cardboard square
vanilla frosting
graham crackers
candy corn
black licorice
mini chocolate bars
candy pumpkins
ghost-shaped marshmallows
Clean out the milk carton with soapy water, rinse and let dry. Attach the milk carton to the cardboard square with a dollop of frosting; hold in place for 30 seconds. Use frosting to attach graham crackers to carton, breaking the crackers as needed to fit. To form the roof, turn 2 graham cracker rectangles on their sides and lean toward each other; secure to the carton with frosting. Cut a cracker square diagonally and attach each piece to the front and back of the roof. Use frosting to attach the remaining candy. Use candy corn as shingles and mini chocolate bars as doors and windows. Use black licorice to fill in the seams of the house and attach pumpkins and ghost-shaped marshmallows.
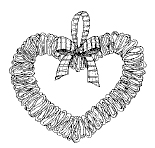
Apple Wreath
8-inch length heavy-gauge wire
Scented Apples
pliers
thin floral wire
ribbon bow
Form the wire into a heart shape. Fold the Scented Apples into halves, then into quarters and thread onto the wire. Use pliers to bend the wire ends into hooks and connect them. Use floral wire to attach a ribbon and create a loop for hanging.
Scented Apples:
8 to 10 firm apples like Braeburn or Granny Smith
1-1/2 c. lemon juice
2 t. salt
2 T. cinnamon
2 t. allspice
1 t. ground cloves
Peel and slice apples horizontally into 1/4-inch thick pieces; core slices as needed. In a medium bowl, combine lemon juice and salt. Soak apples in lemon juice mixture for 6 minutes, turning once. Drain apples and pat dry. Combine spices. Dust apples with spice mixture; gently remove excess with a pastry brush. Arrange slices in a single layer on a broiler pan and dry in a 200-degree oven for 6 hours, or until evenly dried. Slices will be pliable.
Porch Pumpkin Tower
black permanent marker
7 pumpkins in graduated sizes, stems removed
6-quart galvanized bucket
5- to 6-foot wooden stake
sand
knife
assorted gourds and mini pumpkins
Use a permanent marker to write one letter per pumpkin, to spell out “WELCOME.” Place the stake upright in a bucket; fill the bucket with sand to secure the stake in place. Use a knife to cut small entry holes in the bottoms of the pumpkins. Stack the pumpkins on the stake, starting with the largest. Arrange gourds and mini pumpkins at the base of the stake. Place near your front door to greet guests and goblins!

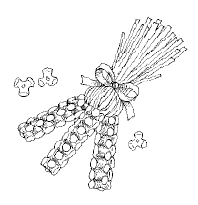
Indian Corn Pin
4-1/2 inch yellow chenille stem
2-1/3 inch yellow chenille stem
18 plastic tri-beads in fall colors
craft glue
2-1/2 yds. raffia
craft wire
5 inches 1/4-inch wide ribbon
jewelry pin
Fold longer chenille stem in half; wrap one end of shorter stem around the fold to make 3 prongs. Thread beads onto prongs in random order. Place a drop of craft glue in the hole of the last bead on each prong; let dry. Cut 20 pieces of raffia 4-1/2 inches long. Fold 10 raffia pieces between the first and second prongs; repeat for between the second and third prongs. Pull the raffia together and secure with craft wire to hold it tightly together; twist ends and clip. Hide the wire by adding a ribbon tied in a bow. Attach the jewelry pin with glue; let dry.
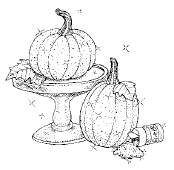
Sparkly Pumpkins
2 paintbrushes
craft glue
3 pumpkins
orange, red and clear craft glitter
brown acrylic paint
cake pedestals
Use a paintbrush to evenly apply glue over the surface of one pumpkin. Choose one glitter and sprinkle glitter over the glue, covering it completely. Repeat, using a different color of glitter for remaining pumpkins. Let dry for one hour; shake off excess glitter. Paint the stems with the brown acrylic paint and let dry. Arrange the pumpkins on cake pedestals for a festive centerpiece.
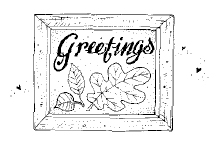
Framed Fall Greeting
colored paper
picture frame
calligraphy pen, crayons, markers
pressed leaves
double-sided tape
Trim colored paper to fit inside the frame. Use a calligraphy pen to write “Welcome” or “Greetings” along the top third of the paper. You can also have the kids use crayons or markers to write the greeting. Using double-sided tape, attach pressed leaves to the paper and slip the paper into the frame.
Hostess Gift Coasters & Potholder
4 3-1/2 inch dia. circles Felted Wool pieces
needle and embroidery thread
2 8-1/2 inch squares Felted Wool pieces
straight pins
size 20 chenille needle
worsted-weight wool knitting yarn
For coasters, use a needle and thread to sew a straight-stitch border along each of the circle-shaped pieces, 1/4 inch from the edge. For potholder, pin the square pieces, wrong sides together. Stitch squares together using a chenille needle and wool yarn to sew a blanket stitch to attach the 2 pieces.
Felted Wool:
washing machine
100% wool fabric
zippered laundry bag
liquid laundry detergent
clothes dryer
Set up washing machine for heavy-duty cycle with hot-water wash. Place wool fabric in a zippered laundry bag. Add detergent (1/3 capful for small load; 1/2 capful for medium; 3/4 capful for large). Wash fabric with the full machine cycle. Machine dry on high setting of clothes dryer. Cut felted wool to desired size.

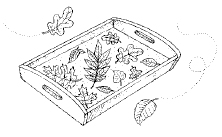
Elegant Leaf Tray Liners
wax paper
rectangular tray
various dried leaves
iron and ironing board
tea towel
Cut 2 sheets of wax paper to fit the bottom of the tray. Arrange leaves on one sheet of paper and cover with the other sheet. Lay on an ironing board and cover with a tea towel. With the iron on the low-heat setting, carefully iron the wax paper until the 2 sheets stick together. Line a serving tray with the finished liner.
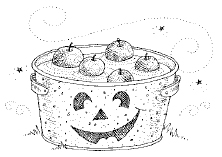
Halloween Party Tub
16-gallon galvanized metal wash tub
orange spray paint for metal surfaces
tracing paper
cardstock or other thick paper
craft knife
tape
black acrylic paint
paintbrush
old toothbrush
spray polyurethane
Spray outside of tub with orange paint; let dry. To create a stencil, draw pumpkin eyes, nose and mouth onto tracing paper and cut out. Transfer cutouts to cardstock and cut each carefully with a craft knife. Tape stencil to tub and use black paint to stencil on the face; let dry. Dip an old toothbrush into black paint thinned with a little water. Position the toothbrush over the tub; drag your thumbnail or palette knife across the bristles to spatter the surface. Let dry. To protect paint, coat the outside of the tub with polyurethane. Fill with ice and beverages or with water and apples for apple bobbing.
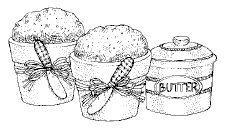
Terra-Cotta Bread Pots
5 new 6-inch terra-cotta flower pots
parchment paper
3-lb. pkg. frozen bread dough (5 count), thawed
1 egg white
1 T. water
Garnish: all-purpose flour, caraway seed, poppy seed, oats
Wash pots in hot soapy water, thoroughly rinse and let dry completely. Trace the bottom of the pots onto parchment paper and cut the circles out. Place a circle in the bottom of each pot. Spray the inside of the pots with non-stick vegetable spray. Place one piece of dough into each pot and spray tops of dough with non-stick vegetable spray. Place pots, uncovered, on bottom rack of a cold oven. Place a small pan of boiling water in the oven. Close oven door and let bread rise until double in bulk, about 20 minutes. Remove pots and water from oven. Combine egg white with water and brush evenly over the loaves. Sprinkle loaves with desired garnish. Bake pots on bottom oven rack at 375 degrees for 30 minutes, until golden. Cool on wire racks.
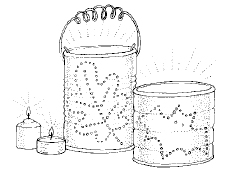
Tin-Can Luminaries
tracing paper
clean, empty tin cans of various sizes
permanent marker
hammer and large nail
ruler
Optional: 16" craft wire
spray paint for metal surfaces in color of your choice
tealight candles
Trace fall patterns such as bats, leaves or pumpkin faces onto tracing paper that will fit tin cans. Cut out patterns and arrange on the cans; outline with a permanent marker. Fill each can with water and place in the freezer until water is completely frozen. Remove from freezer and punch dotted lines along designs using a hammer and nail. If hanging lanterns are desired, punch 2 holes in the rim of the can on opposite sides. Let ice melt and cans dry completely. For the optional handle, insert wire into the holes along the rim; twist ends to secure. Spray paint the outside of the cans and let dry. Place a candle in each can.