The collapsing of the top finger joint when pressing a key
This is not to be confused with fused phalanges. If students have floppy finger predicament, their hand shape will be curved but their finger joints will bend backward as they play the keys. This is extremely common in young students and even more so in students with long, slender fingers.
It is imperative that this is resolved as soon as possible on the piano journey and preferably before the student begins to use legato. It takes a lot of determination on the part of the student, teacher and parent to persist and develop the technique needed to create firm fingertips out of floppy ones. The prescriptions below will help ease this process, but you should still be prepared to be vigilant for quite some time.
Symptoms
Prescriptions
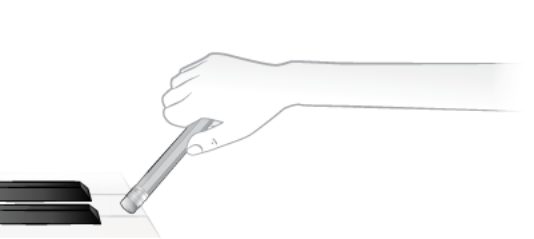
The Bionic Pianist
In lesson
This solution will help your student to move her whole arm as one unit, thus avoiding pushing into each finger. If you suspect that the reason your student’s finger joints are collapsing is because she is pushing unnecessarily into the key, this is a great way to change the way she moves and thinks about her arms and hands at the piano.
Give your student a pencil, preferably with an eraser on the end. Ask her to hold the pencil in her hand, eraser side down. This is her new “bionic hand”. Tell her to play her piece using her bionic hand and encourage her to move her whole arm up and down to play each key. She shouldn’t lock her wrist but it should be kept in a reasonably stable position making a straight line from her elbow to her knuckles.
Have her use the bionic hand to play one hand at a time first, and then hands together. After several repetitions using the bionic pencil hands, tell her she’s going to try a new type of bionic hand now.
Help her make a closed hand shape with her thumb behind her second finger, supporting the joint (sometimes called a “braced finger” in piano method books). Instruct her to play her piece with this new bionic hand, keeping the same motion in her arms that she needed to play with the pencils. Repeat this several times, changing around the finger she supports with her thumb.
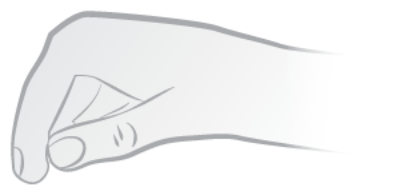
After she has tried out each finger in a bionic hand shape, she can open her hands out once more to play. Ask her to play her piece with regular fingering now, but imagining that a thumb is strengthening each finger, or that her fingers are as firm as a pencil. Don’t rush her to play legato with her bionic hands but, if she does try it herself and manages to keep her fingertips firm, don’t discourage her either.
At home
Assign practice of each of these stages, reducing the number of steps according to the amount of time your student has to practice each day. For example, if she has time for three repetitions she should do the first with bionic pencil hands, the second with bionic braced fingers (she can choose which finger) and the third with an open hand shape. Continue to assign this type of practice until the floppy finger predicament is cured, and reassign if it returns at any stage.
Tap Drills
In lesson
Isolating the action required to play the piano from the actual piano keys can really help students who are struggling to control that pesky top finger joint. You will have to be very persistent with this technique, and it’s best if the parents are helping out at home too. Over time, though, the condition should improve and you will be able to rely on your student’s firm fingertips.
Close the piano lid or move to a table and place your student’s music in front of both of you. Hold your right hand over the hard surface and demonstrate by tapping down with your fingertip in a nice curved shape. Ask your student to copy you, and try out each finger. Correct her action as needed, explaining which part of the finger she should be tapping with and the right technique to use.
After warming up in this way with each hand, tap out your student’s piece together. Tap the right hand first, then the left, and then hands together, all the time watching her hands for any collapsing fingers or odd techniques.
Once the ‘Tap Drills’ are completed, return to the keys and tell her to keep the same firm feeling in her fingertips that she had while tapping it out. If a finger does fall down, pause the playing and ask her to tap that finger on the fallboard or bench to “test” it, and then restart from that spot. Repeat the ‘Tap Drills’ before each and every piece.
At home
Assign ‘Tap Drills’ for each piece during the week and ask a parent to help with reminders if possible. You may need to assign fewer pieces due to the extra time it will take your student to practice each one, but it will be worth it if you can fix her floppy finger predicament. It’s important that you follow through with this in the next lesson and continue to expect the ‘Tap Drills’ before each piece. Over time, your student will carry the process over to her home practice if she forms the habit during the lesson.
Related Diagnoses
Fortissimo Fixation
Fused Phalanges
Sticky Tipitis
Wrist Drowsiness